
DF-730
Operation Guide
Manuel d’utilisation
Guía de uso
Einführung
Guida alle funzioni
᪢Աᠠݡ
ঀဥ୰ྶ

This Operation Guide contains explanations in 7 different languages: English, French, Spanish, German,
Italian, Chinese and Japanese. Refer to the corresponding pages as indicated below for the language of your
choice.
Ce manuel d’utilisation contient des explications en 7 langues différentes: anglais, français, espagnol,
allemand, italien, chinois et japonais. Veuillez consulter les pages correspondant à votre langue comme indiqué
ci-dessous.
Este manual de instrucciones describe el funcionamiento en 7 idiomas: inglés, francés, español, alemán,
italiano, chino y japonés. Consulte las correspondientes páginas tal como se indica a continuación para el
idioma de su elección.
Diese Bedienungsanleitung enthält Erklärungen in 7 verschiedenen Sprachen: Englisch, Französisch,
Spanisch, Deutsch, Italienisch, Chinesisch und Japanisch. Gehen Sie für die Sprache Ihrer Wahl zu den
Seiten, die unten angeführt sind.
Questa guida operativa contiene spiegazioni in 7 lingue diverse: Inglese, Francese, Spagnolo, Tedesco, Italiano,
Cinese e Giapponese. Fare riferimento alle pagine corrispondenti come indicato sotto per la lingua prescelta.
本手册以英文、法文、西班牙文、德文、意大利文、中文、日文等 7 国语言进行说明。每种语言的说明,请参阅下列页
码。
本書は、英語・フランス語・スペイン語・ドイツ語・イタリア語・中国語・日本語の7言語で説明しています。
各言語での説明は下記のページをご覧ください。
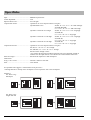
English ............................................................................ Pages 1 to 10
Français .......................................................................... Pages 11 à 20
Español ........................................................................ Páginas 21 a 30
Deutsch ......................................................................... Seite 31 bis 40
Italiano ...................................................... Da pagina 41 a pagina 50
简体中文 ...................................................................... 第51页至第60页
日本語 ................................................................................ 61 ~ 70 ページ

1
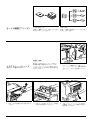
• This Document Finisher can be installed on both copiers and printers.
• This Operation Guide focuses its explanations towards installation on copiers, but the same basic
procedure can be used to install this Document Finisher on a printer.
• The few places where the procedures differ are clearly indicated with separate explanations.
English

2
ALWAYS read this Operation Guide thoroughly
before use. After reading, maintain it in good
condition and keep it together with the Operation
Guide for your copier (or printer, as appropriate).
Refer to the Operation Guide for your copier (or
printer, as appropriate) for information on the service
representative for your product.
The sections of this Operation Guide and parts of this
product marked with symbols are safety warnings
meant to protect the user, other individuals and
surrounding objects, and ensure correct and safe
usage of the product.
The symbols and their meanings are indicated below.
DANGER: Indicates that serious injury
or even death will very possibly result
from insufficient attention to or incorrect
compliance with the related points.
WARNING: Indicates that serious injury
or even death may result from insufficient
attention to or incorrect compliance with
the related points.
CAUTION: Indicates that personal
injury or mechanical damage may result
from insufficient attention to or incorrect
compliance with the related points.
Symbols
The symbol indicates that the related section
includes safety warnings. Specific points of attention
are indicated inside the symbol.
........... [General warning]
The symbol indicates that the related section
includes information on prohibited actions. Specifics
of the prohibited action are indicated inside the
symbol.
........... [Warning of prohibited action]
........... [Disassembly prohibited]
The z symbol indicates that the related section
includes information on actions which must be
performed. Specifics of the required action are
indicated inside the symbol.
........... [Alert of required action]
........... [Remove the power plug from the
outlet]
........... [Always connect the product to an
outlet with a ground connection]
Please contact your service representative to order a
replacement if the safety warnings in the Operation
Guide are illegible or if the Operation Guide itself is
missing. (fee required)
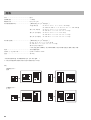
CONTENTS
INSTALLATION PRECAUTIONS...................... 3
PRECAUTIONS FOR USE.................................. 4
Names of parts........................................................... 5
Cautions ..................................................................... 6
Types of modes [copier].............................................. 6
Sort: ON ........................................................... 6
Sort: OFF ......................................................... 6
Stapling............................................................ 6
Types of modes [printer]............................................ 7
Offset ejection .................................................. 7
Stapling............................................................ 7
Troubleshooting ......................................................... 7
Handling a paper jam...................................... 7
Replenishing staples........................................ 8
Handling a staple jam ..................................... 9
Specifications ........................................................... 10

3
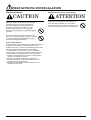
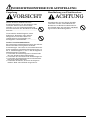
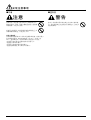
INSTALLATION PRECAUTIONS
Environment
CAUTION
Avoid placing this product on or in locations
which are unstable or not level. Such locations
may cause the product to fall down or fall
over. This type of situation presents a danger
of personal injury or damage to the product.
Avoid locations near radiators, heaters, or
other heat sources, or locations near
flammable items, to avoid the danger of fire.
Other precautions
Adverse environmental conditions may affect the safe
operation and performance of this product. Install in
an air-conditioned room (recommended room
temperature: around 22°C (71.6°F), humidity: around
60%) and avoid the following locations when selecting
a site for the product.
• Avoid locations near a window or with exposure to
direct sunlight.
• Avoid locations with vibrations.
• Avoid locations with drastic temperature
fluctuations.
• Avoid locations with direct exposure to hot or cold
air.
Handling of plastic bags
WARNING
Keep the plastic bags that are used with this
product away from children. The plastic may
cling to their nose and mouth causing
suffocation......................................................

4
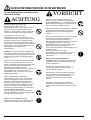
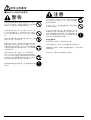
PRECAUTIONS FOR USE
Cautions when using this product
WARNING
DO NOT place metallic objects or containers
with water (flower vases, flower pots, cups,
etc.) on or near this product. This type of
situation presents a danger of fire or
electrical shock should any water fall inside.
DO NOT damage, break or attempt to repair
the signal line. DO NOT place heavy objects
on the signal line, pull it, bend it
unnecessarily or cause any other type of
damage. These types of situations present
a danger of fire or electrical shock. ............
NEVER attempt to repair or disassemble
this product or its parts as there is a danger
of injury, fire or electrical shock. ................
If this product becomes excessively hot,
smoke appears, there is an odd smell, or any
other abnormal situation occurs, there is a
danger of fire or electrical shock. Turn the
power switch to the copier or printer OFF ({)
immediately, remove the power plug of the
copier or printer from the outlet and contact
your service representative. ........................
If anything harmful (paper clips, water, other
fluids, etc.) falls into this product, turn the
power switch to the copier or printer OFF ({)
immediately. Next, remove the power plug of
the copier or printer from the outlet to avoid
the danger of fire or electrical shock and then
contact your service representative. If you do
not take these steps, there is a danger of fine
or electrical shock. .......................................
ALWAYS contact your service representative
for maintenance or repair of internal parts.
CAUTION
For safety purposes, ALWAYS turn the
power switch to the copier or printer OFF ({)
and remove the power plug of the copier or
printer from the outlet when performing
cleaning operations on this product. ............
DO NOT touch the ejection tray when the
product is in operation as there is a danger
of injury. ........................................................
If dust accumulates within this product,
there is a danger of fire or other trouble.
It is therefore recommended that you consult
with your service representative in regard to
cleaning of internal parts. This is
particularly effective if accomplished prior to
seasons of high humidity.
Consult with your service representative in
regard to the cost of cleaning the internal
parts of the product as well. ........................
Other precautions
DO NOT place heavy objects on this product
or cause other damage to the product.
When lifting or moving the product, contact
your service representative.
Do not touch electrical parts, such as
connectors or printed circuit boards. They
could be damaged by static electricity.
DO NOT attempt to perform any operations
not explained in this Operation Guide.

5
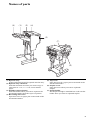
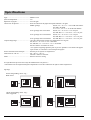
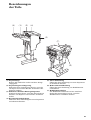
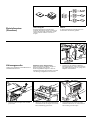
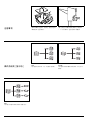
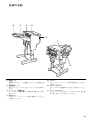
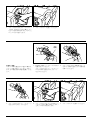
(2) (1) (5) (4)
(3)
(7)
(6)
(1) Ejection tray
Copies and printouts will be ejected onto this tray.
(2) Ejection tray extension
Pull this extension out when you want to copy or
print onto 11" × 17", 8
1/2" × 14", B4 or A3 size
paper.
(3) Finisher release button
Push this button when you want to separate the
Document Finisher from the copier (or printer).
(4) Reversing unit cover
Open this cover if a paper jam occurs inside of the
Document Finisher.
(5) Top cover
Open this cover if a paper jam occurs inside of the
Document Finisher.
(6) Stapler cover
Open this cover when you want to replenish
staples.
(7) Staple holder
The staple cartridge is installed here. Pull out this
holder when you want to replenish staples.
Names of parts

6
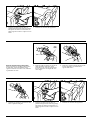
Cautions
• If finished copies or printouts come
out curled or are stacked unevenly,
turn the paper in the drawer[cassette]
over and reload it.
• While the Document Finisher is
turning the copy or printout over, that
paper will be visible (as shown in (1)
in the illustration). NEVER attempt
to grab the paper at this point.
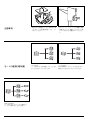
Types of modes
[copier]
Sort: ON
This mode automatically sorts copies made
from multiple originals into identical sets.
Sort: OFF
This mode automatically groups copies made
from multiple originals, with all the copies
produced from an individual original grouped
together in one set.
Stapling
This mode automatically sorts and then
staples each copy set.
D
C
B
A
D
C
B
A
D
C
B
A
D
C
B
A
D
C
B
A
D
C
B
A
D
C
B
A
D
C
B
A
C
B
A
C
C
C
B
B
B
A
A
A

7
Types of modes
[printer]
Offset ejection
This mode automatically shifts each set of
printouts to the right and left in order to
separate each individual set in a staggered
fashion.
Stapling
This mode automatically staples each set of
printouts.
Troubleshooting
(Paper jam, replenishing staples and
staple jam)
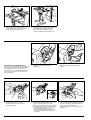
Handling a paper jam
If a paper jam happens to occur, the
operation will stop, and an indication of the
cause of the jam will appear on the operation
panel of the copier (or the message display of
the printer).
1. Push the finisher release button to
separate the Document Finisher from the
copier (or printer).
2. Remove any jammed paper there. 3. Open the reversing unit cover and
remove any jammed paper inside that
cover.
4. Check the lower portion of the Document
Finisher (A) and remove any jammed
paper from that area.
D
C
B
A
D
C
B
A
D
C
B
A
D
C
B
A
(A)

8
5. Open the top cover and remove any
jammed paper inside that cover.
6. Close the top cover and the reversing
unit cover and reattach the Document
Finisher to the copier (or printer).
Replenishing staples
If an indication that staples have run out
appears on the operation panel of the copier
(or the message display of the printer),
perform the following procedure.
1. Open the stapler cover. 2. Pull out the stapler holder.
3. Remove the empty staple cartridge from
the staple holder.
4. Hold the staple holder in one hand and
the new staple cartridge in the other, and
set the new cartridge into the staple
holder paying due attention to the
direction of insertion.
* Insert in the direction of the arrow
shown on the staple cartridge.
5. Push the staple cartridge all the way into
the staple holder and then peel off the
paper tape that is attached to the
cartridge.

9
6. Reinstall the staple holder in its original
location inside the staple unit. The staple
holder will click into place when it is
properly inserted.
7. Close the stapler cover.
Handling a staple jam
If a paper jam happens to occur during
stapling, a staple may have jammed. In this
case, perform the following procedure.
1. Remove the staple holder using the same
procedure as in “Replenishing staples”.
Then, open the face plate by pushing on
the tab (B) with your finger.
2. Remove any jammed staples from the
front of the staple holder (where the
staples are set).
3. Push the face plate closed into its original
position.
4. Reinstall the staple holder in its original
location inside the staple unit. The staple
holder will click into place when it is
properly inserted.
5. Close the stapler cover.
(B)

10
Specifications
Type........................................................... Floor model
Available trays.......................................... One
Thickness of paper.................................... 64 to 128 g/m
²
Tray capacity.................................................. (When using under 80 g/m² weight paper)
When NOT stapling 11" × 17", 8
1/2" × 14", A3, B4 or 8K: 500 sheets
8
1/2" × 11"*, 11" × 8 1/2", A4, A4R*,
B5, B5R or 16K: 1000 sheets
When stapling 2 to 10 sheets 11" × 17", 8
1/2" × 14", A3 or B4: 28 sets
8
1/2" × 11", 11" × 8 1/2", A4, A4R or B5: 50 sets
When stapling 11 to 20 sheets 11" × 17", 8 1/2" × 14", A3 or B4: 12 sets
8
1/2" × 11", 11" × 8 1/2", A4, A4R or B5: 16 sets
When stapling 21 to 30 sheets 8
1/2" × 11", 11" × 8 1/2", A4, A4R or B5: 16 sets
Stapling capacity ......................................(When using under 80 g/m² weight paper)
11" × 17", 8
1/2" × 14", A3 or B4: 20 sheets
8
1/2" × 11", 11" × 8 1/2", A4, A4R or B5: 30 sheets
Mixed sizes: 30 sheets or less
* The specified stapling capacity may not be possible when using color copy paper.
This is due to the characteristics of the paper.
Power source ............................................. Supplied from the copier or printer
Dimensions (W × H × D) .......................... 22" × 20
11/16" × 36 1/16"
558
mm × 526 mm × 916 mm
Weight ....................................................... Approx. 55 lbs / 25 kg
(Specifications are subject to change without notice.)
* 500 sheets when printing out from the printer or when using the copier as a printer.
Staple
Orig. Set Direction:
Top Edge/Back Edge
Orig. Set Direction:
Left Top Edge/Left top corner

11
• Ce retoucheur de document peut être installé sur les copieurs ainsi que sur les imprimantes.
• Dans ce manuel
d’utilisation, les explications concernent principalement l’installation de cette
option sur les copieurs, mais la même procédure de base peut être utilisée pour installer ce
retoucheur de document sur une imprimante.
• Les rares étapes pour lesquelles les procédures diffèrent sont clairement indiquées avec des
explications distinctes.
Français

12
TOUJOURS lire entièrement ce manuel d’utilisation
avant d’utiliser l’appareil. Après l’avoir lu, conservez
ce manuel dans de bonnes conditions avec le manuel
d’utilisation de votre copieur (ou imprimante, selon le
besoin).
Consulter le manuel d’utilisation du copieur (ou de
l’imprimante, selon le besoin) au sujet du personnel
technique chargé de l’entretien de votre produit.
Les sections de ce manuel ainsi que les éléments de ce
produit marqués de symboles sont des avertissements
en matière de sécurité, destinés, d’une part, à assurer
la protection de l’utilisateur, d’autres personnes et
d’objets environnants, et, d’autre part, à garantir une
utilisation correcte et sûre du produit.
Les symboles et leur signification figurent ci-dessous.
DANGER: Le non-respect de ces points
ou le manque d’attention vis-à-vis de
ceux-ci entraînera très probablement des
blessures graves, voire la mort.
ATTENTION: Le non-respect de ces
points ou le manque d’attention vis-à-vis
de ceux-ci risque de provoquer des
blessures graves, voire la mort.
ATTENTION: Le non-respect de ces
points ou le manque d’attention vis-à-vis
de ceux-ci risque de provoquer des
blessures ou d’occasionner des dommages
mécaniques.
Symboles
Le symbole indique que la section concernée
comprend des avertissements en matière de sécurité.
Il attire l’attention du lecteur sur des points
spécifiques.
........... [Avertissement d’ordre général]
Le symbole indique que la section concernée
contient des informations sur des opérations
proscrites. Il précède les informations spécifiques
relatives à ces opérations proscrites.
...........[Avertissement relatif à une
opération proscrite]
........... [Démontage proscrit]
Le symbole z indique que la section concernée
comprend des informations sur des opérations qui
doivent être exécutées. Il précède les informations
spécifiques relatives à ces opérations requises.
........... [Alarme relative à une action
requise]
........... [Ôter le cordon secteur de la prise
murale]
........... [Toujours brancher le produit sur
une prise murale raccordée à la
terre]
Veuillez contacter votre technicien de maintenance
pour demander le remplacement du manuel
d’utilisation si les avertissements en matière de
sécurité sont illisibles ou si le manuel lui-même est
manquant (participation demandée).
TABLE DES MATIERES
PRECAUTIONS D’INSTALLATION ................ 13
PRECAUTIONS D’UTILISATION ................... 14
Nom des pièces......................................................... 15
Précautions............................................................... 16
Types de modes [copieur] ........................................ 16
Tri: ACTIVÉ................................................... 16
Tri: DÉSACTIVÉ ........................................... 16
Agrafage ......................................................... 16
Types de modes [imprimante]................................. 17
Éjection avec décalage................................... 17
Agrafage ......................................................... 17
Dépannage................................................................ 17
Retrait d’un bourrage de papier.................... 17
Ajout d’agrafes ............................................... 18
Retrait d’un bourrage d’agrafes .................... 19
Spécifications ........................................................... 20

13
PRECAUTIONS D’INSTALLATION
Environnement
CAUTION
Evitez de placer ce produit à des endroits
instables ou qui ne sont pas de niveau.
De tels emplacements risquent de faire
basculer ou tomber le produit. Ce type
d’emplacement présente un risque de
blessure aux personnes ou de dommage au
produit. .........................................................
Evitez les endroits proches de radiateurs,
foyers ou autres sources de chaleur, ainsi que
la proximité d’objets inflammables, pour
éviter tout danger d’incendie. .....................
Autres précautions
Des conditions d’environnement incorrectes risquent
d’affecter la sécurité de fonctionnement et les
performances de ce produit. Installez l’appareil dans
une pièce climatisée (température ambiante
recommandée: environ 22°C (71.6°F); humidité:
environ 60%) et évitez les endroits suivants lorsque
vous choisissez un emplacement pour le produit.
• Evitez la proximité d’une fenêtre ou l’exposition
directe à la lumière du soleil.
• Evitez les endroits soumis aux vibrations.
• Evitez les endroits connaissant d’importantes
fluctuations de température.
• Evitez les endroits directement exposés à l’air
chaud ou à l’air froid.
Manipulation des sacs en plastique
ATTENTION
Conservez hors de portée des enfants les
sacs plastiques utilisés avec le produit.
Le plastique risque en effet de coller au nez
et à la bouche, entraînant un étouffement. .

14
PRECAUTIONS D’UTILISATION
Mises en garde pour l’utilisation de
ce produit
ATTENTION
NE PAS poser d’objets métalliques ou
d’objets contenant de l’eau (vases, pots
de fleur, tasses, etc.) sur ce produit ou à
proximité de celui-ci. Ces situations
présentent un risque d’incendie ou de
décharge électrique si les liquides s’écoulent
à l’intérieur du produit. ..............................
Évitez d’endommager, de casser ou de
réparer la ligne de transfert des signaux.
Ne placez PAS d’objets lourds sur la ligne de
transfert des signaux et évitez de la plier
sans raison ou de lui faire subir tout autre
type de dégâts. Ces types de situations
présentent un risque d’incendie ou de
décharge électrique. ....................................
NE JAMAIS tenter de réparer ou de
démonter ce produit ou ses pièces, car il y a
risque de blessure, d’incendie ou de décharge
électrique. .....................................................
Si ce produit devient extrêmement chaud, s’il
dégage de la fumée et une odeur désagréable
ou si toute autre manifestation anormale se
produit, il y a danger d’incendie ou de
décharge électrique. Éteignez
immédiatement l’interrupteur principal du
copieur ou de l’imprimante ({), débranchez
son cordon d’alimentation et contactez le
service d’assistance. .....................................
Si un corps étranger nuisible (trombones,
eau, autres liquides, etc.) tombe à l’intérieur
de ce produit, placez immédiatement
l’interrupteur principal du copieur ou de
l’imprimante sur arrêt ({), puis retirez la
fiche du cordon secteur du copieur ou de
l’imprimante de la prise murale pour éviter
tout risque d’incendie ou de décharge
électrique. Appelez ensuite votre technicien.
Si ceci n’est pas effectué, il y aura un risque
d’incendie ou de décharge électrique. .........
Veuillez TOUJOURS contacter votre
technicien de maintenance pour l’entretien
ou la réparation des pièces internes. ..........
ATTENTION
À des fins de sécurité, éteignez TOUJOURS
l’interrupteur principal du copieur ou de
l’imprimante ({) et débranchez son cordon
d’alimentation lorsque vous procédez au
nettoyage de l’appareil. .................................
NE PAS toucher le plateau d’éjection lors du
fonctionnement du produit car il y a un
danger de blessure. .......................................
L’accumulation de poussière à l’intérieur de
ce produit peut causer un risque d’incendie
ou d’autres problèmes. Nous vous conseillons
donc de consulter votre technicien au sujet
du nettoyage des pièces internes.
Le nettoyage est particulièrement efficace s’il
précède les saisons à haute humidité.
Consultez votre technicien au sujet du coût
du nettoyage des pièces internes du produit.
Autres précautions
NE posez PAS d’objet lourd sur ce produit ou
évitez tout autre dommage au produit.
Avant de lever ou déplacer le produit, prenez
contact avec votre technicien.
NE touchez PAS aux pièces électriques,
telles que les connecteurs ou les cartes de
circuits imprimés. Ils pourraient être
endommagés par l’électricité statique.
NE tentez PAS de réaliser toute opération
qui ne serait pas expliquée dans ce manuel.

15
(2) (1) (5) (4)
(3)
(7)
(6)
(1) Plateau d’éjection
Copies et feuilles imprimées seront éjectées sur ce
plateau.
(2) Rallonge du plateau d’extension
Ouvrez cette rallonge pour imprimer ou copier avec
du papier de format 11"
× 17", 8 1/2" × 14", B4 ou A3.
(3) Bouton de déverrouillage du retoucheur de
document
Appuyez sur ce bouton pour détacher le retoucheur
de document du copieur (ou de l’imprimante).
(4) Capot de l’unité d’inversion
Ouvrez ce capot si des feuilles sont coincées dans le
retoucheur de document.
(5) Capot supérieur
Ouvrez ce capot si des feuilles sont coincées dans le
retoucheur de document.
(6) Capot de l’unité d’agrafage
Ouvrez ce capot pour remplir l’agrafeuse.
(7) Boîte d’agrafes
La cartouche d’agrafes est installée dans cette
boîte. Ouvrez cette boîte pour remplir l’agrafeuse.
Nom des pièces

16
Précautions
• Si les copies ou feuilles imprimées
terminées sortent froissées ou ne
s’empilent pas correctement,
retournez la pile de papier dans la
cassette et replacez-la.
• Pendant que le retoucheur de
document retourne la copie ou la
feuille imprimées, le papier sera
visible (comme indiqué par (1) dans
l’illustration). N’essayez JAMAIS de
prendre le papier à ce moment.
Types de modes
[copieur]
Tri: ACTIVÉ
Ce mode trie automatiquement les copies
réalisées à partir de plusieurs originaux afin
d’en faire des exemplaires identiques.
Tri: DÉSACTIVÉ
Ce mode regroupe automatiquement les
copies réalisées à partir de plusieurs
originaux, afin de constituer des groupes de
toutes les copies effectuées au départ d’un
même original.
Agrafage
Ce mode trie automatiquement chaque jeu de
copies puis l’agrafe.
D
C
B
A
D
C
B
A
D
C
B
A
D
C
B
A
D
C
B
A
D
C
B
A
D
C
B
A
D
C
B
A
C
B
A
C
C
C
B
B
B
A
A
A

17
Types de modes
[imprimante]
Éjection avec décalage
Ce mode décale automatiquement chaque jeu
d’impressions vers la droite et vers la gauche
pour séparer chaque jeu individuel en
escalier.
Agrafage
Ce mode agrafe automatiquement chaque jeu
d’impressions.
Dépannage
(Bourrage de papier, ajout d’agrafes et
bourrage d’agrafes)
Retrait d’un bourrage de papier
Si un bourrage de papier survient, l’appareil
s’arrêtera de fonctionner et une indication au
sujet de la cause du bourrage apparaîtra sur
le panneau de commande (ou sur l’affichage
de message de l’imprimante).
1. Appuyez sur le bouton de déverrouillage
du retoucheur de document et détachez le
retoucheur de document du copieur (ou
de l’imprimante).
2. Retirez le papier coincé à cet endroit. 3. Ouvrez le capot de l’unité d’inversion et
retirez le papier coincé à l’intérieur de ce
capot.
4. Vérifiez la partie inférieure du
retoucheur de document (A) et retirez le
papier coincé dans cette zone.
D
C
B
A
D
C
B
A
D
C
B
A
D
C
B
A
(A)

18
5. Ouvrez le capot supérieur et retirez le
papier coincé à l’intérieur de ce capot.
6. Refermez le capot supérieur et le capot de
l’unité d’inversion puis fixez de nouveau
le retoucheur de document sur le copieur
(ou l’imprimante).
Ajout d’agrafes
Lorsqu’une indication signalant qu’il n’y a
plus d’agrafes apparaît sur le panneau de
commande du copieur (ou l’affichage de
message de l’imprimante), effectuez la
procédure suivante.
1. Ouvrez le couvercle de l’agrafeuse. 2. Faites sortir la boîte d’agrafes.
3. Retirez la cartouche d’agrafes vide de la
boîte d’agrafes.
4. Tenez la boîte d’agrafes d’une main et la
nouvelle cartouche de l’autre, puis
insérez la nouvelle cartouche d’agrafes
dans la boîte d’agrafes en faisant
attention à l’orientation de la cartouche.
* Insérez la cartouche dans la direction
de la flèche indiquée sur la cartouche
d’agrafes.
5. Poussez la cartouche d’agrafes jusqu’au
fond de la boîte d’agrafes puis détachez le
ruban adhésif fixé sur la cartouche.
La pagina si sta caricando...
La pagina si sta caricando...
La pagina si sta caricando...
La pagina si sta caricando...
La pagina si sta caricando...
La pagina si sta caricando...
La pagina si sta caricando...
La pagina si sta caricando...
La pagina si sta caricando...
La pagina si sta caricando...
La pagina si sta caricando...
La pagina si sta caricando...
La pagina si sta caricando...
La pagina si sta caricando...
La pagina si sta caricando...
La pagina si sta caricando...
La pagina si sta caricando...
La pagina si sta caricando...
La pagina si sta caricando...
La pagina si sta caricando...
La pagina si sta caricando...
La pagina si sta caricando...
La pagina si sta caricando...
La pagina si sta caricando...
La pagina si sta caricando...
La pagina si sta caricando...
La pagina si sta caricando...
La pagina si sta caricando...
La pagina si sta caricando...
La pagina si sta caricando...
La pagina si sta caricando...
La pagina si sta caricando...
La pagina si sta caricando...
La pagina si sta caricando...
La pagina si sta caricando...
La pagina si sta caricando...
La pagina si sta caricando...
La pagina si sta caricando...
La pagina si sta caricando...
La pagina si sta caricando...
La pagina si sta caricando...
La pagina si sta caricando...
La pagina si sta caricando...
La pagina si sta caricando...
La pagina si sta caricando...
La pagina si sta caricando...
La pagina si sta caricando...
La pagina si sta caricando...
La pagina si sta caricando...
La pagina si sta caricando...
La pagina si sta caricando...
La pagina si sta caricando...
La pagina si sta caricando...
La pagina si sta caricando...
La pagina si sta caricando...
La pagina si sta caricando...
-
 1
1
-
 2
2
-
 3
3
-
 4
4
-
 5
5
-
 6
6
-
 7
7
-
 8
8
-
 9
9
-
 10
10
-
 11
11
-
 12
12
-
 13
13
-
 14
14
-
 15
15
-
 16
16
-
 17
17
-
 18
18
-
 19
19
-
 20
20
-
 21
21
-
 22
22
-
 23
23
-
 24
24
-
 25
25
-
 26
26
-
 27
27
-
 28
28
-
 29
29
-
 30
30
-
 31
31
-
 32
32
-
 33
33
-
 34
34
-
 35
35
-
 36
36
-
 37
37
-
 38
38
-
 39
39
-
 40
40
-
 41
41
-
 42
42
-
 43
43
-
 44
44
-
 45
45
-
 46
46
-
 47
47
-
 48
48
-
 49
49
-
 50
50
-
 51
51
-
 52
52
-
 53
53
-
 54
54
-
 55
55
-
 56
56
-
 57
57
-
 58
58
-
 59
59
-
 60
60
-
 61
61
-
 62
62
-
 63
63
-
 64
64
-
 65
65
-
 66
66
-
 67
67
-
 68
68
-
 69
69
-
 70
70
-
 71
71
-
 72
72
-
 73
73
-
 74
74
-
 75
75
-
 76
76


in altre lingue
- français: Copystar CS-C3232E Mode d'emploi
- español: Copystar CS-C3232E Instrucciones de operación
- Deutsch: Copystar CS-C3232E Bedienungsanleitung
- 日本語: Copystar CS-C3232E 取扱説明書