KYOCERA TASKalfa 500ci Series Manuale del proprietario
- Tipo
- Manuale del proprietario

DF-760 MT-720 BF-720
PH-5A, PH-5B, PH-5C
Operation Guide
Einführung
Guía de uso
Manuel d'utilisation
Guida alle funzioni
᪡ݠ
ঀဥ୰ྶ

Please read the Operation Guide before using this product. After reading, keep it close to the copier/printer
for easy reference.
This guide mainly explains usage when used with the copier feature. See the Extended Driver User Guide
for more information on usage from a computer when using the printer feature.
Bitte lesen Sie vor dem Einsatz dieses Geräts das vorliegende Handbuch sorgfältig durch. Auch nach dem
Lesen ist das Handbuch beim Kopierer/Drucker aufzubewahren, so dass es immer zur Hand ist.
Dieses Handbuch beschreibt hauptsächlich den Gebrauch bei Verwendung der Kopiererfunktion. Weitere
Informationen zum Gebrauch am Computer mit der Druckerfunktion siehe Extended Driver User Guide
(Ausführliches Treiber-Bedienerhandbuch).
Lea esta Guía de uso antes de utilizar este producto. Después de leerla, guárdela cerca de la copiadora/
impresora para facilitar las consultas.
Esta guía explica, sobre todo, el funcionamiento cuando se usa con la función de copiadora. Si desea más
información acerca del funcionamiento desde un ordenador usando la función de impresora, consulte la
Guía de uso ampliada de controladores.
Prendre connaissance de ce Manuel d'utilisation avant d'utiliser ce produit. Le conserver à proximité de la
copieuse/imprimante afin de pouvoir le consulter facilement.
Le présent manuel détaille essentiellement le fonctionnement lors de l’utilisation avec la fonction copieur.
Pour plus d’informations sur le fonctionnement depuis un ordinateur lors de l’utilisation de la fonction
copieur, reportez-vous au Manuel d’utilisation du pilote étendu.
Si raccomanda di leggere la Guida alle funzioni prima di utilizzare questo prodotto. Una volta letta,
conservarla vicino alla copiatrice o stampante per una rapida consultazione.
La presente guida spiega l’utilizzo della macchina come copiatrice. Fare riferimento alla Guida utente driver
dettagliata per maggiori informazioni sull’utilizzo da un computer come stampante.
使用本机前请阅读操作手册。然后将其保管在复印机/打印机附近,以便查阅。
本手册主要介绍了当其与复印功能一起使用时的情况。有关通过计算机使用打印功能时的详情,请参见
扩
展驱动程序用户指南
。
ご使用前に必ずこの使用説明書をお読みください。お読みになった後は、複写機/プリンタ本体の使用
説明書といっしょに大切に保管してください。
本書はコピー機能を使用した場合の操作方法を中心に説明していますので、プリンタ機能を使用した場
合のコンピュータからの操作方法については、KX プリンタドライバ操作手順書を参照してください。

DF-760, MT-720, BF-720, PH-5A, PH-5B AND PH-5C OPERATION GUIDE 1
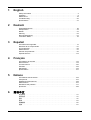
1 English
Safety Information . . . . . . . . . . . . . . . . . . . . . . . . . . . . . . . . . . . . . . . . . . . . . . . . . . . . . . .3
Operation . . . . . . . . . . . . . . . . . . . . . . . . . . . . . . . . . . . . . . . . . . . . . . . . . . . . . . . . . . . . . .8
Maintenance. . . . . . . . . . . . . . . . . . . . . . . . . . . . . . . . . . . . . . . . . . . . . . . . . . . . . . . . . . .16
Troubleshooting . . . . . . . . . . . . . . . . . . . . . . . . . . . . . . . . . . . . . . . . . . . . . . . . . . . . . . . .20
Specifications . . . . . . . . . . . . . . . . . . . . . . . . . . . . . . . . . . . . . . . . . . . . . . . . . . . . . . . . . .37
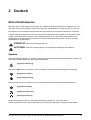
2 Deutsch
Sicherheitshinweise . . . . . . . . . . . . . . . . . . . . . . . . . . . . . . . . . . . . . . . . . . . . . . . . . . . . .39
Komponenten. . . . . . . . . . . . . . . . . . . . . . . . . . . . . . . . . . . . . . . . . . . . . . . . . . . . . . . . . .43
Betrieb . . . . . . . . . . . . . . . . . . . . . . . . . . . . . . . . . . . . . . . . . . . . . . . . . . . . . . . . . . . . . . .44
Wartung . . . . . . . . . . . . . . . . . . . . . . . . . . . . . . . . . . . . . . . . . . . . . . . . . . . . . . . . . . . . . .53
Störungsbeseitigung. . . . . . . . . . . . . . . . . . . . . . . . . . . . . . . . . . . . . . . . . . . . . . . . . . . . .57
Technische Daten. . . . . . . . . . . . . . . . . . . . . . . . . . . . . . . . . . . . . . . . . . . . . . . . . . . . . . .75
3 Español
Información de seguridad. . . . . . . . . . . . . . . . . . . . . . . . . . . . . . . . . . . . . . . . . . . . . . . . .77
Nombres de los componentes . . . . . . . . . . . . . . . . . . . . . . . . . . . . . . . . . . . . . . . . . . . . .81
Funcionamiento . . . . . . . . . . . . . . . . . . . . . . . . . . . . . . . . . . . . . . . . . . . . . . . . . . . . . . . .82
Mantenimiento . . . . . . . . . . . . . . . . . . . . . . . . . . . . . . . . . . . . . . . . . . . . . . . . . . . . . . . . .91
Solución de problemas. . . . . . . . . . . . . . . . . . . . . . . . . . . . . . . . . . . . . . . . . . . . . . . . . . .95
Especificaciones . . . . . . . . . . . . . . . . . . . . . . . . . . . . . . . . . . . . . . . . . . . . . . . . . . . . . . 112
4Français
Informations de sécurité. . . . . . . . . . . . . . . . . . . . . . . . . . . . . . . . . . . . . . . . . . . . . . . . . 115
Nomenclature. . . . . . . . . . . . . . . . . . . . . . . . . . . . . . . . . . . . . . . . . . . . . . . . . . . . . . . . .119
Fonctionnement . . . . . . . . . . . . . . . . . . . . . . . . . . . . . . . . . . . . . . . . . . . . . . . . . . . . . . .120
Entretien. . . . . . . . . . . . . . . . . . . . . . . . . . . . . . . . . . . . . . . . . . . . . . . . . . . . . . . . . . . . .129
Dépannage. . . . . . . . . . . . . . . . . . . . . . . . . . . . . . . . . . . . . . . . . . . . . . . . . . . . . . . . . . .133
Spécifications . . . . . . . . . . . . . . . . . . . . . . . . . . . . . . . . . . . . . . . . . . . . . . . . . . . . . . . . .151
5Italiano
Informazioni sulla sicurezza . . . . . . . . . . . . . . . . . . . . . . . . . . . . . . . . . . . . . . . . . . . . . .153
Componenti . . . . . . . . . . . . . . . . . . . . . . . . . . . . . . . . . . . . . . . . . . . . . . . . . . . . . . . . . .157
Modalità di funzionamento . . . . . . . . . . . . . . . . . . . . . . . . . . . . . . . . . . . . . . . . . . . . . . .158
Manutenzione. . . . . . . . . . . . . . . . . . . . . . . . . . . . . . . . . . . . . . . . . . . . . . . . . . . . . . . . .167
Risoluzione dei problemi . . . . . . . . . . . . . . . . . . . . . . . . . . . . . . . . . . . . . . . . . . . . . . . .171
Specifiche. . . . . . . . . . . . . . . . . . . . . . . . . . . . . . . . . . . . . . . . . . . . . . . . . . . . . . . . . . . .189
6 简体中文
安全信息 . . . . . . . . . . . . . . . . . . . . . . . . . . . . . . . . . . . . . . . . . . . . . . . . . . . . . . . . . . . . . . . . . . . 191
部件名称 . . . . . . . . . . . . . . . . . . . . . . . . . . . . . . . . . . . . . . . . . . . . . . . . . . . . . . . . . . . . . . . . . . . 195
操作 . . . . . . . . . . . . . . . . . . . . . . . . . . . . . . . . . . . . . . . . . . . . . . . . . . . . . . . . . . . . . . . . . . . . . . . 196
保养 . . . . . . . . . . . . . . . . . . . . . . . . . . . . . . . . . . . . . . . . . . . . . . . . . . . . . . . . . . . . . . . . . . . . . . . 204
故障排除 . . . . . . . . . . . . . . . . . . . . . . . . . . . . . . . . . . . . . . . . . . . . . . . . . . . . . . . . . . . . . . . . . . . 208
规格 . . . . . . . . . . . . . . . . . . . . . . . . . . . . . . . . . . . . . . . . . . . . . . . . . . . . . . . . . . . . . . . . . . . . . . . 225

2 DF-760, MT-720, BF-720, PH-5A, PH-5B AND PH-5C OPERATION GUIDE
7 日本語
安全に正しくお使いいただくために . . . . . . . . . . . . . . . . . . . . . . . . . . . . . . . . . . . . . . .227
各部の名称 . . . . . . . . . . . . . . . . . . . . . . . . . . . . . . . . . . . . . . . . . . . . . . . . . . . . . . . . . . .231
操作のしかた . . . . . . . . . . . . . . . . . . . . . . . . . . . . . . . . . . . . . . . . . . . . . . . . . . . . . . . . .232
日常のメンテナンス. . . . . . . . . . . . . . . . . . . . . . . . . . . . . . . . . . . . . . . . . . . . . . . . . . . .241
困ったときは . . . . . . . . . . . . . . . . . . . . . . . . . . . . . . . . . . . . . . . . . . . . . . . . . . . . . . . . .245
仕様 . . . . . . . . . . . . . . . . . . . . . . . . . . . . . . . . . . . . . . . . . . . . . . . . . . . . . . . . . . . . . . . .263

DF-760, MT-720, BF-720, PH-5A, PH-5B AND PH-5C OPERATION GUIDE 3
1 English
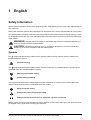
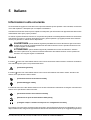
Safety Information
Please read the Operation Guide before using this product. After reading, keep it close to the copier/printer for
easy reference.
Refer to the Operation Guide for the copier/printer for information on the service representative for your product.
The sections of this Operation Guide and parts of this product marked with symbols are safety warnings. These
are designed to protect the user, other individuals and surrounding objects, and ensure correct and safe usage
of the product.
Symbols
The symbol indicates that the related section includes safety warnings. Specific points of attention are
indicated inside the symbol.
The symbol indicates that the related section includes information on prohibited actions. Specifics of the
prohibited action are indicated inside the symbol.
The
z symbol indicates that the related section includes information on actions which must be performed.
Specifics of the required action are indicated inside the symbol.
Please contact your service representative to order a replacement if the safety warnings in this Operation Guide
are illegible or if the guide itself is missing (fee required).
WARNING: Indicates that serious injury or even death may result from insufficient attention to or
incorrect compliance with the related points.
CAUTION: Indicates that personal injury or mechanical damage may result from insufficient
attention to or incorrect compliance with the related points.
....
[General warning]
....
[Warning of prohibited action]
....
[Disassembly prohibited]
....
[Alert of required action]
....
[Remove the power plug from the outlet]
....
[Always connect the machine to an outlet with a ground connection]

English
4 DF-760, MT-720, BF-720, PH-5A, PH-5B AND PH-5C OPERATION GUIDE
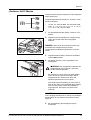
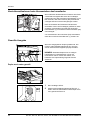
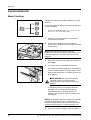
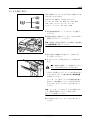
CAUTION LABELS
Caution labels have been attached to the Document Finisher at the following locations for safety purposes. BE
VERY CAREFUL to avoid accidents such as trapping your foot when moving the finisher.
NOTE: DO NOT REMOVE THESE LABELS.
LABEL 1
CAUTION: Paper is ejected into
the eject section at high speeds.
Do not look into the eject section
while the machine is in operation.
LABEL 2
The interior of this section reaches high
temperatures. DO NOT touch this section
as there is a danger of being burned.
LABEL 3
DO NOT place any objects underneath
Tray A.

English
DF-760, MT-720, BF-720, PH-5A, PH-5B AND PH-5C OPERATION GUIDE 5
INSTALLATION PRECAUTIONS
Environment
CAUTION
Avoid placing this product on or in locations which are unstable or not level. Such locations may cause
the product to fall down or fall over. This type of situation presents a danger of personal injury or damage
to the product.
Avoid locations near radiators, heaters, or other heat sources, or locations near flammable items, to avoid
the danger of fire.
Other precautions
The requirements for the operating environment are as follows:
• Temperature: 0°C to 35°C (32°F to 95°F)
• Humidity: 10% to 85%
Note that ambient environmental conditions, such as ventilation, may affect performance.
The following locations should be avoided:
• bright locations near a window or with exposure to direct sunlight
• locations with vibrations
• locations with drastic fluctuations in temperature or humidity
• locations with direct exposure to hot or cold air
Handling of plastic bags
WARNING
Keep the plastic bags that are used with this product away from children. The plastic may cling to their
nose and mouth causing suffocation.
PRECAUTIONS FOR USE
Cautions when using this product
WARNING
DO NOT place metallic objects or containers with water (flower vases, flower pots, cups, etc.) on or near
this product. This type of situation presents a danger of fire or electrical shock should any water fall inside.
DO NOT damage, break or attempt to repair the power cable. DO NOT place heavy objects on the power
cable, pull it, bend it unnecessarily or cause any other type of damage. These types of situations present
a danger of fire or electrical shock.
NEVER attempt to repair or disassemble this product or its parts as there is a danger of injury or fire or
electrical shock.
If this product becomes excessively hot, smoke appears, there is an odd smell, or any other abnormal
situation arises, there is a danger of fire or electrical shock. Immediately turn the copier/printer OFF (O)
at the main power switch and remove the copier/printer power plug from its outlet. Then contact your
service representative.

English
6 DF-760, MT-720, BF-720, PH-5A, PH-5B AND PH-5C OPERATION GUIDE
If anything harmful (paper clips, water, other fluids, etc.) falls into this product, immediately turn the
copier/printer OFF (O) at the main power switch, remove the copier/printer power plug from its outlet and
then contact your service representative. If you continue to use this product without taking these steps,
there is a danger of fire or electrical shock.
ALWAYS contact your service representative for maintenance or repair of internal parts.
CAUTION
For safety purposes, ALWAYS turn the copier/printer OFF (O) at the main power switch and remove the
copier/printer power plug from its outlet when cleaning this product.
DO NOT touch the ejection tray when the product is in operation as there is a danger of injury.
Paper is ejected into the eject section at high speeds. Do not look into the eject section while the machine
is in operation.
If dust accumulates within this product, there is a danger of fire or other problems. It is therefore
recommended that you consult with your service representative in regard to cleaning of internal parts.
This is particularly effective if performed prior to seasons of high humidity. Consult with your service
representative in regard to the cost of cleaning the internal parts of the product.
Other Precautions
DO NOT place heavy objects on this product or cause other damage to the product.
When lifting or moving the product, contact your service representative.
Do not touch electrical parts, such as connectors or printed circuit boards. They could be damaged by static
electricity.
DO NOT attempt to perform any operations not explained in this Operation Guide.

English
DF-760, MT-720, BF-720, PH-5A, PH-5B AND PH-5C OPERATION GUIDE 7
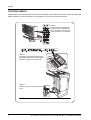
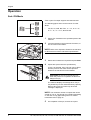
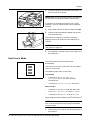
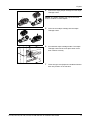
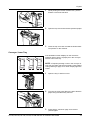
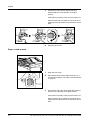
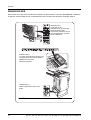
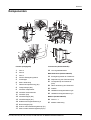
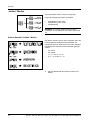
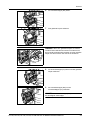
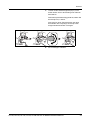
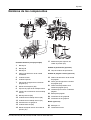
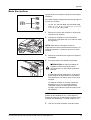
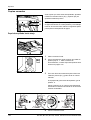
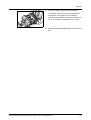
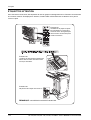
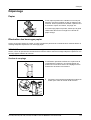
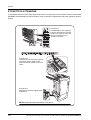
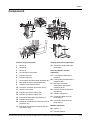
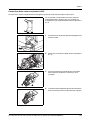
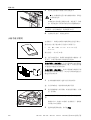
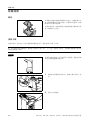
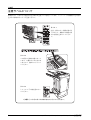
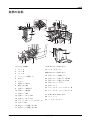
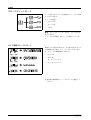
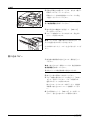
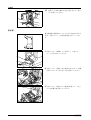
Names of Parts
Document Finisher (main body)
1 Tray A
2 Tray B
3 Tray C
4 Finisher release lever
5 Front cover
6 Top cover
7 Folding unit paper guide plate (D1)
8 Conveyor knob (D2)
9 Inner tray paper holder
10 Inner tray confirmation window
11 Inner tray (D5)
12 Inner tray cover (D6)
13 Inner tray cover (D7)
14 Staple cartridge holder A
15 Right cover (D8)
16 Pressure roller bottom adjust knob (E1)
17 Pressure roller top adjust knob (E2)
Hole Punch Unit (option)
18 Punch waste box
Center-Folding Unit (option)
19 Folding unit release lever
20 Folding unit paper guide plate (D9)
21 Folding unit conveyor knob (D10)
22 Folding unit top cover
23 Folding tray
24 Staple cartridge holder B
25 Staple cartridge holder C
Mailbox (option)
26 Trays 1 - 7
27 Mailbox cover
1
5
4
2
3
6
7
16 17 8
1514
18
27
26
913
11
12
10
21
23 19
22
20
25
24

English
8 DF-760, MT-720, BF-720, PH-5A, PH-5B AND PH-5C OPERATION GUIDE
Operation
Sort: ON Mode
Sorts copies of multiple originals into identical sets.
The following paper sizes can be used in Sort:ON
Mode:
• A3, B4, A4, A4R, B5, Folio, 11
× 17", 8 1/2 × 14",
8
1/2 × 11", 11 × 8 1/2", 8K and 16K
1 Select Sort: On Mode on the operation panel of the
machine.
2 Load the originals in the Document Processor, or
one at a time on the Platen.
NOTE: Refer to the Operation Guide for the machine
for Document Processor and Platen specifications.
3 Select other features as required and press Start.
4 Copies are ejected onto the specified tray.
If Tray A is selected, each copy set can be offset
from the previous set. Refer to the Operation
Guide for the machine for further details.
CAUTION: Do not touch the ejection tray
when the product is in operation as there is a
danger of injury.
The machine displays a message when Tray A,
Tray B and Tray C have reached their tray capacity.
Remove all copies from each tray when this
message is displayed.
NOTE: The maximum number of copies that can be
stored on Tray A, Tray B and Tray C differs depending
on the size of copy paper being used. For further
information refer to page 37.
5 On completion of the job, remove the copies.

English
DF-760, MT-720, BF-720, PH-5A, PH-5B AND PH-5C OPERATION GUIDE 9
Sort: OFF Mode
Groups the copies of each individual original together in
one stack.
The following paper sizes can be used in Sort:OFF
Mode:
• A3, B4, A4, A4R, B5, B5R, A5, A5R, B6R, A6R,
Folio, 11
× 17", 8 1/2 × 14", 8 1/2 × 11", 11 × 8 1/2",
5
1/2 × 8 1/2", 8K, 16K and 16KR
1 Select Sort: Off Mode on the operation panel of the
machine.
2 Load the originals in the Document Processor, or
one at a time on the Platen.
NOTE: Refer to the Operation Guide for the machine
for Document Processor and Platen specifications.
3 Select other features as required and press Start.
4 Copies are ejected onto the specified tray.
CAUTION: Do not touch the ejection tray
when the product is in operation as there is a
danger of injury.
If Tray A is selected, each stack can be offset from
the previous stack. Refer to the Operation Guide
for the machine for further details.
The machine displays a message when Tray A,
Tray B and Tray C have reached their tray capacity.
Remove all copies from each tray when this
message is displayed.
NOTE: The maximum number of copies that can be
stored on Tray A, Tray B and Tray C differs depending
on the size of copy paper being used. For further
information refer to page 37.
5 On completion of the job, remove the copies.

English
10 DF-760, MT-720, BF-720, PH-5A, PH-5B AND PH-5C OPERATION GUIDE
Staple Mode
Sorts and staples each copy set.
Stapling options are as follows:
• Upper Left Single Staple
• Upper Right Single Staple
• Double Staple
NOTE: Only Tray A is used during staple mode. For
stapling specifications, refer to page 37.
Auto Selection Staple Mode
Staple mode is available even if the paper size is
different if the paper width is the same as shown in the
below combinations. The staple capacity is 30 sheets.
• A3 and A4
• B4 and B5
•11
× 17" and 11 × 8 1/2"
•8
1/2 × 14" and 8 1/2 × 11"
1 Select Sort: On Mode on the operation panel of the
machine.

English
DF-760, MT-720, BF-720, PH-5A, PH-5B AND PH-5C OPERATION GUIDE 11
2 Select the staple setting required.
NOTE: Refer to the Operation Guide for the machine
for more detailed information.
3 Load the originals in the Document Processor, or
one at a time on the Platen.
NOTE: Refer to the Operation Guide for the machine
for Document Processor and Platen specifications.
4 Select other features as required and press Start.
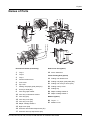
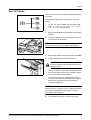
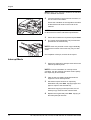
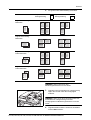
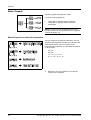
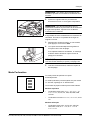
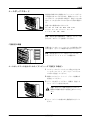
Cassette Paper
Load Direction
Cassette Paper
Load Direction
Original Orientation:
Top Edge
Original Orientation:
Top Edge
Original Orientation:
Left Top Edge
Original Orientation:
Left Top Edge

English
12 DF-760, MT-720, BF-720, PH-5A, PH-5B AND PH-5C OPERATION GUIDE
5 Copies will be stapled and ejected onto Tray A,
face down.
CAUTION: Do not touch the ejection tray
when the product is in operation as there is a
danger of injury.
If Tray A reaches its maximum capacity, a
message displays. Remove all copies from Tray A
to continue.
NOTE: The maximum number of copies that can be
stored on Tray A differs depending on the size of copy
paper being used. For further information refer to page
37.
6 On completion of the job, remove the copies.
Booklet Stitching Mode
In this mode, copies are stapled in two positions in the
center of the paper.
The following paper sizes can be used in Booklet
Stitching mode:
• A3, B4, A4R, 11
× 17", 8 1/2 × 14" and 8 1/2 × 11"
Stapling Capacity: 2 to 16 sheets at a time.
NOTE: The optional Center-Folding Unit is required
for automatic folding. Only the folding tray is used for
Booklet Stitching mode.
Booklet Feature (Sheet originals): Delivers booklet of
two-sided copies with facing pages from one-sided or
two-sided originals. Booklets such as magazines can
be created by folding at the center.
Booklet Feature (Facing originals): Copies book
originals to booklets consisting of two-sided copies with
facing pages. Booklets such as magazines can be
created by folding at the center.
1 Select the Booklet Stitching mode on the operation
panel of the machine.
NOTE: Refer to the Operation Guide for the machine
for more detailed information.

English
DF-760, MT-720, BF-720, PH-5A, PH-5B AND PH-5C OPERATION GUIDE 13
2 Load the originals in the Document Processor, or
one at a time on the Platen.
NOTE: Refer to the Operation Guide for the machine
for Document Processor and Platen specifications.
A maximum of 16 sheets can be bound in a single
operation. Up to 64 original sheets can be loaded at
one time.
3 Select other features as required and press Start.
4 Copies will be automatically stapled and ejected
onto the folding tray.
If the maximum capacity is reached, a message
displays. Remove all copies from the folding tray to
continue.
NOTE: For further information refer to Center-Folding
Unit (option) on page 38.
5 On completion of the job, remove the copies from
the folding tray.
Hole Punch Mode
This mode produces hole punched copies
automatically.
Hole Punch mode can be used with Sort: ON, Staple
and Sort: OFF modes.
The following paper sizes can be used:
Inch models
• 2-hole punch: 8
1/2 × 14", 8 1/2 × 11",
5
1/2 × 8 1/2", A3, B4, A4, A4R, B5, B5R,
A5R and Folio
• 3-hole punch: 11
× 17", 11 × 8 1/2", A3 and A4
Metric models
• 2-hole punch: A3, B4, A4, A4R, B5, B5R, A5R,
Folio, 8
1/2 × 14", 8 1/2 × 11" and 5 1/2 × 8 1/2"
• 4-hole punch: A3, A4, 11
× 17" and 11 × 8 1/2"
Paper weights must be between 45 g/m
2
and 220 g/m
2
.
NOTE: Punching requires the optional punching unit.
Tray C cannot be specified as the output destination
for punch mode.
1 Select Hole Punch mode on the operation panel of
the machine.

English
14 DF-760, MT-720, BF-720, PH-5A, PH-5B AND PH-5C OPERATION GUIDE
NOTE: Refer to the Operation Guide for the machine
for more detailed information.
2 Load the originals in the Document Processor, or
one at a time on the Platen.
Ensure the orientation of the originals is the same
as that selected for Hole Punch mode on the
machine.
NOTE: Refer to the Operation Guide for the machine
for Document Processor and Platen specifications.
3 Select other features as required and press Start.
4 The copies are automatically hole punched and
ejected onto the selected tray.
NOTE: Holes are punched in each copy individually,
therefore the location of the holes may vary on each
sheet.
On completion of the job, remove all the copies.
Interrupt Mode
1 Specify the settings for interrupt mode at from the
machine operation panel.
NOTE: For more information on interrupt mode
operation, see the machine Operation Guide. Specify
the output tray at the machine.
2 Take out the any existing original and set the
original to use for interrupt mode.
3 Set desired copier functions or output tray
destination and press Start. Copying begins and
paper is output to the selected tray.
When done copying in interrupt mode, turn off
interrupt copy mode from the machine itself.
4 Replace the original and press Start. Copying of
the interrupted job resumes.

English
DF-760, MT-720, BF-720, PH-5A, PH-5B AND PH-5C OPERATION GUIDE 15
Mailbox Mode
Paper printed at the machine can be output to the
optional mailbox. This feature is useful when sharing
the printer among multiple computers to output paper to
specific trays for each user.
The following paper sizes can be used:
A3, B4, A4, A4R, B5, B5R, A5R, Folio, 11
× 17",
8
1/2 × 14", 11 × 8 1/2", 8 1/2 × 11", 5 1/2 × 8 1/2", 8K, 16K
and 16KR
NOTE: The maximum number of copies that can be
stored in each tray will differ depending on the size of
copy paper being used. For further information refer to
page 38.
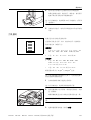
Preparation for Usage
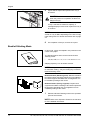
Write the name of the user of each tray on the labels
provided and attach the labels to the side of each tray.
NOTE: Attach the labels in the location indicated on
the illustration. The bins to which labels should be
applied are 1, 2, 3, 4, 5, 6, 7 as counted from the top
down.
Configuring Mailbox Output <from Computer>
1
Use the printer driver on your computer to select a
mailbox tray (mailbox) between 1 and 7.
2 Select the paper size, page(s) to be printed and
number of prints required.
3 Print the job. Prints will be ejected onto the
selected tray (mailbox).
CAUTION: Paper is ejected into the eject
section at high speeds. Do not look into the
eject section while the machine is in operation.
4 On completion of the job, remove all prints from the
tray (mailbox).
Configuring Mailbox Output <from Machine>
To use the machine to select the tray required, refer to the Operation Guide for the machine. On the full color
machine, the output tray can be specified with the copy and fax functions. On the monochrome machine, the
output tray can be specified with the copy, fax, and printer functions.

English
16 DF-760, MT-720, BF-720, PH-5A, PH-5B AND PH-5C OPERATION GUIDE
Maintenance
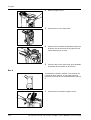
Replacing Staples
The finisher contains staple cartridge holder A.
The optional folding unit contains staple cartridge holders B and C. The refill procedure for staple cartridge
holders B and C are the same as for staple cartridge holder A.
If a message displays indicating that staples have run out, the staple cartridge holder need to be replenished
with staples.
NOTE: If the Staple Unit runs out of staples, contact your service representative or the place of purchase.
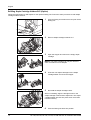
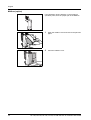
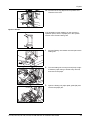
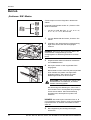
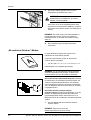
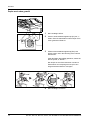
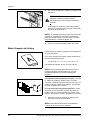
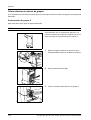
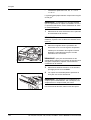
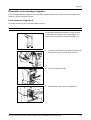
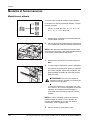
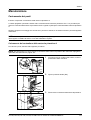
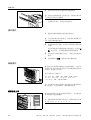
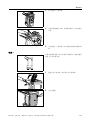
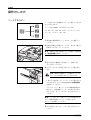
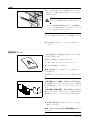
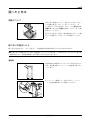
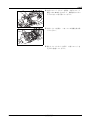
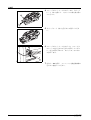
Refilling Staple Cartridge Holder A
Follow the steps below to refill staples.
NOTE: See page 18 to refill staple cartridge holder B/C of the optional folding unit.
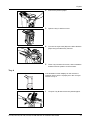
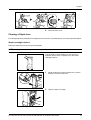
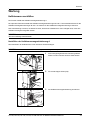
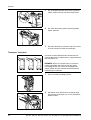
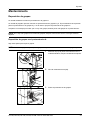
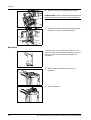
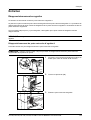
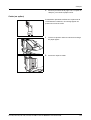
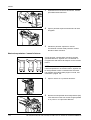
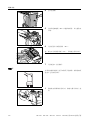
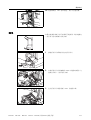
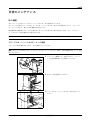
1 While pushing the finisher release lever, pull the
finisher out from the machine.
2 Open the right cover (D8).
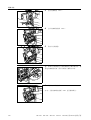
3 Remove the staple cartridge holder.

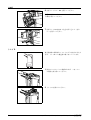
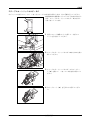
English
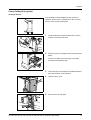
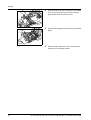
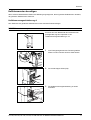
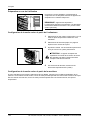
DF-760, MT-720, BF-720, PH-5A, PH-5B AND PH-5C OPERATION GUIDE 17
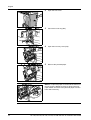
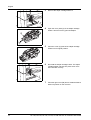
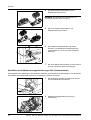
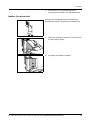
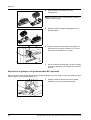
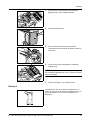
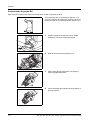
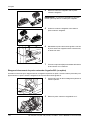
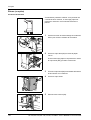
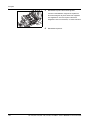
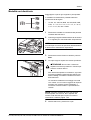
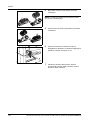
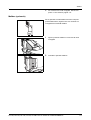
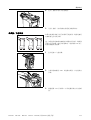
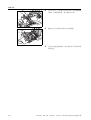
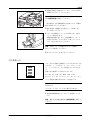
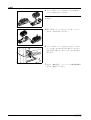
4 Remove the empty staple cartridge from the staple
cartridge holder.
NOTE: The staple cartridge can only be removed
when it contains no more staples.
5 Insert the new staple cartridge into the staple
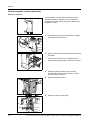
cartridge holder.
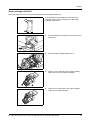
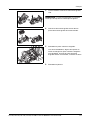
6 Re-install the staple cartridge holder. The staple
cartridge holder will click into place when it has
been inserted correctly.
7 Close the right cover (D8) and re-install the finisher
back into position on the machine.

English
18 DF-760, MT-720, BF-720, PH-5A, PH-5B AND PH-5C OPERATION GUIDE
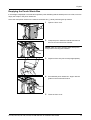
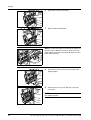
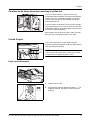
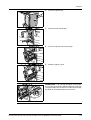
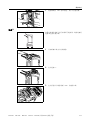
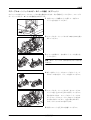
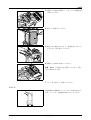
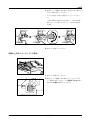
Refilling Staple Cartridge Holders B/C (Option)
Follow the steps below to refill staples for the optional folding unit. Follow the same procedure to refill staple
cartridge holders B and C.
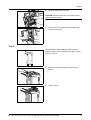
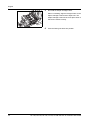
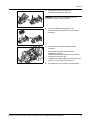
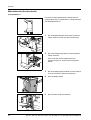
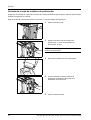
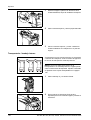
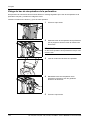
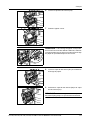
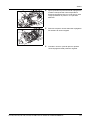
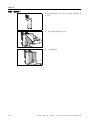
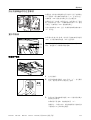
1 Push the folding unit release lever and pull out the
folding unit.
2 Remove staple cartridge holder B or C.
3 Open the stopper and remove the empty staple
cartridge.
NOTE: The staple cartridge can only be removed
when it contains no more staples.
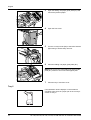
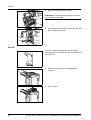
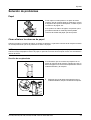
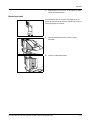
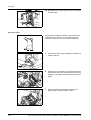
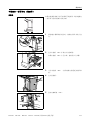
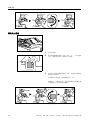
4 Insert the new staple cartridge into the staple
cartridge holder and close the stopper.
5 Re-install the staple cartridge holder.
When re-installing, align the triangle marks on the
staple cartridge holder and the staple unit. The staple
cartridge holder will click into place when it has been
inserted correctly.
6 Push the folding unit back into position.
La pagina si sta caricando...
La pagina si sta caricando...
La pagina si sta caricando...
La pagina si sta caricando...
La pagina si sta caricando...
La pagina si sta caricando...
La pagina si sta caricando...
La pagina si sta caricando...
La pagina si sta caricando...
La pagina si sta caricando...
La pagina si sta caricando...
La pagina si sta caricando...
La pagina si sta caricando...
La pagina si sta caricando...
La pagina si sta caricando...
La pagina si sta caricando...
La pagina si sta caricando...
La pagina si sta caricando...
La pagina si sta caricando...
La pagina si sta caricando...
La pagina si sta caricando...
La pagina si sta caricando...
La pagina si sta caricando...
La pagina si sta caricando...
La pagina si sta caricando...
La pagina si sta caricando...
La pagina si sta caricando...
La pagina si sta caricando...
La pagina si sta caricando...
La pagina si sta caricando...
La pagina si sta caricando...
La pagina si sta caricando...
La pagina si sta caricando...
La pagina si sta caricando...
La pagina si sta caricando...
La pagina si sta caricando...
La pagina si sta caricando...
La pagina si sta caricando...
La pagina si sta caricando...
La pagina si sta caricando...
La pagina si sta caricando...
La pagina si sta caricando...
La pagina si sta caricando...
La pagina si sta caricando...
La pagina si sta caricando...
La pagina si sta caricando...
La pagina si sta caricando...
La pagina si sta caricando...
La pagina si sta caricando...
La pagina si sta caricando...
La pagina si sta caricando...
La pagina si sta caricando...
La pagina si sta caricando...
La pagina si sta caricando...
La pagina si sta caricando...
La pagina si sta caricando...
La pagina si sta caricando...
La pagina si sta caricando...
La pagina si sta caricando...
La pagina si sta caricando...
La pagina si sta caricando...
La pagina si sta caricando...
La pagina si sta caricando...
La pagina si sta caricando...
La pagina si sta caricando...
La pagina si sta caricando...
La pagina si sta caricando...
La pagina si sta caricando...
La pagina si sta caricando...
La pagina si sta caricando...
La pagina si sta caricando...
La pagina si sta caricando...
La pagina si sta caricando...
La pagina si sta caricando...
La pagina si sta caricando...
La pagina si sta caricando...
La pagina si sta caricando...
La pagina si sta caricando...
La pagina si sta caricando...
La pagina si sta caricando...
La pagina si sta caricando...
La pagina si sta caricando...
La pagina si sta caricando...
La pagina si sta caricando...
La pagina si sta caricando...
La pagina si sta caricando...
La pagina si sta caricando...
La pagina si sta caricando...
La pagina si sta caricando...
La pagina si sta caricando...
La pagina si sta caricando...
La pagina si sta caricando...
La pagina si sta caricando...
La pagina si sta caricando...
La pagina si sta caricando...
La pagina si sta caricando...
La pagina si sta caricando...
La pagina si sta caricando...
La pagina si sta caricando...
La pagina si sta caricando...
La pagina si sta caricando...
La pagina si sta caricando...
La pagina si sta caricando...
La pagina si sta caricando...
La pagina si sta caricando...
La pagina si sta caricando...
La pagina si sta caricando...
La pagina si sta caricando...
La pagina si sta caricando...
La pagina si sta caricando...
La pagina si sta caricando...
La pagina si sta caricando...
La pagina si sta caricando...
La pagina si sta caricando...
La pagina si sta caricando...
La pagina si sta caricando...
La pagina si sta caricando...
La pagina si sta caricando...
La pagina si sta caricando...
La pagina si sta caricando...
La pagina si sta caricando...
La pagina si sta caricando...
La pagina si sta caricando...
La pagina si sta caricando...
La pagina si sta caricando...
La pagina si sta caricando...
La pagina si sta caricando...
La pagina si sta caricando...
La pagina si sta caricando...
La pagina si sta caricando...
La pagina si sta caricando...
La pagina si sta caricando...
La pagina si sta caricando...
La pagina si sta caricando...
La pagina si sta caricando...
La pagina si sta caricando...
La pagina si sta caricando...
La pagina si sta caricando...
La pagina si sta caricando...
La pagina si sta caricando...
La pagina si sta caricando...
La pagina si sta caricando...
La pagina si sta caricando...
La pagina si sta caricando...
La pagina si sta caricando...
La pagina si sta caricando...
La pagina si sta caricando...
La pagina si sta caricando...
La pagina si sta caricando...
La pagina si sta caricando...
La pagina si sta caricando...
La pagina si sta caricando...
La pagina si sta caricando...
La pagina si sta caricando...
La pagina si sta caricando...
La pagina si sta caricando...
La pagina si sta caricando...
La pagina si sta caricando...
La pagina si sta caricando...
La pagina si sta caricando...
La pagina si sta caricando...
La pagina si sta caricando...
La pagina si sta caricando...
La pagina si sta caricando...
La pagina si sta caricando...
La pagina si sta caricando...
La pagina si sta caricando...
La pagina si sta caricando...
La pagina si sta caricando...
La pagina si sta caricando...
La pagina si sta caricando...
La pagina si sta caricando...
La pagina si sta caricando...
La pagina si sta caricando...
La pagina si sta caricando...
La pagina si sta caricando...
La pagina si sta caricando...
La pagina si sta caricando...
La pagina si sta caricando...
La pagina si sta caricando...
La pagina si sta caricando...
La pagina si sta caricando...
La pagina si sta caricando...
La pagina si sta caricando...
La pagina si sta caricando...
La pagina si sta caricando...
La pagina si sta caricando...
La pagina si sta caricando...
La pagina si sta caricando...
La pagina si sta caricando...
La pagina si sta caricando...
La pagina si sta caricando...
La pagina si sta caricando...
La pagina si sta caricando...
La pagina si sta caricando...
La pagina si sta caricando...
La pagina si sta caricando...
La pagina si sta caricando...
La pagina si sta caricando...
La pagina si sta caricando...
La pagina si sta caricando...
La pagina si sta caricando...
La pagina si sta caricando...
La pagina si sta caricando...
La pagina si sta caricando...
La pagina si sta caricando...
La pagina si sta caricando...
La pagina si sta caricando...
La pagina si sta caricando...
La pagina si sta caricando...
La pagina si sta caricando...
La pagina si sta caricando...
La pagina si sta caricando...
La pagina si sta caricando...
La pagina si sta caricando...
La pagina si sta caricando...
La pagina si sta caricando...
La pagina si sta caricando...
La pagina si sta caricando...
La pagina si sta caricando...
La pagina si sta caricando...
La pagina si sta caricando...
La pagina si sta caricando...
La pagina si sta caricando...
La pagina si sta caricando...
La pagina si sta caricando...
La pagina si sta caricando...
La pagina si sta caricando...
La pagina si sta caricando...
La pagina si sta caricando...
La pagina si sta caricando...
La pagina si sta caricando...
La pagina si sta caricando...
La pagina si sta caricando...
La pagina si sta caricando...
La pagina si sta caricando...
La pagina si sta caricando...
La pagina si sta caricando...
La pagina si sta caricando...
La pagina si sta caricando...
La pagina si sta caricando...
La pagina si sta caricando...
La pagina si sta caricando...
La pagina si sta caricando...
La pagina si sta caricando...
La pagina si sta caricando...
La pagina si sta caricando...
La pagina si sta caricando...
-
 1
1
-
 2
2
-
 3
3
-
 4
4
-
 5
5
-
 6
6
-
 7
7
-
 8
8
-
 9
9
-
 10
10
-
 11
11
-
 12
12
-
 13
13
-
 14
14
-
 15
15
-
 16
16
-
 17
17
-
 18
18
-
 19
19
-
 20
20
-
 21
21
-
 22
22
-
 23
23
-
 24
24
-
 25
25
-
 26
26
-
 27
27
-
 28
28
-
 29
29
-
 30
30
-
 31
31
-
 32
32
-
 33
33
-
 34
34
-
 35
35
-
 36
36
-
 37
37
-
 38
38
-
 39
39
-
 40
40
-
 41
41
-
 42
42
-
 43
43
-
 44
44
-
 45
45
-
 46
46
-
 47
47
-
 48
48
-
 49
49
-
 50
50
-
 51
51
-
 52
52
-
 53
53
-
 54
54
-
 55
55
-
 56
56
-
 57
57
-
 58
58
-
 59
59
-
 60
60
-
 61
61
-
 62
62
-
 63
63
-
 64
64
-
 65
65
-
 66
66
-
 67
67
-
 68
68
-
 69
69
-
 70
70
-
 71
71
-
 72
72
-
 73
73
-
 74
74
-
 75
75
-
 76
76
-
 77
77
-
 78
78
-
 79
79
-
 80
80
-
 81
81
-
 82
82
-
 83
83
-
 84
84
-
 85
85
-
 86
86
-
 87
87
-
 88
88
-
 89
89
-
 90
90
-
 91
91
-
 92
92
-
 93
93
-
 94
94
-
 95
95
-
 96
96
-
 97
97
-
 98
98
-
 99
99
-
 100
100
-
 101
101
-
 102
102
-
 103
103
-
 104
104
-
 105
105
-
 106
106
-
 107
107
-
 108
108
-
 109
109
-
 110
110
-
 111
111
-
 112
112
-
 113
113
-
 114
114
-
 115
115
-
 116
116
-
 117
117
-
 118
118
-
 119
119
-
 120
120
-
 121
121
-
 122
122
-
 123
123
-
 124
124
-
 125
125
-
 126
126
-
 127
127
-
 128
128
-
 129
129
-
 130
130
-
 131
131
-
 132
132
-
 133
133
-
 134
134
-
 135
135
-
 136
136
-
 137
137
-
 138
138
-
 139
139
-
 140
140
-
 141
141
-
 142
142
-
 143
143
-
 144
144
-
 145
145
-
 146
146
-
 147
147
-
 148
148
-
 149
149
-
 150
150
-
 151
151
-
 152
152
-
 153
153
-
 154
154
-
 155
155
-
 156
156
-
 157
157
-
 158
158
-
 159
159
-
 160
160
-
 161
161
-
 162
162
-
 163
163
-
 164
164
-
 165
165
-
 166
166
-
 167
167
-
 168
168
-
 169
169
-
 170
170
-
 171
171
-
 172
172
-
 173
173
-
 174
174
-
 175
175
-
 176
176
-
 177
177
-
 178
178
-
 179
179
-
 180
180
-
 181
181
-
 182
182
-
 183
183
-
 184
184
-
 185
185
-
 186
186
-
 187
187
-
 188
188
-
 189
189
-
 190
190
-
 191
191
-
 192
192
-
 193
193
-
 194
194
-
 195
195
-
 196
196
-
 197
197
-
 198
198
-
 199
199
-
 200
200
-
 201
201
-
 202
202
-
 203
203
-
 204
204
-
 205
205
-
 206
206
-
 207
207
-
 208
208
-
 209
209
-
 210
210
-
 211
211
-
 212
212
-
 213
213
-
 214
214
-
 215
215
-
 216
216
-
 217
217
-
 218
218
-
 219
219
-
 220
220
-
 221
221
-
 222
222
-
 223
223
-
 224
224
-
 225
225
-
 226
226
-
 227
227
-
 228
228
-
 229
229
-
 230
230
-
 231
231
-
 232
232
-
 233
233
-
 234
234
-
 235
235
-
 236
236
-
 237
237
-
 238
238
-
 239
239
-
 240
240
-
 241
241
-
 242
242
-
 243
243
-
 244
244
-
 245
245
-
 246
246
-
 247
247
-
 248
248
-
 249
249
-
 250
250
-
 251
251
-
 252
252
-
 253
253
-
 254
254
-
 255
255
-
 256
256
-
 257
257
-
 258
258
-
 259
259
-
 260
260
-
 261
261
-
 262
262
-
 263
263
-
 264
264
-
 265
265
-
 266
266
-
 267
267
-
 268
268


KYOCERA TASKalfa 500ci Series Manuale del proprietario
- Tipo
- Manuale del proprietario
in altre lingue
Documenti correlati
-
KYOCERA DF-650 Manuale del proprietario
-
Copystar CS-C3232E Manuale del proprietario
-
KYOCERA TASKALFA 820 Manuale del proprietario
-
KYOCERA DF-610 Manuale del proprietario
-
KYOCERA CS-3035 Istruzioni per l'uso
-
KYOCERA F-4730 Manuale del proprietario
-
-
-
-
Olivetti d-Copia 1800MF and d-Copia 2200MF Manuale del proprietario