Sony CCD-TR501E Manuale utente
- Categoria
- Videocamere
- Tipo
- Manuale utente

CCD-TR501E/TR502E/TR620E 3-859-127-13.E/R
Video Camera
Recorder
Operating Instructions
Before operating the unit, please read this manual thoroughly,
and retain it for future reference.
àÌÒÚ Û͈Ëfl ÔÓ ˝ÍÒÔÎÛ‡Ú‡ˆËË
è ‰ ̇˜‡ÎÓÏ ˝ÍÒÔÎÛ‡Ú‡ˆËË ‰‡ÌÌÓ„Ó ‡ÔÔ‡ ‡Ú‡ Ô ÓÒËÏ ‚ÌËχÚÂθÌÓ
Ô Ó˜ÂÒÚ¸ ̇ÒÚÓfl˘Â ÛÍÓ‚Ó‰ÒÚ‚Ó Ë ÓÒÚ‡‚ËÚ¸ Â„Ó ‰Îfl ·Û‰Û˘Ëı ÒÔ ‡‚ÓÍ.
3-859-127-13 (1)
CCD-TR501E/TR502E/TR620E
© 1997 by Sony Corporation
CCD-TR620E

CCD-TR501E/TR502E/TR620E 3-859-127-13.E/R
2
English
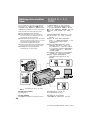
Welcome!
Congratulations on your purchase of this
Sony Handycam
camcorder. With your
Handycam, you can capture life’s precious
moments with superior picture and sound
quality. Your Handycam is loaded with
advanced features, but at the same time it is
very easy to use. You will soon be
producing home video that you can enjoy
for years to come.
WARNING
To prevent fire or shock hazard, do not expose
the unit to rain or moisture.
To avoid electrical shock, do not open the
cabinet. Refer servicing to qualified personnel
only.
NOTICE ON THE SUPPLIED AC POWER
ADAPTOR FOR CUSTOMERS IN THE
UNITED KINGDOM
A moulded plug complying with BS1363 is fitted
to this equipment for your safety and
convenience.
Should the fuse in the plug supplied need to
be replaced, a 5 AMP fuse approved by ASTA
or BSI to BS1362 (i.e., marked with 2 or @
mark) must be used.
If the plug supplied with this equipment has a
detachable fuse cover, be sure to attach the
fuse cover after you change the fuse. Never
use the plug without the fuse cover. If you
should lose the fuse cover, please contact your
nearest Sony service station.
ÑÓ· Ó !
èÓÁ‰ ‡‚ÎflÂÏ Ç‡Ò Ò Ô ËÓ· ÂÚÂÌËÂÏ ‰‡ÌÌÓÈ
‚ˉÂÓ͇Ï ˚ Handycam
ÙË Ï˚ Sony. ë
ÔÓÏÓ˘¸˛ LJ¯ÂÈ ‚ˉÂÓ͇Ï ˚ Handycam Ç˚
ÏÓÊÂÚ Á‡Ô˜‡ÚÎÂÚ¸ ‰Ó Ó„ËÂ Ç‡Ï Ï„ÌÓ‚ÂÌËfl
ÊËÁÌË Ò Ô Â‚ÓÒıÓ‰Ì˚Ï Í‡˜ÂÒÚ‚ÓÏ
ËÁÓ· ‡ÊÂÌËfl Ë Á‚Û͇. LJ¯‡ ‚ˉÂÓ͇Ï ‡
Handycam ÓÒ̇˘Â̇ ÛÒÓ‚Â ¯ÂÌÒÚ‚Ó‚‡ÌÌ˚ÏË
ÙÛÌ͈ËflÏË, ÌÓ Ë ‚ ÚÓ Ê ‚ ÂÏfl  ӘÂ̸
΄ÍÓ ËÒÔÓθÁÓ‚‡Ú¸. Ç˚ ‚ÒÍÓ Â ·Û‰ÂÚÂ
ÒÓÁ‰‡‚‡Ú¸ ÒÂÏÂÈÌ˚ ‚ˉÂÓÁ‡ÔËÒË, ÍÓÚÓ ˚ÏË
ÏÓÊÂÚ ̇Ò·ʉ‡Ú¸Òfl ‚ ÔÓÒÎÂ‰Û˛˘Ë „Ó‰˚.
èêÖÑìèêÖÜÑÖçàÖ
ÑÎfl Ô Â‰ÓÚ‚ ‡˘ÂÌËfl ‚ÓÁ„Ó ‡ÌËfl ËÎË
ÓÔ‡ÒÌÓÒÚË ˝ÎÂÍÚ Ë˜ÂÒÍÓ„Ó Û‰‡ ‡ ÌÂ
ÔÓ‰‚ „‡Ú¸ ‡ÔÔ‡ ‡Ú ‚ÓÁ‰ÂÈÒڂ˲ ‰Óʉfl
ËÎË ‚·„Ë.
ÇÓ ËÁ·ÂʇÌË ÔÓ ‡ÊÂÌËfl ˝ÎÂÍÚ Ë˜ÂÒÍËÏ
ÚÓÍÓÏ Ì ÓÚÍ ˚‚‡Ú¸ ÍÓ ÔÛÒ. á‡
Ó·ÒÎÛÊË‚‡ÌËÂÏ Ó· ‡˘‡Ú¸Òfl ÚÓθÍÓ Í
Í‚‡ÎËÙËˆË Ó‚‡ÌÌÓÏÛ Ó·ÒÎÛÊË‚‡˛˘ÂÏÛ
Ô ÒÓ̇ÎÛ.
êÛÒÒÍËÈ

CCD-TR501E/TR502E/TR620E 3-859-127-13.E/R
3
Before you begin è ‰ ̇˜‡ÎÓÏ ‡·ÓÚ˚
Before you begin
Using this manual............................................. 4
Checking supplied accessories .......................... 6
Getting started
Charging and installing the battery pack......... 7
Inserting a cassette ........................................... 11
Basic operations
Camera recording ............................................ 12
Using the zoom feature................................ 15
Hints for better shooting................................. 16
Checking the recorded picture ........................ 18
Connections for playback................................ 19
Playing back a tape ......................................... 20
Advanced operations
Using alternative power sources .................... 22
Changing the mode settings ............................ 26
Recording with the date or time...................... 29
Selecting the START/STOP mode ................... 30
Shooting with backlighting............................. 31
Fade-in and fade-out ....................................... 32
Enjoying picture effect..................................... 34
Using the wide mode function (CCD-TR502E/
TR620E only) ................................................ 36
Focusing manually.......................................... 38
Using the PROGRAM AE function................. 40
Releasing the STEADY SHOT function
(CCD-TR620E only) ..................................... 42
Superimposing a title....................................... 43
Making your own titles................................... 46
Editing onto another tape................................ 48
Additional information
Changing the lithium battery
in the camcorder .......................................... 49
Resetting the date and time ............................. 51
Playback modes ............................................... 52
Tips for using the battery pack........................ 53
Maintenance information and precautions..... 58
Using your camcorder abroad......................... 64
Trouble check ................................................. 65
Specifications .................................................. 73
Identifying the parts........................................ 75
Warning indicators.......................................... 84
Index.............................................................. 85
Table of contents
è ‰ ̇˜‡ÎÓÏ ‡·ÓÚ˚
àÒÔÓθÁÓ‚‡ÌË ‰‡ÌÌÓ„Ó ÛÍÓ‚Ó‰ÒÚ‚‡ ..... 4
è ӂ ͇ Ô Ë·„‡ÂÏ˚ı Ô Ë̇‰ÎÂÊÌÓÒÚÂÈ . 6
èÓ‰„ÓÚӂ͇ Í Ì‡˜‡ÎÛ ‡·ÓÚ˚
ᇠfl‰Í‡ Ë ÛÒÚ‡Ìӂ͇ ·‡Ú‡ ÂÈÌÓ„Ó ·ÎÓ͇ .. 7
ÇÒÚ‡‚͇ ͇ÒÒÂÚ˚.................... 11
éÒÌÓ‚Ì˚ ÓÔ ‡ˆËË
á‡ÔËÒ¸ Ò ÔÓÏÓ˘¸˛ ‚ˉÂÓ͇Ï ˚ ....... 12
àÒÔÓθÁÓ‚‡ÌË ÙÛÌ͈ËË Ì‡ÂÁ‰‡
‚ˉÂÓ͇Ï ˚ ..................... 15
ëÓ‚ÂÚ˚ ‰Îfl ÎÛ˜¯ÂÈ Ò˙ÂÏÍË ........... 16
è ӂ ͇ Á‡ÔËÒ‡ÌÌÓ„Ó ËÁÓ· ‡ÊÂÌËfl .... 18
èÓ‰ÒÓ‰ËÌÂÌËfl ‰Îfl ‚ÓÒÔ ÓËÁ‚‰ÂÌËfl ... 19
ÇÓÒÔ ÓËÁ‚‰ÂÌË ÎÂÌÚ˚ .............. 20
ìÒÓ‚Â ¯ÂÌÒÚ‚Ó‚‡ÌÌ˚ ÓÔ ‡ˆËË
àÒÔÓθÁÓ‚‡ÌË ‡Î¸Ú ̇ÚË‚Ì˚ı ËÒÚÓ˜ÌËÍÓ‚
ÔËÚ‡ÌËfl .......................... 22
àÁÏÂÌÂÌË ÂÊËÏÌ˚ı ÛÒÚ‡ÌÓ‚ÓÍ ....... 26
á‡ÔËÒ¸ Ò ‰‡ÚÓÈ ËÎË ‚ ÂÏÂÌÂÏ .......... 29
Ç˚·Ó ÂÊËχ START/STOP .......... 30
ë˙ÂÏ͇ Ò Á‡‰ÌÂÈ ÔÓ‰Ò‚ÂÚÍÓÈ .......... 31
ǂ‰ÂÌËÂ Ë ‚˚‚‰ÂÌË ËÁÓ· ‡ÊÂÌËfl .... 32
ç‡Ò·ʉÂÌË ˝ÙÙÂÍÚ‡ÏË ËÁÓ· ‡ÊÂÌËfl .. 34
àÒÔÓθÁÓ‚‡ÌË ÙÛÌ͈ËË ¯Ë ÓÍÓÙÓ Ï‡ÚÌÓ„Ó
ÂÊËχ (íÓθÍÓ CCD-TR502E/TR620E) . 36
îÓÍÛÒË Ó‚Í‡ ‚ Û˜ÌÛ˛ ............... 38
àÒÔÓθÁÓ‚‡ÌË ÙÛÌ͈ËË PROGRAM AE .. 40
éÚÍβ˜ÂÌË ÙÛÌ͈ËË STEADY SHOT
(íÓθÍÓ CCD-TR620E) .............. 42
ç‡ÎÓÊÂÌË ̇‰ÔËÒË ................. 43
ëÓÁ‰‡ÌË LJ¯Ëı ÒÓ·ÒÚ‚ÂÌÌ˚ı ̇‰ÔËÒÂÈ . 46
åÓÌÚ‡Ê Ì‡ ‰ Û„Û˛ ÎÂÌÚÛ ............. 48
ÑÓÔÓÎÌËÚÂθ̇fl ËÌÙÓ Ï‡ˆËfl
á‡ÏÂ̇ ÎËÚË‚ÓÈ ·‡Ú‡ ÂÈÍË ‚
‚ˉÂÓ͇Ï  ...................... 49
ìÒÚ‡Ìӂ͇ ‰‡Ú˚ Ë ‚ ÂÏÂÌË ............ 51
êÂÊËÏ˚ ‚ÓÒÔ ÓËÁ‚‰ÂÌËfl ............ 52
ëÓ‚ÂÚ˚ ÔÓ ËÒÔÓθÁÓ‚‡Ì˲ ·‡Ú‡ ÂÈÌÓ„Ó
·ÎÓ͇ ........................... 53
àÌÙÓ Ï‡ˆËfl ÔÓ ÛıÓ‰Û Á‡ ‡ÔÔ‡ ‡ÚÓÏ Ë
Ô Â‰ÓÒÚÓ ÓÊÌÓÒÚË ................. 58
àÒÔÓθÁÓ‚‡ÌË LJ¯ÂÈ ‚ˉÂÓ͇Ï ˚ Á‡
Û·ÂÊÓÏ ......................... 64
è ӂ ͇ ÌÂËÒÔ ‡‚ÌÓÒÚÂÈ ............ 69
íÂıÌ˘ÂÒÍË ı‡ ‡ÍÚ ËÒÚËÍË .......... 74
éÔÓÁ̇‚‡ÌË ‰ÂÚ‡ÎÂÈ ................ 75
è ‰ÛÔ Âʉ‡˛˘Ë Ë̉Ë͇ÚÓ ˚ ....... 84
ì͇Á‡ÚÂθ ......................... 86
é„·‚ÎÂÌËÂ

CCD-TR501E/TR502E/TR620E 3-859-127-13.E/R
4
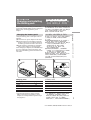
The instructions in this manual are for the three
models listed below. Before you start reading this
manual and operating the unit, check your model
number by looking at the bottom of your
camcorder. The CCD-TR620E is the model used
for illustration purposes. Otherwise, the model
name is indicated in the illustrations. Any
differences in operation are clearly indicated in
the text, for example, “CCD-TR620E only”.
As you read through this manual, buttons and
settings on the camcorder are shown in capital
letters.
e.g. Set the POWER switch to CAMERA.
As indicated with ≥ in the illustrations, you can
hear the beep sound to confirm your operation.
Before you begin
Using this manual
àÌÒÚ Û͈ËË ‚ ‰‡ÌÌÓÏ ÛÍÓ‚Ó‰ÒÚ‚Â ËÁÎÓÊÂÌ˚
‰Îfl Ú Âı ÌËÊÂÔ ˜ËÒÎÂÌÌ˚ı ÏÓ‰ÂÎÂÈ.
è ‰ ÚÂÏ, Í‡Í Ç˚ ̇˜ÌÂÚ ˜ËÚ‡Ú¸ ‰‡ÌÌÓÂ
ÛÍÓ‚Ó‰ÒÚ‚Ó Ë ˝ÍÒÔÎÛ‡ÚË Ó‚‡Ú¸ ‡ÔÔ‡ ‡Ú,
Ô Ó‚Â ¸Ú ÌÓÏ LJ¯ÂÈ ÏÓ‰ÂÎË, ÔÓÒÏÓÚ Â‚
̇ ÌËÊÌ˛˛ Ô‡ÌÂθ LJ¯ÂÈ ‚ˉÂÓ͇Ï ˚.
åÓ‰Âθ CCD-TR620E ËÒÔÓθÁÛÂÚÒfl ‚
ËÎβÒÚ ‡ÚË‚Ì˚ı ˆÂÎflı. Ç ËÌÓÏ ÒÎÛ˜‡Â
̇ËÏÂÌÓ‚‡ÌË ÏÓ‰ÂÎË Û͇Á˚‚‡ÂÚÒfl ̇
ËÒÛÌ͇ı. ã˛·˚ ‡Á΢Ëfl ‚ ‡·ÓÚ ˜ÂÚÍÓ
Û͇Á‡Ì˚ ‚ ÚÂÍÒÚÂ, Í‡Í Ì‡Ô ËÏ “íÓθÍÓ
CCD-TR620E”.
äÓ„‰‡ Ç˚ ·Û‰ÂÚ ˜ËÚ‡Ú¸ ÛÍÓ‚Ó‰ÒÚ‚Ó,
Û˜ËÚ˚‚‡ÈÚÂ, ˜ÚÓ ÍÌÓÔÍË Ë ÛÒÚ‡ÌÓ‚ÍË Ì‡
‚ˉÂÓ͇Ï  ÔÓ͇Á‡Ì˚ Á‡„·‚Ì˚ÏË ·ÛÍ‚‡ÏË.
Ô ËÏ. ìÒÚ‡ÌÓ‚ËÚ ‚˚Íβ˜‡ÚÂθ POWER ‚
ÔÓÎÓÊÂÌËÂ CAMERA.
ÖÒÎË Ì‡ ËÒÛÌ͇ı Û͇Á˚‚‡ÂÚÒfl ÁÌ‡Í ≥, Ç˚
ÏÓÊÂÚ ÒÎ˚¯‡Ú¸ ÁÛÏÏ Ì˚È Á‚ÛÍÓ‚ÓÈ
Ò˄̇Π‰Îfl ÔӉڂ ʉÂÌËfl LJ¯ÂÈ ‡·ÓÚ˚.
è ‰ ̇˜‡ÎÓÏ ‡·ÓÚ˚
àÒÔÓθÁÓ‚‡ÌË ‰‡ÌÌÓ„Ó ÛÍÓ‚Ó‰ÒÚ‚‡
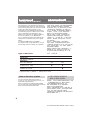
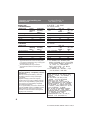
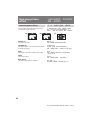
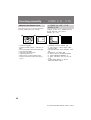
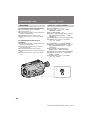
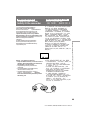
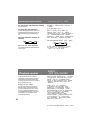
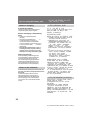
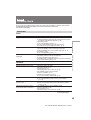
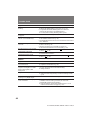
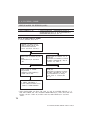
Types of differences
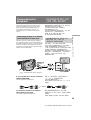
Note on TV colour systems
TV colour systems differ from country to
country. To view your recordings on a TV, you
need a PAL system-based TV.
When you want to use a SECAM system-based
TV, you will need a PAL/SECAM transcorder (as
this is a PAL system-based camcorder).
íËÔ˚ ‡Á΢ËÈ
15X 15X 15X
— 30X* 30X*
— rr
——r
CCD- TR501E TR502E TR620E
Optical Zoom
éÔÚ˘ÂÒÍËÈ Ú ‡ÌÒÙÓ͇ÚÓ
Digital Zoom
ñËÙ Ó‚ÓÈ Ú ‡ÌÒÙÓ͇ÚÓ
Wide Mode
òË ÓÍÓ˝Í ‡ÌÌ˚È ÂÊËÏ
Steady Shot
ìÒÚÓȘ˂‡fl Ò˙ÂÏ͇
è ËϘ‡ÌË ÔÓ ÒËÒÚÂχÏ
ˆ‚ÂÚÌÓ„Ó ÚÂ΂ˉÂÌËfl
ëËÒÚÂÏ˚ ˆ‚ÂÚÌÓ„Ó ÚÂ΂ˉÂÌËfl ÓÚ΢‡˛ÚÒfl
‚ Á‡‚ËÒËÏÓÒÚË ÓÚ ÒÚ ‡Ì˚. ÑÎfl Ô ÓÒÏÓÚ ‡
LJ¯Ëı Á‡ÔËÒÂÈ ÔÓ ÚÂ΂ËÁÓ Û, LJÏ
ÌÂÓ·ıÓ‰ËÏÓ ËÒÔÓθÁÓ‚‡Ú¸ ÚÂ΂ËÁÓ ,
ÓÒÌÓ‚‡ÌÌ˚È Ì‡ ÒËÒÚÂÏ PAL.
ÖÒÎË Ç˚ ıÓÚËÚ ËÒÔÓθÁÓ‚‡Ú¸ ÚÂ΂ËÁÓ Ì‡
ÓÒÌÓ‚Â ÒËÒÚÂÏ˚ SECAM , Ç‡Ï ÔÓ̇‰Ó·ËÚÒfl
Ô ÂÓ· ‡ÁÓ‚‡ÚÂθ ÍÓ‰‡ PAL/SECAM
(ÔÓÒÍÓθÍÛ ˝Ú‡ ‚ˉÂÓ͇Ï ‡ ËÁ„ÓÚÓ‚ÎÂ̇ ̇
ÓÒÌÓ‚Â ÒËÒÚÂÏ˚ PAL ).
* 180x in some area/* Ç ÌÂÍÓÚÓ ˚ı ‡ÈÓ̇ı 180-Í ‡ÚÌ˚È

CCD-TR501E/TR502E/TR620E 3-859-127-13.E/R
5
Before you begin è ‰ ̇˜‡ÎÓÏ ‡·ÓÚ˚
Using this manual
Precaution on copyright
Television programmes, films, video tapes, and
other materials may be copyrighted.
Unauthorized recording of such materials may
be contrary to the provision of the copyright
laws.
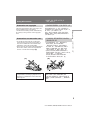
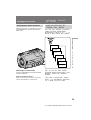
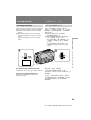
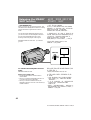
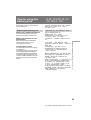
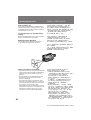
Precautions on camcorder care
•Do not let the camcorder get wet. Keep the
camcorder away from rain and sea water. It
may cause a malfunction and sometimes the
malfunction cannot be repaired. [a]
•Never leave the camcorder under temperatures
above 60 °C (140° F), such as in a car parked in
the sun or under direct sunlight. [b]
è ‰ÓÒÚ ÂÊÂÌË ӷ ‡‚ÚÓ ÒÍÓÏ Ô ‡‚Â
íÂ΂ËÁËÓÌÌ˚Â Ô Ó„ ‡ÏÏ˚, ÍËÌÓÙËθÏ˚,
‚ˉÂÓÎÂÌÚ˚ Ë ‰ Û„Ë χÚ ˇÎ˚ ÏÓ„ÛÚ ·˚Ú¸
Á‡˘Ë˘ÂÌ˚ ‡‚ÚÓ ÒÍËÏ Ô ‡‚ÓÏ.
çÂÔ ‡‚ÓÏӘ̇fl Á‡ÔËÒ¸ Ú‡ÍËı χÚ ˇÎÓ‚
ÏÓÊÂÚ Ô ÓÚË‚Ó Â˜ËÚ¸ ÛÒÎÓ‚ËflÏ Á‡ÍÓ̇ Ó·
‡‚ÚÓ ÒÍÓÏ Ô ‡‚Â.
è ‰ÓÒÚÓ ÓÊÌÓÒÚË ÔÓ ÛıÓ‰Û Á‡
‚ˉÂÓ͇Ï ÓÈ
• ç ‰ÓÔÛÒ͇ÈÚÂ, ˜ÚÓ·˚ ‚ˉÂÓ͇Ï ‡
ÒÚ‡ÌÓ‚Ë·Ҹ ÏÓÍ ÓÈ. Ñ ÊËÚÂ
‚ˉÂÓ͇ÏÂ Û ÔÓ‰‡Î¸¯Â ÓÚ ‰Óʉfl Ë
ÏÓ ÒÍÓÈ ‚Ó‰˚. ùÚÓ ÏÓÊÂÚ Ô Ë‚ÂÒÚË Í
ÌÂËÒÔ ‡‚ÌÓÒÚË ‡ÔÔ‡ ‡Ú‡, ÍÓÚÓ ‡fl ÌÂ
‚Ò„‰‡ ÏÓÊÂÚ ·˚Ú¸ ËÒÔ ‡‚ÎÂ̇. [a]
• çËÍÓ„‰‡ Ì ÓÒÚ‡‚ÎflÈÚ ‚ˉÂÓ͇ÏÂ Û ‚
ÏÂÒÚÂ Ò ÚÂÏÔ ‡ÚÛ ÓÈ Ò‚˚¯Â 60°ë (140°F),
Í‡Í Ì‡Ô ËÏ , ‚ ‡‚ÚÓÏÓ·ËÎÂ,
ÓÒÚ‡ÌÓ‚ÎÂÌÌÓÏ Ì‡ ÒÓÎ̈ ËÎË ÔÓ‰
Ô flÏ˚ÏË ÒÓÎ̘Ì˚ÏË ÎÛ˜‡ÏË. [b]
àÒÔÓθÁÓ‚‡ÌË ‰‡ÌÌÓ„Ó
ÛÍÓ‚Ó‰ÒÚ‚‡
[b][a]
Contents of the recording cannot be
compensated if recording or playback is not
made due to a malfunction of the camcorder,
video tape, etc.
ëӉ ÊËÏÓ Á‡ÔËÒË Ì ÏÓÊÂÚ ·˚Ú¸
ÓÚÍÓ ÂÍÚË Ó‚‡ÌÓ, ÂÒÎË Á‡ÔËÒ¸ ËÎË
‚ÓÒÔ ÓËÁ‚‰ÂÌË Ì ‚˚ÔÓÎÌfl˛ÚÒfl ËÁ-Á‡
ÌÂËÒÔ ‡‚ÌÓÒÚË ‚ˉÂÓ͇Ï ˚, ‚ˉÂÓÎÂÌÚ˚
Ë Ú.‰.

CCD-TR501E/TR502E/TR620E 3-859-127-13.E/R
6
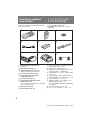
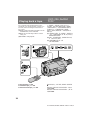
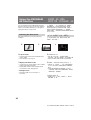
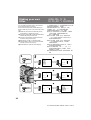
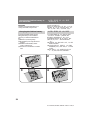
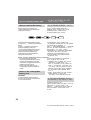
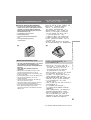
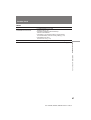
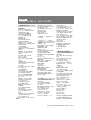
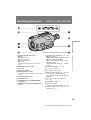
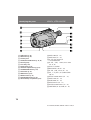
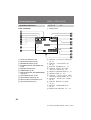
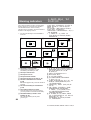
Checking supplied
accessories
Check that the following accessories are supplied
with your camcorder.
1
4
7
23
65
9
1 Wireless Remote Commander (1)
(p. 21, 79)
2 NP-33 Battery Pack (1) (p. 7)
3 CR2025 Lithium Battery (1) (p. 49)
Already installed in the camcorder.
4 A/V connecting cable (1) (p. 19)
5 R6 (size AA) battery for Remote
Commander (2) (p. 79)
6 Shoulder strap (1) (p. 81)
7 AC-V16/V16A/V17/V17A AC power
adaptor (1) (p. 7, 23)
AC-V17A AC power adaptor is not available
in the United Kingdom.
8 Battery case (1) (p. 24)
9 21-pin adaptor (1) (p. 19)
8
or/ËÎË
è Ó‚Â ¸Ú ̇΢ˠÒÎÂ‰Û˛˘Ëı
Ô Ë̇‰ÎÂÊÌÓÒÚÂÈ, Ô Ë·„‡ÂÏ˚ı Í Ç‡¯ÂÈ
‚ˉÂÓ͇Ï Â.
è ӂ ͇ Ô Ë·„‡ÂÏ˚ı
Ô Ë̇‰ÎÂÊÌÓÒÚÂÈ
1 ÅÂÒÔ Ó‚Ó‰Ì˚È ÔÛÎ¸Ú ‰ËÒڇ̈ËÓÌÌÓ„Ó
ÛÔ ‡‚ÎÂÌËfl (1) (ÒÚ . 21, 79)
2 Ňڇ ÂÈÌ˚È ·ÎÓÍ NP-33(1) (ÒÚ . 7)
3 ãËÚË‚‡fl ·‡Ú‡ ÂÈ͇ CR2025 (1) (ÒÚ . 49)
ìÊ ÛÒÚ‡ÌÓ‚ÎÂ̇ ‚ ‚ˉÂÓ͇Ï Â.
4 ëÓ‰ËÌËÚÂθÌ˚È Í‡·Âθ ‡Û‰ËÓ/‚ˉÂÓ
(1) (ÒÚ . 19)
5 Ňڇ ÂÈ͇ R6 ( ‡ÁÏ ÓÏ ÄÄ) ‰Îfl ÔÛθڇ
‰ËÒڇ̈ËÓÌÌÓ„Ó ÛÔ ‡‚ÎÂÌËfl (2) (ÒÚ . 79)
6 èΘ‚ÓÈ ÔÂÏÂ̸ (1) (ÒÚ . 81)
7 ëÂÚ‚ÓÈ ‡‰‡ÔÚ Ô ÂÏ. ÚÓ͇ AC-V16/
V16A/V17/V17A (1) (ÒÚ . 7, 23)
AC-V17A Ì ËÒÔÓθÁÛÂÚÒfl ‚ ëÓ‰ËÌÂÌÌÓÏ
äÓ Ó΂ÒÚ‚Â
8 Ňڇ ÂÈ̇fl ͇Ï ‡ (1) (ÒÚ . 24)
9 21-¯Ú˚ ¸ÍÓ‚˚È ‡‰‡ÔÚ (1) (ÒÚ . 19)

CCD-TR501E/TR502E/TR620E 3-859-127-13.E/R
7
Getting started èÓ‰„ÓÚӂ͇ Í Ì‡˜‡ÎÛ ‡·ÓÚ˚
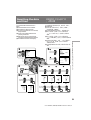
POWER
CHARGE
Battery pack
NP-33 (supplied)
NP-67
NP-66H/68
NP-78
NP-98
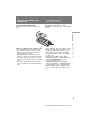
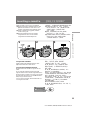
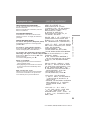
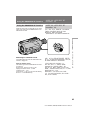
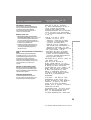
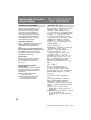
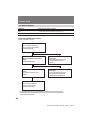
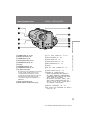
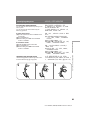
Before using your camcorder, you first need to
charge and install the battery pack. To charge the
battery pack, use the supplied AC power
adaptor.
Charging the battery pack
Charge the battery pack on a flat place without
vibration.
(1)Connect the AC power adaptor to the mains.
(2)Align the right side of the battery pack with
the line on the AC power adaptor, then slide
the battery pack in the direction of the arrow.
(3)Set the selector to CHARGE. The CHARGE
lamp (orange) lights up. Charging begins.
When charging is completed, the CHARGE lamp
goes out. Unplug the unit from the mains, and
then remove the battery pack and install it on the
camcorder.
Charging time*
60
105
125
170
215
Charging Time
2
Getting started
Charging and installing
the battery pack
3
1
*Approximate minutes to charge an empty
battery pack using the supplied AC power
adaptor (Lower temperatures require a longer
charging time.)
è ‰ ÔÓθÁÓ‚‡ÌËÂÏ Ç‡¯ÂÈ ‚ˉÂÓ͇Ï ÓÈ
Ç‡Ï ÒΉÛÂÚ Ò̇˜‡Î‡ Á‡ fl‰ËÚ¸ Ë ÛÒÚ‡ÌÓ‚ËÚ¸
·‡Ú‡ ÂÈÌ˚È ·ÎÓÍ. ÑÎfl Á‡ fl‰ÍË ·‡Ú‡ ÂÈÌÓ„Ó
·ÎÓ͇ ‚ÓÒÔÓθÁÛÈÚÂÒ¸ Ô Ë·„‡ÂÏ˚Ï
ÒÂÚ‚˚Ï ‡‰‡ÔÚ ÓÏ Ô ÂÏ. ÚÓ͇.
ᇠfl‰Í‡ ·‡Ú‡ ÂÈÌÓ„Ó ·ÎÓ͇
ᇠfl‰ÍÛ ·‡Ú‡ ÂÈÌÓ„Ó ·ÎÓ͇ Ô ÓËÁ‚Ó‰ËÚ ̇
Ó‚ÌÓÈ ÔÓ‚Â ıÌÓÒÚË, Ì ÔÓ‰‚ ÊÂÌÌÓÈ
‚Ë· ‡ˆËË.
(1)èÓ‰ÒÓ‰ËÌËÚ ÒÂÚ‚ÓÈ ¯ÌÛ ‡‰‡ÔÚ ‡
Ô ÂÏ. ÚÓ͇ Í ˝ÎÂÍÚ Ë˜ÂÒÍÓÈ ÒÂÚË.
(2)ìÒÚ‡ÌÓ‚ËÚÂ Ô ‡‚Û˛ ÒÚÓ ÓÌÛ ·‡Ú‡ ÂÈÌÓ„Ó
·ÎÓ͇ ̇ Ó‰ÌÓÈ ÎËÌËË Ò ÒÂÚ‚˚Ï
‡‰‡ÔÚ ÓÏ Ô ÂÏ. ÚÓ͇, Á‡ÚÂÏ
Ô ‰‚Ë̸Ú ·‡Ú‡ ÂÈÌ˚È ·ÎÓÍ ‚
Ì‡Ô ‡‚ÎÂÌËË ÒÚ ÂÎÍË.
(3)ìÒÚ‡ÌÓ‚ËÚ ÒÂÎÂÍÚÓ ‚ ÔÓÎÓÊÂÌËÂ
CHARGE. á‡„Ó ËÚÒfl ·ÏÔӘ͇ CHARGE
(Ó ‡ÌÊ‚‡fl). 燘ÌÂÚÒfl Á‡ fl‰Í‡.
äÓ„‰‡ Á‡ fl‰Í‡ Á‡‚ ¯ËÚÒfl, ·ÏÔӘ͇
CHARGE ÔÓ„‡ÒÌÂÚ. éÚÍβ˜ËÚ ‡ÔÔ‡ ‡Ú ÓÚ
˝ÎÂÍÚ Ë˜ÂÒÍÓÈ ÒÂÚË, ‡ Á‡ÚÂÏ ÒÌËÏËÚÂ
·‡Ú‡ ÂÈÌ˚È ·ÎÓÍ Ë ÛÒÚ‡ÌÓ‚ËÚÂ Â„Ó Ì‡
‚ˉÂÓ͇Ï Û.
èÓ‰„ÓÚӂ͇ Í Ì‡˜‡ÎÛ ‡·ÓÚ˚
ᇠfl‰Í‡ Ë ÛÒÚ‡Ìӂ͇
·‡Ú‡ ÂÈÌÓ„Ó ·ÎÓ͇
Ç ÂÏfl Á‡ fl‰ÍË
Ňڇ ÂÈÌ˚È ·ÎÓÍ
NP-33 (Ô Ë·„‡ÂÚÒfl)
NP-67
NP-66H/68
NP-78
NP-98
Ç ÂÏfl Á‡ fl‰ÍË*
60
105
125
170
215
* è Ë·ÎËÁËÚÂθÌÓ ‚ ÏËÌÛÚ‡ı ‰Îfl Á‡ fl‰ÍË
‡Á flÊÂÌÌÓ„Ó ·‡Ú‡ ÂÈÌÓ„Ó ·ÎÓ͇ Ò
ËÒÔÓθÁÓ‚‡ÌËÂÏ Ô Ë·„‡ÂÏÓ„Ó ÒÂÚ‚ӄÓ
‡‰‡ÔÚ ‡ Ô ÂÏ. ÚÓ͇. (è Ë ÌËÁÍËı
ÚÂÏÔ ‡ÚÛ ‡ı ‚ ÂÏfl Á‡ fl‰ÍË Û‰ÎËÌflÂÚÒfl.)

CCD-TR501E/TR502E/TR620E 3-859-127-13.E/R
8
Battery life
CCD-TR501E/TR502E
Charging and installing the
battery pack
Continuous
recording
time***
Typical
recording
time**
Battery pack
NP-33 (supplied) 55 100
NP-67 90 175
NP-66H/68 105 195
NP-78 135 255
NP-98 175 330
CCD-TR620E
Battery pack
NP-33 (supplied) 50 95
NP-67 90 160
NP-66H/68 100 185
NP-78 130 240
NP-98 175 315
**
Approximate minutes when recording while
you repeat recording start/stop, zooming and
turning the power on/off.
The actual battery life may be shorter.
***
Approximate continuous recording time
indoors.
Important!
Use the battery completely before re-
charging!
Before you recharge the battery, make sure
the battery has been used up (discharged)
completely.
Repeated charging while some capacity
remains causes a lowering of battery capacity.
However, the original battery capacity can be
recovered if you use the battery completely
and charge it fully again.
To use up the battery, remove the cassette and
turn the POWER switch to CAMERA with the
battery attached, and leave the camcorder
until the i indicator and the red lamp flash
rapidly in the viewfinder.
Typical
recording
time**
Continuous
recording
time***
ᇠfl‰Í‡ Ë ÛÒÚ‡Ìӂ͇
·‡Ú‡ ÂÈÌÓ„Ó ·ÎÓ͇
ë ÓÍ ÒÎÛÊ·˚ ·‡Ú‡ ÂÈÍË
CCD-TR501E/TR502E
Ňڇ ÂÈÌ˚È
·ÎÓÍ
NP-33 ( Ô Ë·„‡ÂÚÒfl)
55 100
NP-67 90 175
NP-66H/68 105 195
NP-78 135 255
NP-98 175 330
çÂÔÂ˚-
‚ÌÓÂ ‚ ÂÏfl
Á‡ÔËÒË***
íËÔ˘ÌÓÂ
‚ ÂÏfl
Á‡ÔËÒË* *
CCD-TR620E
íËÔ˘ÌÓÂ
‚ ÂÏfl
Á‡ÔËÒË* *
Ňڇ ÂÈÌ˚È
·ÎÓÍ
NP-33 ( Ô Ë·„‡ÂÚÒfl)
50 95
NP-67 90 160
NP-66H/68 100 185
NP-78 130 240
NP-98 175 315
çÂÔÂ˚-
‚ÌÓÂ ‚ ÂÏfl
Á‡ÔËÒË***
** è Ë·ÎËÁËÚÂθ̇fl Ô Ó‰ÎÊËÚÂθÌÓÒÚ¸ ‚
ÏËÌÛÚ‡ı ÔË Á‡ÔËÒË, ÍÓ„‰‡ Ç˚ ÔÓ‚ÚÓ flÂÚÂ
̇˜‡ÎÓ/ÓÒÚ‡ÌÓ‚ Á‡ÔËÒË, Ú ‡ÌÒÙÓ͇ˆË˛ Ë
‚Íβ˜‡ÂÚÂ/‚˚Íβ˜‡ÂÚ ÔËÚ‡ÌËÂ.
ê‡θÌ˚È Ò ÓÍ ÒÎÛÊ·˚ ·‡Ú‡ ÂÈÌÓ„Ó
·ÎÓ͇ ÏÓÊÂÚ ·˚Ú¸ ÍÓ Ó˜Â.
***è Ë·ÎËÁËÚÂθÌÓ ‚ ÂÏfl ÌÂÔ Â ˚‚ÌÓ„Ó
‚ÓÒÔ ÓËÁ‚‰ÂÌËfl ‚ ÔÓÏ¢ÂÌËË.
LJÊÌÓ!
àÒÔÓθÁÛÈÚ Á‡ fl‰ ·‡Ú‡ ÂÈÌÓ„Ó ·ÎÓ͇
ÔÓÎÌÓÒÚ¸˛, Ô ÂʉÂ, ˜ÂÏ Ô ËÒÚÛÔËÚ¸ Í
Â„Ó Á‡ fl‰ÍÂ!
è ‰ Á‡ fl‰ÍÓÈ ·‡Ú‡ ÂÈÌÓ„Ó ·ÎÓ͇
۷‰ËÚÂÒ¸, ˜ÚÓ Â„Ó Á‡ fl‰ ÔÓÎÌÓÒÚ¸˛
ËÒÔÓθÁÓ‚‡Ì (·ÎÓÍ ‡Á flÊÂÌ).
èÓ‚ÚÓ Ì‡fl Á‡ fl‰Í‡ ‚ ÒÎÛ˜‡Â ˜‡ÒÚ˘ÌÓ
ÓÒÚ‡˛˘ÂÈÒfl ÂÏÍÓÒÚË Ô Ë‚Ó‰ËÚ Í ÒÌËÊÂÌ˲
ÂÏÍÓÒÚË. é‰Ì‡ÍÓ Ô ‚Ó̇˜‡Î¸Ì‡fl ÂÏÍÓÒÚ¸
·‡Ú‡ ÂË ÏÓÊÂÚ ·˚Ú¸ ‚ÓÒÒÚ‡ÌÓ‚ÎÂ̇, ÂÒÎË
Ç˚ ÔÓÎÌÓÒÚ¸˛ ËÒÔÓθÁÛÂÚ Á‡ fl‰ ·‡Ú‡ ÂË
Ë ÒÌÓ‚‡  ÔÓÎÌÓÒÚ¸˛ Á‡ fl‰ËÚÂ.
ÑÎfl ‡Á fl‰ÍË ·‡Ú‡ ÂË ÒÌËÏËÚ ͇ÒÒÂÚÛ Ë
Ô ‰‚Ë̸Ú Ô ÂÍβ˜‡ÚÂθ POWER ‚
ÔÓÎÓÊÂÌË CAMERA ÔË ÔÓ‰ÒÓ‰ËÌÂÌÌÓÈ
·‡Ú‡ ÂË Ë ÓÒÚ‡‚¸Ú ‚ˉÂÓ͇Ï Û
‚Íβ˜ÂÌÌÓÈ ‰Ó ÚÂı ÔÓ , ÔÓ͇ ‚
‚ˉÓËÒ͇ÚÂΠ̠̇˜ÌÛÚ ·˚ÒÚ Ó ÏË„‡Ú¸
Ë̉Ë͇ÚÓ i Ë Í ‡Ò̇fl ·ÏÔӘ͇.

CCD-TR501E/TR502E/TR620E 3-859-127-13.E/R
9
Getting started èÓ‰„ÓÚӂ͇ Í Ì‡˜‡ÎÛ ‡·ÓÚ˚
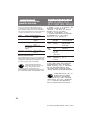
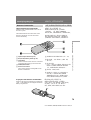
To remove the battery pack
Slide the battery pack in the direction of the
arrow.
Charging and installing the
battery pack
ÑÎfl ÒÌflÚËfl ·‡Ú‡ ÂÈÌÓ„Ó ·ÎÓ͇
è ‰‚Ë̸Ú ·‡Ú‡ ÂÈÌ˚È ·ÎÓÍ ‚ Ì‡Ô ‡‚ÎÂÌËË
ÒÚ ÂÎÍË.
ᇠfl‰Í‡ Ë ÛÒÚ‡Ìӂ͇
·‡Ú‡ ÂÈÌÓ„Ó ·ÎÓ͇
è ËϘ‡ÌËfl ÔÓ Á‡ fl‰Í ·‡Ú‡ ÂÈÌÓ„Ó ·ÎÓ͇
•ã‡ÏÔӘ͇ POWER ·Û‰ÂÚ ÌÂÍÓÚÓ Ó ‚ ÂÏfl
Ò‚ÂÚËÚ¸Òfl, ‰‡Ê ÂÒÎË ·‡Ú‡ ÂÈÌ˚È ·ÎÓÍ
ÒÌflÚ Ë ÒÂÚ‚ÓÈ Ô Ó‚Ó‰ ÓÚÍβ˜ÂÌ ÔÓÒÎÂ
Á‡ fl‰ÍË ·‡Ú‡ ÂÈÌÓ„Ó ·ÎÓ͇. ùÚÓ fl‚ÎflÂÚÒfl
ÌÓ Ï‡Î¸Ì˚Ï.
•ÖÒÎË Î‡ÏÔӘ͇ POWER Ì Á‡„Ó ‡ÂÚÒfl,
ÛÒÚ‡ÌÓ‚ËÚ ÒÂÎÂÍÚÓ ‚ ÔÓÎÓÊÂÌË VTR (DC
OUT) Ë ÓÚÒÓ‰ËÌËÚ ÒÂÚ‚ÓÈ Ô Ó‚Ó‰.
è ËÏ ÌÓ ˜Â ÂÁ ÏËÌÛÚÛ ‚ÌÓ‚¸
ÔÓ‰ÒÓ‰ËÌËÚ ÒÂÚ‚ÓÈ Ô Ó‚Ó‰ Ë ÓÔflÚ¸
ÛÒÚ‡ÌÓ‚ËÚ ÒÂÎÂÍÚÓ ‚ ÔÓÎÓÊÂÌË CHARGE.
•Ç˚ Ì ÏÓÊÂÚ ÛÔ ‡‚ÎflÚ¸ ‚ˉÂÓ͇Ï ÓÈ Ò
ËÒÔÓθÁÓ‚‡ÌËÂÏ ÒÂÚÂ‚Ó„Ó ‡‰‡ÔÚ ‡ Ô ÂÏ.
ÚÓ͇ ‚Ó ‚ ÂÏfl Á‡ fl‰ÍË ·‡Ú‡ ÂÈÌÓ„Ó ·ÎÓ͇.
Notes on charging the battery pack
•The POWER lamp will remain lit for a while
even if the battery pack is removed and the
mains lead is unplugged after charging the
battery pack. This is normal.
•If the POWER lamp does not light, set the
selector to VTR (DC OUT) and disconnect the
mains lead. After about one minute, reconnect
the mains lead and set the selector to CHARGE
again.
•You cannot operate the camcorder using the
AC power adaptor while charging the battery
pack.

CCD-TR501E/TR502E/TR620E 3-859-127-13.E/R
10
Charging and installing the
battery pack
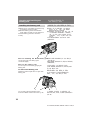
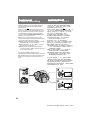
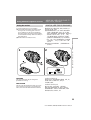
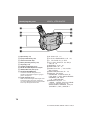
Installing the battery pack
(1)Insert the top of the battery pack into the top
of the battery mounting surface.
(2)Push the battery pack so that it attaches
firmly. Make sure that you hear clicks twice.
Attach the battery pack to the camcorder
securely.
ᇠfl‰Í‡ Ë ÛÒÚ‡Ìӂ͇
·‡Ú‡ ÂÈÌÓ„Ó ·ÎÓ͇
ìÒÚ‡Ìӂ͇ ·‡Ú‡ ÂÈÌÓ„Ó ·ÎÓ͇
(1)ÇÒÚ‡‚¸Ú ‚ ıÌËÈ ÍÓ̈ ·‡Ú‡ ÂÈÌÓ„Ó
·ÎÓ͇ ‚ ‚ ıÌ˛˛ ˜‡ÒÚ¸ ·‡Ú‡ ÂÈÌÓÈ
ÛÒÚ‡ÌÓ‚Ó˜ÌÓÈ ÔÓ‚Â ıÌÓÒÚË.
(2)ç‡ÊÏËÚ ·‡Ú‡ ÂÈÌ˚È ·ÎÓÍ, Ú‡Í, ˜ÚÓ·˚ ÓÌ
·˚Π̇‰ÂÊÌÓ Ô ËÒÓ‰ËÌÂÌ. ì·Â‰ËÚÂÒ¸,
˜ÚÓ·˚ Ç˚ ÛÒÎ˚¯‡ÎË ‰‚ÓÈÌÓÈ ˘ÂΘÓÍ.
ì·Â‰ËÚÂÒ¸, ˜ÚÓ Ç˚ ‰‚‡Ê‰˚ ÛÒÎ˚¯‡ÎË
˘ÂΘÓÍ.
è ËÍ ÂÔËÚ ̇‰ÂÊÌÓ ·‡Ú‡ ÂÈÌ˚È ·ÎÓÍ Í
‚ˉÂÓ͇Ï Â.
You can look at the demonstration of the
functions available with this camcorder. (p. 28)
Ç˚ ÏÓÊÂÚ ‚Á„ÎflÌÛÚ¸ ̇ ‰ÂÏÓÌÒÚ ‡ˆË˛
ÙÛÌ͈ËÈ, Ëϲ˘ËıÒfl ‚ ‰‡ÌÌÓÈ ‚ˉÂÓ͇Ï Â.
(ÒÚ . 28)
è ËϘ‡ÌË ÓÚÌÓÒËÚÂθÌÓ ·‡Ú‡ ÂÈÌÓ„Ó
·ÎÓ͇ NP-98
àÒÔÓθÁÛÈÚ ‚ˉÂÓ͇Ï Û, Ò΄͇ Ô ËÔÓ‰Ìfl‚
‚ˉÓËÒ͇ÚÂθ.
è ËϘ‡ÌËÂ Í ·‡Ú‡ ÂÈÌÓÏÛ ·ÎÓÍÛ
ç Ô ÂÌÓÒËÚ ‚ˉÂÓ͇Ï Û, ۉ ÊË‚‡fl ÂÂ
Á‡ ·‡Ú‡ ÂÈÌ˚È ·ÎÓÍ.
ÑÎfl ÒÌflÚËfl ·‡Ú‡ ÂÈÌÓ„Ó ·ÎÓ͇
뉂Ë̸Ú BATT, ‡ Á‡ÚÂÏ ÔÓÚflÌËÚ Á‡
ÌËÊÌ˛˛ ˜‡ÒÚ¸ ·‡Ú‡ ÂÈÌÓ„Ó ·ÎÓ͇.
Note on installing the NP-98 battery pack
Use the camcorder while lifting up the
viewfinder slightly.
Note on the battery pack
Do not carry the camcorder by grasping the
battery pack.
To remove the battery pack
Slide BATT, and then pull the lower part of the
battery pack.

CCD-TR501E/TR502E/TR620E 3-859-127-13.E/R
11
Getting started èÓ‰„ÓÚӂ͇ Í Ì‡˜‡ÎÛ ‡·ÓÚ˚
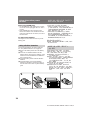
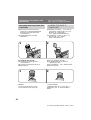
Make sure that a power source is installed.
(1)While pressing the small blue button, slide
EJECT in the direction of the arrow. The
cassette compartment automatically opens.
(2)Insert a cassette (not supplied) with the
window facing out.
(3)Press the PUSH mark on the cassette
compartment to close it. The cassette
compartment automatically closes.
Inserting a cassette
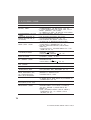
To eject the cassette
While pressing the small blue button, slide
EJECT in the direction of the arrow.
To prevent accidental erasure
Slide the tab on the cassette to expose the red
mark.
If you insert the cassette with the red mark
exposed and close the cassette compartment, the
beeps sound for a while. If you try to record with
the red mark exposed, the L and 6 indicators
flash, and you cannot record.
To re-record on this tape, slide the tab back out
covering the red mark.
123
ì·Â‰ËÚÂÒ¸, ˜ÚÓ ËÒÚÓ˜ÌËÍ ÔËÚ‡ÌËfl ÛÒÚ‡ÌÓ‚ÎÂÌ.
(1) ç‡ÊËχfl χÎÂ̸ÍÛ˛ ÒËÌ˛˛ ÍÌÓÔÍÛ,
Ò‰‚Ë̸Ú EJECT ‚ Ì‡Ô ‡‚ÎÂÌËË ÒÚ ÂÎÍË.
éÚÒÂÍ Í‡ÒÒÂÚ˚ ‡‚ÚÓχÚ˘ÂÒÍË
ÓÚÍ ˚‚‡ÂÚÒfl.
(2) ÇÒÚ‡‚¸Ú ͇ÒÒÂÚÛ (ÌÂ Ô Ë·„‡ÂÚÒfl)
ÓÍÓ¯ÍÓÏ, Ó· ‡˘ÂÌÌ˚Ï Ì‡ ÛÊÛ.
(3) ç‡ÊÏËÚ ÏÂÚÍÛ PUSH ̇ ÓÚÒÂÍ ͇ÒÒÂÚ˚
‰Îfl Â„Ó Á‡Í ˚ÚËfl. éÚÒÂÍ Í‡ÒÒÂÚ˚
‡‚ÚÓχÚ˘ÂÒÍË Á‡Í ˚‚‡ÂÚÒfl.
ÇÒÚ‡‚͇ ͇ÒÒÂÚ˚
ÑÎfl ‚˚Ú‡ÎÍË‚‡ÌËfl ͇ÒÒÂÚ˚
ç‡ÊËχfl χÎÂ̸ÍÛ˛ ÒËÌ˛˛ ÍÌÓÔÍÛ,
Ò‰‚Ë̸Ú EJECT ‚ Ì‡Ô ‡‚ÎÂÌËË ÒÚ ÂÎÍË.
ÑÎfl Ô Â‰ÓÚ‚ ‡˘ÂÌËfl ÒÎÛ˜‡ÈÌÓ„Ó
ÒÚË ‡ÌËfl
è ‰‚Ë̸Ú ÎÂÔÂÒÚÓÍ Ì‡ ͇ÒÒÂÚÂ, ˜ÚÓ·˚
ÔÓfl‚Ë·Ҹ Í ‡Ò̇fl ÏÂÚ͇.
ÖÒÎË Ç˚ ‚ÒÚ‡‚ËÚ ͇ÒÒÂÚÛ ÔË ‚˚ÒÚ‡‚ÎÂÌÌÓÈ
Í ‡ÒÌÓÈ ÏÂÚÍÂ Ë Á‡Í ÓÂÚ ÓÚÒÂÍ Í‡ÒÒÂÚ˚, ÚÓ
Á‡Á‚Û˜ËÚ ÁÛÏÏ Ì˚È Ò˄̇Î. ÖÒÎË Ç˚
ÔÓÔ˚Ú‡ÂÚÂÒ¸ Á‡ÔËÒ˚‚‡Ú¸ ÔË ‚˚ÒÚ‡‚ÎÂÌÌÓÈ
Í ‡ÒÌÓÈ ÏÂÚÍÂ, ‚ ‚ˉÓËÒ͇ÚÂΠ·Û‰ÛÚ ÏË„‡Ú¸
Ë̉Ë͇ÚÓ ˚
ˇ
Ë 6, Ë Ç˚ ÌÂ ÒÏÓÊÂÚÂ
Ô ËÁ‚ÂÒÚË Á‡ÔËÒ¸.
ÑÎfl Ô ÂÁ‡ÔËÒË Ì‡ ‰‡ÌÌÛ˛ ÎÂÌÚÛ
Ô ‰‚Ë̸Ú ÎÂÔÂÒÚÓÍ Ì‡Á‡‰, ˜ÚÓ·˚ Á‡Í ˚Ú¸
Í ‡ÒÌÛ˛ ÏÂÚÍÛ.

CCD-TR501E/TR502E/TR620E 3-859-127-13.E/R
12
Basic operations
Camera recording
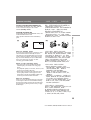
Make sure that a power source and a cassette is
inserted and that the START/STOP MODE
switch is set to .
When you use the camcorder for the first time,
power on it and reset the date and time to your
time (p. 51) before you start recording. The date
is automatically recorded for 10 seconds after
you start recording (AUTO DATE feature). This
feature works only once a day.
Before you record one-time events, you may
want to make a trial recording to make sure that
you are using the camcorder correctly.
(1)While pressing the small green button on the
POWER switch, set it to CAMERA.
(2)Turn STANDBY up. The “STBY” indicator
appears in the viewfinder.
(3)Press START/STOP. The camcorder starts
recording and the “STBY” indicator changes
to the “REC” indicator.
You can also select Recording mode, SP
(standard play) mode or LP (long play) mode. Set
REC MODE in the menu system according to the
length of your planned recording before you
start.
ì·Â‰ËÚ¸Òfl, ËÒÚÓ˜ÌËÍ ÔËÚ‡ÌËfl Ë Í‡ÒÒÂÚ‡
‚ÒÚ‡‚ÎÂÌ˚ Ë, ˜ÚÓ Ô ÂÍβ˜‡ÚÂθ START/
STOP MODE ÛÒÚ‡ÌÓ‚ÎÂÌ Ì‡ .
ÖÒÎË Ç˚ ËÒÔÓθÁÛÂÚ ‚ˉÂÓ͇ÏÂ Û ‚ Ô ‚˚È
‡Á, ÚÓ ‚Íβ˜Ëڠ ÔËÚ‡ÌËÂ Ë ÛÒÚ‡ÌÓ‚ËÚÂ
‰‡ÚÛ Ë ‚ ÂÏfl ̇ LJ¯Â ‚ ÂÏfl (ÒÚ . 51) Ô ‰
ÚÂÏ, Í‡Í Ç˚ ̇˜ÌÂÚ Á‡ÔËÒ¸. чڇ
‡‚ÚÓχÚ˘ÂÒÍË ·Û‰ÂÚ Á‡ÔËÒ˚‚‡Ú¸Òfl ‚
Ú˜ÂÌË 10 ÒÂÍÛ̉ ÔÓÒΠ̇˜‡Î‡ Á‡ÔËÒË
(ÙÛÌ͈Ëfl AUTO DATE). ùÚ‡ ÙÛÌ͈Ëfl
‡·ÓÚ‡ÂÚ ÚÓθÍÓ Ó‰ËÌ ‡Á ‚ ‰Â̸.
è ‰ ÚÂÏ, Í‡Í Ç˚ ̇˜ÌÂÚ Á‡ÔËÒ¸
Ó‰ÌÓ ‡ÁÓ‚˚ı ÒÓ·˚ÚËÈ, Ç˚ ÏÓÊÂÚ Á‡ıÓÚÂÚ¸
҉·ڸ Ô Ó·Û ‰Îfl ÔӉڂ ʉÂÌËfl, ˜ÚÓ Ç˚
ËÒÔÓθÁÛÂÚ ‚ˉÂÓ͇ÏÂ Û Ô ‡‚ËθÌÓ.
(1)ç‡ÊËχfl χÎÂ̸ÍÛ˛ ÁÂÎÂÌÛ˛ ÍÌÓÔÍÛ Ì‡
‚˚Íβ˜‡ÚÂΠPOWER, ÛÒÚ‡ÌÓ‚ËÚÂ Â„Ó ‚
ÔÓÎÓÊÂÌËÂ CAMERA.
(2)èÓ‚Â ÌËÚ STANDBY ‚‚ ı: à̉Ë͇ÚÓ
“STBY” ÔÓfl‚ËÚÒfl ‚ ‚ˉÓËÒ͇ÚÂÎÂ.
(3)ç‡ÊÏËÚ START/STOP. ÇˉÂÓ͇Ï ‡
̇˜Ë̇ÂÚ Á‡ÔËÒ¸, Ë Ë̉Ë͇ÚÓ “STBY”
ËÁÏÂÌËÚÒfl ̇ Ë̉Ë͇ÚÓ “REC”.
Ç˚ Ú‡ÍÊ ÏÓÊÂÚ ‚˚· ‡Ú¸ ÂÊËÏ Á‡ÔËÒË,
ÂÊËÏ SP (Òڇ̉‡ ÚÌÓ ‚ÓÒÔ ÓËÁ‚‰ÂÌËÂ)
ËÎË ÂÊËÏ LP (Û‰ÎËÌÂÌÌÓ ‚ÓÒÔ ÓËÁ‚‰ÂÌËÂ).
ìÒÚ‡ÌÓ‚ËÚ REC MODE ‚ ÒËÒÚÂÏ ÏÂÌ˛ ‚
ÒÓÓÚ‚ÂÚÒÚ‚ËË Ò ‰ÎËÚÂθÌÓÒÚ¸˛ Ô·ÌË ÛÂÏÓÈ
LJÏË Á‡ÔËÒË Ô ‰ ̇˜‡ÎÓÏ.
éÒÌÓ‚Ì˚ ÓÔ ‡ˆËË
á‡ÔËÒ¸ Ò ÔÓÏÓ˘¸˛ ‚ˉÂÓ͇Ï ˚

CCD-TR501E/TR502E/TR620E 3-859-127-13.E/R
13
Basic operations éÒÌÓ‚Ì˚ ÓÔ ‡ˆËË
To stop recording momentarily [a]
Press START/STOP again. The “REC” indicator
in the viewfinder changes to the “STBY”
indicator (Standby mode).
To finish recording [b]
Press START/STOP. Turn STANDBY down, and
set the POWER switch to OFF.
Then, eject the cassette and remove the battery
pack.
Note on standby mode
If you leave the camcorder for 5 minutes or more
with a cassette inserted in Standby mode, the
camcorder goes off automatically. This prevents
wearing down the battery and wearing out the
tape. To resume Standby mode, turn STANDBY
down once and turn it up again. To start
recording, press START/STOP.
Notes on the recording mode
•This camcorder records and plays back in SP
(standard play) mode and in LP (long play)
mode.
The playback quality in LP mode, however, will
not be as good as that in SP mode.
•When a tape recorded on this camcorder in LP
mode is played back on other types of 8 mm
camcorders or VCRs, the playback quality may
not be as good as that on this camcorder.
Note on recording
When you record from the beginning of the tape,
run the tape for about 15 seconds before starting
the actual recording. This prevents the camcorder
from missing any start-up scenes when you play
back the tape.
[a] [b]
Camera recording
ÑÎfl ‚ ÂÏÂÌÌÓÈ ÓÒÚ‡ÌÓ‚ÍË Á‡ÔËÒË [a]
ç‡ÊÏËÚ ÓÔflÚ¸ START/STOP. Ç
‚ˉÓËÒ͇ÚÂΠË̉Ë͇ÚÓ “REC” ËÁÏÂÌËÚÒfl ̇
Ë̉Ë͇ÚÓ “STBY” ( ÂÊËÏ „ÓÚÓ‚ÌÓÒÚË) .
ÑÎfl ÓÍÓ̘‡ÌËfl Á‡ÔËÒË [b]
ç‡ÊÏËÚ START/STOP. èÓ‚Â ÌËÚ STANDBY
‚ÌËÁ Ë ÛÒÚ‡ÌÓ‚ËÚ ‚˚Íβ˜‡ÚÂθ POWER ‚
ÔÓÎÓÊÂÌË OFF. á‡ÚÂÏ ‚˚ÚÓÎÍÌËÚ ͇ÒÒÂÚÛ Ë
Û‰‡ÎËÚ ·‡Ú‡ ÂÈÌ˚È ·ÎÓÍ.
á‡ÔËÒ¸ Ò ÔÓÏÓ˘¸˛ ‚ˉÂÓ͇Ï ˚
è ËϘ‡ÌËÂ Í ÂÊËÏÛ „ÓÚÓ‚ÌÓÒÚË
ÖÒÎË Ç˚ ÓÒÚ‡‚ÎflÂÚ ‚ˉÂÓ͇ÏÂ Û Ì‡ 5 ÏËÌÛÚ
ËÎË ·ÓΠÒÓ ‚ÒÚ‡‚ÎÂÌÌÓÈ Í‡ÒÒÂÚÓÈ ‚ ÂÊËÏÂ
„ÓÚÓ‚ÌÓÒÚË, ÚÓ ‚ˉÂÓ͇Ï ‡ ‚˚Íβ˜ËÚÒfl
‡‚ÚÓχÚ˘ÂÒÍË. ùÚÓ Ô Â‰ÓÚ‚ ‡˘‡ÂÚ ‡Á fl‰ÍÛ
·‡Ú‡ ÂË Ë ËÁÌÓÒ ÎÂÌÚ˚. ÑÎfl ‚ÓÁÓ·ÌÓ‚ÎÂÌËfl
ÂÊËχ „ÓÚÓ‚ÌÓÒÚË Ó‰ËÌ ‡Á ÔÓ‚Â ÌËÚÂ
STANDBY ‚ÌËÁ Ë ÒÌÓ‚‡ ÔÓ‚Â ÌËÚÂ Â„Ó ‚‚ ı.
ÑÎfl ̇˜‡Î‡ Á‡ÔËÒË Ì‡ÊÏËÚ START/STOP.
è ËϘ‡ÌËfl Í ÂÊËÏ‡Ï Á‡ÔËÒË
• чÌ̇fl ‚ˉÂÓ͇Ï ‡ Á‡ÔËÒ˚‚‡ÂÚ Ë
‚ÓÒÔ ÓËÁ‚Ó‰ËÚ ‚ ÂÊËÏ SP (Òڇ̉‡ ÚÌÓ„Ó
‚ÓÒÔ ÓËÁ‚‰ÂÌËfl) ËÎË ‚ ÂÊËÏ LP
(Û‰ÎËÌÂÌÌÓ„Ó ‚ÓÒÔ ÓËÁ‚‰ÂÌËfl).
é‰Ì‡ÍÓ, ͇˜ÂÒÚ‚Ó ‚ÓÒÔ ÓËÁ‚‰ÂÌËfl ‚
ÂÊËÏ LP ·Û‰ÂÚ Ì ڇÍËÏ ıÓ Ó¯ËÏ, Í‡Í ‚
ÂÊËÏÂ SP.
• ÖÒÎË ÎÂÌÚ‡ ·˚· Á‡ÔË҇̇ ‚ ÂÊËÏ LP ̇
‰‡ÌÌÓÈ ‚ˉÂÓ͇ÏÂ Â Ë ‚ÓÒÔ ÓËÁ‚Ó‰ËÚÒfl ̇
‰ Û„Ëı ÚËÔ‡ı 8-ÏÏ ‚ˉÂÓ͇Ï ËÎË äÇå,
͇˜ÂÒÚ‚Ó ‚ÓÒÔ ÓËÁ‚‰ÂÌËfl ÏÓÊÂÚ ·˚Ú¸ ÌÂ
Ú‡ÍËÏ ıÓ Ó¯ËÏ, Í‡Í ÔË ‚ÓÒÔ ÓËÁ‚‰ÂÌËË
̇ ‰‡ÌÌÓÈ ‚ˉÂÓ͇Ï Â.
è ËϘ‡ÌËÂ Í Ô ÓˆÂÒÒÛ Á‡ÔËÒË
ÖÒÎË Ç˚ Ô ÓËÁ‚Ó‰ËÚ Á‡ÔËÒ¸ Ò Ò‡ÏÓ„Ó Ì‡˜‡Î‡
ÎÂÌÚ˚, ‰‡ÈÚ ‚ÓÁÏÓÊÌÓÒÚ¸ ÎÂÌÚÂ
Ô ÂÏÂÒÚËÚ¸Òfl ÓÍÓÎÓ 15 ÒÂÍÛ̉ ‰Ó ̇˜‡Î‡
Á‡ÔËÒË. ùÚÓ Ô Â‰Óı ‡ÌflÂÚ ‚ˉÂÓ͇ÏÂ Û ÓÚ
Ô ÓÔÛÒ͇ ̇˜‡Î¸Ì˚ı Ò˛ÊÂÚÓ‚ Ò˙ÂÏÍË, ÍÓ„‰‡
Ç˚ ·Û‰ÂÚ ‚ÓÒÔ ÓËÁ‚Ó‰ËÚ¸ ÎÂÌÚÛ.

CCD-TR501E/TR502E/TR620E 3-859-127-13.E/R
14
To focus the viewfinder lens
If the viewfinder is not in focus at all or when
you use the camcorder after someone else has
used it, focus the viewfinder lens. Turn the
viewfinder lens adjustment ring so that the
indicators in the viewfinder come into sharp
focus.
Camera recording
ÑÎfl ÙÓÍÛÒË Ó‚ÍË Ó·˙ÂÍÚË‚‡ ‚ˉÓËÒ͇ÚÂÎfl
ÖÒÎË ‚ˉÓËÒ͇ÚÂθ ‚ÓÓ·˘Â Ì ÒÙÓÍÛÒË Ó‚‡Ì,
ËÎË, ÂÒÎË Ç˚ ËÒÔÓθÁÛÂÚ ‚ˉÂÓ͇Ï Û
ÔÓÒΠÚÓ„Ó, Í‡Í Â ËÒÔÓθÁÓ‚‡Î ÍÚÓ-ÚÓ
‰ Û„ÓÈ, ÚÓ ÒÙÓÍÛÒË ÛÈÚÂ Ó·˙ÂÍÚË‚
‚ˉÓËÒ͇ÚÂÎfl. èÓ‚Â ÌËÚ „ÛÎË Ó‚Ó˜ÌÓÂ
ÍÓθˆÓ Ó·˙ÂÍÚË‚‡ ‚ˉÓËÒ͇ÚÂÎfl Ú‡Í, ˜ÚÓ·˚
Ë̉Ë͇ÚÓ ˚ ‚ ‚ˉÓËÒ͇ÚÂΠ·˚ÎË ˜ÂÚÍÓ
ÒÙÓÍÛÒË Ó‚‡Ì˚.
á‡ÔËÒ¸ Ò ÔÓÏÓ˘¸˛ ‚ˉÂÓ͇Ï ˚
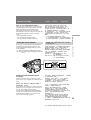
Notes on the tape counter
•The tape counter indicates the recording or
playback time. Use it as a guide. There will be a
time lag of several seconds from the actual
time. To set the counter to zero, press
COUNTER RESET.
•If the tape is recorded in SP and LP modes
mixed, the tape counter shows incorrect
recording time. When you intend to edit the
tape using the tape counter as a guide, record in
same (SP or LP) mode.
Note on beep sound
As indicated with ≥ in the illustrations, a beep
sounds when you turn the power on or when
you start recording and two beeps sound when
you stop recording, confirming the operation.
Several beeps also sound as a warning of any
unusual condition of the camcorder. Note that
the beep sound is not recorded on the tape. If you
do not want to hear the beep sound, set BEEP to
OFF in the menu system.
è ËϘ‡ÌËfl Í Ò˜ÂÚ˜ËÍÛ ÎÂÌÚ˚
• ë˜ÂÚ˜ËÍ ÎÂÌÚ˚ Û͇Á˚‚‡ÂÚ ‚ ÂÏfl Á‡ÔËÒË
ËÎË ‚ ÂÏfl ‚ÓÒÔ ËÁ‚‰ÂÌËfl. àÒÔÓθÁÛÈÚÂ
Â„Ó ‚ ͇˜ÂÒÚ‚Â ÛÍÓ‚Ó‰ÒÚ‚‡. ëÛ˘ÂÒÚ‚ÛÂÚ
ÓÚÒÚ‡‚‡ÌË ÔÓ ‚ ÂÏÂÌË Ì‡ ÌÂÒÍÓθÍÓ
ÒÂÍÛ̉ ÓÚ Ù‡ÍÚ˘ÂÒÍÓ„Ó ‚ ÂÏÂÌË. ÑÎfl
ÛÒÚ‡ÌÓ‚ÍË Ò˜ÂÚ˜Ë͇ ̇ ÌÛθ ̇ÊÏËÚÂ
ÍÌÓÔÍÛ COUNTER RESET.
• ÖÒÎË ÎÂÌÚ‡ Á‡ÔË҇̇ ‚ ÒÓ˜ÂÚ‡ÌËË ÂÊËÏÓ‚
SP Ë LP, Ò˜ÂÚ˜ËÍ ÎÂÌÚ˚ ·Û‰ÂÚ ÔÓ͇Á˚‚‡Ú¸
ÌÂÔ ‡‚ËθÌÓ ‚ ÂÏfl Á‡ÔËÒË. ÖÒÎË Ç˚
̇Ï ‚‡ÂÚÂÒ¸ Ô ÓËÁ‚ÂÒÚË ÏÓÌÚ‡Ê ÎÂÌÚ˚ Ò
ËÒÔÓθÁÓ‚‡ÌËÂÏ Ò˜ÂÚ˜Ë͇ ‚ ÂÏÂÌË
Òӄ·ÒÌÓ ÛÍÓ‚Ó‰ÒÚ‚Û, ‚˚ÔÓÎÌflÈÚ Á‡ÔËÒ¸
‚ Ó‰ÌÓÏ Ë ÚÓÏ Ê ÂÊËÏ (SP ËÎË LP).
è ËϘ‡ÌËÂ Í ÁÛÏÏ ÌÓÏÛ Á‚ÛÍÓ‚ÓÏÛ Ò˄̇ÎÛ
ä‡Í Û͇Á‡ÌÓ Ò ÔÓÏÓ˘¸˛≥ ̇ ËÒÛÌ͇ı,
ÁÛÏÏ Ì˚È Ò˄̇ΠÁ‚Û˜ËÚ, ÍÓ„‰‡ Ç˚
̇˜Ë̇ÂÚ Á‡ÔËÒ¸, ‡ ‰‚‡ ÁÛÏÏ Ì˚ı Ò˄̇·
Á‚Û˜‡Ú, ÍÓ„‰‡ Ç˚ Á‡Í‡Ì˜Ë‚‡ÂÚ Á‡ÔËÒ¸,
ÔӉڂ ʉ‡fl ÚÂÏ Ò‡Ï˚Ï ‡·ÓÚÛ. çÂÒÍÓθÍÓ
ÁÛÏÏ Ì˚˚ı Ò˄̇ÎÓ‚ Ú‡ÍÊ Á‚Û˜ËÚ ‚
͇˜ÂÒÚ‚Â Ô Â‰ÛÔ ÂʉÂÌËfl ͇ÍÓ„Ó-ÎË·Ó
ÌÂÌÓ Ï‡Î¸ÌÓ„Ó ÒÓÒÚÓflÌËfl ‚ˉÂÓ͇Ï ˚.
á‡ÏÂÚ¸ÚÂ, ˜ÚÓ ÁÛÏÏ Ì˚È Á‚ÛÍÓ‚ÓÈ Ò˄̇ΠÌÂ
Á‡ÔËÒ˚‚‡ÂÚÒfl ̇ ÎÂÌÚÛ. ÖÒÎË Ç˚ Ì ıÓÚËÚÂ
ÒÎ˚¯‡Ú¸ ÁÛÏÏ Ì˚È Ò˄̇Î, ÚÓ ÛÒÚ‡ÌÓ‚ËÚÂ
BEEP ‚ ÔÓÎÓÊÂÌË OFF ‚ ÒËÒÚÂÏ ÏÂÌ˛.

CCD-TR501E/TR502E/TR620E 3-859-127-13.E/R
15
Basic operations éÒÌÓ‚Ì˚ ÓÔ ‡ˆËË
Note on the AUTO DATE feature
The clock is set at the factory to London time for
United Kingdom and to Paris time for the other
European models. You can reset the clock.
The AUTO DATE feature shows the date
automatically once a day. However, the date may
automatically appear more than once a day
when:
– you reset the date and time.
– you eject and insert the tape again.
– you stop recording within 10 seconds.
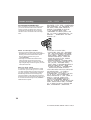
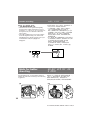
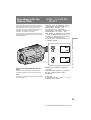
Using the zoom feature
Zooming is a recording technique that lets you
change the size of the subject in the scene. For
more professional-looking recordings, use the
zoom sparingly.
“T” Side: for telephoto (subject appears closer)
“W” Side:for wide-angle (subject appears farther
away)
Camera recording
è ËϘ‡ÌËÂ Í ÙÛÌ͈ËË AUTO DATE
ó‡Ò˚ ÛÒÚ‡ÌÓ‚ÎÂÌ˚ ̇ Á‡‚Ӊ ̇ ‚ ÂÏfl
ãÓ̉Ó̇ ‰Îfl ÏÓ‰ÂÎÂÈ ëÓ‰ËÌÂÌÌÓ„Ó
äÓ Ó΂ÒÚ‚‡ Ë Ì‡ ‚ ÂÏfl è‡ Ëʇ ‰Îfl ‰ Û„Ëı
‚ ÓÔÂÈÒÍËı ÏÓ‰ÂÎÂÈ. Ç˚ ÏÓÊÂÚÂ
Ô ÂÛÒÚ‡ÌÓ‚ËÚ¸ ˜‡Ò˚. îÛÌ͈Ëfl AUTO DATE
‡·ÓÚ‡ÂÚ Ó‰ËÌ ‡Á ‚ ‰Â̸. é‰Ì‡ÍÓ, ‰‡Ú‡
ÏÓÊÂÚ ÔÓfl‚ËÚ¸Òfl ·ÓΠӉÌÓ„Ó ‡Á‡ ‚ ‰Â̸,
ÂÒÎË:
– Ç˚ Ô ÂÛÒÚ‡ÌÓ‚ËÚ ‰‡ÚÛ Ë ‚ ÂÏfl.
– Ç˚ ‚˚ÚÓÎÍÌÂÚ ÎÂÌÚÛ Ë ‚ÒÚ‡‚Ëڠ ÒÌÓ‚‡.
– Ç˚ ÓÒÚ‡ÌÓ‚ËÚ Á‡ÔËÒ¸ ‚ Ô Â‰Â·ı 10 ÒÂÍÛ̉.
àÒÔÓθÁÓ‚‡ÌË ÙÛÌ͈ËË Ì‡ÂÁ‰‡
‚ˉÂÓ͇Ï ˚
ç‡ÂÁ‰ ‚ˉÂÓ͇Ï ˚ fl‚ÎflÂÚÒfl ÚÂıÌ˘ÂÒÍËÏ
Ô ËÂÏÓÏ Á‡ÔËÒË, ÍÓÚÓ ˚È ÔÓÁ‚ÓÎflÂÚ Ç‡Ï
ËÁÏÂÌflÚ¸ ‡ÁÏ ӷ˙ÂÍÚ‡ ‚ ͇‰ Â. çÂ
ÁÎÓÛÔÓÚ Â·ÎflÈÚ ˝ÚËÏ Ô ËÂÏÓÏ, ÂÒÎË ıÓÚËÚÂ,
˜ÚÓ·˚ LJ¯Ë Á‡ÔËÒË ‚˚„Îfl‰ÂÎË ·ÓÎÂÂ
Ô ÓÙÂÒÒËÓ̇θÌÓ.
ëÚÓ Ó̇ “T”: ‰Îfl ÚÂÎÂÙÓÚÓ (Ó·˙ÂÍÚ
Ô Ë·ÎËʇÂÚÒfl)
ëÚÓ Ó̇ “W”: ‰Îfl ¯Ë ÓÍÓ„Ó Û„Î‡ Ò˙ÂÏÍË
(Ó·˙ÂÍÚ Û‰‡ÎflÂÚÒfl)
ëÍÓ ÓÒÚ¸ ̇ÂÁ‰‡ ‚ˉÂÓ͇Ï ˚ (̇ÂÁ‰
Ò ‡ÁÌÓÈ ÒÍÓ ÓÒÚ¸˛)
èÓÎÌÓÒÚ¸˛ ÔÓ‚Â ÌËÚ ˚˜‡„ Ô Ë‚Ó‰ÌÓ„Ó
Ú ‡ÌÒÙÓ͇ÚÓ ‡ ‰Îfl ·˚ÒÚ Ó„Ó Ì‡ÂÁ‰‡
‚ˉÂÓ͇Ï ˚. èÓ‚Â ÌËÚÂ Â„Ó Ò΄͇ ‰Îfl
ωÎÂÌÌÓ„Ó Ì‡ÂÁ‰‡ ‚ˉÂÓ͇Ï ˚.
äÓ„‰‡ Ç˚ ÒÌËχÂÚ ӷ˙ÂÍÚ, ËÒÔÓθÁÛfl
̇ÂÁ‰ ‚ ÂÊËÏ ÚÂÎÂÙÓÚÓ
ÖÒÎË Ç˚ Ì ÏÓÊÂÚ ÔÓÎÛ˜ËÚ¸ ˜ÂÚÍÓÈ
ÙÓÍÛÒË Ó‚ÍË ‚Ó ‚ ÂÏfl Í ‡ÈÌÂ„Ó Ì‡ÂÁ‰‡ ‚
ÂÊËÏ ÚÂÎÂÙÓÚÓ, ÚÓ Ô ÂÏ¢‡ÈÚ ˚˜‡„
Ô Ë‚Ó‰ÌÓ„Ó Ú ‡ÌÒÙÓ͇ÚÓ ‡ ‚ ÒÚÓ ÓÌÛ “W” ‰Ó
ÚÂı ÔÓ , ÔÓ͇ Ì ÔÓÎÛ˜ËÚ ˜ÂÚÍÓÈ
ÙÓÍÛÒË Ó‚ÍË.
Ç˚ ÏÓÊÂÚÂ Ô ÓËÁ‚ÂÒÚË Ò˙ÂÏÍÛ Ô Â‰ÏÂÚ‡,
ÍÓÚÓ ˚È ÔÓ ÏÂ̸¯ÂÈ Ï  ̇ıÓ‰ËÚÒfl ̇
‡ÒÒÚÓflÌËË ÓÍÓÎÓ 80ÒÏ ÓÚ ÔÓ‚Â ıÌÓÒÚË
Ó·˙ÂÍÚË‚‡ ‚ ÔÓÎÓÊÂÌËË ÚÂÎÂÙÓÚÓ, ËÎË 1 ÒÏ ‚
ÔÓÎÓÊÂÌËË ¯Ë ÓÍÓ„Ó Û„Î‡.
á‡ÔËÒ¸ Ò ÔÓÏÓ˘¸˛ ‚ˉÂÓ͇Ï ˚
Zooming speed (Variable speed
zooming)
Turn the power zoom lever fully for a high-
speed zoom. Turn it lightly for a relatively slow
zoom.
When you shoot a subject using a
telephoto zoom
If you cannot get a sharp focus while in extreme
telephoto zoom, move the power zoom lever to
the “W” side until the focus is sharp.
You can shoot a subject that is at least about 80
cm (about 2 5/8 feet) away from the lens surface
in the telephoto position, or 1 cm (about 1/2
inch) in the wide-angle position.

CCD-TR501E/TR502E/TR620E 3-859-127-13.E/R
16
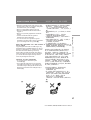
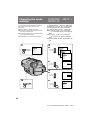
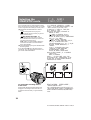
Notes on digital zoom
– CCD-TR502E/TR620E only
•More than 15x zoom is performed digitally,
and the picture quality deteriorates as you go
toward the “ T ” side. If you do not want to use
the digital zoom, set D ZOOM to OFF in the
menu system.
•The right side [a] of the power zoom indicator
shows the digital zooming zone, and the left
side [b] shows the optical zooming zone. If you
set D ZOOM to OFF, the right [a] zone
disappears.
Camera recording
Hints for better
shooting
For hand-held shots, you’ll get better results by
holding the camcorder according to the following
suggestions:
[b][a]
á‡ÔËÒ¸ Ò ÔÓÏÓ˘¸˛ ‚ˉÂÓ͇Ï ˚
è ËϘ‡ÌËfl Í ˆËÙ Ó‚ÓÏÛ Ú ‡ÌÒÙÓ͇ÚÓ Û
– ÚÓθÍÓ CCD-TR502E/TR620Ö
• í ‡ÌÒÙÓ͇ÚÓ ·ÓÎÂÂ, ˜ÂÏ 15ı, ÒÓÁ‰‡Ì ‚
ˆËÙ Ó‚ÓÏ ËÒÔÓÎÌÂÌËË, Ë Í‡˜ÂÒÚ‚Ó
ËÁÓ· ‡ÊÂÌËfl ÛıÛ‰¯‡ÂÚÒfl ÔÓ Ï  LJ¯Â„Ó
‰‚ËÊÂÌËfl ‚ ÒÚÓ ÓÌÛ í. ÖÒÎË Ç˚ Ì ıÓÚËÚÂ
ËÒÔÓθÁÓ‚‡Ú¸ ˆËÙ Ó‚ÓÈ Ú ‡ÌÒÙÓ͇ÚÓ ,
ÛÒÚ‡ÌÓ‚ËÚ D ZOOM ‚ ÔÓÎÓÊÂÌË OFF ‚
ÒËÒÚÂÏ ÏÂÌ˛.
• è ‡‚‡fl ÒÚÓ Ó̇ [a] Ë̉Ë͇ÚÓ ‡ Ô Ë‚Ó‰ÌÓ„Ó
Ú ‡ÌÒÙÓ͇ÚÓ ‡ ÔÓ͇Á˚‚‡ÂÚ ÁÓÌÛ ˆËÙ Ó‚ÓÈ
Ú ‡ÌÒÙÓ͇ˆËË ‡ ΂‡fl ÒÚÓ Ó̇ [b]
ÔÓ͇Á˚‚‡ÂÚ ÁÓÌÛ ÓÔÚ˘ÂÒÍÓÈ
Ú ‡ÌÒÙÓ͇ˆËË. ÖÒÎË Ç˚ ÛÒÚ‡ÌÓ‚ËÚÂ
ÙÛÌÍˆË˛ D ZOOM ̇ OFF, ÚÓ ÁÓ̇ [a]
ËÒ˜ÂÁÌÂÚ.
ëÓ‚ÂÚ˚ ‰Îfl ÎÛ˜¯ÂÈ
Ò˙ÂÏÍË
ÑÎfl ͇‰ Ó‚ ÔË Û‰Â ÊË‚‡ÌËË ‚ˉÂÓ͇Ï ˚ ‚
Û͇ı, Ç˚ ÔÓÎÛ˜ËÚ ÎÛ˜¯Ë ÂÁÛθڇÚ˚,
ÂÒÎË ·Û‰ÂÚ ‰Â ʇڸ ‚ˉÂÓ͇ÏÂ Û ‚
ÒÓÓÚ‚ÂÚÒÚ‚ËË ÒÓ ÒÎÂ‰Û˛˘ËÏË Û͇Á‡ÌËflÏË:

CCD-TR501E/TR502E/TR620E 3-859-127-13.E/R
17
Basic operations éÒÌÓ‚Ì˚ ÓÔ ‡ˆËË
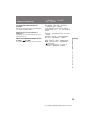
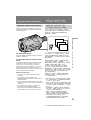
•Hold the camcorder firmly and secure it with
the grip strap so that you can easily manipulate
the controls with your thumb [a].
•Place your right elbow against your side.
•Place your left hand under the camcorder to
support it.
•Place your eye firmly against the viewfinder
eyecup.
•Use the viewfinder frame as a guide to
determine the horizontal plane.
•You can record in a low position to get an
interesting recording angle. Lift the viewfinder
up for recording from a low position [b].
Place the camcorder on a flat surface or
use a tripod
Try placing the camcorder on a table top or any
other flat surface of suitable height. If you have a
tripod for a still camera, you can also use it with
the camcorder. When attaching a non-Sony
tripod, make sure that the length of the tripod
screw is less than 6.5 mm (9/32 inch). Otherwise,
you cannot attach the tripod securely and the
screw may damage the camcorder.
Cautions on the viewfinder
•Do not pick up the camcorder by the
viewfinder [c].
•Do not place the camcorder so as to point the
viewfinder toward the sun. The inside of the
viewfinder may be damaged. Be careful when
placing the camcorder under sunlight or by a
window [d].
Hints for better shooting ëÓ‚ÂÚ˚ ‰Îfl ÎÛ˜¯ÂÈ Ò˙ÂÏÍË
• Ñ ÊËÚ ‚ˉÂÓ͇ÏÂ Û Í ÂÔÍÓ Ë Á‡Í ÂÔËÚÂ
ÂÂ Ò ÔÓÏÓ˘¸˛ ÂÏÂÌÌÓ„Ó Á‡ı‚‡Ú‡ Ú‡Í,
˜ÚÓ·˚ Ç˚ ÏÓ„ÎË Î„ÍÓ Ï‡ÌËÔÛÎË Ó‚‡Ú¸
„ÛÎflÚÓ ‡ÏË Ò ÔÓÏÓ˘¸˛ ·Óθ¯Ó„Ó Ô‡Î¸ˆ‡
[a].
• ê‡ÒÔÓÎÓÊËÚ LJ¯ Ô ‡‚˚È ÎÓÍÓÚ¸ Ò·ÓÍÛ ÓÚ
Ò·fl.
• ê‡ÒÔÓÎÓÊËÚ LJ¯ ÎÂ‚Û˛ ÛÍÛ ÔÓ‰
‚ˉÂÓ͇Ï ÓÈ ‰Îfl  ÔÓ‰‰Â ÊÍË.
• 燉ÂÊÌÓ Ô ËÒÎÓÌËÚ LJ¯ „·Á Í ÓÍÛÎfl Û
‚ˉÓËÒ͇ÚÂÎfl.
• àÒÔÓθÁÛÈÚ ‚ËÁË ÌÛ˛ ‡ÏÍÛ ‚ ͇˜ÂÒÚ‚Â
ÛÍÓ‚Ó‰ÒÚ‚‡ ‰Îfl ÓÔ Â‰ÂÎÂÌËfl
„Ó ËÁÓÌڇθÌÓ„Ó Ô·̇.
• Ç˚ ÏÓÊÂÚ Á‡ÔËÒ˚‚‡Ú¸ ËÁ ÌËÁÍÓ„Ó
ÔÓÎÓÊÂÌËfl ‰Îfl ÔÓÎÛ˜ÂÌËfl ËÌÚ ÂÒÌÓ„Ó Û„Î‡
Á‡ÔËÒË. èÓ‰ÌËÏËÚ ‚ˉÓËÒ͇ÚÂθ ‚‚ ı ‰Îfl
Á‡ÔËÒË ËÁ ÌËÁÍÓ„Ó ÔÓÎÓÊÂÌËfl [b].
ê‡ÒÔÓ·„‡ÈÚ ‚ˉÂÓ͇ÏÂ Û Ì‡ ÔÎÓÒÍÓÈ
ÔÓ‚Â ıÌÓÒÚË ËÎË ËÒÔÓθÁÛÈÚÂ Ú ÂÌÓ„Û
ëÚ‡ ‡ÈÚÂÒ¸ ‡ÒÔÓÎÓ„‡Ú¸ ‚ˉÂÓ͇ÏÂ Û Ì‡
ÒÚÓΠËÎË Î˛·ÓÈ ‰ Û„ÓÈ ÔÎÓÒÍÓÈ ÔÓ‚Â ıÌÓÒÚË
̇ ÔÓ‰ıÓ‰fl˘ÂÈ ‚˚ÒÓÚÂ. ÖÒÎË Ç˚ ËÏÂÂÚÂ
Ú ÂÌÓ„Û ‰Îfl ÙÓÚÓ‡ÔÔ‡ ‡Ú‡, ÚÓ Ç˚ Ú‡ÍÊÂ
ÏÓÊÂÚ ËÒÔÓθÁÓ‚‡Ú¸ ÂÂ Ò ‚ˉÂÓ͇Ï ÓÈ.
èË Ô ËÍ ÂÔÎÂÌËË Ú ÂÌÓ„Ë Ì ÙË Ï˚ Sony
۷‰ËÚÂÒ¸, ˜ÚÓ ‰ÎË̇ ‚ËÌÚ‡ Ú ÂÌÓ„Ë ÏÂÌÂÂ
6,5 ÏÏ. Ç Ô ÓÚË‚ÌÓÏ ÒÎÛ˜‡Â Ç˚ Ì ÒÏÓÊÂÚÂ
̇‰ÂÊÌÓ Ô ËÒÓ‰ËÌËÚ¸ Ú ÂÌÓ„Û Ë ‚ËÌÚ ÏÓÊÂÚ
ÔÓ‚ ‰ËÚ¸ ‚ˉÂÓ͇Ï Û.
è ‰ÓÒÚ ÂÊÂÌËfl Í ‚ˉÓËÒ͇ÚÂβ
• ç ÔÓ‰ÌËχÈÚ ‚ˉÂÓ͇ÏÂ Û Á‡
‚ˉÓËÒ͇ÚÂθ [c].
• ç ‡ÒÔÓ·„‡ÈÚ ‚ˉÂÓ͇ÏÂ Û Ú‡Í, ˜ÚÓ·˚
‚ˉÓËÒ͇ÚÂθ ·˚ÎË Ì‡Ô ‡‚ÎÂÌ˚ Ô flÏÓ Ì‡
ÒÓÎ̈Â. ÇÌÛÚ ÂÌÌË ˜‡ÒÚË ‚ˉÓËÒ͇ÚÂÎfl
ÏÓ„ÛÚ ·˚Ú¸ ÔÓ‚ ÂʉÂÌ˚. ÅÛ‰¸ÚÂ
ÓÒÚÓ ÓÊÌ˚ Ô Ë ‡ÒÔÓÎÓÊÂÌËÂ
‚ˉÂÓ͇Ï ˚ ÔÓ‰ ÒÓÎ̈ÂÏ ËÎË ‚ÓÁΠÓÍ̇
[d].
[c]
[d]

CCD-TR501E/TR502E/TR620E 3-859-127-13.E/R
18
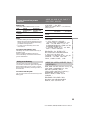
Using EDITSEARCH, you can review the last
recorded scene or check the recorded picture in
the viewfinder.
(1)While pressing the small green button on the
POWER switch, set it to CAMERA.
(2)Turn STANDBY up.
(3)Press the – ( Œ) side of EDITSEARCH
momentarily; the last few seconds of the
recorded portion plays back (Rec Review).
Hold down the – side of EDITSEARCH until
the camcorder goes back to the scene you
want. The last recorded portion is played
back. To go forward, hold down the + side
(Edit Search).
Checking the
recorded picture
To stop playback
Release EDITSEARCH.
To begin re-recording
Press START/STOP. Re-recording begins from
the last recorded point or the point you released
EDITSEARCH. Provided you do not eject the
tape, the transition between the last scene you
recorded and the next scene you record will be
smooth.
àÒÔÓθÁÛfl EDITSEARCH, Ç˚ ÏÓÊÂÚÂ
Ô ÂÒÏÓÚ ÂÚ¸ ÔÓÒÎÂ‰Ì˛˛ Á‡ÔËÒ‡ÌÌÛ˛ ÒˆÂÌÛ
ËÎË Ô Ó‚Â ËÚ¸ Á‡ÔËÒ‡ÌÌÓ ËÁÓ· ‡ÊÂÌË ‚
‚ˉÓËÒ͇ÚÂÎÂ.
(1) ç‡ÊËχfl χÎÂ̸ÍÛ˛ ÁÂÎÂÌÛ˛ ÍÌÓÔÍÛ Ì‡
‚˚Íβ˜‡ÚÂΠPOWER, ÛÒÚ‡ÌÓ‚ËÚÂ Â„Ó ‚
ÔÓÎÓÊÂÌËÂ CAMERA.
(2) èÓ‚Â ÌËÚÂ STANDBY ‚‚Â ı.
(3) çÂ̇‰ÓÎ„Ó Ì‡ÊÏËÚ ÒÚÓ ÓÌÛ – (Œ) ÍÌÓÔÍË
EDITSEARCH; ÔÓÒΉÌË ÌÂÒÍÓθÍÓ
ÒÂÍÛ̉ Á‡ÔËÒ‡ÌÌÓÈ ˜‡ÒÚË ·Û‰ÛÚ
‚ÓÒÔ ÓËÁ‚‰ÂÌ˚ (Ô ÂÒÏÓÚ Á‡ÔËÒË).
ÑÂ ÊËÚÂ ÒÚÓ ÓÌÛ – ÍÌÓÔÍË EDITSEARCH
‰Ó ÚÂı ÔÓ , ÔÓ͇ ‚ˉÂÓ͇Ï ‡ Ì ‚ ÌÂÚÒfl
Í Ê·ÂÏÓÈ ÒˆÂÌÂ. èÓÒΉÌflfl Á‡ÔËÒ‡Ì̇fl
˜‡ÒÚ¸ ·Û‰ÂÚ ‚ÓÒÔ ÓËÁ‚‰Â̇. ÑÎfl
Ô Ó‰‚ËÊÂÌËfl ‚Ô ‰ ‰Â ÊËÚ ÒÚÓ ÓÌÛ +
(ÏÓÌÚ‡ÊÌ˚È ÔÓËÒÍ).
è ӂ ͇ Á‡ÔËÒ‡ÌÌÓ„Ó
ËÁÓ· ‡ÊÂÌËfl
ÑÎfl ÓÒÚ‡ÌÓ‚‡ ‚ÓÒÔ ÓËÁ‚‰ÂÌËfl
ç‡ÊÏËÚ EDITSEARCH.
ÑÎfl ̇˜‡Î‡ Ô ÂÁ‡ÔËÒË
ç‡ÊÏËÚ START/STOP. è ÂÁ‡ÔËÒ¸
̇˜Ë̇ÂÚÒfl ÓÚ ÔÓÒΉÌÂÈ Á‡ÔËÒ‡ÌÌÓÈ ÚÓ˜ÍË
ËÎË ÓÚ ÚÓ˜ÍË, „‰Â Ç˚ ÓÚÔÛÒÚËÎË
EDITSEARCH. è ‰ÛÒÏÓÚ ÂÌÓ, ˜ÚÓ·˚ Ç˚ ÌÂ
‚˚ÚÓÎÍÌÛÎË Í‡ÒÒÂÚÛ, Ë Ô ÂıÓ‰ ÏÂʉÛ
ÔÓÒΉÌÂÈ ÒˆÂÌÓÈ, ÍÓÚÓ Û˛ Ç˚ Á‡ÔËÒ‡ÎË, Ë
ÒÎÂ‰Û˛˘ÂÈ ÒˆÂÌÓÈ, ÍÓÚÓ Û˛ Ç˚
Á‡ÔËÒ˚‚‡ÂÚÂ, ·Û‰ÂÚ Ô·‚Ì˚Ï.
EDITSEARCH
EDITSEARCH
EDITSEARCH
Œ
Œ
Œ

CCD-TR501E/TR502E/TR620E 3-859-127-13.E/R
19
Basic operations éÒÌÓ‚Ì˚ ÓÔ ‡ˆËË
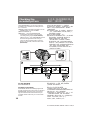
Connections for
playback
Connect the camcorder to your VCR or TV to
watch the playback picture on the TV screen.
When monitoring the playback picture by
connecting the camcorder to your TV, we
recommend you to use mains for the power
source.
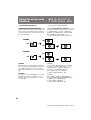
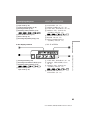
Connecting directly to a VCR/TV
with Video/Audio input jack
Open the jack cover. With using the supplied
A/V connecting cable, connect the camcorder to
the LINE IN inputs on the TV or VCR connected
to the TV. Set the TV/VCR selector on the TV to
VCR. When connecting to the VCR, set the input
selector on the VCR to LINE.
èÓ‰ÒÓ‰ËÌËÚ ‚ˉÂÓ͇ÏÂ Û Í Ç‡¯ÂÏÛ äÇå
ËÎË ÚÂ΂ËÁÓ Û ‰Îfl Ô ÓÒÏÓÚ ‡
‚ÓÒÔ ÓËÁ‚Ó‰ËÏÓ„Ó ËÁÓ· ‡ÊÂÌËfl ̇
ÚÂ΂ËÁËÓÌÌÓÏ ˝Í ‡ÌÂ.
èË ÔÓ‰ÒÓ‰ËÌÂÌËË ‚ˉÂÓ͇Ï ˚ Í Ç‡¯ÂÏÛ
ÚÂ΂ËÁÓ Û Ï˚ ÂÍÓÏẨÛÂÏ Ç‡Ï
ËÒÔÓθÁÓ‚‡Ú¸ ÁÎÂÍÚ Ë˜ÂÒÍÛ˛ ÒÂÚ¸ ‚
͇˜ÂÒÚ‚Â ËÒÚÓ˜ÌË͇ ÔËÚ‡ËÌfl.
èÓ‰ÒÓ‰ËÌÂÌËÂ Ô flÏÓ Í äÇå/
ÚÂ΂ËÁÓ Û Ò ‚ıÓ‰Ì˚ÏË
„ÌÂÁ‰‡ÏË ‚ˉÂÓ/‡Û‰ËÓ
éÚÍ ÓÈÚÂ Í ˚¯ÍÛ „ÌÂÁ‰, ËÒÔÓθÁÛfl
Ô Ë·„‡ÂÏ˚È ÒÓ‰ËÌËÚÂθÌ˚È ¯ÌÛ ‡Û‰ËÓ/
‚ˉÂÓ, ÔÓ‰ÒÓ‰ËÌËÚ ‚ˉÂÓ͇ÏÂ Û Í
‚ıÓ‰Ì˚Ï „ÌÂÁ‰‡Ï LINE IN ̇ ÚÂ΂ËÁÓ Â ËÎË
‚ˉÂÓχ„ÌËÚÓÙÓÌÂ, ÔÓ‰ÒÓ‰ËÌÂÌÌÓÏ Í
ÚÂ΂ËÁÓ Û. ìÒÚ‡ÌÓ‚ËÚ ÒÂÎÂÍÚÓ TV/VCR ̇
ÚÂ΂ËÁÓ Â ‚ ÔÓÎÓÊÂÌË VCR, ÛÒÚ‡ÌÓ‚ËÚÂ
ÒÂÎÂÍÚÓ ‚ıÓ‰ÌÓ„Ó Ò˄̇· ̇ äÇå ‚
ÔÓÎÓÊÂÌËÂ LINE.
èÓ‰ÒÓ‰ËÌÂÌËfl ‰Îfl
‚ÓÒÔ ÓËÁ‚‰ÂÌËfl
If your TV/VCR has a 21-pin connector
(EUROCONNECTOR)
Use the supplied 21-pin adaptor.
TV TV
To connect to a VCR or TV without
Video/Audio input jacks
Use an RFU adaptor (not supplied).
: Signal flow/ è ‰‡˜‡ Ò˄̇·
ÑÎfl ÔÓ‰ÒÓ‰ËÌÂÌËfl Í äÇå ËÎË
ÚÂ΂ËÁÓ Û ·ÂÁ ‚ıÓ‰Ì˚ı „ÌÂÁ‰ ‚ˉÂÓ/
‡Û‰ËÓ
àÒÔÓθÁÛÈÚ Çó-‡‰‡ÔÚ (ÌÂ Ô Ë·„‡ÂÚÒfl).
ÖÒΠLJ¯ ÚÂ΂ËÁÓ /äÇå ËÏÂÂÚ 21-
¯Ú˚ ¸ÍÓ‚˚È ÒÓ‰ËÌËÚÂθ
(EUROCONNECTOR)
àÒÔÓθÁÛÈÚÂ Ô Ë·„‡ÂÏ˚È 21-¯Ú˚ ¸ÍÓ‚˚È
‡‰‡ÔÚ .
or/ËÎË

CCD-TR501E/TR502E/TR620E 3-859-127-13.E/R
20
Playing back a tape
You can monitor the playback picture in the
viewfinder. You can also monitor a picture on a
TV screen, after connecting the camcorder to a
TV or VCR.
(1)While pressing the small green button on the
POWER switch, set it to PLAYER.
(2)Insert the recorded tape with the window
facing out.
(3)Press ( to start playback.
Ç˚ ÏÓÊÂÚ ‚˚ÔÓÎÌËÚ¸ ÍÓÌÚ ÓθÌ˚È
Ô ÓÒÏÓÚ ‚ÓÒÔ ÓËÁ‚Ó‰ËÏÓ„Ó ËÁÓ· ‡ÊÂÌËfl ‚
‚ˉÓËÒ͇ÚÂÎÂ. Ç˚ Ú‡ÍÊ ÏÓÊÂÚ ҉·ڸ
Ô ÓÒÏÓÚ Ì‡ ˝Í ‡Ì ÚÂ΂ËÁÓ ‡ ÔÓÒÎÂ
ÔÓ‰Íβ˜ÂÌËfl ‚ˉÂÓ͇Ï ˚ Í ÚÂ΂ËÁÓ Û
ËÎË äÇå.
(1) ç‡ÊËχfl χÎÂ̸ÍÛ˛ ÁÂÎÂÌÛ˛ ÍÌÓÔÍÛ Ì‡
‚˚Íβ˜‡ÚÂΠPOWER, Ô ‰‚Ë̸ÚÂ Â„Ó ‚
ÔÓÎÓÊÂÌËÂ PLAYER.
(2) ÇÒÚ‡‚¸Ú Á‡ÔËÒ‡ÌÌÛ˛ ͇ÒÒÂÚÛ ÓÍÓ¯ÍÓÏ,
Ó· ‡˘ÂÌÌ˚Ï Ì‡ ÛÊÛ.
(3) ç‡ÊÏËÚ ( ‰Îfl ̇˜‡Î‡
‚ÓÒÔ ÓËÁ‚‰ÂÌËfl.
ÇÓÒÔ ÓËÁ‚‰ÂÌËÂ
ÎÂÌÚ˚
PLAY
STOP
REW FF
PAUSE
To stop playback, press p.
To rewind the tape, press 0.
To fast-forward the tape, press ).
ÑÎfl ÓÒÚ‡ÌÓ‚‡ ‚ÓÒÔ ÓËÁ‚‰ÂÌËfl ̇ÊÏËÚÂ
p.
ÑÎfl ÛÒÍÓ ÂÌÌÓÈ Ô ÂÏÓÚÍË ÎÂÌÚ˚ ̇Á‡‰
̇ÊÏËÚ 0.
ÑÎfl ÛÒÍÓ ÂÌÌÓÈ Ô ÂÏÓÚÍË ÎÂÌÚ˚ ‚Ô ‰
̇ÊÏËÚ ).
La pagina si sta caricando...
La pagina si sta caricando...
La pagina si sta caricando...
La pagina si sta caricando...
La pagina si sta caricando...
La pagina si sta caricando...
La pagina si sta caricando...
La pagina si sta caricando...
La pagina si sta caricando...
La pagina si sta caricando...
La pagina si sta caricando...
La pagina si sta caricando...
La pagina si sta caricando...
La pagina si sta caricando...
La pagina si sta caricando...
La pagina si sta caricando...
La pagina si sta caricando...
La pagina si sta caricando...
La pagina si sta caricando...
La pagina si sta caricando...
La pagina si sta caricando...
La pagina si sta caricando...
La pagina si sta caricando...
La pagina si sta caricando...
La pagina si sta caricando...
La pagina si sta caricando...
La pagina si sta caricando...
La pagina si sta caricando...
La pagina si sta caricando...
La pagina si sta caricando...
La pagina si sta caricando...
La pagina si sta caricando...
La pagina si sta caricando...
La pagina si sta caricando...
La pagina si sta caricando...
La pagina si sta caricando...
La pagina si sta caricando...
La pagina si sta caricando...
La pagina si sta caricando...
La pagina si sta caricando...
La pagina si sta caricando...
La pagina si sta caricando...
La pagina si sta caricando...
La pagina si sta caricando...
La pagina si sta caricando...
La pagina si sta caricando...
La pagina si sta caricando...
La pagina si sta caricando...
La pagina si sta caricando...
La pagina si sta caricando...
La pagina si sta caricando...
La pagina si sta caricando...
La pagina si sta caricando...
La pagina si sta caricando...
La pagina si sta caricando...
La pagina si sta caricando...
La pagina si sta caricando...
La pagina si sta caricando...
La pagina si sta caricando...
La pagina si sta caricando...
La pagina si sta caricando...
La pagina si sta caricando...
La pagina si sta caricando...
La pagina si sta caricando...
La pagina si sta caricando...
La pagina si sta caricando...
La pagina si sta caricando...
La pagina si sta caricando...
-
 1
1
-
 2
2
-
 3
3
-
 4
4
-
 5
5
-
 6
6
-
 7
7
-
 8
8
-
 9
9
-
 10
10
-
 11
11
-
 12
12
-
 13
13
-
 14
14
-
 15
15
-
 16
16
-
 17
17
-
 18
18
-
 19
19
-
 20
20
-
 21
21
-
 22
22
-
 23
23
-
 24
24
-
 25
25
-
 26
26
-
 27
27
-
 28
28
-
 29
29
-
 30
30
-
 31
31
-
 32
32
-
 33
33
-
 34
34
-
 35
35
-
 36
36
-
 37
37
-
 38
38
-
 39
39
-
 40
40
-
 41
41
-
 42
42
-
 43
43
-
 44
44
-
 45
45
-
 46
46
-
 47
47
-
 48
48
-
 49
49
-
 50
50
-
 51
51
-
 52
52
-
 53
53
-
 54
54
-
 55
55
-
 56
56
-
 57
57
-
 58
58
-
 59
59
-
 60
60
-
 61
61
-
 62
62
-
 63
63
-
 64
64
-
 65
65
-
 66
66
-
 67
67
-
 68
68
-
 69
69
-
 70
70
-
 71
71
-
 72
72
-
 73
73
-
 74
74
-
 75
75
-
 76
76
-
 77
77
-
 78
78
-
 79
79
-
 80
80
-
 81
81
-
 82
82
-
 83
83
-
 84
84
-
 85
85
-
 86
86
-
 87
87
-
 88
88


Sony CCD-TR501E Manuale utente
- Categoria
- Videocamere
- Tipo
- Manuale utente
in altre lingue
- English: Sony CCD-TR501E User manual