La pagina si sta caricando...
La pagina si sta caricando...
La pagina si sta caricando...

WARNING Switch off the electrical power supply
before starting. There are risks involved in wor-
king with electricity. If you are not qualified, call a
professional. ATTENTION Coupez l’électricité avant
de commencer. Intervenir sur une installation
électrique présente des risques. Si vous n’êtes
pas une personne qualifiée, faites appel à un professionnel.
ATENCIÓN Interrompere l’elettricità prima di cominciare.
Intervenire su un impianto elettrico ha dei rischi. Si usted no es
una persona cualificada, solicite la asistencia de un profesional.
ATTENZIONE Spegnere l’elettricità prima di iniziare. Intervenire
su un impianto elettrico presenta rischi. Se non sei una persona
qualificata, ricorri a un professionista. ACHTUNG Stellen Sie zuvor
den Strom ab. Das Arbeiten an elektrischen Anlagen ist mit Ge-
fahren verbunden. Wenn Sie nicht dafür qualifiziert sind, lassen Sie
das einen Fachmann machen. LET OP Sluit de elektriciteit af voor u
begint. Aan een elektrische installatie werken brengt risico’s met
zich mee. Bent u niet bevoegd, doe dan een beroep op een vakman.
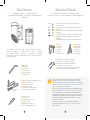
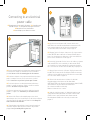
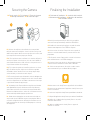
Where to Install it?
FR Où installer votre caméra ?/ ES ¿Dónde desea instalar su
cámara? / IT Dove si può installare la telecamera?
DE Wo sollten Sie Ihre Kamera installieren? / NL Waar kunt u het
beste de camera installeren?
FR 3 façons d’installer votre caméra / ES 3 maneras de instalar su
cámara / IT 3 maneras de instalar su cámara / DE 3 Möglichkeiten,
Ihre Kamera zu installieren / NL 3 manieren om uw camera te
installeren
3 Ways of Installing it
EN Wi-Fi: Use your smartphone to check that Wi-Fi is available at
the selected location. Location: For best operation, avoid direct
exposure to the sun or rain. Ensure that the field of view of the
camera is unobstructed. Height: Position the camera at least 2.5 m
(8 ft) above ground level.
FR Wi-Fi : Utilisez votre smartphone pour vous assurer de la
disponibilité du Wi-Fi à l’emplacement choisi. Emplacement : Pour
un fonctionnement optimal du produit, évitez l’exposition directe au
soleil et à la pluie. Veillez à ce que le champ de vision de la caméra
soit dégagé. Hauteur : Placez la caméra à une hauteur minimale
de 2,5 m.
ES Wi-Fi: Utilice su smartphone para verificar el alcance de la
Wi-Fi en el lugar elegido. Ubicación: Para garantizar el
funcionamiento óptimo del producto, evite la exposición directa al
sol y a la lluvia. Asegúrese de que la cámara disponga de un campo
de visión despejado. Altura: Instale la cámara a una altura mínima
de 2,5 m.
IT Wi-Fi: Utilizza il tuo smartphone per assicurarti che sia dis-
ponibile il Wi-Fi nella posizione scelta. Posizionamento: Per un
funzionamento ottimale del prodotto, evita l’esposizione diretta al
sole e alla pioggia. Accertati che il campo visivo della telecamera
sia libero. Altezza: La telecamera va collocata a un’altezza minima
di 2,5 m.
DE WLAN: Stellen Sie mithilfe Ihres Smartphones fest, ob an dem
gewählten Platz WLAN-Empfang besteht. Platzierung: Damit das
Gerät optimal funktioniert, platzieren Sie es an einem Ort, an dem
es weder direkter Sonneneinstrahlung noch Regen ausgesetzt ist.
Achten Sie darauf, dass die Kamera ein freies «Blickfeld» hat.
Höhe: Bringen Sie die Kamera in mindestens 2,5 m Höhe an.
NL Wi-Fi: Gebruik uw smartphone om de Wifibeschikbaarheid op de
gekozen plaats te controleren. Locatie: Voor een optimale werking
van het product dient u rechtstreekse blootstelling aan de zon en
regen te vermijden. Controleer of het gezichtsveld van de
camera vrij is. Hoogte: Plaats de camera op een hoogte van
minstens 2,5 m.
Connecting to an existing light fixture (page 10)
B
L~N | N L
A
Connecting to an electrical power cable (page 8)
Connecting to an electrical power socket (page 14)
L~N | N L
C
FR Raccordement à un éclairage existant (page 10)
ES Conexión a un punto de luz existente (página 10)
IT Collegamento a un’illuminazione esistente (pagina 10)
DE Anschluss an eine vorhandene Beleuchtung (Seite 10)
NL Aansluiting op een bestaand lichtpunt (pagina 10)
FR Branchement sur une arrivée électrique (page 8)
ES Conexión a una entrada eléctrica (página 8)
IT Collegamento a un ingresso elettrico (pagina 8)
DE Anschluss an eine Verteilerdose (Seite 8)
NL Aansluiting op een elektrische toevoer (pagina 8)
FR Branchement sur une prise électrique (page 14)
ES Conexión a una toma eléctrica (página 14)
IT Collegamento a una presa elettrica (pagina 14)
DE Anschluss an eine Steckdose (Seite 14)
NL Aansluiting op een elektrisch stopcontact (pagina 14)
6 7
La pagina si sta caricando...

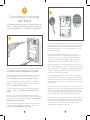
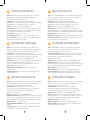
Connecting to an existing
light fixture
FR Raccordement à un éclairage existant / ES Conexión a un punto de luz
existente / IT Collegamento a un’illuminazione esistente / DE Anschluss an
eine vorhandene Beleuchtung / NL Aansluiting op een bestaand lichtpunt
B
1
EN Remove the light fitting and release the power cable. Ensure you
have an outdoor power cable for the camera. Connect the blue wire
(NEUTRAL) to the terminal marked N and the brown wire (LIVE) to
the terminal marked L on the left of the terminal block. The earth
wire (GND) is not needed.
FR Retirez votre luminaire et dégagez l’arrivée électrique.
Munissez-vous d’un câble électrique adapté pour l’extérieur afin
de raccorder votre caméra : connectez le fil bleu (NEUTRE) dans
la borne N et le fil marron (PHASE) dans la borne L sur la partie
gauche du bornier. Le fil de terre (GND) n’est pas nécessaire.
ES Retire la lámpara y desenchufe la entrada eléctrica. Tome un
cable eléctrico adaptado al uso en exterior para conectar su cámara:
cable azul (NEUTRO) en el terminal N y el cable marrón (FASE) en el
terminal L en la parte izquierda de la regleta de terminales. No es
necesario usar un cable de tierra (GND).
IT Togliere la lampada e liberare l’ingresso elettrico. Munirsi di un
cavo elettrico per esterni adeguato per collegare la telecamera: filo
blu (NEUTRO) nel morsetto N e filo marrone (FASE) nel morsetto L
sulla parte sinistra della morsettiera. Il filo di messa a terra (GND)
non è necessario.
DE Nehmen Sie die Leuchte ab und öffnen Sie die Anschlussdose.
Nehmen Sie ein für das Äußere angepasstes elektrisches kabel, um
Ihre Camera zu verbinden: Blaues Kabel (NEUTRALLEITER) an die
Klemme N und braunes Kabel (PHASE) an die Klemme L im linken
Bereich der Klemmleiste. Der Schutzleiter (GND) ist nicht nötig.
NL Verwijder het licht en maak de elektrische toevoer vrij. Gebruik
een voor buiten geschikte elektrische kabel om uw camera aan te
sluiten.: blauwe kabel (NEUTRAAL) in de klem N en de bruine kabel
(FASE) in de klem L op de linkerkant van de klemmenstrook.
De aardingskabel (GND) heeft u niet nodig.
EN Put the mounting plate in its final position and mark the holes
(see instructions on page 6). Drill and insert the screwholders
provided. Do not secure the mounting plate for the moment.
FR Positionnez la platine à son emplacement définitif (consignes
page 6) et marquez les trous. Percez et insérez les chevilles
fournies. Attention : ne pas fixer la platine pour l’instant.
ES Posicione la placa en su ubicación definitiva (indicaciones
página 6) y marque los agujeros. Perfore e instale los tornillos
provistos. Atención: no fije aún la placa.
IT Collocare la piastra nella sua posizione definitiva (istruzioni
pagina 6) e segnare i fori. Attenzione: per ora non fissare la
piastra.
DE Halten Sie die Platte an die endgültig vorgesehene Stelle
(Anweisungen siehe Seite 6) und zeichnen Sie die Löcher an. Bohren
Sie und stecken Sie die mitgelieferten Dübel hinein. Achtung: Die
Platte noch nicht festschrauben.
NL Plaats de plaat op zijn definitieve locatie (instructies pagina 6)
en markeer de gaten. Boor de gaten en monteer de geleverde
pluggen. Let op: maak de plaat nog niet vast.
L~N |N L
2
10 11

L~N | N L
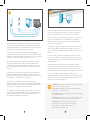
EN Obtain another outdoor power cable to power the light fixture.
Connect the blue wire (NEUTRAL) to the terminal marked N and
the brown wire (LIVE) to the terminal marked L on the right of the
terminal block. The earth wire (GND) is not needed.
FR Munissez vous d’un second câble électrique adapté pour
l’extérieur afin d’alimenter votre luminaire : fil bleu (NEUTRE) dans
la borne N et fil marron (PHASE) dans la borne L sur la partie droite
du bornier. Le fil de terre (GND) n’est pas nécessaire.
ES Traiga un segundo cable de alimentación adaptado al uso en
exterior para alimentar su luminaria. cable azul (NEUTRAL) en
el terminal N y cable marrón (PHASE) en el terminal L en el lado
derecho del bloque de terminales. El cable de tierra (GND) no es
necesario.
IT Munirsi di un secondo cavo elettrico per esterni adeguato per
alimentare la lampada: filo blu (NEUTRO) nel morsetto N e filo
marrone (FASE) nel morsetto L sulla parte destra della morsettiera.
Il filo di messa a terra (GND) non è necessario.
DE Nehmen Sie ein zweites für das Äußere angepasstes
elektrisches Kabel, um Ihre Leuchte zu versorgen. Blaues Kabel
(NEUTRALLEITER) an die Klemme N und braunes Kabel (PHASE) an
die Klemme L im linken Bereich der Klemmleiste.
NL Gebruik een geschikte tweede elektrische kabel om uw licht te
voeden: blauwe kabel (NEUTRAAL) in de klem N en bruine kabel
(FASE) in de klem L op de rechterkant van de klemmenstrook.
De aardingskabel (GND) heeft u niet nodig.
3
EN You can then reinstall the light and reconnect the earth (GND)
wire. We recommend that you protect the cable connecting the
camera to the light with a duct or conduit. Then go to page 16.
FR Vous pouvez ensuite réinstaller votre luminaire et y rebrancher
le fil de terre (GND). Nous vous recommandons de protéger le
câblage reliant la caméra au luminaire au moyen d’une goulotte.
Rendez-vous ensuite page 16.
ES Después, reinstale su lámpara y vuelva a conectar el cable de
toma de tierra (GND). Le recomendamos proteger el cable que
conecta la cámara a la lámpara mediante un pasacables. Vaya a la
página 16.
IT Ora è possibile ricollocare la lampada e ricollegarvi il filo di
messa a terra (GND). Consigliamo di proteggere l’impianto elettrico
collegando la telecamera a una lampada per mezzo di uno scivolo.
Andare a pagina 16.
DE Dann können Sie Ihre Leuchte wieder anbringen und den
Schutzleiter (GND) wieder anschließen. Wir empfehlen Ihnen, die
Verbindungskabel zwischen der Kamera und einer Leuchte mit
einem. Kabelkanal zu schützen. Blättern Sie dann zu Seite 16 weiter.
NL U kunt vervolgens uw licht opnieuw installeren en de
aardingskabel (GND) er opnieuw op aansluiten. We raden aan om de
kabel die de camera met het licht verbindt te beschermen met een
kabelgoot. Ga verder naar pagina 16.
4
EN Warning: ensure that the switch for the light controlled
by the camera cannot be operated.
FR Attention : condamnez l’interrupteur qui commande
l’éclairage raccordé à la caméra.
ES Precaución: Apague el interruptor que controla la lámpara
conectada a la cámara.
IT Attenzione: bloccare e mettere in sicurezza l’interruttore
che comanda l’illuminazione collegata alla telecamera.
DE Achtung: Blockieren Sie den Schalter für die
Beleuchtung, die mit der Kamera verbunden ist.
NL Let op: zet de schakelaar waarmee u de
cameraverlichting bedient vast.
!
12 13

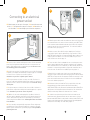
Connecting to an electrical
power socket
C
L~N | N L
EN Obtain a power cable made for outdoor to connect the left part of
the terminal block to the camera. Connect the blue wire (NEUTRAL)
to the terminal marked N and the brown wire (LIVE) to the terminal
marked L on the left of the terminal block. The earth wire (GND) is
not needed. Then go to page 16.
FR Munissez-vous d’un câble électrique adapté pour l’extérieur
et raccordez la partie gauche du bornier de votre caméra : fil bleu
(NEUTRE) dans la borne N et fil marron (PHASE) dans la borne L sur
la partie gauche du bornier. Le fil de terre (GND) n’est pas néces-
saire. Rendez-vous ensuite page 16.
ES Tome un cable eléctrico adaptado al uso en exterior para conec-
tarlo a la parte izquierda de la regleta de terminales de su cámara:
cable azul (NEUTRO) en el terminal N y el cable marrón (FASE) en el
terminal L en la parte izquierda de la regleta de terminales. No es
necesario usar un cable de tierra (GND). Vaya a la página 16.
IT Munirsi di un secondo cavo elettrico per esterni adeguato per
collegare la parte sinistra della morsettiera della telecamera: filo blu
(NEUTRO) nel morsetto N e filo marrone (FASE) nel morsetto L sulla
parte sinistra della morsettiera. Il filo di messa a terra (GND) non è
necessario. Andare a pagina 16.
DE Nehmen Sie bitte ein kabel im Freien, um die linke Seite des
Klemmenbrett Ihrer Kamera anzuschließen: Blaues Kabel
(NEUTRALLEITER) an die Klemme N und braunes Kabel (PHASE) an
die Klemme L im linken Bereich der Klemmleiste. Der Schutzleiter
(GND) ist nicht nötig. Blättern Sie dann zu Seite 16 weiter.
NL Gebruik een voor buiten geschikte elektrische kabel om de
linkerkant van de klemmenstrook van uw camera aan te sluiten:
blauwe kabel (NEUTRAAL) in de klem N en bruine kabel (FASE) in de
klem L op de linkerkant van de klemmenstrook. De aardingskabel
(GND) heeft u niet nodig. Ga verder naar pagina 16.
2
1
EN Choose a close and accessible power socket. Put the mounting
plate in its final position and mark the holes (see instructions on
page 6). Drill and insert the screwholders provided. Do not secure
the mounting plate for the moment.
FR Choisissez une prise électrique proche et accessible. Positionnez
la platine à son emplacement définitif (consignes page 6) et marquez
les trous. Percez et insérez les chevilles fournies.
Attention : ne pas fixer la platine pour l’instant.
ES Escoge una toma eléctrica cercana y accesible. Posicione la
placa en su ubicación definitiva (indicaciones página 6) y marque los
agujeros. Perfore e instale los tornillos provistos. Atención: no fije
aún la placa.
IT Scegliere una presa elettrica vicina ed accessibile. Collocare la
piastra nella sua posizione definitiva (istruzioni pagina 6) e segnare
i fori. Attenzione: per ora non fissare la piastra.
DE Wählen Sie eine nahe und zugängliche Steckdose. Halten Sie
die Platte an die endgültig vorgesehene Stelle (Anweisungen siehe
Seite 6) und zeichnen Sie die Löcher an. Bohren Sie und stecken
Sie die mitgelieferten Dübel hinein. Achtung: Die Platte noch nicht
festschrauben.
NL Kies een nabij en toegankelijk stopcontact. Plaats de plaat op
zijn definitieve locatie (instructies pagina 6) en markeer de gaten.
Boor de gaten en monteer de geleverde pluggen. Let op: maak de
plaat nog niet vast.
FR Branchement sur une prise électrique / ES Conexión a una toma
eléctrica / IT Collegamento a una presa elettrica / DE Anschluss an
eine Steckdose / NL Aansluiting op een elektrisch stopcontact
14 15
La pagina si sta caricando...

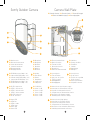
Technical Information
Informations techniques
Informaciones técnicas
EN
FR
ES
Video Full HD video sensor 1080p / 30 fps | Wide angle 130° (diagonal)
Night vision (8 m) with mechanical infrared filter | Digital zoom x8
Somfy-Vision™ motion detection (up to 8 m)
Connectivity Wi-Fi 802.11 b/g/n (2.4 GHz) (e.r.p<100mW)
Open/WPA2-Personal/WPA-WPA2 mixed mode | 500 Kbps (HD) or 1200 Kbps
(Full HD) upload recommended | Bluetooth 4.0 (e.r.p<2.5mW)
Audio Built-in speaker and microphone Siren 110 dB
Power Supply 110-230 V AC, 50-60 Hz, 4.8 A Max | Protected by a 1O A or 16 A
circuit breaker | Powered by electric cables of at least 1.5mm
2
| Max power
supported lighting : 500 W (Halogen) or 100 W (LED)
Size / Weight 150 x 150 x 85 mm / 512 g
Operating temperature from -20°C to 50°C | IP54 weather resistant
Secure connection Video feed secured with SSL/TLS 2048-bit encryption
and cloud storage with AES-256 encryption
Vidéo Capteur vidéo qualité Full HD 1080p / 30 fps | Grand angle 130°
(diagonale) | Vision nocturne (8 m) avec filtre infrarouge mécanique | Zoom
numérique x8 | Détection de mouvement SomfyVision™ (jusqu’à 8 m)
Connectivité Wi-Fi 802.11 b/g/n (2.4 GHz) (e.r.p<100mW)
Open/WPA2-Personal/WPA-WPA2 mixed mode | Débit montant recommandé
500 Kbps (HD) ou 1200 Kbps (Full HD) | Bluetooth 4.0 (e.r.p<2.5mW)
Audio Haut-parleur et microphone intégrés Sirène 110 dB
Alimentation 110-230 V AC, 50-60 Hz, 4,8 A max | Protection par disjoncteur
10 A ou 16 A | Alimentation par fils de 1,5 mm
2
minimum
Puissance maximum de l’éclairage : 500 W (Halogène) ou 100 W (LED)
Taille / Poids 150 x 150 x 85 mm / 512 g
Température de fonctionnement de -20°C à 50°C | Résistance aux
intempéries (IP54)
Connexion sécurisée Flux sécurisés (SSL/TLS avec RSA) et stockage
cloud chiffré (AES-256)
Vídeo Sensor de vídeo Full HD 1080p / 30 fps | Gran angular 130° (en diagonal)
Visión nocturna (8 m) con filtro mecánico de infrarrojos | Zoom digital x8
Detección de movimiento Somfy-Vision™ (hasta 8 m)
Conectividad Wi-Fi 802,11 b/g/n (2,4 GHz) (e.r.p. <100 mW)
Open/ WPA2-Personal/WPA-WPA2 mixed mode | Se recomienda una
velocidad de subida de 500 Kbps (HD) o 1200 Kbps (Full HD)
Bluetooth 4.0 (e.r.p< 2,5 mW)
Audio Altavoz y micrófono integrados Sirena 110 dB
Fuente de alimentación 110-230 V AC, 50-60 Hz, 4,8 A Máx | Protegido por un
disyuntor de 10 A o 16 A | Alimentación por cables eléctricos de 1,5mm
2
mínimo
Potencia de iluminación máxima compatible: 500 W (halógena) o 100 W (LED)
Tamaño / Peso 150 x 150 x 85 mm / 512 g
Temperatura de funcionamiento desde -20 °C a 50 °C | IP54 resistente a los
elementos
Conexión segura Feed de vídeo protegido con cifrado SSL/TLS 2048 bits y
almacenamiento en nube con cifrado AES-256
Specifiche tecniche
Technische informationen
Technische informatie
IT
DE
NL
Video Sensore video Full HD 1080p / 30 fps | Grandangolo 130° (diagonale)
Visione notturna (8 m) con filtro meccanico a infrarossi | Zoom digitale x8
Rilevazione di movimento Somfy-Vision™ (fino a 8 m)
Connettività Wi-Fi 802.11 b/g/n (2.4 GHz) (e.r.p<100mW)
Open/WPA2-Personal / WPA-WPA2 mixed mode | Upload consigliato
500 Kbps (HD) o 1200 Kbps (Full HD) | Bluetooth 4.0 (e.r.p< 2,5 mW)
Audio Altoparlante e microfono integrati Sirena 110 dB
Alimentazione 110-230 V AC, 50-60 Hz, massimo 4,8 A | Protezione da
interruttore di circuito 10 A o 16 A | Alimentazione (elettrica) con cavo da 1,5mm
2
minimo | Massima potenza sostenuta illuminazione: 500 W (alogena) o 100 W (LED)
Dimensioni / Peso 150 x 150 x 85 mm / 512 g
Temperatura di esercizio da -20°C a 50°C | Resistenza agli agenti atmosferici IP54
Connessione protetta Feed video protetto con crittografia SSL/TLS a 2048
bit e cloud storage con crittografia AES-256
Video Full-HD-Videosensor 1080p / 30 fps | Weitwinkel 130° (diagonal)
Nachtsicht (8 m) mit mechanischem Infrarotfilter | 8x-Digitalzoom
Bewegungserkennung Somfy-Vision™ (bis 8 m)
Anschlussmöglichkeiten Wi-Fi 802.11 b/g/n (2,4 GHz) (e.r.p < 100mW)
Open/WPA2-Personal/WPA-WPA2 mixed mode | Upload-Geschwindigeit
500 kbps (HD) oder 1.200 kbps (Full HD) empfohlen
Bluetooth 4.0 (e.r.p< 2,5 mW)
Audio Eingebauter Lautsprecher, eingebautes Mikrofon Sirene 110 dB
Stromversorgung 110-230 V AC, 50-60 Hz, 4,8 A max | Schutz von
Ausschalter 10 A oder 16 A | Stromversorgung von Faden 1,5 mm
2
Minimum
Höchste unterstützte Beleuchtungsleistung: 500 W (Halogen) oder 100 W (LED)
Maße / Gewicht 150 x 150 x 85 mm / 512 g
Betriebstemperatur von -20°C bis 50°C | Witterungsbeständig IP54
Sichere Verbindung Video-Feed gesichert durch SSL/TLS-2048-Bit-
Verschlüsselung und Cloud-Speicherung mit AES-256-Verschlüsselung
Video Full-HD video sensor 1080p / 30 fps | Groothoeklens 130° (diagonaal)
Nachtvisie (8 m) met mechanische infraroodfilter | Digitale zoom x8
Somfy-Vision™ bewegingsdetector (tot 8 m)
Connectiviteit Wi-Fi 802,11 b/g/n (2.4 GHz) (e.r.p.<100mW)
Open/WPA2-Personal/WPA-WPA2 mixed mode | 500 Kbps (HD) of
1200 Kbps (Full-HD) upload aanbevolen | Bluetooth 4.0 (e.r.p< 2,5 mW)
Audio Ingebouwde luidspreker en microfoon Alarm 110 dB
Stroom 110-230 V AC, 50-60 Hz, 4,8 A Max | Beveiliging met 10 A- of
16 A-stroomonderbreker | Toevoer door draden van minimaal 1,5 mm
2
Max
Stroomondersteuning verlichting: 500 W (halogeen) of 100 W (LED)
Afmeting / Gewicht 150 x 150 x 85 mm / 512 g
Werkingstemperatuur van -20° tot 50° C | IP54 weerbestendig
Veilige verbinding Videofeed beveiligd met SSL/TLS 2048-bit encryptie
en cloudopslag met AES-256 encryptie
18 19
La pagina si sta caricando...
-
 1
1
-
 2
2
-
 3
3
-
 4
4
-
 5
5
-
 6
6
-
 7
7
-
 8
8
-
 9
9
-
 10
10
-
 11
11


Somfy Protect Outdoor Camera grise Manuale del proprietario
- Tipo
- Manuale del proprietario
- Questo manuale è adatto anche per
in altre lingue
- English: Somfy Protect Outdoor Camera grise Owner's manual
- français: Somfy Protect Outdoor Camera grise Le manuel du propriétaire
- español: Somfy Protect Outdoor Camera grise El manual del propietario
- Deutsch: Somfy Protect Outdoor Camera grise Bedienungsanleitung
- Nederlands: Somfy Protect Outdoor Camera grise de handleiding
Documenti correlati

Altri documenti
-
Somfy 2401507 Guida utente
-
-
-
-
Somfy 110dB protect INDOOR SIREN Home alaram Guida utente
-
-
-
Somfy 1875255 Guida utente
-
Somfy Home Alarm Essential Guida utente
-
Panasonic WZ-CW380 Istruzioni per l'uso