
UK: PC RECOMMENDED SPECS / FR: SPÉCIFICATIONS RECOMMANDÉES DU PC / IT: SPECIFICHE
CONSIGLIATE PER IL PC / DE: EMPFOHLENE PC-SPEZIFIKATIONEN / ES: ESPECIFICACIONES
RECOMENDADAS PARA EL PC / NL: AANBEVOLEN PC-SPECIFICATIES / PT: ESPECIFICAÇÕES
RECOMENDADAS PARA PC
UK: MINIMUM REQUIREMENTS FOR LINK CABLE / FR: EXIGENCES MINIMALES DU CÂBLE DE
LIAISON / IT: REQUISITI MINIMI PER IL CAVO LINK / DE: MINDESTANFORDERUNGEN AN DAS
VERBINDUNGSKABEL / ES: REQUISITOS MÍNIMOS PARA EL CABLE DE CONEXIÓN / NL:
MINIMUMVEREISTEN VOOR DE LINK-KABEL / PT: REQUISITOS MÍNIMOS PARA A LIGAÇÃO POR
CABO:
Processor / Processeur / Processore / Prozessor / Procesador / Processor / Processado:
Intel i5-4590 / AMD Ryzen 5 1500x (or greater / ou supérieur / o superiore / oder höher / o superior
of hoger / ou superior)
Graphics Card / Carte graphique / Scheda Grafica / Grafikkarte / Tarjeta gráfica / Grafische kaart
Placa gráfica:
NVIDIA GTX 1050 Ti / AMD Radeon RX 470 (or greater / ou supérieur / o superiore / oder höher
o superior / of hoger / ou superior)
Alternative Graphics Card / Autre carte graphique / Scheda Grafica Alternativa / Alternative
Grafikkarte / Tarjeta gráfica alternativ / Alternatieve grafische kaart / Placa gráfica alternativa:
NVIDIA GTX 960 4GB / AMD Radeon R9 290 (or greater / ou supérieur / o superiore / oder höher
o superior / of hoger / ou superior)
Memory / Mémoire / Memoria / Speicher / Memoria / Geheugen / Memória:
8GB + RAM
Operating System / Système d’exploitation / Sistema Operativo / Betriebssystem / Sistema
operativo / Besturingssysteem / Sistema Operativo :
Windows 10+
UK: PLEASE NOTE: IF YOUR GPU ISN’T LISTED, WE CANNOT GUARANTEE COMPATIBILITY.
FR: VEUILLEZ NOTER : SI VOTRE PROCESSEUR GRAPHIQUE N’EST PAS SUR LA LISTE, NOUS NE
POUVONS GARANTIR LA COMPATIBILITÉ.
IT: NOTA: SE LA TUA CPU NON È PRESENTE NELL'ELENCO, NON POSSIAMO GARANTIRNE LA
COMPATIBILITÀ.
DE: BITTE BEACHTEN: WENN DEINE GPU NICHT AUFGELISTET IST, KÖNNEN WIR DIE
KOMPATIBILITÄT NICHT GARANTIEREN.
ES: TEN EN CUENTA QUE SI TU GPU NO SE ENCUENTRA EN LA LISTA, LA COMPATIBILIDAD NO
ESTÁ GARANTIZADA.
NL: MERK OP: ALS JE GPU NIET WORDT VERMELD, KUNNEN WE DE COMPATIBILITEIT NIET
GARANDEREN.
PT: LEMBRAMOS QUE SE O TEU GPU NÃO ESTIVER LISTADO, NÃO GARANTIMOS A
COMPATIBILIDADE.
UK: FULL INSTRUCTIONS OVERLEAF
FR: INSTRUCTIONS COMPLÈTES AU VERSO
IT: ISTRUZIONI COMPLETE SUL RETRO
DE: KOMPLETTE ANLEITUNG AUF DER RÜCKSEITE
ES: INSTRUCCIONES COMPLETAS AL DORSO
NL: VOLLEDIGE INSTRUCTIES OP OMMEZIJDE
PT: INSTRUÇÕES COMPLETAS NO VERSO
QUICK START GUIDE
GUIDE DE DÉMARRAGE RAPIDE
ONLINE: STEALTHGAMING.NET/SUPPORT
Set-Up Guides, Support Articles, FAQ’s and more
EMAIL: HELP@ABPTECH.CO.UK
How can we help? Our support team will answer your questions
LIVE CHAT:
Speak to our Support Team by clicking the ‘Chat With Us’
box over at stealthgaming.net
OPERATING TIMES:
Monday - Thursday 9am to 5pm
Friday 9am to 4pm
(UK Times - GMT)
FR: VOUS RENCONTREZ DES DIFFICULTÉS DURANT L’INSTALLATION
DU PRODUIT? NOUS POUVONS VOUS AIDER! ONL D'EXPRESSION
ANGLAISE
IT: HAI PROBLEMI DI INSTALLAZIONE? POSSIAMO AIUTARTI!
ONL ANGLOFONO
DE: PROBLEME BEIM AUFBAU? WIR HELFEN IHNEN WEITER!
ENGLISCH SPRECHENDES ONL
ES: ¿PROBLEMAS CON LA CONFIGURACIÓN? ¡PODEMOS AYUDARLE!
ONL DE HABLA INGLESA
NL: PROBLEMEN BIJ HET INSTELLEN? WIJ HELPEN U WEL!
(ENGELSTALIGE ONL)
PT: ESTÁ A TER PROBLEMAS EM CONFIGURAR?
ATENDIMENTO APENAS EM INGLÊS
HAVING TROUBLE
SETTING UP? WE CAN HELP!
TECHNICAL SUPPORT
QUESTIONS / SET-UP / NOT WORKING?
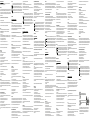
Supported GPUs
NVIDIA GPU Supported Not currently
supported
NVIDIA Titan Z •
NVIDIA Titan X •
NVIDIA GeForce GTX 970 •
NVIDIA GeForce GTX 1060 Desktop, 3 GB •
NVIDIA GeForce GTX 1060 Desktop, 6 GB •
NVIDIA GeForce GTX 1060M •
NVIDIA GeForce GTX 1070 (all) •
NVIDIA GeForce GTX 1080 (all) •
NVIDIA GeForce GTX 1650 •
NVIDIA GeForce GTX 1650 Super •
NVIDIA GeForce GTX 1660 •
NVIDIA GeForce GTX 1660 TI •
NVIDIA GeForce RTX 20-series (all) •
NVIDIA GeForce RTX 30-series* •
AMD GPU Supported Not currently
supported
AMD 200 Series •
AMD 300 Series •
AMD 400 Series •
AMD 500 Series •
AMD 5000 Series •
AMD 6000 Series** •
AMD Vega Series •
UK: RECOMMENDED SPEC / FR: RECOMMANDÉ / IT: CONSIGLIATO
DE: EMPFOHLEN / ES: RECOMENDADO / NL: AANBEVOLEN / PT: RECOMENDADO
Processor / Processeur / Processore / Prozessor / Procesador / Processor / Processado:
Intel i5-4590/AMD Ryzen 5 1500X (or greater / ou supérieur / o superiore / oder höher / o superior
of hoger / ou superior)
Graphics Card / Carte graphique / Scheda Grafica / Grafikkarte / Tarjeta gráfica / Grafische kaart
Placa gráfica:
SEE GPU TABLES
Memory / Mémoire / Memoria / Speicher / Memoria / Geheugen / Memória:
8 GB+ RAM
Operating System / Système d’exploitation / Sistema Operativo / Betriebssystem / Sistema operativo
Besturingssysteem / Sistema Operativo:
Windows 10, Windows 11
USB Ports: 3.0 USB port
meta.com/quest/setup
UK: install the Oculus/Meta App on a compatible gaming PC (non Mac) by downloading the software at...
FR: 1: installez l’application Oculus/Meta sur un PC de jeux compatible (non un Mac) en téléchargeant
le logiciel sur...
IT: installa l'app Oculus/Meta su un PC da gaming (non Mac) scaricando il software dal link...
DE: installiere die Oculus/Meta App auf einem kompatiblen Gaming-PC (nicht Mac), indem du die
Software auf...
ES: instala la aplicación de Oculus/Meta en un PC compatible (no puede ser un Mac) descargando el
software en...
NL: installeer de Oculus/Meta-app op een compatibele gaming-pc (geen Mac) door de software te
downloaden op...
PT: instala a aplicação Oculus/Meta num PC de gaming compatível descarregando o software em...
UK: Connect your headset using the Stealth USB C Power* & Link Cable. For the first time, you will need to click add new device and complete the set-up.
Plug the right-angle end of the cable into the Meta Quest 2, and then plug the larger end – USB A into a USB 3.0 port on the back of your PC.
FR: Connectez votre casque à l’aide du câble Power* & Link USB C Stealth La première fois, vous devrez cliquer sur « Ajouter un nouveau dispositif » et terminer la
configuration. Branchez l’extrémité à angle droite du câble dans le Meta Quest 2, puis branchez la grande extrémité – USB A dans le port USB 3.0 à l’arrière de votre PC.
IT: Collega le cue utilizzando l'alimentatore USB C Stealth* e il Cavo Link. Per la prima volta, è necessario fare clic su Aggiungi nuovo dispositivo e completare la
configurazione. Collega l'estremità ad angolo retto del cavo a Meta Quest 2, quindi collegare l'estremità più grande - USB A - a una porta USB 3.0 sul retro del PC.
DE: Schließe dein Headset mit dem Stealth USB C Power* & Link-Kabel an. Beim ersten Mal musst du auf „Neues Gerät hinzufügen“ klicken und die Einrichtung
abschließen. Stecke das rechtwinklige Ende des Kabels in das Meta Quest 2 und dann das größere Ende – USB A – in einen USB 3.0-Anschluss auf der Rückseite deines PCs.
ES: Conecta las gafas al Stealth USB C Power* y Link Cable. La primera vez tienes que hacer clic en añadir nuevo dispositivo y finalizar la configuración. Conecta el extremo
derecho en ángulo del cable en Meta quest 2 y, a continuación, conecta el extremo de mayor tamaño USB A en un puerto USB 3.0 en la parte posterior del PC.
NL: Sluit je headset aan via de Stealth USB-C-kabel voor voeding* en Link. De eerste keer moet je op 'Nieuw apparaat toevoegen' klikken en de installatie voltooien. Sluit
het haakse uiteinde van de kabel aan op de Meta Quest 2 en sluit dan het grotere uiteinde met USB-A-stekker aan op een USB 3.0-poort aan de achterkant van je pc.
PT: Liga os óculos utilizando o cabo de dados e alimentação USB-C Stealth* . Na primeira vez, vais ter de clicar em 'adicionar novo dispositivo' e completar a configuração.
Liga a extremidade em 90º do cabo no Meta Quest 2 e de seguida liga a extremidade maior – USB A na porta USB 3.0 na parte de trás do teu PC.
UK: Attach the cable to your head strap using the provided Velcro strap and fasten
FR: Attachez votre câble au serre-tête à l’aide du strap en Velcro fourni, puis serrez
IT: Collega il cavo alla fascia per la testa utilizzando il velcro in dotazione e fissarlo
DE: Befestige dein Kabel mit dem mitgelieferten Klettband an deinem Kopfband und schließe es
ES: Conecta el cable a la correa de sujeción con el velcro y ajústala
NL: Bevestig je kabel aan je hoofdband met behulp van de meegeleverde klittenband
PT: Fixa o cabo na correia da cabeça usando a correia de velcro fornecida e aperta

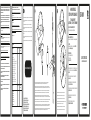
UK: USB C POWER & LINK CABLE
Please keep this instruction manual for future reference. If you require any help or assistance please contact
[email protected] or visit stealthgaming.net/support
WARRANTY
This product is guaranteed for a period of one year from the date of purchase. During this period if there is a defect due
to faulty materials, or workmanship the retailer from whom you purchased it will replace it with the same or a similar
model on production of your purchase receipt or proof of purchase. This guarantee does not cover defects arising from
accidental damage, misuse or wear and tear, and is available only to the original purchaser of the product. This does not
aect your statutory rights.
To play Rift content on your Meta Quest 2, please start by confirming the following…
• Your PC meets the Recommended Specs.
• Your Meta Quest system software is up to date on both your PC (download for first time users below) and Headset.
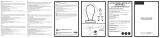
Once you’ve confirmed these requirements, you can begin by following the steps below:
FROM PC
1: install the Oculus/Meta App on a compatible gaming PC (non Mac) by downloading the software at
www.meta.com/quest/setup/ under Quest 2 - Link Cable and Air Link and follow the instructions
2: Open the desktop app on your PC
3: Turn on your headset
4: Connect your headset using the Stealth USB C Power* & Link Cable. For the first time, you will need to click add
new device and complete the set-up. Plug the right-angle end of the cable into the Meta Quest 2, and then plug the
larger end – USB A into a USB 3.0 port on the back of your PC
5: You should see a prompt to Enable Oculus Link. Click Enable
6: You can also launch your Link cable via Settings > Quick Actions > Oculus Link
You can open games via the Headset Interface or via the Oculus PC App Library on your PC
Attach the cable to your head strap using the provided Velcro strap and fasten
PLEASE NOTE:
Connection issues
If your wired link is unsuccessful, try and check the following:
• Make sure you enable the Oculus Link
• Make a USB Connection test
• Make sure your graphics card meets our PC requirements
• Make sure your drivers are up to date on your PC
• Try logging out and back in, or, completely powering o your headset and restarting
• Make sure the headset is not low on power
• Make sure the cable is plugged directly into a 3.0/3.1 USB port. Also try another port and test with other devices to
check they are working
• Check that Air Link is turned o. It will aect the wired link performance
If your connection isn’t great and has a jumpy or stuttering screen, try the following:
1: Open PC app on your computer
2: Select Devices and then Meta Quest
3: Select Graphics Preferences and the select Reset to default
4: Select Save
*CHARGING
You can charge your headset while playing games. However, its charging rate is considerably slower when playing
games and will only keep the battery at a similar % when you turned on the headset and attach the cable.
The charging capability and overall speed will depend on the quality of your motherboard and PC power supply. Most
motherboard USB ports don’t output much power as standalone chargers. Charging speeds can also be aected the
longer the cable.
For charging, it is best to charge when your headset is powered o.
IMPORTANT SAFEGUARDS & PRECAUTIONS
• Children should always be supervised when using this product
•This unit is for indoor use only, do not expose to dust, direct sunlight, wet weather conditions, high humidity, high
temperatures or mechanical shock
• Do not expose to splashing, dripping, rain or moisture. Do not immerse in liquid
• Do not position the cable where it would be subjected to extreme heat or flames
• Keep the cable away from oil or sharp objects
• Avoid any unnecessary strain of the cable
• Do not use the USB cable with any other attachment, unit or equipment other than your console and controllers
• Do not disassemble; there are no serviceable parts inside
• For external cleaning, use a soft, clean, damp cloth only. Use of detergents may damage the cabinet finish and leak
inside
RECYCLING
Where you see this symbol on any of our electrical products, batteries or packaging, it indicates that the
relevant electrical product or battery should not be disposed of as general household waste in the EU or
Turkey. To ensure the correct waste treatment of the product and battery, please dispose of them in
accordance with any applicable local laws or requirements for disposal of electrical equipment/batteries. In
so doing, you will help to conserve natural resources and improve standards of environmental protection in
treatment and disposal of electrical waste. The recycling and processing of Waste Electrical and Electronic
Equipment will make a significant contribution towards helping protect the environment by reducing landfill
waste.
MADE IN CHINA
FR: CÂBLE D’ALIMENTATION ET DE LIAISON USB-C
GARANTIE
Ce produit est garanti pendant un an à compter de la date d'achat. Au cours de cette période, s'il y a un défaut dû à des
matériaux défectueux ou à la fabrication, le détaillant auprès duquel vous l'avez acheté le remplacera par le même
modèle ou un modèle similaire lors de la présentation de votre reçu ou d'une preuve d'achat. Cette garantie ne couvre
pas les défauts résultant de dommages accidentels, d'utilisations abusives ou d'usure et n'est disponible que pour
l'acheteur original du produit. Cela n'aecte pas vos droits légaux.
Pour jouer le contenu Rift sur votre Meta Quest 2, veuillez commencer par confirmer ce qui suit...
• Votre PC satisfait aux spécifications recommandées.
• Votre logiciel du système Meta Quest est à jour à la fois sur votre PC (téléchargement pour les utilisateurs débutants
ci-dessous) et le casque.
Lorsque vous avez confirmé ces exigences, vous pouvez commencer en suivant les étapes ci-dessous :
DEPUIS LE PC
1: installez l’application Oculus/Meta sur un PC de jeux compatible (non un Mac) en téléchargeant le logiciel sur
www.meta.com/quest/setup/ sous Quest 2 - Câble Link et Air Reliez et suivez les instructions
2: Ouvrez l’application de bureau sur votre PC
3: Allumez votre casque
4: Connectez votre casque à l’aide du câble Power* & Link USB C Stealth La première fois, vous devrez cliquer sur «
Ajouter un nouveau dispositif » et terminer la configuration. Branchez l’extrémité à angle droite du câble dans le Meta
Quest 2, puis branchez la grande extrémité – USB A dans le port USB 3.0 à l’arrière de votre PC
5: Vous devriez voir une invite pour Activer Oculus Link. Cliquez sur Activer
6: Vous pouvez aussi lancer votre câble Link via Paramètres > Actions rapides > Oculus Link
Vous pouvez ouvrir les jeux via l’interface du casque ou via la bibliothèque d’applications PC Oculus sur votre PC
Attachez votre câble au serre-tête à l’aide du strap en Velcro fourni, puis serrez
VEUILLEZ NOTER :
Problèmes de connexion
Si votre connexion filaire échoue, essayez de vérifier les points suivants :
• Assurez-vous d’activer le Oculus Link
• Faites un test de connexion USB
• Assurez-vous que votre carte graphique satisfait aux exigences de votre PC
• Assurez-vous que vos pilotes sont à jour sur votre PC
• Essayez de vous déconnecter et de vous connecter à nouveau ou d’éteindre complètement votre casque, puis
redémarrez
• Assurez-vous que votre casque n’est pas déchargé
• Assurez-vous que le câble est branché directement à un port USB 3.0/3.1. Essayez aussi un autre port et faites un test
avec d’autres dispositifs pour vérifier qu’ils fonctionnent correctement
• Vérifiez que Air Link est éteint. Cela aura une incidence sur les performances de la connexion filaire
Si votre connexion n'est pas excellente et que l'écran est saccadé, essayez ce qui suit :
1: Ouvrez l’application PC sur votre ordinateur
2: Sélectionnez Dispositifs puis Meta Quest
3: Sélectionnez Préférences Graphiques, puis Réinitialiser sur défaut
4: Sélectionnez Sauvegarder
*EN CHARGE
Vous pouvez charger votre casque pendant le jeu. Cependant, son taux de charge est considérablement plus lent lorsque
vous jouez et ne maintient la batterie à un pourcentage similaire que lorsque vous avez allumé le casque et branché le
câble. La capacité de charge et la vitesse globale dépendent de la qualité de votre carte mère et de l'alimentation de
votre PC. La plupart des ports USB des cartes mères ne produisent pas beaucoup d'énergie en tant que chargeurs
autonomes. La vitesse de chargement peut également être aectée par la longueur du câble.
Pour le chargement, il est préférable de le faire lorsque le casque est éteint.
GARANTIES ET PRÉCAUTIONS IMPORTANTES
• Les enfants doivent toujours être sous la surveillance d’un adulte lors de l’utilisation de ce produit
• Utilisez uniquement à l’intérieur. Ne pas les exposer à la poussière, à la lumière directe du soleil, aux intempéries, à une
forte humidité, à des températures élevées ou à un choc mécanique
• Ne pas exposer à des éclaboussures, à la pluie ou à l’humidité. Ne pas les immerger dans un liquide
• Ne pas exposer à des chaleurs intenses ou au contact direct de flammes
This product is not aliated with, nor authorized, sponsored, or approved by, Meta Quest. Meta Quest is a
registered trademark of Meta Platforms, Inc. Not recommended for children under 6 years of age. Please
retain this packaging for future reference. Due to the company’s policy of constant improvement and
technical refinement, the company reserve the right to alter the specification. Manufactured by ABP
Technology Ltd. Bolton, BL2 1BX. MADE IN CHINA.
Marking of this symbol indicates this product has been tested
and is compliant with the EMC Directive of the European Union
2014/30/EU.
Marking of this symbol indicates this product conforms to
Electromagnetic Compatibility Regulations 2016 issued by the
UK.
• N’exposez pas les câbles à des objets huileux ou tranchants
• Éviter les tensions de câbles
• N’utilisez pas le câble USB avec aucun autre équipement autre que vos manettes ou votre console
• Ne pas démonter l’équipement; il ne contient aucune pièce réparable
• Pour nettoyer l’extérieur de l’équipement, utiliser uniquement un chion doux et propre légèrement humidifié. L’emploi
de détergents risquerait d’endommager le revêtement du coret
RECYCLAGE
Lorsque ce symbole figure sur l’un de vos produits électriques, sur des batteries ou des emballages, cela
signifie que ces produits ou batteries électriques ne doivent pas être jetés dans les ordures ménagères, au
sein de l’UE ou en Turquie. Pour être sûr d’éliminer correctement le produit et la batterie, veuillez respecter
les lois applicables locales ou les réglementations pour le traitement des équipements/batteries électriques.
Vous aiderez ainsi à préserver les ressources naturelles et à améliorer les normes de protection
environnementales relatives au traitement des déchets électriques. Le recyclage et le traitement des
déchets d'équipements électriques et électroniques contribueront grandement à protéger l'environnement
en réduisant les déchets d'enfouissement. électriques et électroniques contribueront grandement à
protéger l'environnement en réduisant les déchets d'enfouissement.
FABRIQUÉ EN CHINE
IT: CAVO DI ALIMENTAZIONE E DI COLLEGAMENTO USB-C
GARANZIA
Questo prodotto è garantito per un periodo di un anno a partire dalla data di acquisto. Durante questo periodo, in
presenza di un difetto dovuto ai materiali o alla manodopera, il rivenditore presso il quale è stato acquistato il prodotto lo
sostituirà con lo stesso prodotto o con un modello simile previa presentazione della ricevuta o della prova di acquisto. La
presente garanzia non copre i difetti derivanti da danno accidentale, utilizzo improprio o usura ed è disponibile solo per
l'acquirente originale del prodotto. Ciò non influisce sui diritti legali.
Per giocare ai contenuti Rift su Meta Quest 2, inizia confermando quanto segue...
• Il tuo PC soddisfa le Specifiche richieste.
• Il software di sistema di Meta Quest è aggiornato sia sul PC (download per i primi utenti qui sotto) che sulle Cue.
Una volta confermati questi requisiti, puoi iniziare a seguire i passaggi indicati di seguito:
DAL PC,
1: installa l'app Oculus/Meta su un PC da gaming (non Mac) scaricando il software dal link www.meta.com/quest/setup/
sotto Quest 2 - Cavo Link e Air Link e segui le istruzioni
2: Apri l'app desktop sul PC
3: Accendi le cue
4: Collega le cue utilizzando l'alimentatore USB C Stealth* e il Cavo Link. Per la prima volta, è necessario fare clic su
Aggiungi nuovo dispositivo e completare la configurazione. Collega l'estremità ad angolo retto del cavo a Meta Quest 2,
quindi collegare l'estremità più grande - USB A - a una porta USB 3.0 sul retro del PC.
5: Dovresti vedere una richiesta per Abilitare Oculus Link. Clicca su Abilita
6: Puoi anche avviare il tuo cavo Link tramite Impostazioni > Azioni rapide > Oculus Link
È possibile aprire i giochi tramite l'interfaccia delle Cue o tramite la libreria di app per PC di Oculus sul PC
Collega il cavo alla fascia per la testa utilizzando il velcro in dotazione e fissarlo
NOTA:
Problemi di connessione
Se il collegamento via cavo non riesce, prova a verificare quanto segue:
• Assicurati di aver abilitato Oculus Link
• Esegui un test di connessione USB
• Assicurati che la tua scheda grafica soddisfi i nostri requisiti del PC
• Assicurati che i driver del tuo PC siano aggiornati
• Prova a disconnetterti e riaccedere, oppure segni completamente le cue e riavvia
• Assicurati che le cue non siano scariche
• Assicurati che il cavo sia collegato direttamente nella porta USB 3.0/3.1. Prova anche un'altra porta e verifica che questa
funzioni collegandovi altri dispositivi
• Verifica che Air Link sia spento. Ciò influisce sulle prestazioni del collegamento cablato
Se la connessione non è ottimale e la schermata è discontinua o va a scatti, prova a eseguire le seguenti operazioni:
1: Apri l'applicazione PC sul computer
2: Seleziona Dispositivi e quindi Meta Quest
3: Seleziona Preferenze Grafiche e seleziona Ripristina alle impostazioni predefinite
4: Seleziona Salva
*CARICA IN CORSO
È possibile cambiare le cue mentre si gioca. Tuttavia, la velocità di ricarica è notevolmente più lenta quando si gioca e
mantiene la batteria a una percentuale simile solo quando si accendono le cue e si collega il cavo.
La capacità di ricarica e la velocità complessiva dipendono dalla qualità della scheda madre e dell'alimentatore del PC. La
maggior parte delle porte USB delle schede madri non eroga molta potenza come carica autonoma. La velocità di ricarica
può anche essere influenzata dalla lunghezza del cavo.
Per quanto riguarda la ricarica, è meglio ricaricare quando le cue sono spente.
MISURE DI SICUREZZA E PRECAUZIONI IMPORTANTI
• È necessario sempre sorvegliare adeguatamente i bambini quando utilizzano il prodotto
• L’unità è destinata esclusivamente per l’uso in ambienti interni. Non esporre a polvere, luce solare diretta, climi umidi,
elevata umidità, alte temperature o urti meccanici
• Non esporre a gocce, schizzi, pioggia o umidità. Non immergere in liquidi
• Non posizionare i cavi in punti in cui potrebbero essere soggetti a calore eccessivo o fiamme
• Tenere tutti i cavi lontano da olio oppure oggetti appuntiti
• Evitare di tirare inutilmente i cavi
• Non utilizzare il cavo USB con un accessorio o un’apparecchiatura diversa dalla console e dai controller
• Non smontare. All’interno non sono presenti parti riparabili
• Per la pulizia esterna, utilizzare soltanto un panno umido morbido e pulito. L’uso di detergenti può danneggiare la
finitura e causare perdite interne
RICICLABILE
La presenza di questo simbolo sui prodotti o sulle confezioni indica che i prodotti elettrici o le batterie non
devono essere gettati tra i rifiuti domestici comuni in Europa e in Turchia. Per garantire il corretto
smaltimento di tali rifiuti, gettarli in conformità alle leggi o alle normative locali in materia di smaltimento di
prodotti elettrici o batterie. Così facendo, si contribuisce a preservare le risorse naturali e a migliorare gli
standard di protezione ambientale nel trattamento e nello smaltimento dei rifiuti elettrici. Riducendo i rifiuti
in discarica, il riciclo e il trattamento delle apparecchiature elettriche ed elettroniche darà un contributo
rilevante nella protezione dell'ambiente.
PRODOTTO IN CINA
DE: USB-C STROM & LINK KABEL
GARANTIE
Dieses Produkt hat eine Garantielaufzeit von einem Jahr ab Kaufdatum. Sollte während dieser Zeit ein Defekt aufgrund
von Material- oder Verarbeitungsfehlern auftreten, wird der Händler, bei dem Sie den Artikel gekauft haben, ihn gegen
Vorlage Ihrer Kaufquittung oder Ihres Kaufbelegs anhand desselben oder einem ähnlichen Modell ersetzen. Diese
Garantie deckt keine Mängel ab, die durch versehentliche Beschädigungen, Missbrauch oder Verschleiß entstehen, und
steht nur dem ursprünglichen Käufer des Produkts zur Verfügung. Dies beeinträchtigt Ihre gesetzlichen Rechte nicht.
Um Rift-Inhalte auf Ihrer Meta Quest 2 zu spielen, bestätige bitte zunächst Folgendes ...
• Dein PC entspricht den empfohlenen technischen Daten.
• Deine Meta Quest Systemsoftware ist sowohl auf deinem PC (Download für Erstbenutzer unten) als auch auf deinem
Headset auf dem neuesten Stand.
Sobald du diese Voraussetzungen bestätigt hast, kannst du mit den folgenden Schritten beginnen:
VOM PC
1: installiere die Oculus/Meta App auf einem kompatiblen Gaming-PC (nicht Mac), indem du die Software auf
www.meta.com/quest/setup/ unter Quest 2 – Link Cable und Air Link herunterlädst und den Anweisungen folgt an
Ihren PC an:
2: Öne die Desktop-Anwendung auf deinem Gaming-PC**, um Ihr VR-Erlebnis zu verbessern PC
3: Schalte dein Headset ein
4: Schließe dein Headset mit dem Stealth USB C Power* & Link-Kabel an. Beim ersten Mal musst du auf „Neues Gerät
hinzufügen“ klicken und die Einrichtung abschließen. Stecke das rechtwinklige Ende des Kabels in das Meta Quest 2 und
dann das größere Ende – USB A – in einen USB 3.0-Anschluss auf der Rückseite deines PCs
5: Du solltest eine Auorderung zur Aktivierung von Oculus Link sehen. Klicke auf Aktivieren
6: Du kannst dein Link-Kabel auch über Einstellungen > Schnellzugri > Oculus Link
Du kannst Spiele über die Headset-Schnittstelle oder über die Oculus PC App-Bibliothek auf deinem Gaming-PC**, um Ihr
VR-Erlebnis PC önen
Befestige dein Kabel mit dem mitgelieferten Klettband an deinem Kopfband und schließe es
BITTE BEACHTEN:
Verbindungsprobleme
Wenn deine kabelgebundene Verbindung nicht erfolgreich ist, versuche Folgendes zu überprüfen:
• Stellen sicher, dass du den Oculus Link aktivieren
• Test einer USB-Verbindung durchführen
• Stelle sicher, dass deineGrafikkarte unsere PC-Anforderungen erfüllt
• Stelle sicher, dass die Treiber auf deinem PC auf dem neuesten Stand sind
• Versuche, dich ab- und wieder anzumelden, oder schalte das Headset komplett aus und starte es neu
• Vergewisser dich, dass der Stromverbrauch des Headsets nicht zu niedrig ist
• Stelle sicher, dass das Kabel direkt an einen 3.0/3.1 USB-Anschluss angeschlossen ist. Versuche auch einen anderen
Anschluss und testen Sie mit anderen Geräten, ob sie funktionieren
• Vergewisser dich, dass Air Link ausgeschaltet ist. Dies beeinträchtigt die Leistung der kabelgebundenen Verbindung
Wenn deine Verbindung nicht gut ist und der Bildschirm ruckelt oder stottert, versuche Folgendes:
1: Öne die PC-Anwendung auf deinem Computer
2: Wähle Geräte und dann Meta Quest
3: Wähle Grafikeinstellungen und dann Auf Standard zurücksetzen
4: Wähle Speichern
*AUFLADEN
Du kannst dein Headset während des Spielens aufladen. Allerdings ist die Ladegeschwindigkeit beim Spielen deutlich
langsamer und hält den Akku nur dann auf einem ähnlichen Prozentsatz, wenn du das Headset einschaltest und das Kabel
anschließt. Die Ladefähigkeit und die Gesamtgeschwindigkeit hängen von der Qualität der Hauptplatine und des
PC-Netzteils ab. Die meisten USB-Anschlüsse an Hauptplatinen liefern als eigenständige Ladegeräte nicht viel Strom. Auch
die Ladegeschwindigkeit kann beeinträchtigt werden, je länger das Kabel ist.
Zum Aufladen ist es am besten, wenn das Headset ausgeschaltet ist.
WICHTIGE HINWEISE UND VORSICHTSMAßNAHMEN
• Kinder sollten bei dem Einsatz dieses Produktes stets von Erwachsenen betreut werden
• Dieses Produkt ist ausschließlich für den Einsatz in geschlossenen Räumen gedacht. Setzen Sie dieses Produkt keiner
direkten Sonneneinwirkung, hohen Temperaturen, Staub, hoher Luftfeuchtigkeit, Schlägen oder Erschütterungen aus
• Vermeiden Sie jeden direkten oder indirekten Kontakt mit Flüssigkeiten jeglicher Art
• Achten Sie darauf, dass das Kabel keiner hohen Temperatur oder Feuer aus
• Halten Sie das Kabel von Öl und scharfen Kanten und Objekten entfernt
• Vermeiden Sie jede unnötige Beanspruchung des Kabels
• Benutzen Sie das USB Kabel ausschließlich für die angegebenen Geräte und auf keinen Fall für andere Kontroller,
Konsolen, Zubehör oder andere technische Geräte
• Nehmen Sie das Produkt oder die einzelnen Teile nicht auseinander
• Für die äußerliche Reinigung setzen Sie ein weiches und sauberes Tuch ein. Chemische Reinigungsmittel können den
Kunststo beschädigen
ENTSORGUNG
Wenn Sie dieses Symbol auf einem unserer Elektroprodukte, Batterien oder Verpackungen sehen, bedeutet
dies, dass das betreende Elektroprodukt oder die betreende Batterie nicht als gewöhnlicher Hausmüll in der
EU oder der Türkei entsorgt werden darf. Um die korrekte Entsorgung des Produkts und der Batterie zu
gewährleisten, entsorgen Sie sie bitte in Übereinstimmung mit den geltenden örtlichen Gesetzen oder den
Vorschriften für die Entsorgung von elektrischen Geräten/Batterien. Auf diese Weise tragen Sie dazu bei,
natürliche Ressourcen zu schonen und die Umweltschutzstandards bei der Behandlung und Entsorgung von
Elektroschrott zu verbessern. Das Recycling und die Verarbeitung von Elektro- und Elektronik-Altgeräten
leistet einen bedeutenden Beitrag zum Schutz der Umwelt durch die Reduzierung von Deponieabfällen.
MADE IN CHINA
ES: USB-C POWER & LINK CABLE
GARANTÍA
Este producto dispone de garantía durante un año desde la fecha de compra. Durante este periodo, si existiesen defectos
debido a materiales defectuosos o de fabricación, el vendedor al que le compró el producto lo reemplazará por el mismo
modelo o uno similar presentando el recibo o comprobante de compra. Esta garantía no cubre defectos causados por daños
accidentales, por un uso inadecuado o por el desgaste, y sólo está disponible para el comprador original del producto. Esto
no afecta a sus derechos legales.
Si deseas empezar a reproducir contenido de Rift en Meta Quest 2, confirma lo siguiente:
• Tu PC cumple con las especificaciones recomendadas.
• Tanto tu PC como las gafas tienen la última versión de software de Meta Quest (a continuación, tienes la descarga para
nuevos usuarios).
Una vez hayas confirmado que cumples con los requisitos, sigue los pasos siguientes:
DESDE EL PC
1: instala la aplicación de Oculus/Meta en un PC compatible (no puede ser un Mac) descargando el software en
www.meta.com/quest/setup/ en la sección Quest 2 - Link Cable and Air Link y sigue las instrucciones
2: Abre la aplicación de escritorio en tu PC
3: Enciende las gafas
4: Conecta las gafas al Stealth USB C Power* y Link Cable. La primera vez tienes que hacer clic en añadir nuevo dispositivo
y finalizar la configuración. Conecta el extremo derecho en ángulo del cable en Meta quest 2 y, a continuación, conecta el
extremo de mayor tamaño USB A en un puerto USB 3.0 en la parte posterior del PC
5: Debe aparecer un mensaje para permitir la conexión con Oculus Link. Haz clic en Habilitar
6: También puede iniciarse el cable de conexión en Configuración > Acciones rápidas > Oculus Link
Puedes abrir juegos en la interfaz de las gafas o en la biblioteca de la aplicación Oculus en tu PC
Conecta el cable a la correa de sujeción con el velcro y ajústala
NOTA:
Problemas de conexión
Si la conexión con el cable no funciona, comprueba lo siguiente:
• Asegúrate de haber habilitado Oculus Link
• Realiza una prueba de conexión del USB
• Asegúrate de que la tarjeta gráfica cumple con los requisitos para el PC
• Asegúrate de que los controladores del PC estén actualizados
• Prueba a reiniciar sesión, apaga y vuelve a encender las gafas
• Asegúrate de que a las gafas no les quede poca batería
• Asegúrate de que el cable esté conectado directamente a un puerto USB 3.0/3.1. Prueba también a conectar en otro
puerto, así como otros dispositivos para comprobar si funcionan
• Comprueba que Air Link esté apagado, ya que afecta al funcionamiento de la conexión con cable
Si la conexión no va bien y hay saltos o distorsión en la pantalla, prueba lo siguiente:
1: Abre la aplicación de escritorio en tu PC
2: Selecciona Dispositivos y, a continuación, Meta Quest
3: Selecciona Preferencias de gráficos y, a continuación, selecciona Restablecer preferencias predeterminadas
4: Selecciona Guardar
*CARGA
Puedes cargar las gafas al mismo tiempo que juegas. Aunque se cargan mucho más lentamente cuando se juega.
Mantendrá solo un porcentaje similar de carga al momento en que encendiste las gafas y las conectaste al cable.
La capacidad total de carga y la velocidad dependen de la calidad de la placa madre y la alimentación eléctrica del PC. La
mayoría de los puertos USB no suministran la misma capacidad de carga que los cargadores individuales. La longitud del
cable también afecta a la velocidad de carga.
Es mejor realizar la carga con las gafas apagadas.
PRECAUCIONES IMPORTANTES
• Los menores deberán ser supervisados siempre por un adulto cuando utilicen este producto
• Este dispositivo es sólo para uso doméstico, No exponga el producto al polvo, luz solar directa, alta concentración de
humedad, condiciones de clima extremas, altas temperaturas o descargas eléctrica
• No exponga el producto a salpicaduras, goteras, lluvia o humedad. No sumergir en líquidos
• No coloque ningún cable donde puedan estar expuestos a fuentes de calor extremo o llamas
• Mantenga todos los cables fuera del alcance de combustibles u objetos afilados
• Evite torcer demasiado los cables
• No utilice el cable USB con cualquier otro dispositivo, aparato o equipo que no sean el Sistema o los Mandos de control
• No desmontar; no hay ningún componente sustituible en su interior
• Para una limpieza externa, use solamente un trapo suave, limpio y ligeramente humedecido. El uso de detergentes
podrían dañar el acabado de la carcasa y podría filtrarse a su interior ocasionando daños
RECICLAJE
Cuando se incluya este símbolo en alguno de nuestros productos eléctricos, baterías o cajas, significa que el
producto eléctrico o la batería en cuestión no deben desecharse como residuos domésticos habituales en la UE
o Turquía. Para asegurar la eliminación correcta del producto y la batería, deséchelos de conformidad con las
leyes o los requisitos locales aplicables de eliminación de baterías/equipos eléctricos. De este modo, ayudará a
conservar los recursos naturales y mejorar las normas de protección medioambientales relativas al tratamiento
y la eliminación de residuos eléctricos. El reciclaje y el procesamiento de residuos eléctricos y equipos
electrónicos representan una contribución significativa a la protección del medio ambiente mediante la
reducción de residuos en vertederos.
FABRICADO EN CHINA
NL: USB-C-KABEL VOOR LINK EN VOEDING
GARANTIE
Dit product wordt gedurende een jaar vanaf de datum van aankoop door garantie gedekt. Als er tijdens deze periode sprake
is van een defect ten gevolge van fouten in materiaal of productie, zal de detailhandelaar die het product aan u verkocht
heeft, het vervangen door hetzelfde of een vergelijkbaar model als u uw aankoopbon of ander bewijs van aankoop overlegt.
Deze garantie geldt niet voor defecten die voortvloeien uit incidentele schade, verkeerd gebruik of slijtage, en is alleen
beschikbaar voor de oorspronkelijke koper van het product. Dit heeft geen invloed op uw grondwettelijk vastgelegde
rechten.
Om Rift-games op je Meta Quest 2 te spelen, moet je met het volgende rekening houden…
• Je pc voldoet aan de aanbevolen specificaties.
• Je Meta Quest-systeemsoftware is up-to-date op zowel je pc (download hieronder voor nieuwe gebruikers) als je headset.
Zodra je deze vereisten hebt bevestigd, kun je beginnen door de onderstaande stappen te volgen:
VANAF DE PC
1: installeer de Oculus/Meta-app op een compatibele gaming-pc (geen Mac) door de software te downloaden op
www.meta.com/quest/setup/ onder Quest 2- Link Cable and Air Link en de instructies te volgen
2: Open de desktop-app op je pc
3: Zet je headset aan
4: Sluit je headset aan via de Stealth USB-C-kabel voor voeding* en Link. De eerste keer moet je op 'Nieuw apparaat
toevoegen' klikken en de installatie voltooien. Sluit het haakse uiteinde van de kabel aan op de Meta Quest 2 en sluit dan
het grotere uiteinde met USB-A-stekker aan op een USB 3.0-poort aan de achterkant van je pc
5: Je zou een prompt moeten zien om Oculus Link in te schakelen. Klik op Inschakelen
6: Je kunt je Link-kabel ook activeren via Settings > Quick Actions > Oculus Link
Je kunt games openen via het menu in de headset of via de Oculus PC App Library op je pc
Bevestig je kabel aan je hoofdband met behulp van de meegeleverde klittenband
MERK OP:
Verbindingsproblemen
Als de kabelverbinding niet lukt, probeer en controleer dan het volgende:
• Zorg ervoor dat je Oculus Link inschakelt
• Voer een USB-verbindingstest uit
• Zorg ervoor dat je grafische kaart voldoet aan onze pc-vereisten
• Zorg ervoor dat de drivers op je pc up-to-date zijn
• Probeer uit te loggen en weer in te loggen, of zet je headset volledig uit en start hem opnieuw op
• Controleer of de headset nog genoeg stroom heeft
• Zorg ervoor dat de kabel rechtstreeks is aangesloten op een 3.0/3.1 USB-poort. Probeer ook een andere poort
en test met andere apparaten om te controleren of ze werken
• Controleer of Air Link is uitgeschakeld. Dit heeft invloed op de prestaties van de kabelverbinding
Als je verbinding niet zo goed is en je scherm hapert of stottert, probeer dan het volgende:
1: Open de pc-app op je computer
2: Selecteer Devices en vervolgens Meta Quest
3: Selecteer Graphics Preferences en dan Reset to default
4: Selecteer Save
*OPLADEN
Je kunt je headset opladen terwijl je aan het spelen bent. De oplaadsnelheid is tijdens het spelen echter
aanzienlijk langzamer en zorgt ervoor dat de batterij slechts op min of meer hetzelfde niveau blijft als op het
moment dat de headset is aangezet en de kabel erop is aangesloten. De oplaadcapaciteit en-snelheid zijn
afhankelijk van de kwaliteit van je moederbord en de voeding van je pc. De meeste USB-poorten van een
moederbord leveren niet zoveel vermogen als aparte opladers. Oplaadsnelheden kunnen ook worden beïnvloed
door de lengte van de kabel.
Je kunt je headset het beste opladen wanneer deze is uitgeschakeld.
BELANGRIJKE VOORZORGSMAATREGELEN
• Kinderen moeten altijd onder toezicht staan bij het gebruik van dit product
• Dit apparaat is alleen bedoeld voor gebruik binnenshuis. Stel het niet bloot aan stof, direct zonlicht, neerslag,
hoge luchtvochtigheid, hoge temperaturen of mechanische schokken
• Stel het niet bloot aan spatten, druppels, regen of vocht. Dompel het niet onder in vloeistof
• Plaats kabels niet op plekken waar deze kunnen worden blootgesteld aan extreme hitte of vlammen
• Plaats kabels niet in de buurt van olie of scherpe voorwerpen
• Draag het apparaat nooit aan de kabels
• Gebruik de USB-kabel niet met een andere bevestiging, eenheid of apparatuur die niet de console of de
controllers zijn
• Niet demonteren; er zijn geen interne onderdelen waarop onderhoud mogelijk is
• Voor reiniging van de buitenkant alleen een zachte, schone, licht bevochtigde doek gebruiken. Het gebruik van
reinigingsmiddelen kan schade aan de afwerking veroorzaken en dergelijke middelen kunnen het apparaat
binnendringen
RECYCLING
Wanneer u dit symbool op een van onze elektrische producten, batterijen of verpakkingen ziet, betekent dit
dat het product of de batterij in de EU of Turkije niet met het normale huishoudelijk afval mag worden
afgevoerd. Om te zorgen voor een juiste afvalverwerking van product en batterij, dient u deze af te voeren in
overeenstemming met geldende plaatselijke weten of verordeningen op het gebied van de afvoer van
elektrische apparatuur/batterijen. Zo draagt u bij aan het behoud van het milieu en de verbetering van
normen voor milieubescherming op het gebied van verwerking en afvoer van elektrisch afval. Recycling en
verwerking van het afval van elektrische en elektronische apparatuur levert een aanzienlijke bijdrage aan de
bescherming van het milieu door verkleining van de afvalberg.
MADE IN CHINA
PT: CABO USB-C DE DADOS E ALIMENTAÇÃO
GARANTIA
Este produto está garantido por um período de um ano a partir da data da compra. Durante este período, se
existir uma anomalia devida a defeito nos materiais, ou fabrico, o revendedor a quem os comprou, substitui-los-á
pelo mesmo modelo ou por modelo semelhante em produção, tendo em conta o seu recibo de compra ou
comprovante de compra. Esta garantia não cobre defeitos decorrentes de danos acidentais, utilização abusiva ou
desgaste, e está apenas disponível para o comprador original do produto. tal não afeta os seus direitos
estatutários.
Para jogares com conteúdos do Rift no teu Mega Quest 2, começa por confirmar o seguinte...
• O teu PC cumpre as Especificações Recomendadas.
• O teu sistema de software Meta Quest está atualizado, tanto no PC (quem nunca o utilizou pode descarregá-lo aqui) como
nos óculos.
Depois de confirmados estes requisitos, podes começar seguindo os passos indicados abaixo:
NO PC
1: instala a aplicação Oculus/Meta num PC de gaming compatível descarregando o software em
www.meta.com/quest/setup/, em Quest 2 - Cabo Link e Air Link, e segue as instruções
2: Abre a aplicação de desktop no teu PC
3: Liga os óculos
4: Liga os óculos utilizando o cabo de dados e alimentação USB-C Stealth* . Na primeira vez, vais ter de clicar em 'adicionar
novo dispositivo' e completar a configuração. Liga a extremidade em 90º do cabo no Meta Quest 2 e de seguida liga a
extremidade maior – USB A na porta USB 3.0 na parte de trás do teu PC
5: Surgirá uma mensagem indicando Ativar o Oculus Link. Clica em Ativar
6.Também podes iniciar o teu cabo Link em Configurações > Ações rápidas > Oculus Link
Podes abrir jogos através da interface dos óculos ou na Biblioteca de Aplicações para PC Oculus no teu PC
Fixa o cabo na correia da cabeça usando a correia de velcro fornecida e aperta
TEM EM ATENÇÃO O SEGUINTE:
Problemas de ligação
Se não conseguiste fazer a ligação por cabo, experimenta verificar o seguinte:
• Assegura-te de que ativaste o Oculus Link
• Testa a Ligação USB
• Confirma se a tua placa gráfica cumpre os nossos requisitos para PC
• Confirma se os drivers estão atualizados no teu PC
• Experimenta sair e voltar a aceder ao sistema ou desligar completamente os óculos e reiniciar
• Verifica se os óculos têm carga suficiente
• Verifica se o cabo está ligado diretamente na porta USB 3.0/3.1. Experimenta também outra porta e testa os outros
dispositivos para confirmar que estão a trabalhar
• Confirma se o Air Link está desligado, pois isso afetará o desempenho da ligação por cabo
Se a tua ligação não for boa e o ecrã estiver aos saltos ou com quebras, tenta o seguinte:
1: Abre a aplicação para PC no teu computador
2: Seleciona Dispositivose de seguida Meta Quest
3: Seleciona Preferências Gráficase de seguida Repor as predefinições
4: Seleciona Guardar
*A CARREGAR
Podes carregar os óculos enquanto jogas. No entanto, a velocidade de carregamento é consideravelmente menor
enquanto se joga, e a bateria apenas será mantida a uma percentagem de carga semelhante enquanto os óculos estão
ligados e o cabo está conectado. A capacidade de carregamento e a velocidade em geral irão depender da qualidade da tua
motherboard e da fonte de alimentação do PC. A maioria das portas USB da motherboard não produz tanta potência como
um carregador autónomo. Um comprimento maior do cabo também pode afetar a velocidade de carregamento.
A melhor altura para carregar é quando os óculos estiverem desligados.
MEDIDAS DE SEGURANÇA E PRECAUÇÕES IMPORTANTES
• Nunca expor à luz solar direta nem a condições de pluviosidade
• Não expor a unidade a salpicos, pingos, chuva ou humidade. não imergir em líquidos
• Não expor ao pó, humidade elevada, temperaturas elevadas ou choque mecânico
• Evitar qualquer tipo de esticão desnecessário do cabo
• Não utilizar se o equipamento estiver danificado
• Não desmontar; não existem peças reparáveis no interior
• Para a limpeza externa, utilizar apenas um pano macio, limpo e húmido. A utilização de detergentes pode danificar o
acabamento e provocar escorrimentos para o seu interior
RECICLAGEM
Onde vir este símbolo, em qualquer dos nossos produtos elétricos, baterias ou embalagens, indica que o
produto elétrico ou bateria pertinente, não deverá ser descartado como resíduos domésticos em geral na ue
ou na turquia. Para garantir o tratamento correto dos resíduos do produto e da bateria, descarte-os de acordo
com todas as leis ou requisitos locais aplicáveis para descarte de equipamentos/baterias elétricos. Ao fazê-lo,
ajudará a conservar os recursos naturais e a melhorar os padrões de proteção ambiental no tratamento e no
descarte de resíduos elétricos. A reciclagem e o processamento de resíduos de equipamentos elétricos e
eletrónicos darão uma contribuição significativa no sentido de ajudar a proteger o ambiente reduzindo os
resíduos em aterro.
FABRICADO NA CHINA
-
 1
1
-
 2
2


in altre lingue
- français: Stealth SVR-LC-5M 5 Mode d'emploi
- español: Stealth SVR-LC-5M 5 Guía del usuario
- Deutsch: Stealth SVR-LC-5M 5 Benutzerhandbuch
- Nederlands: Stealth SVR-LC-5M 5 Gebruikershandleiding
- português: Stealth SVR-LC-5M 5 Guia de usuario
Documenti correlati
Altri documenti
-
STEALTH GAMING SQ2-ES Pro Guida utente
-
 STEALTH GAMING XP-RGBHS-V1 Manuale utente
-
STEALTH GAMING SP-HS Guida utente
-
STEALTH GAMING SQ2-DCS-V1 Guida utente
-
Alienware 15 R4 Guida utente
-
Alienware 17 R4 Guida utente
-
Alienware 17 R5 Guida utente
-
-
Alienware 13 R3 Guida utente
-
Steelseries Stratus Duo Manuale del proprietario
