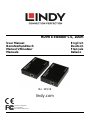
Lindy 100m C6 HDBaseT HDMI & IR Extender Manuale utente
- Categoria
- Estensori AV
- Tipo
- Manuale utente

© LINDY Group - FIFTH EDITION (MARCH 2018)
HDMI Extender C6, 100m
User Manual English
Benutzerhandbuch Deutsch
Manuel Utilisateur Français
Manuale Italiano
No. 38119
lindy.com
Tested to Comply with
FCC Standards
For Home and Office Use!

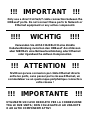
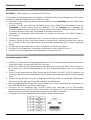
!!! IMPORTANT !!!
Only use a direct Cat.5e/6/7 cable connection between the
HDBaseT ports. Do not connect these ports to Network or
Ethernet equipment or any active components
!!!! WICHTIG !!!!
Verwenden Sie AUSSCHLIEßLICH eine direkte
Kabelverbindung zwischen den HDBaseT Anschlüssen
aber NIEMALS eine Netzwerkverbindung oder Ethernet
oder irgendwelche aktiven Komponenten
!!! ATTENTION !!!
N'utilisez qu'une connexion par câble Ethernet directe
entre les ports, sans passer par le réseau Ethernet, un
commutateur ou un quelconque périphérique connecté à
votre réseau !
!!! IMPORTANTE !!!
UTILIZZATE UN CAVO DEDICATO PER LA CONNESSIONE
TRA LE DUE UNITA', NON COLLEGATELO AD UNA RETE
O AD ALTRI COMPONENTI ATTIVI

User Manual English
Introduction
Thank you for purchasing the Lindy HDMI Extender C6. This product has been designed to provide trouble
free, reliable operation. It benefits from both a LINDY 2 year warranty and free lifetime technical support.
To ensure correct use, please read this manual carefully and retain it for future reference. The Extender
supports 4K Ultra HD HDMI signal transmission including support for HDR10 at distances of up to 100m
using high quality Cat.5e/6/Cat.7 RJ45 cable. For best results and especially longer distances, we
recommend using solid core/structured cabling.
Package Contents
▪ HDMI Extender C6 for HDMI (1 x Transmitter, 1 x Receiver)
▪ Multi-Country Power Adapter 5V DC/2A) x 2
▪ IR Extender Cable 1.4m x 2 (1 x Emitter, 1 x Receiver)
▪ This User Manual
Features
▪ Extends uncompressed HDMI or DVI-D signals up to 100m via its HDBaseT connection
▪ HDMI 4K Ultra HD or DVI-D up to 1920 x 1200 (using a HDMI to DVI adapter or cable)
▪ Support for 3D signals, including 1080p 3D
▪ Supports 10/100 Base-T Ethernet via the HDBaseT connection (2 x 2 Port 10/100 Ethernet)
▪ Suitable for use with 3D/HDTV Home Theatre, professional HDTV installations, Computer Systems,
Multimedia and Control Center system installations.
Specification
▪ The HDBaseT connection is a dedicated cable connection, it is not an Ethernet connection!
▪ Maximum cable length for the HDBaseT connection: 100m (approx.)
▪ Compatible with HDMI 1.4 specification
▪ UHD resolutions: 3840x2160p60 4:2:0 8bit, 3840x2160p24 4:2:2 12bit
▪ HD resolutions: 1080p24/30/50/60, 1080i, 720p, 576p, 480p
▪ PC resolutions: From 640x480 to 1920x1080
▪ Support for 3D Signals, including 1080p 3D
▪ Deep Colour capable: supports 30/36/48 bit colour depth at resolutions up to 1080p (4:4:4)
▪ Support for CEC commands
▪ Audio Formats: LPCM, DTS Digital, DTS HD, Dolby Digital & Dolby True HD
▪ IR Extension cables (included) can be attached to allow the control of IR (38KHz) equipment via the
extender
▪ Maximum HDMI Cable length, 5m in/out
▪ Transmitter and Receiver each have a 2 port RJ45 switch for 10/100 Ethernet support. The 10/100
switches are also connected via the HDBaseT connection
▪ Dimensions: 75x110x25mm (WxDxH)
▪ Weight: 0.221kg (each unit)

User Manual English
Installation
Important! Before starting the installation, please ensure that all devices are powered off.
The following steps are for an installation using HDMI equipment, if you are using DVI equipment, please
substitute the HDMI cables for DVI to HDMI cables where required.
1. Connect your HDMI source to the HDMI Extender Transmitter unit using a HDMI cable (maximum
length 5m).
2. Connect one end of the Cat.5e/6/7 cable (max. length 100m) to the HDBaseT port on the Transmitter
and the other end to the HDBaseT port of the Receiver. Use solid core installation cable of at least
Cat.5e UTP.
3. Use another HDMI cable (maximum length 5m) to connect your HDMI display device to the HDMI
output port on the Receiver unit.
4. For additional Infrared remote signal functionality, connect the included IR Extension Cables to the
Transmitter and Receiver units.
5. At the Transmitter side, place the IR Eye in front of the HDMI source devices IR receiver. At the remote
side, place the IR Eye in a location where it may easily receive the signal of your IR remote.
6. For Ethernet functionality, connect your devices to the 10/100Base-T ports.
7. Plug the DC power supplies into the Transmitter and Receiver units and switch on.
8. Power on your HDMI Source and Display to complete the installation.
Troubleshooting
There is no display on the screen.
▪ Check that the DC plug and jack used by the external power supplies are firmly connected.
▪ Check that the Cat.5e/6/7 cable is plugged in correctly and that the Link Status LED is lit.
▪ Check that the HDMI source and display are both powered on and active and that the HDCP LED is lit
(if using HDCP content) or flashing (if using non-HDCP content) on both the Transmitter and Receiver.
▪ Power off all the devices, then power on in this order: first, the transmitter unit, then the display and
finally the source.
▪ For several HDMI devices it may be helpful to unplug and re-plug their HDMI connection to re-initiate
the HDMI handshake and recognition.
▪ Reduce the length of Cat.5e/6/7 or HDMI cable used, or use a higher quality cable.

Benutzerhandbuch Deutsch
Einführung
Wir freuen uns, dass Ihre Wahl auf ein LINDY-Produkt gefallen ist und danken Ihnen für Ihr Vertrauen.
Sie können sich jederzeit auf unsere Produkte und einen guten Service verlassen. Dieser Lindy HDMI
Extender C6 unterliegt einer 2-Jahres LINDY Herstellergarantie und lebenslangem kostenlosen,
technischen Support. Bitte lesen Sie diese Anleitung sorgfältig und bewahren Sie sie auf. Der Extender
unterstützt 4K Ultra HD HDMI Signalübertragung inklusive HDR10 bis zu 100m. Für die Übertragung
werden qualitativ hochwertige Cat.5e/6/7 RJ45 Kabel benötigt. Um eine bestmögliche Übertragung zu
gewährleisten, empfehlen wir die Nutzung von Kabeln mit starren Adern (solid core).
Lieferumfang
▪ HDMI Extender C6 für HDMI (1 x Transmitter, 1 x Receiver)
▪ 2x Multi-Country Netzteil 5V DC ~2A
▪ 2x IR Extender-Kabel 1.4m (1 x Emitter, 1 x Receiver)
▪ Dieses Handbuch
Eigenschaften
▪ Sendet unkomprimierte HDMI oder DVI-D Signale über eine HDBaseT Verbindung
▪ HDMI 4K Ultra HD oder DVI-D bis 1920x1200 (bei Verwendung von HDMI/DVI Kabeln)
▪ Unterstützt 3D Signale, einschließlich 1080p und 3D
▪ IR Fernbedienungs-Erweiterung
▪ Unterstützt 10/100 Base-T Ethernet über die HDBaseT Verbindung (2 x 2 Port 10/100)
▪ Ideal geeignet zum Einsatz im Bereich 3D/HDTV Home Theater, bei professionellen HDTV
Installationen, Computersystemen, Multimedia und Control Center Installationen
Spezifikationen
▪ HDBaseT ist eine dedizierte Verbindung und keine Gigabit Ethernet Verbindung!
▪ Maximale Kabellänge der HDBaseT Verbindung ca. 100m
▪ Kompatibel mit der HDMI 1.4 Spezifikation
▪ UHD Auflösungen: 3840x2160p60 4:2:0 8bit, 3840x2160p24 4:2:2 12bit
▪ HD Auflösungen: 1080p24/30/50/60, 1080i, 720p, 576p, 480p
▪ PC Auflösungen: Von 640x480 bis 1920x1080
▪ Unterstützung für 3D Signale, einschließlich 1080p 3D
▪ Deep Colour-fähig: Unterstützung für 30/36/48 Bit Farbtiefe bei Auflösungen bis zu 1080p (4:4:4)
▪ Unterstützt CEC Kommandos (Fernsteuerung über das HDMI-Signal)
▪ Audioformate: LPCM, DTS Digital, DTS HD, Dolby Digital & Dolby True HD
▪ IR Erweiterungskabel (inkl.) zur Unterstützung von IR (38KHz) Fernbedienungen über die
Extenderstecker
▪ Maximale HDMI Kabellänge: 5m am Ein- und Ausgang
▪ Transmitter und Receiver verfügen jeweils über einen RJ45 2 Port 10/100 Ethernet Switch. Die
Switches werden ebenfalls über die HDBaseT Verbindung gekoppelt
▪ Abmessungen ca.: 11 x 7.5 x 2.5cm (B x T x H); Gewicht ca.: 0.22kg (je Einheit)
▪ Temperaturbereich: 0-70°C, Verwendung nur in geschlossenen Räumen (Innenbereich)

Benutzerhandbuch Deutsch
Installation und Inbetriebnahme
ACHTUNG! Bitte schalten Sie vor Beginn alle Geräte aus.
Die folgenden Schritte beschreiben die Installation mit HDMI Geräten. Bei Verwendung von DVI Geräten
ersetzen Sie bitte die HDMI-Kabel durch HDMI-DVI-Kabel.
1. Verbinden Sie Ihre HDMI Signalquelle mit dem HDMI Extender Transmitter mit einem HDMI Kabel
(max. Länge 5m).
2. Schließen Sie das eine Ende des Cat.5e/6/7 Kabels (max. Länge 100m) am HDBaseT Port am
Transmitter und das andere Ende am HDBaseT Port am Receiver an. Verwenden Sie
Installationskabel mit starren Adern (solid core) mindestens der Qualität 22/24AWG Cat.5e/6 UTP. Bis
zu mittleren Distanzen kann auch hochwertiges Patchkabel funktionieren.
3. Verwenden Sie ein weiteres HDMI Kabel (max. 5m Länge) zum Anschluss Ihres HDMI Displays an
den Receiver.
4. Schließen Sie die IR-Extenderkabel an falls Sie diese zusätzliche Funktionalität nutzen wollen.
5. Platzieren Sie das IR Eye an der Receiverseite so, dass es die IR Signale aufnehmen kann und den
IR Transmitter an der Transmitterseite so, dass die HDMI Signalquellen die IR-Signale empfangen
können.
6. Zur Nutzung der Ethernetfunktion müssen Sie lediglich ihre Geräte anschließen.
7. Schließen Sie die Netzteile an Transmitter und Receiver an und schalten Sie sie ein.
8. Schalten Sie anschließend Ihre HDMI Signalquelle und den Monitor ein.
Fehlersuche und -behebung
Der Monitor zeigt kein Bild.
▪ Prüfen Sie, ob die Netzteile korrekt angeschlossen sind. Sowohl am Transmitter als auch am Receiver
müssen die Power- und auch die HDMI LEDs leuchten.
▪ Prüfen Sie, ob das Cat.5e/6/7 Kabel korrekt angeschlossen ist und die Link Status LEDs leuchten. Es
muss immer eine direkte Kabelverbindung sein, eine Netzwerkverbindung kann nicht verwendet
werden.
▪ Prüfen Sie die Verbindung der HDMI Quelle und des Displays. Die HDCP LEDs (Transmitter und
Receiver) sollten leuchten (bei Nutzung von HDCP Inhalt) oder blinken (falls kein HDCP Inhalt genutzt
wird).
▪ Schalten Sie alle Geräte aus und in der folgenden Reihenfolge wieder ein: zuerst den HDMI Monitor,
dann den Receiver, dann den Transmitter und dann die HDMI Quelle.
▪ Bei verschiedenen HDMI Geräten kann es erforderlich sein nochmals das HDMI Kabel abzuziehen um
den HDMI Handshake Link erneut zu initialisieren.
▪ Verringern Sie die Kabellänge des Cat.5e/6/7 Kabels oder verwenden Sie ein höherwertiges
Verbindungskabel, wenn die Link LEDs nicht leuchten. Kontrollieren Sie ob die RJ45 Stecker korrekt
angeschlossen sind und die richtige Pinbelegung analog zu 568-B verwenden.
▪ Verwenden Sie kürzere HDMI Kabel bei Problemen mit den HDMI Geräten.

Manuel Utilisateur Français
Introduction
Nous sommes heureux que votre choix se soit porté sur un produit LINDY et vous remercions de votre
confiance. Vous pouvez compter à tout moment sur la qualité de nos produits et de notre service. Cet
extender HDMI C6 LINDY est soumis à une durée de garantie LINDY de 2 ans et d’une assistance
technique gratuite à vie. Merci de lire attentivement ces instructions et de les conserver pour future
référence.
L’extender prend en charge la transmission de signaux HDMI 4K Ultra HD et HDR10 à des distances allant
jusqu’à 100m en utilisant du câble RJ45 Cat.5e/6/Cat.7 de haute qualité. Pour obtenir de bons résultats
et plus spécialement pour les grandes longueurs, nous recommandons l’utilisation de câble monobrin.
Contenu de l’emballage
▪ Extender HDMI C6 (1 x Transmitter ou émetteur, 1 x Receiver ou récepteur)
▪ Alimentation multi pays (100…240VAC / 5V DC/2A) x 2
▪ Câble IR Extender 1.4m x 2 (1 x Emetteur, 1 x Récepteur)
▪ Ce manuel
Caractéristiques
▪ Etend des signaux HDMI ou DVI-D non compressés jusqu’à 100m via sa connexion HDBaseT
▪ HDMI 4K Ultra HD ou DVI-D jusqu’à 1920 x 1200 (en utilisant un adaptateur HDMI vers DVI)
▪ Prend en charge les signaux 3D, 1080p 3D inclus
▪ Prise en charge Ethernet 10/100 Base-T via la connexion HDBaseT (2 x 2 ports 10/100 Ethernet)
▪ Convient pour les installations Home Cinéma 3D/HDTV, ordinateurs.
Spécifications
▪ La connexion HDBaseT est dédiée, ce n’est pas une connexion Gigabit Ethernet!
▪ Longueur maximale du câble pour la connexion HDBaseT: 100m (environ)
▪ Compatible avec les spécifications HDMI 1.4
▪ Résolutions UHD : 3840x2160p60 4:2:0 8bit, 3840x2160p24 4:2:2 12bit
▪ Résolutions HDTV : 1080p24/30/50/60, 1080i, 720p, 576p, 480p
▪ Résolutions PC: de 640x480 à 1920x1080
▪ Prise en charge des signaux 3D, 1080p 3D inclus
▪ Capacités Deep Colour: profondeurs de couleurs en 30/36/48 bit jusqu’au 1080p (4:4:4)
▪ Prends en charge les commandes CEC
▪ Formats Audio: LPCM, DTS Digital, DTS HD, Dolby Digital & Dolby True HD
▪ Câbles d’extension IR (inclus), ils peuvent être connectés pour contrôler les périphériques par infra-
rouge (38KHz) via l’extender
▪ Longueur de câbles HDMI maxi., 5m en entrée et en sortie
▪ Les deux unités ont chacune un switch 2 ports RJ45 10/100. Ces deux switchs 10/100 sont donc
connectés via la liaison HDBaseT
▪ Dimensions: 11 x 7.5 x 2.5cm (P x L x H) ; poids: 0.22kg (chaque unité)
Température d’utilisation: 0-70°C. A utiliser à l’intérieur uniquement

Manuel Utilisateur Français
Installation
Important! Avant de démarrer l’installation, merci de vérifier que tous les appareils sont éteints.
Les étapes suivantes sont pour l’installation d’un équipement HDMI, si vous êtes en DVI, merci de
remplacer vos câbles HDMI par des câbles DVI vers HDMI.
1. Connectez votre source HDMI à l’extender HDMI Emetteur en utilisant un câble HDMI (longueur
maximale : 5m).
2. Connectez une extrémité du câble cat.5e/6/7 (longueur maximale: 100m) sur le port HDBaseT du
Récepteur et l’autre sur port HDBaseT du Récepteur. Utilisez des câbles réseau monobrin, au mieux
22/24AWG cat.6 UTP; en respectant la connectique RJ45 568-B.
3. Utilisez un autre câble HDMI (longueur maximale: 5m) pour connecter votre écran HDMI vers le port
de sortie de l’unité réceptrice.
4. Pour profiter des fonctionnalités d’extension IR, connectez les câbles d’extensions IR aux unités
d’émission et de réception.
5. Du côté émission, placez l’émetteur IR en face du capteur IR du périphérique HDMI. Du côté
télécommande, placez le capteur IR dans un endroit où il peut facilement recevoir le signal de votre
télécommande IR.
6. Pour le support Ethernet, connectez vos appareils réseau aux ports 10/100Base-T.
7. Branchez l’alimentation sur l’émetteur et le récepteur et mettez les unités en route.
8. Allumez la source HDMI et l’écran pour terminer l’installation.
Dépannage
Il n’y a pas d’affichage sur l’écran.
▪ Vérifiez que les prises DC des alimentations sont bien connectées.
▪ Vérifiez que le câble cat.5e/6/7 est bien connecté et que la LED “Link Status » soit allumée.
▪ Vérifiez que source et écran HDMI soient allumés et actifs, et que la LED HDCP soit allumée (si un
contenu HDCP est utilisé) ou clignotante (si le contenu n’est pas HDCP) sur l’émetteur et le récepteur.
▪ Eteignez tous les appareils, puis allumez-les dans cet ordre: d’abord l’émetteur, le récepteur (le
récepteur est immédiatement alimenté par le lien HDBaseT venant de l’émetteur), puis l’écran et
finalement la source.
▪ Pour plusieurs appareils HDMI, il peut être utile de déconnecter/connecter leur connexion HDMI pour
réinitialiser la synchro HDMI.
▪ Réduisez la longueur de câbles cat.5e/6/7 utilisés, ou utilisez-en de meilleure qualité. Vérifiez si les
connecteurs RJ45 soient bien maintenus par le câble et qu’ils utilisent un câblage 568-B.
▪ Utilisez des câbles HDMI plus courts pour des problèmes avec les appareils HDMI.

Manuale Italiano
Introduzione
Grazie per aver scelto il l’Extender LINDY HDMI C6! Supporta segnali FullHD 1080p HDMI non compressi
ad alta risoluzione per trasmissioni di alta qualità! L’Extender supporta risoluzioni HDMI 4K Ultra HD e
HDR10 a distanze fino a 100m utilizzando cavi Cat.5e/6/Cat.7 RJ45 di buona qualità. Per ottenere le
migliori performance specialmente su lunghe distanze consigliamo l’utilizzo di cavi solid core.
Contenuto della confezione
▪ Extender HDMI C6 (1 trasmettitore, 1 ricevitore)
▪ 2 x alimentatori Multi-Country (100…240VAC / 5V DC/2A)
▪ 2 x cavi IR da 1.4m (1 trasmettitore, 1 ricevitore)
▪ Questo manuale
Caratteristiche
▪ Estende segnali HDMI o DVI-D non compressi fino a 100m tramite cavo di rete
▪ HDMI Ultra HD 4K o DVI-D fino a 1920 x 1200 (tramite un adattatore HDMI / DVI)
▪ Supporta segnali 1080p 3D
▪ Supporto Ethernet 10/100 Base-T via connessione HDBaseT (2 x 2 porte 10/100 Ethernet)
▪ Ideale per Home Theater 3D/HDTV, installazioni HDTV professionali, Computer, applicazioni
multimediali e sistemi di controllo centralizzato.
Specifiche
▪ HDBaseT è una connessione via cavo dedicata, non è una connessione Gigabit Ethernet!
▪ Lunghezza massima del cavo per una connessione HDBaseT : 100m ca.
▪ Compatibile con le specifiche HDMI 1.4
▪ Risoluzioni UHD: 3840x2160p60 4:2:0 8bit, 3840x2160p24 4:2:2 12bit
▪ Risoluzioni PC: da 640x480 a 1920x1080
▪ Supporto 3D
▪ Deep Colour 30/36/48 bit a risoluzioni fino a 1080p (4:4:4)
▪ Supporta comandi CEC
▪ Formati Audio: LPCM, DTS Digital, DTS HD, Dolby Digital & Dolby True HD
▪ Cavi IR (inclusi) per abilitare il controllo della sorgente dal relativo telecomando IR (38KHz)
dall’extender
▪ Supporta cavi HDMI lunghi fino a 5m (in ingresso e in uscita)
▪ Trasmettitore e ricevitore con 2 porte RJ45 ciascuno, switch con supporto Ethernet 10/100. Gli switch
10/100 possono essere collegati anche tramite connessione HDBaseT
▪ Dimensioni: 11 x 7.5 x 2.5cm ; Peso: 0.22kg (ogni unità)
▪ Temperatura operativa: 0-70°C. Solo per uso interno

Manuale Italiano
Installazione
Importante! Prima di iniziare l’installazione assicuratevi che tutti i dispositivi siano spenti.
I passaggi seguenti sono riferiti ad un’installazione tipo con dispositivi HDMI, se utilizzate apparecchiature
DVI considerate cavi DVI / HDMI al posto di cavi HDMI dove indicato.
1. Collegate la vostra sorgente HDMI al Trasmettitore con un cavo HDMI (lunghezza massima 5m).
2. Collegate un capo del cavo Cat.5e/6/7 (lungo fino a 100m) alla porta HDBaseT sul Trasmettitore e
l’altro capo alla porta HDBaseT del Ricevitore. Utilizzate un cavo 22/24AWG Cat.6 UTP; RJ45
conforme alla codifica 568-B.
3. Utilizzate un altro cavo HDMI (lungo non più di 5m) per collegare il monitor HDMI all’uscita HDMI sul
Ricevitore.
4. Per il controllo della sorgente dal suo telecomando a infrarossi collegate i cavi IR al trasmettitore ed al
ricevitore
5. Posizionate il cavo IR collegato al trasmettitore, davanti al ricevitore IR della sorgente HDMI. Dalla
parte del ricevitore, posizionate il cavo IR in modo da poter essere raggiunto facilmente dal segnale
IR del telecomando.
6. Per la funzione Ethernet, collegate i vostri dispositivi alle porte 10/100Base-T
7. Collegate gli alimentatori alle unità ed accendetele
8. Accendete anche la sorgente HDMI e il monitor per completare l’installazione
Soluzione Problemi
Non compare nessun segnale video.
▪ Controllate che i connettore degli alimentatori sia inserito correttamente.
▪ Controllate che il cavo Cat.5e/6/7 sia inserito correttamente e che il relativo LED sia acceso
▪ Controllate che la sorgente HDMI e il monitor siano entrambi accesi ed attivi e che il LED HDCP sia
acceso (se il segnale ha la codifica HDCP) o lampeggiante (se il segnale non ha la codifica HDCP),
sia sul trasmettitore che sul ricevitore.
▪ Spegnete tutti i dispositivi e riaccendeteli nel seguente ordine: prima il trasmettitore (il ricevitore si
accende automaticamente tramite il collegamento HDBaseT ), quindi il monitor e in fine la sorgente.
▪ Per molti dispositivi HDMI può essere necessario scollegare e ricollegare i cavi HDMI per riavviare il
riconoscimento HDMI.
▪ Ridurre la lunghezza del cavo Cat.5e/6/7 oppure utilizzarne uno di qualità superiore. Controllate che i
connettori RJ45 siano installati correttamente al cavo secondo la codifica 568-B.
▪ Utilizzate cavi HDMI più corti.

CE/FCC Statement
CE Certification
This equipment complies with the requirements relating to Electromagnetic Compatibility Standards.
It has been manufactured under the scope of RoHS compliance.
CE Konformitätserklärung
Dieses Produkt entspricht den einschlägigen EMV Richtlinien der EU für IT-Equipment und darf nur
zusammen mit abgeschirmten Kabeln verwendet werden.
Diese Geräte wurden unter Berücksichtigung der RoHS Vorgaben hergestellt.
Die formelle Konformitätserklärung können wir Ihnen auf Anforderung zur Verfügung stellen
FCC Certification
This equipment has been tested and found to comply with the limits for a Class B digital device, pursuant
to part 15 of the FCC Rules. These limits are designed to provide reasonable protection against harmful
interference in a residential installation.
You are cautioned that changes or modification not expressly approved by the party responsible for
compliance could void your authority to operate the equipment.
This device complies with part 15 of the FCC Rules.
Operation is subject to the following two conditions:
1. This device may not cause harmful interference, and
2. This device must accept any interference received, including interference that may cause undesired
operation.
LINDY Herstellergarantie – Hinweis für Kunden in Deutschland
LINDY gewährt für dieses Produkt über die gesetzliche Regelung in Deutschland hinaus eine zweijährige Hersteller-
garantie ab Kaufdatum. Die detaillierten Bedingungen dieser Garantie finden Sie auf der LINDY Website aufgelistet
bei den AGBs.
Hersteller / Manufacturer (EU):.
LINDY-Elektronik GmbH LINDY Electronics Ltd
Markircher Str. 20 Sadler Forster Way
68229 Mannheim Stockton-on-Tees, TS17 9JY
GERMANY United Kingdom
Email: info@lindy.com , T: +49 (0)621 470050 postmaster@lindy.co.uk , T: +44 (0)1642 754000

Recycling Information
WEEE (Waste of Electrical and Electronic Equipment),
Recycling of Electronic Products
Europe, United Kingdom
In 2006 the European Union introduced regulations (WEEE) for the collection and recycling of all waste electrical
and electronic equipment. It is no longer allowable to simply throw away electrical and electronic equipment. Instead,
these products must enter the recycling process.
Each individual EU member state has implemented the WEEE regulations into national law in slightly different ways.
Please follow your national law when you want to dispose of any electrical or electronic products. More details can
be obtained from your national WEEE recycling agency.
Germany / Deutschland Rücknahme Elektroschrott und Batterie-Entsorgung
Die Europäische Union hat mit der WEEE Direktive Regelungen für die Verschrottung und das Recycling von Elektro-
und Elektronikprodukten geschaffen. Diese wurden im Elektro- und Elektronikgerätegesetz – ElektroG in deutsches
Recht umgesetzt. Das Entsorgen von Elektro- und Elektronikgeräten über die Hausmülltonne ist verboten! Diese
Geräte müssen den Sammel- und Rückgabesystemen zugeführt werden! Dort werden sie kostenlos entgegen
genommen. Die Kosten für den weiteren Recyclingprozess übernehmen die Gerätehersteller.
LINDY bietet deutschen Endverbrauchern ein kostenloses Rücknahmesystem an, beachten Sie bitte, dass Batterien
und Akkus den Produkten vor der Rückgabe an das Rücknahmesystem entnommen werden müssen und über die
Sammel- und Rückgabesysteme für Batterien separat entsorgt werden müssen. Ausführliche Informationen zu
diesen Themen finden Sie stets aktuell auf der LINDY Webseite im Fußbereich.
France
En 2006, l'union Européenne a introduit la nouvelle réglementation (DEEE) pour le recyclage de tout équipement
électrique et électronique.
Chaque Etat membre de l’ Union Européenne a mis en application la nouvelle réglementation DEEE de manières
légèrement différentes. Veuillez suivre le décret d’application correspondant à l’élimination des déchets électriques
ou électroniques de votre pays.
Italy
Nel 2006 l’unione europea ha introdotto regolamentazioni (WEEE) per la raccolta e il riciclo di apparecchi elettrici ed
elettronici. Non è più consentito semplicemente gettare queste apparecchiature, devono essere riciclate. Ogni stato
membro dell’ EU ha tramutato le direttive WEEE in leggi statali in varie misure. Fare riferimento alle leggi del proprio
Stato quando si dispone di un apparecchio elettrico o elettronico.
Per ulteriori dettagli fare riferimento alla direttiva WEEE sul riciclaggio del proprio Stato.
No. 38119
5
th
Edition, March 2018
lindy.com
Tested to Comply with
FCC Standards
For Home and Office Use!
-
 1
1
-
 2
2
-
 3
3
-
 4
4
-
 5
5
-
 6
6
-
 7
7
-
 8
8
-
 9
9
-
 10
10
-
 11
11
-
 12
12


Lindy 100m C6 HDBaseT HDMI & IR Extender Manuale utente
- Categoria
- Estensori AV
- Tipo
- Manuale utente
in altre lingue
Documenti correlati
-
Lindy 100m C6 HDBaseT 2.0 HDMI & USB KVM Extender Manuale utente
-
-
-
-
-
Lindy 38116 Manuale utente
-
-
-
-