
EN
11
Colour LCD Weather Station
Model: BAR206S / BAR206SA
USER MANUAL


EN
1
Colour LCD Weather Station
Model: BAR206S / BAR206SA
USER MANUAL
CONTENTS
Overview .....................................................................2
Front View .............................................................. 2
Back View ..............................................................2
Remote Sensor .......................................................3
Getting Started ...........................................................3
Insert Batteries ........................................................ 3
Connect AC Adapter ...............................................3
Remote Sensor ...........................................................4
Sensor Data Transmission ......................................4
Clock ...........................................................................4
Clock Reception ...................................................... 4
Manually Set Clock .................................................5
Weather Forecast ....................................................... 5
Temperature And Humidity ......................................6
Ice Warning ............................................................. 6
Backlight ....................................................................6
Reset ...........................................................................6
Precautions ................................................................ 6
............................................................7
...........................................7
EU-Declaration of Conformity ..................................7
FCC Statement ...........................................................8
Information For Users ............................................... 9

EN
2
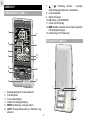
OVERVIEW
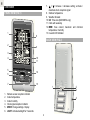
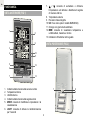
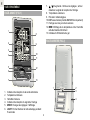
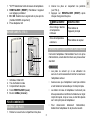
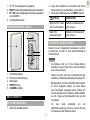
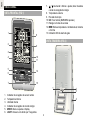
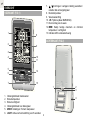
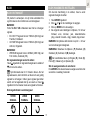
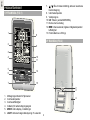
FRONT VIEW (FIG 1)
6
7
8
9
10
11
12
13
1
2
3
4
5
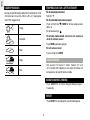
1. Remote sensor reception indicator
2. Indoor temperature
3. Indoor humidity
4. Clock signal reception indicator
5. MODE: Change settings / display
6. LIGHT: Activate backlight for 5 seconds
7. / : Increase / decrease setting; activate /
deactivate clock reception signal
8. Outdoor temperature
9. Weather forecast
10. US: Time zone (BAR206SA only)
11. Clock with weekday
12. MEM: View current, maximum and minimum
temperature / humidity
13. Ice alert LED indicator
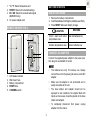
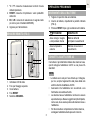
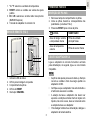
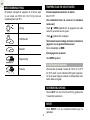
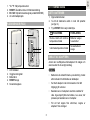
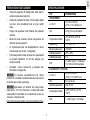
BACK VIEW (FIG 2)
1
2
3
4

EN
3
GETTING STARTED
INSERT BATTERIES
1. Remove the battery compartment.
2. Insert the batteries, matching the polarities (see FIG 2).
3. Press RESET after each battery change.
LOCATION
MEANING
Clock / alarm and indoor
temperature area
Main unit batteries low
Outdoor temperature area Sensor batteries low
CONNECT AC ADAPTER
Connect the supplied power adapter to the power jack,
then plug into a standard AC outlet.
connect the unit to the power grid source via AC/DC
adapter.
easily accessible to the unit.
liquid, such as vases, should be placed on the base
station and adapter.
adapter from the mains.
1. °C / °F: Select temperature unit
2. RESET: Reset unit to default settings
3. EU / UK: Select the nearest radio signal
(BAR206S only)
4. AC power adapter jack
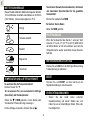
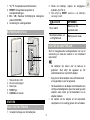
REMOTE SENSOR (FIG 3)
2
3
4
5
1
1. LED status indicator
2. Wall mount hole
3. Battery compartment
4. RESET hole
5. CHANNEL switch

EN
4
REMOTE SENSOR
The main unit can collect data from up to 3 sensors.
To set up the sensor:
1. Open the battery compartment (see FIG 3).
2. Select a channel then press RESET.
3. Close the battery door.
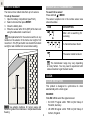
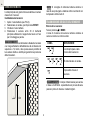
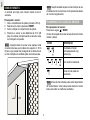
4. Place the sensor within 30 m (98 ft) of the main unit
using the table stand or wall mount.
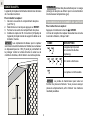
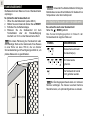
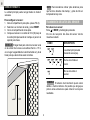
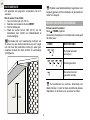
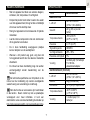
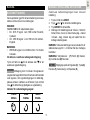
TIP
Ideal placements for the sensor would be in any
location on the exterior of the home at a height of not
more than 1.5 m (5 ft) and which can shield it from direct
sunlight or wet conditions for an accurate reading.
1.5 m (5 ft)
Use alkaline batteries for longer usage and
consumer grade lithium batteries in temperatures below
freezing.
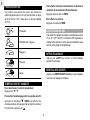
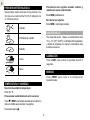
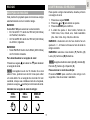
SENSOR DATA TRANSMISSION
To search for a sensor:
Press and hold + MODE.
The sensor reception icon in the remote sensor area
shows the status:
ICON DESCRIPTION
Main unit is searching for
sensor(s).
A channel has been found.
The sensor cannot be found.
TIP
The transmission range may vary depending
on many factors. You may need to experiment with
various locations to get the best results.
CLOCK
CLOCK RECEPTION
This product is designed to synchronize its clock
automatically with a clock signal.
BAR206S:
Slide EU / UK to select the signal received.
Frankfurt, Germany.
Anthorn, England.

EN
5
BAR206SA:
Collins Colorado.
To enable / disable signal reception:
Press and hold
to enable or to disable signal
reception.
weak, it can take up to 24 hours to get a valid signal.
If signal reception is unsuccessful, place your unit next
to a window, press and hold to force another signal
search.
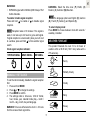
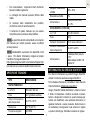
Clock signal reception indicator:
STRONG SIGNAL WEAK SIGNAL NO SIGNAL
MANUALLY SET CLOCK
To set the clock manually, disable the signal reception
1. Press and hold MODE.
2. Press
or to change the settings.
3. Press MODE
4. The settings order is: time zone, 12/24 hr format,
hour, minute, year, calendar mode (day – month /
month – day), month, day and language.
BAR206S:
from the received clock signal time.
BAR206SA: Select the time zone: (P E)
Eastern, (C) Central or (M) Mountain.
The language options are English (E), German
(D), French (F), Italian (I), and Spanish (S).
To select display mode:
Press MODE to choose between clock with seconds /
weekday / calendar.
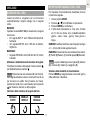
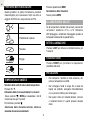
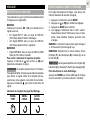
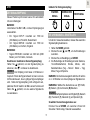
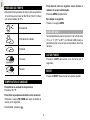
WEATHER FORECAST
This product forecasts the next 12 to 24 hours of
75% accuracy.
Sunny
Partially Cloudy
Cloudy
Rainy
Snowy

EN
6
TEMPERATURE AND HUMIDITY
To toggle temperature unit:
Press °C / °F.
To auto-scan between sensors:
Press and hold
+ MEM to display each sensor’s data
for 3 seconds.
To end press .
To toggle between current, minimum and maximum
records for the selected sensor:
Press MEM repeatedly.
To clear the records:
Press and hold MEM.
ICE WARNING
once the temperature is out of this range.
BACKLIGHT
Press LIGHT to activate backlight for 5 seconds.
RESET
Press RESET to return to the default settings.
PRECAUTIONS
dust, temperature or humidity.
cloth.
materials.
components. Doing so invalidates the warranty.
actual display.
separately for special treatment.
without the permission of the manufacturer.
the contents of the user manual are subject to change
without notice.
Features and accessories will not be available
in all countries. For more information, please contact
your local retailer. To download an electronic version of
the user manual, please visit

EN
7
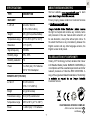
SPECIFICATIONS
TYPE DESCRIPTION
MAIN UNIT
L x W x H 94 x 49 x 164 mm
(3.70 x 1.93 x 6.46 in)
Weight 241 g (8.5 oz) without battery
Temperature range -5°C to 50°C (23°F to 122°F)
Resolution 0.1°C (0.2°F)
Signal frequency 433 MHz
Humidity range 25% - 95%
Humidity resolution 1%
Power 3 x UM-3 (AA) 1.5 V batteries
DC 5V 100 mA adapter
REMOTE UNIT (THN132N)
L x W x H 96 x 50 x 22 mm
(3.78 x 1.97 x 0.87 in)
Weight 62 g (2.22 ounces)
Transmission range 30 m (98 ft) unobstructed
Temperature range -20°C to 60°C (-4°F to 140°F)
Power 1 x UM-3 (AA) 1.5 V batteries
ABOUT OREGON SCIENTIFIC
Visit our website to learn
For any inquiry, please contact our Customer Services
at .
the right to interpret and construe any contents, terms
and provisions in this user manual and to amend it, at
its sole discretion, at any time without prior notice. To
the extent that there is any inconsistency between the
English version and any other language versions, the
English version shall prevail.
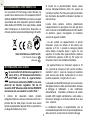
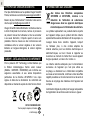
EU-DECLARTION OF CONFORMITY
Hereby, IDT Technology Limited, declares that Colour
LCD Weather Station (model: BAR206S / BAR206SA) is
in compliance with the essential requirements and other
relevant provisions of Directive RED 2014/53/EU. A
copy of the signed and dated Declaration of Conformity
Customer Service.
COUNTRIES RED APPROVED COMPLIED
All EU countries, Switzerland
and Norway
N
CH

EN
8
FCC STATEMENT
This device complies with Part 15 of the FCC Rules.
Operation is subject to the following two conditions: (1)
This device may not cause harmful interference, and
(2) This device must accept any interference received,
including interference that may cause undesired
operation.
WARNING
approved by the party responsible for compliance could
void the user’s authority to operate the equipment.
NOTE
This equipment has been tested and found
to comply with the limits for a Class B digital device,
pursuant to Part 15 of the FCC Rules. These limits
are designed to provide reasonable protection against
harmful interference in a residential installation.
This equipment generates, uses and can radiate radio
frequency energy and, if not installed and used in
accordance with the instructions, may cause harmful
interference to radio communications. However, there
is no guarantee that interference will not occur in a
particular installation. If this equipment does cause
harmful interference to radio or television reception,
which can be determined by turning the equipment
off and on, the user is encouraged to try to correct the
interference by one or more of the following measures:
• Reorient or relocate the receiving antenna.
• Increase the separation between the equipment
and receiver.
• Connect the equipment into an outlet on a
circuit different from that to which the receiver is
connected.
• Consult the dealer or an experienced radio / TV
technician for help.
DECLARATION OF CONFORMITY
The following information is not to be used as contact
for support or sales. Please call our customer service
number (listed on our website at
com, or on the warranty card for this product) for all
inquiries instead.
We
Address: Centerpointe CENTER
5 Centerpointe DRIVE, SUITE 400
Telephone No.:
declare that the product
Product No.: BAR206S / BAR206SA
Product Name: Colour LCD Weather Station
Manufacturer: IDT Technology Limited
Phase 1,41 Man Yue St.,
is in conformity with Part 15 of the FCC Rules.
Operation is subject to the following two conditions: 1)
This device may not cause harmful interference. 2) This
device must accept any interference received, including
interference that may cause undesired operation.

EN
9
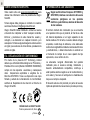
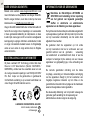
INFORMATION FOR USERS
Pursuant to and in accordance with Article 14
of the Directive 2012/19/EU of the European
Parliament on waste electrical and electronic
equipment (WEEE), and pursuant to and in
accordance with Article 20 of the Directive 2006/66/
EC of the European Parliament on batteries and
accumulators and waste batteries.
The barred symbol of the rubbish bin shown on the
equipment indicates that, at the end of its useful life, the
product must be collected separately from other waste.
Please note that the batteries/rechargeable batteries
must be removed from the equipment before it is given
as waste. To remove the batteries/accumulators refer
products that have reached the end of their useful life
must be given to waste disposal centers specializing
in separate collection of waste electrical and electronic
equipment, or given back to the dealer when purchasing
a new WEEE, pursuant to and in accordance with Article
14 as implemented in the country.
The adequate separate collection for the subsequent
and disposal of in an environmentally compatible way
contributes to preventing possible negative effects on
the environment and health and optimizes the recycling
and reuse of components making up the apparatus.
Abusive disposal of the product by the user involves
application of the administrative sanctions according to
the laws in force.


IT
1
Colour stazione meteo con
temperatura IN/OUT
Modello: BAR206S / BAR206SA
MANUALE PER L’UTENTE
INDICE
Panoramica .................................................................2
Vista Anteriore .........................................................2
Vista Posteriore .......................................................2
Sensore Remoto ......................................................3
Operazioni Preliminari ...............................................3
Inserimento Delle Batterie .......................................3
Connetti L’adattatore CA .......................................3
Sensore Remoto ........................................................4
Trasmissione Dei Dati Del Sensore .........................4
Orologio ...................................................................... 5
Ricezione dell’ora ....................................................5
Impostazione Manuale Dell’ora ...............................5
Previsioni meteorologiche ........................................ 6
Temperatura e umidità ..............................................6
Allarme rischio gelate ..............................................6
Retroilluminazione .....................................................6
Funzione RESET ........................................................6
Precauzioni .................................................................6
..................................................7
...........................7
Dichiarazione Di Conformità UE ...............................8
Informazione Agli Utenti ............................................8

IT
2
PANORAMICA
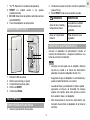
VISTA ANTERIORE (FIG 1)
1. Indicatore della ricezione del sensore remoto
2. Temperatura interna
3. Umidità interna
4. Indicatore della ricezione del segnale orario
5. MODE
visualizzazione
6. LIGHT: consente di attivare la retroilluminazione
per 5 secondi
7. / : consente di aumentare o diminuire
l’impostazione e di attivare o disattivare il segnale
di ricezione dell’ora
8. Temperatura esterna
9. Previsioni meteorologiche
10: US: Fuso orario (solo il modello BAR206SA)
11. Orologio con giorno della settimana
12. MEM: consente di visualizzare temperatura e
umidità attuali, massime e minime
13. Indicatore LED allarme rischio gelate
VISTA POSTERIORE (FIG 2)
1
2
3
4
6
7
8
9
10
11
12
13
1
2
3
4
5

IT
3
1. °C / °F: consente di selezionare l’unità di misura
della temperatura
2. RESET
dell’unità
3. EU / UK: consente di selezionare il segnale radio
più vicino (solo il modello BAR206S)
4. Ingresso per l’alimentatore
SENSORE REMOTO (FIG 3)
1. Indicatore LED di stato
3. Vano batterie
4. Foro RESET
5. Selettore CHANNEL
OPERAZIONI PRELIMINARI
INSERIMENTO DELLE BATTERIE
1. Togliere il coperchio del vano batterie.
2. Inserire le batterie, rispettando la polarità indicata
(FIG 2).
3. Premere RESET dopo ogni sostituzione di batteria.
POSIZIONE
SIGNIFICATO
e temperatura interna
Batterie dell’unità
principale in esaurimento
Area temperatura
esterna
Batterie del sensore in
esaurimento
CONNETTI L’ADATTATORE AC
Connettere il jack dell’alimentatore alla stazione base,
standard.
NOTA
per cui, sempre l’apparecchio alla presa della rete
Assicurarsi che l’adattatore non sia ostruito e sia
facilmente accessibile all’unità.
La stazione base e l’adattatore non devono essere
esposti ad acqua. Nessun oggetto riempito di liquido,
come vasi, deve essere posto sulla stazione base e
l’adattatore.
Per disconnettere completamente l’alimentazione,
scollegare l’adattatore dalla presa di corrente.
2
3
4
5
1

IT
4
SENSORE REMOTO
L’unità principale è in grado di ricevere dati da un numero
massimo di 3 sensori.
Installazione del sensore:
1. Aprire il vano batterie (see FIG 3).
2. Selezionare un canale, quindi premere RESET.
3. Chiudere il vano batterie.
4. Posizionare il sensore entro 30 m dall’unità
principale utilizzando il supporto da tavolo o il foro
per il montaggio a parete.
SUGGERIMENTO
La collocazione ideale del sensore
è un luogo all’esterno dell’abitazione ad un’altezza non
superiore a 1½ metro, dove possa essere protetto da
luce solare diretta o umidità per garantire la precisione
delle rilevazioni.
1.5m
NOTA
Si consiglia di utilizzare batterie alcaline in
caso di uso prolungato e batterie al litio in ambienti con
temperature inferiori allo 0.
TRASMISSIONE DEI DATI DEL SENSORE
Ricerca di un sensore:
Tenere premuto + MODE.
L’icona di ricezione del sensore nell’area relativa al
sensore remoto ne indica lo stato:
ICONA DESCRIZIONE
L’unità principale è alla
.
È stato rilevato un canale.
Impossibile trovare il
sensore.
SUGGERIMENTO
Il campo di trasmissione può variare
in base a molti fattori. è possibile dover provare diverse
posizioni prima di ottenere i risultati migliori.

IT
5
OROLOGIO
RICEZIONE DELL’ORA
Questo prodotto è progettato per sincronizzare
automaticamente il proprio orologio con un segnale
orario.
BAR206S:
Spostare la levetta EU / UK per selezionare il segnale
da ricevere.
Germania.
Inghilterra.
BAR206SA:
Colorado.
Attivazione / disattivazione della ricezione del segnale:
Per attivare la ricezione del segnale, tenere premuto
,
per disattivarla tenere premuto
.
NOTA
Per la ricezione sono necessari dai 2 ai 10 minuti.
per riceverne uno valido. Se la ricezione non riesce,
per forzare la ricerca di un altro segnale.
Indicatore della ricezione del segnale dell’ora:
SEGNALE
FORTE
SEGNALE
DEBOLE
NESSUN
SEGNALE
IMPOSTAZIONE MANUALE DELL’ORA
Per impostare l’ora manualmente, disattivare prima la
ricezione del segnale.
1. Tenere premuto MODE.
2. Premere
o
3. Premere MODE per confermare.
4. L’ordine delle impostazioni è: time zone, formato
lingua.
BAR206S: La differenza di fuso orario imposta l’orologio
BAR206SA: Selezionare la zona relativa al fuso orario:
(PE) Eastern, (C) Central oppure (M) Mountain.
NOTA
Le opzioni della lingua sono inglese (E), tedesco
(D), francese (F), italiano (I) e spagnolo (S).
Selezione della modalità di visualizzazione:
Premere MODE

IT
6
PREVISIONI METEOROLOGICHE
Questo prodotto è in grado di mostrare le previsioni
Sereno
Parzialmente nuvoloso
Nuvoloso
Pioggia
Neve
TEMPERATURA E UMIDITÀ
Selezione delle unità di misura della temperatura:
Premere °C / °F.
Attivazione della ricerca automatica tra i sensori:
Tenere premuto
+ MEM per visualizzare i dati di
ciascun sensore per 3 secondi.
Per terminare, premere
.
Alternanza delle rilevazioni attuale, minima e
massima del sensore selezionato:
Premere ripetutamente MEM.
Cancellazione delle rilevazioni:
Tenere premuto MEM.
ALLARME RISCHIO GELATE
Se la temperatura rilevata dal sensore posizionato
LED lampeggia e smetterà di lampeggiare quando la
temperatura sarà uscita da questa fascia.
RETROILLUMINAZIONE
Premere LIGHT per attivare la retroilluminazione per
5 secondi.
FUNZIONE RESET
Premere RESET per ripristinare le impostazioni
PRECAUZIONI
polvere, temperatura o umidità.
liquido sul prodotto, asciugarlo immediatamente
con un panno morbido e privo di lanugine.
o contenenti alcool, in quanto possono causare
danni.

IT
7
Questo invalida la garanzia.
realtà.
riprodotto senza il permesso del produttore.
NOTA
senza preavviso.
NOTA
Caratteristiche e accessori non disponibili in tutti
i paesi. Per ulteriori informazioni, rivolgersi al proprio
rivenditore. Si prega di visitare il sito
per scaricare una versione elettronica del manuale.
SPECIFICHE TECNICHE
TIPO DESCRIZIONE
UNITÀ PRINCIPALE
L x P x H 94 x 49 x 164 mm
Peso 241 g (batterie escluse)
Campo di misurazione
della temperatura
da
a
Risoluzione
Frequenza segnale 433 MHz
Campo di misurazione
umidità
Risoluzione umidità
Alimentazione
3 batterie
da 1.5V
UNITÀ REMOTA (THN132N)
L x P x H
96 x 50 x 22 mm
Peso 62 g
Campo di trasmissione 30 m senza ostruzioni
Campo di misurazione
della temperatura
Alimentazione
1,5 V
mA da 5V
INFORMAZIONI SU OREGON SCIENTIFIC
visitate il nostro sito web .
Per richiedere informazioni, contattate il nostro Servizio
Clienti all’indirizzo .
termini e disposizioni contenuti in questo manuale per
qualsiasi momento e senza preavviso. Nella misura in
cui risultassero incongruenze tra la versione in inglese
e quelle in altre lingue, farà fede la versione in inglese.

IT
8
DICHIARAZIONE DI CONFORMITA’ UE
Con la presente IDT Technology Limited dichiara che
questo
è conforme ai requisiti
essenzialied alle altre disposizioni pertinenti stabilite
della Dichiarazione di Conformità è disponibile, su
PAESI CONFORMI ALLA DIRETTIVA RED
T ut t i I P aes i U E , S v i z z er a
e N or v egi a
N
CH
INFORMAZIONE AGLI UTENTI
Ai sensi dell’art.26 del Decreto Legislativo 14
marzo 2014, n. 49 “Attuazione della Direttiva
elettriche ed elettroniche (RAEE)” ed ai sensi
dell’art.22 del Decreto Legislativo 188 del 20
novembre 2008 “Attuazione della direttiva 2006/66/CE
Il simbolo del cassonetto barrato riportato
sull’apparecchiatura o sulla sua confezione indica che il
un adeguato trattamento e riciclo.
rimosse dall’apparecchiatura prima che questa sia
manuale d’uso.
L’utente dovrà, pertanto, conferire gratuitamente
ed elettronici, oppure riconsegnarle al rivenditore
secondo le seguenti modalità:
sia pile portatili sia apparecchiature di piccole
dimensioni, ovvero con almeno un lato esterno non
superiore a 25 cm, è prevista la consegna gratuita
senza obbligo di acquisto presso i negozi con una
ed elettroniche superiore ai 400 mq. Per negozi con
dimensioni inferiori, tale modalità è facoltativa.
per apparecchiature con dimensioni superiori a 25
cm, è prevista la consegna in tutti i punti di vendita in
modalità 1 contro 1, ovvero la consegna al rivenditore
potrà avvenire solo all’atto dell’acquisto di un nuovo
prodotto equivalente, in ragione di uno a uno.
L’adeguata raccolta differenziata per l’avvio successivo
al riciclaggio, al trattamento e allo smaltimento
ambientalmente compatibile contribuisce ad evitare
possibili effetti negativi sull’ambiente e sulla salute e
sono composti.
Lo smaltimento abusivo di apparecchiature, pile ed
accumulatori da parte dell’utente comporta l’applicazione
delle sanzioni di cui alla corrente normativa di legge.
La pagina si sta caricando...
La pagina si sta caricando...
La pagina si sta caricando...
La pagina si sta caricando...
La pagina si sta caricando...
La pagina si sta caricando...
La pagina si sta caricando...
La pagina si sta caricando...
La pagina si sta caricando...
La pagina si sta caricando...
La pagina si sta caricando...
La pagina si sta caricando...
La pagina si sta caricando...
La pagina si sta caricando...
La pagina si sta caricando...
La pagina si sta caricando...
La pagina si sta caricando...
La pagina si sta caricando...
La pagina si sta caricando...
La pagina si sta caricando...
La pagina si sta caricando...
La pagina si sta caricando...
La pagina si sta caricando...
La pagina si sta caricando...
La pagina si sta caricando...
La pagina si sta caricando...
La pagina si sta caricando...
La pagina si sta caricando...
La pagina si sta caricando...
La pagina si sta caricando...
La pagina si sta caricando...
La pagina si sta caricando...
La pagina si sta caricando...
La pagina si sta caricando...
La pagina si sta caricando...
La pagina si sta caricando...
La pagina si sta caricando...
La pagina si sta caricando...
La pagina si sta caricando...
La pagina si sta caricando...
La pagina si sta caricando...
La pagina si sta caricando...
La pagina si sta caricando...
La pagina si sta caricando...
La pagina si sta caricando...
La pagina si sta caricando...
La pagina si sta caricando...
La pagina si sta caricando...
La pagina si sta caricando...
La pagina si sta caricando...
La pagina si sta caricando...
La pagina si sta caricando...
-
 1
1
-
 2
2
-
 3
3
-
 4
4
-
 5
5
-
 6
6
-
 7
7
-
 8
8
-
 9
9
-
 10
10
-
 11
11
-
 12
12
-
 13
13
-
 14
14
-
 15
15
-
 16
16
-
 17
17
-
 18
18
-
 19
19
-
 20
20
-
 21
21
-
 22
22
-
 23
23
-
 24
24
-
 25
25
-
 26
26
-
 27
27
-
 28
28
-
 29
29
-
 30
30
-
 31
31
-
 32
32
-
 33
33
-
 34
34
-
 35
35
-
 36
36
-
 37
37
-
 38
38
-
 39
39
-
 40
40
-
 41
41
-
 42
42
-
 43
43
-
 44
44
-
 45
45
-
 46
46
-
 47
47
-
 48
48
-
 49
49
-
 50
50
-
 51
51
-
 52
52
-
 53
53
-
 54
54
-
 55
55
-
 56
56
-
 57
57
-
 58
58
-
 59
59
-
 60
60
-
 61
61
-
 62
62
-
 63
63
-
 64
64
-
 65
65
-
 66
66
-
 67
67
-
 68
68
-
 69
69
-
 70
70
-
 71
71
-
 72
72


Oregon Scientific BAR206S Manuale utente
- Tipo
- Manuale utente
- Questo manuale è adatto anche per
in altre lingue
- français: Oregon Scientific BAR206S Manuel utilisateur
- español: Oregon Scientific BAR206S Manual de usuario
- Deutsch: Oregon Scientific BAR206S Benutzerhandbuch
- Nederlands: Oregon Scientific BAR206S Handleiding
- português: Oregon Scientific BAR206S Manual do usuário
Documenti correlati
-
 Oregon Scientific BAR800X Manuale utente
-
 Oregon Scientific OSBAR208SX Manuale del proprietario
-
Oregon Scientific BAR206SX Manuale utente
-
 Oregon Scientific OS VENUS Manuale del proprietario
-
 Oregon Scientific BAR808HG / BAR808HGA Manuale utente
-
 Oregon Scientific RMS600 / RMS600A Manuale utente
-
Oregon BAR339P Manuale del proprietario
-
Oregon Scientific 086L005036-017 Manuale utente
-
Oregon Scientific BAR908HG / BAR908HGU / BAR908HGA Manuale utente
-
 Oregon Scientific OS CELSIUS Manuale del proprietario


