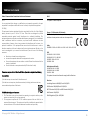
Trendnet RB-TEW-809UB Manuale utente
- Categoria
- Router
- Tipo
- Manuale utente
Questo manuale è adatto anche per

TRENDnet User’s Guide
Cover Page

© Copyright 2016 TRENDnet. All Rights Reserved.
TRENDnet User’s Guide
Table of Contents
i
Contents
Product Overview ........................................................................... 2
Package Contents .......................................................................................................... 2
Features ......................................................................................................................... 2
Product Hardware Features........................................................................................... 3
System Requirements .................................................................................................... 3
Application Diagram ...................................................................................................... 4
Installing your Wireless Adapter ...................................................... 5
Windows® OS Installation .............................................................................................. 5
Mac® OS Installation ...................................................................................................... 2
Connect to your wireless network using WPS .................................. 7
Windows® OS................................................................................................................. 7
WPS connection using the built in utility (Virtual Push Button) ................................ 7
WPS connection using the hardware push button ................................................... 8
Mac® OS ....................................................................................................................... 10
WPS connection using the built in utility (Virtual Push Button) ............................. 10
WPS connection using the hardware push button ................................................. 11
Technical Specifications ................................................................ 14
Troubleshooting ........................................................................... 16
Appendix ...................................................................................... 17

© Copyright 2016 TRENDnet. All Rights Reserved.
TRENDnet User’s Guide
TEW-809UB
2
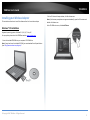
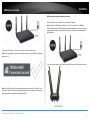
Product Overview
TEW-809UB
Package Contents
In addition to your wireless adapter, the package includes:
Quick Installation Guide
CD-ROM (Drivers & User’s Guide)
4 x High Gain Detachable Dual Band Antennas
USB 3.0 Micro-B to USB Type-A cable (0.91 m / 3 ft)
If any package contents are missing or damaged, please contact the retail store, online
retailer, or reseller/distributor from which the product was purchased.
Features
TRENDnet’s AC1900 High Power Dual Band Wireless USB Adapter, model TEW-809UB,
upgrades a computer to Wireless AC1900. Quickly connect to a high performance
Wireless AC network at 1300 Mbps or to a Wireless N network at 600 Mbps. A high
power radio with detachable high gain antennas increase wireless coverage.
Easy Setup
Get up and running in minutes with the intuitive guided setup
AC1900 Dual Band
Connect to an extreme performance 1300 Mbps Wireless AC or 600 Mbps
Wireless N network*
Wireless Coverage
Extended wireless coverage with high power radio and detachable high gain
antennas
LED Indicator
LED indicator conveys device status
Operating Systems
Compatible with Windows® and Mac® operating systems
*Maximum wireless signal rates are referenced from IEEE 802.11 theoretical specifications. Actual
data throughput and coverage will vary depending on interference, network traffic, building
materials and other conditions. For maximum performance of up to 1.3 Gbps use with a 1.3 Gbps
802.11ac wireless adapter. For maximum performance of up to 600 Mbps, use with a 600 Mbps
802.11n wireless adapter.

© Copyright 2016 TRENDnet. All Rights Reserved.
TRENDnet User’s Guide
TEW-809UB
3
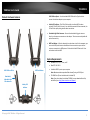
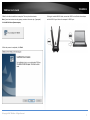
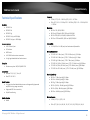
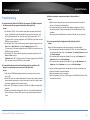
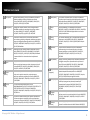
Product Hardware Features
USB 3.0 Micro-B port – Use the included USB 3.0 Micro-B to Type A cable to
connect the wireless adapter to your computer.
Activity LED Indicator –The LED will blink rapidly to indicate WPS has been
activated. The LED will blink every 5 sec. when disconnected. When connected, the
LED will blink rapidly during wireless data transmission.
Detachable High Gain Antennas – Connect the detachable high gain antenna
directly to the antenna connectors on the adapter. The antennas are adjustable for
optimal connectivity.
WPS Push Button – After the adapter drivers have been install in the computer, you
can use the WPS push button to establish wireless connection to your wireless
router or access point via WPS protocol. Push and hold the WPS button for 3 sec.
and release to activate WPS.
System Requirements
Windows® 10, 8.1, 8, 7, Vista, or XP
Mac OS® 10.6-10.11
Available USB 3.0 port on your computer.
Note: Maximum wireless speeds will be reduced if using a USB 2.0 port.
CD-ROM Drive (Driver Installation with included CD)
Note: If you do not have the included CD-ROM, you can download the utility
and drivers from http://www.trendnet.com/support/.
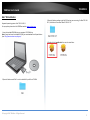
Activity LED
Indicator
USB 3.0 Micro-B Port
Detachable /
Adjustable High
Gain Antennas
WPS Push Button

© Copyright 2016 TRENDnet. All Rights Reserved.
TRENDnet User’s Guide
TEW-809UB
4
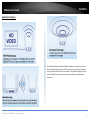
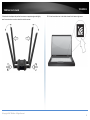
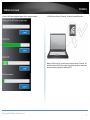
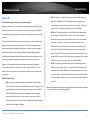
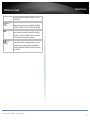
Application Diagram
The AC1900 High Power Wireless Dual Band PCIe Adapter can provide wireless AC or
wireless N connectivity to a wireless AC/N network (router/access point) through the
use of an available USB 3.0 port on your computer. The detachable high gain antenna
allows for flexible adjustment to achieve the best possible wireless coverage and
connectivity

© Copyright 2016 TRENDnet. All Rights Reserved.
TRENDnet User’s Guide
TEW-809UB
5
Installing your Wireless Adapter
This section describes how to install the software driver for the wireless adapter.
Windows® OS Installation
Supported operating systems: Windows® 10, 8.1, 8, 7, Vista, XP
For any updates, please check the TRENDnet website www.trendnet.com.
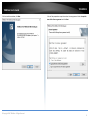
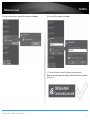
1. Insert the included CD-ROM into your computer’s CD-ROM drive.
Note: If you do not have the included CD-ROM, you can download the utility and drivers
from http://www.trendnet.com/support/.
2. At the CD Autorun Prompt window, click Run Autorun.exe.
Note: If the Autorun prompt does not appear automatically, open the CD contents and
double-click Autorun.exe.
At the CD-ROM main menu, click Install Drivers.

© Copyright 2016 TRENDnet. All Rights Reserved.
TRENDnet User’s Guide
TEW-809UB
6
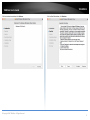
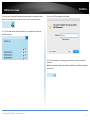
3. At the installation window, click Next.
4. You will be prompted to accept the end user license agreement. Select I accept the
terms of the license agreement and click Next.

© Copyright 2016 TRENDnet. All Rights Reserved.
TRENDnet User’s Guide
TEW-809UB
7
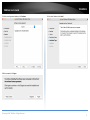
5. Wait for the driver installation to complete. This may take a few minutes.
Note: If you do not receive a security prompt, continue to the next step. If prompted,
click Install this driver software anyway.
6. After the process is completed, click Finish.
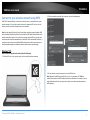
8. Using the included USB 3.0 cable, connect the USB 3.0 micro-B side to the adapter
and the USB 3.0 type A side to the computer’s USB 3.0 port.

© Copyright 2016 TRENDnet. All Rights Reserved.
TRENDnet User’s Guide
TEW-809UB
8
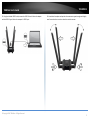
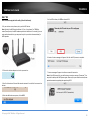
9. Attached to the adapter and position the antennas at opposite angles and slightly
away from each other on each as shown for optimal coverage.
10. Click on the wireless icon in the taskbar located in the bottom right corner.

© Copyright 2016 TRENDnet. All Rights Reserved.
TRENDnet User’s Guide
TEW-809UB
9
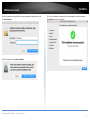
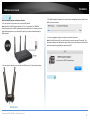
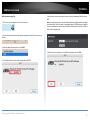
11. Click on the wireless network you would like to connect and click Connect.
.
12. Enter the WiFi Key (password) and click Next.
13. The status will display “Connected” to indicate a successful connection.
Note: If the connected message does not display, double check your WiFi key (password)
and re-enter it.

© Copyright 2016 TRENDnet. All Rights Reserved.
TRENDnet User’s Guide
TEW-809UB
2
Mac® OS Installation
Supported operating systems: Mac® OS 10.6-10.11
For any updates, please check the TRENDnet website www.trendnet.com.
1. Insert the included CD-ROM into your computer’s CD-ROM drive.
Note: If you do not have the included CD-ROM, you can download the utility and drivers
from http://www.trendnet.com/support/
2. Open the folder named “Mac” on the included Utility and Driver CD ROM.
3. Open the folder according to the Mac® OS version you are running. For Mac® OS 10.6-
10.11, the folder will be named “Mac OS 10.6-10.11”.
4. Double click the Installer.pkg file to start the installation.

© Copyright 2016 TRENDnet. All Rights Reserved.
TRENDnet User’s Guide
TEW-809UB
2
5. At the Introduction window, click Continue.
6. At the Read Me window, click Continue.

© Copyright 2016 TRENDnet. All Rights Reserved.
TRENDnet User’s Guide
TEW-809UB
3
7.At the License Agreement window, click Continue.
8. When prompted, click Agree.
9.At the Install window, click Install.

© Copyright 2016 TRENDnet. All Rights Reserved.
TRENDnet User’s Guide
TEW-809UB
4
10. When prompted, enter your Mac® user account password to authorize the install,
click Install Software.
11. When prompted, click Continue Installation.
12. Once the installation is complete, you will be prompted to restart the computer.
Click Restart to restart your computer.

© Copyright 2016 TRENDnet. All Rights Reserved.
TRENDnet User’s Guide
TEW-809UB
5
13. Using the included USB 3.0 cable, connect the USB 3.0 micro-B side to the adapter
and the USB 3.0 type A side to the computer’s USB 3.0 port.
14. Attached to the adapter and position the antennas at opposite angles and slightly
away from each other on each as shown for optimal coverage.

© Copyright 2016 TRENDnet. All Rights Reserved.
TRENDnet User’s Guide
TEW-809UB
6
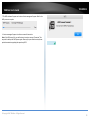
15. After the driver is successfully installed and wireless adapter is connected, a wireless
adapter icon will appear in the top menu bar. Click on the icon in the top menu bar.
16. A list of available wireless network will appear. Click on the wireless network you
would like to connect.
12. Enter the WiFi Key (password) and click Join.
13. The wireless adapter icon will change to green WiFi bars to indicate a successful
connection.
Note: If the connected message does not display, double check your WiFi key (password)
and re-enter it.

© Copyright 2016 TRENDnet. All Rights Reserved.
TRENDnet User’s Guide
TEW-809UB
7
Connect to your wireless network using WPS
WPS (Wi-Fi Protected Setup) is a feature that makes it easy to connect devices to your
wireless network. If your wireless router/access point supports WPS, you can use this
feature to easily connect wireless devices to your network.
Note: You can typically find out if you if your wireless router/access point supports WPS
just by looking at the physical device. There should be a WPS push button located on the
exterior casing of the device, if not, your device may not support WPS or you may need
to reference your device documentation as to how WPS can be initiated on the device. If
your device does not have an identifiable WPS push button on the exterior location, we
would recommend using the standard connection method on the previous page.
Windows® OS
WPS connection using the built in utility (Virtual Push Button)
1. Click the WiFi icon in the system tray to scan for available wireless networks.
2. Click the network you would like to connect. Leave this window open.
3. On your wireless router/access point, push the WPS button.
Note: Typically, the WPS button hold time is 3-5 sec., then release. For TRENDnet
routers/access points, the WPS hardware push button hold time is 3 seconds. If you are
using another brand device, you may need to refer to your device documentation for
WPS operation.

© Copyright 2016 TRENDnet. All Rights Reserved.
TRENDnet User’s Guide
TEW-809UB
8
4. The status will display “Connected” to indicate a successful connection.
Note: If the connected message does not display, double check your WiFi key (password)
and re-enter it.
Note: If the WPS process fails, you will receive not receive a message “Connected”. You
may need to attempt the WPS process again. Please refer to your wireless router/access
point documentation regarding the operation of WPS.
WPS connection using the hardware push button
1 On your wireless router/access point, push the WPS button.
Note: Typically, the WPS button hold time is 3-5 sec., then release. For TRENDnet
routers/access points, the WPS hardware push button hold time is 3 seconds. If you are
using another brand device, you may need to refer to your device documentation for
WPS operation.
2. On your wireless adapter, push and hold the WPS button for 3 seconds and release.

© Copyright 2016 TRENDnet. All Rights Reserved.
TRENDnet User’s Guide
TEW-809UB
9
3. A series of WPS status messages will appear. Wait for process to complete.
4. The WiFI status will display “Connected” to indicate a successful connection.
Note: If the WPS process fails, you will receive not receive a message “Connected”. You
will need to attempt the WPS process again. Please refer to your wireless router/access
point documentation regarding the operation of WPS.

© Copyright 2016 TRENDnet. All Rights Reserved.
TRENDnet User’s Guide
TEW-809UB
10
Mac® OS
WPS connection using the built in utility (Virtual Push Button)
1 On your wireless router/access point, push the WPS button.
Note: Typically, the WPS button hold time is 3-5 sec., then release. For TRENDnet
routers/access points, the WPS hardware push button hold time is 3 seconds. If you are
using another brand device, you may need to refer to your device documentation for
WPS operation.
2. Click on the wireless adapter icon in the top menu bar.
3. Scroll to the bottom of the available wireless networks list and click the arrow at the
bottom.
4, After the additional menu opens, click on WPS.
5. In the WPS window, click PBC to activate WPS.
6. A series of status messages will appear. Wait for the WPS process to complete.
7. A status message will appear to indicate a successful connection.
Note: If the WPS process fails, you will receive not receive a message “Connected”. You
may need to attempt the WPS process again. Please refer to your wireless router/access
point documentation regarding the operation of WPS.
La pagina si sta caricando...
La pagina si sta caricando...
La pagina si sta caricando...
La pagina si sta caricando...
La pagina si sta caricando...
La pagina si sta caricando...
La pagina si sta caricando...
La pagina si sta caricando...
La pagina si sta caricando...
La pagina si sta caricando...
La pagina si sta caricando...
La pagina si sta caricando...
La pagina si sta caricando...
La pagina si sta caricando...
La pagina si sta caricando...
La pagina si sta caricando...
-
 1
1
-
 2
2
-
 3
3
-
 4
4
-
 5
5
-
 6
6
-
 7
7
-
 8
8
-
 9
9
-
 10
10
-
 11
11
-
 12
12
-
 13
13
-
 14
14
-
 15
15
-
 16
16
-
 17
17
-
 18
18
-
 19
19
-
 20
20
-
 21
21
-
 22
22
-
 23
23
-
 24
24
-
 25
25
-
 26
26
-
 27
27
-
 28
28
-
 29
29
-
 30
30
-
 31
31
-
 32
32
-
 33
33
-
 34
34
-
 35
35
-
 36
36


Trendnet RB-TEW-809UB Manuale utente
- Categoria
- Router
- Tipo
- Manuale utente
- Questo manuale è adatto anche per
in altre lingue
- English: Trendnet RB-TEW-809UB User manual
Documenti correlati
-
Trendnet TEW-731BR Guida utente
-
-
-
-
Trendnet TEW-637AP 3.01 Manuale utente
-
Trendnet TEW-652BRP Manuale del proprietario
-
-
-
Trendnet TV-IP672WI Manuale utente
-
Altri documenti
-
Edimax EW-7822ULC-UTC Dual-Band MU-MIMO USB Adapter Guida d'installazione
-
Edimax D-Link DWA-T185 11ac 2T2R Wireless LAN USB Adapter Guida d'installazione
-
Edimax EW-7822UAC Guida d'installazione
-
 Conitech CN406WLUSBN Manuale del proprietario
-
Kindermann KLICK&SHOW K-FX Wireless Conferencing System Guida utente
