Bossini Z032204 + Z030203 000 Istruzioni per l'uso
- Tipo
- Istruzioni per l'uso

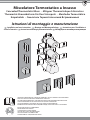
Miscelatore Termostatico a Incasso
Concealed Thermostatic Mixer - Mitigeur Thermostatique A Encastrer
Thermostat-Brausebatterie Für Den Unterputz - Mezclador Termostático
Empotrable - Смеситель Термостатический Встраиваемый
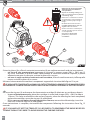
LEGGERE ATTENTAMENTE IL PRESENTE LIBRETTO DI INSTALLAZIONE E MANUTENZIONE.
READ THIS INSTALLATION AND CARE MANUAL CAREFULLY.
DIE VORLIEGENDE MONTAGE- UND WARTUNGSANLEITUNG AUFMERKSAM DURCHLESEN.
LIRE ATTENTIVEMENT CETTE NOTICE D’INSTALLATION ET D'ENTRETIEN.
LEA ATENTAMENTE ESTE MANUAL DE INSTALACIÓN Y MANTENIMIENTO
ВНИМАТЕЛЬНО ПРОЧИТАТЬ ИНСТРУКЦИЮ ПРЕЖДЕ, ЧЕМ ПРИСТУПАТЬ К УСТАНОВКЕ
INDOSSARE GUANTI DI PROTEZIONE.
WEAR PROTECTIVE GLOVES.
SCHUTZHANDSCHUHE TRAGEN.
UTILISER DES GANTS DE PROTECTION.
UTILICE GUANTES DE PROTECCIÓN.
ИСПОЛЬЗОВАТЬ ЗАЩИТНЫЕ ПЕРЧАТКИ
Istruzioni di montaggio e manutenzione
Installation and care instructions Montage-und Wartungsanleitung Instructions pour l’installation et
conseils d’entretien Instrucciones de montaje y de mantenimiento Инструкция по монтажу и эксплуатации

BCD
EFG
HIJ
Adesivi
Stickers
Etiquettes Adhésives
Aufkleber
Etiquetas Adhesivas
Наклейки
1
2
3
24
23
22
7
25
17
17
31
30
14
11
21
20
22
23
19
18
8
13
16
12
30
9
5
4
10
9
6
10
28
28
31
27
26
27
26
29
29
15
32
2
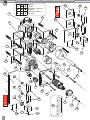
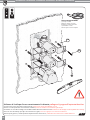
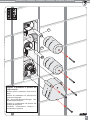
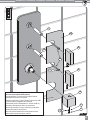
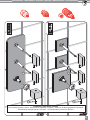
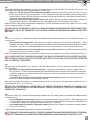
Componenti - Parst - Composants - Einzelteile - Componentes - Комплектация

1. Corpo deviatore
2. Corpo rubinetto
3. Corpo miscelatore termostatico
4. Cartuccia deviatore
5. Cartuccia rubinetto
6. Cartuccia termostatica
7. Ghiera deviatore (Ch.25)
8. Ghiera termostatico (Ch.32)
9. Distanziali deviatore
10. Distanziali rubinetto
11. Astina per deviatore, Ø12x54mm
12. Astina per rubinetto, Ø12x54mm
13. Astina per Termostatico, Ø12x24mm
14. Viti TC M4x45mm
15. Piasta di copertura (versione intera)
16. Vite TC M4x25mm
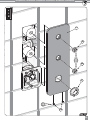
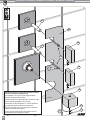
Lista componenti
17. Tappino coprigrano
18. Valvola di non ritorno
19. Tappo con chiusura valvole
20. Telaio di supporto
21. Vite TSCEI M4x50mm
22. Vite TC Ø5x50mm
23. Fisher Ø8mm
24. Piastra piccola di copertura Utenze
25. Piastra grande di copertura Utenze
26. Ghiera montaggio copertura
27. Camma
28. Grano lettato M4x8mm
29. Manopola Utenze
30. Manopola Termostatico
31. Grano lettato M5x8mm
32. Dima di montaggio manopole
1. Diverter body
2. Valve body
3. Thermostatic mixer body
4. Diverter cartridge
5. Valve cartridge
6. Thermostatic cartridge
7. Diverter ring nut (Ch.25)
8. Thermostatic mixer ring nut (Ch.32)
9. Diverter spacers
10. Valve spacers
11. Rod for diverter, Ø12x54mm
12. Rod for faucet, Ø12x54mm
13. Rod for thermostatic mixer, Ø12x24mm
14. Viti TC M4x45mm
15. Cover plate
16. Vite TC M4x25mm
Components
17. Dowel plug cover
18. Non-return valve
19. Plug with valves closing
20. Support frame
21. Screws TSCEI M4x50mm
22. Screws TC Ø5x50mm
23. Fisher Ø8mm
24. Small plate cover
25. Large plate cover
26. Cover installation ring nut
27. Cam
28. Threaded dowel M4x8mm
29. User knob
30. Thermostatic mixer knob
31. Threaded dowel M5x8mm
32. Template for knob installation
1. Corps inverseur
2. Corps robinet
3. Corps mitigeur thermostatique
4. Cartouche inverseur
5. Cartouche robinet
6. Cartouche thermostatique
7. Virole pour inverseur (Ch.25)
8. Virole pour mitigeur thermostatique (Ch.32)
9. Ecarteurs pour inverseur
10. Ecarteurs pour robinet
11. Petite tige pour inverseur, Ø12x54mm
12. Petite tige pour robinet, Ø12x54mm
13. Petite tige pour mitigeur thermostatique,
Ø12x24mm
14. Vis TC M4x45mm
15. Plaque de recouvrement (version entière)
Composants 16. Vis TC M4x25mm
17. Petit bouchon pour vis sans tête
18. Clapet anti-retour
19. Bouchon
20. Châssis de support
21. Vis TSCEI M4x50mm
22. Vis TC Ø5x50mm
23. Fisher Ø8mm
24. Petite plaque de recouvrement
25. Grande plaque de recouvrement
26. Virole de montage recouvrement
27. Came
28. Vis sans tête M4x8mm
29. Poignée usagers
30. Poignée mitigeur thermostatique
31. Vis sans tête M5x8mm
32. Gabarit de montage poignées
3
Componenti - Parst - Composants - Einzelteile - Componentes - Комплектация

1. Cuerpo desviador
2. Cuerpo grifo
3. Cuerpo mezclador termostático
4. Cartucho desviador
5. Cartucho grifo
6. Cartucho termostático
7. Abrazadera desviador (Ch.25)
8. Abrazadera termostático (Ch.32)
9. Distanciadores Desviador
10. Distanciadores Grifo
11. Barra para desviador, Ø12x54mm
12. Barra para grifo, Ø12x54mm
13. Barra para termostático, Ø12x24mm
14. Screws TC M4x45mm
15. Placa cobertora
16. Screws TC M4x25mm
Componentes
1. Gehäuse Umsteller
2. Gehäuse Wasserhahn
3. Gehäuse Thermostat-Batterie
4. Kartusche Umsteller
5. Kartusche Wasserhahn
6. Kartusche Thermostat
7. Gewindering Umsteller (Ch.25)
8. Gewindering Thermostat (Ch.32)
9. Distanzhülsen Umsteller
10. Distanzhülsen Wasserhahn
11. Fangstift für Umsteller, Ø12x54mm
12. Fangstift für Wasserhahn, Ø12x54mm
13. Fangstift für Thermostat, Ø12x24mm
14. Schrauben TC M4x45mm
15. Abdeckplatte
16. Schrauben TC M4x25mm
Einzelteile
1. корпус девиатора
2. корпус смесителя
3. корпус термостатического смесителя
4. картридж девиатора
5. картридж смесителя
6. картридж термостата
7. хомут девиатора (Ch.25)
8. хомут термостата (Ch.32)
9. распорка девиатора
10. распорка смесителя
11. штенгель девиатора, Ø12x54mm
12. штенгель смесителя, Ø12x54mm
13. штенгель термостата, Ø12x24mm
14. винты TC M4x45mm
15. наружная панель
16. винт TC M4x25
Комплектация
17. Tapón cubre tornillo prisionero
18. Válvula antirretroceso
19. Tapón con cierre válvulas
20. Bastidor de soporte
21. Tornillo TSCEI M4x50mm
22. Tornillo TC Ø5x50mm
23. Taco Fisher Ø8mm
24. Placa pequeña cobertora
25. Placa grande cobertora
26. Abrazadero de montaje cobertura
27. Excéntrica
28. Tornillo prisionero roscado M4x8mm
29. Pomo utilidades
30. Pomo termostático
31. Tornillo prisionero roscado M5x8mm
32. Plantilla de montaje pomos
17. Schraubenkappe
18. Rückschlagventil
19. Kappe mit Ventilverschluss
20. Halterung
21. Schraube TSCEI M4x50mm
22. Schraube TC Ø5x50mm
23. Fisher Ø8mm
24. Kleine Abdeckplatte
25. Große Abdeckplatte
26. Montagering für Abdeckung
27. Nocken
28. Gewindeschraube M4x8mm
29. Bediengri
30. Thermostatregler
31. Gewindeschraube M5x8mm
32. Schablone zur Gri montage
17. заглушка
18. обратный клапан
19. крышка с клапаном
20. опорная рама
21. винт TSCEI M4x50mm
22. винт TC Ø5x50mm
23. дюбель Ø8mm
24. малая наружная панель
25. большая наружная панель
26. хомут для монтажа панели
27. эксцентрик
28. винт нарезной M4x8mm
29. регулятор потребления
30. регулятор термостата
31. винт нарезной M5x8mm
32. шаблон монтажа регуляторов
4
Componenti - Parst - Composants - Einzelteile - Componentes - Комплектация

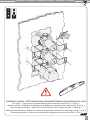
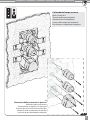
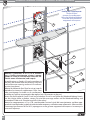
Questo Libretto contiene le indicazioni necessarie per l’installazione in verticale di un gruppo composto
da:
• n°1 Deviatore
• n°1 Rubinetto
• n°1 Miscelatore Termostatico
Se avete acquistato un gruppo composto da componenti diversi o composto da più di un componente
dello stesso tipo, si deve avere l’accortezza di adeguare le indicazioni presenti in questo libretto al
gruppo di cui si è in possesso.
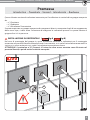
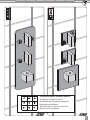
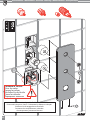
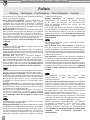
INSTALLAZIONE IN ORIZZONTALE ( Fig.A, Fig.B)
Nel caso di montaggio del gruppo in senso orizzontale utilizzare le indicazioni per il montaggio
contenute nel presente libretto ruotando il tutto il senso orario, se si vuole il miscelatore termostatico a
sinistra, o in senso antiorario se si vuole il miscelatore termostatico a destra.
ATTENZIONE: il particolare n°27 (Camma) è l’unico che deve essere montato come illustrato nel
presente libretto, e quindi anche la relativa manopola.
Premessa
Introduction - Preambule - Vorwort - Introducción - Введение
Fig_A
27
5
Premessa - Introduction - Introduction - Einführung - Introducción - Введение

Introduction
This booklet contains the instructions required for the vertical installation of a unit made up of the
following components:
• 1 diverter
• 1 Faucet
• 1 thermostatic mixer
If you have purchased a unit made up of various components or made up of more than one compo-
nent of the same type, it is necessary to adapt the instructions in this booklet to the unit you have.
HORIZONTAL INSTALLATION ( Fig.A, Fig.B)
If the unit needs to be installed horizontally, follow the assembly instructions in this booklet by rotating
everything clockwise, if you wish to have the thermostatic mixer on the left, and anticlockwise if you
prefer to have the thermostatic mixer on the right.
PLEASE NOTE: Piece N.27 (cam) is the only one which should be assembled as illustrated in this
booklet, and therefore also the related knob.
Preambule
Ce livret contient les indications nécessaires pour l’installation verticale d’un ensemble composé de :
• 1 inverseur
• 1 robinet
• 1 mitigeur thermostatique
Si vous avez fait l’acquisition d’un ensemble composé d’éléments différents ou de plus d’un élément
du même type, il sera nécessaire de se conformer aux indications correspondantes à l’ensemble que
vous avez acheté.
Fig_B
27
6
Premessa - Introduction - Introduction - Einführung - Introducción - Введение

INSTALLATION HORIZIONTALE ( Fig.A, Fig.B)
Si vous souhaitez installer l’ensemble en position horizontale, il faudra vous référer aux indications de
montage contenues dans ce livret en tournant le tout dans le sens des aiguilles d’une montre pour
un mitigeur thermostatique à gauche, ou dans le sens contraire des aiguilles d’une montre pour un
mitigeur thermostatique à droite.
ATTENTION : l’élément n°27 (came) est le seul qui doit être monté selon les indications du livret tout
comme la poignée correspondante.
Vorwort
Diese Anleitung enthält die nötigen Angaben zur vertikalen Montage einer Gruppe bestehend aus:
1. 1 Umsteller
2. 1 Wasserhahn
3. 1 Thermostat-Batterie
Wenn Sie eine Gruppe erworben haben, die sich aus anderen Elementen zusammensetzt oder mehrere
Elemente desselben Typs umfasst, müssen die Angaben aus dieser Anleitung an die Gruppe, in deren
Besitz man sich befindet, angepasst werden.
HORIZONTALE MONTAGE ( Abb.A, Abb.B)
Wenn die Gruppe horizontal montiert werden soll, müssen die Angaben aus dieser Anleitung im
Uhrzeigersinn gedreht werden, wenn die Thermostat-Batterie links sein soll. Die Angaben aus dieser
Anleitung sind gegen den Uhrzeigersinn zu drehen, wenn die Thermostat-Batterie rechts sein soll.
ACHTUNG: nur der Einzelteil 27 (Nocken) muss wie in der vorliegenden Anleitung angegeben montiert
werden, und demnach auch der entsprechende Regler.
Introducción
Este manual contiene las indicaciones necesarias para la instalación en posición vertical de un grupo
compuesto por:
1. n°1 desviador
2. n°1 grifo
3. n°1 mezclador termostático
Si usted ha adquirido un grupo compuesto por otros componentes o por más de un componente del
mismo tipo, deberá adecuar las indicaciones detalladas en este manual al grupo que usted posee.
INSTALACIÓN EN POSICIÓN HORIZONTAL ( Fig.A, Fig.B)
En caso de querer instalar el grupo en posición horizontal, siga las instrucciones de montaje conteni-
das en este manual girando todo en sentido horario, si desea ubicar el mezclador termostático sobre
la izquierda y, en sentido antihorario, si desea situarlo sobre la derecha.
ATENCIÓN: el componente n°27 (Excéntrica) es el único que debe montarse como ilustra este ma-
nual y, por tanto, también el relativo pomo.
Введение
Данная инструкция содержит необходимые указания по вертикальной установке комплект,
состоящий:
1. n°1 девиатор
2. n°1 смеситель
3. n°1 смеситель термостатический
Если Вы приобрели комплект, состоящий из разных или более чем один, однотипных компонентов,
нужно предусмотрительно подобрать подходящую вашему комплекту инструкцию по установке,
из представленных в данной брошюре.
ГОРИЗОНТАЛЬНАЯ УСТАНОВКА ( Fig.A, Fig.B)
При горизонтальной установки комплекта используйте указания, приведенные в данной
брошюре; при этом весь комплект поверните по часовой стрелке, если термостатический
смеситель необходим слева либо против часовой стрелки, в случае, если термостат должен
располагаться справа.
ВНИМАНИЕ: эксцентрик №27 – единственная деталь, которая должна быть монтирована
строго, как это представлено в данной брошюре, что относиться и к располагающемуся на
ней регулятору.
7
Premessa - Introduction - Introduction - Einführung - Introducción - Введение

Caratteristiche Tecniche
Technical features - Caractéristiques techniques - Technische Eigenschaften
Características técnicas - Технические характеристики
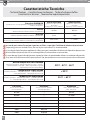
Pressione DINAMICA
Dynamic Pressure - Pression dynamique - Staudruck - Presión dinámica -
динамическое давление
Bassa Pressione
Low Pressure - Basse pression -
Niederdruck
De baja presión - низкое давление
Alta Pressione
High Pressure - Haute Pression -
Hochdruck
Alta Presión - высокое давление
Minima
Minimum - Minimum - Minimum - Mínimo - минимальный 0,1 bar 0,5 bar
Massima
Maximum - Maximum - Maximum - Máximo - максимальный 2 bar 5 bar
Consigliata
Recommended - Recommandé - Empfohlen - Recomendado - рекомендованный
0,2 ÷ 1 bar 1 ÷ 3 bar
in caso di pressione d’esercizio superiore ai 5 bar si consiglia l’utilizzo di riduttori di pressione.
If operating pressure exceeds 5 bar, the use of pressure reducers is recommended.
En cas de pression d’exercice supérieure à 5 bar, nous vous conseillons d’utiliser des réducteurs de pression.
Bei einem Betriebsdruck über 5 bar wird empfohlen Druckminderer zu verwenden.
En caso de que la presión de ejercicio supere los 5bar se recomienda utilizar un reductor de presión.
В случаях, когда давление подачи превышает 5 бар, рекомендуем использовать ограничители давления.
Blocco temperatura di sicurezza
Temperature safety block - Blocage température de sécurité - Sicherhei-
tsblockierung für die Temperatur - Bloque Temperatura de seguridad
- Предохранительный блок температуры
38°C - 42°C - 46°C
Temperatura acqua fredda
Cold water temperature - Température eau froide - Temperatur Kaltwasser
- Temperatura agua fría - Температура холодной воды ≤20°C
Temperatura acqua calda
Hot water temperature - Température eau chaude - Temperatur Warmwas-
ser - Temperatura agua caliente - Температура горячей воды 55°C ÷ 65°C
Pressione
Pressure - Pression - Druck
Presión - давление
Deviatore
Diverter - Inverseur - Umsteller
Desviador - Девиатор
Rubinetto
Faucet - Robinet - Wasserhahn
Grifo - Cмеситель
0,1 bar / 8,2 l/m
0,2 bar / 11,8 l/m
0,5 bar 16,5 l/m 19,9 l/m
1 bar 23,4 l/m 28,0 l/m
2 bar 33,1 l/m 40,2 l/m
3 bar 40,1 l/m >50 l/m
4 bar 46,1 l/m
5 bar 51,4 l/m
8
Caratteristiche tecniche - Technical features - Caractéristiques techniques - Technische Eigenschaften - Características técnicas - Технические характеристики

MAX
MIN
max 25mm
min 80mm
155mm
PARETE PIASTRELLATA
Tiled Wall
Fig_C
1100 ÷ 1200mm
Ingombri d’incasso
Concealed appliance overall
dimensions
Encombrement d’encastrement
Platzbedarf für den Einbau
Espacio necesario para empo-
trar
Размеры для встраивания
Fig_D
Quote importanti
Important sizes - Dimensions importantes - Wichtige Abmessungen
Tamaños importantes - Необходимые значения
155 155 155 155
285 390 495 600
80
80
80
80
Altezza da terra consigliata
Recommended height from ground
Hauteur de terre conseillée
Empfohlene Bodenhöhe
Distancia del piso recomendada
Рекомендованная высота от пола
9
Caratteristiche tecniche - Technical features - Caractéristiques techniques - Technische Eigenschaften - Características técnicas - Технические характеристики

1
2
3
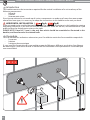
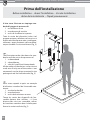
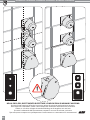
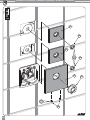
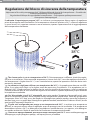
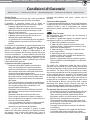
A lato viene illustrato un impiego stan-
dard del gruppo in presenza di:
1. un soffione a muro
2. una doccetta di servizio
3. un kit di 6 soffioncini a parete
Tutte le uscite dei dispositivi inclusi nel
gruppo vengono utilizzate; nel caso in cui
anche solo una di queste non sia collegata,
utilizzare i tappi contenuti nella confezio-
ne per chiudere l’uscita inutilizzata (Fig_E)
The illustration to the side shows the stan-
dard use of the unit in the presence of:
1. a showerhead
2. a handshower
3. a kit of 6 small fixed showerheads
All the outlets of the devices in the unit are
used; even if only one of the outlets is not
connected, use the plugs contained in the
package to seal the unused outlet (fig_E).
Nous avons reporté ci-après un exemple
d’utilisation standard de l’ensemble con-
tenant :
1. un douche de tête
2. une douchette
3. un kit de 6 aérateurs muraux
Toutes les sorties des dispositifs de l’en-
semble doivent être utilisées ; si l’une
d’entre elles n’est pas raccordée, utiliser
les bouchons contenus dans la boîte pour
fermer la sortie inutilisée (fig_E).
Prima dell’installazione
Before installation - Avant l’installation - Vor der Installation
Antes de la instalación - Перед установкой
10
Preliminari - Pre-installation information - Préliminaires - Vorbereitung - Preliminares - Предварительная подготовка

Fig_E
Usare canapa o te on
Use hemp or te on
Employer chanvre ou te on
Benutzen Sie Hanf oder Te on
Usar cáñamo o te ón
Используйте лен или тефлон
Seitlich wird ein Standardeinbau der Duschgruppe gezeigt, mit:
1. einem Brausekopf
2. einer Handbrause
3. einem Set von 6 kleinen Wandduschköpfen
Alle an der Gruppe vorgesehenen Ausgänge werden verwendet; wenn auch nur einer dieser Ausgänge
nicht verwendet wird, müssen die in der Verpackung enthaltenen Kappen zum Verschließen des nicht
genutzten Ausgangs verwendet werden (Abb_E).
De costado se ilustra un ejemplo de uso estándar del grupo en presencia de:
1. un rociador
2. una ducha
3. un kit de 6 rociadores de pared
Se emplean todas las salidas de los dispositivos incluidos en el grupo; en caso de que alguna de estas no
esté conectada, utilice los tapones suministrados en la caja de embalaje para cerrar la salida inutilizada
(Fig_E).
Сбоку представлено стандартное размещение комплекта, который состоит из:
1. душевой лейки
2. ручного душа
3. 6 форсунок настенного монтажа
Все, представленные в комплекте выходы должны быть задействованы; в случае, если хотя бы
один из них не используется, его необходимо закрыть, входящей в комплект специальной
заглушкой (Рис.E).
11
Preliminari - Pre-installation information - Préliminaires - Vorbereitung - Preliminares - Предварительная подготовка

*
*
*Eseguire lo spacco nel muro rispettando le misure indicate in Fig_C e Fig_D
Make a hole in wall following the measurements shown in Fig_C and Fig_D.
Réaliser la fente murale en respectant les mesures indiquées aux illustrations Fig_C et Fig_D
Halten Sie sich beim Aufstemmen des Lochs an die in Abb_C und Abb_D angegebenen Maße
Realice la hendidura en la pared respetando las medidas indicadas en las guras Fig_C y Fig_D
Выполните нишу в стене согласно размерам, указанным на Рис.C и Рис.D
Installazione
Installation - Installation - Montage - Instalación - установка
Fig_1
12
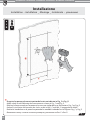
Installazione - Installation - Installation - Installation - Instalación - Установка

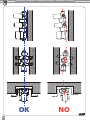
UTILIZZARE LA LIVELLA - EFFETTUARE L’INSTALLAZIONE RISPETTANDO LE INDICAZIONI DI FIG.C e FIG.3
Use a level - Carry out the installation following the instructions shown in Fig_C and Fig_3
Utiliser la nivelle - Procéder à l’installation en respectant les indications illustrées aux Fig_C et Fig_3
Wasserwaage verwenden - Halten Sie sich beim Einbau an die Angaben aus Abb_C und Abb_3
Utilice el nivel de burbuja - Realice la instalación respetando las indicaciones de las guras Fig_C y Fig_3
Используйте уровень - Выполнить установку придерживаясь указаний на Рис.С и Рис.3
Fig_2
13
Installazione - Installation - Installation - Installation - Instalación - Установка

OK NO
Fig_3
14
Installazione - Installation - Installation - Installation - Instalación - Установка

Prima di passare alla fase successiva spurgare i tubi
Before proceeding with the next phase, ush the pipes out
Avant de passer à la phase suivante, vidangez les tuyaux
Bevor Sie zum nächsten Schritt übergehen, säubern Sie die Rohre
Antes de pasar a la fase sucesiva, purgue los tubos
Прежде чем перейти к следующей фазе установки дать воде вытечь из труб
Ø 8mm
Fig_4
15
Installazione - Installation - Installation - Installation - Instalación - Установка

Utilizzare la livella per ssare correttamente il rubinetto, collegare il gruppo all’impianto idraulico.
Use the level to secure the shower valve correctly, Connect the unit to the hydraulic system.
Utiliser la nivelle pour xer correctement le robinet, relier l’ensemble à l’installation hydraulique.
Verwenden Sie eine Wasserwaage, um den Wasserhahn korrekt zu montieren und verbinden Sie die Gruppe mit der hydraulischen Anlage.
Utilice el nivel de burbuja para jar correctamente el grifo, conecte el grupo a la instalación hidráulica.
Используйте уровень, чтобы правильно разместить смеситель, подсоедините комплект к водоснабжению.
Usare canapa o te on
Use hemp or te on
Employer chanvre ou te on
Benutzen Sie Hanf oder Te on
Usar cáñamo o te ón
Используйте лен или тефлон
23
22
Fig_5
16
Installazione - Installation - Installation - Installation - Instalación - Установка

M
I
N
M
A
X
M
I
N
M
A
X
MIN
MAX
M
I
N
M
A
X
M
I
N
M
A
X
MIN
MAX
1)
Rimozione delle protezioni in plastica
Removal of plastic protections
Elimination des protections en plastique
Entfernen der Kunststo schutzvorrichtungen
Remoción de las protecciones de plástico
Detección de la profundidad por empotrar
Collaudo del corpo incasso
Built-in body test
Test du corps encastrement
Abnahme des Einbaukörpers
Ensayo del cuerpo por empotrar
Испытание встроенного корпуса
Fig_6
17
Installazione - Installation - Installation - Installation - Instalación - Установка

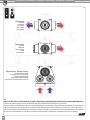
Deviatore
Diverter
Inverseur
Umsteller
Desviador
девиатор
Rubinetto
Faucet
Robinet
Wasserhahn
Grifo
смеситель
Miscelatore Termostatico
Thermostatic mixer
Mitigeur thermostatique
Thermostat-Batterie
Mezclador termostático
смеситель термостатический
2)
Aprire la rete idrica di alimentazione, aprire il deviatore ed il rubinetto veri cando la tenuta dell’impianto.
Turn on the water supply, turn on the diverter and the shower valve, checking the system seal.
Ouvrir le réseau d’alimentation en eau, ouvrir l’inverseur et le robinet tout en véri ant l’étanchéité de l’installation.
Ö nen Sie die Wasserversorgung, ö nen Sie den Umsteller und den Wasserhahn und stellen Sie sicher, dass die Anlage dicht ist.
Abra la red hídrica de alimentación, abra el desviador y el grifo para comprobar la estanqueidad de la instalación.
Включите водоснабжение, откройте вентиль девиатора и проверьте герметичность установки .
Fig_7
18
Installazione - Installation - Installation - Installation - Instalación - Установка

M
I
N
M
A
X
M
I
N
M
A
X
MIN
MAX
3)
Rimontare le cover protettive per poter proseguire con la applicazione del rivestimento della parete
Reassemble the protective covers in order to proceed with the wall covering.
Remonter les plaques de protection pour procéder à la pose du revêtement mural
Setzen Sie die Kunststo schutzvorrichtungen wieder auf, um mit der Verkleidung der Wand fortfahren zu können.
Vuelva a montar las tapas de protección para poder continuar con la aplicación del revestimiento de pared.
Установите защитные крышки, чтобы выполнить облицовку стеновой поверхности.
Fig_8
19
Installazione - Installation - Installation - Installation - Instalación - Установка

M
I
N
M
A
X
M
I
N
M
A
X
MIN
MAX
M
I
N
M
A
X
M
I
N
M
A
X
MIN
MAX
MIN
MAX
NELLA POSA DEL RIVESTIMENTO RISPETTARE LE INDICAZIONI DI MINIMO E MASSIMO
During the wall covering, follow the instructions about the minimum and maximum amounts.
Pour la pose du revêtement, veiller à tenir compte des indications de minimum et maximum
Halten sie sich beim verlegen der wandverkleidung an die angaben min und max
Durante la colocación del revestimiento, respete las marcas de mínimo y máximo.
При облицовке поверхности придерживаться минимальных и максимальных показателей Fig_9
20
Installazione - Installation - Installation - Installation - Instalación - Установка
La pagina si sta caricando...
La pagina si sta caricando...
La pagina si sta caricando...
La pagina si sta caricando...
La pagina si sta caricando...
La pagina si sta caricando...
La pagina si sta caricando...
La pagina si sta caricando...
La pagina si sta caricando...
La pagina si sta caricando...
La pagina si sta caricando...
La pagina si sta caricando...
La pagina si sta caricando...
La pagina si sta caricando...
La pagina si sta caricando...
La pagina si sta caricando...
La pagina si sta caricando...
La pagina si sta caricando...
La pagina si sta caricando...
La pagina si sta caricando...
-
 1
1
-
 2
2
-
 3
3
-
 4
4
-
 5
5
-
 6
6
-
 7
7
-
 8
8
-
 9
9
-
 10
10
-
 11
11
-
 12
12
-
 13
13
-
 14
14
-
 15
15
-
 16
16
-
 17
17
-
 18
18
-
 19
19
-
 20
20
-
 21
21
-
 22
22
-
 23
23
-
 24
24
-
 25
25
-
 26
26
-
 27
27
-
 28
28
-
 29
29
-
 30
30
-
 31
31
-
 32
32
-
 33
33
-
 34
34
-
 35
35
-
 36
36
-
 37
37
-
 38
38
-
 39
39
-
 40
40


Bossini Z032204 + Z030203 000 Istruzioni per l'uso
- Tipo
- Istruzioni per l'uso
in altre lingue
Documenti correlati
-
Bossini E91000 Istruzioni per l'uso
-
-
-
-
-
-
-
-
-
Altri documenti
-
LIVARNO 383283 Manuale del proprietario
-
-
-
Klarstein 10045509 Manuale del proprietario
-
-
-
 Welltime Brausegarnitur Raindrop 4.5 Newsletter anmelden & Vorteile sichern Guida d'installazione
-
 Welltime Duschsystem Turin Guida d'installazione

