
Notice d’utilisation et d’installation
Instructions for use and installation
Instrucciones de utilización e instalación
Manual de utilização e de instalação
Gebrauchs- und Installierungsanweisung
Istruzioni per l'uso e l'installazione
4511 1252.qxd 28/05/02 13:18 Page 1

Présentation 4
Utilisation 5
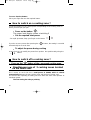
Comment mettre en marche une zone
de chauffe
Comment arrêter une zone de chauffe
Utilisation simultanée d’une zone avant
et d’une zone arrière
Sécurité 6
Conseils d’utilisation 7/8
Précautions d’emplois
Conseil de cuisson
Casserolerie 9
Quels sont les récipients adaptés
Quels sont les matériaux incompatibles
Le test récipient
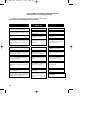
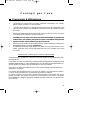
Sommaire
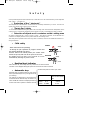
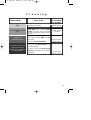
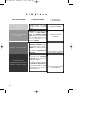
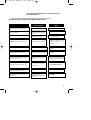
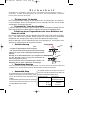
UTILISATIONS
1/2 TRÉS DOUX fondre du beurre,du chocolat
maintenir au chaud
sauces,crèmes..
3 DOUX riz au lait
réchauffage
4/5 MIJOTAGE purée, légumes secs,potages
confitures, compotes
6 MOYEN pâtes, riz à l’eau,
ébullition du lait
7/8 VIF steacks, grillades, crèpes
9 TRÉS VIF fritures, grosses ébullitions
Nettoyage 10
Vous avez un doute sur le bon
fonctionnement de votre table 11
Pour l’installateur 12/16
Précautions d’installation
Encastrement de la table dans un plan
de travail
Choix de votre installation
Au dessus d’un meuble vide ou tiroir
Au dessus d’un four
Raccordement électrique
4511 1252.qxd 28/05/02 13:18 Page 2

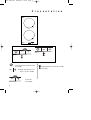
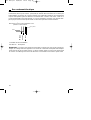
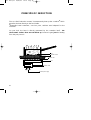
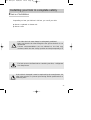
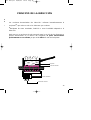
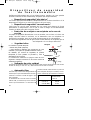
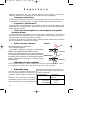
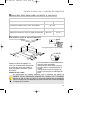
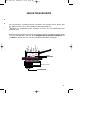
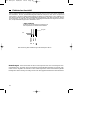
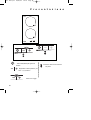
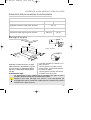
PRINCIPE DE L’INDUCTION
3
Les courants, dits “d’induction”, chauffent instantanément le récipient*qui cède
sa chaleur aux aliments qu’il contient.
*Récipient en acier émaillé, fonte, inox adapté à l’induction.
Avec votre table la chaleur nécessaire à la cuisson des aliments étant produite
directement à l’intérieur du récipient, le verre vitrocéramique ne chauffe
pratiquement pas car il reçoit JUSTE la chaleur du récipient posé dessus..
Courants induits
Alimentation électrique
Circuit électronique
Récipient
4511 1252.qxd 28/05/02 13:18 Page 3
La pagina si sta caricando...
La pagina si sta caricando...
La pagina si sta caricando...
La pagina si sta caricando...
La pagina si sta caricando...
La pagina si sta caricando...
La pagina si sta caricando...
La pagina si sta caricando...
La pagina si sta caricando...

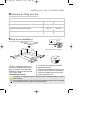
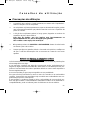
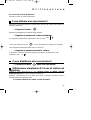
13
●●
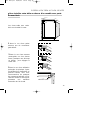
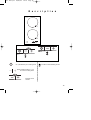
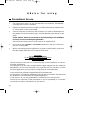
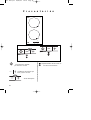
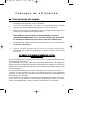
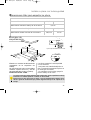
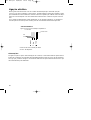
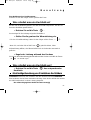
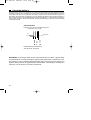
Vous installez votre table au dessus d’un meuble avec porte
Cas d’une table avec sortie
d’air sous la table à l’avant.
1 Dans le cas d’une petite
traverse pas de contraintes
particulières
.
2 Dans le cas d’une traverse
rectangulaire ou d’un dessus
fermé, pratiquez une découpe
en biseau pour dégager la
sortie d’air.
3 Dans le cas d’une utilisation
prolongée de plusieurs foyers
en simultané ou d’utilisation en
période chaude, nous vous
recommandons de pratiquer
des ouvertures latérales sur les
cotés du meuble à l’avant pour
permettre une meilleure
évacuation de l’air chaud.
Installer votre table en toute sécurité
mini 40 cm2
4 cm mini
VIDE SANITAIRE
ou avec tiroir
4511 1252.qxd 28/05/02 13:18 Page 13

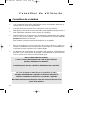
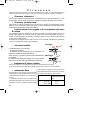
14
●●
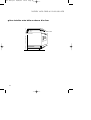
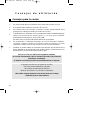
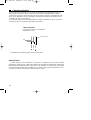
Vous installez votre table au dessus d’un four
Installer votre table en toute sécurité
mini 40 cm2
mini 4 mm
mini 5 mm
4511 1252.qxd 28/05/02 13:18 Page 14
La pagina si sta caricando...
La pagina si sta caricando...

17
USES
1/2 VERY LOW melting butter, chocolate,
keeping warm
sauces, creames...
3 SLOW milk rice, reheating,
4/5 SIMMERING purée, dry vegetables, soups,
jams, compote
6 MEDIUM boiling rice, boiling milk, pasta
7/8 HIGH frying steaks, crèpes, grilled meat
9 VERY HIGH deep frying - boiling
Description 19
Using 20
How to switch on a cooking zone
How to switch off a cooking zone
Simultaneous use of 2 cooking zones
Safety 21
Advice for using 22/23
Precautions for use
Advice for usingAbove an oven from the
Contents
Containers 24
What are the suitable containers
What materials are not adapted
Pan test
Cleaning 25
If you should ever have the impression that
your induction hob is not working perfectly
26
For the installer 27/31
Precautions of installation
Builting-n your hob into the worktop
Choice of your installation
On top of an empty unit or drawer
On top of an oven
Electrical connection
4511 1252.qxd 28/05/02 13:18 Page 17
La pagina si sta caricando...

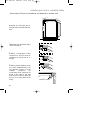
19
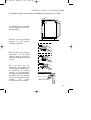
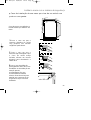
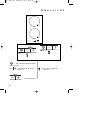
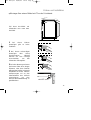
Description
On / Off button per cooking zone
Power setting button (-) (+)
for each cooking zone
Locking touch
control
Location of the heating zones
4511 1252.qxd 28/05/02 13:18 Page 19
La pagina si sta caricando...
La pagina si sta caricando...
La pagina si sta caricando...
La pagina si sta caricando...
La pagina si sta caricando...

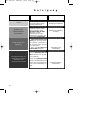
25
Cleaning
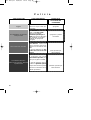
TYPES OF DIRT
Light
Accumulation of hard
dirt
Stains and
calcareous traces
Incrustations following
sugary substances
boiling over, aluminium
or melted plastic
Soak the area to be cleaned well with
warm water, then wipe
sanitary sponge
Soak the area to be cleaned well with
warm water, use a special glass
scraper to get the worst off, finish
with the scraping side of the sponge,
then wipe.
sanitary sponge
or scraper
• Apply hot spirit vinegar to the
stain, allow it to work, wipe it off with
a soft cloth.
• Or use a commercial product.
Special ceramic
glass cream
• Use a special glass scraper to re-
move the residue.
•Or apply a special ceramic glass
product, preferably silicone based
(protective).
Special glass
ceramic product
WHAT TO DO
PRODUCTS /
ACCESSORIES
TO BE USED
4511 1252.qxd 28/05/02 13:18 Page 25
La pagina si sta caricando...

27
Depending on how your kitchen is laid out, you can fit your hob:
● Above a cupboard or drawer unit
● Above a oven
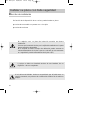
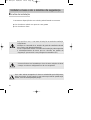
Your induction hob must always be adequately ventilated.
Make sure that the air inlet through the fan grid at the back is not
obstructed.
If these recommendations are not adhered to, the hob may
overheat, switch into the "safety" position and stop temporarily (
F7
F7)
C
hoice of installation
The hob must not be fitted above a washing machine, a refrigerator
or a deep-freeze.
If the cable is damaged it must be replaced by the manufacturer, his
after-sales service or a person possessing similar qualifications to
avoid any risks.
Installing your hob in complete safety
4511 1252.qxd 28/05/02 13:18 Page 27
La pagina si sta caricando...

29
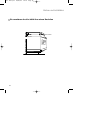
● You want to fit your hob above an oven.
Installing your hob in complete safety
mini 40 cm2
mini 4 mm
mini 5 mm
4511 1252.qxd 28/05/02 13:18 Page 29

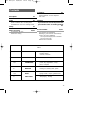
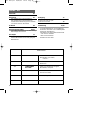
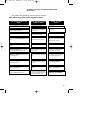
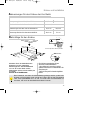
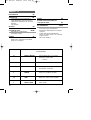
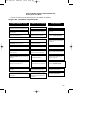
30
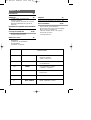
Width Depth
Worktop cut-out 26,5 cm 49 cm
Overall depth beneath the worktop 6,4 cm
Overall size under the worktop 26,3 cm 48,8 cm
Overall size above the worktop 28,8 cm 51 cm
D
imensions for fitting your hob
cut-out a rectangular hole in the
worktop of the appropriate size. A
gap of at least 4 cm must be left
between the sides of the hole and
rear or side- walls.
Protecting the cut-out:
A seal exists for preventing any humidity
getting under the hob.
-Stick the seal under the rim of the hob and
lower the hob into position on the worktop.
-This seal is supplied in the sachet; stick it
in place beneath the hob.
Fitting recommendations
The types of chipboard used for worktops swell relatively quickly in contact
with humidity.
Apply a special varnish or glue to the cutout edge to protect it from any steam
or condensation that may form under the worktop.
Installing your hob in complete safety
Fix the clips provided in the sachet
SEAL
4 cm mini
26,5 cm
49 cm
4 cm mini
4 cm mini
4511 1252.qxd 28/05/02 13:18 Page 30
La pagina si sta caricando...
La pagina si sta caricando...
La pagina si sta caricando...

34
Presentación
Tecla marcha / parada
por zona de cocción
Regulación de potencia por
zona
(-) (+) de cocción.
Tecla de bloqueo
Emplazamiento de las zonas de
cocción en la encimera
.
4511 1252.qxd 28/05/02 13:18 Page 34
La pagina si sta caricando...
La pagina si sta caricando...
La pagina si sta caricando...
La pagina si sta caricando...

39
Batería de cocina
¿Cuáles son los recipientes más adaptados?
Sin duda, Ud. ya posee recipientes adaptados:
•
RECIPIENTES DE ACERO ESMALTADO, CON O SIN REVESTIMIENTO ANTIADHERENTE.
Olla, freidora, sartén, parrilla de carne etc.
•
RECIPIENTES DE FUNDICIÓN.
Para no correr el riesgo de rayar la parte superior de vidrio de su encimera, utilice
recipientes con fondo esmaltado, o evite deslizarlo sobre la superficie de la encimera.
•
RECIPIENTES DE ACERO INOXIDABLE ADAPTADOS A LA INDUCCIÓN.
La mayoría de los recipientes de acero inoxidable son aptos para la cocción
por inducción (cacerolas, marmitas, sartén, freidora).
•
RECIPIENTES DE ALUMINIO CON FONDO ESPECIAL.
E
LIJA ARTÍCULOS CON FONDO GRUESO QUE ASEGURAN UNA COCCIÓN MÁS HOMOGÉNEA
(
EL CALOR SE
REPARTE MEJOR
).
•
N
OTA
: P
UEDEN SERVIR INCLUSO LOS RECIPIENTES CUYO FONDO NO SEA PERFECTAMENTE PLANO
,
SIEMPRE QUE NO ESTÉ DEMASIADO DEFORMADO
.
¿Cuáles son los materiales incompatibles?
L
OS RECIPIENTES DE VIDRIO
,
CERÁMICA O BARRO
,
ALUMINIO SIN FONDO ESPECIAL O COBRE Y CIERTOS ACEROS
INOXIDABLES NO MAGNÉTICOS
.
La prueba “recipiente”
Gracias a su tecnología de vanguardia, su encimera de inducción es capaz
de reconocer la mayoría de los recipientes.
Coloque un recipiente sobre una zona de cocción a la potencia 4. Si el
visualizador se mantiene fijo su recipiente es compatible; si parpadea, su
recipiente no puede ser utilizado para la cocción por inducción.
También puede utilizar un imán; si se “pega” a su cacerola, seguramente es
compatible.
4511 1252.qxd 28/05/02 13:18 Page 39
La pagina si sta caricando...
La pagina si sta caricando...
La pagina si sta caricando...
La pagina si sta caricando...

44
● Debe instalar su placa encima de un horno
Instalar su placa con toda seguridad
mini 40 cm2
mini 4 mm
mini 5 mm
4511 1252.qxd 28/05/02 13:18 Page 44
La pagina si sta caricando...
La pagina si sta caricando...

47
4511 1252.qxd 28/05/02 13:18 Page 47
La pagina si sta caricando...

49
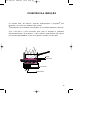
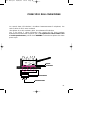
Corrente induzida
Alimentação elcétrica
Circuito electrónico
Recipiente
PRINCÍPiO DA INDUÇÃO
As corrente ditas “de indução” aquecem instaneamente o recipiente* que
transmite o seu calor aos alimentos que contém.
*Recipiente de aço esmaltado, ferro fundido, aço inoxidável adaptado à indução.
Com a sua placa, o calor necessário para cozer os alimentos é produzido
directamente dentro do recipiente, o vidro-cerâmico praticamente não aquece
pois recebe UNICAMENTE o calor do recipiente colocado em cima dele.
4511 1252.qxd 28/05/02 13:18 Page 49

50
Descrição
Tecla Ligado /Desligado para
cada foco
Tecla de regulação (-) (+) do nível
de potência para cada foco
Tecla de bloqueio
Localização das zonas de
aquecimento
4511 1252.qxd 28/05/02 13:18 Page 50
La pagina si sta caricando...
La pagina si sta caricando...
La pagina si sta caricando...

54
Conselhos de utilização
Conselhos de cozedura
•
Com o aparelho reage muito rapidamente, não é aconselhado deixar um re-
cipiente vazio na zona de aquecimento.
•
O recipiente deverá contudo ficar centrado na zona de cozedura.
•
Não aqueça uma lata de conserva fechada, pode explodir (esta precaução é
aliás válida para quaisquer outros modos de cozedura).
•
Quando utilizar um recipiente com revestimento antiaderente (tipo téflon)
sem ou com pouca gordura, aqueça-o previamente na posição 7 ou na
posição 8 durante uns instantes.
Nunca utilize a posição 9, pois pode danificar os recipientes.
•
Não é conveniente colocar utensílios de metal, talheres e objectos
metálicos semelhantes em cima da mesa. Podem aquecer se estiverem jun-
to de uma zona de cozedura com o indutor ligado.
•
La utilização de um diâmetro de recipiente mais pequeno é perfeitamente
possível e não causa perdas de energia, contrariamente ao que se passa
com os outros focos clássicos (electricidade, gaz).
Nunca utilize folhas de alumínio
e nunca coloque directamente em cima da mesa indução
produtos embalados em alumínio.
O alumínio pode derreter e danificar definitivamente o aparelho.
No caso de aparecer uma fissura na superfície do vidro,
desligue imediatamente o aparelho da fonte de alimentação
eléctrica, retirando os fusíveis ou accionando o disjuntor.
Não utilize nenhuma zona da placa antes da colocação de uma nova
placa vitrocerâmica.
4511 1252.qxd 28/05/02 13:18 Page 54
La pagina si sta caricando...

56
Limpeza
TIPO DE SUJIDADE
Ligeria
Acumulação de sujidade seca
Manchas e vestígios de
calcário
Incrustações residuais de
açúcar, alumínio ou plástico
derretido
COMO PROCEDER PRODUTOS /
ACESSÓRIOS A
UTILIZAR
Molhe bem a zona com
água quente e em seguida
seque-a
Esponja de limpeza
Molhe bem a zona com
água quente. Utilize um
raspador especial para
vidro, esfregue e finalmente
seque-a
Esfregão ou raspador
•Derrame vinagre branco
sobre a sujidade, deixe agir e
limpe com um pano macio,
• ou utilize um produto do
mercado.
Pasta especial para vidro
vitrocerâmico
• Utilize um raspador
especial para vidro para
retirar os resíduos,
• ou aplique sobre a
superfície da placa um
produto especial para vidro
vitrocerâmico, de preferência
composto de silicones
(protector).
Produto especial para
vidro vitrocerâmico
4511 1252.qxd 28/05/02 13:18 Page 56
La pagina si sta caricando...
La pagina si sta caricando...
La pagina si sta caricando...

60
● Caso de instalação da sua mesa por cima de um forno
Instalar a mesa com o máximo de segurança
O dispositivo de segurança térmica desta mesa impede a sua utilização
durante a fase de pirólise do forno.
mini 40 cm2
mini 4 mm
mini 5 mm
4511 1252.qxd 28/05/02 13:18 Page 60
La pagina si sta caricando...
La pagina si sta caricando...
La pagina si sta caricando...
La pagina si sta caricando...
La pagina si sta caricando...
La pagina si sta caricando...
La pagina si sta caricando...
La pagina si sta caricando...
La pagina si sta caricando...
La pagina si sta caricando...
La pagina si sta caricando...
La pagina si sta caricando...
La pagina si sta caricando...
La pagina si sta caricando...
La pagina si sta caricando...
La pagina si sta caricando...
La pagina si sta caricando...
La pagina si sta caricando...
La pagina si sta caricando...
La pagina si sta caricando...
La pagina si sta caricando...
La pagina si sta caricando...
La pagina si sta caricando...
La pagina si sta caricando...
La pagina si sta caricando...
La pagina si sta caricando...
La pagina si sta caricando...
La pagina si sta caricando...
La pagina si sta caricando...
La pagina si sta caricando...
La pagina si sta caricando...
La pagina si sta caricando...
La pagina si sta caricando...
La pagina si sta caricando...
La pagina si sta caricando...
La pagina si sta caricando...
-
 1
1
-
 2
2
-
 3
3
-
 4
4
-
 5
5
-
 6
6
-
 7
7
-
 8
8
-
 9
9
-
 10
10
-
 11
11
-
 12
12
-
 13
13
-
 14
14
-
 15
15
-
 16
16
-
 17
17
-
 18
18
-
 19
19
-
 20
20
-
 21
21
-
 22
22
-
 23
23
-
 24
24
-
 25
25
-
 26
26
-
 27
27
-
 28
28
-
 29
29
-
 30
30
-
 31
31
-
 32
32
-
 33
33
-
 34
34
-
 35
35
-
 36
36
-
 37
37
-
 38
38
-
 39
39
-
 40
40
-
 41
41
-
 42
42
-
 43
43
-
 44
44
-
 45
45
-
 46
46
-
 47
47
-
 48
48
-
 49
49
-
 50
50
-
 51
51
-
 52
52
-
 53
53
-
 54
54
-
 55
55
-
 56
56
-
 57
57
-
 58
58
-
 59
59
-
 60
60
-
 61
61
-
 62
62
-
 63
63
-
 64
64
-
 65
65
-
 66
66
-
 67
67
-
 68
68
-
 69
69
-
 70
70
-
 71
71
-
 72
72
-
 73
73
-
 74
74
-
 75
75
-
 76
76
-
 77
77
-
 78
78
-
 79
79
-
 80
80
-
 81
81
-
 82
82
-
 83
83
-
 84
84
-
 85
85
-
 86
86
-
 87
87
-
 88
88
-
 89
89
-
 90
90
-
 91
91
-
 92
92
-
 93
93
-
 94
94
-
 95
95
-
 96
96


Fagor MF-2IS Manuale del proprietario
- Tipo
- Manuale del proprietario
- Questo manuale è adatto anche per
in altre lingue
- English: Fagor MF-2IS Owner's manual
- français: Fagor MF-2IS Le manuel du propriétaire
- español: Fagor MF-2IS El manual del propietario
- Deutsch: Fagor MF-2IS Bedienungsanleitung
- português: Fagor MF-2IS Manual do proprietário
Documenti correlati
Altri documenti
-
Groupe Brandt DTI634XE1 Manuale del proprietario
-
-
-
-
Bertazzoni P60 4 I NE Manuale del proprietario
-
Bertazzoni P905INE Manuale del proprietario
-
Foster S4000.Line.IS.4 Manuale utente
-
Foster 7341 245 Manuale utente
-
-