
CreaPRINT
Surgical guide HT
en
fr
it
es
Gebrauchsanweisung
Instructions for use
Notice d'utilisation
Istruzioni per l’uso
Instrucciones de uso
Gebruiksaanwijzing
nl
de
www.merz-dental.de

CreaPRINT Surgical guide HT
UV-härtender Kunststoff auf Acrylatbasis
für die additive Fertigung
de Gebrauchsanweisung, bitte aufmerksam lesen!
Zweckbestimmung
Flüssiges Acrylatgemisch zur additiven Herstellung von dampfsterili-
sierbaren Bohrschablonen im Dentalbereich unter Verwendung der
wannenbasierten Photopolymerisation bei 385 nm.
Klassifizierung gem. MDR (EU) 2017/745
Medizinprodukt der Klasse I für den vorübergehenden Kontakt mit
intakter und / oder verletzter Schleimhaut.
Patientenzielgruppen
• Alle Geschlechter und Altersgruppen
Vorgesehene Anwender
• Dentales Fachpersonal
Indikation
• Teilweiser oder vollständiger Zahnverlust
Kontraindikation
• Überempfindlichkeit gegen einen der Bestandteile
Zusammensetzung
•
Diurethandimethacrylat, Isomerenmix (UDMA)
•
Ethylenglykoldimethacrylat (EGDMA)
•
1,4-Butandioldimethacrylat
•
Diphenyl(2,4,6-trimethylbenzoyl)phosphinoxid (TPO)
•
2-[[(Butylamino)carbonyl]oxy]ethylacrylat
• Propoxyliertes Glyceroltriacrylat
• 4-Methoxyphenol
• Farbstoffe

*angelehnt
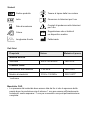
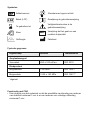
MD
Vor Sonne schützen
Gebrauchsanweisung (GBA)
beachten
Sicherheitshinweise in der GBA
Hinweis, dass es sich um ein
Medizinprodukt handelt
Hersteller
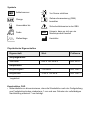
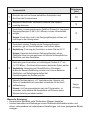
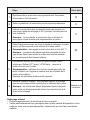
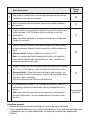
Eigenschaft Wert Prüfnorm
Acrylatgemisch
Viskosität 650 ± 100 mPa·s ISO 3219
Endprodukt
Biegefestigkeit > 80 MPa ISO 10477
Biegemodul 3150 ± 130 MPa ISO 10477*
Konstruktion CAD
• Materialstärke so dimensionieren, dass die Wandstärke nach der Fertigstellung
aus Festigkeitsgründen mindestens 1 mm und aus Gründen der vollständigen
Nachhärtung maximal 7 mm beträgt.
Physikalische Eigenschaften
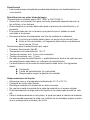
Symbole
Artikelnummer
Charge
Verwendbar bis
Farbe
Wellenlänge

Verarbeitung CAM
• Korrekte Drucker- / Materialkombination verwenden. Freigegebene Parameter-
sätze befinden sich zum Download auf www.merz-dental.de
• Das Material ist für Schichtdicken / Slices von 50 µm und 100 µm ausgelegt.
• Zur Vermeidung von Dimensionsfehlern in der z-Achse wird empfohlen die
Konstruktion mittels Supportstrukturen auf eine Grundplatte mit Lochmuster,
wie z. B. einem hexagonalen Gitter, zu setzen.
• Eine parallel zur Bauplattform ausgerichtete Konstruktion weist durch die
niedrigere Schichtanzahl zwar eine geringere Druckzeit als eine vertikal
ausgerichtete auf, jedoch benötigt diese auch deutlich mehr Supportstrukturen,
welche im Post-Processing manuell entfernt und versäubert werden müssen.
Es empfiehlt sich eine Angulierung der Konstruktionen von 30° bis 90°.
• Die Verwendung von Sollbruchstellen / Verjüngungen der Supports zum
Bauteil hin wird empfohlen, da so das Risiko von Ausbrüchen aus der Ober-
fläche beim Entfernen der Supports verringert wird.
• Bei der Positionierung der Supports darauf achten, dass Überhänge abgestützt
und Passflächen möglichst nicht angestiftet werden, um die Nacharbeit zu
minimieren.
Additive Fertigung auf einem 3D-Drucker
• Dem Material entsprechenden Parametersatz verwenden.
• Zum Druck die identische Schichtdicke wie in der CAM-Planung verwenden,
da es ansonsten zu Passungenauigkeiten und/oder Fehldrucken kommt.
• Auf sauberes Arbeiten achten. Verunreinigungen, insbesondere am optischen
Fenster zum Projektor und an der Materialwanne (Vat), können Fehler am
Druckobjekt oder Fehldrucke verursachen.
• Beim Befüllen der Materialwanne darauf achten, dass das Material möglichst
kurz dem Umgebungslicht ausgesetzt ist und die Füllhöhenmarkierungen
eingehalten werden.
• Das weitere Vorgehen sowie die Bedienung des Druckers sind im dazuge-
hörigen Handbuch beschrieben.
• Nach dem Druck sollte die Konstruktion noch für 10 Minuten hängend im
Drucker verbleiben, damit überschüssiges Druckmaterial von der Oberfläche
abtropfen kann. Dies spart Material und verlängert die Standzeit der Reini-
gungsflüssigkeit.
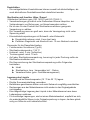
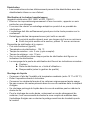
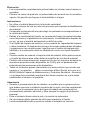
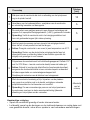
Post-Processing
Das Post-Processing sollte umgehend nach der Beendigung des Druckes durch-
geführt werden, um Risiken im Hinblick auf Verunreinigungen und ungewollte Po-
lymerisation von noch auf der Oberfläche vorhandenem Material zu minimieren.

Manuelle Reinigung
• Konstruktion gründlich unter fließendem Wasser abspülen
• Hierbei besonders auf Bohrungen sowie Sichtkontrollschächte achten und
diese, insbesondere bei erkennbaren Anhaftungen, mit einer geeigneten Bürste
reinigen.
1
2
3
4
5
6
Prozessschritt
Abtropfen der noch im Drucker befindlichen Konstruktion nach
Abschluss des Druckprozesses.
Bauplattform entnehmen, Konstruktion entfernen und Supports
vorsichtig abtrennen.
Konstruktion in einem geschlossenen Gefäß mit Propan-2-ol; Isopropanol
Reinigungsflüssigkeit (≥ 99 %) für 5 Minuten in einem Ultraschallbad
reinigen.
Hinweis: Konstruktion nicht in der Reinigungsflüssigkeit erhitzen und
nicht länger in der Lösung lassen.
Druckobjekt mit einer Pinzette aus der Reinigungsflüssigkeit
entnehmen, ggf. mit Druckluft abblasen, und trocknen lassen.
Empfehlung: Trocknung der Konstruktion in einem Ofen bei 40 °C.
Hinweis: Reste der alkoholischen Reinigungsflüssigkeit auf der
Oberfläche führen zu einer weicheren und mitunter kratzempfindlichen
Oberfläche nach dem Nachhärten.
Nachhärtung der Konstruktion im Lichthärtegerät Otoflash G171 mit
2 x 2700 Blitzen – Die Konstruktion zwischen den beiden Zyklen wenden.
Empfehlung: Verwendung der Stickstofffunktion (Schutzgas),
da dies die Sauerstoffinhibierung minimiert und so zu verbesserten
Oberflächen- und Materialeigenschaften führt.
Herstellerangaben des Gerätes beachten.
Manuelle Nachbearbeitung, z. B. Versäuberung der Supports und
Politur mit handelsüblichen rotierenden Instrumenten für die Kunst-
stoffbearbeitung.
Hinweis: Um Passungenauigkeiten nach der Polymerisation zu
vermeiden, sollte während des Ausarbeitens und Polierens starke
Wärmeentwicklung vermieden werden.
Design-
abhängig
10
5
5
30
8
Zeitaufwand
[min]

Desinfektion
• Die nachgehärteten Konstruktionen können sowohl mit alkoholhaltigen, als
auch alkoholfreien Desinfektionsmitteln desinfiziert werden.
Sterilisation mit feuchter Hitze / Dampf
(Validiertes Verfahren gem. ISO 14937 und ISO 17665-1)
• Verschmutzungen gründlich unter fließendem Wasser abspülen, bei
Vorhandensein von Bohrungen, auf diese besonders achten.
• Es ist eine für das Produkt und Sterilisationsverfahren geeignete
Verpackung zu wählen.
• Die Verpackung muss so groß sein, dass die Versiegelung nicht unter
Spannung steht.
• Klarsichtsterilverpackungen mit Schweiß- oder Klebenaht:
► Siegelnähte müssen mind. 8 mm breit sein
► Zwischen Siegelnaht und Abschnitt min. 10 mm Abstand vorsehen
Parameter für die Dampfsterilisation:
• Fraktioniertes Vorvakuum (Typ B)
• Sterilisationstemperatur: 134 °C
• Haltezeit: mind. 3 min (Vollzyklus)
• Trocknungszeit: mind. 10 min
• Auf jeder Sterilisationsverpackung, bevorzugt in jeder Packung sollte ein
Sterilisationsindikator sein.
• Die Kennzeichnung der Sterilisationsverpackung sollte Folgendes
beinhalten:
► Inhalt
► Sterilisations- bzw. „Verwendbar bis“ - Datum
► Verantwortlicher (gem. Qualitätsmanagement)
Lagerung des Liquids
• Trocken und bei Raumtemperatur (15 °C bis 25 °C) lagern.
• Direkte Sonneneinstrahlung vermeiden.
• Behältnisse geschlossen halten und nach Gebrauch sorgfältig verschließen.
• Restmengen aus der Materialwanne nicht wieder in das Originalgebinde
zurückgeben.
•
Eine längerfristige Lagerung des Liquids in der Materialwanne kann deren
Lebensdauer verkürzen.
•
Für kurzfristige Lagerungen, wie bei einem Materialwechsel, empfiehlt es sich,
die materialgefüllte
Wanne in der Originalverpackung zu lagern, da diese gleich-
zeitig vor Schmutz und Lichteinfall schützt
.

Entsorgung
• Die vollständig auspolymerisierten Bestandteile werden als Restmüll entsorgt.
• Entsorgung nicht auspolymerisierter Produktreste gemäß den behördlichen
Vorschriften. Reste nicht in die Kanalisation oder Gewässer gelangen lassen.
Hinweise
• Material nach Ablauf des Haltbarkeitsdatums nicht mehr verwenden.
• LOT-Nr. bei jedem Vorgang angeben, der eine Identifikation des Materials
erfordert.
• Bei der Wahl des Parametersatzes auf Übereinstimmung mit der Versions-
nummer des Liquids auf dem Chargenetikett achten.
• Auf Grund der Reaktivität des Liquids wird empfohlen, hiermit benetzte Teile,
wie z. B. Pinzetten und Bauplattform unmittelbar nach der Verwendung zu
reinigen, da das polymerisierte Material schwer zu entfernen ist.
• Wenn sich die Reinigungsflüssigkeit deutlich eintrübt, ist die Reinigungskapa-
zität erreicht und sie sollte gegen frische ausgetauscht werden. Sollten nach
dem Trocknungsprozess noch feucht scheinende, klebrige Bereiche auf den
Konstruktionen vorhanden sein, so ist dies ebenfalls ein Hinweis auf eine
gesättigte Reinigungsflüssigkeit und die Konstruktion sollte mit frischer
Reinigungsflüssigkeit erneut gereinigt werden.
• Bei einem Materialwechsel / einer Reinigung der Materialwanne weiche
Tücher und den Silikonwischer verwenden, um die Oberfläche der Material-
wanne nicht zu beschädigen.
• Bei der Verwendung anderer Drucker darauf achten, dass entsprechende
Druckerdatensätze im CAM verfügbar und Materialparameter für die Drucker
vorhanden sind.
• Alle im Zusammenhang mit diesem Produkt auftretenden schwerwiegenden
Vorfälle bei Anwendern und/oder Patienten sind sowohl Merz Dental, als
auch dem BfArM Deutschland) bzw. der jeweils zuständigen Behörde des
Mitgliedsstaates, in dem der Anwender und/oder der Patient niedergelassen
ist, zu melden.
Warnhinweise
• Bei der Bearbeitung von Konstruktionen können Stäube entstehen, die zur
mechanischen Reizung der Augen und Atemwege führen können. Achten Sie
daher immer auf eine einwandfreie Funktion der Absaugung an Ihrem Arbeits-
platz zur individuellen Nachbearbeitung sowie auf Ihre persönliche Schutzaus-
rüstung.
• Direkten Hautkontakt mit dem nicht polymerisierten Gemisch vermeiden.
• Beim Umgang mit dem Liquid wird empfohlen Nitrilhandschuhe zu tragen.
• Die Biokompatibilität ist nur bei korrekter Nachhärtung gegeben.

Gefahrenhinweise
H317 Kann allergische Hautreaktionen verursachen.
H335 Kann die Atemwege reizen.
H412 Schädlich für Wasserorganismen, mit langfristiger Wirkung.
Sicherheitshinweise
P261 Einatmen von Staub / Rauch / Gas / Nebel / Dampf / Aerosol vermeiden.
P280 Schutzhandschuhe / Schutzkleidung / Augenschutz / Gesichtsschutz tragen.
P302 + P352 BEI BERÜHRUNG MIT DER HAUT: Mit viel Wasser waschen.
P333 + P313 Bei Hautreizung oder -ausschlag: Ärztlichen Rat einholen / ärztliche
Hilfe hinzuziehen.
P362 + P364 Kontaminierte Kleidung ausziehen und vor erneutem Tragen
waschen.
Detaillierte Informationen entnehmen Sie bitte dem jeweiligen Sicherheitsdatenblatt
auf Anfrage und zum Download auf www.merz-dental.de erhältlich.
Die Produkteigenschaften basieren auf Einhaltung und Beachtung dieser
Gebrauchsanweisung.
Gedruckte Ausfertigungen dieser Gebrauchsanweisung können kostenfrei unter
den angegebenen Kontaktdaten angefordert werden.
Der Anwender ist für den Einsatz des Produktes selbst verantwortlich. Merz Dental
übernimmt keine Haftung und / oder Gewährleistung bei der Verwendung von
systemfremden und / oder nicht geprüften Komponenten sowie für fehlerhafte
Ergebnisse, da der Hersteller keinen Einfluss auf die Verarbeitung hat. Eventuell
dennoch auftretende Schadenersatzansprüche beziehen sich ausschließlich auf
den Warenwert unserer Produkte.
Stand der Information 2022-05

CreaPRINT Surgical guide HT
UV-curable resin based on acrylate
for additive manufacturing
Instructions for use, please read carefully!
Intended purpose
Liquid acrylate mixture for the additive production of steam-sterilisable
drilling templates in dentistry using tub-based photopolymerisation at
385 nm.
Classification according to MDR (EU) 2017/745
Class I medical device for temporary contact with intact and / or injured
mucous membranes.
Patient target groups
• All genders and age groups
Intended users
• Dental professionals
Indication
• Total or partial tooth loss
Contraindication
• Hypersensitivity to one of the components
Composition
•
Diurethane dimethacrylate, Mix of isomers (UDMA)
• Ethylene dimethacrylate
• 1,4-Butanediol dimethacrylate
• Diphenyl(2,4,6-trimethylbenzoyl)phosphine oxide (TPO)
• 2-[[(butylamino)carbonyl]oxy]ethyl acrylate
• Propoxylated glycerol triacrylate
• Mequinol
• Colourants
en

*based on
MD
Protect from the sun
Observe Instructions for use (IfU)
Safety notes in the IfU
Reference that the product
is a medical device
Manufacturer
Property Value Test method
Acrylate mixture
Viscosity 650 ± 100 mPa·s ISO 3219
End product
Flexural strength > 80 MPa ISO 10477
Modulus of elasticity 3150 ± 130 MPa ISO 10477*
CAD design
• Dimension the material thickness so that the wall thickness after completion is
at least 1 mm for reasons of strength and a maximum of 7 mm for reasons of
complete postcuring.
Physical data
Symbols
Article number
Batch
Use by
Colour
Wavelength

CAM processing
• Use the correct printer / material combination. Released parameter sets are
available for download at www.merz-dental.de
• The material is designed for layer thicknesses / slices of 50 µm and 100 µm.
• To avoid dimensional errors in the z-axis, it is recommended to use support
structures to place the design on a base plate with a perforated pattern,
e.g. a hexagonal grid.
• A design aligned parallel to the construction platform has a lower printing time
than a vertically aligned one, due to the lower number of layers, but this also
requires significantly more support structures, which must be manually
removed and cleaned in post-processing. It is recommended to angle the
designs between 30° and 90°.
• The use of predetermined breaking points / tapering of the supports towards
the component is recommended, as this reduces the risk of damaging the
surface when removing the supports.
• When positioning the supports, make sure that overhangs are supported and,
wherever possible, fitting surfaces are not pinned to minimise reworking.
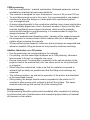
Additive fabrication on a 3D-printer
• Use the parameter set corresponding to the material.
• For printing, use the same layer thickness as in CAM planning, otherwise
inaccuracies in fit and / or misprints may occur.
• Ensure clean work. Contamination, especially at the optical window to the
projector and at the material tub (vat), can cause errors on the printed part
or misprints.
• When filling the material tub, make sure that the material is exposed to
ambient light as briefly as possible and that the filling level markings are
observed.
• The further procedure, as well as the operation of the printer, are described
in the associated manual.
• After printing, the design should remain suspended in the printer for 10
minutes to allow excess print material to drip off the surface. This saves
material and prolongs the service life of the cleaning fluid.
Post-processing
Post-processing should be performed immediately after completion of printing
to minimise the risk of contamination and unwanted polymerisation of material
still present on the surface.

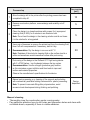
Allow the design still in the printer after the printing process has been
completed to drip off.
Remove construction platform, remove design and carefully cut off
supports.
Clean the design in a closed container with propan-2-ol; isopropanol
cleaning fluid (≥ 99%) for 5 minutes in an ultrasonic bath.
Note: Do not heat the design in the cleaning solution and do not leave
it in the solution for a long period.
Use a pair of tweezers to remove the printed part from the cleaning fluid,
blow it off with compressed air if necessary, and let it dry.
Recommendation: Dry the design in an oven at 40 °C.
Note: Residues of the alcoholic cleaning fluid on the surface lead to a
softer and sometimes scratch-sensitive surface after post-curing.
Post-curing of the design in the Otoflash G171 light curing device
with 2 x 2700 flashes - turn the design between the two cycles.
Recommendation: Use the nitrogen (protective gas) function,
as this minimises oxygen inhibition and thus leads to improved
surface and material properties.
Observe the manufacturer's specifications for the device.
Manual post-processing, e.g. cleaning of the supports and polishing
with commercially available rotating instruments for plastic processing.
Note: To prevent inaccurate fitting after polymerisation, avoid
excessive heat development during finishing and polishing.
Manual cleaning
• Thoroughly rinse the construction under running water.
• Pay particular attention here to drill holes and inspection holes and clean with
a suitable brush, especially if there is visible adhesion.
1
2
3
4
5
6
Process step
Design-
dependent
10
5
5
30
8
Time required
[min]

Disinfection
• The post-cured designs can be disinfected with both alcoholic and
non-alcoholic disinfectants.
Sterilisation with heat / steam
(Validated method in accordance with ISO 14937 and ISO 17665-1)
• Rinse off soiling under running water; take special care given the presence
of drill holes.
• Select a package that is suitable for the product and sterilisation procedure.
• The package must be large enough that the seal is not under tension.
• Transparent sterile packages with welded or bonded seams:
► Sealed seams must be at least 8 mm wide
► Allow a distance at least 10 mm between the sealing seam and
the insertion
Parameters for steam sterilisation:
• Fractionated pre-vacuum (Type B)
• Sterilisation temperature: 134°C
• Hold time: at least 3 min (full cycle)
• Drying time: at least 10 min
• A sterilisation indicator should be on every sterilisation package or preferably
in every package.
• The labelling of the sterilisation package should include the following:
► Content
► Sterilisation and “Use by” date
► Responsible person (acc. to Quality Management)
Storage of the liquid
• Store dry and at room temperature (15 °C to 25 °C).
• Avoid direct sunlight.
• Keep containers closed and seal carefully after use.
• Do not return residual amounts from the material tub to the original container.
• Long-term storage of the liquid in the material tub can reduce its service life.
• For short-term storage, such as when changing materials, it is advisable to
store the materialfilled tub in the original packaging, as this protects against
dirt and light at the same time.
Disposal
• The fully polymerized components are disposed of as residual waste.
• Disposal of nonpolymerized product residues according to legal regulations.
Do not allow entry into the sewage system or waterways.

Notes
• Do not use the material after the expiration date.
• Record the LOT number with every process that requires identification of the
material.
• When selecting the parameter set, make sure it matches the version number
of the liquid on the batch label.
• Due to the reactivity of the liquid, it is recommended to clean wetted parts,
such as forceps and
the construction platform, immediately after use, as the
polymerised material is difficult to remove.
• If the cleaning fluid becomes noticeably cloudy, the cleaning capacity is spent
and it should be replaced with fresh fluid. If there are still damp, sticky patches
on the designs after the drying process, this is also an indication of a saturated
cleaning fluid and the design should be cleaned again with fresh cleaning fluid.
• When changing material / cleaning the material tub, use soft cloths and the
silicone wiper to avoid damaging the surface of the material tub.
• If other printers are used, make sure that the appropriate printer data sets
are available in the CAM and that material parameters for the printers are
available.
• All serious incidents occurring with users and / or patients in connection with
this product must be reported to Merz Dental, as well as to the German
Federal Institute for Drugs and Medical Devices (BfArM), or the respective
competent authority of the member state in which the user and / or patient is
resident.
Warnings
• Processing frameworks may generate dust which can lead to mechanical
irritation of the eyes and airways. Therefore, always ensure that the extraction
system at the workplace is working properly for individual post-processing and
that you are using personal protective equipment.
• Avoid direct skin contact with the unpolymerised mixture.
• It is recommended to wear nitrile gloves when handling the liquid.
• The biocompatibility can only be assured with correct post-curing.
Danger instruction
H317 May cause an allergic skin reaction.
H335 May cause respiratory irritation.
H412 Harmful to aquatic life with long lasting effects.
Safety instruction
P261 Avoid breathing dust / fume / gas / mist / vapours / spray.
P280 Wear protective gloves / protective clothing / eye protection / face protection.
P302 + P352 IF ON SKIN: Wash with plenty of water.
P333 + P313 If skin irritation or rash occurs: Get medical advice / attention.
P362 + P364 Take off contaminated clothing and wash it before reuse.

For detailed information please see the applicable Material Safety Data Sheet,
available upon request or as download from www.merz-dental.de.
The product properties are based on compliance with and observation of these
instructions for use.
Printed copies of these instructions for use can be requested free of charge using
the contact details provided.
The users themselves are responsible for the use of the product. Merz Dental
assumes no liability and / or guarantee for the use of components that are not part
of the system and / or for components that have not been tested and for incorrect
results, as the manufacturer has no influence on processing. Any claims for dama-
ges that may still arise relate exclusively to the value of our products.
Date of information 2022-05

CreaPRINT Surgical guide HT
Résine photopolymérisable à base d'acrylate
pour la fabrication additive
fr Notice d'utilisation, à lire attentivement !
Destination
Mélange liquide d'acrylates pour la fabrication additive de guides de
forage stérilisables à la vapeur dans le domaine dentaire utilisation
de la photopolymérisation en cuve à 385 nm.
Classification selon MDR (UE) 2017/745
Dispositif médical de classe I pour le contact temporaire avec la
muqueuse intacte et / ou lésée.
Groupes de patients ciblés
• Tous les sexes et tranches d'âge
Utilisateurs prévus
• Professionnel de santé dentaire
Indication
• Édentement total ou partiel
Contre-indication
• Hypersensibilité à l'un des composants
Composition
•
Diméthacrylate de diuréthane, mélange d'isomères (UDMA)
• Diméthacrylate d'éthylène
• Diméthacrylate de 1,4-butanediol
• Oxyde de diphényl(2,4,6-triméthylbenzoyl)phosphine
• Acrylate de [[(butylamino)carbonyl]oxy]-2 éthyle
• Triacrylate de glycerol proxylè
• 4-méthoxyphénol
• Colorants

*de référence
MD
Protéger des rayons du soleil
Lire la notice d'utilisation
Consignes de sécurité dans
la notice d'utilisation
Mention indiquant qu'il s'agit
d'un dispositif médical
Fabricant
Propriété Valeur Méthode d'essai
Mélange d'acrylates
Viscosité 650 ± 100 mPa·s ISO 3219
Produit final
Résistance à la flexion > 80 MPa ISO 10477
Module de flexion 3150 ± 130 MPa ISO 10477*
Conception CAO
• Dimensionner l'épaisseur de telle sorte que l’épaisseur de la paroi est égale
à 1 mm au minimum après réalisation pour des raisons de solidité et à 7 mm
au maximum pour garantir le durcissement ultérieur complet.
Caractéristiques physiques
Symboles
Référence article
Lot
Date limite d'utilisation
Couleur
Longueur d'onde

Traitement FAO
• Utiliser la bonne combinaison d'imprimante et matériaux. Les paramètres
validés peuvent être téléchargés sur www.merz-dental.de
• Le matériau est conçu pour une épaisseur de couche / coupe de 50 µm
et 100 µm.
• Pour éviter les erreurs de dimensionnement sur l'axe z, il est recommandé de
placer la construction avec des supports sur une plaque de base à trous,
comme par exemple une grille hexagonale.
• Une construction parallèle à la plateforme permet certes de réduire la durée
d'impression en raison du nombre inférieur de couches, mais requiert aussi
nettement plus de supports qui sont à retirer et nettoyer manuellement à
l'étape de post-traitement. Un angle de 30° à 90° est recommandé pour la
construction.
• Le recours à des points de rupture / rétrécissement des supports au niveau
de la pièce est recommandé car cette mesure réduit le risque d'éclats
superficiels au retrait des supports.
• Lors du positionnement des supports, il convient de soutenir les surplombs
et de limiter les tenons sur les surfaces d'ajustement pour limiter au maximum
les retouches.
Fabrication additive sur une imprimante 3D
• Utiliser les paramètres prévus pour le matériau.
• Pour l'impression, utiliser la même épaisseur de couche que pour la planifica-
tion FAO pour prévenir les défauts d'ajustement et / ou d'impression.
• Travailler proprement. Les impuretés, en particulier sur la fenêtre optique du
projecteur et sur la cuve de matériau (Vat), peuvent entraîner des défauts sur
l'objet imprimé ou des erreurs d'impression.
• Lors du remplissage de la cuve de matériau, veiller à limiter autant que possi-
ble l'exposition du matériau à la lumière ambiante et à respecter les repères
de niveau de remplissage.
• L'étape suivante ainsi que l'utilisation de l'imprimante sont décrites dans le
manuel de cette dernière.
• Après l'impression, la construction doit rester suspendue encore 10 minutes
dans l'imprimante pour permettre à l'excès de matériau d'impression de
s'égoutter de la surface. Une utilisation économe du matériau et une durée de
vie plus longue du liquide de nettoyage sont ainsi obtenues.
Post-traitement
Le post-traitement doit avoir lieu immédiatement après l'impression pour limiter
le risque d'impuretés et de polymérisation non souhaitée de matériau encore
présent en surface.

Nettoyage manuel
• Rincer soigneusement la structure à l’eau courante
• Veiller particulièrement aux parcages ainsi qu’aux oeillets d’inspection et les
nettoyer avec une brosse appropriée, notamment en cas d’accumulations
visibles.
1
2
3
4
5
6
Étape
Égouttement de la construction encore présente dans l'imprimante
l'imprimante en fin d'impression.
Retirer la plateforme, la construction puis les supports prudemment.
Nettoyer la construction dans un récipient fermé avec propane-2-ol;
isopropanol liquide de nettoyage (≥ 99 %) pendant 5 minutes dans un
bain à ultrasons.
Remarque : ne pas chauffer la construction dans la solution de
nettoyage et ne pas la laisser plus longtemps dans la solution.
Retirer l'objet imprimé avec une pince du liquide de nettoyage, le passer
sous un jet d'air comprimé le cas échéant et le laisser sécher.
Recommandation : séchage de la construction dans un four à 40 °C.
Remarque : la présence de résidus superficiels de liquide de netto-
yage à base d'alcool peut rendre la surface plus souple et sensible
aux rayures après le durcissement ultérieur.
Durcissement ultérieur de la construction dans la lampe à photo-
polymériser Otoflash G171 avec 2 x 2700 flashs – retourner la
construction entre les 2 cycles.
Recommandation : utilisation de la fonction azotée (gaz inerte) qui
réduit l'inhibition par l'oxygène et améliore ainsi les propriétés de la
surface et du matériau.
Respecter les indications du fabricant de l'appareil.
Retouche manuelle, exemple : nettoyage des supports et polissage
avec des instruments rotatifs courants pour le traitement de la résine.
Remarque : afin d’éviter des défauts d'ajustement après la polyméri-
sation, éviter un développement de chaleur trop important lors de la
finition et du polissage.
Dépend de la
conception
10
5
5
30
8
Durée [min]

Désinfection
• Les constructions durcies ultérieurement peuvent être désinfectées avec des
désinfectants à base ou non d'alcool.
Stérilisation à la chaleur humide/vapeur
(procédé validé selon ISO 14937 et ISO 17665-1)
• Éliminer les impuretés soigneusement à l'eau courante ; apporter un soin
particulier aux alésages.
• Il convient de choisir un emballage adapté au produit et au procédé de
stérilisation.
• L'emballage doit être suffisamment grand pour éviter toute pression sur le
scellement.
• Emballages stériles transparents avec joint collé ou soudé :
► Les joints scellés doivent avoir une largeur de 8 mm au minimum
► Entre les joints scellés et la section, prévoir 10 mm au minimum
Paramètre de stérilisation à la vapeur :
• Pré-vide fractionné (type B)
• Température de stérilisation : 134 °C
• Temps de maintien : min. 3 min (cycle complet)
• Temps de séchage : min. 10 min
• Sur ou de préférence dans chaque poche de stérilisation doit figurer un
indicateur de stérilisation.
• Le marquage de la poche de stérilisation doit fournir les indications suivantes :
► Contenu
► Date de stérilisation ou « limite d'utilisation »
► Responsable (selon la gestion de qualité)
Stockage du liquide
•
Conserver à l’abri de l’humidité et à température ambiante (entre 15 °C et 25 °C).
• Éviter l’exposition directe à la lumière.
• Conserver les récipients fermés et les refermer soigneusement après usage.
• Ne pas reverser les restes présents dans la cuve de matériau dans le récipient
d'origine.
• Un stockage prolongé du liquide dans la cuve de matériau peut en réduire la
durée de vie.
• Pour le stockage de courte durée, notamment en cas de changement de
matériau, il est recommandé de stocker la cuve remplie de matériau dans
l'emballage d'origine car ce dernier la protège aussi bien de la saleté que de
la lumière.
La pagina si sta caricando...
La pagina si sta caricando...
La pagina si sta caricando...
La pagina si sta caricando...
La pagina si sta caricando...
La pagina si sta caricando...
La pagina si sta caricando...
La pagina si sta caricando...
La pagina si sta caricando...
La pagina si sta caricando...
La pagina si sta caricando...
La pagina si sta caricando...
La pagina si sta caricando...
La pagina si sta caricando...
La pagina si sta caricando...
La pagina si sta caricando...
La pagina si sta caricando...
La pagina si sta caricando...
La pagina si sta caricando...
La pagina si sta caricando...
La pagina si sta caricando...
La pagina si sta caricando...
La pagina si sta caricando...
La pagina si sta caricando...
-
 1
1
-
 2
2
-
 3
3
-
 4
4
-
 5
5
-
 6
6
-
 7
7
-
 8
8
-
 9
9
-
 10
10
-
 11
11
-
 12
12
-
 13
13
-
 14
14
-
 15
15
-
 16
16
-
 17
17
-
 18
18
-
 19
19
-
 20
20
-
 21
21
-
 22
22
-
 23
23
-
 24
24
-
 25
25
-
 26
26
-
 27
27
-
 28
28
-
 29
29
-
 30
30
-
 31
31
-
 32
32
-
 33
33
-
 34
34
-
 35
35
-
 36
36
-
 37
37
-
 38
38
-
 39
39
-
 40
40
-
 41
41
-
 42
42
-
 43
43
-
 44
44


in altre lingue
- English: MERZ DENTAL 907354 User manual
- français: MERZ DENTAL 907354 Manuel utilisateur
- español: MERZ DENTAL 907354 Manual de usuario
- Deutsch: MERZ DENTAL 907354 Benutzerhandbuch
- Nederlands: MERZ DENTAL 907354 Handleiding


