RIKA SYMBIA Assembly Instructions Manual
- Tipo
- Assembly Instructions Manual

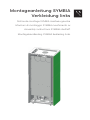
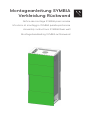
Montageanleitung SYMBIA
Steinverkleidung
Notice de montage SYMBIA pierre
Istruzioni di montaggio SYMBIA pietra
Assembly instructions SYMBIA stone
Montagehandleiding SYMBIA bekleding steen

2

|3
2
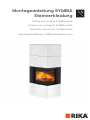
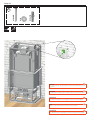
Abmessungen /Dimensions/Dimensioni/ Dimensions / Afmeting (mm)
840
616
1764
1590
1680
610
115
375
250
190
445
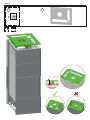
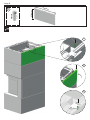
Hinweis
Bei der Wartung wird das Aluflex-Rohr mit der Luftbox herausgezogen. Bemessen Sie es lang genug!
Aanwijzing
Tijdens onderhoud wordt de luchtregelaar met de aluflex buis uitgetrokken. Let op een toereikende lengte!
Note
In case of maintenance, you draw the air box including the aluminium flex pipe out. Be sure it is long enough!
Attenzione
Durante la manutenzione, il tubo flessibili in alluminio viene estratto con il regolatore d’aria. Assicurati che sia abbastanza lungo.
Attention
En cas de maintenance, le tuyau flexible en alu aura dégagé avec le régulateur. Dimensionnez-le assez long !
616
840
616
840
375

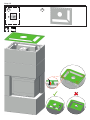
Zeichenerklärung
...wichtiger Hinweis
Information importante / Informazione importante /
Important note / Belangrijke aanwijzing
...Gabelschlüssel #10, #8
Clef à la fourche / Chiave a bocca / Open-end wrench /
Steeksleutel
...praktischer Tipp
conseil pratique / consiglli pratici / useful tip / praktische tip
...mit Wasserwaage ausrichten
équilibrer avec niveau à bulle / settare con livella a bolla / align
with spirit level / met waterpas richten
...per Hand
à la main / manualmente / manually / manueel
...Eisensäge
Scie à métaux / Seghetto per il ferro / Hacksaw / IJzerzaag
#8
...Sechskant #8, #10, #13
Tournevis hexa-gonal / Esagonale / Hex / Steeksleutel
...zerbrechlich
fragile / fragile / fragile / fragiel
...Innensechskant #3, #4, #5
Clef six pans / Vite a testa esagonale cava / Allen key /
Binnenzeskant
...Innensechsrund T30
Clef pour vis étoile / Vite a stella / Hexalobular / T30
...bohren
percer / trapanare / drill / boren
...entsorgen
jeter à la poubelle / smaltire / dispose / weggooien
...Bodentragfähigkeit beachten
Faites attention à la force portante du sol. / Fate attenzione a la capacità di portata del pavimento. / Be aware of the floor bearing capacity. /
Let op de draagkracht van de vloer.
#10
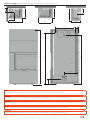
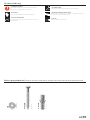
Befestigungsmaterial/ Matériel de fixation/ Materiale di fissaggio/ Mounting material/ Bevestigingsmateriaal
N100662
N112715
N111910
N112714
M5x12
M8
M8x80
D12x70
2x2x
2x 2x
M5
N112142
4x
#30
2x
2x
N112074
Z37387
M5x12
kg
M6x25
N111953
2x
4
#3

|5
4
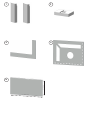
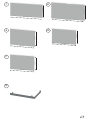
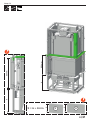
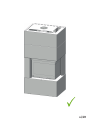
Paket Übersicht / paquet / pacchetto / package / pakket
1 6
4
3
2
7
8
9
10
11
13

6
1 2
3
4
6
370 mm
840 mm

|7
6
7
370 mm
840 mm
8
430 mm
840 mm
9
430 mm
615 mm
10
370 mm
615 mm
11
370 mm
615 mm
13

8
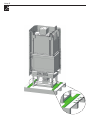
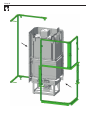
Step 1
#4

|9
8
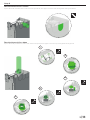
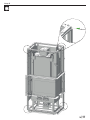
Step 2
#4

#30
10
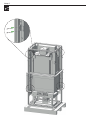
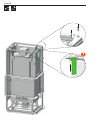
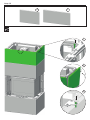
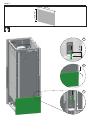
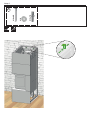
Step 3

|11
10
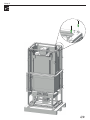
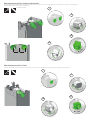
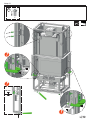
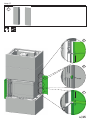
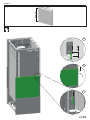
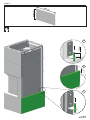
Step 4

12
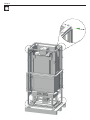
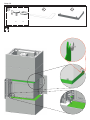
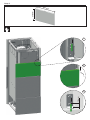
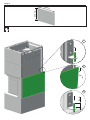
Step 5
#10

|13
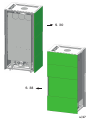
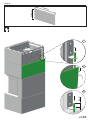
12
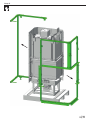
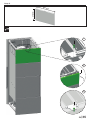
Step 6
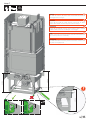
Rauchrohranschluss hinten
Tuyaux de fumée à l‘arrière / Raccordo uscita fumi posteriore / Flue pipe connection rear / Rookgasaansluiting achterkant
Rauchrohranschluss oben
Tuyaux de fumée par le dessus / Raccordo uscita fumi superiore / Flue pipe connection top / Rookgasaansluiting boven
#10
I
II
III
IV
V
#10
#10
#10

14
Rauchrohranschluss hinten links/rechts
Tuyaux de fumée arrière à gauche/ à droite / Raccordo uscita fumi post. sinistra/destra / Flue pipe connection back left/right /
Rookgasaansluiting achteraan links/rechts
#10
Rauchrohranschluss links
Tuyaux de fumée à gauche / Raccordo uscita fumi sinistra / Flue pipe connection left / Rookgasaansluiting links
#10
45°
90°
220mm 220mm
E13999 optional
I
II
III
IV
I
II
III
IV

kg
|15
14
#8
Step 7
461 mm
461 mm
461 mm
Hinweis
Vor dem Anschluss des Ofens die hintere Rahmenhälfte in
Montageposition bringen.
Aanwijzing
Voordat u sluit de kachel aan, plaats het achtern chassis naar
de juiste montagepositie.
Note
Before connecting the stove, place the half-frame behind in
the correct position for assembly.
Attention
Avant de raccorder le poêle, veuillez positionner le demi-
châssis de l‘arrière à la bonne position de montage.
Attenzione
Prima de raccordare la stufa, posizionare il telaio di metà
didietro nella posizione corretta per il montaggio.

16
Step 8

#30
|17
16
Step 9

18
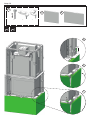
Step 10
#4
#8

N111910
M5x12
2x
|19
18
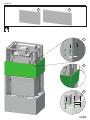
Step 11
#4
±0 mm
±0 mm
±0 mm
±0 mm
±0 mm
D1

20
Step 12
2x 2x
M8
M8x80
D12x70
2x
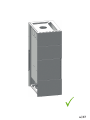
Hinweis
Bei Verkleidung der Rückseite ist die Wandmontage nicht
möglich!
Aanwijzing
Als de achterkant is bekleed, is muurmontage niet mogelijk!
Note
If the back is clad, wall mounting is not possible!
Attenzione
Se il retro è rivestito, il montaggio a muro non è possibile!
Attention
Si le dossier est revêtu, le montage mural n’est pas possible!
D1
#13
La pagina si sta caricando...
La pagina si sta caricando...
La pagina si sta caricando...
La pagina si sta caricando...
La pagina si sta caricando...
La pagina si sta caricando...
La pagina si sta caricando...
La pagina si sta caricando...
La pagina si sta caricando...
La pagina si sta caricando...
La pagina si sta caricando...
La pagina si sta caricando...
La pagina si sta caricando...
La pagina si sta caricando...
La pagina si sta caricando...
La pagina si sta caricando...
La pagina si sta caricando...
La pagina si sta caricando...
La pagina si sta caricando...
La pagina si sta caricando...
La pagina si sta caricando...
La pagina si sta caricando...
La pagina si sta caricando...
La pagina si sta caricando...
La pagina si sta caricando...
La pagina si sta caricando...
La pagina si sta caricando...
La pagina si sta caricando...
-
 1
1
-
 2
2
-
 3
3
-
 4
4
-
 5
5
-
 6
6
-
 7
7
-
 8
8
-
 9
9
-
 10
10
-
 11
11
-
 12
12
-
 13
13
-
 14
14
-
 15
15
-
 16
16
-
 17
17
-
 18
18
-
 19
19
-
 20
20
-
 21
21
-
 22
22
-
 23
23
-
 24
24
-
 25
25
-
 26
26
-
 27
27
-
 28
28
-
 29
29
-
 30
30
-
 31
31
-
 32
32
-
 33
33
-
 34
34
-
 35
35
-
 36
36
-
 37
37
-
 38
38
-
 39
39
-
 40
40
-
 41
41
-
 42
42
-
 43
43
-
 44
44
-
 45
45
-
 46
46
-
 47
47
-
 48
48


RIKA SYMBIA Assembly Instructions Manual
- Tipo
- Assembly Instructions Manual
in altre lingue
- English: RIKA SYMBIA
- français: RIKA SYMBIA
- Deutsch: RIKA SYMBIA
- Nederlands: RIKA SYMBIA
Documenti correlati
-
RIKA INTERNO Assembly Instructions Manual
-
RIKA E 15402 Istruzioni per l'uso
-
-
-
-
-
-
-
-