
1
ARMADIO ........................................................................................................da pag.1 a pag.3
IT
FRIDGE ........................................................................................................... page 4 to page 6
GB
REFRIGERATEUR ................................................................................................... pages 7 à 9
FR
KÜHLSCHRANK ....................................................................................... Seite 10 bis Seite 12
DE
FRIGORÍFICO ..............................................................................................de pág.13 a pág.15
ES
FRIGORÍFICO .................................................................................................da pág. 16 à pág.18
PT
ΨΥΓΕΙΟ ............................................................................................... αό σελ. 19 έως σελ. 21
EL
LODÓWKA ................................................................................................. od str. 22 do str. 24
PL
CHLADNIČKA ................................................................................ od strany 25 do strany 27
CZ
KOELKAST ..................................................................................................pag. 28 t/m pag. 30
NL
JÄÄKAAPPI
............................................................................................................... sivut 31-33
FI
KJØLESKAP ............................................................................................ fra side 34 til side 36
NO
KYLSKÅP ..... ....................................................................................... från sida 37 till sida 39
SV
KØLESKAB .......................................................................................................fra s. 40 til s.42
DA

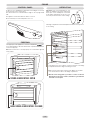
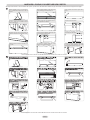
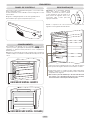
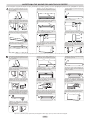
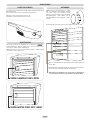
1 IT
ARMADIO
SCATOLA COMANDI
Per poter accendere è modificare la temperatura del frigorifero è
necessario agire sulla manopola della scatola termostato.
La scatola termostato è collocata all’interno del frigorifero in alto a
destra.
L’apparecchio è spento se la manopola è sulla posizione “0”.
Le posizioni consigliate sono 2-3.
LO SBRINAMENTO
Lo sbrinamento della cella frigo avviene automaticamente durante le
pause del compressore
Importante: In presenza di temperatura
ambiente molto calda, l’apparecchio potrebbe
funzionare in continuo, con conseguente
formazione anomala di brina sulla parete
di fondo della cella frigo. In questi casi è
necessario ruotare la manopola frigo su
numeri più bassi
La presenza di un lieve strato di brina o di gocce d’ acqua durante
il funzionamento è da considerarsi normale
E’ importante mantenere sempre pulito il condotto di scarico ed
evitare di porre i cibi a contatto con la parete della cella
NB. In questa posizione è possibile trovare la targa matricola,
contenente i dati da comunicare all’Assistenza Tecnica
qualora si verificasse un guasto.
CONGELAZIONE
Questo prodotto è dotato di sezione nella parte superiore
del prodotto (vedi guida rapida). Per una corretta congelazione
bisogneràvattendere 24 ore dopo l’inserimento dei cibi nella cella.
N.B. Per assere certi che la porta freezer sia corretamente chiusa,
verificare che l’indiactore colorato di apertura porta non sia visible.

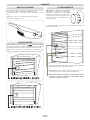
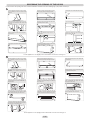
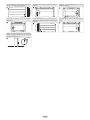
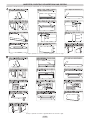
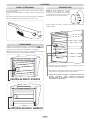
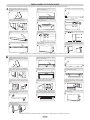
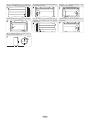
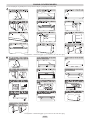
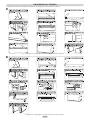
2 IT
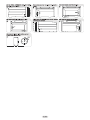
A
Per invertire il senso di apertura delle porte seguire le indicazioni in relazione al tipo di testata e di cerniera di cui il vostro prodotto è costituito.
INVERSIONE DEL SENSO DI APERTURA DELLE PORTE
Riportare l‘apparecchio in posizione verticale e attendere 2 ore prima di rimetterlo in funzione
Sdraiare o inclinare di 45° il frigorifero, per facilitare
le operazioni nella parte inferiore dello stesso
Incidere e rompere l'asola sinistra del cruscotto
nella zona dell'impronta
Se il cruscotto è di altro tipo, rompere la
membrana, inserire il perno e avvitare la cerniera
sul lato sinistro del cruscotto
Avvitare il cruscotto e rimontare l’etichetta
estetica. Riportare l’apparecchio in posizione
verticale ed attendere 2 ore prima di rimetterlo in
funzione
Per effettuare la reversibilità delle maniglie:
Togliere i tappini estetici sul lato destro delle
porte
Svitare le maniglie dal lato sinistro e rimontarle
sul lato destro del prodotto.
Posizionare i tappini sul lato sinistro.
Inserire il perno della cerniera e il distanziale
nella testata. Rimontare le cerniere e le porte
operando dal basso verso l’alto
Rimuovere il tappo sulla parte sinistra e inserirlo
sulla parte destra delle testatine centrali e
inferiore.
In presenza di questa tipologia di cruscotto, asportare
l’etichetta e svitare le viti, quindi estrarre parzialmente
il cruscotto.
Svitare la cerniera superiore destra ed invertire la
posizione del perno, quindi rimontarla sul lato sinistro
Togliere la cerniera inferiore destra svitando le viti, il
perno e le rondelle, quindi togliere la porta inferiore
Rimuovere lo zoccolo inferiore, estraendo i 3
tappini protettivi e allentando le apposite viti
Forare lo zoccolo nella zona dell’impronta sinistra
1) rompere la
membrana
2) Inserire il perno
B
Riportare l‘apparecchio in posizione verticale e attendere 2 ore prima di rimetterlo in funzione

3 IT

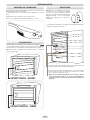
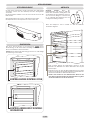
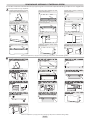
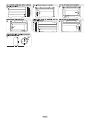
4 GB
FRIDGE
CONTROL PANEL
In order to access and adjust the temperature of the fridge it is necessary
to turn the knob on the control panel.
The thermostat box is located inside the fridge on the top right hand-
side.
The appliance is turned off when the knob is set to “0”.
We recommend you set the temperature to 2 or 3.
DEFROSTING
The fridge compartment is automatically defrosted when the compressor
is not working
Important: If the room temperature is very
warm, the appliance may work continuously
and a layer of frost will deposit on the back
of the fridge compartment. In this case it is
necessary to turn the knob to lower settings
A small amount of frost or drops of water on the back of the fridge
compartment when the fridge is working is normal
Make sure the water outlet is always clean. Make sure foods do
not touch the back or sides of the fridge compartment
NB. This is the rating plate. If you need to contact our Service
Department in the event of faults, remember to give them the
information on the plate.
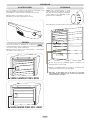
FREEZING
The upper part of the appliance is a freezer compartment (see
User‘s quick guide). Foods must remain in this compartment for 24 hours
to be frozen properly.
N.B. If the freezer door is closed properly, the coloured door light will
not be visible.
VISIBLE INDICATOR: OPEN
NON-VISIBLE INDICATOR: CLOSED

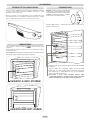
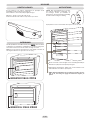
5 GB
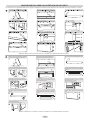
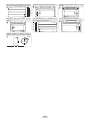
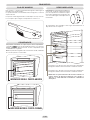
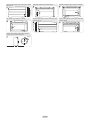
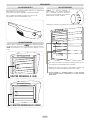
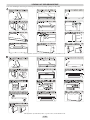
A
Place the appliance on the floor or at a 45° angle,
as it is necessary to work on the bottom of the
appliance.
Take off the bottom right-hand hinge by removing
the screws, pin and washers, then remove the
lower door.
Mark and break the left-hand slot on the panel, in
the insert area.
Flip the top left-hand hinge found in the
accessories kit.
Fit the panel, and secure with the screws and
caps.
To reverse the handles: remove the outer caps
from the right-hand side of the doors.
Remount the hinges and doors working from
bottom to top,
Unscrew the handles from the left-hand side and
move them to the right-hand side, then position
the outer caps on the left-hand side of the doors.
Remove the lower plinth by pulling out the 3
protective plugs and by loosening the screws.
Remove the caps (A) and (B), loosen the screws
and partially remove the panel.
Unscrew the right hinge.
Drill the plinth on the marked left hand-side area.
REVERSING THE OPENING OF THE DOORS
In order to reverse the opening of the doors, follow the indications in relation to the insert and hinge type your product is made up of.
Place the appliance on the floor or at a 45° angle,
as it is necessary to work on the bottom of the
appliance.
Mark and break the left-hand slot on the panel, in
the insert area.
With another panel type, break the plastic
membrane and screw the hinge on the left-hand
side of the panel.
Screw the panel back on and place the outer
label back on. Put the appliance in the upright
position and wait two hours before turning it on.
To reverse the handles: remove the outer caps
from the right-hand side of the doors.
Unscrew the handles from the left-hand side and
remount them on the right-hand side of the product.
Place the plugs on the left-hand side.
Insert the pin in the hinge and the spacer in the
insert. Reassemble the hinges and doors
working from bottom to top.
Remove the plug on the left-hand side and insert
it on the right-hand side of the central and lower
inserts. Invert the bushing in the lower insert.
With this panel type, remove the label and screws,
then partially remove the panel.
Remove the screws from the top right hinge and
invert the position of the pin, then reassemble it on
the left-hand side.
Take off the bottom right-hand hinge by removing
the screws, pin and washers, then remove the
lower door.
Remove the lower plinth by pulling out the
3 protective plugs and by loosening the screws.
Mark and break the plinth on the marked left
hand-side area.
1) break the
plastic membrane
2) Insert the pin
spacer
bushing
plug
Put the appliance in an upright position and wait two hours before turning it on.
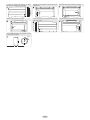
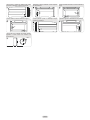
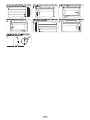
B
Put the appliance in an upright position and wait two hours before turning it on.

In order to reverse the opening of doors,
disassemble the hinge at the bottom right
Insert the caps as shown in the figure
Turn the appliance back in vertical position and wait
2 hours before operating it
2 hours
Position the door and the hinge first, then screw the
latter to the product
Screw the hook on the right side of the compartment
Unscrew the hook located on the left side of the
compartment
Remove the outer caps as shown in the figure
6 GB

7 FR
REFRIGERATEUR
PANNEAU DE COMMANDE
Afin de régler la température du réfrigérateur il est nécessaire de tourner
le bouton du panneau de commande.
Le boîtier thermostat se trouve à l'intérieur du réfrigérateur, en haut, à
droite.
L'appareil est éteint si le bouton est positionné sur “0”.
Nous vous recommandons de régler la température à 2 ou 3.
DEGIVRAGE
Le compartiment réfrigérateur est dégivré automatiquement quand le
compresseur n'est pas en marche.
Important : Si la température de la pièce
est trop élevée, il se peut que l'appareil
fonctionne en continue et qu'une couche de
givre se forme dans le fond du compartiment
réfrigérateur. Dans ce cas il est nécessaire
diminuer les réglages avec le bouton de
commande
La présence d’une fine pellicule de givre, ou de gouttes d’eau, est
normale durant le fonctionnement de l’appareil.
Assurez-vous de toujours maintenir propre la zone d'évacuation
d'eau. Assurez-vous que les aliments ne soient pas en contact
avec le fond ou les parois de la cuve.
NB. Ceci est la plaque signalétique. Si vous deviez contacter
notre service après vente en cas de dysfonctionnement ou
de panne, pensez à leur fournir les informations figurant sur
la plaque.
CONGELATION
La partie supérieure de l‘appareil est un compartiment congélateur
(voir le guide d‘utilisation rapide). Les aliments doivent êtres gardés
24 heures dans ce compartiment pour être parfaitement congelés.
N.B. Si la porte du congélateur est correctement fermée, le voyant de
porte n‘est pas visible.
VOYANT VISIBLE : OUVERT
VOYANT INVISIBLE : FERME

8 FR
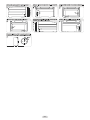
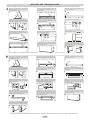
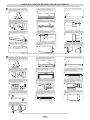
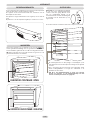
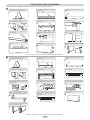
Placez l'appareil à la verticale et attendez deux heures avant de le mettre en marche.
B
A
Allongez l'appareil au sol ou ŕ un angle de 45°
car il est nécessaire d'intervenir sur le bas de
l'appareil.
Enlevez la charničre inférieure droite en retirant
les vis, le goujon et les rondelles. Enlevez
ensuite la porte du bas.
Découpez une fente sur le côté gauche du
panneau au niveau de la zone marquée a cet effet.
Fixez la charničre supérieure gauche que vous
trouverez dans le kit d'accessoires.
Installez le panneau et fixez-le ŕ l'aide des vis et
des caches.
Pour inverser les poignées: Retirez les caches
extérieurs sur le côté droit des portes.
Remontez les charničres et les portes en
commençant par celles du bas
Devissez les poignées ŕ gauche et déplacez les
du côté droit, puis positionnez les caches
extérieurs dans les trous du côté gauche.
Retirez la plinthe inférieure en tirant sur les trois
caches protecteurs et en devissant les vis.
Retirez les caches (A) et (B), desserrez les vis et
enlevez partiellement le bandeau.
Devissez la charničre de droite.
Percez la plinthe au niveau du repčre situé ŕ
gauche.
INVERSER LE SENS D'OUVERTURE DES PORTES
Afin de pouvoir inverser le sens d'ouverture des portes, reportez vous aux instructions relatives au type de charnière et d'insert dont votre appareil est équipé.
Placez l'appareil à la verticale et attendez deux heures avant de le mettre en marche.

Afin d’inverser le sens d’ouverture de la porte
intérieure, démontez la charnière en bas à droite.
Réinsérez les petits caches comme le montre
l’illustration.
Replacez l’appareil en position verticale et
patientez 2 heures avant de le remettre en marche.
2 heures
Place d’abord la porte sur la charnière avant de
visser cette dernière sur l’appareil.
Vissez le crochet à droite du compartiment.
Dévissez le crochet à gauche du compartiment.
Retirez les petits caches comme le montre
l’illustration.
9 FR

10 DE
KÜHLSCHRANK
STEUERGEHÄUSE
Um das Gerät einzuschalten und die Temperatur des Kühlschranks
einzustellen, müssen Sie den Drehknopf auf dem Steuergehäuse
einschalten.
Die Thermostatbox befindet sich rechts oben auf der Innenseite des
Kühlschranks.
Wenn der Drehknopf auf "0" steht, ist das Gerät ausgeschaltet.
Wir empfehlen Ihnen, die Temperatur auf 2 oder 3 zu stellen.
ABTAUEN
Wenn der Kompressor nicht in Betrieb ist, wird der Kühlraum
automatisch abgetaut.
Wichtiger Hinweis: Wenn die
Raumtemperatur sehr warm ist, wird das
Gerät unter Umständen ständig laufen und
auf der Rückseite des Kühlraums wird sich
eine Frostschicht ablagern. In diesem Fall
ist es notwendig, den Drehknopf auf eine
niedrigere Einstellung zu drehen.
Beim normalen Betrieb des Kühlschranks entstehen auf der
Rückseite des Kühlraums eine dünne Reifschicht oder ein paar
Wassertropfen.
Vergewissern Sie sich, dass die Wasserablaufrinne immer sauber
ist. Achten Sie darauf, dass die Nahrungsmittel nicht die Rückseite
oder die Seitenwände des Kühlschranks berühren.
Hinweis: Hier finden Sie das Matrikelschild. Wenn Sie bei
einer Störung den Kundendienst kontaktieren müssen, geben
Sie die Informationen auf diesem Schild an.
EINFRIEREN
Der obere Teil des Geräts ist ein Gefrierfach (Siehe
Kurzanleitung). Um die Lebensmittel vollständig einzufrieren, müssen
diese für 24 Stunden in dem Fach bleiben.
Hinweis: Wenn die Gefrierfachtür richtig geschlossen ist, ist die farbige
Kontrollanzeige nicht sichtbar.
KONTROLLANZEIGE SICHTBAR: OFFEN
KONTROLLANZEIGE NICHT SICHTBAR:
GESCHLOSSEN

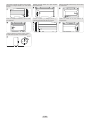
Stellen Sie den Kühlschrank auf den Fußboden
oder kippen Sie ihn um 45°, um leichter an der
Unterseite arbeiten zu können.
Ritzen Sie die linke Öse der Stirnwand ein und
stechen Sie diese an der markierten Stelle im
Bereich des Einsatzes durch.
Bei einer anderen Stirnwand müssen Sie die
Kunststoffmembran durchbrechen und das Scharnier
auf der linken Seite der Strinwand anschrauben.
Schrauben Sie die Stirnwand wieder an und
befestigen Sie die äußere Beschriftung. Bringen
Sie den Kühlschrank in die aufrechte Position
und warten Sie zwei Stunden, bevor Sie ihn
wieder in Betrieb nehmen.
Um die Griffe nach der anderen Richtung
auszurichten: Nehmen Sie die Zierkappen an der
rechten Seite der Türen ab.
Schrauben Sie die Griffe auf der linken Seite ab und
befestigen Sie diese auf der rechten Seite des Geräts.
Bringen Sie die Stopfen auf der linken Seite an.
Setzen Sie den Stift in das Scharnier und die
Distanzscheibe in den Einsatz ein. Bringen Sie
die Scharniere und Türen wieder an, beginnen
Sie dabei von unten.
Entfernen Sie die Stopfen auf der linken Seite
und setzen Sie diese auf der rechten Seite der
mittleren und unteren Einsätze ein. Drehen Sie
die Lagerbuchse im unteren Einsatz um.
Entfernen Sie bei dieser Stirnwand die Aufschrift und
die Schrauben und ziehen Sie die Stirnwand dann
teilweise heraus.
Entfernen Sie die Schrauben vom oberen rechten
Scharnier, drehen Sie den Stift um und befestigen
Sie es auf der linken Seite
Entfernen Sie das untere rechte Scharnier, indem Sie
die Schrauben, den Stift und die Unterlegscheiben
abschrauben. Nehmen Sie dann die untere Tür ab.
Entfernen Sie den unteren Sockel, indem Sie die 3
Schutzstopfen herausziehen und die Schrauben lösen.
Bohren Sie an der Markierung der linken Seite
ein Loch in den Sockel.
1) Durchbrechen
Sie die Kunststoff
-membran
2) Setzen Sie den
Stift ein
Distanzscheibe
Lagerbuchse
Stopfen
Bringen Sie den Kühlschrank in die aufrechte Position und warten Sie zwei Stunden, bevor Sie ihn wieder in Betrieb nehmen.
B
11 DE
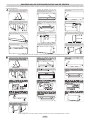
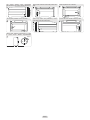
A
Stellen Sie den Kühlschrank auf den Fußboden
oder kippen Sie ihn um 45°, um leichter an der
Unterseite arbeiten zu können.
Entfernen Sie das untere rechte Scharnier, indem
Sie die Schrauben, den Stift und die Unterlegscheiben
abschrauben. Nehmen Sie dann die untere Tür ab.
Ritzen Sie die linke Öse der Stirnwand ein und
stechen Sie diese an der markierten Stelle im
Bereich des Einsatzes durch.
Nehmen Sie aus dem Zubehör das obere linke
Scharnier und befestigen Sie es.
Bringen Sie die Stirnwand wieder an, indem Sie
die Schrauben und Schutzkappen befestigen.
Um die Griffe nach der anderen Richtung
auszurichten: Nehmen Sie die Zierkappen an der
rechten Seite der Türen ab.
Bringen Sie die Scharniere und Türen wieder an,
beginnen Sie dabei von unten:
Schrauben Sie die Kappen von der linken Seite
ab und bringen Sie sie an der rechten Seite an,
befestigen Sie dann erneut die Zierkappen an
der linken Seite der Türen.
Entfernen Sie den unteren Sockel, indem Sie die
3 Schutzstopfen herausziehen und die
Schrauben lösen.
Entfernen Sie die Schutzkappen (A) und (B),
lösen Sie die Schrauben und ziehen Sie die
Stirnwand teilweise heraus.
Schrauben Sie das rechte Scharnier ab.
Bohren Sie an der Markierung der linken Seite
ein Loch in den Sockel.
WECHSEL DES TÜRANSCHLAGES
Um den Türanschlag zu wechseln, befolgen Sie die Anweisungen, die sich die Art des Schaltbrefts und der Scharniere beziehen, die ihr Gerät verwendet.
Bringen Sie den Kühlschrank in die aufrechte Position und warten Sie zwei Stunden, bevor Sie ihn wieder in Betrieb nehmen.

Um die Türöffnung auszutauschen, müssen Sie
das Scharnier rechts unten demontieren
Setzen Sie die Kappen wie in der Abbildung
dargestellt ein
Bringen Sie den Kühlschrank in die aufrechte
Position und warten Sie zwei Stunden, bevor Sie
ihn wieder in Betrieb nehmen
2 Stunden
Bringen Sie zuerst die Tür und das Scharnier in
Stellung, und schrauben Sie dann das Scharnier an
das Gerät
Schrauben Sie den Haken an die rechte Seite des
Fachs
Schrauben Sie den Haken auf der linken Seite des
Fachs ab
Entfernen Sie die Abdeckkappen wie in der
Abbildung dargestellt
12 DE

13 ES
FRIGORÍFICO
CAJA DE MANDOS
Para acceder a y ajustar la temperatura del frigorífico deberá girar el
interruptor de la caja de mandos.
La caja del termostato está situada al interior del frigorífico, en la zona
superior derecha.
La aplicación estará apagada mientras el interrumptor esté en posición “0”.
Le aconsejamos que configure su temperatura en el nivel 2 o 3.
DESCONGELACIÓN
El compartimento del congelador se descongela automáticamente al
dejar de funcionar el compresor.
Importante: Si la temperatura de la habitación
es muy alta, el aparato seguirá funcionando
pero una capa de hielo se formará en la parte
trasera del compartimento del frigorífico. En
este caso, deberá girar el interruptor hasta el
nivel mínimo.
Un pequeño goteo de agua en la parte interna del compartimento
del frigorífico mientras esté funcionando es totalmente normal.
Un pequeño goteo de agua en la parte interna del compartimento
del frigorífico mientras esté funcionando es totalmente normal.
NOTA: Esta es la placa indicadora. Si necesita contactar con
nuestro servicio de atención al cliente en caso de fallos o
defectos, no olvide indicarle la información contenida en
dicha placa.
CONGELADOR
Este producto está dotado, en su parte superior, de un compartimento-
congelador
(véase la guía rápida del usuario). Los alimentos
deberán permanecer durante 24 horas en dicho compartimento para
ser debidamente congelados.
Nota. si la puerta del congelador está correctamente cerrada, el indicador
de color de la puerta no estará visible.
INDICADOR VISIBLE: PUERTA ABIERTA
INDICADOR INVISIBLE: PUERTA CERRADA

14 ES
A
Coloque el aparato en el suelo, respetando un
ángulo de 45°, ya que deberá trabajar sobre la
parte inferior del aparato.
Saque la bisagra del lado inferior derecho
desajustando los tornillos, la clavija y la arandelas.
A continuación, saque la puerta inferior.
Marque y perfore la ranura de la parte izquierda
del panel, situada en la zona de inserción.
Ajuste la bisagra del lado superior izquierdo que
se encuentra en su kit de accesorios.
Ajuste la caja de mandos y refuerce todo el
conjunto con ayuda de los tornillos y las tapas.
Para invertir el sentido de las asas: quite las
tapas exteriores situadas el la parte derecha de
las puertas.
Coloque las puertas y las bisagras instaladas de
arriba a abajo indicadas por los números
Desajuste las asas situadas en la parte izquierda
y colóquelas en la parte derecha. A continuación,
coloque las tapas externas en la parte izquierda
de las puertas.
Saque el plinto inferior, quitando las 3 tapas de
protección y desajustando los tornillos.
Quite las tapas (A) y (B), ajustadas por los
tornillos y saque una parte de la caja de mandos.
Desapriete la bisagra derecha.
Taladre el plinto en el lado izquierdo indicado.
INVERTIR EL SENTIDO DE APERTURA DE LAS PUERTAS
Para invertir el sentido de apertura de las puertas, siga las siguientes instrucciones en función del tipo de orificio y de bisagra que contenga su producto.
Coloque el aparato en el suelo, respetando un
ángulo de 45°, ya que deberá trabajar sobre la
parte inferior del aparato.
Marque y trace la ranura del lado izquierdo sobre
el panel, en la zona de insercción.
Con otro tipo de paneles, rompa la membrana de
plástico y ajuste la bisagra en la parte izquierda del panel.
Apriete la parte trasera del panel y coloque
encima la etiqueta superior. Coloque el aparato
en posición vertical y espere durante dos horas
antes de encenderlo.
Para invertir el sentido de las asas: quite las
tapas exteriores situadas en la parte derecha de
las puertas.
Desajuste las asas de la parte izquierda y colóquelas
en la parte derecha del producto.
Coloque las tapas en la parte izquierda.
Introduzca la clavija en la bisagra y el
espaciador en la hendidura. Una las bisagras y
las puertas de arriba a abajo.
Quite la tapa de la parte izquierda e introdúzcala
en la parte derecha de la hendidura central e
inferior. Invierta el casquillo de la ranura inferior.
Con este tipo de paneles, deberá quitar todas
las etiquetas y los tornillos y a continuación,
quitar de forma parcial la paneles.
Saque los tornillos de la bisagra superior derecha e
invierta la posición de la clavija. A continuación,
vuelva a unirlo todo en la parte izquierda.
Saque la bisagra del lado inferior derecho
desajustando los tornillos, la clavija y la arandelas.
A continuación, saque la puerta inferior.
Saque el plinto inferior, quitando las tapas de
protección y desajustando los tornillos.
Taladre el plinto en el lado izquierdo indicado.
1) Rompa la
membrana de
plástico
2) Introduzca la
clavija
separador
casquillo
tapón
Coloque el aparato en posición vertical y espere durante dos horas antes de encenderlo.
B
Coloque el aparato en posición vertical y espere durante dos horas antes de encenderlo.

Para invertir el sentido de apertura de las puertas,
desmonte la bisagra situada en la zona inferior
derecha
Retire los casquillos exteriores tal y como se indica
en la ilustración
Coloque el aparato en posición vertical y espere
2 horas antes de ponerlo en funcionamiento
2 horas
Coloque la puerta y la bisagra primero, y a
continuación atornille esta última al producto
Apriete los tornillos de la parte derecha del
compartimiento
Desafloje el tornillo situado en la parte izquierda
del compartimiento
Retire los casquillos exteriores tal y como se indica
en la ilustración
15 ES

16 PT
FRIGORÍFICO
PAINEL DE CONTROLO
Para aceder e regular a temperatura do frigorífico, é necessário rodar o
botão no painel de controlo.
A caixa do termóstato está localizada no interior do frigorífico no canto
superior direito.
O frigorífico é desligado quando o botão está regulado para “0”.
Recomendamos que regule a temperatura para 2 ou 3.
DESCONGELAÇÃO
Quando o compressor não está a funcionar, o compartimento do
frigorífico é descongelado automaticamente
Importante: Se a temperatura ambiente
estiver muito quente, o aparelho pode
continuar a funcionar de forma contínua
e uma camada de gelo irá formar-se na
parte posterior do frigorífico. Neste caso,
é necessário rodar o botão para uma
regulação mais baixa
A presença de uma camada fina de gelo ou de gotas de água na
parte posterior do frigorífico durante o funcionamento é normal
É importante manter a conduta de água sempre limpa. Evite
guardar os alimentos encostados às partes posterior ou lateral do
compartimento do frigorífico
Obs.: Esta é a placa de identificação. Se necessitar de entrar
em contacto com a Assistência técnica em caso de avaria,
deve fornecer-lhes a informação indicada na placa.
CONGELAMENTO
Este aparelho está equipado com um congelador na parte
superior (consulte o guia rápido do utilizador). Para um congelamento
adequado, os alimentos devem permanecer neste compartimento
durante 24 horas.
N.B. Para se certificar de que a porta do congelador está correctamente
fechada, verifique se o indicador colorido de abertura da porta não está
visível.
INDICADOR VISÍVEL: ABERTO
INDICADOR NÃO VISÍVEL: FECHADO

Coloque o aparelho na vertical e aguarde duas horas antes de o ligar.
B
17 PT
A
INVERTER O SENTIDO DE ABERTURA DAS PORTAS
Para inverter a abertura das portas, siga as indicações relacionadas com o tipo de dobradiça e fecho incluídos no seu produto.
Coloque o aparelho na vertical e aguarde duas horas antes de o ligar.

18 PT
Para inverter o sentido de abertura das portas,
desmonte a dobradiça na parte inferior direita
Insira as cavilhas, conforme indicado na figura
Coloque de novo o aparelho na posição vertical e
aguarde 2 horas antes de colocá-lo em
funcionamento
2 horas
Coloque primeiro a porta e a dobradiça e depois
aparafuse a dobradiça
Aparafuse o gancho no lado direito do compartimento
Desaperte o gancho localizado no lado esquerdo
do compartimento
Retire as cavilhas exteriores, conforme indicado na
figura

19 EL
ΨΥΓΕΙΟ
ΠΙΝΑΚΑΣ ΕΛΕΓΧΟΥ
Για να αποκτήσετε πρόσβαση και να ρυθμίσετε τη θερμοκρασία του
ψυγείου είναι αναγκαίο να γυρίσετε το κουμπί στον πίνακα ελέγχου.
Το κουτί του θερμοστάτη είναι εγκατεστημένο στο εσωτερικό του ψυγείου
στην επάνω δεξιά πλευρά.
Η συσκευή είναι απενεργοποιημένη όταν το κουμπί έχει ρυθμιστεί στη
θέση “0”.
Συνιστούμε να ρυθμίσετε τη θερμοκρασία στο 2 ή το 3.
ΑΠΟΨΥΞΗ
Στον χώρο του ψυγείου γίνεται αυτόματα απόψυξη όταν δεν λειτουργεί
ο συμπιεστής
Σημαντική παρατήρηση: Εάν η θερμοκρασία
του χώρου είναι πολύ υψηλή, η συσκευή
ενδεχομένως να λειτουργεί συνεχώς και
να σχηματιστεί στοιβάδα πάχνης στο πίσω
μέρος του χώρου της συντήρησης. Σ' αυτήν
την περίπτωση είναι απαραίτητο να γυρίσετε
το κουμπί σε χαμηλότερες θέσεις ρύθμισης
Μια μικρή ποσότητα πάχνης ή σταγόνες νερού στο πίσω μέρος του
χώρου της συντήρησης είναι κανονικό φαινόμενο όταν λειτουργεί
το ψυγείο.
Να βεβαιώνεστε ότι η έξοδος νερού είναι πάντα καθαρή. Να
βεβαιώνεστε ότι τα τρόφιμα δεν αγγίζουν την πίσω πλευρά ή τα
πλαϊνά του χώρου του ψυγείου
ΣΗΜΕΙΩΣΗ: Αυτή είναι η πινακίδα στοιχείων. Εάν θέλετε να
απευθυνθείτε στο Τμήμα μας Τεχνικής Εξυπηρέτησης σε
περίπτωση κάποιου προβλήματος, θυμηθείτε να τους δώσετε
τις πληροφορίες που περιέχει αυτή η πινακίδα.
ΚΑΤΑΨΥΞΗ
Το επάνω μέρος της συσκευής είναι χώρος κατάψυξης (δείτε το
Σύντομο οδηγό χρήστη). Τα τρόφιμα πρέπει να παραμείνουν σ‘ αυτό το
χώρο 24 ώρες για να παγώσουν σωστά.
ΣΗΜΕΙΩΣΗ: Εάν η πόρτα του καταψύκτη είναι κλεισμένη σωστά, το
χρωματιστό φωτάκι της πόρτας δεν θα είναι ορατό.
ΕΝΔΕΙΚΤΙΚΟ ΦΩΤΑΚΙ ΟΡΑΤΟ: ΑΝΟΙΚΤΗ
ΕΝΔΕΙΚΤΙΚΟ ΦΩΤΑΚΙ ΜΗ ΟΡΑΤΟ: ΚΛΕΙΣΤΗ
La pagina sta caricando ...
La pagina sta caricando ...
La pagina sta caricando ...
La pagina sta caricando ...
La pagina sta caricando ...
La pagina sta caricando ...
La pagina sta caricando ...
La pagina sta caricando ...
La pagina sta caricando ...
La pagina sta caricando ...
La pagina sta caricando ...
La pagina sta caricando ...
La pagina sta caricando ...
La pagina sta caricando ...
La pagina sta caricando ...
La pagina sta caricando ...
La pagina sta caricando ...
La pagina sta caricando ...
La pagina sta caricando ...
La pagina sta caricando ...
La pagina sta caricando ...
La pagina sta caricando ...
La pagina sta caricando ...
La pagina sta caricando ...
-
 1
1
-
 2
2
-
 3
3
-
 4
4
-
 5
5
-
 6
6
-
 7
7
-
 8
8
-
 9
9
-
 10
10
-
 11
11
-
 12
12
-
 13
13
-
 14
14
-
 15
15
-
 16
16
-
 17
17
-
 18
18
-
 19
19
-
 20
20
-
 21
21
-
 22
22
-
 23
23
-
 24
24
-
 25
25
-
 26
26
-
 27
27
-
 28
28
-
 29
29
-
 30
30
-
 31
31
-
 32
32
-
 33
33
-
 34
34
-
 35
35
-
 36
36
-
 37
37
-
 38
38
-
 39
39
-
 40
40
-
 41
41
-
 42
42
-
 43
43
-
 44
44


Documenti correlati
-
Hoover HCN 4580 Kühl-gefrierkombination Manuale utente
-
Hoover HCN 3986 Manuale del proprietario
-
-
Otsein-Hoover HCNP 4274 Manuale utente
-
-
Hoover CDNI 4070A Manuale utente
-
-
Otsein-Hoover HDA 2950 Manuale utente
-
Otsein-Hoover OHVN 3886 Manuale utente
-