
1
ARMADIO ........................................................................................................da pag.1 a pag.3
IT
FRIDGE ........................................................................................................... page 4 to page 6
GB
REFRIGERATEUR ................................................................................................... pages 7 à 9
FR
KÜHLSCHRANK ....................................................................................... Seite 10 bis Seite 12
DE
FRIGORÍFICO ..............................................................................................de pág.13 a pág.15
ES
FRIGORÍFICO .................................................................................................da pág. 16 à pág.18
PT
ΨΥΓΕΙΟ ............................................................................................... αό σελ. 19 έως σελ. 21
EL
LODÓWKA ................................................................................................. od str. 22 do str. 24
PL
CHLADNIČKA ................................................................................ od strany 25 do strany 27
CZ
KOELKAST ..................................................................................................pag. 28 t/m pag. 30
NL
JÄÄKAAPPI
............................................................................................................... sivut 31-33
FI
KJØLESKAP ............................................................................................ fra side 34 til side 36
NO
KYLSKÅP ..... ....................................................................................... från sida 37 till sida 39
SV
KØLESKAB .......................................................................................................fra s. 40 til s.42
DA

1 IT
ARMADIO
SCATOLA COMANDI
Per poter accendere è modificare la temperatura del frigorifero è
necessario agire sulla manopola della scatola termostato.
La scatola termostato è collocata all’interno del frigorifero in alto a
destra.
L’apparecchio è spento se la manopola è sulla posizione “0”.
Le posizioni consigliate sono 2-3.
LO SBRINAMENTO
Lo sbrinamento della cella frigo avviene automaticamente durante le
pause del compressore
Importante: In presenza di temperatura
ambiente molto calda, l’apparecchio potrebbe
funzionare in continuo, con conseguente
formazione anomala di brina sulla parete
di fondo della cella frigo. In questi casi è
necessario ruotare la manopola frigo su
numeri più bassi
La presenza di un lieve strato di brina o di gocce d’ acqua durante
il funzionamento è da considerarsi normale
E’ importante mantenere sempre pulito il condotto di scarico ed
evitare di porre i cibi a contatto con la parete della cella
NB. In questa posizione è possibile trovare la targa matricola,
contenente i dati da comunicare all’Assistenza Tecnica
qualora si verificasse un guasto.
CONGELAZIONE
Questo prodotto è dotato di sezione nella parte superiore
del prodotto (vedi guida rapida). Per una corretta congelazione
bisogneràvattendere 24 ore dopo l’inserimento dei cibi nella cella.
N.B. Per assere certi che la porta freezer sia corretamente chiusa,
verificare che l’indiactore colorato di apertura porta non sia visible.

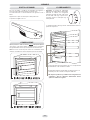
2 IT
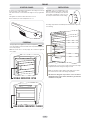
A
Per invertire il senso di apertura delle porte seguire le indicazioni in relazione al tipo di testata e di cerniera di cui il vostro prodotto è costituito.
INVERSIONE DEL SENSO DI APERTURA DELLE PORTE
Riportare l‘apparecchio in posizione verticale e attendere 2 ore prima di rimetterlo in funzione
Sdraiare o inclinare di 45° il frigorifero, per facilitare
le operazioni nella parte inferiore dello stesso
Incidere e rompere l'asola sinistra del cruscotto
nella zona dell'impronta
Se il cruscotto è di altro tipo, rompere la
membrana, inserire il perno e avvitare la cerniera
sul lato sinistro del cruscotto
Avvitare il cruscotto e rimontare l’etichetta
estetica. Riportare l’apparecchio in posizione
verticale ed attendere 2 ore prima di rimetterlo in
funzione
Per effettuare la reversibilità delle maniglie:
Togliere i tappini estetici sul lato destro delle
porte
Svitare le maniglie dal lato sinistro e rimontarle
sul lato destro del prodotto.
Posizionare i tappini sul lato sinistro.
Inserire il perno della cerniera e il distanziale
nella testata. Rimontare le cerniere e le porte
operando dal basso verso l’alto
Rimuovere il tappo sulla parte sinistra e inserirlo
sulla parte destra delle testatine centrali e
inferiore.
In presenza di questa tipologia di cruscotto, asportare
l’etichetta e svitare le viti, quindi estrarre parzialmente
il cruscotto.
Svitare la cerniera superiore destra ed invertire la
posizione del perno, quindi rimontarla sul lato sinistro
Togliere la cerniera inferiore destra svitando le viti, il
perno e le rondelle, quindi togliere la porta inferiore
Rimuovere lo zoccolo inferiore, estraendo i 3
tappini protettivi e allentando le apposite viti
Forare lo zoccolo nella zona dell’impronta sinistra
1) rompere la
membrana
2) Inserire il perno
B
Riportare l‘apparecchio in posizione verticale e attendere 2 ore prima di rimetterlo in funzione

3 IT

4 GB
FRIDGE
CONTROL PANEL
In order to access and adjust the temperature of the fridge it is necessary
to turn the knob on the control panel.
The thermostat box is located inside the fridge on the top right hand-
side.
The appliance is turned off when the knob is set to “0”.
We recommend you set the temperature to 2 or 3.
DEFROSTING
The fridge compartment is automatically defrosted when the compressor
is not working
Important: If the room temperature is very
warm, the appliance may work continuously
and a layer of frost will deposit on the back
of the fridge compartment. In this case it is
necessary to turn the knob to lower settings
A small amount of frost or drops of water on the back of the fridge
compartment when the fridge is working is normal
Make sure the water outlet is always clean. Make sure foods do
not touch the back or sides of the fridge compartment
NB. This is the rating plate. If you need to contact our Service
Department in the event of faults, remember to give them the
information on the plate.
FREEZING
The upper part of the appliance is a freezer compartment (see
User‘s quick guide). Foods must remain in this compartment for 24 hours
to be frozen properly.
N.B. If the freezer door is closed properly, the coloured door light will
not be visible.
VISIBLE INDICATOR: OPEN
NON-VISIBLE INDICATOR: CLOSED

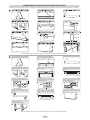
5 GB
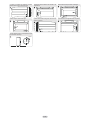
A
Place the appliance on the floor or at a 45° angle,
as it is necessary to work on the bottom of the
appliance.
Take off the bottom right-hand hinge by removing
the screws, pin and washers, then remove the
lower door.
Mark and break the left-hand slot on the panel, in
the insert area.
Flip the top left-hand hinge found in the
accessories kit.
Fit the panel, and secure with the screws and
caps.
To reverse the handles: remove the outer caps
from the right-hand side of the doors.
Remount the hinges and doors working from
bottom to top,
Unscrew the handles from the left-hand side and
move them to the right-hand side, then position
the outer caps on the left-hand side of the doors.
Remove the lower plinth by pulling out the 3
protective plugs and by loosening the screws.
Remove the caps (A) and (B), loosen the screws
and partially remove the panel.
Unscrew the right hinge.
Drill the plinth on the marked left hand-side area.
REVERSING THE OPENING OF THE DOORS
In order to reverse the opening of the doors, follow the indications in relation to the insert and hinge type your product is made up of.
Place the appliance on the floor or at a 45° angle,
as it is necessary to work on the bottom of the
appliance.
Mark and break the left-hand slot on the panel, in
the insert area.
With another panel type, break the plastic
membrane and screw the hinge on the left-hand
side of the panel.
Screw the panel back on and place the outer
label back on. Put the appliance in the upright
position and wait two hours before turning it on.
To reverse the handles: remove the outer caps
from the right-hand side of the doors.
Unscrew the handles from the left-hand side and
remount them on the right-hand side of the product.
Place the plugs on the left-hand side.
Insert the pin in the hinge and the spacer in the
insert. Reassemble the hinges and doors
working from bottom to top.
Remove the plug on the left-hand side and insert
it on the right-hand side of the central and lower
inserts. Invert the bushing in the lower insert.
With this panel type, remove the label and screws,
then partially remove the panel.
Remove the screws from the top right hinge and
invert the position of the pin, then reassemble it on
the left-hand side.
Take off the bottom right-hand hinge by removing
the screws, pin and washers, then remove the
lower door.
Remove the lower plinth by pulling out the
3 protective plugs and by loosening the screws.
Mark and break the plinth on the marked left
hand-side area.
1) break the
plastic membrane
2) Insert the pin
spacer
bushing
plug
Put the appliance in an upright position and wait two hours before turning it on.
B
Put the appliance in an upright position and wait two hours before turning it on.

In order to reverse the opening of doors,
disassemble the hinge at the bottom right
Insert the caps as shown in the figure
Turn the appliance back in vertical position and wait
2 hours before operating it
2 hours
Position the door and the hinge first, then screw the
latter to the product
Screw the hook on the right side of the compartment
Unscrew the hook located on the left side of the
compartment
Remove the outer caps as shown in the figure
6 GB

Z STUDIO > 03-2006 – 41017588
-
 1
1
-
 2
2
-
 3
3
-
 4
4
-
 5
5
-
 6
6
-
 7
7
-
 8
8


in altre lingue
- English: Candy CPLA335K User manual
- français: Candy CPLA335K Manuel utilisateur
Documenti correlati
-
Candy CFL3586 A-0 Manuale utente
-
Hoover CFL 3580 E Manuale utente
-
Hoover HCN 4580 Kühl-gefrierkombination Manuale utente
-
Otsein-Hoover HDA 2950 Manuale utente
-
Otsein-Hoover OHVN 3886 Manuale utente
-
-
Otsein-Hoover HCNP 4274 Manuale utente
-
Otsein-Hoover CFM 2260 E Manuale utente