Tightening torque:
2 - 4 N·m {18 - 35 in. lbs.}
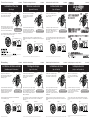
Install the rotor and the rotor tightening
plate to the hub, and then install and
tighten the bolts as shown in Fig. 1.
Fig. 2 Fig. 3
Tightening plate
Fig. 1
Tightening plate
Rotor fixing bolts
(#T25 torx)
Rotor
Hub
While wearing gloves, apply a force to the rotor
to turn it in a clockwise direction as shown in
Fig. 2. While doing this, tighten the rotor fixing
bolts in the order shown in the illustration.
Use a flat-tipped screwdriver or similar tool to bend the edges of the tightening
plate over the heads of the bolts as shown in Fig. 3.
Technical Service Instructions SI-0035A
Installation of the rotor
(6 bolt type)
One Holland, Irvine, California 92618, U.S.A. Phone: +1-949-951-5003
Industrieweg 24, 8071 CT Nunspeet, The Netherlands Phone: +31-341-272222
3-77 Oimatsu-cho Sakai-ku, Sakai, Osaka 590-8577, Japan
Please note: specifications are subject to change for improvement without notice. (English)
© Apr. 2006 by Shimano Inc. XBC IZM Printed in Japan.
These service instructions are
printed on recycled paper.
Anzugsdrehmoment:
2 - 4 N·m
Bringen Sie die Scheibe und die
Sicherungsscheibe an der Nabe an und
ziehen Sie die Schrauben fest, wie in
Abbildung 1 gezeigt.
Abb. 2 Abb. 3
Sicherungsscheibe
Abb. 1
Sicherungsscheibe
Scheibenbefestigungsschrauben
(Torx T25)
Scheibe
Nabe
Tragen Sie Handschuhe und drehen Sie die
Sicherungsscheibe nach rechts, wie in der
Abbildung 2 gezeigt. Ziehen Sie dabei die
Scheibenbefestigungsschrauben in der
abgebildeten Reihenfolge fest.
Biegen Sie die Kanten der Sicherungsplatte über die Schraubenköpfe,
wie in der Abbildung 3 gezeigt.
Einbauanleitung SI-0035A
Installation der Bremsscheibe
(Ausführung mit 6 Schrauben)
Änderungen vorbehalten. (German)
Couple de serrage:
2 - 4 N·m {20 - 40 kgf·cm}
Installer le disque et la plaque de serrage
du disque sur le moyeu, puis installer et
resserrer les boulons comme montré
dans la figure 1.
Illustration 2 Illustration 3
Plaque de serrage
Illustration 1
Plaque de serrage
Boulons de fixation du disque
(Torx #T25)
Disque
Moyeu
En prenant soin de porter des gants, appliquer
une force sur le disque afin de le tourner dans
le sens des aiguilles d'une montre comme
indiqué sur l'illustration 2. En ce faisant, serrer
les boulons de fixation du disque dans l'ordre
indiqué sur l'illustration.
Utiliser un tournevis à tête plate ou un outil similaire pour plier les bords de la
plaque de serrage par-dessus les têtes des boulons, comme indiqué sur
l'illustration 3.
Instructions de montage SI-0035A
Montage du disque
(type à 6 boulons)
Sous réserve de changement des spécifications sans préavis pour l’amérioration du produit. (French)
Aantrekkoppel:
2 - 4 N·m {20 - 40 kgf·cm}
Monteer de rotor en de rotoraantrekplaat
aan de naaf en monteer vervolgens de
bouten zoals aangegeven in Afb. 1 en
trek deze aan.
Afb. 2 Afb. 3
Aantrekplaat
Afb. 1
Aantrekplaat
Rotorbevestigingsbouten
(#T25 torx)
Rotor
Naaf
Doe beschermende handschoenen aan en
oefen kracht uit op de rotor en draai deze
rechtsom zoals aangegeven in Afb. 2. Trek
daarbij de rotorbevestigingsbouten aan in de
volgorde aangegeven in de illustratie.
Gebruik een platte schroevendraaier of soortgelijk gereedschap om de
uiteinden van de aantrekplaat over de boutkoppen te buigen zoals aangegeven
in Afb. 3.
Technische montage-instructies SI-0035A
Monteren van de rotor
(type met 6 bouten)
Opmerking: Specificaties kunnen zonder voorafgaande kennisgeving gewijzigd worden. (Dutch)
coppia di serraggio:
2 - 4 N·m {20 - 40 kgf·cm}
Installare il disco e la piastra di serraggio
disco sul mozzo, dopo di che installare e
serrare i bulloni, come mostrato in Fig. 1.
Figura 2 Figura 3
Piastra di serraggio
Figura 1
Piastra di serraggio
Bulloni di fissaggio del disco
(#T25 torx)
Disco
Mozzo
Indossare i guanti, quindi esercitare sul disco
una forza sufficiente a farlo ruotare in senso
orario come mostrato nella figura 2.
Contemporaneamente, serrare i bulloni di
fissaggio del disco seguendo l'ordine mostrato
nell'illustrazione
Utilizzare un cacciavite a testa piatta o un utensile analogo per piegare i
margini della piastra di serraggio sulla testa dei bulloni, come mostrato nella
figura 3.
Istruzioni per l'assistenza tecnica SI-0035A
Installazione del disco
(tipo a 6 bulloni)
Vogliate notare che le caratteristiche sono soggette a cambiamenti dovuti a miglioramento, senza preavviso. (Italian)
Torque de aperto:
2 - 4 N·m {20 - 40 kgf·cm}
Instale o rotor e a placa de aperto do
rotor no cubo e em seguida instale e
aperte os parafusos conforme indicado
na Fig. 1.
Fig. 2 Fig. 3
Placa de aperto
Fig. 1
Placa de aperto
Parafusos de fixação do rotor
(Torx nº T25)
Rotor
Cubo
Usando luvas, aplique força ao rotor para que
este rode no sentido horário conforme indicado
na Fig. 2. Ao mesmo tempo, aperte os
parafusos de fixação do rotor pela ordem
indicada na ilustração.
Com uma chave de fendas ou uma ferramenta similar dobre as bordas da
placa de aperto para cima das cabeças dos parafusos, conforme indicado na
Fig. 3.
Instruções para o serviço técnico SI-0035A
Instalação do rotor
(do tipo com 6 parafusos)
Observação: As especificações estão sujeitas a alterações para aperfeiçoamentos sem notificação prévia.
(Portuguese)
Par de apriete:
2 - 4 N·m {20 - 40 kgf·cm}
Instale el rotor y la placa de apriete del
rotor, y luego instale y apriete los pernos
indicados en la Fig. 1.
Fig. 2 Fig. 3
Placa de apriete
Fig. 1
Placa de apriete
Pernos de fijación del rotor
(Torx #T25)
Rotor
Cubo
Usando guantes, aplique una fuerza al rotor de
manera de girarlo hacia la derecha tal como se
indica en la Fig. 2. Mientras realiza esto,
apriete los pernos de fijación del rotor en el
orden indicado en la figura.
Use un destornillador de punta plana o herramienta similar para doblar los
bordes de la placa de apriete sobre las cabezas de los pernos tal como se
indica en la Fig. 3.
Instrucciones de servicio técnico
SI-0035A
Instalación del rotor
(tipo de 6 pernos)
Nota: Las especificaciones pueden cambiar por mejoras sin previo aviso (Spanish)
SI-0035A
-
 1
1

in altre lingue
- English: Shimano SM-RT
- français: Shimano SM-RT
- español: Shimano SM-RT
- Deutsch: Shimano SM-RT
- Nederlands: Shimano SM-RT
- português: Shimano SM-RT