
DIGITRADIO UP 1
DAB+/FM recessed radio with Bluetooth

2
CONTENTS
ENGLISH ........................................................................................... 3-34
FRANÇAIS ..................................................................................... 35-66
ITALIANO ........................................................................................67-98
NEDERLANDS ............................................................................ 99-130
NORSK ......................................................................................... 131-162
DANSK ........................................................................................ 163-194
POLSKE ..................................................................................... 195-226
ČEŠTINA .................................................................................... 227-258
SLOVENSKÉ ............................................................................ 259-290

Instruction Manual
DIGITRADIO UP 1
DAB+/FM recessed radio with Bluetooth
EN
FR
IT
NL
NW
DK
PL
CZ
SK

Contents
1 Foreword ..................................................................................................................... 6
1.1 Target group for this instruction manual ......................................................................... 6
1.1.1 Intended use ................................................................................................................................. 6
1.2 Important information .............................................................................................................. 6
1.2.1 Safety .................................................................................................................................................7
1.2.2 Disposal ........................................................................................................................................... 8
1.2.3 Legal notices ............................................................................................................................... 10
1.2.4 Service instructions .................................................................................................................. 10
2 Illustration and buons .......................................................................................... 11
3 Connection and assembly of the DIGITRADIO UP1 ....................................... 12
4 Description of the DIGITRADIO UP1 ....................................................................13
4.1 Scope of delivery ........................................................................................................................ 13
4.2 The special features of the DIGITRADIO UP1 ................................................................13
5 General device functions .......................................................................................13
5.1 Switching on the device .........................................................................................................13
5.2 Switching o the device .........................................................................................................13
5.3 Changing to DAB+/FM/Bluetooth mode ........................................................................13
5.4 Adjusting the volume ...............................................................................................................13
5.5 Retrieving displays .................................................................................................................... 14
6 Menu operation ....................................................................................................... 14
7 DAB+ (digital radio) function ............................................................................... 15
7.1 What is DAB+? ............................................................................................................................15
7.1.1 Data compression ......................................................................................................................15
7.1.2 Audio stream ................................................................................................................................15
7.2 DAB+ (digital radio) reception .............................................................................................15
7.2.1 Performing a complete scan ...............................................................................................15
7.2.2 Selecting stations ...................................................................................................................... 16
7.2.3 Storing DAB+ stations on a memory slot ...................................................................... 16
7.2.4 Retrieving DAB+ stations from a memory slot ........................................................... 16
7.2.5 Overwriting/deleting a station memory slot ................................................................ 16
7.2.6 Signal intensity ............................................................................................................................17
7.2.7 Manual seing .............................................................................................................................17
7.2.8 Volume adjustment (DRC) .....................................................................................................17
7.2.9 Deleting inactive stations .......................................................................................................17
8 FM mode .................................................................................................................... 18
8.1 Switching on FM radio mode .............................................................................................. 18
8.2 FM reception with RDS information ................................................................................. 18
8.3 Automatic station scan .......................................................................................................... 18
8.4 Manual station scan ................................................................................................................. 18
8.5 Scan seing ................................................................................................................................. 18
8.6 Audio seings ............................................................................................................................. 19
4

8.7 Saving FM stations to a memory slot .............................................................................. 19
8.8 Retrieving FM stations from a memory slot ................................................................. 19
8.9 Overwriting/deleting a station memory slot ................................................................ 19
9 Bluetooth ................................................................................................................... 19
9.1 Pairing a device ........................................................................................................................ 20
9.2 Bluetooth playback ................................................................................................................. 20
10 Other functions ........................................................................................................ 21
10.1 Sleep timer ................................................................................................................................... 21
10.2 Alarm .............................................................................................................................................. 21
10.2.1 Seing the alarm time ............................................................................................................ 21
10.2.2 Switching o the alarm aer being woken ..................................................................22
10.2.3 Deactivating the alarm ...........................................................................................................22
10.3 Equaliser ........................................................................................................................................22
11 System seings ........................................................................................................ 23
11.1 Time and date seings ........................................................................................................... 23
11.1.1 Manually seing the time/date ..........................................................................................23
11.1.2 Time update ................................................................................................................................23
11.1.3 Seing the time format ......................................................................................................... 24
11.1.4 Seing the date format ........................................................................................................ 24
11.2 Display brightness ................................................................................................................... 24
11.3 Language ......................................................................................................................................25
11.4 Factory seing ............................................................................................................................25
11.5 Soware version ........................................................................................................................25
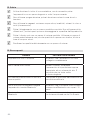
12 Cleaning .....................................................................................................................26
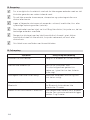
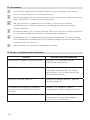
13 Troubleshooting ......................................................................................................26
14 Technical data .......................................................................................................... 27
15 Installation ................................................................................................................ 27
5
EN
FR
IT
NL
NW
DK
PL
CZ
SK

1 Foreword
This instruction manual will help you to use your radio device, hereinaer referred to
as DIGITRADIO or device, as intended and safely.
1.1 Target group for this instruction manual
The instruction manual is intended for anyone who is installing, operating, cleaning or
disposing of the device.
1.1.1 Intended use
Please read this instruction manual carefully. This is the only way to operate your
device safely and correctly. Keep the instruction manual in a safe place for use at a
later date.
The device has been designed to receive DAB+/FM radio programmes.
Furthermore, it can receive music streams via Bluetooth if another device is
connected. The device has been designed for private use and not for commercial
purposes.
Caution!
This device is only intended for installation.
Only a licensed specialist is allowed to connect devices without connectors.
Risk of electric shock!
In the event of damage resulting from incorrect connection, no warranty claim can be
made.
In the event of having to completely disconnect the device from the power supply
(storm, prolonged absence), this should be performed using a switch.
1.2 Important information
Please take note of the following information to minimise safety risks, to prevent
damage to the device and to make a contribution to environmental protection.
Please read all the safety information carefully and keep it for future reference.
Always follow all the warnings and instructions in this instruction manual and on the
rear of the device.
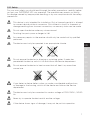
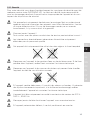
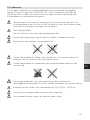
Caution - This identifies important information that must be observed to
prevent device defects, data loss/misuse or undesired operation.
Tip - This identifies information relating to the described function, as well
as to another related function that may have to be taken into account, with
reference to the corresponding section in the manual.
6

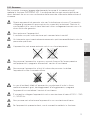
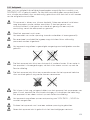
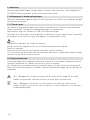
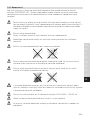
1.2.1 Safety
For your own safety, you should read through the safety precautions carefully before
you put your DIGITRADIO UP1 into operation. The manufacturer accepts no liability
for damage caused by inappropriate handling, or by non-compliance with the safety
precautions.
This device is only intended for installation. Only a licensed specialist is allowed
to connect devices without connectors. Risk of electric shock! In the event of
damage resulting from incorrect connection, no warranty claim can be made.
Do not open the device under any circumstances!
Touching live parts poses a danger to life!
Any necessary repairs to the receiver should only be carried out by qualified
personnel.
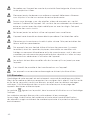
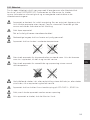
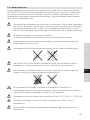
The device must only be operated in an appropriate climate.
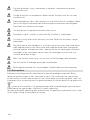
Do not expose the device to dripping or splashing water. If water has
penetrated the device, switch it o and inform the Service department.
Do not expose the device to heat sources that will heat it up more than
normal use.
If you detect a device defect, odour or smoke, considerable malfunctions,
or damage to the housing, switch o the device and inform the Service
department.
The device must only be connected to a mains voltage of 100V-240V~, 50/60
Hz.
Never try to operate the device with another voltage.
If the device shows signs of damage, it may not be put into operation.
7
EN
FR
IT
NL
NW
DK
PL
CZ
SK

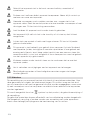
Do not put the device into operation in the vicinity of baths, swimming pools
or splashing water.
Never try to repair a faulty device yourself. Always contact one of our customer
service locations.
Foreign bodies, e.g. nails, coins, etc. must not be allowed to fall inside the
device. Do not touch the connection contacts with metal objects or fingers.
This could lead to short-circuits.
Never allow children to use the device unsupervised.
Even when switched o and on standby, the device is still connected to the
mains power supply.
Do not listen to music or the radio at high volume. Doing so can cause
permanent hearing impairment.
This device is not intended to be used by people (including children) with
limited physical, sensoryormentalcapacities or lackof experienceand/or
knowledge,unless they are supervised by a person responsible for their safety
or they are instructed by them as to how to use the device.
Children must be supervised to ensure that they do not play with the device.
It is forbidden to carry out modifications to the device.
Damaged devices or damaged accessories must not continue to be used.
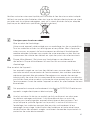
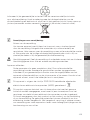
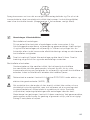
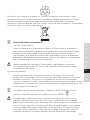
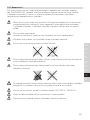
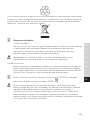
1.2.2 Disposal
The device packaging is exclusively comprised of recyclable materials. Please sort
these and take them to the "Dual System." At the end of its service life, this device
must not be disposed of with your regular household waste. It must be taken to a
recycling collection point for electrical and electronic equipment.
This is indicated by the symbol on the product, the instruction manual or the
packaging.
The materials are recyclable according to their identification.
An important contribution is made to our environment by recycling, recovery of
materials or other kinds of recycling for old devices.
8

Please ask local authorities for the location of the relevant disposal point. Ensure that
used baeries/rechargeable baeries as well as electronic waste are not disposed of
with domestic waste, but are properly disposed of (returned to the specialist shop,
hazardous waste).
Disposal instructions:
Disposal of packaging:
Your new device was protected by packaging on its way to you. All materials
used are environmentally friendly and recyclable. Please collaborate and
dispose of the packaging in an environmentally-friendly way. Ask for
information from your dealer regarding current disposal means or regarding
your local disposal facility.
Risk of suocation! Do not give packaging and parts thereof to children. Risk
of suocation by films and other packaging materials.
Device disposal:
Old devices constitute valuable waste. Valuable raw materials can be
recovered through environmentally-friendly disposal. Consult your town or
local authority as to the possibilities for environmentally-friendly and proper
disposal of the device. Prior to disposal of the device, remove the baeries/
rechargeable baeries contained therein.
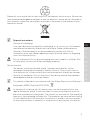
This device is identified in accordance with the Waste Electrical and Electronic
Equipment (WEEE) Directive2012/19/EU.
At the end of its service life, this device must not be disposed of with your
regular household waste. It must be taken to a recycling collection point for
electrical and electronic equipment. The symbol on the product, the operating
manual or the packaging indicates this. The materials are recyclable according
to their identification. An important contribution is made to our environment
by recycling, recovery of materials or other kinds of recycling for old devices.
9
EN
FR
IT
NL
NW
DK
PL
CZ
SK

1.2.3 Legal notices
TechniSat herewith declares that the radio system model DIGITRADIO UP1
corresponds to Directive 2014/53/EU. The complete text of the EU declaration
of conformity is available at the following website:
hp://konf.tsat.de/?ID=11471
TechniSat accepts no liability for product damage as a result of external
influences, wear or improper handling, unauthorised repairs, modifications or
accidents.
Changes and printingerrors reserved. Version 02/18.
Copy and reproduction are subject to the publisher's consent. The respective
current version of the manual can be obtained in PDF format in the
download area of the TechniSat homepage at www.technisat.de.
DIGITRADIO UP1 and TechniSat are registered trademarks of:
TechniSat Digital GmbH
TechniPark
Julius-Saxler-Strasse 3
D-54550 Daun/Eifel, Germany
www.technisat.de
1.2.4 Service instructions
This product is quality-tested and provided with the legal warranty period of
24 months as from the date of purchase. Please keep your receipt as proof of
purchase. In the event of warranty claims please contact the product dealer.
Note!
Should you experience a problem with this device, or for queries and
information, our Technical Hotline is available:
Mon. - Fri. 8:00 am - 8:00 pm on tel.:
+49 (0) 3925 9220 1800.
10

If the device needs to be sent back, please use the following address only:
TechniSat Digital GmbH
Service-Center
Nordstr. 4a
39418 Staßfurt, Germany
The names of the companies, institutions or makes referred to are trademarks or
registered trademarks of the respective owners.
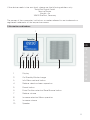
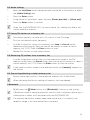
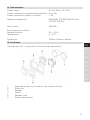
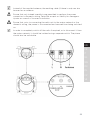
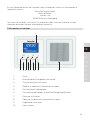
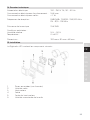
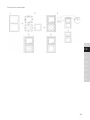
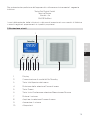
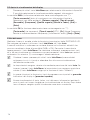
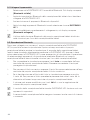
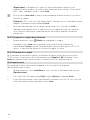
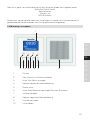
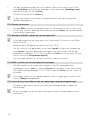
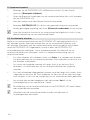
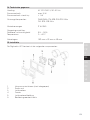
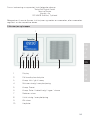
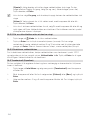
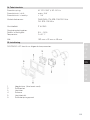
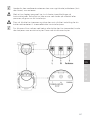
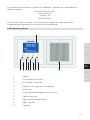
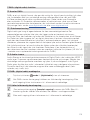
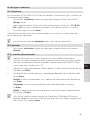
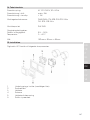
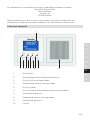
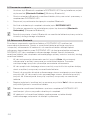
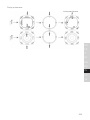
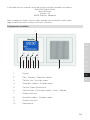
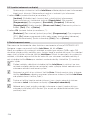
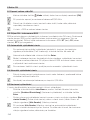
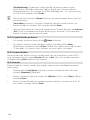
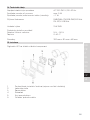
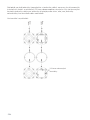
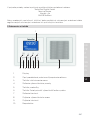
2 Illustration and buons
2 3 4 5 6 7 8 9
1
10
1 Display
2 On/Standby/Mode change
3 Info/Menu retrieval buon
4 Reduce selection/menu operation
5 Preset buon
6 Enter/Confirm selection/Save/Snooze buon
7 Reduce volume
8 Increase selection/Menu operation
9 Increase volume
10 Speaker
11
EN
FR
IT
NL
NW
DK
PL
CZ
SK

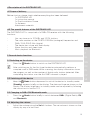
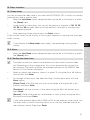
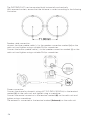
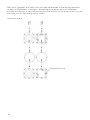
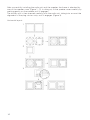
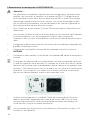
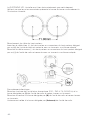
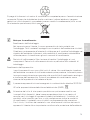
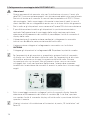
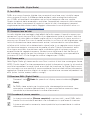
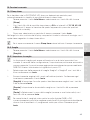
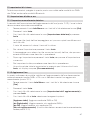
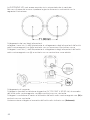
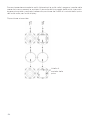
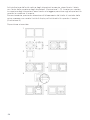
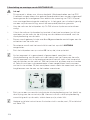
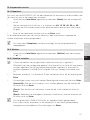
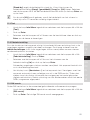
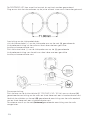
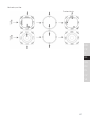
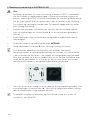
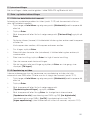
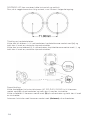
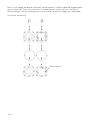
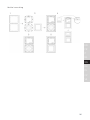
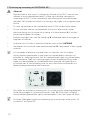
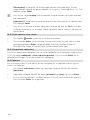
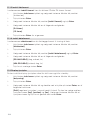
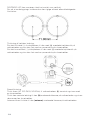
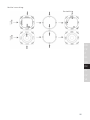
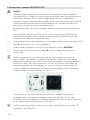
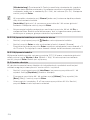
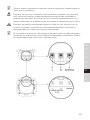
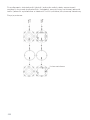
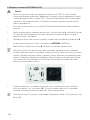
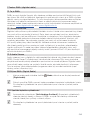
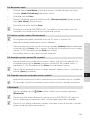
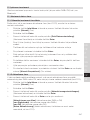
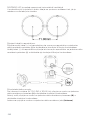
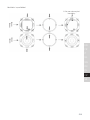
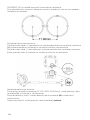
3 Connection and assembly of the DIGITRADIO UP1
Caution!
> This device is only intended for installation. Work on the 230 V network may
only be performed by qualified electricians. Life-threatening hazard and fire
hazard from electric voltage of 230 V. Disconnect the mains power supply
prior to assembly / disassembly. No claim can be made under the warranty or
for liability in the event of damage due to incorrect connection.
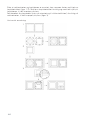
> 2 x DIN flush-mounted/surface boxes are required for the radio and speaker.
> It is possible to assemble the radio and speaker in a horizontal or vertical
position. When assembling the radio, ensure the correct position of the plug
contacts A for the radio display operating unit.
> The power supply is established via the terminal connections labelled L and N
on the back of the radio unit.
> The antenna must be connected to the terminal connection labelled
ANTENNA.
> Connect the speaker to the terminal connection B. Ensure correct polarity.
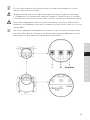
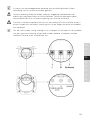
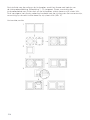
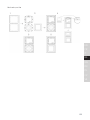
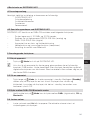
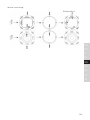
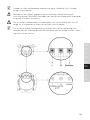
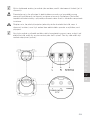
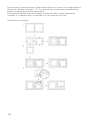
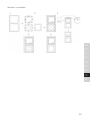
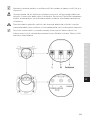
If the device is already mounted or assembled, remove the display operating
unit from the radio unit with the help of the frame. If the device is in
the delivery condition, remove the aachment from the radio unit using
your hands. Remove the aachment using your hands only. Under no
circumstances use a screwdriver or similar hard object for removal purposes.
When removing, you must first of all overcome the resistance of the spring
snap-in clips.
+
-
A
B
A
> Aer successful assembly, first of all connect the display operating unit taking
into account the position of the contact strip (A). To do so, carefully push the
display operating unit straight onto the radio unit until it engages.
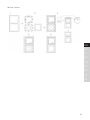
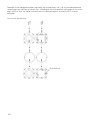
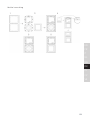
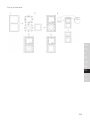
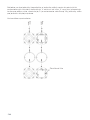
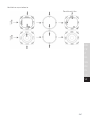
More detailed installation instructions and illustrations can be found in section
„15 Installation“ auf Seite 27.
12

4 Description of the DIGITRADIO UP1
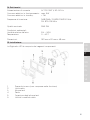
4.1 Scope of delivery
Before start-up, please check whether everything has been delivered.
1 x DIGITRADIO UP1
1 x instruction manual
1 x Dual Installation Frame
1 x Antenna
Aachment materials
4.2 The special features of the DIGITRADIO UP1
The DIGITRADIO UP1 is comprised of a DAB+/FM receiver with the following
functions:
- You can store up to 10 DAB+ and 10 FM stations.
- The radio receives on the FM 87.5–108 MHz (analogue) frequencies and
DAB+ 174.9–239.2 MHz (digital).
- The device has a time and date display.
- Alarm function and sleep timer
- Music playback via Bluetooth
5 General device functions
5.1 Switching on the device
> Press the /Mode buon to switch on the DIGITRADIO UP1.
Aer switching on for the first time the device automatically performs a
complete scan in DAB mode. While scanning, the display information shows
the progress, as well as the number of digital radio stations detected. Aer
completing the station scan the first DAB+ channel is played.
5.2 Switching o the device
> Keep the /Mode buon depressed to switch the device to standby mode.
[Standby] appears briefly on the display. The date and time are shown on the
display. The display brightness in standby mode can be adjusted by following
the instructions in section 11.2.
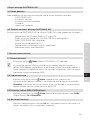
5.3 Changing to DAB+/FM/Bluetooth mode
> Press the /Mode buon briefly to switch between DAB+ (Digital Radio), FM
and Bluetooth.
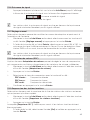
5.4 Adjusting the volume
> Adjust the volume using the Vol +/- buons. The set volume is shown on the
display by way of a bar chart.
13
EN
FR
IT
NL
NW
DK
PL
CZ
SK

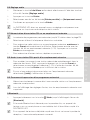
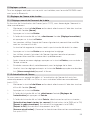
5.5 Retrieving displays
> Press the Info/Menu buon repeatedly to scroll through the information
available. You have the choice of viewing the following information:
In DAB+ mode (the selected function is identified with an “*”):
[Running text] (continuous text with additional information provided
by broadcasters etc.), [Signal intensity], [Channel type], [Ensemble],
[Frequency], [Signal quality], [Bit rate and Codec], [Time] and [Date].
In FM mode (the selected function is identified with an “*”):
[Radio text] (if transmied), [Channel type] (PTY), [Ps] (Programme Service
Name or Station Name or Frequency), [Audio Information], [Time] and [Date].
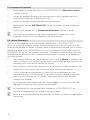
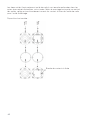
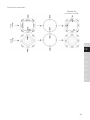
6 Menu operation
All the DIGITRADIO UP1 functions and seings are accessed via the menu. The menu
navigation takes place using the Info/Menu, <<, >> and Enter buons.
The menu is divided into submenus and, depending on the mode (DAB+ or FM),
contains dierent menu items or functions which can be enabled. To open the menu,
keep the Info/Menu buon depressed. To change to submenus, first of all press the
<< or >> buons to display a submenu, then press the Enter buon to retrieve the
submenu. An asterisk (*) highlights the current selection.
Close menu: press the Info/Menu buon repeatedly (depending on which
submenu you are in), or wait until the current radio channel is displayed again.
Seings are not saved until the Enter buon is pressed. If the Info/Menu is
pressed instead, the seings are not confirmed and saved (the Info/Menu
buon in this case acts as a “Back” buon).
The functions and buons to be pressed are shown in bold in this instruction
manual. Displays in [square brackets].
Some texts (e.g. menu items, station information) may be too long to show on
the display. Shortly thereaer, these will be shown as running text.
14

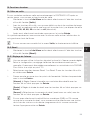
7 DAB+ (digital radio) function
7.1 What is DAB+?
DAB+ is a new digital format through which crystal clear sound with no noise can
be heard. In contrast to conventional analogue radio stations, DAB+ can be used to
broadcast multiple stations on one and the same frequency. This is referred to as
an ensemble or multiplex. An ensemble is comprised of the radio station, as well as
several service components or data services, which are broadcast individually by the
radio stations. There is information at www.digitalradio.de or www.digitalradio.ch, for
example.
7.1.1 Data compression
With this, digital radio takes advantage of the properties of human hearing. The
human ear does not perceive sounds which are found under a specific minimum
volume. Data which are found under the so-called audibility threshold can, therefore,
be filtered out. This is possible because, in a digital data stream, the relevant relative
volume for other units is saved for every unit of information. Moreover, in an audio
signal, the quieter parts are superimposed by louder ones at a specific limit value.
All the sound information below the threshold of hearing in a piece of music can be
filtered out of the signal to be broadcast. This leads to a reduction of data in the data
stream to be transmied, with no perceptible dierence in sound for the listener (HE
AAC v2 - supplementary codification process for DAB+).
7.1.2 Audio stream
With digital radio, audio streams are continuous data streams which contain the
MPEG 1 audio layer 2 frames and thereby represent acoustic information. This
enables standard radio channels to be broadcast and listened to on the receiver
side. Digital radio provides you not only with excellent sound quality radio but also
additional information. This may refer to the programme being broadcast or be
independent information (e.g. news, weather, trac, tips).
7.2 DAB+ (digital radio) reception
> Briefly press the /Mode buon until [Digital Radio] appears on the display.
If DAB+ is being started for the first time, a complete scan will be performed.
Aer completing the scan, the first station in alphanumerical order will be
played.
7.2.1 Performing a complete scan
The automatic scan [Complete Scan] scans all DAB+ band III channels and
thereby finds all stations being broadcast within the reception area.
Aer completing the scan, the first station in alphanumerical order will be
played.
15
EN
FR
IT
NL
NW
DK
PL
CZ
SK

> In order to perform a complete scan, open the menu by keeping the Info/
Menu buon depressed and use the <<, >> and Enter buons to select the
menu item [Complete Scan].
> [Scan...] appears on the display.
During the scan a progress bar and the number of stations found is displayed.
7.2.2 Selecting stations
> In order to select DAB+ stations, open the station list by pressing the << or
>> buons. Confirm the station selected with Enter. The selected station is
played.
7.2.3 Storing DAB+ stations on a memory slot
The programme memory can save up to 10 stations in the DAB+ range.
> Now select the desired station (see section 7.2.2).
> In order to store this station on a memory slot, keep the Preset buon
depressed while playing. Then use the <<, >> buons to select a station
memory slot (1-10). Press the Enter buon to save. [Station saved] appears
on the display.
> Repeat this process to save other stations.
7.2.4 Retrieving DAB+ stations from a memory slot
> To retrieve a station that you have stored in the FAV memory, briefly press the
Preset buon and select a station slot (1-10) using the <<, >> buons. Press
the Enter buon to play the station.
If no station is saved on the selected station slot, [(empty)] appears on the
display.
7.2.5 Overwriting/deleting a station memory slot
> Simply save a new station to a favourite memory slot as described.
When retrieving the factory seings all memory slots are deleted.
16

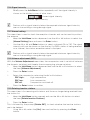
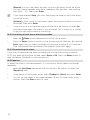
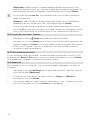
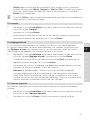
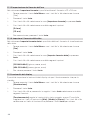
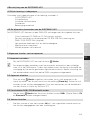
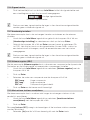
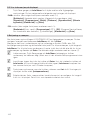
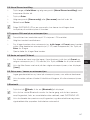
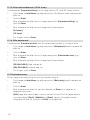
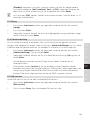
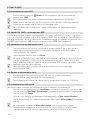
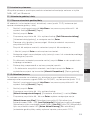
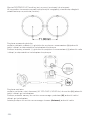
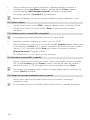
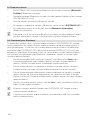
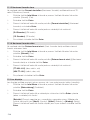
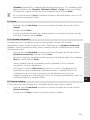
7.2.6 Signal intensity
> Briefly press the Info/Menu buon repeatedly until the signal intensity is
shown on the display by way of a bar chart.
Minimum signal intensity
Current signal intensity
Stations with a signal intensity below the required minimum signal intensity
are not transmiing a strong enough signal.
7.2.7 Manual seing
This menu item is used to check the reception channels and can be used to position
the antenna.
> Keep the Info/Menu buon depressed, use the << or >> buons to select the
[Manual Seing] item and press the Enter buon.
> Use the << or >> and Enter buons to select a channel (5A to 13F). The signal
intensity will now be shown on the display. If a DAB+ station is being received
on a channel, the station ensemble name is displayed.
Stations with a signal intensity below the required minimum signal intensity
are not transmiing a strong enough signal.
7.2.8 Volume adjustment (DRC)
With the Volume Adjustment menu item, the compression rate is set which balances
the dynamic variations and thereby the accompanying volume variations.
> Keep the Info/Menu buon depressed and use the << or >> buons to select
the item [Volume Adjustment].
> Press the Enter buon.
> Select the compression rate using the << or >> buons:
DRC high - High compression
DRC low - Low compression
DRC o - Compression switched o.
> Press the Enter buon to confirm.
7.2.9 Deleting inactive stations
This menu item is for removing old stations and those no longer being received from
the station list.
> Keep the Info/Menu buon pressed and use the << or >> buons to select
the item [Delete Inactive Stations].
> Press the Enter buon.
This is followed by the prompt [Delete OK?], to check whether the inactive stations
are to be deleted.
> Using << or >>, select the [Yes] item and confirm by pressing the Enter
buon.
17
EN
FR
IT
NL
NW
DK
PL
CZ
SK

8 FM mode
8.1 Switching on FM radio mode
> Briefly press the /Mode buon until [FM] appears on the display.
When switching on for the first time, the frequency 87.50 MHz is set.
If you have already set or saved a station, the radio plays the last station set.
In the case of RDS stations, the station name appears.
8.2 FM reception with RDS information
RDS is a procedure for broadcasting additional information via FM stations.
Broadcasters with RDS broadcast their station name or the programme type, for
example. This is shown on the display. The device can show the RDS information RT
(Radio text), PS (Station name), PTY (Programme type).
8.3 Automatic station scan
> Keep the << or >> buons depressed for longer (2 to 3 sec.), in order to
automatically search for the next station with sucient signal.
> Alternatively, you can press the Enter buon.
If a FM station with sucient signal intensity is found, the scan stops and the
station is played. If an RDS station is being received, the station name appears
and, possibly, radio text.
Please use the manual station scan for seing weaker stations.
8.4 Manual station scan
> Briefly press the << or >> buons repeatedly to set the desired stations or
frequency.
The display shows the frequency in steps of 0.05 MHz.
8.5 Scan seing
In this menu item it is possible to set the sensitivity of the scan.
> Keep the Info/Menu depressed, use the << or >> buons to select the [Scan
Seing] item and press the Enter buon.
> Select whether the scan should only stop for stations with a strong signal
[Strong Stations Only] or for all stations (including stations with a weak
signal) [All Stations].
With the All Stations seing the scan stops automatically upon detecting
each available station. This can result in weak stations being played with
background noise.
18

8.6 Audio seings
> Keep the Info/Menu buon depressed and use the << or >> buons to select
the [Audio Seing] item.
> Press the Enter buon.
> Using the << or >> buons, select the item [Stereo possible] or [Mono only].
> Press the Enter buon to confirm.
Given that the DIGITRADIO UP1 is a mono device, this seing only aects the
station reception intensity.
8.7 Saving FM stations to a memory slot
The station memory can save up to 10 stations in the FM range.
> First set the desired station frequency.
> In order to store this station on a memory slot, keep the Preset buon
depressed while playing. Then use the <<, >> buons to select a station
memory slot (1-10). Press the Enter buon to save.
> Repeat this process to save other stations.
8.8 Retrieving FM stations from a memory slot
> In order to retrieve a station that you have previously stored in the FAV
memory, briefly press the Preset buon and use the <<, >> buons to select a
station memory slot (1-10). Press the Enter buon to play the station.
If you have no station saved to the selected station slot [(empty)] appears on
the display.
8.9 Overwriting/deleting a station memory slot
> Simply save a new station to the respective memory slot as described.
When retrieving the factory seings all memory slots are deleted.
9 Bluetooth
> Briefly press the /Mode buon until [Bluetooth] is shown on the display.
If Bluetooth mode is being launched for the first time, a playback device, e.g. a
smartphone or tablet, must be paired with the DIGITRADIO UP1.
If a playback device has already been paired once and it is located in the
reception range, it will be automatically connected.
19
EN
FR
IT
NL
NW
DK
PL
CZ
SK

9.1 Pairing a device
> Select Bluetooth mode on the DIGITRADIO UP1. The display shows [Bluetooth
Visible].
> Open the Bluetooth seings on the smartphone/tablet that you wish to pair
with the DIGITRADIO UP1.
> Launch the search for available Bluetooth devices.
> From the list of detected Bluetooth devices, select the DIGITRADIO UP 1 item.
> Once successfully paired, [Bluetooth Connected] appears on the display.
Please refer to the instruction manual for your smartphone/tablet as to how
to use the Bluetooth function on your smartphone/tablet.
9.2 Bluetooth playback
Once you have successfully paired your smartphone/tablet with the DIGITRADIO
UP1, you can start playing audio. Open a music app on your smartphone/tablet
and start playing music. Depending on the smartphone/tablet, the sound will either
be played directly via the DIGITRADIO UP1, or you will first of all have to select the
DIGITRADIO UP1 as the playback device. Please refer to the instruction manual for
your smartphone/tablet as to how to select playback devices via Bluetooth on your
smartphone/tablet.
> To pause playback, press the Enter buon, or pause via the music app on your
smartphone/tablet. Press the buon again to continue playback.
> To skip to the next track, press the >> buon, or select the next track in the
music app on your smartphone/tablet.
> If you would like to listen to the track currently being played from the start,
press the << buon once. To skip to the previous track, press the << buon
twice. Alternatively, use the music app on your smartphone/tablet.
> The volume can be adjusted using the Vol+/- buons, or with the volume
control on your smartphone/tablet.
Control of the smartphone/tablet via the DIGITRADIO UP1 is only possible with
supported devices.
Depending on the smartphone/tablet, ring tones or system tones can also be
transferred.
20
La pagina si sta caricando...
La pagina si sta caricando...
La pagina si sta caricando...
La pagina si sta caricando...
La pagina si sta caricando...
La pagina si sta caricando...
La pagina si sta caricando...
La pagina si sta caricando...
La pagina si sta caricando...
La pagina si sta caricando...
La pagina si sta caricando...
La pagina si sta caricando...
La pagina si sta caricando...
La pagina si sta caricando...
La pagina si sta caricando...
La pagina si sta caricando...
La pagina si sta caricando...
La pagina si sta caricando...
La pagina si sta caricando...
La pagina si sta caricando...
La pagina si sta caricando...
La pagina si sta caricando...
La pagina si sta caricando...
La pagina si sta caricando...
La pagina si sta caricando...
La pagina si sta caricando...
La pagina si sta caricando...
La pagina si sta caricando...
La pagina si sta caricando...
La pagina si sta caricando...
La pagina si sta caricando...
La pagina si sta caricando...
La pagina si sta caricando...
La pagina si sta caricando...
La pagina si sta caricando...
La pagina si sta caricando...
La pagina si sta caricando...
La pagina si sta caricando...
La pagina si sta caricando...
La pagina si sta caricando...
La pagina si sta caricando...
La pagina si sta caricando...
La pagina si sta caricando...
La pagina si sta caricando...
La pagina si sta caricando...
La pagina si sta caricando...
La pagina si sta caricando...
La pagina si sta caricando...
La pagina si sta caricando...
La pagina si sta caricando...
La pagina si sta caricando...
La pagina si sta caricando...
La pagina si sta caricando...
La pagina si sta caricando...
La pagina si sta caricando...
La pagina si sta caricando...
La pagina si sta caricando...
La pagina si sta caricando...
La pagina si sta caricando...
La pagina si sta caricando...
La pagina si sta caricando...
La pagina si sta caricando...
La pagina si sta caricando...
La pagina si sta caricando...
La pagina si sta caricando...
La pagina si sta caricando...
La pagina si sta caricando...
La pagina si sta caricando...
La pagina si sta caricando...
La pagina si sta caricando...
La pagina si sta caricando...
La pagina si sta caricando...
La pagina si sta caricando...
La pagina si sta caricando...
La pagina si sta caricando...
La pagina si sta caricando...
La pagina si sta caricando...
La pagina si sta caricando...
La pagina si sta caricando...
La pagina si sta caricando...
La pagina si sta caricando...
La pagina si sta caricando...
La pagina si sta caricando...
La pagina si sta caricando...
La pagina si sta caricando...
La pagina si sta caricando...
La pagina si sta caricando...
La pagina si sta caricando...
La pagina si sta caricando...
La pagina si sta caricando...
La pagina si sta caricando...
La pagina si sta caricando...
La pagina si sta caricando...
La pagina si sta caricando...
La pagina si sta caricando...
La pagina si sta caricando...
La pagina si sta caricando...
La pagina si sta caricando...
La pagina si sta caricando...
La pagina si sta caricando...
La pagina si sta caricando...
La pagina si sta caricando...
La pagina si sta caricando...
La pagina si sta caricando...
La pagina si sta caricando...
La pagina si sta caricando...
La pagina si sta caricando...
La pagina si sta caricando...
La pagina si sta caricando...
La pagina si sta caricando...
La pagina si sta caricando...
La pagina si sta caricando...
La pagina si sta caricando...
La pagina si sta caricando...
La pagina si sta caricando...
La pagina si sta caricando...
La pagina si sta caricando...
La pagina si sta caricando...
La pagina si sta caricando...
La pagina si sta caricando...
La pagina si sta caricando...
La pagina si sta caricando...
La pagina si sta caricando...
La pagina si sta caricando...
La pagina si sta caricando...
La pagina si sta caricando...
La pagina si sta caricando...
La pagina si sta caricando...
La pagina si sta caricando...
La pagina si sta caricando...
La pagina si sta caricando...
La pagina si sta caricando...
La pagina si sta caricando...
La pagina si sta caricando...
La pagina si sta caricando...
La pagina si sta caricando...
La pagina si sta caricando...
La pagina si sta caricando...
La pagina si sta caricando...
La pagina si sta caricando...
La pagina si sta caricando...
La pagina si sta caricando...
La pagina si sta caricando...
La pagina si sta caricando...
La pagina si sta caricando...
La pagina si sta caricando...
La pagina si sta caricando...
La pagina si sta caricando...
La pagina si sta caricando...
La pagina si sta caricando...
La pagina si sta caricando...
La pagina si sta caricando...
La pagina si sta caricando...
La pagina si sta caricando...
La pagina si sta caricando...
La pagina si sta caricando...
La pagina si sta caricando...
La pagina si sta caricando...
La pagina si sta caricando...
La pagina si sta caricando...
La pagina si sta caricando...
La pagina si sta caricando...
La pagina si sta caricando...
La pagina si sta caricando...
La pagina si sta caricando...
La pagina si sta caricando...
La pagina si sta caricando...
La pagina si sta caricando...
La pagina si sta caricando...
La pagina si sta caricando...
La pagina si sta caricando...
La pagina si sta caricando...
La pagina si sta caricando...
La pagina si sta caricando...
La pagina si sta caricando...
La pagina si sta caricando...
La pagina si sta caricando...
La pagina si sta caricando...
La pagina si sta caricando...
La pagina si sta caricando...
La pagina si sta caricando...
La pagina si sta caricando...
La pagina si sta caricando...
La pagina si sta caricando...
La pagina si sta caricando...
La pagina si sta caricando...
La pagina si sta caricando...
La pagina si sta caricando...
La pagina si sta caricando...
La pagina si sta caricando...
La pagina si sta caricando...
La pagina si sta caricando...
La pagina si sta caricando...
La pagina si sta caricando...
La pagina si sta caricando...
La pagina si sta caricando...
La pagina si sta caricando...
La pagina si sta caricando...
La pagina si sta caricando...
La pagina si sta caricando...
La pagina si sta caricando...
La pagina si sta caricando...
La pagina si sta caricando...
La pagina si sta caricando...
La pagina si sta caricando...
La pagina si sta caricando...
La pagina si sta caricando...
La pagina si sta caricando...
La pagina si sta caricando...
La pagina si sta caricando...
La pagina si sta caricando...
La pagina si sta caricando...
La pagina si sta caricando...
La pagina si sta caricando...
La pagina si sta caricando...
La pagina si sta caricando...
La pagina si sta caricando...
La pagina si sta caricando...
La pagina si sta caricando...
La pagina si sta caricando...
La pagina si sta caricando...
La pagina si sta caricando...
La pagina si sta caricando...
La pagina si sta caricando...
La pagina si sta caricando...
La pagina si sta caricando...
La pagina si sta caricando...
La pagina si sta caricando...
La pagina si sta caricando...
La pagina si sta caricando...
La pagina si sta caricando...
La pagina si sta caricando...
La pagina si sta caricando...
La pagina si sta caricando...
La pagina si sta caricando...
La pagina si sta caricando...
La pagina si sta caricando...
La pagina si sta caricando...
La pagina si sta caricando...
La pagina si sta caricando...
La pagina si sta caricando...
La pagina si sta caricando...
La pagina si sta caricando...
La pagina si sta caricando...
La pagina si sta caricando...
La pagina si sta caricando...
La pagina si sta caricando...
La pagina si sta caricando...
La pagina si sta caricando...
La pagina si sta caricando...
La pagina si sta caricando...
La pagina si sta caricando...
La pagina si sta caricando...
La pagina si sta caricando...
La pagina si sta caricando...
La pagina si sta caricando...
La pagina si sta caricando...
La pagina si sta caricando...
La pagina si sta caricando...
La pagina si sta caricando...
La pagina si sta caricando...
La pagina si sta caricando...
La pagina si sta caricando...
La pagina si sta caricando...
La pagina si sta caricando...
La pagina si sta caricando...
La pagina si sta caricando...
La pagina si sta caricando...
La pagina si sta caricando...
La pagina si sta caricando...
La pagina si sta caricando...
La pagina si sta caricando...
-
 1
1
-
 2
2
-
 3
3
-
 4
4
-
 5
5
-
 6
6
-
 7
7
-
 8
8
-
 9
9
-
 10
10
-
 11
11
-
 12
12
-
 13
13
-
 14
14
-
 15
15
-
 16
16
-
 17
17
-
 18
18
-
 19
19
-
 20
20
-
 21
21
-
 22
22
-
 23
23
-
 24
24
-
 25
25
-
 26
26
-
 27
27
-
 28
28
-
 29
29
-
 30
30
-
 31
31
-
 32
32
-
 33
33
-
 34
34
-
 35
35
-
 36
36
-
 37
37
-
 38
38
-
 39
39
-
 40
40
-
 41
41
-
 42
42
-
 43
43
-
 44
44
-
 45
45
-
 46
46
-
 47
47
-
 48
48
-
 49
49
-
 50
50
-
 51
51
-
 52
52
-
 53
53
-
 54
54
-
 55
55
-
 56
56
-
 57
57
-
 58
58
-
 59
59
-
 60
60
-
 61
61
-
 62
62
-
 63
63
-
 64
64
-
 65
65
-
 66
66
-
 67
67
-
 68
68
-
 69
69
-
 70
70
-
 71
71
-
 72
72
-
 73
73
-
 74
74
-
 75
75
-
 76
76
-
 77
77
-
 78
78
-
 79
79
-
 80
80
-
 81
81
-
 82
82
-
 83
83
-
 84
84
-
 85
85
-
 86
86
-
 87
87
-
 88
88
-
 89
89
-
 90
90
-
 91
91
-
 92
92
-
 93
93
-
 94
94
-
 95
95
-
 96
96
-
 97
97
-
 98
98
-
 99
99
-
 100
100
-
 101
101
-
 102
102
-
 103
103
-
 104
104
-
 105
105
-
 106
106
-
 107
107
-
 108
108
-
 109
109
-
 110
110
-
 111
111
-
 112
112
-
 113
113
-
 114
114
-
 115
115
-
 116
116
-
 117
117
-
 118
118
-
 119
119
-
 120
120
-
 121
121
-
 122
122
-
 123
123
-
 124
124
-
 125
125
-
 126
126
-
 127
127
-
 128
128
-
 129
129
-
 130
130
-
 131
131
-
 132
132
-
 133
133
-
 134
134
-
 135
135
-
 136
136
-
 137
137
-
 138
138
-
 139
139
-
 140
140
-
 141
141
-
 142
142
-
 143
143
-
 144
144
-
 145
145
-
 146
146
-
 147
147
-
 148
148
-
 149
149
-
 150
150
-
 151
151
-
 152
152
-
 153
153
-
 154
154
-
 155
155
-
 156
156
-
 157
157
-
 158
158
-
 159
159
-
 160
160
-
 161
161
-
 162
162
-
 163
163
-
 164
164
-
 165
165
-
 166
166
-
 167
167
-
 168
168
-
 169
169
-
 170
170
-
 171
171
-
 172
172
-
 173
173
-
 174
174
-
 175
175
-
 176
176
-
 177
177
-
 178
178
-
 179
179
-
 180
180
-
 181
181
-
 182
182
-
 183
183
-
 184
184
-
 185
185
-
 186
186
-
 187
187
-
 188
188
-
 189
189
-
 190
190
-
 191
191
-
 192
192
-
 193
193
-
 194
194
-
 195
195
-
 196
196
-
 197
197
-
 198
198
-
 199
199
-
 200
200
-
 201
201
-
 202
202
-
 203
203
-
 204
204
-
 205
205
-
 206
206
-
 207
207
-
 208
208
-
 209
209
-
 210
210
-
 211
211
-
 212
212
-
 213
213
-
 214
214
-
 215
215
-
 216
216
-
 217
217
-
 218
218
-
 219
219
-
 220
220
-
 221
221
-
 222
222
-
 223
223
-
 224
224
-
 225
225
-
 226
226
-
 227
227
-
 228
228
-
 229
229
-
 230
230
-
 231
231
-
 232
232
-
 233
233
-
 234
234
-
 235
235
-
 236
236
-
 237
237
-
 238
238
-
 239
239
-
 240
240
-
 241
241
-
 242
242
-
 243
243
-
 244
244
-
 245
245
-
 246
246
-
 247
247
-
 248
248
-
 249
249
-
 250
250
-
 251
251
-
 252
252
-
 253
253
-
 254
254
-
 255
255
-
 256
256
-
 257
257
-
 258
258
-
 259
259
-
 260
260
-
 261
261
-
 262
262
-
 263
263
-
 264
264
-
 265
265
-
 266
266
-
 267
267
-
 268
268
-
 269
269
-
 270
270
-
 271
271
-
 272
272
-
 273
273
-
 274
274
-
 275
275
-
 276
276
-
 277
277
-
 278
278
-
 279
279
-
 280
280
-
 281
281
-
 282
282
-
 283
283
-
 284
284
-
 285
285
-
 286
286
-
 287
287
-
 288
288
-
 289
289
-
 290
290
-
 291
291
-
 292
292


TechniSat DigitRadio UP1 Manuale del proprietario
- Tipo
- Manuale del proprietario
- Questo manuale è adatto anche per
in altre lingue
Documenti correlati
-
TechniSat DIGITRADIO 1990 Manuale del proprietario
-
TechniSat DIGITRADIO 2 S Manuale del proprietario
-
-
-
-
TechniSat DIGITRADIO 143 CD Manuale del proprietario
-
-
-
TechniSat DIGITRADIO 601 BLACK Manuale del proprietario
-
TechniSat Transita 115 Manuale del proprietario