Eurotech DuraNAS 1000 Manuale del proprietario
- Tipo
- Manuale del proprietario

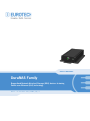
DuraNAS Family
Ruggedized Network Attached Storage (NAS) devices featuring
Power
-over-Ethernet (PoE) technology
USER MANUAL
Rev 3.1 – 22 June 2015 – NAS_UserMan_EN_3.1

© 2015 Eurotech SpA - Via Fratelli Solari 3/A - 33020 AMARO (UD) - Italy
Trademarks
All trademarks or registered trademarks, logos, designs and products appearing in this document are property
of their respective owners
Warranty
Please contact your local Eurotech Sales Office for detailed warranty terms and conditions.
Refer to the back covers of this manual for full contact details.
Revision history
Revision
Description
Date
1.0
First release
22 February 2011
2.0
Complete manual review
5 October 2011
3.0
FTP and new commands added
14 March 2012
3.1
Inserted NAS-1000-10 information
22 June 2015

DuraNAS User Manual Table of contents
3
NAS_UserMan_EN_3.1
Table of contents
Trademarks ............................................................................................................................................................. 2
Warranty .................................................................................................................................................................. 2
Revision history ....................................................................................................................................................... 2
Table of contents .......................................................................................................................................................... 3
1 Important information .............................................................................................................................................. 5
1.1 Warning signs and notes used in this manual ................................................................................................. 5
1.2 Disclaimer of liability ........................................................................................................................................ 6
1.3 Qualified/skilled person .................................................................................................................................... 6
2 Safety instructions ................................................................................................................................................... 7
2.1 Antistatic precautions ....................................................................................................................................... 7
2.2 Connection to power supply or other devices.................................................................................................. 7
2.3 Principles of safety integration ......................................................................................................................... 7
3 EC declaration of conformity .................................................................................................................................. 8
3.1 CE marking ...................................................................................................................................................... 8
3.2 E marking ......................................................................................................................................................... 8
3.3 WEEE .............................................................................................................................................................. 8
3.4 RoHS ............................................................................................................................................................... 8
4 Technical assistance ............................................................................................................................................... 9
4.1 How to return a product to Eurotech ................................................................................................................ 9
5 Product overview ................................................................................................................................................... 11
5.1 Intended use .................................................................................................................................................. 11
5.2 Device labelling .............................................................................................................................................. 11
6 Contents of the box ............................................................................................................................................... 12
7 Product specifications .......................................................................................................................................... 13
7.1 Front panel Layout ......................................................................................................................................... 14
7.1.1 LED indicators layout and functionality ........................................................................................ 14
7.1.2 M12 connector layout and functionality ....................................................................................... 14
8 How to install the system ...................................................................................................................................... 15
8.1 Unpack the system ........................................................................................................................................ 15
8.2 Warnings about electrical and power connections ........................................................................................ 15
8.3 Installation notes ............................................................................................................................................ 16
8.3.1 Firmly secure the product ............................................................................................................ 16
8.3.2 Ensure adequate clearance distance for cabling and air circulation ........................................... 16
8.3.3 Observe the Operating Characteristics ....................................................................................... 16
8.3.4 Cabling notes ............................................................................................................................... 16
8.4 Installation procedure .................................................................................................................................... 16
8.4.1 How to install the NAS-0200-00, NAS-1000-00, and NAS-1000-10............................................ 17
8.4.2 How to install the NAS-0200-01 and NAS-1000-01 models ........................................................ 18
8.4.3 How to release the system from the key-locked enclosure ......................................................... 19
8.4.4 How to reinstall the system in the key-locked enclosure ............................................................. 19
9 How to connect the system to the PoE Ethernet ................................................................................................ 20
9.1 Example of connections ................................................................................................................................. 20

Table of contents DuraNAS User Manual
4
NAS_UserMan_EN_3.1
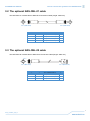
9.2 The optional NAS-CBL-01 cable ................................................................................................................... 21
9.3 The optional NAS-CBL-02 cable ................................................................................................................... 21
10 How to switch off the DuraNAS ............................................................................................................................ 22
10.1 Safe shut-down procedure (available for all DuraNAS devices) ................................................................... 22
10.2 Easy shut-down feature (available only for NAS-1000-10 devices) .............................................................. 22
11 How to access the DuraNAS ................................................................................................................................. 23
11.1 Before you begin ............................................................................................................................................ 23
11.2 Supported network protocols ......................................................................................................................... 23
11.3 Hardware encryption ...................................................................................................................................... 23
11.4 Available ways to access the DuraNAS ........................................................................................................ 23
11.5 The Samba shared directories ...................................................................................................................... 24
11.6 The ‘manager-command.txt’ file .................................................................................................................... 24
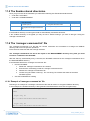
11.6.1 Example of ‘manager-command.txt’ file ...................................................................................... 24
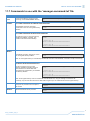
11.7 Commands to use with the ‘manager-command.txt’ file ................................................................................ 25
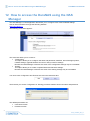
12 How to access the DuraNAS using the NAS Manager ....................................................................................... 26
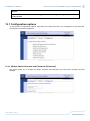
12.1 Configuration options ..................................................................................................................................... 27
12.1.1 Update Admin Username and Password [Advanced] ................................................................. 27
12.1.2 Change Current Date and Time................................................................................................... 28
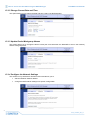
12.1.3 Update Device/Workgroup Names .............................................................................................. 28
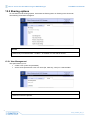
12.1.4 Configure the Network Settings ................................................................................................... 28
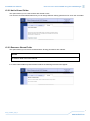
12.1.5 Upgrade the System Firmware .................................................................................................... 29
12.1.6 Change Drive Type ...................................................................................................................... 29
12.1.7 Format New Internal Drive ........................................................................................................... 29
12.1.8 Safely Remove USB Drive ........................................................................................................... 29
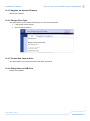
12.2 Sharing options .............................................................................................................................................. 30
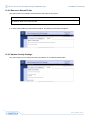
12.2.1 User Management ....................................................................................................................... 30
12.2.2 Add a Shared Folder .................................................................................................................... 31
12.2.3 Rename a Shared Folder ............................................................................................................ 31
12.2.4 Remove a Shared Folder ............................................................................................................. 32
12.2.5 Update Security Settings ............................................................................................................. 32
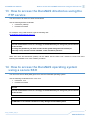
13 How to access the DuraNAS directories using the FTP service ....................................................................... 33
14 How to access the DuraNAS operating system using a secure SSH ............................................................... 33
15 Maintenance ........................................................................................................................................................... 34
15.1 How to clean the product ............................................................................................................................... 34
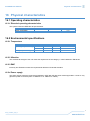
16 Physical characteristics ........................................................................................................................................ 35
16.1 Operating characteristics ............................................................................................................................... 35
16.1.1 Electrical operating characteristics .............................................................................................. 35
16.2 Environmental specifications ......................................................................................................................... 35
16.2.1 Temperature ................................................................................................................................ 35
16.2.2 Vibration ....................................................................................................................................... 35
16.2.3 EMC ............................................................................................................................................. 35
16.2.4 Power supply ............................................................................................................................... 35
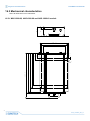
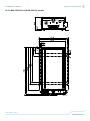
16.3 Mechanical characteristics ............................................................................................................................. 36
16.3.1 NAS-0200-00, NAS-1000-00 and NAS-1000-10 models ............................................................ 36
16.3.2 NAS-0200-01 and NAS-1000-01 models .................................................................................... 37
Notes ............................................................................................................................................................................ 39

DuraNAS User Manual Important information
5
NAS_UserMan_EN_3.1
1 Important information
Carefully read and understand the instructions contained in this manual before installing/operating the
device.
Whenever you have any doubt regarding the correct understanding of the instructions contained in this manual
contact your local Eurotech Technical Support Team (see the last page of this manual for further details).
Keep this manual for future reference.
To lower the risk of personal injury, electric shock, fire or damage to equipment, observe the following
precautions, as well as using good technical judgment, whenever installing/operating this device.
1.1 Warning signs and notes used in this manual
DANGER
Indicates a hazard with a high level of risk which, if not avoided, will result in death or serious
personal injury.
WARNING
Indicates a hazard with a medium level of risk which, if not avoided, could result in death or serious
personal injury.
CAUTION
Indicates a hazard with a low level of risk which, if not avoided, could result in minor or moderate
personal injury.
NOTICE
Indicates:
• an instruction to follow to use the product effectively
• a statement of company policy, directly or indirectly related to personnel safety or property
protection. In this case the notice is integrated with the following symbol:
• an instruction to follow to not damage the product. In this case the notice is integrated with the
following symbol:

Important information DuraNAS User Manual
6
NAS_UserMan_EN_3.1
1.2 Disclaimer of liability
Eurotech has reviewed the contents of this manual to ensure accuracy and consistency with the hardware and
software described.
Since variance cannot be precluded entirely, we cannot guarantee full consistency. However, the information in
this manual is reviewed regularly and any necessary corrections are included in later editions. Make sure you
are always referring to the latest available manual revision.
1.3 Qualified/skilled person
The device described in this manual may be only operated by a qualified/skilled person.
Qualified/skilled person is an individual with relevant technical education, training and/or experience enabling
him/her to perceive risks and to avoid hazards occurring during use of a product.

DuraNAS User Manual Safety instructions
7
NAS_UserMan_EN_3.1
2 Safety instructions
Observe the following safety instructions when installing/operating this device.
Failure to comply with these instructions or with specific warnings elsewhere in this guide violates safety
standards of design, manufacture, and intended use of the device.
Eurotech assumes no liability for any failure to comply with these instructions.
2.1 Antistatic precautions
NOTICE
Preventing Electrostatic Discharge (ESD)
The warning symbol on the left is usually placed on electros
tatic-sensitive devices.
When handing electrostatic
-sensitive devices always use appropriate antistatic
precautions to avoid damages due to electrostatic discharge.
For example, use a wrist strap or ESD cuff kept in constant contact with bare skin and
atta
ched to an ESD ground.
2.2 Connection to power supply or other devices
WARNING
Risk of electricity hazards
The warning symbol on the left is usually placed on electronic devices to warn you
about the presence of dangerous voltages.
Before applying power to the system, thoroughly review all installation, operation, and
safety instructions.
Failure to install the system power supply correctly or to follow all operating
instructions correctly may create an electrical shock hazard, which can result in
personal injury or loss of life, and/or damage to equipment or other property.
To avoid injuries:
• before operating any equipment carefully read any supplied instructions
• do not perform connections with wet hands
• check any power cords for damage before use
• use certified power cables. The power cables must meet the power requirements of the device
• position cables with care. Avoid positioning cables in places where they may be trampled on or
compressed by objects placed on them. Take particular care of the plug, power-point and outlet
• avoid overcharging any power outlets
• always disconnect power and discharge circuits before touching them
• only start the device with a power supply that meets the requirements stated on the voltage label. In case
of uncertainties about the required power supply, please contact the Eurotech Technical Support Team or
the electricity authority
2.3 Principles of safety integration
The installation must be performed following all the safety rules and only by qualified/skilled personnel.
Whenever applicable, the operator must have the appropriate license for working at height.

EC declaration of conformity DuraNAS User Manual
8
NAS_UserMan_EN_3.1
3 EC declaration of conformity
3.1 CE marking
This product is CE marked.
Eurotech shall not be liable for use of its products with equipment (i.e., power supplies,
personal computers, etc.) that are not CE marked.
3.2 E marking
This product is E marked with approval No: E24 10R-041661
The type tests have been conducted connecting together the DuraNAS 1000 devices with the Industrial 8-port
unmanaged Gigabit PoE Ethernet switch ORing IGPS-1080-24V.
3.3 WEEE
The use of the following symbol, attached to the equipment, packaging, instruction literature,
or the guarantee sheet, states that you must separate all of the product’s components, and
dispose of them in accordance withal waste disposal legislations.
Because of the substances present in the equipment, improper use or disposal of the refuse
can cause damage to human health and the environment.
With reference to WEEE, it is compulsory not to dispose of the equipment with normal urban
refuse; an arrangement for separate collection and disposal is essential
To avoid any possible legal implications, contact the local waste collection body for full
recycling information.
3.4 RoHS
This product, including all the components, subassemblies and the consumable materials that are an integral
part of it, have been manufactured in compliance with the European directive on the restriction of the use of
certain hazardous substances in electrical and electronic equipment (RoHS).

DuraNAS User Manual Technical assistance
9
NAS_UserMan_EN_3.1
4 Technical assistance
For any technical questions, or if you cannot isolate a problem with your device, or for any enquiry about repair
and returns policies, feel free to contact your local Eurotech Technical Support Team.
See the back cover for full contact details.
4.1 How to return a product to Eurotech
If you need to return a product to Eurotech:
1. Send an email to the Eurotech RMA Office (rma.it@eurotech.com) specifying:
• Product Model Number (printed on the device label)
• Product Serial Number (printed on the device label)
• Brief fault description
2. The Eurotech RMA Office sends you an email containing:
• The RMA number
• The shipping information
3. Pack the product using anti-static material and place it in a sturdy box with enough packing material to
adequately cushion it
4. Ship the product to Eurotech following the information given by the Eurotech RMA Office
NOTICE
Any product returned to Eurotech that is damaged due to inappropriate packaging will not be
covered by the warranty!

(This page has been intentionally left blank)

DuraNAS User Manual Product overview
11
NAS_UserMan_EN_3.1
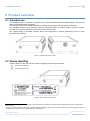
5 Product overview
5.1 Intended use
The DuraNAS family of systems is intended to be used as Network-Attached Storage (NAS)
1
devices with
Power-over-Ethernet (PoE) technology
2
.
The DuraNAS systems are available in RAID0 or RAID1 configurations, and with different HDD sizes.
The DuraNAS systems can be installed using two mounting brackets, or inserted inside a security enclosure
provided with a locking mechanism that avoids unauthorized removal.
The rugged design of DuraNAS systems allows their deployment in railway applications prone to harsh
environmental conditions.
Figure 1. DuraNAS rear and front views
5.2 Device labelling
A label is placed on the rear side of the device displaying the following information:
Model Number (example)
Serial Number (example)
Figure 2. Label location on the rear side
1
Network-Attached-Storage (NAS) is file-level computer data storage connected to a computer network providing data access to heterogeneous
network clients.
2
Power-over-Ethernet (PoE) is a technology that allows IP-based terminals to receive power in parallel to data over an existing category 5 Ethernet
infrastructure (or higher), without the need to make any modification in it.
A
B
A
B

Contents of the box DuraNAS User Manual
12
NAS_UserMan_EN_3.1
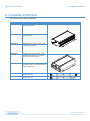
6 Contents of the box
The following order codes are available:
Model / Order Code
Description
Diagram
NAS-0200-00
DuraNAS POE 100 GB in RAID 1 or 200
GB aggregated HDD
NAS-1000-00
DuraNAS POE 500 GB in RAID 1 or 1 TB
aggregated HDD
NAS-1000-10
DuraNAS POE 1 TB HDD in RAID 1 with
easy shut-down feature
NAS-0200-01
DuraNAS POE 100 GB in RAID 1 or 200
GB aggregated HDD coming enclosed
within a Key-locked Enclosure
NAS-1000-01
DuraNAS POE 500 GB in RAID 1 or 1 TB
aggregated HDD coming enclosed within a
Key-locked Enclosure
NAS-CBL-01
M12 Male to M12 Male Connection Cable
(length: 2000 mm)
NAS-CBL-02
M12 Male to RJ45 Male Connection Cable
(length: 2000 mm)

DuraNAS User Manual Product specifications
13
NAS_UserMan_EN_3.1
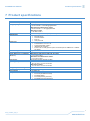
7 Product specifications
FEATURE
DESCRIPTION
Communication port
10/100Mbps Ethernet host interface
Storage capacity
NAS-0200-00 and NAS-0200-01 models:
100 GB in RAID 1 or 200 GB aggregated HDD
NAS-1000-00 and NAS-1000-01 models:
500 GB in RAID 1 or 1 TB aggregated HDD
NAS-1000-10 model:
1 TB HDD in RAID 1
Encryption standard
Advanced Encryption Standard (AES); 128 bit key-size
LED indicators
• Ethernet link
• Ethernet activity
• SATA boot failure
• Early On
•
CPU power ON
Power Input
• Power-over-Ethernet
• Powered Device: 37 to 57 V dc
• Power Classification: Class 0
• (IEEE 802.3af compliant)
• Power mode: A mode (phantom power on the data pairs of 100Base-TX or 10Base-
TX cables)
Maximum Weight
3 Kg
Maximum Power Consumption
12 W
Overall Dimensions in millimetres
(W x H x L)
NAS-0200-00, NAS-1000-00, NAS-1000-10 models:
171.0 x 59.5 x 285.0
NAS-0200-01 and NAS-1000-01 models:
171.0 x 83.0 x 293.0
Cooling Fans
Not required. Passive heat sink provided
Operating Temperature
NAS-0200-0x models:
-25°C to +55°C; +70°C for 10 minutes
NAS-1000-xx models:
-10°C to +55°C; +70°C for 10 minutes
Storage Temperature Range
-40°C to +65°C
Relative Humidity
<95% (non-Condensing)
Environmental
IP 65 (NEMA 4X)
Compliance
• EN 50155 (Railway applications)
• EN 61373 (Vibrations & Shocks)
• EN 60950 (Safety)
• EN 61000 (Immunity, Emission)
•
EN 60068 (Environmental testing)

Product specifications DuraNAS User Manual
14
NAS_UserMan_EN_3.1
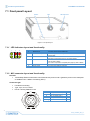
7.1 Front panel Layout
Figure 3. Front panel layout
7.1.1 LED indicators layout and functionality
LED #
FUNCTION
NOTES
1
Ethernet link
On when network link is established
2
Ethernet activity Blinks during network activity.
Off otherwise
3
Disk boot failure
On if the boot fails. Contact the Eurotech Technical Support Team.
See page 9 and the back cover for full contact details.
4
Safe to detach
Indicates if it is safe/not safe to detach the DuraNAS from network
Off: Not safe to detach
On: Power off procedure completed (see page 25); Safe to detach
5
Reserved -
6
Power supply
On when the DuraNAS is powered
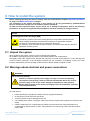
7.1.2 M12 connector layout and functionality
Function
• 10/100 Mbps Ethernet with Power-over-Ethernet with power mode A (phantom power on the data pairs
of 100Base-TX or 10Base-TX cables) (ETH1)
Connector type:
• Female box-mounting
• Type: 4-pin, M 12, D Code
• Part #: Lumberg 0986 EFC 152
PIN #
FUNCTION
PoE
1
TX+ (Transmit Data +)
+
2
Rx+ (Receive Data +)
-
3
TX- (Transmit Data -)
+
4
RX- (Receive Data +)
-
Housing
Shield
2
1 3
4
Handle M12 LED indicators
1 3 5
2 4 6

DuraNAS User Manual How to install the system
15
NAS_UserMan_EN_3.1
8 How to install the system
Before installing/operating this device carefully read and understand the chapters Important information
on page 5 and Safety instructions on page 7.
The installation of the product described in this manual can be only performed by qualified/skilled
persons and must be carried out in accordance with the standards.
To lower the risk of personal injury, electric shock, fire or damage to equipment, observe the following
precautions, as well as using good technical judgment, whenever installing or using the device.
NOTICE
Preventing Electrostatic Discharge (ESD)
The warning symbol on the left is usually placed on electrostatic
-sensitive devices.
When handing electrostatic
-sensitive devices always use appropriate antistatic
precautions to avoid damages due to electrostatic discharge.
For example, use a wrist
strap or ESD cuff kept in constant contact with bare skin and
attached to an ESD ground.
8.1 Unpack the system
When unpacking the system, ensure to remove all packaging material.
All ventilation openings that may be present in the chassis must be free of obstructions.
Thoroughly inspect the equipment for damage that may have occurred during shipment. If such damage has
occurred, further inspection of the packaging material may be necessary. Immediately contact your local
Eurotech Sales Office (see the last page of this manual for further details) to register a claim.
8.2 Warnings about electrical and power connections
WARNING
Risk of electricity hazards
Failure to install the system power supply correctly or to follow all operating
instructions correctly
may create an electrical shock hazard which can result in
personal injury or loss of life, and/or damage to equipment or other property.
Before applying power to the system, thoroughly review all installation, operation,
and safety instructions.
To avoid injuries:
• before operating any equipment carefully read any supplied instructions
• do not perform connections with wet hands
• check any power cords for damage before use
• use certified power cables. The power cable must meet the requirements (voltage and current) of the
device
• position cables with care. Avoid positioning cables in places where they may be trampled on or
compressed by objects placed on them. Take particular care of the plug, power-point and outlet of
power cable

How to install the system DuraNAS User Manual
16
NAS_UserMan_EN_3.1
• avoid overcharging any power outlets
• always disconnect power and discharge circuits before touching them
• always disconnect the power before connecting or disconnecting cables
• only start the device with a power supply that meets the requirements stated on the voltage label. In
case of uncertainties about the required power supply, please contact the Eurotech Technical Support
Team or the electricity authority
8.3 Installation notes
Product orientation
The product can operate in vertical, transversal and longitudinal orientations
8.3.1 Firmly secure the product
Firmly secure the system and verify that installing it does not cause instability or damage to the mounting
location.
Be aware of potentially hazardous situation when mounting the system (e.g. falling down). If required, use
stiffeners to reinforce the mounting area.
8.3.2 Ensure adequate clearance distance for cabling and air circulation
When the product is mounted, ensure adequate clearance distance for cabling and air circulation: there must be
sufficient space to connect the cables and for maintenance operations
8.3.3 Observe the Operating Characteristics
Make sure the temperature and humidity will stay within the ranges specified in Operating characteristics on
page 35.
Be aware of other devices that may raise the ambient temperature in the installation area, also the radiated heat
of the system itself.
8.3.4 Cabling notes
It is the responsibility of the system integrator to ensure that all connections are compliant with relevant
standards for each type of interface.
The degree protection on the system is only obtained by sealing the connectors properly.
Use cables that ensure the seal of the connector. Unused connectors have to be sealed with an appropriate
plug/cap. An improper sealing of the connectors may result in damage to the system and other system’s
components due to a leaking seal.
Make sure that the system has a proper grounding.
8.4 Installation procedure
According to the DuraNAS model there are two ways of installation:
• NAS-0200-00, NAS-1000-00 and NAS-1000-10: installation can be made using the two mounting
brackets attached to the DuraNAS system
• NAS-0200-01 and NAS-1000-01: installation can be made using the two mounting brackets attached to
the key-locked enclosure

DuraNAS User Manual How to install the system
17
NAS_UserMan_EN_3.1
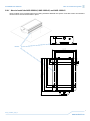
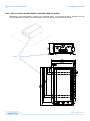
8.4.1 How to install the NAS-0200-00, NAS-1000-00, and NAS-1000-10
These models come provided with two mounting brackets attached the system. Four M5 screws and washers
can be used to secure the brackets in place.
Bracket
171.0
5.5
5.5
5
.
5
15.0
59.5
32.0
47.0
248.5
207.0
254.0
221.5
285.0
153.0
129.0

How to install the system DuraNAS User Manual
18
NAS_UserMan_EN_3.1
8.4.2 How to install the NAS-0200-01 and NAS-1000-01 models
NAS-0200-01 and NAS-1000-01 models come enclosed within a key-locked enclosure provided with two
mounting brackets. Four M5 screws and washers can be used to secure the brackets in place.
Bracket

DuraNAS User Manual How to install the system
19
NAS_UserMan_EN_3.1
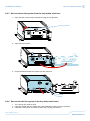
8.4.3 How to release the system from the key-locked enclosure
1. Open the latch of the locking mechanism using the key provided
2. Open the security door
3. Pull the handle and slide the system from the enclosure
8.4.4 How to reinstall the system in the key-locked enclosure
1. The security door must be open
2. Using the handle slide the system along the guiderails to insert it into the enclosure
3. Close the security door and close the latch of the locking mechanism
Handle
Locking mechanism
Guiderail

How to connect the system to the PoE Ethernet DuraNAS User Manual
20
NAS_UserMan_EN_3.1
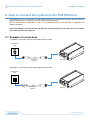
9 How to connect the system to the PoE Ethernet
The DuraNAS has to be connected to a PoE Ethernet network via connector M12 using a specific cable (not
supplied) and that has to comply with the Power-over-Ethernet standards.
The PoE power mode is supported in “mode A” only (phantom power on the data pairs of 100Base-TX or
10Base-TX cables)
Once the DuraNAS is connected to the PoE Ethernet, it immediately turns itself ON. Check for the status
of the LED indicators (see page 14).
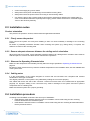
9.1 Example of connections
1) Example of connection using the optional NAS-CBL-01 cable
2) Example of connection using the optional NAS-CBL-02 cable
NAS-CBL-01
(optional)
DuraNAS
PoE Ethernet
outlet
NAS-CBL-02
(optional)
DuraNAS
PoE Ethernet
outlet
La pagina si sta caricando...
La pagina si sta caricando...
La pagina si sta caricando...
La pagina si sta caricando...
La pagina si sta caricando...
La pagina si sta caricando...
La pagina si sta caricando...
La pagina si sta caricando...
La pagina si sta caricando...
La pagina si sta caricando...
La pagina si sta caricando...
La pagina si sta caricando...
La pagina si sta caricando...
La pagina si sta caricando...
La pagina si sta caricando...
La pagina si sta caricando...
La pagina si sta caricando...
La pagina si sta caricando...
La pagina si sta caricando...
La pagina si sta caricando...
-
 1
1
-
 2
2
-
 3
3
-
 4
4
-
 5
5
-
 6
6
-
 7
7
-
 8
8
-
 9
9
-
 10
10
-
 11
11
-
 12
12
-
 13
13
-
 14
14
-
 15
15
-
 16
16
-
 17
17
-
 18
18
-
 19
19
-
 20
20
-
 21
21
-
 22
22
-
 23
23
-
 24
24
-
 25
25
-
 26
26
-
 27
27
-
 28
28
-
 29
29
-
 30
30
-
 31
31
-
 32
32
-
 33
33
-
 34
34
-
 35
35
-
 36
36
-
 37
37
-
 38
38
-
 39
39
-
 40
40


Eurotech DuraNAS 1000 Manuale del proprietario
- Tipo
- Manuale del proprietario
in altre lingue
- English: Eurotech DuraNAS 1000 Owner's manual
Documenti correlati
-
Eurotech DuraMAR 2150 Manuale del proprietario
-
Eurotech DynaPCN 10-20 Manuale del proprietario
-
-
-
-
-
-
-
-