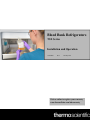
Thermo Fisher Scientific TSX BloodBank Manuale utente
- Categoria
- Frigoriferi
- Tipo
- Manuale utente


Read this instruction manual. Failure to follow the instructions in this manual can result
in damage to the unit, injury to operating personnel, and poor equipment performance.
All internal adjustments and maintenance must be performed by qualified service personnel.
Material in this manual is for informational purposes only. The contents and the product it describes are
subject to change without notice. Thermo Fisher Scientific makes no representations or warranties with
respect to this manual.
© 2021 Thermo Fisher Scientific Inc. All rights reserved.
For your future reference and when contacting the factory, please have the following information readily
available. It can be found on the dataplate attached to your unit.
Model Number:
Serial Number:
The following information, if available, is helpful for contacting the factory.
Date Purchased:
Purchase order number:
Source of Purchase:
(manufacturer or specific agent/rep organization)

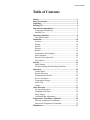
Table of Contents
Table of Contents
Models .......................................................................................1
Safety Precautions....................................................................2
Unpacking.................................................................................5
Packing List ..............................................................................6
General Recommendations .....................................................7
Temperature Monitoring ......................................................7
Intended Use ........................................................................ 7
Operating Standards ...............................................................8
Unit Specifications ...............................................................9
Installation..............................................................................10
Location .............................................................................10
Wiring ................................................................................ 14
Shelves ...............................................................................15
Drawers ..............................................................................15
Baskets ...............................................................................19
Temperature Sensor Bottles ...............................................20
Door Operation .................................................................. 20
Remote Alarm (Optional) ..................................................21
Final Checks....................................................................... 22
Startup ....................................................................................23
Initial Startup...................................................................... 23
Product Loading and Unloading Guidelines...................... 23
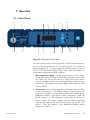
Operation................................................................................25
Control Panel ......................................................................25
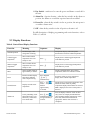
Display Functions ..............................................................27
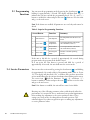
Programming Functions .....................................................28
Service Parameters .............................................................28
Temperature Settings .........................................................31
Safety Trip ..........................................................................31
Alarms ................................................................................31
Chart Recorder ......................................................................33
Set Up and Operation .........................................................33
Changing Chart Paper ........................................................34
Power Supply .....................................................................34
Calibration and Adjustments ..............................................35
Temperature Transmitter (Optional) ..................................36
Powered Temperature Transmitter..................................... 36
Unpowered Temperature Transmitter................................ 36
Maintenance ...........................................................................37

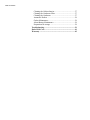
Table of Contents
Cleaning the Cabinet Interior .............................................37
Cleaning the Condenser Filter ............................................37
Cleaning the Condenser .....................................................37
Automatic Defrost ..............................................................38
Gasket Maintenance ...........................................................38
Alarm Battery Maintenance ...............................................38
Preparation for storage .......................................................38
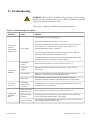
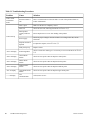
Troubleshooting .....................................................................39
End of Life Care.....................................................................41
Warranty ................................................................................42

Thermo Scientific TSX Blood Bank Refrigerators 1
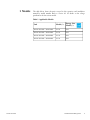
1 Models
The table below shows the units covered in this operation and installation
manual by model number. Refer to
Section 6.1
for details on the voltage
specifications for the various models.
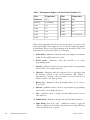
Table 1. Applicable Models
Unit Model (*) Energy Star
Model (*)
Thermo Scientific - TSX1204B* V/Y/Z A/D
Thermo Scientific - TSX2304B* V/Y/Z A/D
Thermo Scientific - TSX3004B* V/Y/Z A/D
Thermo Scientific - TSX5004B* V/Y/Z A/D

2 TSX Blood Bank Refrigerators Thermo Scientific
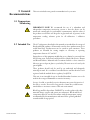
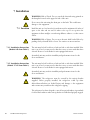
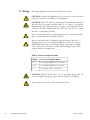
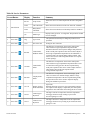
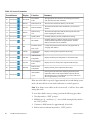
2 Safety Precautions
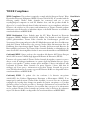
In this manual, the following symbols and conventions are used:
This symbol when used alone indicates important operating instructions which
reduce the risk of injury or poor performance of the unit.
WARNING: This symbol indicates potentially hazardous situations which,
if not avoided, could result in serious injury or death.
WARNING: This symbol indicates situations where dangerous voltages
exist and potential for electrical shock is present.
WARNING: This symbol indicates potentially hazardous situations, which
if not avoided could result in fire.
CAUTION: This symbol, in the context of a CAUTION, indicates a
potentially hazardous situation which if not avoided could result in minor to
moderate injury or damage to the equipment.
CAUTION: This indicates a situation which may result in property
damage.
This symbol indicates surfaces which may become hot during use and may cause
a burn if touched with unprotected body parts.
Before installing, using or maintaining this product, please be sure to read the
manual and product warning labels carefully. Failure to follow these instructions
may cause the product to malfunction, which could result in injury or damage.
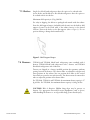
This symbol indicates possible pinch points which may cause personal injury.
This symbol indicates the need to use gloves during indicated procedures. If
performing decontamination procedures, use chemically resistant gloves.
This symbol indicates possible sharp points which may cause skin abrasion.

Thermo Scientific TSX Blood Bank Refrigerators 3
Below are important safety precautions that apply to this product:
Use this product only in the way described in the product literature and in this
manual. Before using it, verify that this product is suitable for its intended use. If
the equipment is used in a manner not specified by the manufacturer, the
protection provided by the equipment may be impaired.
Do not modify system components, especially the controller. Use OEM exact
replacement equipment or parts. Before use, confirm that the product has not
been altered in any way.
WARNING: Risk of Shock. Your unit must be properly grounded in
conformity with national and local electrical codes. Do not connect the unit
to overloaded power sources.
WARNING: Risk of Shock. Disconnect unit from all power sources before
cleaning, troubleshooting, or performing other maintenance on the product
or its controls.
WARNING: Risk of Fire. This unit is not for storage of flammable
materials.
WARNING: Risk of Fire. This unit is charged with hydrocarbon
refrigerants. Only qualified service personnel should service this unit.
Unauthorized repair of your refrigerator will invalidate your warranty.
Contact Technical Service at 1-800-438-4851 for additional information.
WARNING: Risk of Fire. No equipment that uses an open flame should be
placed inside the unit. This will harm the unit, hamper functionality and
compromise your safety.
WARNING: Risk of Fire. Do not use any battery powered or
externally-powered equipment in the refrigerator.
CAUTION: Risk of Abrasion. Hidden sharp edges may be present on
drawers. Use appropriate Personal Protective Equipment (such as gloves)
while handling the drawers to avoid possible sharp points related injury.

4 TSX Blood Bank Refrigerators Thermo Scientific
EMC Registration is done on this equipment for business use only. It may cause
interference when the product would be used in home.
사용자 안내문 이 기기는 업무용 환경에서 사용할 목적으로 적합성평가를
받은 기기로서 가정용 환경에서 사용하는 경우 전파간섭의 우려가 있습니
다.
This equipment has been tested and found to comply with the limits for a
Class A digital device. Class A covers devices for usage in all establishments other
than domestic and that are not directly connected to a low voltage power supply
network, which supplies domestic environment.
This ISM device complies with Canadian ICES-001.
This equipment has been tested and found to comply with the limits for a
Class A digital device, pursuant to part 15 of the FCC Rules. These limits are
designed to provide reasonable protection against harmful interference when the
equipment is operated in a commercial environment. This equipment generates,
uses, and can radiate radio frequency energy and, if not installed and used in
accordance with the instruction manual, may cause harmful interference to radio
communications. Operation of this equipment in a residential area is likely to
cause harmful interference in which case the user will be required to correct the
interference at his own expense.

Thermo Scientific TSX Blood Bank Refrigerators 5
3 Unpacking
At the time of delivery, be sure to inspect the unit packaging for damage before
signing for the shipment. If packaging damage is present, request immediate
product inspection and file a claim with the carrier.
Note Packaging damage does not denote that unit damage exists.
If concealed damage is found (damage that is not apparent until the item has
been unpacked), stop further unpacking and save all packing for carrier’s
inspection. Make a written request for inspection to delivering carrier. This must
be done within 15 days after delivery. Then file a claim with the carrier.
Do not return goods to the manufacturer without written authorization.

6 TSX Blood Bank Refrigerators Thermo Scientific
4 Packing List
Inside the refrigerator cabinet is a bag containing:
• Essential safety instructions, including translated versions.
• Certificate of Conformance
• Warranty Card
• Safety Data Sheet for Glycerin
• Quick start guide
• Two control panel keys
• Two cabinet door keys
• Chart recorder pamphlet
• Extra chart recorder paper
If the unit was ordered a unit with shelves, the bag will also include:
• Small bag with shelving clips
If specified on the order, the bag may also include:
• QC temperature graph and test log
• Calibration information
Other items with your unit include:
• Power cord
• Anti-Tip Bracket Kit (See Section 7.1.2, Table 3 for applicable models)
• Baskets, Shelves or Drawers
• Thermal Bottles
Note To download the complete Installation and Operation Manual for the
unit, please visit:
https://www.thermofisher.com/usermanuals

Thermo Scientific TSX Blood Bank Refrigerators 7
5 General
Recommendations
This section includes some general recommendations for your unit.
5.1 Temperature
Monitoring
IMPORTANT NOTE We recommend the use of a redundant and
independent temperature monitoring system so that the device can be
monitored continuously for performance commensurate with the value of
the product stored. Please use the probe in glycerin bottle (if present) as the
temperature reading reference point for all calibration / validation
procedures.
5.2 Intended Use
The 4
°C
refrigerators described in this manual are intended for the storage of
blood and blood products. All materials stored in these products must be in
sealed blood bags. Product must not be stored in open containers. These
products are intended for storing samples or inventory at operating
temperatures between 2
°C
and 6
°C.
Expected users of this equipment include but are not limited to personnel from
the following areas: Professional and clinical (blood bank) laboratories, Pharma
and Biotech facilities, Industrial and Government facilities or those trained in
laboratory protocols put in place at your facility. The units are not for use by the
general public.
These products should only be used by an authorized and adequately
trained personnel. It is considered a medical device and has therefore been
registered with the medical device regulatory body FDA.
This unit is not intended for use in classified hazardous locations, nor to be
used for the storage of flammable or corrosive inventory.
Storage of sealed or unsealed corrosive substances may cause the interior of
the unit to corrode. If stored for long periods of time, they could become
unsealed due to moisture content of the unit environment.
Blood bags and blood products CANNOT be stored together with other
materials (drugs, reagents and generic use substances). Blood and blood
components must be stored in accordance with the temperature settings
recommended by the manufacturer and must follow general guidelines
around suitable storage period.

8 TSX Blood Bank Refrigerators Thermo Scientific
6 Operating
Standards
The refrigerators described in this manual are classified for use as stationary
equipment in a Pollution Degree 2 and Overvoltage Category II environment.
These units are designed to operate under the following environmental
conditions:
• Indoor use
• Altitude up to 2000 m (6512 feet)
• Maximum relative humidity 60% for temperatures from 15 to 32°C
(59 to 90°F).
• For V models: Maximum relative humidity 75% for temperatures
from 10°C to 35°C (50 to 95°F).
• Main supply voltage fluctuations not to exceed 10% of the nominal
voltage.
• The refrigerator must not be connected to a GFCI (Ground Fault
Circuit Interrupter) protected outlet as it may be subject to nuisance
tripping.
Operation outside of these conditions will affect the performance of the unit
and the samples stored inside.

Thermo Scientific TSX Blood Bank Refrigerators 9
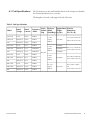
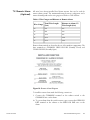
6.1 Unit Specifications The last character in the model number listed on the refrigerator identifies
the electrical specifications for your unit.
The dataplate is located on the upper left side of the unit.
Table 2. Unit Specifications
Model Rated
Voltage
Rated
Current
Frequency
/ Phase
Power
Module
Plug
Drawers/
450ml
Blood Bags
Approximate
Weight
Kg (lbs)
Exterior
Dimensions
(D x W x H)
12A / 12Y 115 V 6.25 A 60 Hz/1
IEC C19
6 / 192
(32 per
drawer)
159 (350) 77.5 x 61.9 x 185.4 cm
(30.5 x 24.0 x 73.0 in)
12D / 12Z 208-230 V 3.05 A 60 Hz/1
12V 208-230 V 3.05 A 50 Hz/1
23A / 23Y 115 V 8.5 A 60 Hz/1 7 / 385
(55 per
drawer)
220 (485)
96.0 x 71.1 x 199.4 cm
(37.8 x 28.0 x 78.5 in)
23D / 23Z 208-230 V 3.7 A 50/60 Hz/1 210 (464)
23V 208-230 V 3.7 A 50/60 Hz/1 210 (464)
30A / 30Y 115 V 9.25 A 60 Hz/1 6 / 426
(71 per
drawer)
221 (486) 94.7 x 86.4 x 199.4 cm
(37.3 x 34.0 x 78.5 in)
30D / 30Z 208-230 V 4.4 A 60 Hz/1
30V 208-230 V 4.4 A 50 Hz/1
50A / 50Y 115 V 10.2 A 60 Hz/1 14 / 770
(55 per
drawer)
353 (779)
96.0 x 143.5 x 199.4
cm
(37.8 x 56.5 x 78.5 in)
50D / 50Z 208-230 V 4.75 A 60 Hz/1
50V 208-230 V 4.75 A 50 Hz/1

10 TSX Blood Bank Refrigerators Thermo Scientific
7 Installation
WARNING: Risk of Shock. Do not exceed the electrical rating printed on
the dataplate located on the upper left side of the unit.
Do not move the unit using the drain pan on the back. This could cause
damage to the equipment.
7.1 Location
Install the unit on a level area free from vibration with a minimum of 6 inches of
space on the sides and rear and 12 inches at the top. Do not position the
equipment in direct sunlight or near heating diffusers, radiators, or other sources
of heat.
WARNING: Risk of Injury. Do not move the unit while loaded. Move by
pushing slowly at handle level or lower. Use caution on uneven surfaces.
7.1.1 Installation Instructions
(Models A/D from Table 1)
The unit must be level both front to back and side to side when installed. If the
unit is out of level, you may need to shim the corners or casters with thin sheets
of metal. Be sure to set the brakes for units equipped with casters.
An unlevel unit may result in instability and performance issues for the
doors and drawers.
7.1.2 Installation Instructions
(Models V/Y/Z from Table 1)
The unit must be level both front to back and side to side when installed. If the
unit is out of level, you may need to shim the corners or casters with thin sheets
of metal. Be sure to set the brakes for units equipped with casters.
An unlevel unit may result in instability and performance issues for the
doors and drawers.
WARNING: The refrigerator must be secured by the anti-tip bracket
supplied. Unless properly installed, the refrigerator could tip when
shelves/drawers/baskets are loaded. Injury and damage to the equipment
and contents may result from the refrigerator tipping.
This refrigerator has been designed to meet all recognized industry tip standards
for all normal conditions when anti-tip bracket is installed and properly engaged.

Thermo Scientific TSX Blood Bank Refrigerators 11
*Check the product data plate to confirm model number.
Anti-Tip Bracket Installation instructions are provided for wood and concrete
floors. Any other type of construction may require special installation techniques
as deemed necessary to provide adequate fastening of the anti-tip bracket to the
floor. For installation on floors other than wood and concrete, please contact
technical support.
The use of this bracket does not prevent the tipping of the refrigerator when not
properly installed.
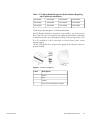
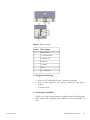
Figure 1. Materials Supplied
Table 3. TSX Blood Bank Refrigerator Model Numbers Requiring
Anti-Tip Bracket Installation*
TSX1204BV TSX2304BV TSX3004BV TSX5004BV
TSX1204BY TSX2304BY TSX3004BY TSX5004BY
TSX1204BZ TSX2304BZ TSX3004BZ TSX5004BZ
Label Description
1 Bracket
2 Bolts
3 Anchors
4 Instructions and Installation Template

12 TSX Blood Bank Refrigerators Thermo Scientific
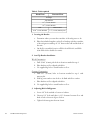
Table 4. Tools required
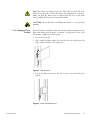
a. Determine where you want the centerline of the refrigerator to be.
b. Place the included template on the floor lined up with the centerline
of the refrigerator and keep 6"-12" between the wall and the back of
the unit.
c. On the floor, mark the location of Hole #1 & Hole #2 (and Hole
#3 & Hole #4 for double door units).
Wood Construction
a. Drill 15/64" (6 mm) pilot holes in locations marked in step 1.
b. Place bracket on floor aligned with holes.
c. Use supplied lag bolts to attach bracket to floor.
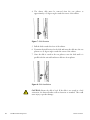
Concrete Construction
a. Drill 1/2" (13 mm) holes in locations marked in step 1 with
masonry bit.
b. Slide lag screw anchors into holes to be flush with floor surface.
c. Place bracket on floor aligned with holes.
d. Use supplied lag bolts to attach bracket to floor.
a. Locate 1/2" bolt attached to bottom of cabinet.
b. Unscrew 1/2" bolt until there is 1/2" clearance between floor and
head of bolt as shown in Figure 2 below.
c. Tighten lock nut against bottom of unit.
Wood Floor Concrete Floor
Flashlight
Tape Measure
1/2" (13 mm) Wrench
3/4" (19 mm) Wrench
Drill Hammer Drill
15/64" (6 mm) Drill Bit 1/2" (13 mm) Masonry Bit

Thermo Scientific TSX Blood Bank Refrigerators 13
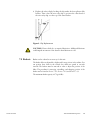
Figure 2. Bolt Location
a. Line up 1/2" bolt installed in step 3 with anti-tip bracket.
b. Roll or slide refrigerator into position until bolt stops against
bracket.
c. Lock the casters.
Check to see if the anti-tip bracket is installed properly by shining light
under cabinet and confirming bolt in cabinet is secured by bracket on
floor.
Label Description
1 Back of Unit
2 1/2" Bolt Location
3 Detailed View
4 Lock Nut
5 1/2" Bolt
6 Floor
7 1/2" Clearance

14 TSX Blood Bank Refrigerators Thermo Scientific
7.2 Wiring
The wiring diagrams are attached on the back of the cabinet.
CAUTION: Connect the equipment to the correct power source. Incorrect
voltage can result in severe damage to the equipment.
CAUTION: Risk of Shock. For personal safety and trouble-free operation,
this unit must be properly grounded while in use. Failure to ground the
equipment may cause personal injury or damage to the equipment. Always
conform to the National Electrical Code and local codes. Do not connect
the unit to overloaded power lines.
Do not position the unit in a way that impedes access to the disconnecting
device or circuit breaker in the back of the unit.
Always connect the unit to a dedicated (separate) circuit. Each unit is
equipped with a service cord and plug designed to connect it to a power
outlet which delivers the correct voltage. Supply voltage must be within
±10% of the unit rated voltage. If cord becomes damaged, replace with a
properly rated power supply cord.
CAUTION: Risk of Shock. Never cut the grounding prong from the
service cord plug. If the prong is removed, the warranty is invalidated.
In an emergency, the power cord is a disconnect device.
Table 5. Power Cord Specifications
Model Power Cord Specifications
A / Y 3-G 12 AWG, NEMA 5-15P, 15 A/125 V
D / Z 3-G 14 AWG, NEMA 6-15P, 15 A/250 V
V 3-G 1.5 mm2, CEE 7/7, 16 A/250 V

Thermo Scientific TSX Blood Bank Refrigerators 15
7.3 Shelves Single door blood bank refrigerators have the option to be ordered with
4 wire shelves and double door blood bank refrigerators have the option to
be ordered with 8 wire shelves.
Maximum shelf capacity is 45 kg (100 lbs).
For safety in shipping, the shelves are packaged and secured inside the cabinet.
Insert the shelf support hangers (included inside the unit) into the built-in shelf
supports (located on the inside walls of the cabinet interior) at the desired
locations. Position the shelves on the flat supports (refer to
Figure 3
). Do not
position shelving to disrupt the thermal bottle(s).
Figure 3. Shelf Support Hanger
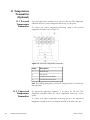
7.4 Drawers
TSX1204 and TSX3004 blood bank refrigerators come standard with 6
drawers, TSX2304 blood bank refrigerators with 7 drawers, and TSX5004
blood bank refrigerators with 14 drawers.
Drawers are shipped in a factory installed position that promotes uniform
spacing between the drawers. The drawer slides are adjustable to higher and
lower positions in the cabinet. You can position these slides in the vertical
slots which are spaced at one-inch intervals. The drawers must be removed in
order to adjust the position of the drawer slides.
For TSX1204, TSX2304, and TSX5004, the maximum drawer capacity is 27
kg (60 lbs). For TSX3004, the maximum drawer capacity is 36 kg (80 lbs).
CAUTION: Risk of Abrasion. Hidden sharp edges may be present on
drawers. Use appropriate Personal Protective Equipment (such as gloves)
while handling the drawers to avoid possible sharp points related injury.

16 TSX Blood Bank Refrigerators Thermo Scientific
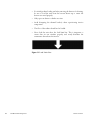
7.4.1 Removing the Drawers
To remove the drawers, complete the following steps (refer to
Figure 4
):
1. Pull the drawer towards you until the slides are fully extended.
2. Lift the back of the drawer to disengage the mounting tabs from the
slots on the slides.
Note The drawers fit snugly between the slides. Push the back of the drawer
from underneath to remove the drawer.
3. Raise the back of the drawer almost to a vertical position and disengage
the front mounting clips from the sides.
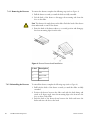
Figure 4. Drawer Removal and Installation
7.4.2 Reinstalling the Drawers
To reinstall the drawers, complete the following steps (refer to
Figure 4
):
1. Pull both the slides of the drawer towards you until the slides are fully
extended.
2. Position the drawer between the slides and with the back facing end
raised at 45 degree angle, insert the mounting clips at the front into the
slots on front of the slides.
3. Push the back of the drawer down between the slides and insert the
basket tabs into the slots at the back.
Label Description
1 Tabs
2 Drawer slide
3 Slot
La pagina si sta caricando...
La pagina si sta caricando...
La pagina si sta caricando...
La pagina si sta caricando...
La pagina si sta caricando...
La pagina si sta caricando...
La pagina si sta caricando...
La pagina si sta caricando...
La pagina si sta caricando...
La pagina si sta caricando...
La pagina si sta caricando...
La pagina si sta caricando...
La pagina si sta caricando...
La pagina si sta caricando...
La pagina si sta caricando...
La pagina si sta caricando...
La pagina si sta caricando...
La pagina si sta caricando...
La pagina si sta caricando...
La pagina si sta caricando...
La pagina si sta caricando...
La pagina si sta caricando...
La pagina si sta caricando...
La pagina si sta caricando...
La pagina si sta caricando...
La pagina si sta caricando...
La pagina si sta caricando...
La pagina si sta caricando...
-
 1
1
-
 2
2
-
 3
3
-
 4
4
-
 5
5
-
 6
6
-
 7
7
-
 8
8
-
 9
9
-
 10
10
-
 11
11
-
 12
12
-
 13
13
-
 14
14
-
 15
15
-
 16
16
-
 17
17
-
 18
18
-
 19
19
-
 20
20
-
 21
21
-
 22
22
-
 23
23
-
 24
24
-
 25
25
-
 26
26
-
 27
27
-
 28
28
-
 29
29
-
 30
30
-
 31
31
-
 32
32
-
 33
33
-
 34
34
-
 35
35
-
 36
36
-
 37
37
-
 38
38
-
 39
39
-
 40
40
-
 41
41
-
 42
42
-
 43
43
-
 44
44
-
 45
45
-
 46
46
-
 47
47
-
 48
48


Thermo Fisher Scientific TSX BloodBank Manuale utente
- Categoria
- Frigoriferi
- Tipo
- Manuale utente
in altre lingue
Documenti correlati
-
Thermo Fisher Scientific TSX Manuale del proprietario
-
-
-
 Thermo Fisher Scientific TSX BloodBank Manuale utente
-
-
-
-
-
 Thermo Fisher Scientific Forma Manuale del proprietario
-

