Motorola GP-688 Manuale utente
- Categoria
- Radio
- Tipo
- Manuale utente
Questo manuale è adatto anche per

лчиттничюнльтцию.
глтчн.Бзвыдны
www.sotmarket.ru
дбняинфмциятв,
тзывы,бзыиы
Инструкция для
Motorola GP-688
Перейти в карточку товара
8 800 775 98 98

M
GP688/GP688R
6866542D04-P

sfd
MOTOROLA and the Stylized M Logo are registered in the U.S. Patent and
Trademark Office.
All other product or service names are the property of their respective owners.

1
English
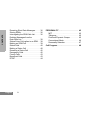
CONTENTS
CONTENTS
Computer Software Copyrights . . . . . . . 3
Safety . . . . . . . . . . . . . . . . . . . . . . . . . . . . 4
Product Safety and RF Exposure
Compliance . . . . . . . . . . . . . . . . . . . . . . . . 4
Radio Overview . . . . . . . . . . . . . . . . . . . . 5
Operation and Control Functions . . . . . . . . 6
Radio Controls . . . . . . . . . . . . . . . . . . . 6
Programmable Buttons . . . . . . . . . . . . . 7
Menu Keys . . . . . . . . . . . . . . . . . . . . . . . . . 8
Keypad Keys. . . . . . . . . . . . . . . . . . . . 10
Entering Characters using
the Keypad . . . . . . . . . . . . . . . . . . . . . 11
LCD Display and Icons . . . . . . . . . . . . 12
Audio Signal Tones (Normal) . . . . . . . 13
Audio Signal Tones (Alternate) . . . . . . 14
Getting Started . . . . . . . . . . . . . . . . . . . . 15
Battery Information. . . . . . . . . . . . . . . . . . 15
Battery Care and Tips . . . . . . . . . . . . . 15
Battery Label. . . . . . . . . . . . . . . . . . . . 17
Recycling or Disposal of Batteries . . . 18
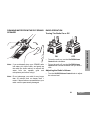
Charging the Battery . . . . . . . . . . . . . 18
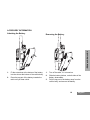
Accessory Information . . . . . . . . . . . . . . . 19
Attaching the Battery . . . . . . . . . . . . . 19
Removing the Battery . . . . . . . . . . . . .19
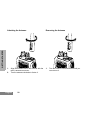
Attaching the Antenna . . . . . . . . . . . . 20
Removing the Antenna . . . . . . . . . . . . 20
Draining Water from the IP67
GP688R Speaker . . . . . . . . . . . . . . . . . . .21
Radio Operation . . . . . . . . . . . . . . . . . . . 21
Turning The Radio On or Off . . . . . . . 21
Adjusting the Radio’s Volume . . . . . . .21
Radio Registration . . . . . . . . . . . . . . . 22
Radio Calls . . . . . . . . . . . . . . . . . . . . . . . 23
Making a Call . . . . . . . . . . . . . . . . . . . 23
Contact List. . . . . . . . . . . . . . . . . . . . . 23
User Absent . . . . . . . . . . . . . . . . . . . . 27
Dedicated Calls . . . . . . . . . . . . . . . . . 28
Manual Dialling. . . . . . . . . . . . . . . . . . 28
Last Number Redial . . . . . . . . . . . . . . 29
Keypad Edit . . . . . . . . . . . . . . . . . . . . 29
Ending a Call . . . . . . . . . . . . . . . . . . . .30
Cancelling a Call. . . . . . . . . . . . . . . . . 30
Receiving a Call . . . . . . . . . . . . . . . . . .30
Missed Calls . . . . . . . . . . . . . . . . . . . . 31
Call Diversion . . . . . . . . . . . . . . . . . . . 34
Special Calls . . . . . . . . . . . . . . . . . . . . . 36
Short Data Messages (SDM) . . . . . . . 36

2
English
CONTENTS
Receiving Short Data Messages. . . . . 36
Storing SDMs . . . . . . . . . . . . . . . . . . . 36
Interrogating the SDM Calls List . . . . . 36
Deleting Messages from the
Data Calls List. . . . . . . . . . . . . . . . . . . 38
Status/Voice Call replies to an SDM . . 38
Making an SDM Call . . . . . . . . . . . . . . 39
Status Calls. . . . . . . . . . . . . . . . . . . . . 40
Making a Status Call . . . . . . . . . . . . . 40
Receiving a Status Call . . . . . . . . . . . 42
Emergency Calls. . . . . . . . . . . . . . . . . 42
Priority Calls . . . . . . . . . . . . . . . . . . . . 43
Broadcast Calls. . . . . . . . . . . . . . . . . . 43
DTMF . . . . . . . . . . . . . . . . . . . . . . . . . 44
PERSONALITY . . . . . . . . . . . . . . . . . . . . 45
MPT . . . . . . . . . . . . . . . . . . . . . . . . . . 45
Talkgroup . . . . . . . . . . . . . . . . . . . . . . 45
Fixed and Dynamic Groups . . . . . . . . 45
Conventional Mode. . . . . . . . . . . . . . . 46
Personality Selection . . . . . . . . . . . . . .47
Call Progress . . . . . . . . . . . . . . . . . . . . . 48

3
English
COMPUTER SOFTWARE
COPYRIGHTS
COMPUTER SOFTWARE
COPYRIGHTS
The Motorola products described in this
manual may include copyrighted Motorola
computer programs stored in semiconductor
memories or other media. Laws in the United
States and other countries preserve for
Motorola certain exclusive rights for
copyrighted computer programs, including, but
not limited to, the exclusive right to copy or
reproduce in any form the copyrighted
computer program. Accordingly, any
copyrighted Motorola computer programs
contained in the Motorola products described
in this manual may not be copied, reproduced,
modified, reverse-engineered, or distributed in
any manner without the express written
permission of Motorola.
Furthermore, the purchase of Motorola
products shall not be deemed to grant either
directly or by implication, estoppel, or
otherwise, any license under the copyrights,
patents or patent applications of Motorola,
except for the normal non-exclusive license to
use that arises by operation of law in the sale
of a product.

4
English
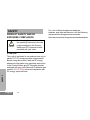
SAFETY
SAFETY
PRODUCT SAFETY AND RF
EXPOSURE COMPLIANCE
ATTENTION!
This radio is restricted to occupational use only to
satisfy FCC RF energy exposure requirements.
Before using this product, read the RF energy
awareness information and operating instructions
in the Product Safety and RF Exposure booklet
enclosed with your radio (Motorola Publication part
number
6864117B25) to ensure compliance with
RF energy exposure limits.
For a list of Motorola-approved antennas,
batteries, and other accessories, visit the following
web site which lists approved accessories:
http://www.motorola.comgovernmentandenterprise
Before using this product, read
the operating instructions for safe
usage contained in the Product
Safety and RF Exposure booklet
enclosed with your radio.
!
C
a u t i o
n

5
English
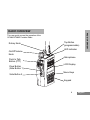
RADIO OVERVIEW
RADIO OVERVIEW
This user guide covers the operation of the
GP688/GP688R Portable Radio.
Top Button
(programmable)
LED Indicator
Microphone
LCD Display
Menu Keys
Rotary Knob
On/Off/Volume
Knob
Push to Talk
Button (PTT)
Clear Button
(Side Button 1)
Side Button 2
Keypad

6
English
RADIO OVERVIEW
OPERATION AND CONTROL FUNCTIONS
Radio Controls
The numbers below refer to the illustrations on
the inside front cover.
1. Rotary Knob
Used as a multi-function scroll key and as a
channel selector in Conventional mode.
2. On/Off/Volume Knob
Used to turn the radio on or off, and to adjust
the radio’s volume.
3. Push to Talk Button (PTT)
Press and hold down this button to talk, release
it to listen.
4. Clear Button (Side Button 1)
Used to cancel a call, clear down at the end of
a call or Carrier Monitor (Conventional mode).
Personality button, otherwise programmable.
5. Side Button 2
Personality button, otherwise programmable.
6. Top Button (programmable)
Recommended as Emergency button.
7. LED Indicator
Green: Flashes to indicate NO SERVICE.
Red: On when radio is transmitting.
Red Flashing: When transmitting - battery low.
Red Flashing: When receiving - channel busy
(Conventional Mode).
8. Microphone
9. LCD Display (1 Line)
10. Menu Keys
11. Keypad
12. Antenna
13. Accessory Connector
Connects headsets, remote speaker/micro-
phones and other accessories. Replace
attached dust cap when not in use.

7
English
RADIO OVERVIEW
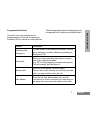
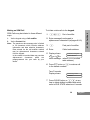
Programmable Buttons
Several of your radio buttons can be
programmed (by Customer Programming
Software CPS) to activate the radio features.
The following table shows the features that can
be assigned to the Top button and Side Button 2.
Feature Description
Dedicated Call/
Emergency
To make a call to a pre-determined number. This can
be an emergency number, effectively activating an
Emergency Call.
Personality
Short cut to the personality menu option to select
one of four radio personalities,
(e.g. MPT trunking system or conventional system).
This will normally be Side Button 2.
Missed Calls
Short cut to the Missed Call menu option.
This is a list of calls received and stored by the radio
when you were unable to take the call.
User Absent
To switch the User Absent feature On and Off.
This feature is used to indicate to the caller that you
are away from your radio and unable to take calls.

8
English
RADIO OVERVIEW
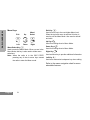
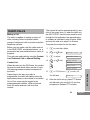
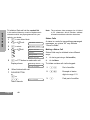
Menu Keys
Menu/Select Key c
Used to enter the Menu Mode. When you are in the
Menu Mode, this key is also used to make menu
selections.
Note: When the radio is in the IDLE STATE,
pressing any of the six menu keys causes
the radio to enter the Menu mode.
Exit Key x
Used to move up to the next higher Menu level.
When the top level menu is selected this key is
used to exit the Menu Mode. Also used to cancel/
end calls.
Up Key +
Used for scrolling when in Menu Mode.
Down Key e
Used for scrolling when in Menu Mode.
Right Key f
Used as More key to provide additional information.
Left Key d
Used as a destructive backspace key when editing.
Refer to the menu navigation chart for menu
selectable features
Left
Up
Down
Right
Menu/
Select
Exit
x
c
+
d
f
e

9
English
RADIO OVERVIEW
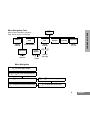
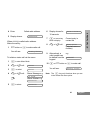
+ e
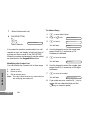
Menu Navigation
c
on/off
c to enter Menu Mode.
+ to e to scroll through the list.
c to select Menu item.
x to return to previous menu level.
+ to e to scroll through sub-list.
c to select sub-menu item.
Menu Navigation Chart
(Refer to Menu Navigation guidelines -
lower, left-hand corner of this page)
search/
edit entry
select/ ID status
select/
enter ID
Data Calls
Personality
Contact
List
User
Absent
select/
enter ID
Missed
Calls
select/
1,2....etc
select/
enter ID
Status
Add
Contact
Delete
Contact
+ e
+ e

10
English
RADIO OVERVIEW
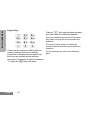
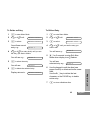
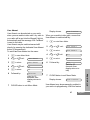
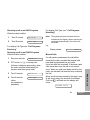
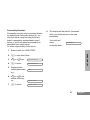
Keypad Keys
These keys are used when dialling a phone
number, making a radio call or entering
information for programming the radio’s lists.
Each key can generate several different
characters. For example, to enter the character
“C”, press the 2 key three times.
123
456
789
*0#
Pressing # will toggle between the upper
and lower case of the selected character.
If the next character required is on the same
key, press
f to move the cursor forward one
character.
If an error is made, press
d to delete the
current character and move cursor back one
character.
For full character set, refer to the following
table.

11
English
RADIO OVERVIEW
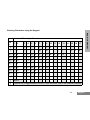
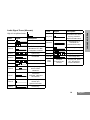
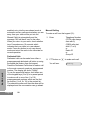
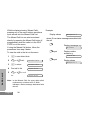
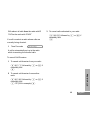
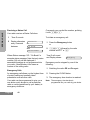
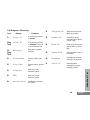
Entering Characters using the Keypad
Number of Times Key is Pressed
Ke
y
1 2 3 4 5 6 7 8 9 10 11 12 13 14 15 16 17
0 + - 0 x * / = > < #
1 . 1 ? ¿ ! , @ - & : “ ( ) ‘ % £ $
2 A B C 2 Ä Å ¥ Á À Æ ß Ç Æ
3 D E F 3 É È Ê Ê Ë
4 G H I 4 Ì Í
5 J K L 5 ³
6 M N O 6 Ñ Ñ Ö Ò Ó
7 P Q R S 7 Œ
8 T U V 8 Ü Ù Ú
9 W X Y Z 9
* Space
# Use this key to toggle between UPPER CASE and lower case of the selected character

12
English
RADIO OVERVIEW
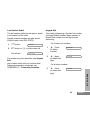
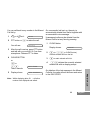
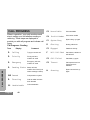
LCD Display and Icons
Displays channel, menu, and radio status
information. The top two screen rows show radio
status indicator symbols, explained in the table
below:
Symbol Name and Description
A
XPAND™ Indicator
Indicates that your radio has the companding
feature activated.
B
Power Level Indicator
“L” lights when your radio is configured to
transmit in Low Power. “H” lights when your
radio is configured to transmit in High Power.
C
Loudspeaker Indicator
Indicates that you have the loudspeaker
active.
H
Scan Indicator
Indicates that you are scanning for a system.
L
Registered Indicator
Indicates that a system has been acquired,
and monitor in conventional mode.
M
Signal Quality Indicator
Shows the radio signal quality. Five bars
indicates the best signal.
D
Contact List Edit Indicator
Indicates user is editing the contact list.
K
Data Calls List Indicator
On, indicates a data call in the list
Flashing, indicates new unread calls.
P
Battery Level Indicator
Shows the remaining charge in your battery,
based on how many bars are displayed.
Flashing, indicates
flat battery.
Q
Missed Calls Indicator
On, indicates there are missed calls in the
missed call list.
Flashing, indicates new unread calls.
!
Timer
Shows the call time.
Symbol Name and Description

13
English
RADIO OVERVIEW
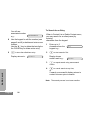
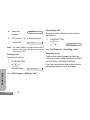
Audio Signal Tones (Normal)
High pitched tone Low pitched tone
Tone Signal Description
Self test Power up.
Tone A Call clear indication.
Tone B
Traffic channel
allocated or PTT/ Mic/
Loudspeaker enabled.
Tone C1 System busy.
Tone C2 Unavailable.
Tone C3 Called party busy.
Tone C4 Invalid number.
Tone D
Call set up in progress,
wait for further
indications.
Tone F
Transaction
confirmed, called unit
will call back.
Tone G
Look at display for
call set up or
System information.
Tone H Invalid entry.
Key click
Confidence tone when
any key pressed or
Speech limitation alert.
Fail tone
Hardware error or
Call timed out
(conventional mode).
Tone I Low battery warning.
Tone M1 Talkgroup Confirmation.
Tone M2 Talkgroup unavailable.
Tone N1 Out of range alert.
Ring
tones
Standard/
English/French/
General
Incoming call, press
PTT, then wait for
further indications.
Tone Signal Description

14
English
RADIO OVERVIEW
Audio Signal Tones (Alternate)
High to Low pitched tones
Tone Signal Description
Self test Power up.
Tone A Call clear indication.
Tone B
Traffic channel
allocated or PTT/ Mic/
Loudspeaker enabled.
Tone C1 System busy.
Tone C2
Unavailable.
Tone C3 Called party busy.
Tone C4 Invalid number.
Tone D
Call set up in progress,
wait for further
indications.
Tone F
Transaction
confirmed, called unit
will call back.
Tone G
Look at display for
call set up or
System information.
Tone H Invalid entry.
Key click
Confidence tone when
any key pressed or
Speech limitation alert.
Fail tone
Hardware error or
Call timed out
(conventional mode).
Tone I Low battery warning.
Tone M1 Talkgroup Confirmation.
Tone M2 Talkgroup unavailable.
Tone N1 Out of range alert.
Ring
tones
Standard/
English/French/
General
Incoming call, press
PTT, then wait for
further indications.
Tone Signal Description

15
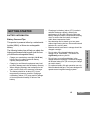
English
GETTING STARTED
GETTING STARTED
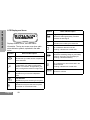
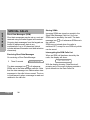
BATTERY INFORMATION
Battery Care and Tips
This product is powered either by a nickel-metal-
hydride (NiMH), or lithium-ion rechargeable
battery.
The following battery tips will help you obtain the
highest performance and longest cycle life from
your Motorola rechargeable battery.
• Charge your new battery overnight (14-16 hrs)
before using it to obtain maximum battery
capacity and performance.
• Charging in non-Motorola equipment may lead
to battery damage and void the battery warranty.
• When charging a battery that is attached to the
radio, turn the radio off to ensure a full charge.
• The battery should be at about 25°C (room
temperature) whenever possible. Charging a
cold battery (below 10°C) may result in leakage
of electrolyte and ultimately, in failure of the
battery.
• Charging a hot battery (above 35°C) results in
reduced discharge capacity, affecting the
performance of the radio. Motorola rapid-rate
battery chargers contain a temperature-sensing
circuit to ensure that the battery is charged
within these temperature limits.
• New batteries can be stored up to two years
without significant cycle loss. Store new/unused
batteries in a cool dry area.
• Batteries which have been in storage should be
charged overnight.
• Do not return fully charged batteries to the
charger for an “extra boost”. This action will
significantly reduce cycle life.
• Do not leave your radio and battery in the
charger when not charging. Continuous charging
will shorten battery life. (Do not use your charger
as a radio stand.)
• For optimum battery life and operation use only
Motorola brand chargers. They were designed to
operate as an integrated energy system.

16
English
GETTING STARTED
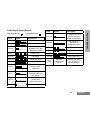
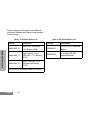
Battery chargers will charge only the Motorola
authorized batteries listed below; other batteries
will not charge.
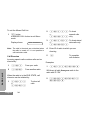
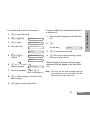
Table 1: IP54 Radio Battery List
Part No. Description
JMNN4023_R
Slim Li-Ion, 1000 mAh,
7.5 V Battery (IP54)
JMNN4024_R
High Capacity Li-Ion,
1320 mAh, 7.5 V Battery
(IP54)
JMNN4025_R
NiMH, 700 mAh, 7.5 V
FM Approved Battery
(IP54)
Do not use IP54 batteries with IP67 radios.
Table 2: IP67 Radio Battery List
Part No. Description
PMNN4073_
Li-Ion FM IP67 Standard
Battery
PMNN4074_
Li-Ion Non-FM IP67
Standard Battery

17
English
GETTING STARTED
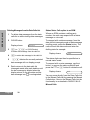
Note: IP67 water submersible radios MUST be
fitted with Motorola authorized IP67 batteries
to ensure proper functionality.
Warning:When charging a IP67 battery, make sure
that the IP67 battery (or IP67 battery with
IP67 radio) is not wet prior to placing in
the charger.
Warning:The battery charger is not waterproof. For
your safety and proper operation of the
charger, IP67 radios MUST be dry prior to
placing in the battery charger for charging.
Do NOT operate the charger, when your
hands are wet or while holding a wet IP67
radio. Do NOT touch the battery contacts,
when your hands are wet. Do NOT put the
battery into water, as this may cause the
IP67 metal contacts to corrode.
Battery Label
IP67
La pagina sta caricando ...
La pagina sta caricando ...
La pagina sta caricando ...
La pagina sta caricando ...
La pagina sta caricando ...
La pagina sta caricando ...
La pagina sta caricando ...
La pagina sta caricando ...
La pagina sta caricando ...
La pagina sta caricando ...
La pagina sta caricando ...
La pagina sta caricando ...
La pagina sta caricando ...
La pagina sta caricando ...
La pagina sta caricando ...
La pagina sta caricando ...
La pagina sta caricando ...
La pagina sta caricando ...
La pagina sta caricando ...
La pagina sta caricando ...
La pagina sta caricando ...
La pagina sta caricando ...
La pagina sta caricando ...
La pagina sta caricando ...
La pagina sta caricando ...
La pagina sta caricando ...
La pagina sta caricando ...
La pagina sta caricando ...
La pagina sta caricando ...
La pagina sta caricando ...
La pagina sta caricando ...
La pagina sta caricando ...
La pagina sta caricando ...
La pagina sta caricando ...
La pagina sta caricando ...
La pagina sta caricando ...
-
 1
1
-
 2
2
-
 3
3
-
 4
4
-
 5
5
-
 6
6
-
 7
7
-
 8
8
-
 9
9
-
 10
10
-
 11
11
-
 12
12
-
 13
13
-
 14
14
-
 15
15
-
 16
16
-
 17
17
-
 18
18
-
 19
19
-
 20
20
-
 21
21
-
 22
22
-
 23
23
-
 24
24
-
 25
25
-
 26
26
-
 27
27
-
 28
28
-
 29
29
-
 30
30
-
 31
31
-
 32
32
-
 33
33
-
 34
34
-
 35
35
-
 36
36
-
 37
37
-
 38
38
-
 39
39
-
 40
40
-
 41
41
-
 42
42
-
 43
43
-
 44
44
-
 45
45
-
 46
46
-
 47
47
-
 48
48
-
 49
49
-
 50
50
-
 51
51
-
 52
52
-
 53
53
-
 54
54
-
 55
55
-
 56
56


Motorola GP-688 Manuale utente
- Categoria
- Radio
- Tipo
- Manuale utente
- Questo manuale è adatto anche per
in altre lingue
- English: Motorola GP-688 User manual
Documenti correlati
-
Motorola GM1280 Manuale utente
-
Motorola GP1280 Series Manuale utente
-
-
-
-
-
-
-
-