Sportline 4144 Instructions Manual
- Categoria
- Contapassi
- Tipo
- Instructions Manual
Questo manuale è adatto anche per

48
1
www.sportline.com
Sportline® and Walking Advantage by Sportline™
are trademarks of SPORTLINE, a division of
E& B Exercise, LLC, Yonkers, NY 10701.
All Rights Reserved. ©2007
WV4144IS03WVI
THINQ PEDOMETER
PODÓMETRO THINQ
PODOMETRE THINQ
PEDOMETRO THINQ
THINQ PEDOMETER
#4144 ©2007 Sportline®
WV4144IS03WVI.indd 48-1 8/16/07 11:34:52 AM

2
3
READ ALL INSTRUCTIONS THROUGH BEFORE
USING YOUR PEDOMETER. KEEP THESE IN A
SAFE PLACE FOR FUTURE REFERENCE.
To operate your new pedometer:
1. Remove the plastic lm from the LCD display.
2. Pull out the battery insulator tab from the battery com-
partment located on the left hand side of your pedometer.
PEDOMETER MAIN FEATURES:
Step Counting Mode (0 ~ 699999 steps)
Calories Mode (0 ~ 6999.99 calories burned)
Distance Mode (0 ~ 699.999 miles or km measured)
Time Mode (12/24 hour format)
Stopwatch Mode (to 59 min. 59sec. 99/100th seconds)
Other Features:
Time shown in either 12 or 24 hour format
Distance traveled with individual stride set function
Calories burned with individual weight set function
Stopwatch to 1/100 accuracy
Operates in either Imperial System or Metric System
(Distance, Stride Input and Weight Input)
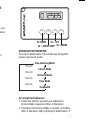
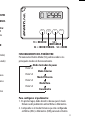
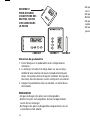
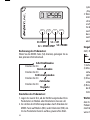
OPERATING THE PEDOMETER
Pressing the Mode button (S4) will take you through the
primary operational modes.
To Set Up Your Pedometer:
1. D
ecide rst whether you want your pedometer’s
Distance Mode to operate in Miles or Kilometers.
2. Determine if the Distance Mode is currently set to Miles
(MIL) or Kilometers (KM) by hitting the Mode Button. If
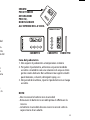
Step Counting Mode
Press S4
Calorie Mode
Press S4
Distance Mode
Press S4
Time Mode
Press S4
Stopwatch
SI=RESET
S2 = START/STOP
S3 = SET
S4 = MODE
RESET START
STOP
SET MODE
WV4144IS03WVI.indd 2-3 8/16/07 11:34:52 AM

2
3
READ ALL INSTRUCTIONS THROUGH BEFORE
USING YOUR PEDOMETER. KEEP THESE IN A
SAFE PLACE FOR FUTURE REFERENCE.
To operate your new pedometer:
1. Remove the plastic lm from the LCD display.
2. Pull out the battery insulator tab from the battery com-
partment located on the left hand side of your pedometer.
PEDOMETER MAIN FEATURES:
Step Counting Mode (0 ~ 699999 steps)
Calories Mode (0 ~ 6999.99 calories burned)
Distance Mode (0 ~ 699.999 miles or km measured)
Time Mode (12/24 hour format)
Stopwatch Mode (to 59 min. 59sec. 99/100th seconds)
Other Features:
Time shown in either 12 or 24 hour format
Distance traveled with individual stride set function
Calories burned with individual weight set function
Stopwatch to 1/100 accuracy
Operates in either Imperial System or Metric System
(Distance, Stride Input and Weight Input)
OPERATING THE PEDOMETER
Pressing the Mode button (S4) will take you through the
primary operational modes.
To Set Up Your Pedometer:
1. D
ecide rst whether you want your pedometer’s
Distance Mode to operate in Miles or Kilometers.
2. Determine if the Distance Mode is currently set to Miles
(MIL) or Kilometers (KM) by hitting the Mode Button. If
Step Counting Mode
Press S4
Calorie Mode
Press S4
Distance Mode
Press S4
Time Mode
Press S4
Stopwatch
SI=RESET
S2 = START/STOP
S3 = SET
S4 = MODE
RESET START
STOP
SET MODE
WV4144IS03WVI.indd 2-3 8/16/07 11:34:52 AM

4
5
already set to your desired measurement system, please
skip to “Input Your Stride Length”.
3. If you need to change from MIL to KM or vice versa, hit
the Mode Button until you reach the Distance Mode
(MIL or KM) will appear on the display. Press and hold
the Reset Button (S1) until the display changes over to
the system you want to work with. Please note that
performing this step will reset all your readings to zero
and return your stride and weight setting to the factory
settings.
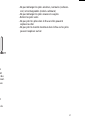
Input Your Stride Length (Range 10”/30cm ~ 80”
200 cm. Default settings are 30”/70cm).
1) Walk 10 steps.
2) Measure the distance that you’ve walked either from
heel-to-heel or toe-to-toe.
3) Divide by the distance covered to arrive at your Stride
Length.
4) Example: measured distance 360 inches, number of
steps taken was 10 = 36 inches stride length.
Important: Please remember that the length of your
stride while walking is dierent than the length of your
stride while running. If you plan to use this pedometer for
both types of exercise, you will have to reprogram your
stride length when you go from one to the other.
5) Press Mode Button (S4) to reach the Distance Mode
showing MIL or KM
6) In Distance Mode, press the Set Button (S3). The display
will show previous stride input in inches or cm and
start to ash. You will now have ve seconds to start
changing your stride length. If you do not adjust your
stride length during these 15 seconds, you will have to
start step 3 over again.
7) To change your stride length while the display is
ashing, press the Reset Button (S1). Each press of
the Reset Button will increase the input by either 1
inch or 1 cm depending on which mode you are in. If
you hold the Reset Button, the numbers will increase
continuously. Release when the display shows the
Stride Length for you.
8) Once you have entered your stride length properly, wait
15 seconds - the display will ash and reset the memory
- and the display will return to Distance Mode.
NOTE: Pedometer starts at 30”/70 cm. If your stride is less
than this, keep pressing until the pedometer goes past the
maximum (80” or 200 cm). Keep pressing until you reach
your desired stride length.
To Input Your Weight (Range 50 Lb./20 KG ~
300 Lb./150 KG. Default settings are 120 Lb./60 KG.)
In order to measure the calories you burn accurately, you
must enter your weight into the pedometer memory. To
do so:
1. Press the Mode Button (S4) until KCAL appears on the
display.
2. Press the Set Button (S3) and you’ll see the “Lb” or KG”
ash on the screen.
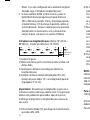
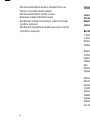
10
9
8
7
6
5
4
3
2 0
1
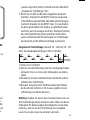
Step Distance
Ideal Distance
WV4144IS03WVI.indd 4-5 8/16/07 11:34:53 AM

4
5
already set to your desired measurement system, please
skip to “Input Your Stride Length”.
3. If you need to change from MIL to KM or vice versa, hit
the Mode Button until you reach the Distance Mode
(MIL or KM) will appear on the display. Press and hold
the Reset Button (S1) until the display changes over to
the system you want to work with. Please note that
performing this step will reset all your readings to zero
and return your stride and weight setting to the factory
settings.
Input Your Stride Length (Range 10”/30cm ~ 80”
200 cm. Default settings are 30”/70cm).
1) Walk 10 steps.
2) Measure the distance that you’ve walked either from
heel-to-heel or toe-to-toe.
3) Divide by the distance covered to arrive at your Stride
Length.
4) Example: measured distance 360 inches, number of
steps taken was 10 = 36 inches stride length.
Important: Please remember that the length of your
stride while walking is dierent than the length of your
stride while running. If you plan to use this pedometer for
both types of exercise, you will have to reprogram your
stride length when you go from one to the other.
5) Press Mode Button (S4) to reach the Distance Mode
showing MIL or KM
6) In Distance Mode, press the Set Button (S3). The display
will show previous stride input in inches or cm and
start to ash. You will now have ve seconds to start
changing your stride length. If you do not adjust your
stride length during these 15 seconds, you will have to
start step 3 over again.
7) To change your stride length while the display is
ashing, press the Reset Button (S1). Each press of
the Reset Button will increase the input by either 1
inch or 1 cm depending on which mode you are in. If
you hold the Reset Button, the numbers will increase
continuously. Release when the display shows the
Stride Length for you.
8) Once you have entered your stride length properly, wait
15 seconds - the display will ash and reset the memory
- and the display will return to Distance Mode.
NOTE: Pedometer starts at 30”/70 cm. If your stride is less
than this, keep pressing until the pedometer goes past the
maximum (80” or 200 cm). Keep pressing until you reach
your desired stride length.
To Input Your Weight (Range 50 Lb./20 KG ~
300 Lb./150 KG. Default settings are 120 Lb./60 KG.)
In order to measure the calories you burn accurately, you
must enter your weight into the pedometer memory. To
do so:
1. Press the Mode Button (S4) until KCAL appears on the
display.
2. Press the Set Button (S3) and you’ll see the “Lb” or KG”
ash on the screen.
10
9
8
7
6
5
4
3
2 0
1
Step Distance
Ideal Distance
WV4144IS03WVI.indd 4-5 8/16/07 11:34:53 AM

6
7
3. Press Reset (S1) to increase the Lbs or Kgs in increments
of 1 or hold 2 seconds to rapidly increase the number
continuously until you reach the weight you need to
input into your pedometer.
4. Press Set (S3) to nish setting your weight.
TO SET THE TIME
(CLOCK WORKS ON BOTH 12 AND 24 HOUR TIME FORMAT):
1. Press the Mode Button (S4) until the clock display
appears on the screen.
2. Press the Reset Button (S4) to toggle between 12 and
24 hours format displays.
3. Press and hold the Set Button (S3) to enter the clock
setting screen. The “Hour” digit will ash.
4. Press the Reset Button (S1) until you reach the hour you
need to set the clock to.
5. Press the Set Button to nish setting the hour. The
“Minutes” digits will ash.
6. Press the Reset Button (S1) until you reach the ap-
propriate minutes digit to set the time to.
7. Then press Set (S3) again to conrm and nish setting
the time.
STEP COUNTING MODE
1. Toggle the Mode Button (S4) to enter Step Mode
2. Put the pedometer into your pocket.
3. Start Walking
4. The display will not increment for the FIRST FIVE steps
counted. This feature is to prevent false counting.
5. The pedometer will determine what steps you have
actually taken and then will add back the rst ve steps
on the display.
6. Press and hold the Reset Button (S1) to reset the step
count back to zero.
CALORIES MODE
1. Toggle the Mode Button (S4) until the KCAL icon ap-
pears on the display.
2. Press and hold the Reset Button (S1) to reset calorie
consumption data back to zero.
3. Calorie consumption can display up to 699.999 kcal
with 0.01 resolution.
DISTANCE MODE
1. Toggle the Mode Button (S4) until MIL or KM appears on
the display to indicate you are in Distance Mode.
2. Press and hold the Reset Button (S1) to reset the
distance walked back to zero.
3. Distance can display up to 699.999 miles or kilometers
walked with 0.001 resolution.
STOPWATCH MODE
1. Toggle the Mode Button (S4) to enter Stopwatch Mode
(00’00”00 will appear on the display).
2. Press the Reset Button (S1) to reset the Stopwatch back
to zero.
3. Press the Start/Stop Button (S2) again to pause/stop
and press the Start/Stop Button again to resume.
Notes:
In Stopwatch Mode, the Stopwatch must be stopped if you
want to Reset the timer to zero.
Your pedometer will continue to count steps, measure
distance and calculate calories burned while you are using
the Stopwatch feature if you are actually walking.
WV4144IS03WVI.indd 6-7 8/16/07 11:34:53 AM

8
9
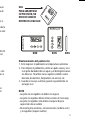
BATTERY REPLACEMENT
1. Slide out battery compartment on left hand side of the
pedometer.
2. Replace with one AG10 or equivalent button cell battery
making sure to insert it with the correct polarity (+ side
down when the front of the pedometer is facing you).
3. Close battery door.
NOTE: Removing the battery resets everything back to
the factory default settings. You will need to reenter
your stride, your weight and the time when you change
the battery.
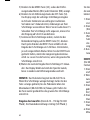
HOW TO WEAR YOUR PEDOMETER
The pedometer should be placed in your pocket either
horizontally or vertically. It should never be placed at an
angle as this will lead to inaccurate readings of your data.
INCORRECT
TO ENSURE ACCURACY,
DO NOT TILT IN YOUR
POCKET
Care of the Pedometer
1. Avoid exposing the pedometer to extreme temperatures
2. To clean the pedometer, use a dry soft cloth or a
moistened cloth in a solution of water and mild neutral
detergent. Never use volatile agents such as benzene,
thinners, spray cleaners, etc.
3. Store your pedometer in a dry place when not in use.
NOTE
• Non-rechargeable batteries are not to be recharged
• Rechargeable batteries must be removed before
recharging
• Rechargeable batteries only to be recharged under adult
supervision
• Do not mix alkaline, standard (carbon-zinc), or
rechargeable (nickel-cadmium) batteries
• Do not mix old and new batteries
• Exhausted batteries to be removed
• Do not dispose of battery in re; battery may explode
or leak
• Do not dispose of product in re; battery may explode
or leak
CORRECT CORRECT CORRECT
WV4144IS03WVI.indd 8-9 8/16/07 11:34:53 AM

8
9
BATTERY REPLACEMENT
1. Slide out battery compartment on left hand side of the
pedometer.
2. Replace with one AG10 or equivalent button cell battery
making sure to insert it with the correct polarity (+ side
down when the front of the pedometer is facing you).
3. Close battery door.
NOTE: Removing the battery resets everything back to
the factory default settings. You will need to reenter
your stride, your weight and the time when you change
the battery.
HOW TO WEAR YOUR PEDOMETER
The pedometer should be placed in your pocket either
horizontally or vertically. It should never be placed at an
angle as this will lead to inaccurate readings of your data.
INCORRECT
TO ENSURE ACCURACY,
DO NOT TILT IN YOUR
POCKET
Care of the Pedometer
1. Avoid exposing the pedometer to extreme temperatures
2. To clean the pedometer, use a dry soft cloth or a
moistened cloth in a solution of water and mild neutral
detergent. Never use volatile agents such as benzene,
thinners, spray cleaners, etc.
3. Store your pedometer in a dry place when not in use.
NOTE
• Non-rechargeable batteries are not to be recharged
• Rechargeable batteries must be removed before
recharging
• Rechargeable batteries only to be recharged under adult
supervision
• Do not mix alkaline, standard (carbon-zinc), or
rechargeable (nickel-cadmium) batteries
• Do not mix old and new batteries
• Exhausted batteries to be removed
• Do not dispose of battery in re; battery may explode
or leak
• Do not dispose of product in re; battery may explode
or leak
CORRECT CORRECT CORRECT
WV4144IS03WVI.indd 8-9 8/16/07 11:34:53 AM

10
11
PODÓMETRO THINQ
LEA ATENTAMENTE TODAS LAS INSTRUCCIONES ANTES
DE UTILIZAR EL PODÓMETRO. GUARDE ESTAS
INSTRUCCIONES PARA POSIBLES CONSULTAS FUTURAS.
Modo de funcionamiento de su nuevo podómetro:
1. Retire la película plástica que cubre la pantalla LCD
2. Retire la pestaña protectora en el alojamiento de las
pilas situado en la parte izquierda del podómetro.
CARACTERÍSTICAS PRINCIPALES DEL PODÓMETRO:
Modo Contador de pasos (0 ~ 699999 pasos)
Modo Calorías (0 ~ 6999,99 calorías quemadas)
Modo Distancia (0 ~ 699,999 millas o kilómetros recorridos)
Modo Hora (formato 12/ 24 horas)
Modo Cronómetro (hasta 59 min 59 seg 99/100 de segundo)
Otras características:
La hora se muestra en formato de 12 ó 24 horas.
Distancia recorrida con función de conguración de paso
personal
Calorías quemadas con función de conguración de peso
personal
Cronómetro con una precisión de 1/100
Funciona según el sistema imperial o el sistema métrico
decimal (Distancia, Conguración de paso y de peso)
FUNCIONAMIENTO DEL PODÓMETRO
Presionando el botón Modo (S4) podrá acceder a los
principales modos de funcionamiento.
Para congurar el podómetro:
1
. E
n primer lugar, debe decidir si desea que el modo
Distancia del podómetro utilice Millas o Kilómetros.
2. Compruebe si el modo Distancia ya está congurado
en Millas (MIL) o Kilómetros (KM) pulsando el botón
S1= REINICIO
S2 = INICIO/ PARADA
S3 =
CONFIGURAR
S4 = MODE
Modo Contador de pasos
P
ulse S4
Modo C
alorías
Pulse S4
Modo Distancia
Pulse S4
Modo Hora
Pulse S4
Cronómetro
RESET START
STOP
SET MODE
WV4144IS03WVI.indd 10-11 8/16/07 11:34:54 AM

12
13
Modo. Si ya está congurado en la unidad de longitud
deseada, vaya a “Introducir longitud de paso”.
3. Si desea cambiar de MIL a KM o viceversa, pulse el
botón Modo hasta que aparezca el modo Distancia
(MIL o KM) en la pantalla. Pulse y mantenga pulsado
el botón Reinicio (S1) hasta que la pantalla cambie al
sistema deseado. Tenga en cuenta que esta operación
pondrá todas las mediciones a cero y devolverá los
valores de paso y de peso a los valores de fábrica.
Introduzca su longitud de paso (Rango 10”/30 cm ~
80”200 cm. El valor por defecto es 30”/70cm).
1) Camine 10 pasos.
2) Mida la distancia que ha recorrido de talón a talón o de
dedo a dedo.
3) Divida por la distancia recorrida para obtener la
Longitud de paso.
4) Ejemplo: distancia medida 360 pulgadas (914 cm),
número de pasos dados 10 = una longitud de paso de
36 pulgadas (91,4 cm).
Importante: Recuerde que la longitud de su paso no es
la misma cuando camina que cuando corre. Si ha pensado
utilizar este podómetro para ambos tipos de ejercicio,
tendrá que reprogramar su longitud de paso al pasar de
uno a otro.
5) Pulse el botón Modo (S4) para llegar al modo Distancia
que indica MIL o KM
6) En el modo Distancia, pulse el botón Congurar (S3). La
pantalla mostrará la longitud de paso anterior en pulga-
das o cm y empezará a parpadear. Ahora dispondrá de
cinco segundos para proceder a cambiar la longitud de
su paso. Si no ajusta su longitud de paso durante esos
15 segundos, tendrá que repetir el paso 3 de nuevo
7) Para cambiar su longitud de paso mientras que la
pantalla parpadea, pulse el botón Reinicio (S1). Con
cada pulsación del botón Reinicio se incrementa el valor
en 1 pulgada o en 1 cm, en función del modo en que
se encuentre. Si mantiene pulsado el botón Reinicio,
los números se incrementarán sin interrupción. Suelte
el botón cuando en la pantalla aparezca su Longitud
de paso.
8) Una vez que ha introducido correctamente su longitud
de paso, espere 15 segundos. La pantalla parpadeará,
reiniciará la memoria y la pantalla regresará al modo
Distancia.
NOTA: El podómetro se inicia en 30”/70 cm. Si su paso es
inferior a este valor, mantenga pulsado el botón del podó-
metro hasta superar los valores máximos (80 pulgadas/
200 cm). Mantenga pulsado el botón hasta alcanzar la
longitud de paso deseada.
Para introducir su peso (Rango 50 Lb/ 20 Kg ~ 300 Lb/
150 Kg. Los valores por defecto son 120 Lb/ 60 Kg.)
A n de poder medir con precisión las calorías que quema,
deberá introducir su peso en la memoria del podómetro.
Para ello:
10
9
8
7
6
5
4
3
2 0
1
Step Distance
Ideal Distance
Distancia de un paso
Distancia ideal
WV4144IS03WVI.indd 12-13 8/16/07 11:34:54 AM

14
15
1. Pulse el botón Modo (S4) hasta que KCAL aparezca en
la pantalla.
2. Pulse el botón Congurar (S3) y “Lb” o KG” parpadearán
en la pantalla.
3. Pulse Reinicio (S1) para incrementar los valores en 1 Lb
o 1 Kg o mantenga pulsado durante 2 segundos para
incrementar el número rápidamente y sin interrupción
hasta que llegue al peso que desea introducir en el
podómetro.
4. Pulsa el botón “set” (S3) una vez introducido el peso.
PARA PONER EL RELOJ EN HORA
(EL RELOJ FUNCIONA EN LOS DOS FORMATOS DE 12 Y
24 HORAS):
1. Pulse el botón Modo (S4) hasta que la hora aparezca
en la pantalla.
2. Pulse el botón Reinicio (S4) para cambiar entre los
formatos de 12 y 24 horas.
3. Pulse y mantenga pulsado el botón Congurar (S3) para
acceder a la pantalla de conguración de la hora. El
valor “Hora” parpadeará.
4. Pulse el botón Reinicio (S1) hasta que se muestre la
hora correcta.
5. Pulse el botón Congurar para terminar el ajuste de la
hora. El valor “Minutos” parpadeará.
6. Pulse el botón Reinicio (S1) hasta que se muestren los
minutos correctos.
7. Pulse el botón Congurar (S3) de nuevo para conrmar
y nalizar el ajuste de la hora.
MODO CONTADOR DE PASOS
1. Pulse el botón Modo (S4) para entrar en el modo Pasos
2. Introduzca el podómetro en su bolsillo.
3. Empiece a caminar
4. La pantalla no registrará los CINCO PRIMEROS pasos
contabilizados. Esta característica evita recuentos
erróneos.
5. El podómetro calculará cuántos pasos ha dado en
realidad y. seguidamente, volverá a sumar los primeros
cinco pasos en la pantalla.
6. Pulse y mantenga pulsado el botón Reinicio (S1) para
volver a poner el contador de pasos a cero.
MODO CALORÍAS
1. Pulse el botón Modo (S4) hasta que el icono KCAL
aparezca en la pantalla.
2. Pulse y mantenga pulsado el botón Reinicio (S1) para
volver a poner el consumo calórico a cero.
3. El consumo calórico puede reejar hasta 699’999 Kcal
con una resolución de 0’01.
MODO DISTANCIA
1. Pulse el botón Modo (S4) hasta que MIL o KM aparezca
en la pantalla para indicar que se encuentra en el modo
Distancia.
2. Pulse y mantenga pulsado el botón Reinicio (S1) para
volver a poner la distancia recorrida a cero.
3. La distancia puede reejar hasta 699’999 millas o
kilómetros recorridos con una resolución de 0.001.
MODO CRONÓMETRO
1. Pulse el botón Modo (S4) para acceder al modo
Cronómetro (00’00”00 aparecerá en la pantalla).
2. Pulse el botón Reinicio (S1) para volver a poner el
Cronómetro a cero.
WV4144IS03WVI.indd 14-15 8/16/07 11:34:54 AM

16
17
3. Pulse el botón Inicio/ Parada (S2) de nuevo para hacer
una pausa/ detener y pulse el botón Inicio/ parada de
nuevo para reiniciar.
Notas:
En el modo Cronómetro, este último deberá detenerse si
desea poner el contador a cero.
Su podómetro continuará contando los pasos, midiendo la
distancia y calculando las calorías quemadas mientras esté
utilizando el Cronómetro al tiempo que camina.
CAMBIO DE PILAS
1. Abra el alojamiento de las pilas que se encuentra
situado en el lado izquierdo del podómetro.
2. Cambie la pila gastada por una pila de botón tipo AG10
o equivalente asegurándose de respetar la polaridad
correcta (lado + hacia abajo con el podómetro
orientado hacia el frente).
3. Vuelva a colocar la tapa.
NOTA: Un cambio de pila devuelve todos los valores a los
valores de fábrica. Al cambiar la pila, tendrá que volver a
introducir su longitud de paso, su peso y la hora.
CÓMO LLEVAR SU PODÓMETRO
El podómetro deberá llevarse en el bolsillo en posición
tanto horizontal como vertical. No deberá colocarse en
ángulo pues esto podría llevar a lecturas imprecisas.
MAL
PARA GARANTIZAR
SU PRECISIÓN, NO
DEBE INCLINARSE
DENTRO DEL BOLSILLO
Mantenimiento del podómetro
1. Evite exponer el podómetro a temperaturas extremas
2. Para limpiar el podómetro, utilice un paño suave y seco
o un paño humedecido con agua y un detergente suave
no abrasivo. No utilice nunca agentes volátiles como
benceno, disolventes, limpiadores en aerosol, etc.
3. Cuando no lo vaya a utilizar, guarde su podómetro en
un lugar seco.
NOTA
• Las pilas no recargables no deben recargarse
• Las pilas recargables deben retirarse antes de la recarga
• Las pilas recargables sólo deben recargarse bajo la
supervisión de un adulto
• No mezcle pilas alcalinas, convencionales (carbono-zinc)
y recargables (níquel-cadmio)
BIEN BIEN BIEN
WV4144IS03WVI.indd 16-17 8/16/07 11:34:55 AM

18
19
• No mezcle pilas usadas y nuevas
• Las pilas agotadas deben retirarse
• No arroje las pilas al fuego; pueden explotar o sufrir fugas
• No arroje el producto al fuego; las pilas pueden explotar
o sufrir fugas
PODOMETRE THINQ
LIRE LE MANUEL DANS SON INTEGRALITE AVANT
D’UTILISER LE PODOMETRE. LE CONSERVER DANS
UN ENDROIT SUR EN VUE DE TOUTE CONSULTATION
ULTERIEURE.
Utilisation du podomètre :
1. Retirer la pellicule en plastique recouvrant l’écran LCD.
2. Tirer sur la languette isolante du compartiment à pile
situé sur le côté gauche du podomètre.
CARACTERISTIQUES PRINCIPALES DU PODOMETRE :
Mode de comptage de pas (0 ~ 699 999 pas)
Mode de calcul des calories (0 ~ 6 999,99 calories brûlées)
Mode distance (0 ~ 699,999 miles ou km parcourus)
Mode d’heure (format 12h/24 h)
Mode chronomètre (jusqu’à 59 min. 59 sec.)
99/100ème sec.)
Autres caractéristiques :
Heure achée au format 12 h ou 24 h
Distance parcourue selon le réglage du nombre de foulées
calculées
Calories brûlées selon le poids déni
Chronomètre au 1/100ème de sec.
Fonctionne selon le système d’unités de mesure anglo-sax-
onnes ou métriques (distance, nombre de foulées, poids)
WV4144IS03WVI.indd 18-19 8/16/07 11:34:55 AM

20
21
FONCTIONNEMENT DU PODOMETRE
Appuyer sur le bouton Mode (S4) pour accéder aux modes
de fonctionnement principaux.
Pour paramétrer le podomètre :
1. Sélectionner d’abord l’unité de mesure pour le mode de
distance (miles ou km).
2. Régler l’unité en miles (MIL) ou en kilomètres (KM) en
appuyant sur le bouton Mode. Si l’unité de mesure a
déjà été dénie, appuyer sur Skip (passer) pour passer à
Input Your Stride Length (saisir la longueur de foulée).3.
Pour changer de MIL à KM ou vice versa, appuyer sur le
bouton Mode jusqu’à ce que Distance Mode (MIL or KM)
apparaisse à l’écran. Appuyer sur le bouton Reset (S1)
et le maintenir enfoncé jusqu’à ce que l’achage passe
au mode souhaité. Noter qu’après cette étape, tous les
relevés précédents reviendront à zéro et les réglages
de la longueur de foulée et du poids reviendront aux
valeurs d’usine.
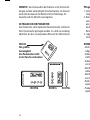
Saisir la longueur de foulée (plage 10 po./30 cm ~ 80”
po./200 cm. La plage par défaut est 30 po./70 cm).
1) Faire dix pas.
2) Mesurer la distance parcourue talon à talon ou orteil
à orteil.
3) Diviser ce chire par la distance parcourue pour obtenir
la longueur de foulée.
4) Exemple : distance mesurée 360 pouces, nombre de
pas : 10 => longueur de foulée : 36 pouces.
Important : ne pas oublier que la longueur de foulée
marchée est diérente de la longueur de foulée courue.
Pour pouvoir utiliser le podomètre lors de ces deux types
d’activité, celui-ci devra être reparamétré entre les deux.
5) Appuyer sur le bouton Mode (S4) pour accéder au mode
distance en MIL ou en KM
6) Au mode distance, appuyer sur le bouton Set (S3).
L’achage indiquera la longueur de foulée saisie
10
9
8
7
6
5
4
3
2 0
1
Step Distance
Ideal Distance
Longueur de pas
Distance idéale
S1= RESET (réinitialisation)
S2 = START/STOP (marche/arrêt)
S3 = SET
(réglage)
S4 = MODE
(mode)
Mode Step Counting
(comptage de pas)
A
ppuy
er sur S4
Mode Calories (calcul des calories)
Appuyer sur S4
Mode Distance (distance)
Appuyer sur S4
Mode Time (heure)
Appuyer sur S4
RESET START
STOP
SET MODE
WV4144IS03WVI.indd 20-21 8/16/07 11:34:55 AM
La pagina si sta caricando...
La pagina si sta caricando...
La pagina si sta caricando...
La pagina si sta caricando...
La pagina si sta caricando...
La pagina si sta caricando...
La pagina si sta caricando...
La pagina si sta caricando...
La pagina si sta caricando...
La pagina si sta caricando...
La pagina si sta caricando...
La pagina si sta caricando...
La pagina si sta caricando...
La pagina si sta caricando...
La pagina si sta caricando...
La pagina si sta caricando...
La pagina si sta caricando...
La pagina si sta caricando...
La pagina si sta caricando...
La pagina si sta caricando...
La pagina si sta caricando...
La pagina si sta caricando...
La pagina si sta caricando...
La pagina si sta caricando...
La pagina si sta caricando...
La pagina si sta caricando...
La pagina si sta caricando...
La pagina si sta caricando...
-
 1
1
-
 2
2
-
 3
3
-
 4
4
-
 5
5
-
 6
6
-
 7
7
-
 8
8
-
 9
9
-
 10
10
-
 11
11
-
 12
12
-
 13
13
-
 14
14
-
 15
15
-
 16
16
-
 17
17
-
 18
18
-
 19
19
-
 20
20
-
 21
21
-
 22
22
-
 23
23
-
 24
24
-
 25
25
-
 26
26
-
 27
27
-
 28
28
-
 29
29
-
 30
30
-
 31
31
-
 32
32
-
 33
33
-
 34
34
-
 35
35
-
 36
36
-
 37
37
-
 38
38
-
 39
39
-
 40
40
-
 41
41
-
 42
42
-
 43
43
-
 44
44
-
 45
45
-
 46
46
-
 47
47
-
 48
48


Sportline 4144 Instructions Manual
- Categoria
- Contapassi
- Tipo
- Instructions Manual
- Questo manuale è adatto anche per
in altre lingue
- English: Sportline 4144
- français: Sportline 4144
- español: Sportline 4144
- Deutsch: Sportline 4144
Documenti correlati
Altri documenti
-
Timex Pedometer: INDIGLO®; Guida utente
-
Silva EX3 PLUS Manuale utente
-
-
-
Hama PM Pro 3 plus - 106903 Manuale del proprietario
-
Hama PM Pro - 106904 Manuale del proprietario
-
iON USB PEDOMETER Manuale del proprietario
-
-
-
Dexford PE 226 Manuale del proprietario