Spectrum Industries Flip-Up Shelf Manuale del proprietario
- Tipo
- Manuale del proprietario

For CORE Lectern only
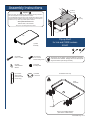
Remove pre-installed adapters
(Not used on CORE Lectern)
Assembly InstructionsAssembly Instructions
15.25”W
[38.7 cm]
7”D
[17.8 cm]
0191814R4 Page 1 of 4
Assembly Instructions
Any parts damaged during shipment must be reported within 5 days of receipt.
To report information regarding missing parts or damage, to purchase parts or
accessories, or if you have any questions, please contact us.
www.spectrumfurniture.com
800-235-1262, 715-723-6750
Thank you for purchasing Spectrum products!
Important
Before you begin, read and comply with all safety and operating instructions,
and ensure all parts and correct quantities are included.
Flip-up Shelf
for Link and CORE Lecterns
55540
(1) Shelf
Assembly
26”D
[66 cm]
(2) 0177523
Spacer plate
(used on CORE
Lectern only)
(16) 0100167
8-32 x 1/2” PH
Thread-cutting screw
(1) 039622
2” Grommet
(8) 051696
8-32 x 1” PHMS
(8) 021588
8-32 Keps Nut
(8) 0285
3/16 Flat Steel
Washer
Assembly tip: Do not tighten component fasteners completely
until all have been installed. Keeping them loose will help with
alignment between parts during assembly.
Adapters
Shelf
Assembly
”

Shelf bracket
Laminate side panel
Installation video available
See www.spectrumfurniture.com
”
Laminate Side Panel
(interior view)
Upper shelf
position holes
Lower shelf
position holes
0191814R4 Page 2 of 4
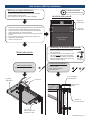
Link Lectern (55115) installation:
Laminate side panels
Metal side panels
2” Grommet
Flip-up shelf
(2) Folding
shelf bracket
8-32 Keps nut
(use 11/32” wrench)
3/16” Flat steel
washer
8-32 x 1” PHMS in
3/16” drilled hole
8-32 x 1/2” PH
thread-cutting screws
Before you begin determine:
• The side of the lectern the shelf will be installed (left or right side)
• The shelf position: (Upper or lower)
• Type of side panels your lectern has (metal or laminate)
Attaching to laminate side panels:
1. Open the lectern door and remove the rack
cube (if equipped).
2. From inside the lectern, use a drill with a 3/16”
drill bit and slowly drill out the corresponding
pre-drilled pilot holes located on the laminate
side panel. Masking tape can be used on the
exterior to minimize chip-out.
Drill with
3/16” drill bit
”
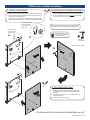
1. Extend and lock each folding shelf bracket into the horizontal position.
2. Select the fasteners needed (Metal or laminate side panels)
3. Install the (4) lower screws into the side panel at the preferred
height leaving about 1/4” of threads exposed.
4. Set the shelf assembly onto the (4) lower screws using the notched
brackets.
5. Secure the shelf assembly by installing the (4) upper screws.
6. Tighten all 8 screws securely.
7. Install 2” grommet in shelf.
Metal side panel fasteners
(4) 8-32 x 1/2” PH Thread-cutting screws
Laminate side panel fasteners
(4) 8-32 x 1” PHMS
(4) 3/16” Flat steel washers
(4) 8-32 Keps nuts

0191814R4 Page 3 of 4
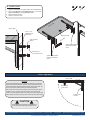
CORE Lectern (55550) installation:
Side panel
(Right side panel shown)
Tip: Masking tape can be
used on the laminate-side
to minimize chip-out.
The (8) starter holes on the back of the laminate side
panel need to be drilled through before installing shelf.
Drill with
3/16” drill bit
Side panel
X8
”
CORE Lectern
1. Remove side panel:
1. Determine which panel the shelf will be mounted to (left or right side)
2. If the side panel is already installed on the lectern, remove the (4)
upper #14 x 3/4” PHSM screws.
3. Loosen the lower (2) #14 x 3/4” PHSM keyhole screws about 1/8”.
4. Lift the side panel up and out of the two lower keyholes to remove.
3. Re-install side panel:
1. Re-align the lower (2) #14 x 3/4” PHSM screws with
the keyholes-be sure the screws are fully seated in the
keyholes.
2. Re-install the (4) upper #14 x 3/4” PHSM screws to
secure side panel.
3. Tighten all (6) screws securely.
2. Drill holes in laminate side panel:
1. Locate the (8) starter holes in the back of the side panel.
2. Using a drill with a 3/16” drill bit, slowly drill completely
through the panel at the (8) hole locations.
CORE Lectern
(Continue with Core Lectern shelf installation on p.4)
X4
X2
Remove the (4)
upper #14 x 3/4”
PHSM screws.
Loosen the lower (2)
#14 x 3/4” PHSM
keyhole screws
about 1/8”.

Shelf Operation
CAUTION
Keep clear of pinch points during shelf movement.
Do not exceed 35 lbs [15.9 kg] of weight on shelf.
Operation
The shelf will automatically lock into place when lifted into the horizontal
hold the shelf bracket levers while slowly lowering or raising the shelf. Do
not move the lectern while the shelf is in the horizontal position.
Note: Power and communication wiring for document cameras, laptop
routed on top of the audience-side of the shelf. Use of the shelf grommet
hole for wiring will result in pinching of the cords when the shelf is folded.
”
Shelf bracket
Laminate side panel
Flip-up shelf
0191814R4 Page 4 of 4
© 2023 Spectrum Industries Inc., All rights reserved.
1500 RIVER STREET, PO BOX 400, CHIPPEWA FALLS, WI 54729 / 800-235-1262 / 715-723-6750 / WWW.SPECTRUMFURNITURE.COM
Flip-up shelf
Release lever
(press here)
Folding shelf
bracket
Spacer plate between
shelf hinge and side
panel
Side panel
Spacer plate between
shelf hinge and side
panel
8-32 Keps nut
(use 11/32” wrench)
3/16” Flat steel
washer
8-32 x 1-1/2”
PHMS in 3/16”
drilled hole
Spacer plate
4. Install shelf:
1. Align the shelf brackets and spacer plates with the drilled holes.
2. Secure using (8) 8-32 x 1-1/2” PHM screws and on the inside,
(8) 3/16” at washers, and (8) 8-32 Keps nuts.
3. Tighten fasteners securely.
4. Install 2” grommet in shelf.
2” Grommet
-
 1
1
-
 2
2
-
 3
3
-
 4
4


