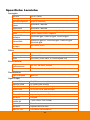
AVer AVerVision F17+ Manuale utente
- Categoria
- Fotocamere per documenti
- Tipo
- Manuale utente

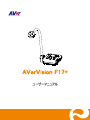
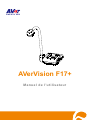
AVerVision F17+
User Manual

Federal Communications Commission Statement (Class A)
NOTE: This equipment has been tested and found to comply with the limits for
a Class A digital device, pursuant to part 15 of the FCC Rules. These limits
are designed to provide reasonable protection against harmful interference
when the equipment is operated in a commercial environment. This equipment
generates, uses, and can radiate radiofrequency energy and, if not installed and used in
accordance with the instruction manual, may cause harmful interference to radio
communications. Operation of this equipment in a residential area is likely to cause
harmful interference in which case the user will be required to correct the interference
at his own expense.
FCC Caution: Any changes or modifications not expressly approved by the party
responsible for compliance could void the user's authority to operate this equipment.
This device complies with part 15 of the FCC Rules.
Operation is subject to the following two conditions:
(1) This device may not cause harmful interference, and
(2) This device must accept any interference received, including interference that may
cause undesired operation.
CE Class A (EMC)
This product is herewith confirmed to comply with the requirements set out in
the Council Directives on the Approximation of the laws of the Member
States relating to Electromagnetic Compatibility Directive 2014/30/EU.
Warning:
This is a class A product. In a domestic environment this product may cause radio
interference in which case the user may be required to take adequate measures.
DISCLAIMER
No warranty or representation, either expressed or implied, is made with respect to the
contents of this documentation, its quality, performance, merchantability, or fitness for a
particular purpose. Information presented in this documentation has been carefully
checked for reliability; however, no responsibility is assumed for inaccuracies. The
information contained in this documentation is subject to change without notice.
In no event will AVer be liable for direct, indirect, special, incidental, or consequential
damages arising out of the use or inability to use this product or documentation, even if
advised of the possibility of such damages.
TRADEMARKS
“AVer” is a trademark owned by AVer Information Inc. Other trademarks used herein for
description purpose only belong to each of their companies.

COPYRIGHT
©2023 of this object belong to AVer Information Inc. | February 22, 2023
All rights of this object belong to AVer Information Inc. Reproduced or transmitted in any
form or by any means without the prior written permission of AVer Information Inc. is
prohibited. All information or specifications are subject to change without prior notice.
NOTICE
SPECIFICATIONS ARE SUBJECT TO CHANGE WITHOUT PRIOR NOTICE. THE
INFORMATION CONTAINED HEREIN IS TO BE CONSIDERED FOR REFERENCE
ONLY.
WARNING
TO REDUCE RISK OF FIRE OR ELECTRIC SHOCK, DO NOT EXPOSE THIS
APPLIANCE TO RAIN OR MOISTURE. WARRANTY VOID FOR ANY UNAUTHORIZED
PRODUCT MODIFICATION.
CAUTION
- Risk of explosion if battery is replaced by an incorrect type.
- Dispose of used batteries in a safe and proper manner.
Remote Control Battery Safety Information
- Store batteries in any cool & dry place.
- Do not dispose used batteries in domestic waste. Dispose batteries at special collection
points or return to stores if applies.
- Remove the batteries if they are not in use for a long period of time. Battery leakage and
corrosion can damage the remote control, dispose batteries safely.
- Do not mix and use old and new batteries.
- Do not mix and use different types of batteries: alkaline, standard (carbon-zinc) or
rechargeable (nickel-cadmium).
- Do not dispose batteries in a fire.
- Do not attempt to short-circuit the battery terminals.
THE MARK OF CROSSED-OUT WHEELED BIN INDICATES THAT THIS PRODUCT
MUST NOT BE DISPOSED OF WITH YOUR OTHER HOUSEHOLD WASTE.
INSTEAD, YOU NEED TO DISPOSE OF THE WASTE EQUIPMENT BY HANDING IT
OVER TO A DESIGNATED COLLECTION POINT FOR THE RECYCLING OF WASTE
ELECTRICAL AND ELECTRONIC EQUIPMENT. FOR MORE INFORMATION ABOUT
WHERE TO DROP OFF YOUR WASTE EQUIPMENT FOR RECYCLING, PLEASE
CONTACT YOUR HOUSEHOLD WASTE DISPOSAL SERVICE OR THE SHOP
WHERE YOU PURCHASED THE PRODUCT.

WARNING
To reduce the risk of fire or electric shock, do not expose this appliance to rain or
moisture. Warranty will be void if any unauthorized modifications are done to the
product.
Do not drop the camera or subject it to physical shock.
Use the correct power supply voltage to avoid the damaging camera.
Do not place the camera where the cord can be stepped on as this may result in
fraying or damage to the lead or the plug.

More Help
For FAQs, technical support, software and user manual download, please visit:
Headquarters
Download Center: https://www.aver.com/download-center
Technical Support: https://www.aver.com/technical-support
USA Branch office
Download Center: https://www.averusa.com/education/support
Technical Support: https://averusa.force.com/support/s/contactsupport
Europe Branch office
Download Center: https://www.avereurope.com/download-center
Technical Support: https://www.avereurope.com/technical-support

Contact Information
Headquarters
AVer Information Inc.
https://www.aver.com
8F, No.157, Da-An Rd., Tucheng Dist., New Taipei City 23673, Taiwan
Tel: +886 (2) 2269 8535
USA Branch office
AVer Information Inc., Americas
https://www.averusa.com
668 Mission Ct., Fremont, CA 94539, USA
Tel: +1 (408) 263 3828
Toll-free: +1 (877) 528 7824
Technical support: support.us[email protected]m
Europe Branch office
AVer Information Europe B.V.
https://www.avereurope.com
Westblaak 134, 3012 KM, Rotterdam, The Netherlands
Tel: +31 (0) 10 7600 550
Technical support: eu.rma@aver.com
Japan Branch Office
アバー・インフォメーション株式会社
https://jp.aver.com
〒160-0023 日本東京都新宿区西新宿 3-2-26 立花新宿ビル 7 階
Tel: +81 (0) 3 5989 0290
テクニカル・サポート: Support.EDU.JP@aver.com
Vietnam Branch Office
Công ty TNHH AVer Information (Việt Nam)
Tầng 5, 596 Nguyễn Đình Chiểu, P.3, Quận 3,
Thành phố Hồ Chí Minh 700000, Việt Nam
Tel: +84 (0) 28 22 539 211

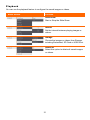
Table of Contents
Package Contents .............................................................................................. 1
Optional Accessories ........................................................................................ 1
Get Familiar with the AVerVision F17+ ............................................................ 2
Right Panel .............................................................................................................. 3
Rear Panel .............................................................................................................. 3
Left Panel ................................................................................................................ 4
Control Panel ........................................................................................................... 5
Remote Control ....................................................................................................... 7
Making the Connections ................................................................................... 9
Connect to a Monitor or LCD/DLP Projector ............................................................ 9
C
Co
on
nn
ne
ec
ct
t
t
to
o
a
a
M
Mo
on
ni
it
to
or
r
o
or
r
L
LC
CD
D/
/D
DL
LP
P
P
Pr
ro
oj
je
ec
ct
to
or
r
w
wi
it
th
h
H
HD
DM
MI
I
O
Ou
ut
tp
pu
ut
t
i
in
nt
te
er
rf
fa
ac
ce
e ................ 9
C
Co
on
nn
ne
ec
ct
ti
in
ng
g
t
th
he
e
P
Po
ow
we
er
r ........................................................................................... 10
C
Co
on
nn
ne
ec
ct
t
t
to
o
a
a
C
Co
om
mp
pu
ut
te
er
r ......................................................................................... 10
C
Co
on
nn
ne
ec
ct
t
t
to
o
a
a
C
Co
om
mp
pu
ut
te
er
r
v
vi
ia
a
U
US
SB
B ........................................................................... 11
C
Co
on
nn
ne
ec
ct
t
t
to
o
a
a
C
Co
om
mp
pu
ut
te
er
r
w
wi
it
th
h
H
HD
DM
MI
I
I
In
np
pu
ut
t
i
in
nt
te
er
rf
fa
ac
ce
e ................................................ 11
C
Co
on
nn
ne
ec
ct
t
a
an
n
E
Ex
xt
te
er
rn
na
al
l
M
Mi
ic
cr
ro
op
ph
ho
on
ne
e .......................................................................... 12
C
Co
on
nn
ne
ec
ct
t
a
an
n
A
Am
mp
pl
li
if
fi
ie
ed
d
S
Sp
pe
ea
ak
ke
er
r .............................................................................. 12
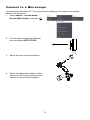
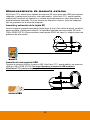
Connect to a Microscope ................................................................................ 13
Storing and Handling the Document Camera ........................................................ 15
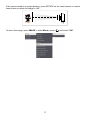
Shooting Area ........................................................................................................ 16
Overhead Light ...................................................................................................... 18
Infrared Sensor ...................................................................................................... 18
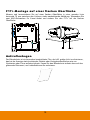
Mounting the F17+ on a Flat Surface .................................................................... 19
Anti-glare Sheet ..................................................................................................... 19
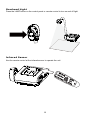
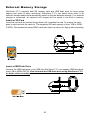
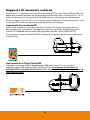
External Memory Storage ............................................................................... 20
Insert an SD Card ............................................................................................. 20
Insert a USB Flash Drive .................................................................................. 20
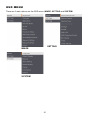
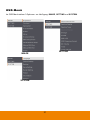
OSD MENU ........................................................................................................ 21
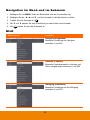
Navigate the Menu and Submenu ......................................................................... 22
Image .................................................................................................................... 22
Brightness ......................................................................................................... 22
Contrast ............................................................................................................ 22
Saturation ......................................................................................................... 22
Preview Mode ................................................................................................... 23
Effect................................................................................................................. 23
Mirror ................................................................................................................ 23
Exposure Setup ................................................................................................ 23
Manual Exposure .............................................................................................. 24

White Balance Setup ........................................................................................ 24
Manual WB Blue ............................................................................................... 24
Manual WB Red ................................................................................................ 24
Focus ................................................................................................................ 25
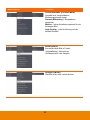
Setting ................................................................................................................... 26
Capture Resolution ........................................................................................... 26
Capture Quality ................................................................................................. 26
Capture Type .................................................................................................... 26
Capture Interval ................................................................................................ 26
Storage ............................................................................................................. 27
Format .............................................................................................................. 27
USB to PC ........................................................................................................ 27
USB Streaming Format ..................................................................................... 27
MIC Volume ...................................................................................................... 28
Start Timer ........................................................................................................ 28
Pause/Stop Timer ............................................................................................. 28
Timer Interval .................................................................................................... 28
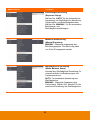
System .................................................................................................................. 29
Language .......................................................................................................... 29
Output Display .................................................................................................. 29
Backup .............................................................................................................. 29
Save Setting ..................................................................................................... 29
Recall Setting .................................................................................................... 29
Flicker ............................................................................................................... 30
Information ........................................................................................................ 30
Default .............................................................................................................. 30
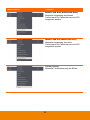
Playback ................................................................................................................ 31
Slide Show ........................................................................................................ 31
Interval .............................................................................................................. 31
Storage ............................................................................................................. 31
Delete All .......................................................................................................... 31
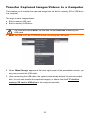
Transfer Captured Images/Videos to a Computer ........................................ 32
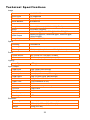
Technical Specifications ................................................................................. 33
Image ................................................................................................................ 33
Optics ............................................................................................................... 33
Power ............................................................................................................... 33
Lighting ............................................................................................................. 33
Input / Output .................................................................................................... 33
Dimension ......................................................................................................... 33
External Storage ............................................................................................... 34
Troubleshooting ............................................................................................... 35
Limited Warranty .............................................................................................. 36

1
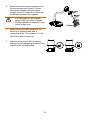
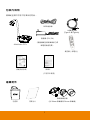
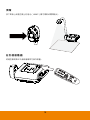
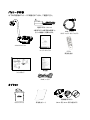
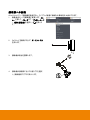
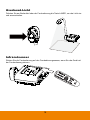
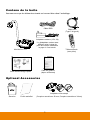
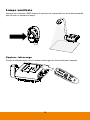
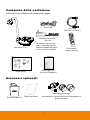
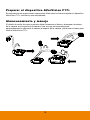
Package Contents
You can find the following items included in the package.
AVerVision F17+
RGB Cable
Power Adapter (12V, 2A)
* The power adapter will vary
depending on the standard
power outlet of the country
where it is sold.
USB Cable
(Type C to Type A)
Remote Control
(AAA*2 batteries included)
Quick Start Guide
Warranty Card
(Only for Japan)
Optional Accessories
Carrying Bag
Anti-glare Sheet
Microscope Adapter (28mm and 34mm Rubber Coupler are included)

2
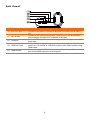
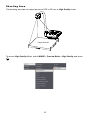
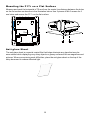
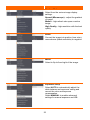
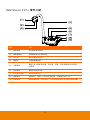
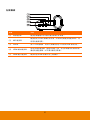
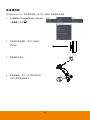
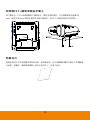
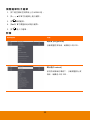
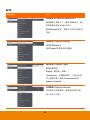
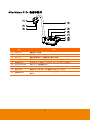
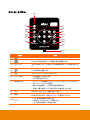
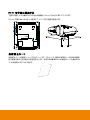
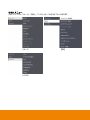
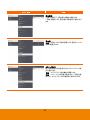
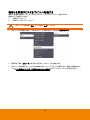
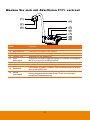
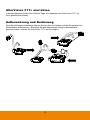
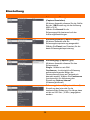
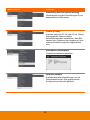
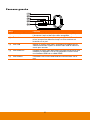
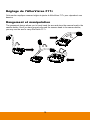
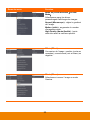
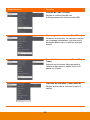
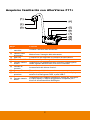
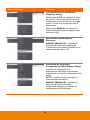
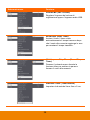
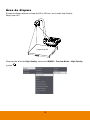
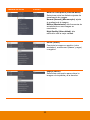
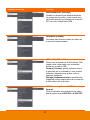
Get Familiar with the AVerVision F17+
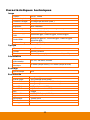
Name
Function
(1) Camera head Contain the camera sensor.
(2) Camera lens Focus the image in the camera.
(3) LED light
Provide light to enhance the lighting condition.
(4) Flexible arm Provide adjustable viewing coverage.
(5) Left panel Connections for HDMI output/input external display device, MIC in,
Line out, and USB Port
(6) Control panel Easy access to various functions.
(7) IR sensor Receive remote control commands.
(8) Rear panel Connections for power, computer, RGB input/output external display
device, and USB-C port.
(9) Right panel Connections for camera head holder, SD card, and Kensington
security lock compatible slot.

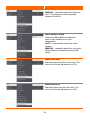
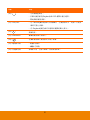
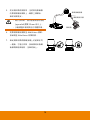
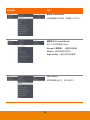
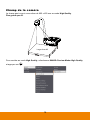
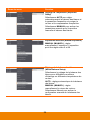
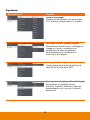
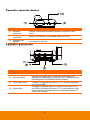
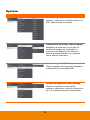
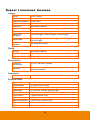
3
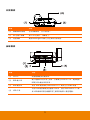
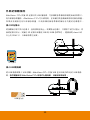
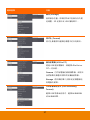
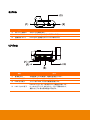
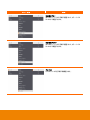
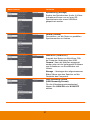
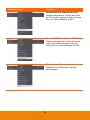
Right Panel
Name
Function
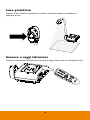
(1) Camera holder
Hold the camera head for storage.
(2) SD card slot
Insert the SD card with the label facing up.
(3) Antitheft slot
Attach a Kensington compatible security lock or antitheft device.
Rear Panel
Name
Function
(1) DC12V
Connect the power adapter into this port.
(2) RGB IN port Input the signal from a computer or other sources and pass it through to
the RGB OUT port only. Connect this port to the RGB output port of a
computer.
(3) RGB OUT port
Connect the AVerVision F17+ to any display device with RGB cable.
(4) USB-C port Connect to a USB port of a computer with a USB cable and use
AVerVision F17+ as a USB camera or transfer the captured
images/videos from the memory source to computer.

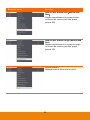
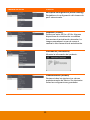
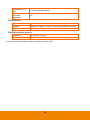
4
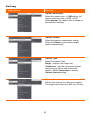
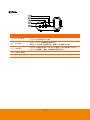
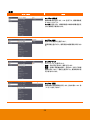
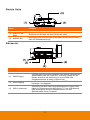
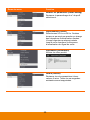
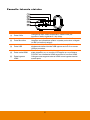
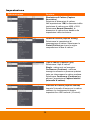
Left Panel
Name
Function
(1) Line OUT port Connect to an amplifier speaker to playback recorded audio & video
clip.
(2) MIC IN port Connect to an external microphone. The built-in mic will be disabled
when external microphone is connected to this port.
(3) USB port Insert a USB flash drive to save the images/video directly from the USB
flash drive.
(4) HDMI OUT port Output the video signal from the main system on an interactive flat
panel, an LCD monitor or LCD/DLP projector with HDMI interface using
HDMI cable.
(5) HDMI IN port Connect an external HDMI source as an input via this port. Connect this
port to the HDMI output port of a computer.

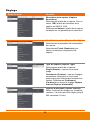
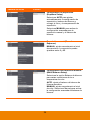
5
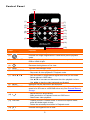
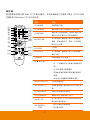
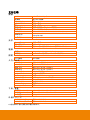
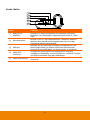
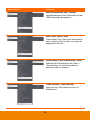
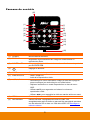
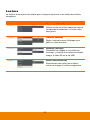
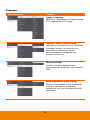
Control Panel
Name
Function
(1) POWER
Turn the unit on/standby mode.
(2) Increase the image magnification in camera and picture playback
mode.
(3) CAMERA / PC Switch the video signal between the camera or computer from the
RGB or HDMI IN port.
(4) Decrease the brightness of live view.
(5) LAMP
Turn the overhead light on/off.
(6) FREEZE/STOP - Pause or resume image display in Camera mode.
- Stop audio & video playback in Playback mode.
(7) ▲,▼,◄, & ► - Pan and zoom-in image (above digital zoom level) in live mode.
- Select options in OSD menu.
- Use ▲&▼ to increase and decrease the video playback volume.
- Use ◄&► to play the video backward and forward.
(8) MENU
Open and exit the OSD menu and submenu.
(9) RECORDING Start/Stop audio & video recording. Audio and video recording can be
saved to an SD card or a USB flash drive only. See External Memory
Storage.
(10) - Adjust the focus automatically.
- Make a selection in Playback mode and OSD menu.
- Start/Pause video playback.
(11) CAP/DEL - Capture picture in Camera mode. In continuous capture mode,
press this button again to stop.
- Delete the selected picture/video in Playback mode.
(12) Increase the brightness of live view.
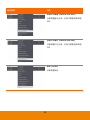
(1)
(2)
(3)
(4)
(5)
(6)
(9)
(10)
(8)
(7)
(16)
(11)
(12)
(13)
(14)
(15)

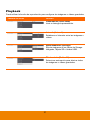
6
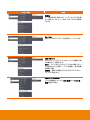
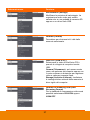
Name
Function
(13) PLAYBACK View & playback captured still images and video files.
(14) Decrease the image magnification in camera and picture playback
mode.
(15) Power LED
indicator
- Red: Standby
- Green: On
(16) Built-in MIC Record audio when recording video clip. The recorded sound will be in
monophonic.

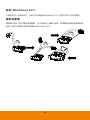
7
.
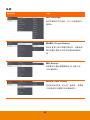
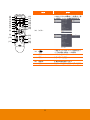
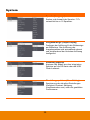
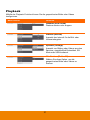
Remote Control
The remote control requires two (2) “AAA” size batteries (provided), make sure batteries are
installed properly before use. You can access all the features of AVerVision F17+ with the
remote.
Name
Function
(1) POWER Turn the unit on/standby
(2) CAMERA
Camera mode displays the video
signal from the built-in camera.
(3) RECORD
Start/Stop audio & video recording.
Video recording can only be saved
either to an SD memory card or a
USB flash drive.
(4) CAPTURE
Capture still image in Camera mode.
In continuous capture mode, press
this button again to stop.
(5) VISOR Not supported
(6) ROTATE
Rotate the image by 0/180° in
Camera mode.
(7) MENU
Open and exit the OSD menu.
(8) ▲,▼,◄, & ► - Pan and zoom-in image (above
digital zoom level) in live mode.
- Select options in OSD menu.
- Use ▲&▼ to increase and
decrease the video playback
volume.
- Use ◄&► to play the video
backward and forward.
(9) AUTO FOCUS Adjust the focus automatically.
(10) ZOOM +/-
Increase/decrease the image
magnification in camera and picture
playback mode.
(11) ZOOM 1X Reset zoom level to 100%.
(12) PLAYBACK
View the captured picture/video from
the memory images.
(13) PC 1/2
PC mode displays the video signal
from the RGB/HDMI INPUT port of
F17+.
(14) FREEZE / STOP
- Freeze live images.
- Stop video playback.
(15) SPOTLIGHT Not supported
(16) SPLIT SCREEN Not supported
(17) MODE Press to switch between Normal
(Microscope), Motion, and High
Quality.
(18)
(14)
(11)
(7)
(8)
(5)
(2)
(1)
(22)
(13)
(4)
(3)
(15)
(12)
(17)
(23)
(20)
(19)
(9)
(6)
(16)
(10) (21)

8
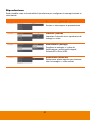
Name
Function
(18) TIMER
Select SETTING > Timer. Select to
Start/Pause/Stop the timer
countdown.
Select Timer Interval to set the timer
duration.
(19)
- Make a selection in Playback
mode and OSD menu.
- Play/Pause video playback.
(20) LAMP
Turn the overhead light on/off.
(21) BRIGHTNESS +/-
Adjust the brightness.
(22) DEFAULT
Reset to factory default setting.
(23) DEL
Delete the selected picture/video in
Playback mode.
(18)
(14)
(11)
(7)
(8)
(5)
(2)
(1)
(22)
(13)
(4)
(3)
(15)
(12)
(17)
(23)
(20)
(19)
(9)
(6)
(16)
(10) (21)

9
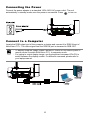
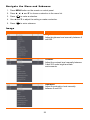
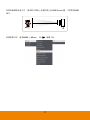
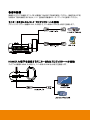
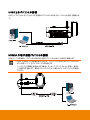
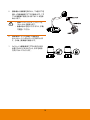
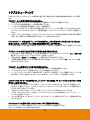
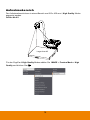
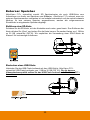
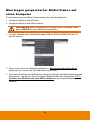
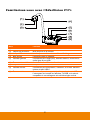
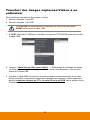
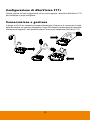
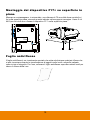
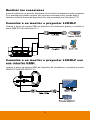
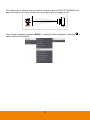
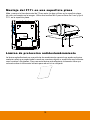
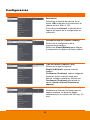
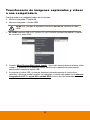
Making the Connections
Before making the connection, make sure the power of all devices are turned off. If you are
not sure on where to connect, simply follow the illustrated connections below and also refer
to the user manual of the device you are connecting to the AVerVision F17+.
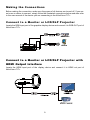
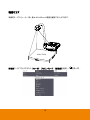
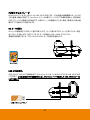
Connect to a Monitor or LCD/DLP Projector
Locate the RGB input port of the graphics display device and connect it to RGB OUT port of
AVerVision F17+.
C
Co
on
nn
ne
ec
ct
t
t
to
o
a
a
M
Mo
on
ni
it
to
or
r
o
or
r
L
LC
CD
D/
/D
DL
LP
P
P
Pr
ro
oj
je
ec
ct
to
or
r
w
wi
it
th
h
H
HD
DM
MI
I
O
Ou
ut
tp
pu
ut
t
i
in
nt
te
er
rf
fa
ac
ce
e
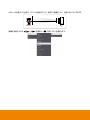
Locate the HDMI input port of the display device and connect it to HDMI out port of
AVerVision F17+.

10
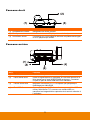
C
Co
on
nn
ne
ec
ct
ti
in
ng
g
t
th
he
e
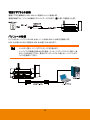
P
Po
ow
we
er
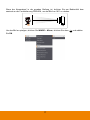
r
Connect the power adapter to a standard 100V~240V AC power outlet. The unit
automatically in standby mode once the power is connected. Press to turn on.
C
Co
on
nn
ne
ec
ct
t
t
to
o
a
a
C
Co
om
mp
pu
ut
te
er
r
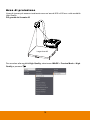
Locate the RGB output port of the computer or laptop and connect it to RGB IN port of
AVerVision F17+. The video signal from the RGB IN port is streamed to RGB OUT.
- To display computer image, press Camera/PC button on the control panel or
remote control to switch AVerVision F17+ to computer mode.
- For laptop to output display image, use the keyboard command (FN+F5) to
switch between the display modes. For different command, please refer to
your laptop manual.

11
C
Co
on
nn
ne
ec
ct
t
t
to
o
a
a
C
Co
om
mp
pu
ut
te
er
r
v
vi
ia
a
U
US
SB
B
Locate the USB port of the computer or laptop and connect it to PC port of AVerVision
F17+.
C
Co
on
nn
ne
ec
ct
t
t
to
o
a
a
C
Co
om
mp
pu
ut
te
er
r
w
wi
it
th
h
H
HD
DM
MI
I
I
In
np
pu
ut
t
i
in
nt
te
er
rf
fa
ac
ce
e
Locate the HDMI output port of the computer of laptop and connect it to HDMI in port of
AVerVision F17+.
- To display computer image, press Camera/PC button on the control panel or
remote control to switch AVerVision F17+ to computer mode.
- For laptop to output display image, use the keyboard command (FN+F5) to
switch between the display modes. For different command, please refer to your
laptop manual.

12
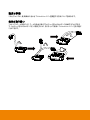
C
Co
on
nn
ne
ec
ct
t
a
an
n
E
Ex
xt
te
er
rn
na
al
l
M
Mi
ic
cr
ro
op
ph
ho
on
ne
e
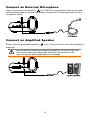
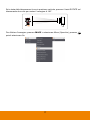
Plug a 3.5mm mono microphone to port. The built-in microphone on the control panel
will be disabled when an external microphone is connected. The recorded audio will be in
monophonic sound.
C
Co
on
nn
ne
ec
ct
t
a
an
n
A
Am
mp
pl
li
if
fi
ie
ed
d
S
Sp
pe
ea
ak
ke
er
r
Plug a 3.5mm plug amplified speaker to port. Only the audio from the video playback is
supported.
We recommend connecting an amplified speaker to the Audio output port.
Take caution when using earphones. Adjust the volume down on the
remote to prevent hearing damage due to loudness.
La pagina si sta caricando...
La pagina si sta caricando...
La pagina si sta caricando...
La pagina si sta caricando...
La pagina si sta caricando...
La pagina si sta caricando...
La pagina si sta caricando...
La pagina si sta caricando...
La pagina si sta caricando...
La pagina si sta caricando...
La pagina si sta caricando...
La pagina si sta caricando...
La pagina si sta caricando...
La pagina si sta caricando...
La pagina si sta caricando...
La pagina si sta caricando...
La pagina si sta caricando...
La pagina si sta caricando...
La pagina si sta caricando...
La pagina si sta caricando...
La pagina si sta caricando...
La pagina si sta caricando...
La pagina si sta caricando...
La pagina si sta caricando...
La pagina si sta caricando...
La pagina si sta caricando...
La pagina si sta caricando...
La pagina si sta caricando...
La pagina si sta caricando...
La pagina si sta caricando...
La pagina si sta caricando...
La pagina si sta caricando...
La pagina si sta caricando...
La pagina si sta caricando...
La pagina si sta caricando...
La pagina si sta caricando...
La pagina si sta caricando...
La pagina si sta caricando...
La pagina si sta caricando...
La pagina si sta caricando...
La pagina si sta caricando...
La pagina si sta caricando...
La pagina si sta caricando...
La pagina si sta caricando...
La pagina si sta caricando...
La pagina si sta caricando...
La pagina si sta caricando...
La pagina si sta caricando...
La pagina si sta caricando...
La pagina si sta caricando...
La pagina si sta caricando...
La pagina si sta caricando...
La pagina si sta caricando...
La pagina si sta caricando...
La pagina si sta caricando...
La pagina si sta caricando...
La pagina si sta caricando...
La pagina si sta caricando...
La pagina si sta caricando...
La pagina si sta caricando...
La pagina si sta caricando...
La pagina si sta caricando...
La pagina si sta caricando...
La pagina si sta caricando...
La pagina si sta caricando...
La pagina si sta caricando...
La pagina si sta caricando...
La pagina si sta caricando...
La pagina si sta caricando...
La pagina si sta caricando...
La pagina si sta caricando...
La pagina si sta caricando...
La pagina si sta caricando...
La pagina si sta caricando...
La pagina si sta caricando...
La pagina si sta caricando...
La pagina si sta caricando...
La pagina si sta caricando...
La pagina si sta caricando...
La pagina si sta caricando...
La pagina si sta caricando...
La pagina si sta caricando...
La pagina si sta caricando...
La pagina si sta caricando...
La pagina si sta caricando...
La pagina si sta caricando...
La pagina si sta caricando...
La pagina si sta caricando...
La pagina si sta caricando...
La pagina si sta caricando...
La pagina si sta caricando...
La pagina si sta caricando...
La pagina si sta caricando...
La pagina si sta caricando...
La pagina si sta caricando...
La pagina si sta caricando...
La pagina si sta caricando...
La pagina si sta caricando...
La pagina si sta caricando...
La pagina si sta caricando...
La pagina si sta caricando...
La pagina si sta caricando...
La pagina si sta caricando...
La pagina si sta caricando...
La pagina si sta caricando...
La pagina si sta caricando...
La pagina si sta caricando...
La pagina si sta caricando...
La pagina si sta caricando...
La pagina si sta caricando...
La pagina si sta caricando...
La pagina si sta caricando...
La pagina si sta caricando...
La pagina si sta caricando...
La pagina si sta caricando...
La pagina si sta caricando...
La pagina si sta caricando...
La pagina si sta caricando...
La pagina si sta caricando...
La pagina si sta caricando...
La pagina si sta caricando...
La pagina si sta caricando...
La pagina si sta caricando...
La pagina si sta caricando...
La pagina si sta caricando...
La pagina si sta caricando...
La pagina si sta caricando...
La pagina si sta caricando...
La pagina si sta caricando...
La pagina si sta caricando...
La pagina si sta caricando...
La pagina si sta caricando...
La pagina si sta caricando...
La pagina si sta caricando...
La pagina si sta caricando...
La pagina si sta caricando...
La pagina si sta caricando...
La pagina si sta caricando...
La pagina si sta caricando...
La pagina si sta caricando...
La pagina si sta caricando...
La pagina si sta caricando...
La pagina si sta caricando...
La pagina si sta caricando...
La pagina si sta caricando...
La pagina si sta caricando...
La pagina si sta caricando...
La pagina si sta caricando...
La pagina si sta caricando...
La pagina si sta caricando...
La pagina si sta caricando...
La pagina si sta caricando...
La pagina si sta caricando...
La pagina si sta caricando...
La pagina si sta caricando...
La pagina si sta caricando...
La pagina si sta caricando...
La pagina si sta caricando...
La pagina si sta caricando...
La pagina si sta caricando...
La pagina si sta caricando...
La pagina si sta caricando...
La pagina si sta caricando...
La pagina si sta caricando...
La pagina si sta caricando...
La pagina si sta caricando...
La pagina si sta caricando...
La pagina si sta caricando...
La pagina si sta caricando...
La pagina si sta caricando...
La pagina si sta caricando...
La pagina si sta caricando...
La pagina si sta caricando...
La pagina si sta caricando...
La pagina si sta caricando...
La pagina si sta caricando...
La pagina si sta caricando...
La pagina si sta caricando...
La pagina si sta caricando...
La pagina si sta caricando...
La pagina si sta caricando...
La pagina si sta caricando...
La pagina si sta caricando...
La pagina si sta caricando...
La pagina si sta caricando...
La pagina si sta caricando...
La pagina si sta caricando...
La pagina si sta caricando...
La pagina si sta caricando...
La pagina si sta caricando...
La pagina si sta caricando...
La pagina si sta caricando...
La pagina si sta caricando...
La pagina si sta caricando...
La pagina si sta caricando...
La pagina si sta caricando...
La pagina si sta caricando...
La pagina si sta caricando...
La pagina si sta caricando...
La pagina si sta caricando...
La pagina si sta caricando...
La pagina si sta caricando...
La pagina si sta caricando...
La pagina si sta caricando...
La pagina si sta caricando...
La pagina si sta caricando...
La pagina si sta caricando...
La pagina si sta caricando...
La pagina si sta caricando...
La pagina si sta caricando...
La pagina si sta caricando...
La pagina si sta caricando...
La pagina si sta caricando...
La pagina si sta caricando...
La pagina si sta caricando...
La pagina si sta caricando...
La pagina si sta caricando...
La pagina si sta caricando...
La pagina si sta caricando...
La pagina si sta caricando...
La pagina si sta caricando...
La pagina si sta caricando...
La pagina si sta caricando...
La pagina si sta caricando...
La pagina si sta caricando...
La pagina si sta caricando...
La pagina si sta caricando...
La pagina si sta caricando...
La pagina si sta caricando...
La pagina si sta caricando...
La pagina si sta caricando...
La pagina si sta caricando...
La pagina si sta caricando...
La pagina si sta caricando...
La pagina si sta caricando...
La pagina si sta caricando...
La pagina si sta caricando...
La pagina si sta caricando...
La pagina si sta caricando...
La pagina si sta caricando...
La pagina si sta caricando...
La pagina si sta caricando...
La pagina si sta caricando...
La pagina si sta caricando...
La pagina si sta caricando...
La pagina si sta caricando...
La pagina si sta caricando...
La pagina si sta caricando...
La pagina si sta caricando...
La pagina si sta caricando...
La pagina si sta caricando...
La pagina si sta caricando...
La pagina si sta caricando...
La pagina si sta caricando...
La pagina si sta caricando...
La pagina si sta caricando...
La pagina si sta caricando...
La pagina si sta caricando...
La pagina si sta caricando...
La pagina si sta caricando...
La pagina si sta caricando...
La pagina si sta caricando...
La pagina si sta caricando...
La pagina si sta caricando...
La pagina si sta caricando...
La pagina si sta caricando...
La pagina si sta caricando...
La pagina si sta caricando...
La pagina si sta caricando...
La pagina si sta caricando...
La pagina si sta caricando...
La pagina si sta caricando...
La pagina si sta caricando...
La pagina si sta caricando...
La pagina si sta caricando...
La pagina si sta caricando...
La pagina si sta caricando...
La pagina si sta caricando...
La pagina si sta caricando...
La pagina si sta caricando...
La pagina si sta caricando...
-
 1
1
-
 2
2
-
 3
3
-
 4
4
-
 5
5
-
 6
6
-
 7
7
-
 8
8
-
 9
9
-
 10
10
-
 11
11
-
 12
12
-
 13
13
-
 14
14
-
 15
15
-
 16
16
-
 17
17
-
 18
18
-
 19
19
-
 20
20
-
 21
21
-
 22
22
-
 23
23
-
 24
24
-
 25
25
-
 26
26
-
 27
27
-
 28
28
-
 29
29
-
 30
30
-
 31
31
-
 32
32
-
 33
33
-
 34
34
-
 35
35
-
 36
36
-
 37
37
-
 38
38
-
 39
39
-
 40
40
-
 41
41
-
 42
42
-
 43
43
-
 44
44
-
 45
45
-
 46
46
-
 47
47
-
 48
48
-
 49
49
-
 50
50
-
 51
51
-
 52
52
-
 53
53
-
 54
54
-
 55
55
-
 56
56
-
 57
57
-
 58
58
-
 59
59
-
 60
60
-
 61
61
-
 62
62
-
 63
63
-
 64
64
-
 65
65
-
 66
66
-
 67
67
-
 68
68
-
 69
69
-
 70
70
-
 71
71
-
 72
72
-
 73
73
-
 74
74
-
 75
75
-
 76
76
-
 77
77
-
 78
78
-
 79
79
-
 80
80
-
 81
81
-
 82
82
-
 83
83
-
 84
84
-
 85
85
-
 86
86
-
 87
87
-
 88
88
-
 89
89
-
 90
90
-
 91
91
-
 92
92
-
 93
93
-
 94
94
-
 95
95
-
 96
96
-
 97
97
-
 98
98
-
 99
99
-
 100
100
-
 101
101
-
 102
102
-
 103
103
-
 104
104
-
 105
105
-
 106
106
-
 107
107
-
 108
108
-
 109
109
-
 110
110
-
 111
111
-
 112
112
-
 113
113
-
 114
114
-
 115
115
-
 116
116
-
 117
117
-
 118
118
-
 119
119
-
 120
120
-
 121
121
-
 122
122
-
 123
123
-
 124
124
-
 125
125
-
 126
126
-
 127
127
-
 128
128
-
 129
129
-
 130
130
-
 131
131
-
 132
132
-
 133
133
-
 134
134
-
 135
135
-
 136
136
-
 137
137
-
 138
138
-
 139
139
-
 140
140
-
 141
141
-
 142
142
-
 143
143
-
 144
144
-
 145
145
-
 146
146
-
 147
147
-
 148
148
-
 149
149
-
 150
150
-
 151
151
-
 152
152
-
 153
153
-
 154
154
-
 155
155
-
 156
156
-
 157
157
-
 158
158
-
 159
159
-
 160
160
-
 161
161
-
 162
162
-
 163
163
-
 164
164
-
 165
165
-
 166
166
-
 167
167
-
 168
168
-
 169
169
-
 170
170
-
 171
171
-
 172
172
-
 173
173
-
 174
174
-
 175
175
-
 176
176
-
 177
177
-
 178
178
-
 179
179
-
 180
180
-
 181
181
-
 182
182
-
 183
183
-
 184
184
-
 185
185
-
 186
186
-
 187
187
-
 188
188
-
 189
189
-
 190
190
-
 191
191
-
 192
192
-
 193
193
-
 194
194
-
 195
195
-
 196
196
-
 197
197
-
 198
198
-
 199
199
-
 200
200
-
 201
201
-
 202
202
-
 203
203
-
 204
204
-
 205
205
-
 206
206
-
 207
207
-
 208
208
-
 209
209
-
 210
210
-
 211
211
-
 212
212
-
 213
213
-
 214
214
-
 215
215
-
 216
216
-
 217
217
-
 218
218
-
 219
219
-
 220
220
-
 221
221
-
 222
222
-
 223
223
-
 224
224
-
 225
225
-
 226
226
-
 227
227
-
 228
228
-
 229
229
-
 230
230
-
 231
231
-
 232
232
-
 233
233
-
 234
234
-
 235
235
-
 236
236
-
 237
237
-
 238
238
-
 239
239
-
 240
240
-
 241
241
-
 242
242
-
 243
243
-
 244
244
-
 245
245
-
 246
246
-
 247
247
-
 248
248
-
 249
249
-
 250
250
-
 251
251
-
 252
252
-
 253
253
-
 254
254
-
 255
255
-
 256
256
-
 257
257
-
 258
258
-
 259
259
-
 260
260
-
 261
261
-
 262
262
-
 263
263
-
 264
264
-
 265
265
-
 266
266
-
 267
267
-
 268
268
-
 269
269
-
 270
270
-
 271
271
-
 272
272
-
 273
273
-
 274
274
-
 275
275
-
 276
276
-
 277
277
-
 278
278
-
 279
279
-
 280
280
-
 281
281
-
 282
282
-
 283
283
-
 284
284
-
 285
285
-
 286
286
-
 287
287
-
 288
288
-
 289
289
-
 290
290
-
 291
291
-
 292
292
-
 293
293
-
 294
294
-
 295
295
-
 296
296
-
 297
297
-
 298
298
-
 299
299
-
 300
300
-
 301
301


AVer AVerVision F17+ Manuale utente
- Categoria
- Fotocamere per documenti
- Tipo
- Manuale utente
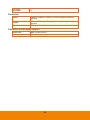
in altre lingue
- français: AVer AVerVision F17+ Manuel utilisateur
- español: AVer AVerVision F17+ Manual de usuario
- português: AVer AVerVision F17+ Manual do usuário
- 日本語: AVer AVerVision F17+ ユーザーマニュアル
Documenti correlati
Altri documenti
-
Celestron 44316 Manuale utente
-
Tasco USB Digital Microscope 780200T Manuale utente
-
-
Canon LEGRIA HF R606 Manuale utente
-
Canon LEGRIA HF M52 Manuale utente
-
Canon HF M52 Manuale utente
-
Canon LEGRIA mini X Manuale utente
-
Canon Vixia HF-R32 Manuale utente
-
Avermedia cp135 Guida di riferimento
-
BenQ W4201.001 Guida utente