1byone 1-AD07US02 Manuale utente
- Categoria
- Giradischi audio
- Tipo
- Manuale utente

1byone Products Inc.
1230 E Belmont Street, Ontario, CA, USA 91761
Customer Service: +1 909-391-3888
www.1byonebros.com
Made in China
HIGH FIDELITY BELT DRIVE TURNTABLE
Instruction Manual

1
EN
DE
FR
ES
IT
Introduction
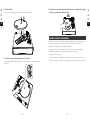
Thank you for purchasing 1byone High Fidelity Belt Drive Turntable. This instruction
manual contains important information about safety, usage and disposal. Use the
product as described and keep this manual for future reference. If you sell this
turntable or pass it on, also give this manual to the new owner.
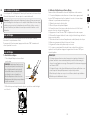
Safety Instructions
Read and understand this entire manual before using this product. Keep these
instructions for future reference.
1. Do not use the turntable near water.
2. Only connect the turntable to a power outlet type as indicated on the marking
label or in the "Specifications" section of this instruction manual.
3. The turntable has a polarized plug (one pin is wider than the other). To reduce the
risk of electric shock, this plug is intended to fit into a polarized outlet in only one
orientation. If the plug does not fit fully into the outlet, reverse the plug. If it still
does not fit, contact a qualified electrician. Do not attempt to modify the plug in
any way.
4. Protect the power cord from being walked on or pinched, particularly at the power
plug, at the point of connection between the plug and outlet and at the point of
connection between the power cable and speaker.
5. Do not overload wall outlets or extension cords as this will be a fire hazard and may
cause electric shock.
6. Never push objects of any kind into the turntable through openings as they may
touch dangerous voltage points or short out parts that could result in a fire or
electric shock. Never spill liquid of any kind on the product.
7. Do not attempt to service the turntable yourself as opening or removing body
panels may expose you to dangerous voltage or other hazards. Refer all servicing to
qualified service personnel.
8. Changes or modifications to the turntable not expressly approved by the party
responsible for compliance could void the user’s authority to operate the product.
9. Do not use attachments not recommended by the manufacturer as they may cause
hazards.
10. Only place on a flat, sturdy table or use with the cart, stand, tripod or
bracket as specified by the manufacturer or sold with the turntable.
When a cart is used, use caution when moving the cart/turntable
combination to avoid injury from tip-over.

2 3
EN
DE
FR
ES
IT
EN
DE
FR
ES
IT
11. Slots and openings in the cabinet are provided for ventilation and to ensure
reliable operation of the product and to protect it from overheating. Do not block
or cover these openings.
12. Unplug the product during lightning storms or when unused for long periods of
time.
COMPLIANCE WITH FCC REGULATIONS
This device complies with Part 15 of FCC rules. Operation is subject to the following
two conditions:
(1) This device may not cause harmful interference, and
(2) This device must accept any interference received, including interference that may
cause undesired operation.
This equipment has been tested and found to comply with the limits for a Class
B digital device, pursuant to Part 15 of the FCC rules. These limits are designed to
provide reasonable protection against harmful interference in a residential installation.
This equipment generates, uses and can radiate radio frequency energy and, if not
installed and used in accordance with the instructions, may cause harmful interference
to radio communications. However, there is no guarantee that interference will not
occur in a particular installation.
If this equipment does cause harmful interference to radio or television reception,
which can be determined by turning the equipment off and on, the user is
encouraged to try to correct the interference by one or more of the following
measures:
• Reorient or relocate the receiving antenna.
• Increase the separation between the equipment and receiver.
• Connect the equipment into an outlet on a circuit different from that to which the
receiver is connected.
• Consult the dealer or an experienced radio/TV technician for help.
WARNING: Changes or modifications to this unit not expressly approved by the party
responsible for compliance could void the user's authority to operate the equipment.
WARNING: Cancer and Reproductive Harm - http://www.P65Warnings.ca.gov
For more information go to http://www.1byonebros.com/Compliance/Prop65
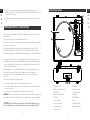
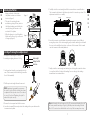
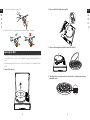
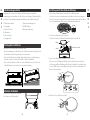
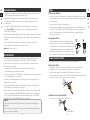
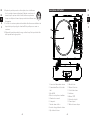
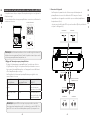
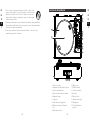
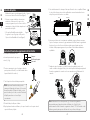
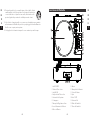
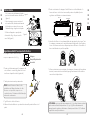
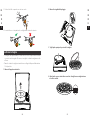
Product Description
R
AUX OUTAUX IN
PHONE
DC12V
LINE OUT
L
1 2 3 4
5
17
16
6
7
8
9
10
11
12
13
14
15
45 33
START
- +
1. DC INPUT Jack
2. Phono & Line Out Switch
3. AUX IN Jack
4. Phono & Aux Out Jacks
5. Lid Hinge
6. Counterweight
7. Tracking Force Dial
8. Tonearm Lift Lever
9. Tonearm Clip
10. Tonearm
11. Function Knob
12. Volume Control
13. Indicator
14. START Button
15. Stylus
16. Turntable Platter
17. Turntable Spindle

4 5
EN
DE
FR
ES
IT
EN
DE
FR
ES
IT
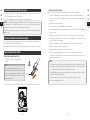
Included Items
Before installing the turntable, check the package contents to ensure all parts below
are included and free of visible damage. Please retain the original packaging materials
for exchange or return purposes.
1) Turntable Unit
2) Power Adapter
3) Turntable Lid
4) Slip Mat
5) Platter with Belt
6) Counterweight
7) Cartridge Alignment Protractor
8) 45 RPM Adapter
9) Instruction Manual
Installing the turntable
• Mount the turntable on a level surface.
• To avoid the effects of vibrations and acoustic pressure, do not mount the turntable
next to items such as speakers.
• The turntable may pick up radio static if placed next to a radio. Therefore, try to keep
the turntable away from transmission devices such as radios.
• If the turntable is near equipment (cell phone, etc.) that emits strong radio waves,
noise may occur.
Installing the Lid
Insert the hinge pockets of the lid onto
the hinges of the turntable.
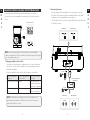
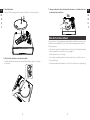
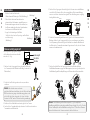
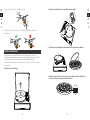
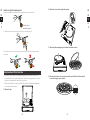
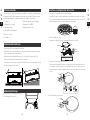
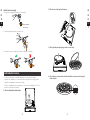
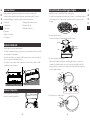
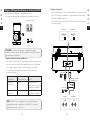
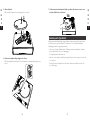
Turntable Platter and Belt Setup
1. Turn the platter over and check the belt position.
Make sure that the drive belt is looped in the middle of the circle. The drive belt
located too high or too low in this circle may cause the drive belt to fall off or speed
to be unstable.
2. Set the platter on the spindle.
Make sure the platter is fully seated on the spindle.
Opening Platter
Spindle Motor Pulley
3. Place the belt on the motor pulley.
Align one of the platter openings with the motor pulley, and while pulling both
ends of the red ribbon that comes attached to the belt, place the belt on the motor
pulley, as per the diagram. When doing this, be careful not to twist the belt.
Hook
Belt
Motor Pulley
Straight Twisted Wrong location
4. Remove the red ribbon from the belt.

6 7
EN
DE
FR
ES
IT
EN
DE
FR
ES
IT
Rotating the Platter
1. Using your hands, slowly rotate
the platter ten times in a clockwise
direction (Figure 1).
2. This step is for resetting the auto
mechanism, getting rid of any twists in
the belt and making sure the belt rides
smoothly along the drive rim on the
underside of the platter.
3. Place the slip mat on top of the platter.
Make sure the 1byone logo on the mat
is facing up (Figure 2).
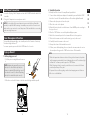
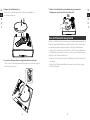
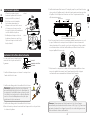
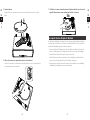
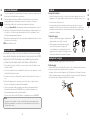
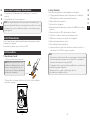
Cartridge Tracking Force Adjustment
The supplied Counterweight is suitable
for cartridges weighing between 3.0-6.0g. Counterweight
Center Line
Tracking Force Dial
1. Gently push and turn the counterweight onto the
rear of the tonearm (with the dial facing toward the
front of the turntable).
2. Pull the protector straight forward to remove it.
NOTE: Applying a downward force may cause
the stylus to come off the body. Only low volume
is outputted if the stylus has come off, or is about
to come off, so refer to “Replacing the stylus” to
reattach the stylus correctly.
3. Remove the tie-wrap and unlock the tonearm.
4. Lower the tonearm lift lever and position the cartridge in the space between the
tonearm rest and platter.
5. Carefully rotate the counterweight until the tonearm achieves a neutral balance.
The tonearm should return to this balanced position if it is moved up or down. This
adjustment must be done carefully.
Tonearm Counterweight
Adjust so that tonearm is level and neutrally balanced
6. Once the tonearm is correctly balanced, return the tonearm to its rest. Without
moving the position of the counterweight, gently rotate the tracking force dial until
the zero is in line with black center line on the rear of the tonearm. Check to make
sure the tonearm is still neutrally balanced.
7. Finally, rotate the counterweight and tracking force dial together counterclockwise
(as seen from the front) to adjust the tracking force according to the cartridge
manufacturer’s recommendations.
Note: Each mark on the scale represents 0.1g. The recommended tracking force for
the factory-installed cartridge is 3.5g±0.5g. Carefully rotate the tracking force dial.
When “3.5” is centered over the black line on the top of the tonearm, please stop.
Figure 1
Figure 2

8 9
EN
DE
FR
ES
IT
EN
DE
FR
ES
IT
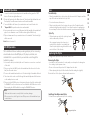
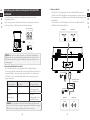
Connection to External Speaker with RCA Audio Cable
This turntable includes 4 built-in speakers and a built-in phone equalizer.
If you wish to use your own amplifier or speakers, please follow the instructions
below:
RCA wired connection
Active Speakers
or
Amplifier
NOTE: In order to achieve the best sound, it is advised to set the turntable
volume to a minimal level. Then the turntable's audio will be played back through
your own amplifier, speakers, etc.
1. Setting pre-amplier selector switch
This product has a built-in phono equalizer function. You can use the product
even if you do not have a phono amplifier or connectable equipment with a
built-in phono amplifier.
Use the pre-amplifier selector switch to set the output, as shown below.
Connected equipment
being used
Position of pre-amplifier
selector switch
Where to connect RCA
audio cable
Device with phono input PHONO Phono input jack and
ground (earth) terminal
of connected equipment
Device without phono
input
LINE AUX or line input jack of
connected equipment
NOTE: The RCA Jacks are not designed to be connected directly to the
passive/unpowered speakers on LINE mode. If connected to the passive
speakers, there will be no sound.
2. Connecting the device
Align the settings for the pre-amplifier selector switch and connect the
RCA audio cable to an input jack that is compatible with the connectable
equipment you are using (amplifier, active speakers, etc.).
• The RCA audio cable's red jack is for the right (R) channel, and the white jack is
for the left (L) channel.
R
AUX OUTAUX IN
PHONE
DC12V
LINE OUT
L
With PHONO Without PHONO
To outlet
AUX
L R
PHONO
L R
With PHONO Without PHONO
To outlet
Connectable equipment
(Amplifier, etc.)

10 11
EN
DE
FR
ES
IT
EN
DE
FR
ES
IT
Main Power Connection
1. Insert the DC plug of the AC adapter cord into the DC INPUT Jack at the back of the
turntable.
2. Plug the AC adapter into a normal power outlet.
NOTE:
Do not plug the AC power adapter into a power outlet before all turntable
assembly is completed. Before turning on turntable power, recheck all connections to
make sure they are correct and secure. Always turn off the turntable before connecting
or disconnecting from power.
Power Management Function
The turntable will automatically go into standby mode after 20 minutes of inactivity.
The indicator light will turn off.
To resume operation, press and hold the START button for 3 seconds.
Playing a Record
1. Before playing a record
1.1 Pull the protector straight forward to remove
it.
NOTE: Applying a downward force may cause
the stylus to come off the body. Only low
volume is outputted if the stylus has come off,
or is about to come off, so refer to “Replacing
the stylus” to reattach the stylus correctly.
Protector
1.2 Place the record on the felt mat so that the center hole aligns with the spindle.
2. Turntable Operation
Sufficiently lower the volume of the amplifier and speakers first.
2.1 Connect the included power adapter to the turntable, press and hold the START
button for 3 seconds. The turntable will turn on. The indicator light will turn red.
2.2 Remove the stylus protector from the stylus.
2.3 Place the record on the slip mat.
2.4 Rotate the function knob to switch between 33 and 45 RPM speeds according to
the type of record.
2.5 Press the START button once and the platter will play or pause.
2.6 Unlock the tonearm clip and set the tonearm lift lever to the up position.
2.7 Position the tonearm over the desired location (groove) on the record.
2.8 Carefully lower the tonearm on the record.
2.9 Turn up the volume of the turntable as needed.
2.10 When you are finished playing the record, raise the tonearm, return it to rest on
the arm clip and long press the START button to turn off the turntable.
NOTE:
1. If the silent pause time between each track is longer than 3 minutes, the platter
will stop spinning automatically to avoid damaging the record. The indicator light
will turn red. To resume operation, press the START button.
2. If the felt mat gets dirty, it can easily scratch the record, so remove the felt mat
periodically and wipe off any dust.
3. To prevent the record from getting scratched and warping, remove it after use.
4. Do not use a disk stabilizer.

12 13
EN
DE
FR
ES
IT
EN
DE
FR
ES
IT
Bluetooth Operation
1. Connect the
included power adapter to the turntable and long press the START
button. The indicator light will turn red.
2. Rotate the function knob to Bluetooth mode. The indicator light will turn blue and
flash quickly. You will hear an activation sound from the turntable.
3. Turn on the Bluetooth feature of your media device and search for and select
“1byone BS020” to pair the media device and turntable.
4. Once your media device is successfully paired with the turntable, the turntable will
play a short confirmation sound. The blue indicator light will flash slowly.
5. Play and stream music from your media device to the turntable. The indicator light
will become solid.
Note: Bluetooth version: 5.0
AUX-IN Operation
This turntable includes an auxiliary audio signal input jack for connecting
external audio devices like MP3 players, CD players, and older, non-
dockable iPods so you can listen to your external source through the
turntable's speakers.
1. Use an audio cable (not included) with one 3.5 mm stereo connection on each end
of the cable.
2. Plug one end into the AUX-IN jack on the turntable and the other end to the Line
Out jack of the audio device.
3. Power on the turntable and audio device. The indicator light of turntable will be red.
4. The volume level can be controlled through the turntable. Operate all the functions
on the auxiliary device as usual.
5. Please note that AUX-IN function is a first-priority function. Even if the indicator light
for PHONO/BT is on, these functions won't work while the AUX-IN function is in use.
Please unplug the AUX-IN cable before using the PHONO/BT functions.
Care
Turntable Body
• When the turntable body is dirty or dusty, first disconnect the AC adapter and then
wipe off the dirt and dust with a soft, dry cloth.
• Do not use benzenes, thinners, etc.
• When storing the product for a long time, disconnect the AC adapter from the
outlet and wrap the product in plastic. Do not allow the product or packaging to
become damp. The drive belt should be removed to prevent unequal stretching.
Stylus Tip
• If dirt and grime are stuck to the stylus tip, clean it
with a commercially sold brush.
• We recommend using a stylus cleaner (not
included) if the stylus tip is considerably dirty.
Clean the stylus tip by moving the brush from the
rear to the front of the stylus tip.
Replacing the Stylus
It's suggested to replace the stylus after 400 hours of use.
Removing the Stylus
• In addition to the deterioration of sound quality, records may also be damaged as
the cartridge’s stylus tip wears down.
• Be sure to disconnect the product’s AC adapter from the outlet.
• When replacing the stylus, hold the headshell and the cartridge body tightly.
Rotate the front of the stylus in a forward and down motion.
Installing a New Replacement Stylus
1. Mount the new replacement stylus to the cartridge.
Engage in body first
NOTE:
1. Make sure the tone arm is securely locked to avoid any damage.
2. When you are done, don’t forget to turn off the power on the turntable and your
external device.

14 15
EN
DE
FR
ES
IT
EN
DE
FR
ES
IT
2. Lift the stylus up until you hear a click.
3. Make sure there is no gap between the headshell and the cartridge.
Replacing the Belt
• The belt is a consumable part. Replace the belt if the speed of playback slows down
or irregular rotation occurs. As a rule of thumb, we suggest replacing the belt once a
year.
• Before replacing the belt, be sure to disconnect the product’s AC adapter from the
outlet.
1. Remove the slip mat.
2. Remove the belt from the motor pulley.
3. Remove the main platter and then remove the old belt.
4. Turn the platter over and you will see a raised circle. Loop the new belt along
the middle circle.

16 17
EN
DE
FR
ES
IT
EN
DE
FR
ES
IT
5. Attach the platter.
Align one of the openings with the position of the brass-colored motor pulley.
6. Place the belt on the brass-colored motor pulley
Grasp the belt that was attached in step 4 and, while pulling it, place it on the brass
motor pulley.
7. Using your hands, slowly rotate the platter ten times in a clockwise direction
as shown by the arrow below.
When the Turntable is Moved
Using the product's original packing materials, wrap the turntable in the reverse order
from when you unwrapped it. If you do not have the packaging materials, take the
following measures:
• After disconnecting the AC adapter from the outlet, remove the felt mat and platter,
and then wrap them so that they do not get damaged.
• Attach the protector to the cartridge.
• Use a string or something similar to tie the tonearm to the rest so that it does not
become dislodged.
• Wrap the turntable body with paper or a soft cloth so that it does not get damaged.

18 19
EN
DE
FR
ES
IT
EN
DE
FR
ES
IT
Troubleshooting
Problem Solution
The platter does
not spin.
• Is the AC adapter connected to the outlet?
-Connect the AC adapter to the outlet.
• What's the status of the indicator light?
- Power is on, but the indicator light is off. That means the
turntable is in ERP mode or not turned on. Press and hold the
START button for 3 seconds to reboot the turntable.
- The indicator light is blue. That means the turntable is in
Bluetooth mode. Please turn the Function knob to switch to
Turntable mode.
- The red indicator light will indicate Turntable mode.
• Has the belt slipped from the platter?
-Correctly place the belt on the platter.
• Is the belt placed on the motor pulley?
-Check that the belt is placed on the motor pulley (brass-colored)
correctly.
• Has the belt been damaged?
-Replace it with a new belt.
• Is the AUX-IN cable pluged in?
-AUX-IN function is a first-priority function. Please unplug the
AUX-IN cable before using the PHONO/BT functions.
The platter spins,
but there is no
sound from the
turntable?
• Is the stylus damaged?
-Check the stylus and replace it, if necessary. It's suggested to
replace the stylus after 400 hours of use.
• Is the stylus placed correctly on the body of the cartridge?
-Check the cartridge and adjust it, if necessary.
The stylus skips. • Is the record warped?
-Check the record.
• Is the record scratched?
-Check the record.
• Is the stylus pressure correct?
-Refer to “Cartridge Tracking Force Adjustment” to readjust the
tracking force.
The turntable is
making a strange
‘howling’ sound.
• Is the product picking up excessive vibrations from the floor,
surfaces of the walls, or nearby speakers?
-Decrease the vibrations or mount the product on a surface that
is not subject to the effects of vibrations.
• Is the product mounted on an unstable surface?
-Check whether the surface on which the product is mounted is
suitable.
There is noise
when the record
is playing.
• Is there dust on the cartridge’s stylus tip?
-If dust is stuck to the stylus tip, clean it with a commercially sold
brush.
The sound when
the record is
playing is either
too fast or too
slow.
• Are the speed settings for this product correct?
-Please select the correct speed for the type of record being
played.
Playback speed
slows down or
there is irregular
rotation.
• Is the belt stretched out?
-Replace with a new belt.
• Is the belt installed correct?
-Refer to “Turntable Platter and Belt Setup” to setup the belt.

EN
DE
FR
ES
IT
2120
EN
DE
FR
ES
IT
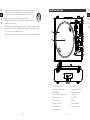
Specications
Turntable
Model 1-AD07US02, H009
Power Supply AC100-240V, DC output 12V 1500mA
Power Consumption 35W
Turntable Speed 33 1/3, 45 RPM
Output Power (RMS) 4Ω 18W X 2(BT) , 5W X 2(PH)
Dimensions (L x W x H)
17.32” x 14.57” x 7.56” (440 x 370 x 192mm) (lid
closed), 15.75” x 16.73” x 18.19” (400 x 425 x 462mm)
(lid open)
Weight 13.3lb (6.05kg)
Stylus
Model Audio-Technica AT3600
Frequency Response 20Hz - 20kHz
Channel Balance <2.5dB
Channel Separation >18dB
Output Voltage 2.5mV
Recommended Load Resistance 47kΩ
Amplier Connection MM (Moving Magnet) - input
Recommended Tracking Force 3.5±0.5g
Weight 0.18oz (5.1g)
Note: Design and specifications are subject to change without notice.
This product’s packaging is made from environmentally friendly material
and can be disposed of at your local recycling plant.
Produktbeschreibung
Vielen Dank für den Kauf des 1byone High Fidelity Belt Drive Plattenspielers. Diese
Betriebsanleitung enthält wichtige Informationen über Sicherheit, Gebrauch und
Entsorgung. Verwenden Sie das Produkt wie beschrieben und bewahren Sie dieses
Handbuch zum späteren Nachschlagen auf. Wenn Sie diesen Plattenspieler verkaufen
oder weitergeben, geben Sie dieses Handbuch auch an den neuen Besitzer weiter.
Sicherheitshinweise
Lesen und verstehen Sie die gesamte Anleitung, bevor Sie dieses Produkt verwenden.
Bewahren Sie diese Anleitung zum späteren Nachschlagen auf.
1. Verwenden Sie den Plattenspieler nicht in der Nähe von Wasser.
2. Schließen Sie den Plattenspieler nur an eine Steckdose an, wie auf dem Typenschild
oder im Abschnitt "Technische Daten" dieser Bedienungsanleitung angegeben.
3. Der Plattenspieler hat einen polarisierten Stecker (ein Pin ist breiter als der andere).
Um das Risiko eines Stromschlags zu verringern, ist dieser Stecker so konzipiert, dass
er in nur einer Ausrichtung in eine polarisierte Steckdose passt. Wenn der Stecker
nicht vollständig in die Steckdose passt, drehen Sie den Stecker um. Wenn es immer
noch nicht passt, wenden Sie sich an einen qualifizierten Elektriker. Versuchen Sie
nicht, den Stecker in irgendeiner Weise zu verändern.
4. Schützen Sie das Netzkabel vor Betreten oder Einklemmen, insbesondere am
Netzstecker, an der Verbindungsstelle zwischen Stecker und Steckdose und an der
Verbindungsstelle zwischen Netzkabel und Lautsprecher.
5. Überlasten Sie keine Steckdosen oder Verlängerungskabel, da dies eine Brandgefahr
darstellt und einen elektrischen Schlag verursachen kann.
6. Stecken Sie niemals Gegenstände jeglicher Art durch Öffnungen in den
Plattenspieler, da sie gefährliche Spannungspunkte berühren oder Teile
kurzschließen können, die zu einem Brand oder einem elektrischen Schlag führen
können. Verschütten Sie niemals Flüssigkeiten jeglicher Art auf das Gerät.
7. Versuchen Sie nicht, den Plattenspieler selbst zu warten, da das Öffnen oder
Entfernen von Gehäuseteilen zu gefährlichen Spannungen oder anderen
Gefahren führen kann. Wenden Sie sich bei allen Wartungsarbeiten an qualifizierte
Servicetechniker.
8. Änderungen oder Modifikationen an der Drehscheibe, die nicht ausdrücklich von
der für die Einhaltung der Vorschriften verantwortlichen Stelle genehmigt wurden,
könnten die Befugnis des Benutzers zum Betrieb des Produkts aufheben.
9. Verwenden Sie keine Aufsätze, die nicht vom Hersteller empfohlen werden, da sie
Gefahren bergen können.

EN
DE
FR
ES
IT
EN
DE
FR
ES
IT
22 23
10. Nur auf einen flachen, stabilen Tisch stellen oder mit dem Wagen,
Ständer, Stativ oder der Halterung verwenden, wie vom Hersteller
angegeben oder mit dem Plattenspieler verkauft wird. Wenn ein
Wagen verwendet wird, ist beim Bewegen der Wagen
PlattenspielerKombination Vorsicht geboten, um Verletzungen durch
Umkippen zu vermeiden.
11. Zur Belüftung und zum zuverlässigen Betrieb des Produkts sowie zum Schutz vor
Überhitzung sind Schlitze und Öffnungen im Gehäuse vorgesehen. Blockieren
oder verdecken Sie diese Öffnungen nicht.
12. Ziehen Sie den Netzstecker bei Gewittern oder bei längerer Nichtbenutzung aus..
Produktbeschreibung
R
AUX OUTAUX IN
PHONE
DC12V
LINE OUT
L
1 2 3 4
5
17
16
6
7
8
9
10
11
12
13
14
15
45 33
START
- +
1. DC-EINGANG-Buchse
2. Phono & Line Out Schalter
3. AUX IN-Buchse
4. Phono & Aux-Ausgangsbuchsen
5. Deckelscharnier
6. Gegengewicht
7. Tracking Force Dial
8. Tonarmhubhebel
9. Tonarmklammer
10. Tonarm
11. Funktion Drehknopf
12. Lautstärkeregler
13. Indikator
14. START-Taste
15. Nadel
16. Drehtischplatte
17. Drehtisch-Spindel

EN
DE
FR
ES
IT
EN
DE
FR
ES
IT
24 25
Enthaltene Gegenstände
Überprüfen Sie vor dem ersten Gebrauch des Plattenspielers den Inhalt der
Verpackung, um sicherzustellen, dass alle Teile frei von sichtbaren Schäden sind. Bitte
bewahren Sie die Originalverpackung zum Umtausch oder zur Rücksendung auf.
1) Plattenspieler-Einheit
2) Netzadapter
3) Drehtisch-Deckel
4) Rutschmatte
5) Teller mit Gürtel
6) Gegengewicht
7) Patronenausrichtungmesser
8) 45 RPM-Adapter
9) Bedienungsanleitung
Plattenspieler installieren
• Montieren Sie das Produkt auf einer ebenen Fläche.
• Um die Auswirkungen von Vibrationen und Schalldruck zu vermeiden, montieren Sie
das Produkt nicht neben Gegenständen wie Lautsprechern.
• Wenn das Produkt neben einem Radio aufgestellt wird, kann es zu Funkstörungen
kommen. Versuchen Sie daher, das Produkt von Radios fernzuhalten.
• Wenn sich das Produkt in der Nähe von Geräten (Mobiltelefonen usw.) befindet, die
starke Funkwellen aussenden, können Störgeräusche auftreten.
Aufsetzen des Deckels
Setzen Sie die Scharniere des Deckels auf
die Scharniere des Plattenspielers.
Einrichtung von Drehscheibe und Riemen
1. Drehen Sie den Plattenteller um und prüfen Sie die Riemenposition.
Stellen Sie sicher, dass der Antriebsriemen in der Mitte des Kreises geschlungen ist.
Ein zu hoch oder zu tief in diesem Kreis liegender Antriebsriemen kann dazu führen,
dass der Antriebsriemen abfällt oder die Geschwindigkeit instabil wird.
2. Setzen Sie den Plattenteller auf die Spindel.
Stellen Sie sicher, dass der Plattenteller vollständig auf der Spindel sitzt.
Önung Platte
Spindel Motor-Riemenscheibe
3. Legen Sie den Riemen auf die Riemenscheibe des Motors.
Richten Sie eine der Plattentelleröffnungen mit der Motorrolle aus, und legen Sie
den Riemen gemäß der Abbildung auf die Motorrolle, während Sie an beiden Enden
des roten Bandes ziehen, das am Riemen befestigt ist. Achten Sie dabei darauf, den
Riemen nicht zu verdrehen.
Haken
Gürtel
Riemenscheibe
eines Motors
Gerade Verdreht Falsche Position
4. Entfernen Sie das rote Band vom Gürtel.

EN
DE
FR
ES
IT
EN
DE
FR
ES
IT
26 27
Platte drehen
1. Drehen Sie mit den Händen die
Platte zehnmal in Richtung des Pfeils (Abbildung 1).
2. Dieser Schritt dient zum Zurücksetzen des
automatischen Mechanismus, zum Entfernen von
Riemenverdrehungen und zum Sicherstellen, dass
der Riemen reibungslos über den Antriebsrand an
der Unterseite des Plattentellers läuft.
3. Legen Sie die Unterlage auf die Platte.
Stellen Sie sicher, dass das 1byoneLogo auf der Matte
nach oben zeigt
(Abbildung 2).
Patronenverfolgungskraft
Das mitgelieferte Gegengewicht eignet
sich für Kartuschen mit einem Gewicht
zwischen 3,0 - 6,0 g. Counterweight
Mittellinie
Messtracker
1. Drücken Sie das Gegengewicht vorsichtig auf die Rückseite
des Tonarms (mit dem Zifferblatt in Richtung Vorderseite des
Plattentellers).
2. Ziehen Sie den Protektor gerade nach vorne, um ihn zu
entfernen.
HINWEIS: Das Ausüben einer nach unten
gerichteten Kraft kann dazu führen, dass der Stift vom Körper
fällt. Es wird nur eine geringe Lautstärke ausgegeben, wenn
sich der Stift gelöst hat oder gerade löst. Lesen Sie daher
„Ersetzen des Stifts“, um den Stift wieder richtig anzubringen.
3. Entfernen Sie den Kabelbinder und entriegeln Sie den Tonarm.
4. Senken Sie den Tonarmhebel und positionieren Sie die Kassette zwischen
Tonarmstütze und Plattenteller.
5. Drehen Sie das Gegengewicht vorsichtig, bis der Tonarm eine neutrale Balance
erreicht hat. Der Tonarm sollte in diese ausgeglichene Position zurückkehren,
wenn er nach oben oder unten bewegt wird. Diese Einstellung muss sorgfältig
durchgeführt werden.
Tonarm Gegengewicht
Stellen Sie den Tonarm so ein, dass er gerade und neutral ausbalanciert ist
6. Sobald der Tonarm richtig ausbalanciert ist, legen Sie den Tonarm wieder in die
Ruhelage. Halten Sie das Gegengewicht fest, ohne es zu bewegen, und drehen
Sie das Spannungs-Rad vorsichtig, bis die Null mit der schwarzen Mittellinie auf
der Rückseite des Tonarms übereinstimmt. Vergewissern Sie sich, dass der Tonarm
immer noch ausbalanciert ist.
7. Drehen Sie abschließend das Gegengewicht und den Drehknopf für die
Nachführkraft zusammen gegen den Uhrzeigersinn (von vorne gesehen), um die
Nachführkraft gemäß den Empfehlungen des Patronenherstellers einzustellen.
Hinweis: Jede Markierung auf der Skala entspricht 0,1 g. Die empfohlene
Spurführungskraft für die werkseitig installierte Patrone beträgt 3,5 g ± 0,5 g. Drehen
Sie den Drehknopf für die Nachführkraft vorsichtig. Wenn "3,5" über der schwarzen
Linie auf der Oberseite des Tonarms zentriert ist, halten Sie bitte an.
Abbildung 1
Abbildung 2

EN
DE
FR
ES
IT
EN
DE
FR
ES
IT
28 29
Verbindung zum externen Lautsprecher mit dem RCA-
Audiokabel
Dieser Plattenspieler verfügt über 4 eingebaute Lautsprecher und einen
eingebauten Entzerrer.
Wenn Sie Ihren eigenen Verstärker oder Ihre eigenen Lautsprecher verwenden
möchten, befolgen Sie bitte die nachstehenden Anweisungen:
Cinch-Kabelverbindung
Aktive Lautsprecher
oder
Verstärker
HINWEIS: Um den besten Klang zu erzielen, ist es ratsam, die Lautstärke des
Plattenspielers auf einen minimalen Pegel einzustellen. Dann wird der Ton des
Plattenspielers über Ihren eigenen Verstärker, Ihre eigenen Lautsprecher usw.
wiedergegeben.
1. Vorverstärker-Wahlschalter einstellen
Dieses Produkt verfügt über eine eingebaute Phono-Equalizer-Funktion.
Sie können das Produkt verwenden, auch wenn Sie keinen Phonoverstärker oder
keine anschließbaren Geräte mit einem eingebauter Phono-Verstärker haben.
Verwenden Sie den Vorverstärker-Wahlschalter, um den Ausgang wie unten
gezeigt einzustellen.
Anschließbare Geräte
werden verwendet
Position des Vorverstärkers
Wahlschalter
Wo wird der Cinch Audio
Kabel angeschlossen?
Gerät mit Phono-
Eingang
PHONO Phono - Eingangsbuchse
und Erdungsanschluss
von anschließbaren Geräte
Gerät ohne
PhonoEinganag
LINE AUX- oder
LineEingangsbuchse für
anschließbare Geräte
HINWEIS: Die Cinch-Buchsen sind nicht für den direkten Anschluss an die
passiven / nicht mit Strom versorgten Lautsprecher im LINE-Modus ausgelegt.
Bei Anschluss an die passiven Lautsprecher ist kein Ton zu hören.
2. Gerät anschließen
Schließen Sie die Einstellungen für den Vorverstärker-Wahlschalter ab und
schließen Sie das RCA-Audiokabel an eine Eingangsbuchse an, die mit den von
Ihnen verwendeten anschließbaren Geräten (Verstärker, Aktivlautsprecher usw.)
kompatibel ist.
• Die rote Buchse des RCA-Audiokabels ist für den rechten (R) Kanal und die
weiße Buchse für den linken (L) Kanal.
R
AUX OUTAUX IN
PHONE
DC12V
LINE OUT
L
Mit PHONO Ohne PHONO
Zum Ausgang
AUX
L R
PHONO
L R
Mit PHONO Ohne PHONO
Zum Ausgang
Anschließbare Geräte
(Verstärker usw.)

EN
DE
FR
ES
IT
EN
DE
FR
ES
IT
30 31
Hauptstromanschluss
1. Stecken Sie den Stromstecker des Netzadapterkabels in die Buchse DC INPUT an der
Rückseite des Plattentellers.
2. Stecken Sie den Netzadapter in eine normale Steckdose.
Hinweis:
Schließen Sie den Netzadapter nicht an eine Steckdose an, bevor der
gesamte Plattenspieler zusammenbau fertiggestellt ist. Überprüfen Sie vor dem
Einschalten des Plattenspielerzusammenbau Verbindungen, um sicherzustellen, dass
sie richtig verbunden und sicher sind. Schalten Sie den Plattenspieler immer aus, bevor
Sie ihn anschließen oder vom Strom abnehmen.
Energieverwaltungsfunktion
Nach 20 Minuten Inaktivität geht der Plattenspieler automatisch in den
Bereitschaftsmodus über. Die Anzeigeleuchte erlischt.
Um den Betrieb wieder aufzunehmen, halten Sie die START-Taste 3 Sekunden lang
gedrückt.
Eine Schallplatte abspielen
1. Vor dem Abspielen einer Aufnahme
1.1 Ziehe
n Sie den Protektor zum Entfernen
gerade nach
vorne.
HINWEIS: Das Ausüben einer nach unten
gerichteten Kraft kann dazu führen, dass der
Stift vom Körper fällt. Es wird nur eine geringe
Lautstärke ausgegeben, wenn sich der Stift
gelöst hat oder gerade löst. Lesen Sie daher
„Ersetzen des Stifts“, um den Stift wieder
richtig anzubringen.
Schutz
1.2 Legen Sie die Schallplatte so auf die Filzmatte, dass das Mittelloch mit der Spindel
ausgerichtet ist.
2. Plattenspieler-Betrieb
Verringern Sie zunächst die Lautstärke des Verstärkers und der Lautsprecher
ausreichend.
2.1 Schließen Sie das mitgelieferte Netzteil an den Plattenspieler an, drücken Sie die
START-Taste und halten Sie sie 3 Sekunden lang gedrückt. Der Plattenspieler schaltet
sich ein. Die Anzeigeleuchte leuchtet rot auf.
2.2 Entfernen Sie den Stylus-Schutz vom Stylus.
2.3 Legen Sie die Schallplatte auf die Gleitmatte.
2.4 Drehen Sie den Funktionsknopf, um je nach Art der Aufzeichnung zwischen 33
und 45 Umdrehungen pro Minute umzuschalten.
2.5 Drücken Sie die START-Taste einmal, und der Plattenteller wird abgespielt oder
angehalten.
2.6 Entriegeln Sie den Tonarmclip und stellen Sie den Tonarmlifthebel in die obere
Position.
2.7 Positionieren Sie den Tonarm über der gewünschten Stelle (Rille) auf der
Schallplatte.
2.8 Senken Sie den Tonarm auf der Platte vorsichtig ab.
2.9 Drehen Sie die Lautstärke des Plattenspielers nach Bedarf auf.
2.10 Wenn Sie mit der Wiedergabe der Platte fertig sind, heben Sie den Tonarm an,
legen Sie ihn wieder auf den Armclip und drücken Sie lange auf die START-Taste,
um den Plattenspieler auszuschalten.
HINWEIS:
1. Wenn die stille Pause zwischen den einzelnen Titeln länger als 3 Minuten
dauert, hört der Plattenteller automatisch auf, sich zu drehen, um die Platte
nicht zu beschädigen. Die Anzeigeleuchte leuchtet rot. Um den Betrieb wieder
aufzunehmen, drücken Sie die START-Taste.
2. Wenn die Filzmatte verschmutzt ist, kann die Schallplatte leicht zerkratzt werden.
Entfernen Sie die Filzmatte daher regelmäßig und wischen Sie den Staub ab.
3. Entfernen Sie die Schallplatte nach dem Gebrauch, um Kratzer und Verformungen
zu vermeiden.
4. Verwenden Sie keinen Plattenstabilisator.

EN
DE
FR
ES
IT
EN
DE
FR
ES
IT
32 33
Bluetooth-Betrieb
1. Schließen Sie das mitgelieferte Netzteil an den Plattenspieler an und drücken Sie die
START-Taste lange, die Anzeigeleuchte leuchtet rot auf.
2. Drehen Sie den Funktionsknopf in den Bluetooth-Modus. Die Anzeigeleuchte
leuchtet blau und blinkt schnell. Sie hören ein Aktivierungsgeräusch von der
Drehscheibee.
3. Schalten Sie die Bluetooth-Funktion Ihres Mediengeräts ein und suchen Sie
nach "1byone BS020" und wählen Sie es aus, um das Mediengerät und den
Plattenspieler zu koppeln.
4. Wenn Ihr Mediengerät erfolgreich mit dem Plattenspieler gekoppelt wurde, gibt der
Plattenspieler einen kurzen Bestätigungston ab. Die blaue Anzeigeleuchte blinkt
langsam.
5. Spielen Sie Musik von Ihrem Mediengerät ab und streamen Sie sie auf den
Plattenspieler. Die Anzeigeleuchte wird solide werden.
Hinweis: Bluetooth-Version: 5.0
AUX-IN-Betrieb
Dieser Plattenspieler verfügt über eine zusätzliche Audiosignal-Eingangsbuchse
zum Anschluss externer Audiogeräte wie MP3-Player, CD-Player und ältere,
nicht andockbare iPods, damit Sie Ihre externe Quelle über die Lautsprecher des
Plattenspielers hören können.
1. Verwenden Sie ein Audiokabel (nicht mitgeliefert) mit einer 3,5-mm-
Stereoverbindung an jedem Ende des Kabels.
2. Stecken Sie ein Ende in die AUX-IN-Buchse des Plattenspielers und das andere Ende
in die Line Out-Buchse des Audiogeräts.
3. Schalten Sie den Plattenspieler und das Audiogerät ein. Die Anzeigeleuchte des
Plattenspielers leuchtet rot.
4. Der Lautstärkepegel kann über den Plattenspieler geregelt werden. Bedienen Sie
alle Funktionen des Zusatzgeräts wie gewohnt.
5. Bitte beachten Sie, dass die Funktion AUX-IN eine Funktion erster Priorität ist. Selbst
wenn die Anzeigeleuchte für PHONO/BT leuchtet, funktionieren diese Funktionen
nicht, solange die AUX-IN-Funktion verwendet wird. Bitte ziehen Sie das AUX-IN-
Kabel ab, bevor Sie die PHONO/BT-Funktionen verwenden.
Pege
Plattenspieler-Gehäuse
• Wenn das Gehäuse des Plattenspielers schmutzig oder staubig ist, ziehen Sie zuerst
den Netzadapter ab und wischen Sie dann Schmutz und Staub mit einem weichen,
trockenen Tuch ab.
• Verwenden Sie keine Benzole, Verdünner usw.
• Wenn Sie das Produkt längere Zeit aufbewahren, ziehen Sie den Netzadapter aus
der Steckdose und wickeln Sie das Produkt in Plastik ein. Lassen Sie es nicht feucht
werden. Der Antriebsriemen sollte entfernt werden, um eine ungleichmäßige
Dehnung zu vermeiden.
Reinigung des Stiftes
• Wenn Schmutz und Schmutz an der Stiftspitze haften
bleiben, reinigen Sie sie mit einer handelsüblichen Bürste.
• Wir empfehlen die Verwendung eines Stiftreinigers (nicht
im Lieferumfang enthalten), wenn die Stiftspitze stark
verschmutzt ist. Reinigen Sie die Stiftspitze, indem Sie die
Bürste von hinten zur Vorderseite der Stiftspitze bewegen
Austauschen des Stiftes
Es wird empfohlen, den Stift nach 400 Betriebsstunden auszutauschen.
Entfernen des Stiftes
• Zusätzlich zur Verschlechterung der Tonqualität können auch Schallplatten
beschädigt werden, wenn die Stiftspitze der Kassette sich verbraucht.
• Ziehen Sie unbedingt den Netzadapter des Produkts aus der Steckdose.
• Halten Sie beim Austauschen des Stifts die Headshell und das Patronengehäuse fest.
Drehen Sie die Vorderseite des Stifts vorwärts und rückwärts.
Installieren eines neuen Ersatzstifts
1. Setzen Sie den neuen Ersatzstift in die Patrone ein.
Nehmen Sie
zuerst am Körper teil
HINWEIS:
1. Stellen Sie sicher, dass der Tonarm sicher verriegelt ist, um Beschädigungen zu
vermeiden.
2. Wenn Sie fertig sind, vergessen Sie nicht, den Strom am Plattenspieler und Ihren
externen Geräten auszuschalten.

EN
DE
FR
ES
IT
EN
DE
FR
ES
IT
34 35
2. Heben Sie den Stift an, bis Sie ein Klicken hören.
3. Stellen Sie sicher, dass zwischen der Headshell und der Patrone kein Spalt
vorhanden ist.
Ersetzen des Riemens
• Der Riemen ist ein Verschleißteil. Tauschen Sie den Riemen aus, wenn die
Wiedergabegeschwindigkeit nachlässt oder unregelmäßige Drehung auftritt. Als
Faustregel empfehlen wir, den Riemen einmal im Jahr auszutauschen
• Ziehen Sie den Netzadapter des Produkts aus der Steckdose, bevor Sie den Riemen
austauschen.
1. Entfernen Sie die Unterlage.
2. Entfernen Sie den Riemen von der Motorriemenscheibe.
3. Entfernen Sie den Hauptteller und entfernen Sie dann den alten Riemen.
4. Drehen Sie den Teller um und Sie sehen einen erhabenen Kreis. Schleifen Sie
den neuen Riemen entlang des mittleren Kreises.

EN
DE
FR
ES
IT
EN
DE
FR
ES
IT
36 37
5. Bringen Sie den Plattenteller an.
Richten Sie eine der Öffnungen auf die Position der messingfarbenen
Motorriemenscheibe aus.
6. Legen Sie den Riemen auf die messingfarbene Motorriemenscheibe.
Fassen Sie den in Schritt 4 angebrachten Riemen und legen Sie ihn unter Zug auf
die Motorrolle aus Messing.
7. Drehen Sie den Plattenteller mit den Händen langsam zehnmal im
Uhrzeigersinn, wie durch den Pfeil unten dargestellt.
Wenn der Plattenteller bewegt wurde
Wickeln Sie den Plattenteller unter Verwendung des Originalverpackungsmaterials des
Produkts in umgekehrter Reihenfolge wie beim Auspacken ein. Wenn Sie nicht über
die Verpackungsmaterialien verfügen, ergreifen Sie die folgenden Maßnahmen:
• Entfernen Sie nach dem Trennen des Netzteils von der Steckdose die Filzmatte und
den Plattenteller und wickeln Sie sie dann so ein, dass sie nicht beschädigt werden.
• Bringen Sie den Schutz an der Patrone an.
• Binden Sie den Tonarm mit einer Schnur oder Ähnlichem an den Rest, damit er sich
nicht bewegt.
• Wickeln Sie den Plattenspieler mit Papier oder einem weichen Tuch ein, damit er
nicht beschädigt wird.
La pagina si sta caricando...
La pagina si sta caricando...
La pagina si sta caricando...
La pagina si sta caricando...
La pagina si sta caricando...
La pagina si sta caricando...
La pagina si sta caricando...
La pagina si sta caricando...
La pagina si sta caricando...
La pagina si sta caricando...
La pagina si sta caricando...
La pagina si sta caricando...
La pagina si sta caricando...
La pagina si sta caricando...
La pagina si sta caricando...
La pagina si sta caricando...
La pagina si sta caricando...
La pagina si sta caricando...
La pagina si sta caricando...
La pagina si sta caricando...
La pagina si sta caricando...
La pagina si sta caricando...
La pagina si sta caricando...
La pagina si sta caricando...
La pagina si sta caricando...
La pagina si sta caricando...
La pagina si sta caricando...
La pagina si sta caricando...
La pagina si sta caricando...
La pagina si sta caricando...
La pagina si sta caricando...
La pagina si sta caricando...
La pagina si sta caricando...
-
 1
1
-
 2
2
-
 3
3
-
 4
4
-
 5
5
-
 6
6
-
 7
7
-
 8
8
-
 9
9
-
 10
10
-
 11
11
-
 12
12
-
 13
13
-
 14
14
-
 15
15
-
 16
16
-
 17
17
-
 18
18
-
 19
19
-
 20
20
-
 21
21
-
 22
22
-
 23
23
-
 24
24
-
 25
25
-
 26
26
-
 27
27
-
 28
28
-
 29
29
-
 30
30
-
 31
31
-
 32
32
-
 33
33
-
 34
34
-
 35
35
-
 36
36
-
 37
37
-
 38
38
-
 39
39
-
 40
40
-
 41
41
-
 42
42
-
 43
43
-
 44
44
-
 45
45
-
 46
46
-
 47
47
-
 48
48
-
 49
49
-
 50
50
-
 51
51
-
 52
52
-
 53
53


1byone 1-AD07US02 Manuale utente
- Categoria
- Giradischi audio
- Tipo
- Manuale utente
in altre lingue
- English: 1byone 1-AD07US02 User manual
- français: 1byone 1-AD07US02 Manuel utilisateur
- español: 1byone 1-AD07US02 Manual de usuario
- Deutsch: 1byone 1-AD07US02 Benutzerhandbuch
Altri documenti
-
Lenco LS-440BUBG Turntable Manuale del proprietario
-
-
Lenco LS-430 Manuale utente
-
Audio-Technica AT-LP3WH Manuale utente
-
Lenco LS-500OK Manuale utente
-
Crosley C62 Manuale utente
-
Yamaha GT-5000 Manuale del proprietario
-
-
Pro-Ject Audio System X2B Turntable Manuale utente
-
Yamaha P-450 Manuale del proprietario