


C €
2006/95/CE
2004/108/CE

Pag. 2
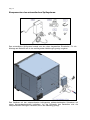
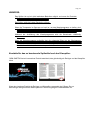
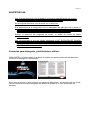
Componenti del Sistema automatico di lavaggio:
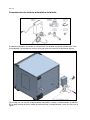
Il sistema automatico di lavaggio è composto dai particolari sopra esposti. Per il montaggio
sul forno procedere come illustrato nelle figure seguenti:
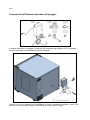
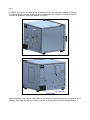
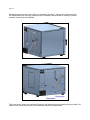
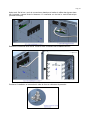
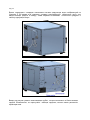
Fissare il box con le apposite viti autofilettanti a corredo, mediante cacciavite a croce. Sul
retro forno sono presenti le forature corrispondenti, come indicato in figura.

Pag. 3
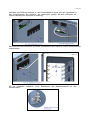
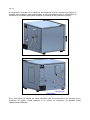
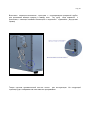
Una volta fissato il box, aprire il coperchio di plastica ed inserire il cavo segnali nell’apposito
alloggiamento, come illustrato sotto. Collegarlo nello slot della scheda elettronica (il
collegamento è univoco).
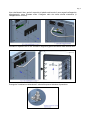
Chiudere il coperchio con le viti. Avvitare in seguito la girante all’interno della camera forno.
Proseguire l’installazione allacciando il tubo dell’acqua nel riduttore di pressione.

Pag. 4
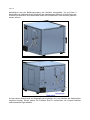
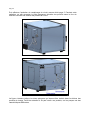
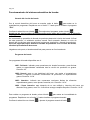
In seguito, si procede con l’operazione di riempimento circuito, descritta a pagina 5. Durante
questa operazione, lasciare scollegato il tubo trasparente per l’ingresso prodotti in camera,
in modo da espellere i residui dei prodotti nel circuito.
Nella vista sopra sono indicati i tubi pescanti che andranno inseriti nelle taniche dei prodotti per il
lavaggio. Fare attenzione a non invertire i prodotti, le pompe hanno caratteristiche differenti.

Pag. 5
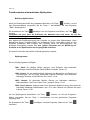
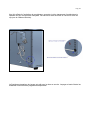
Eseguita l’operazione di riempimento, procedere con l’allacciamento del tubo trasparente per
l’ingresso dei prodotti di pulizia in camera forno. Il tubo stesso andrà agganciato al raccordo
mediante la clip bloccapinzetta, inserita a pressione (vista dettaglio a destra).
Ora il Sistema automatico di lavaggio è pronto per essere messo in funzione. Nella pagina
seguente saranno illustrate le modalità di esecuzione dei programmi disponibili.

Pag. 6
Funzionamento Sistema automatico di lavaggio:
Riempimento circuito di lavaggio
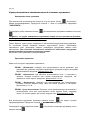
A controllo elettronico del forno avviato, premere il tasto per entrare nella modalità
programmi. Scorrere con il tasto “
-
“ fino a visualizzare il programma
“FILL”.
Confermare la selezione tramite il tasto . Per eseguire il programma premere il tasto .
Sincerarsi che i tubi dell’impianto siano vuoti prima di procedere con l’esecuzione del
programma.
Avrà così inizio l’operazione di riempimento prodotti all’interno del circuito di lavaggio. Al
termine di questa operazione il segnalatore acustico suonerà. E’ necessario effettuare un
ciclo di riempimento del circuito ad ogni operazione sulle taniche (sostituzione o
riempimento prodotti).
Per una maggior sicurezza relativa al riempimento prodotti nel
circuito di lavaggio, effettuare la procedura 2 volte.
A questo punto il lavaggio è pronto per essere messo in funzione.
Programmi di lavaggio
I programmi di lavaggio disponibili sono 4:
LAV1 - Delicato:
adatto a procedure di lavaggio frequente, per rimuovere residui non
particolarmente resistenti a seguito di cotture di prodotti non grassi. Durata: 42’
LAV2 - Normale:
per un uso tradizionale del forno, con residui ed incrostazioni che
fanno capo ad alcune cotture consecutive di prodotti non particolarmente grassi.
Durata: 1h 04’
LAV3 - Intensivo:
adatto in seguito a numerose cotture giornaliere di cibi
particolarmente grassi, quali pizze, focacce, ecc. Durata: 1h 34’
LAV4 - Super Intensivo:
Adatto dopo un molteplice uso intensivo del forno con cibi
particolarmente grassi, ad esempio 3 o 4 cotture a pieno carico di polli.
Durata: 1h 56’
Per eseguire un programma di lavaggio, premere il tasto per entrare nella modalità
programmi. Scorrere con il tasto “
-
“ fino a visualizzare il programma desiderato.
Confermare la selezione tramire il tasto ed eseguire il programma stesso mediante il
tasto .

Pag. 7
AVVERTENZE:
Si può procedere con il ciclo di lavaggio, solamente se il forno non è in cottura e se i
prodotti (detergente e brillantante) sono presenti nel circuito.
Si consiglia di effettuare il ciclo di lavaggio a forno freddo.
Se viene impostato per l’esecuzione il programma di lavaggio ad una temperatura
camera forno non adeguata, il programma di raffreddamento “Cool” viene
eseguito automaticamente. Al raggiungimento della temperatura idonea, il forno
procede con l’esecuzione del lavaggio precedentemente impostato.
Durante l’esecuzione del programma di lavaggio, il controllo della centralina è
completamente inibito.
Una volta terminato il programma di lavaggio, smontare assolutamente la girante in
camera forno. NON PROCEDERE IN NESSUN MODO ALL’ESECUZIONE DI
COTTURE CON LA GIRANTE INSTALLATA NELLA CAMERA DEL FORNO. In caso
contrario, i danni rilevati sarebbero irreparabili.
Detergente e brillantante da usare:
GGM GASTRO ha sviluppato un prodotto innovativo in grado di svolgere sia le funzioni di
detergente che di brillantante contemporaneamente.
Nel caso di utilizzo di un singolo prodotto facente funzione di detergente e brillantante, inserire
solamente il pescante del detergente del sistema di lavaggio nell’unico contenitore del prodotto.

Pag. 8
Automatic washing System components:
The automatic washing system is made up of the details shown above. For oven assembly,
proceed as illustrated in the following figures:
Secure the box using the dedicated self-threading screws supplied and a star screwdriver.
The corresponding holes are on the back of the oven, as shown in the figure.

Pag. 9
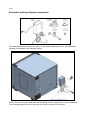
Once the box is secured, open the plastic cover and inset the signal cable into the
dedicated housing, as shown below. Connect it into the electronic board slot (connection is
unequivocal).
Close the cover with the screws. Then screw the rotor into the oven chamber.
Continue installation by connecting the water pipe into the pressure reducer.

Pag. 10
Afterwards proceed with circuit filling as described on page 5
.
During this operation leave
the transparent hose carrying products into the chamber disconnected so that any residual
products in the circuit are expelled
.
The view above shows the immersed hoses to be inserted into the washing product tanks. Be
careful not to invert the products, the hoses have different characteristics.

Pag. 11
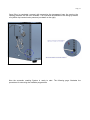
Once filling is completed, proceed with connecting the transparent hose for carrying the
cleaning products into the oven chamber. The hose shall be attached to the fitting by means
of a jubilee clip inserted under pressure (see detail on the right).
Now the automatic washing System is ready to start. The following page illustrates the
procedures for executing the available programmes.

Pag. 12
Automatic washing System operation:
Filling the washing circuit
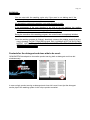
With the electronic oven control activated, press key to enter the programme modes.
Scroll using key “-“ until displayed is the programme
“FILL”
.
Confirm the selection using key . To run the programme, press key .
Check that the hoses of the machinery are empty before proceeding with the execution of
the program.
Doing so starts the operation of filling the washing circuit with products. At the end of this
operation the acoustic indicator shall emit a signal. Circuit filling must be carried out for each
operation on the tanks (product replacement or filling).
For more safety when filling the
washing circuit with products, perform the procedure twice.
At this point the wash cycle is ready to be activated.
Washing programmes
There are 4 washing programmes:
LAV 1: Delicate:
suitable for frequent washing procedures to remove residues that are
not particularly hard to remove after baking non fatty products. Duration: 42’
LAV 2: Normal:
for traditional oven use, with residuals and encrustations resulting
from consecutive baking cycles of products that are not particularly fatty.
Duration: 1h 04’
LAV 3: Intensive:
suitable after numerous daily baking cycles of particularly fatty
foods, such as pizza, focaccia, etc. Duration: 1h 34’
LAV 4: Super Intensive:
suitable after an intensive and multiple use of the oven with
particularly fatty foods, such as 3 or 4 cooking processes of chickens with the oven fully
loaded. Duration: 1h 56’
To run a washing programme, press key to enter programmes mode. Scroll with key
“-“ until the desired programme is displayed.
Confirm the selection using key and run the programme using key .

Pag. 13
WARNINGS:
You can start with the washing cycle only if the oven is not baking and if the
products (detergent and rinse aid) have been filled.
It is advisable to perform the washing cycle when the oven is cold.
If the temperature of the oven chamber is too high to run the washing, the cooling
program "Cool" is performed automatically. Upon reaching the proper temperature, the
oven goes on to perform the washing program previously set.
During the execution of the washing program, the control board is completely inhibited.
Once the washing program is finished, absolutely unmount the rotating nozzle from the
oven’s chambre. DO NOT PROCEED IN ANY WAY COOKING WITH THE ROTATING
NOZZLE INSTALLED IN THE OVEN’S CHAMBER, OR IT’S GOING TO BE
IRREPARABLY DAMAGED.
Contacts for the detergent and rinse aids to be used:
GGM GASTRO developed an innovative product serving both as detergent and rinse aid
simultaneously.
In case a single product serving as detergent and rinse aid is used, insert just the detergent
suction pipe of the washing system in the unique product container.

Pag. 14
Komponenten des automatischen Spülsystems:
Das automatische Spülsystem besteht aus den oben dargestellten Einzelteilen. Für die
Montage am Backofen wie in den nachfolgenden Abbildungen gezeigt vorgehen:
Das Gehäuse mit den entsprechenden beiliegenden selbstschneidenden Schrauben mit
einem Kreuzschraubenzieher befestigen. An der Rückseite des Backofens sind die
entsprechenden Öffnungen vorhanden, wie in der Abbildung gezeigt.

Pag. 15
Nachdem das Gehäuse befestigt ist, den Kunststoffdeckel öffnen und das Signalkabel in
den entsprechenden Sitz einführen, wie nachfolgend gezeigt. Mit dem Steckplatz der
Platine verbinden (der Anschluss ist eindeutig).
Den Deckel mit den Schrauben schließen. Anschließend das Laufrad im Inneren des Backraums
festschrauben.
Mit der Installation fortfahren, durch Anschließen des Wasserschlauchs an den
Druckminderer.

Pag. 16
Nachfolgend wird der Befüllungsvorgang des Kreislauf durchgeführt, der auf Seite 5
beschrieben ist. Während dieses Vorgangs den transparenten Schlauch zum Einführen der
Produkte im Backraum nicht anschließen, damit die Produktreste in den Kreislauf gestoßen
werden können.
Auf der oberen Ansicht sind die Steigschläuche angezeigt, die in die Kanister der Spülprodukte
eingeführt werden. Darauf achten, die Produkte nicht zu vertauschen, die Pumpen besitzen
unterschiedliche Eigenschaften.

Pag. 17
Nach Ausführung des Befüllungsvorgangs den transparenten Schlauch für den Eintritt der
Reinigungsprodukte in den Backraum anschließen. Der Schlauch selbst wird durch den
Befestigungsclip mit Druck am Anschluss eingehakt (siehe Detail rechts).
Nun ist das automatische Spülsystem einsatzbereit. Auf der nachfolgenden Seite werden die
verfügbaren Betriebsarten der Programme erläutert.

Pag. 18
Funktionsweise automatisches Spülsystem:
Befüllung Spülkreislauf
Nach der Elektronikkontrolle des gestarteten Backofens, die Taste drücken, um auf
den Programm-Modus zuzugreifen. Mit der Taste “-“ durchblättern, bis das Programm
“FILL”
angezeigt wird.
Die Auswahl mit der Taste bestätigen. Um ein Programm auszuführen, die Taste
drücken.
Versichern Sie sich, dass die Schläuche der Maschine leer sind, bevor Sie mit der
Ausführung des Programms anfangen.
Nun beginnt der Befüllungsvorgang der Produkte im Inneren des Spülkreislaufs. Nach
Beendigung dieses Vorgangs ertönt ein akustisches Signal. Nach jeder Arbeit an den
Kanistern (Austausch oder Einfüllen der Produkte) muss ein Befüllungszyklus des
Kreislaufs durchgeführt werden.
Für eine größere Sicherheit bei der Befüllung der
Produkte in den Spülkreislauf den Vorgang 2 Mal ausführen
An diesem Punkt kann das Spülen in Betrieb genommen werden.
Spülprogramme
Es sind 4 Spülprogramme verfügbar:
LAV1: Sanft:
für häufiges Spülen geeignet, zum Entfernen nicht besonders
hartnäckiger Flecken nach dem Garen fettfreier Produkte. Dauer: 42’
LAV2: Normal:
für den herkömmlichen Gebrauch des Backofens, mit Resten und
Verkrustungen, die auf einige aufeinander folgende Garungen nicht besonders
fetthaltiger Produkte zurückzuführen sind. Dauer: 1h 04’
LAV3: Intensiv:
für zahlreiche tägliche Garung von besonders fettreichen
Nahrungsmitteln wie Pizza, Fladen, usw., geeignet. Dauer: 1h 34’
LAV4: Super Intensiv:
geeignet nach einer intensiven Mehrfachnutzung des Ofens mit
besonders fetthaltigen Lebensmitteln, wie z. B. 3 oder 4 Kochen von Hühnern mit voller
Ladung. Dauer: 1h 56’
Um ein Spülprogramm auszuführen, die Taste drücken, um auf den Programm-
Modus zuzugreifen. Mit der Taste “-“ durchblättern, bis das gewünschte Programm
angezeigt wird.
Die Auswahl mit der Taste bestätigen, und das Programm selbst mit der Taste
ausführen.
La pagina sta caricando ...
La pagina sta caricando ...
La pagina sta caricando ...
La pagina sta caricando ...
La pagina sta caricando ...
La pagina sta caricando ...
La pagina sta caricando ...
La pagina sta caricando ...
La pagina sta caricando ...
La pagina sta caricando ...
La pagina sta caricando ...
La pagina sta caricando ...
La pagina sta caricando ...
La pagina sta caricando ...
La pagina sta caricando ...
La pagina sta caricando ...
La pagina sta caricando ...
La pagina sta caricando ...
La pagina sta caricando ...
La pagina sta caricando ...
-
 1
1
-
 2
2
-
 3
3
-
 4
4
-
 5
5
-
 6
6
-
 7
7
-
 8
8
-
 9
9
-
 10
10
-
 11
11
-
 12
12
-
 13
13
-
 14
14
-
 15
15
-
 16
16
-
 17
17
-
 18
18
-
 19
19
-
 20
20
-
 21
21
-
 22
22
-
 23
23
-
 24
24
-
 25
25
-
 26
26
-
 27
27
-
 28
28
-
 29
29
-
 30
30
-
 31
31
-
 32
32
-
 33
33
-
 34
34
-
 35
35
-
 36
36
-
 37
37
-
 38
38
-
 39
39
-
 40
40


in altre lingue
- English: GGM Gastro AWB Owner's manual
- français: GGM Gastro AWB Le manuel du propriétaire
- español: GGM Gastro AWB El manual del propietario
- Deutsch: GGM Gastro AWB Bedienungsanleitung
Documenti correlati
Altri documenti
-
Angelo Po FX101 E 1-2CR Use And Installation Manual
-
Terzismo LSGSH5430ZZW Manuale utente
-
-
ROSIERES LS DSI 730 W Manuale utente
-
Lavazza LB2300 SINGLE CUP Operating Instructions Manual
-
Candy CDI 2012-S Manuale utente
-
Hoover HND 7102 S Manuale utente
-
-