
ENGLISH
Getting Started Connections Setup Playback Information Troubleshooting
GraphicalUserInterface
English
Use this manual in combination with the
operating guide displayed on the GUI screen
.
GUI Menu Operations (vpage 9)
GUI Menu Map (vpage 10)
Deutsch
Verwenden Sie dieses Handbuch zusammen
mit den Bedienungsanweisungen auf dem
GUI-Bildschirm.
GUI-Menübedienung (vSeite 9)
GUI-Menüplan (vSeite 10)
Français
Utilisez ce manuel en même temps que le
guide d’utilisation affiché sur l’écran GUI
(Interface graphique).
Fonctionnement du menu de l’interface
graphique GUI (vpage 9)
Plan du menu de l’interface graphique GUI
(vpage 10)
Italiano
Usare questo manuale insieme alla guida
operativa visualizzata sulla schermata GUI.
Operazioni menu GUI (vpagina 9)
Mappa menu GUI (vpagina 10)
Español
Utilice este manual conjuntamente con la
guía de uso que aparece en la pantalla GUI.
Uso de los menús GUI (vpágina 9)
Estructura de los menús GUI (vpágina 10)
Nederlands
Gebruik deze gebruiksaanwijzing samen
met de aanwijzingen die op het GUI-scherm
worden getoond.
Het GUI menu bedienen (vblz. 9)
Overzicht van het GUI menu (vblz. 10)
Svenska
Använd denna bruksanvisning i
kombination med anvisningarna på
GUI-skärmen
.
Användning av GUI-menyerna
(vsidan 9)
GUI-menyöversikt (vsidan 10)
Control Dock for iPod
®
ASD-3N
Owner’s Manual
Bedienungsanleitung
Manuel de l’Utilisateur
Manuale delle istruzioni
Manual del usuario
Gebruiksaanwijzing
Bruksanvisning
iPod is a trademark of Apple Inc., registered in
the U.S. and other countries.

I
SAFETY INSTRUCTIONS
1. Read Instructions – All the safety and operating instructions should be read
before the product is operated.
2. Retain Instructions – The safety and operating instructions should be retained
for future reference.
3. Heed Warnings – All warnings on the product and in the operating instructions
should be adhered to.
4. Follow Instructions – All operating and use instructions should be followed.
5. Cleaning – Unplug this product from the wall outlet before cleaning. Do not
use liquid cleaners or aerosol cleaners.
6. Attachments – Do not use attachments not recommended by the product
manufacturer as they may cause hazards.
7. Water and Moisture – Do not use this product near water – for example, near
a bath tub, wash bowl, kitchen sink, or laundry tub; in a wet basement; or near
a swimming pool; and the like.
8. Accessories – Do not place this product on an unstable cart, stand, tripod,
bracket, or table. The product may fall, causing serious injury to a child or
adult, and serious damage to the product. Use only with a cart, stand, tripod,
bracket, or table recommended by the manufacturer, or sold with the product.
Any mounting of the product should
follow the manufacturer’s instructions, and should
use a mounting accessory recommended by the
manufacturer.
9. A product and cart combination should be moved
with care. Quick stops, excessive force, and
uneven surfaces may cause the product and cart
combination to overturn.
10. Ventilation – Slots and openings in the cabinet are provided for ventilation and
to ensure reliable operation of the product and to protect it from overheating,
and these openings must not be blocked or covered. The openings should
never be blocked by placing the product on a bed, sofa, rug, or other similar
surface. This product should not be placed in a built-in installation such as a
bookcase or rack unless proper ventilation is provided or the manufacturer’s
instructions have been adhered to.
11. Power Sources – This product should be operated only from the type of power
source indicated on the marking label. If you are not sure of the type of power
supply to your home, consult your product dealer or local power company. For
products intended to operate from battery power, or other sources, refer to
the operating instructions.
13. Power-Cord Protection – Power-supply cords should be routed so that they are
not likely to be walked on or pinched by items placed upon or against them,
paying particular attention to cords at plugs, convenience receptacles, and the
point where they exit from the product.
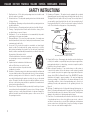
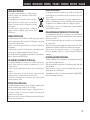
15. Outdoor Antenna Grounding – If an outside antenna or cable system is
connected to the product, be sure the antenna or cable system is grounded
so as to provide some protection against voltage surges and built-up static
charges. Article 810 of the National Electrical Code, ANSI/NFPA 70, provides
information with regard to proper grounding of the mast and supporting
structure, grounding of the lead-in wire to an antenna discharge unit, size
of grounding conductors, location of antenna-discharge unit, connection to
grounding electrodes, and requirements for the grounding electrode. See
Figure A.
16. Lightning – For added protection for this product during a lightning storm, or
when it is left unattended and unused for long periods of time, unplug it from
the wall outlet and disconnect the antenna or cable system. This will prevent
damage to the product due to lightning and power-line surges.
17. Power Lines – An outside antenna system should not be located in the vicinity
of overhead power lines or other electric light or power circuits, or where it
can fall into such power lines or circuits. When installing an outside antenna
system, extreme care should be taken to keep from touching such power
lines or circuits as contact with them might be fatal.
FIGURE A
EXAMPLE OF ANTENNA GROUNDING
AS PER NATIONAL
ELECTRICAL CODE
"/5&//"
-&"%*/
8*3&
(306/%
$-".1
&-&$53*$
4&37*$&
&26*1.&/5
"/5&//"
%*4$)"3(&6/*5
/&$4&$5*0/
(306/%*/($0/%6$5034
/&$4&$5*0/
(306/%$-".14
108&34&37*$&(306/%*/(
&-&$530%&4:45&.
/&$"351"35)
/&$/"5*0/"-&-&$53*$"-$0%&
12. Grounding or Polarization – This product may be equipped with a polarized
alternating-current line plug (a plug having one blade wider than the other).
This plug will fit into the power outlet only one way. This is a safety feature. If
you are unable to insert the plug fully into the outlet, try reversing the plug. If
the plug should still fail to fit, contact your electrician to replace your obsolete
outlet. Do not defeat the safety purpose of the polarized plug.
ENGLISH DEUTSCH FRANCAIS ITALIANO ESPAÑOL NEDERLANDS SVENSKA

II
This Class B digital apparatus complies with Canadian ICES-003.
Cet appareil numérique de la classe B est conforme à la norme NMB-003 du
Canada.
FCC INFORMATION (For US customers)
1. COMPLIANCE INFORMATION
Product Name: Control Dock for iPod
Model Number: ASD-3N
This product complies with Part 15 of the FCC Rules. Operation is subject
to the following two conditions: (1) this product may not cause harmful
interference, and (2) this product must accept any interference received,
including interference that may cause undesired operation.
Denon Electronics (USA), LLC
(a D & M Holdings Company)
100 Corporate Drive
Mahwah, NJ 07430-2041
Tel. (800) 497-8921
2. IMPORTANT NOTICE: DO NOT MODIFY THIS PRODUCT
This product, when installed as indicated in the instructions contained in this
manual, meets FCC requirements. Modification not expressly approved by
DENON may void your authority, granted by the FCC, to use the product.
3. NOTE
This product has been tested and found to comply with the limits for a
Class B digital device, pursuant to Part 15 of the FCC Rules. These limits are
designed to provide reasonable protection against harmful interference in a
residential installation.
This product generates, uses and can radiate radio frequency energy and,
if not installed and used in accordance with the instructions, may cause
harmful interference to radio communications. However, there is no
guarantee that interference will not occur in a particular installation. If this
product does cause harmful interference to radio or television reception,
which can be determined by turning the product OFF and ON, the user
is encouraged to try to correct the interference by one or more of the
following measures:
• Reorient or relocate the receiving antenna.
• Increase the separation between the equipment and receiver.
• Connect the product into an outlet on a circuit different from that to which
the receiver is connected.
• Consult the local retailer authorized to distribute this type of product or an
experienced radio/TV technician for help.
18. Overloading – Do not overload wall outlets, extension cords, or integral
convenience receptacles as this can result in a risk of fire or electric shock.
19. Object and Liquid Entry – Never push objects of any kind into this product
through openings as they may touch dangerous voltage points or short-out
parts that could result in a fire or electric shock. Never spill liquid of any kind
on the product.
20. Servicing – Do not attempt to service this product yourself as opening or
removing covers may expose you to dangerous voltage or other hazards.
Refer all servicing to qualified service personnel.
21. Damage Requiring Service – Unplug this product from the wall outlet and
refer servicing to qualified service personnel under the following conditions:
a) When the power-supply cord or plug is damaged,
b) If liquid has been spilled, or objects have fallen into the product,
c) If the product has been exposed to rain or water,
d) If the product does not operate normally by following the operating
instructions. Adjust only those controls that are covered by the operating
instructions as an improper adjustment of other controls may result in
damage and will often require extensive work by a qualified technician to
restore the product to its normal operation,
e) If the product has been dropped or damaged in any way, and
f) When the product exhibits a distinct change in performance – this indicates
a need for service.
22. Replacement Parts – When replacement parts are required, be sure the service
technician has used replacement parts specified by the manufacturer or have
the same characteristics as the original part. Unauthorized substitutions may
result in fire, electric shock, or other hazards.
23. Safety Check – Upon completion of any service or repairs to this product, ask
the service technician to perform safety checks to determine that the product
is in proper operating condition.
24. Wall or Ceiling Mounting – The product should be mounted to a wall or ceiling
only as recommended by the manufacturer.
25. Heat – The product should be situated away from heat sources such as
radiators, heat registers, stoves, or other products (including amplifiers) that
produce heat.
SVENSKA NEDERLANDS ESPAÑOL ITALIANO FRANCAIS DEUTSCH ENGLISH

III
• DECLARACIÓN DE CONFORMIDAD
Por la presente, D&M Holdings Inc., Denon Brand Company, declara que este
ASD-3N cumple con los requisitos esenciales y otras exigencias relevantes de
la Directiva 1999/5/EC, esta conforme con los siguientes estandares:
EN60950, EN55013, EN55020, EN55022, EN55024, EN61000-3-2,
EN61000-3-3, EN300328, EN301489-01, EN301489-17 y EN50371.
Puede consultar a nuestro representante europeo, DENON Europe, acerca de
la declaración de conformidad.
• EENVORMIGHEIDSVERKLARING
Hierbij verklaart D&M Holdings Inc., Denon Brand Company dat het toestel
ASD-3N in overeenstemming is met de essentiële eisen en de andere
relevante bepalingen van richtlijn 1999/5/EG, in overeenstemming is met de
volgende normen:
EN60950, EN55013, EN55020, EN55022, EN55024, EN61000-3-2,
EN61000-3-3, EN300328, EN301489-01, EN301489-17 en EN50371.
De eenvormigheidsverklaring mag worden geconsulteerd aan onze Europese
vertegenwoordiger, DENON Europa.
• ÖVERENSSTÄMMELSESINTYG
Denna utrustning är i överensstämmelse med de väsentliga kraven och andra
relevanta bestämmelser i Direktiv 1999/5/EC, uppfyller foljande standarder:
EN60950, EN55013, EN55020, EN55022, EN55024, EN61000-3-2,
EN61000-3-3, EN300328, EN301489-01, EN301489-17 och EN50371.
EU-konformitetsintyget kan på begäran fås från DENON Europe, vår
representant i Europa.
• DECLARATION OF CONFORMITY
Hereby, D&M Holdings Inc., Denon Brand Company declares that this product
ASD-3N is in compliance with the essential requirements and other relevant
provisions of Directive 1999/5/EC, in conformity with the following standards;
EN60950, EN55013, EN55020, EN55022, EN55024, EN61000-3-2,
EN61000-3-3, EN300328, EN301489-01, EN301489-17 and EN50371
The declaration of conformity may be consulted to our European representative,
DENON Europe.
• ÜBEREINSTIMMUNGSERKLÄRUNG
Hiermit erklärt D&M Holdings Inc., Denon Brand Company, dass sich das Gerät
ASD-3N in Übereinstimmung mit den grundlegenden Anforderungen und den
übrigen einschlägigen Bestimmungen der Richtlinie 1999/5/EG befindet, den
folgenden Standards entspricht:
EN60950, EN55013, EN55020, EN55022, EN55024, EN61000-3-2,
EN61000-3-3, EN300328, EN301489-01, EN301489-17 und EN50371
Wenden Sie sich bei Fragen zur Konformitätserklärung an unseren europäischen
Vertreter, DENON Europe.
• DECLARATION DE CONFORMITE
Par la présente, D&M Holdings Inc., Denon Brand Company déclare que
l’appareil ASD-3N est conforme aux exigences essentielles et aux autres
dispositions pertinentes de la directive 1999/5/CE, e conforme alle seguenti
normative:
EN60950, EN55013, EN55020, EN55022, EN55024, EN61000-3-2,
EN61000-3-3, EN300328, EN301489-01, EN301489-17 e EN50371.
La déclaration de conformité pourra être consultée auprès de notre
représentant en Europe, DENON Europe.
• DICHIARAZIONE DI CONFORMITÀ
Con la presente D&M Holdings Inc., Denon Brand Company dichiara che questo
ASD-3N è con-forme ai requisiti essenziali ed alle altre disposizioni pertinenti
stabilite dalla direttiva 1999/5/CE, e conforme alle seguenti normative:
EN60950, EN55013, EN55020, EN55022, EN55024, EN61000-3-2,
EN61000-3-3, EN300328, EN301489-01, EN301489-17 e EN50371.
La dichiarazione di conformità può essere consultata presso il nostro
rappresentante europeo, DENON Europe.
QUESTO PRODOTTO E’ CONFORME
AL D.M. 28/08/95 N. 548
DENON EUROPE
Division of D&M Germany GmbH
An der Landwehr 19, Nettetal,
D-41334 Germany
ENGLISH DEUTSCH FRANCAIS ITALIANO ESPAÑOL NEDERLANDS SVENSKA

CAUTION:
• The ventilation should not be impeded by covering the
ventilation openings with items, such as newspapers,
tablecloths, curtains, etc.
• No naked flame sources, such as lighted candles, should be
placed on the unit.
• Observe and follow local regulations regarding battery
disposal.
• Do not expose the unit to dripping or splashing fluids.
• Do not place objects filled with liquids, such as vases, on
the unit.
ACHTUNG:
• Die Belüftung sollte auf keinen Fall durch das Abdecken
der Belüftungsöffnungen durch Gegenstände wie
beispielsweise Zeitungen, Tischtücher, Vorhänge o. Ä.
behindert werden.
• Auf dem Gerät sollten keinerlei direkte Feuerquellen wie
beispielsweise angezündete Kerzen aufgestellt werden.
• Bitte beachten Sie bei der Entsorgung der Batterien die
örtlich geltenden Umweltbestimmungen.
• Das Gerät sollte keiner tropfenden oder spritzenden
Flüssigkeit ausgesetzt werden.
• Auf dem Gerät sollten keine mit Flüssigkeit gefüllten
Behälter wie beispielsweise Vasen aufgestellt werden.
ATTENTION:
• La ventilation ne doit pas être gênée en recouvrant les
ouvertures de la ventilation avec des objets tels que
journaux, rideaux, tissus, etc.
• Aucune flamme nue, par exemple une bougie, ne doit être
placée sur l’appareil.
• Veillez à respecter les lois en vigueur lorsque vous jetez les
piles usagées.
• L’appareil ne doit pas être exposé à l’eau ou à l’humidité.
• Ne pas poser d’objet contenant du liquide, par exemple un
vase, sur l’appareil.
ATTENZIONE:
• Le aperture di ventilazione non devono essere ostruite
coprendole con oggetti, quali giornali, tovaglie, tende e così
via.
• Non posizionate sull’unità fiamme libere, come ad esempio
candele accese.
• Prestate attenzione agli aspetti legati alla tutela
dell’ambiente nello smaltimento delle batterie.
• L’apparecchiatura non deve essere esposta a gocciolii o
spruzzi.
• Non posizionate sull’unità alcun oggetto contenente liquidi,
come ad esempio i vasi.
PRECAUCIÓN:
• La ventilación no debe quedar obstruida por haberse
cubierto las aperturas con objetos como periódicos,
manteles, cortinas, etc.
• No debe colocarse sobre el aparato ninguna fuente
inflamable sin protección, como velas encendidas.
• A la hora de deshacerse de las pilas, respete la normativa
para el cuidado del medio ambiente.
• No exponer el aparato al goteo o salpicaduras cuando se
utilice.
• No colocar sobre el aparato objetos llenos de líquido, como
jarros.
WAARSCHUWING:
• De ventilatie mag niet worden belemmerd door de
ventilatieopeningen af te dekken met bijvoorbeeld kranten,
een tafelkleed, gordijnen, enz.
• Plaats geen open vlammen, bijvoorbeeld een brandende
kaars, op het apparaat.
• Houd u steeds aan de milieuvoorschriften wanneer u
gebruikte batterijen wegdoet.
• Stel het apparaat niet bloot aan druppels of spatten.
• Plaats geen voorwerpen gevuld met water, bijvoorbeeld
een vaas, op het apparaat.
OBSERVERA:
• Ventilationen bör inte förhindras genom att täcka för
ventilationsöppningarna med föremål såsom tidningar,
bordsdukar, gardiner osv.
• Inga blottade brandkällor, såsom tända ljus, får placeras på
apparaten.
• Tänk på miljöaspekterna när du bortskaffar batterier.
• Apparaten får inte utsättas för vätska.
• Placera inte föremål fyllda med vätska, t.ex. vaser, på
apparaten.
CAUTION:
To completely disconnect this product from the mains,
disconnect the plug from the wall socket outlet.
The mains plug is used to completely interrupt the
power supply to the unit and must be within easy
access by the user.
VORSICHT:
Um dieses Gerät vollständig von der Stromversorgung
abzutrennen, ziehen Sie bitte den Stecker aus der
Wandsteckdose.
Der Netzstecker wird verwendet, um die Stromversorgung
zum Gerät völlig zu unterbrechen; er muss für den
Benutzer gut und einfach zu erreichen sein.
PRECAUTION:
Pour déconnecter complètement ce produit du courant
secteur, débranchez la prise de la prise murale.
La prise secteur est utilisée pour couper
complètement l’alimentation de l’appareil et
l’utilisateur doit pouvoir y accéder facilement.
ATTENZIONE:
P
er scollegare completamente questo prodotto dalla
rete di alimentazione elettrica, scollegare la spina
dalla relativa presa a muro.
La spina di rete viene utilizzata per interrompere
completamente l’alimentazione all’unità e deve
essere facilmente accessibile all’utente.
PRECAUCIÓN:
Para desconectar completamente este producto de
la alimentación eléctrica, desconecte el enchufe del
enchufe de la pared.
El enchufe de la alimentación eléctrica se utiliza para
interrumpir por completo el suministro de alimentación
eléctrica a la unidad y debe de encontrarse en un
lugar al que el usuario tenga fácil acceso.
FÖRSIKTIHETSMÅTT:
Koppla loss stickproppen från eluttaget för att helt
skilja produkten från nätet.
Stickproppen används för att helt bryta
strömförsörjningen till apparaten, och den måste
vara lättillgänglig för användaren.
WAARSCHUWING:
Om de voeding van dit product volledig te onderbreken
moet de stekker uit het stopcontact worden getrokken.
De netstekker wordt gebruikt om de stroomtoevoer
naar het toestel volledig te onderbreken en moet
voor de gebruiker gemakkelijk bereikbaar zijn.
IV
SVENSKA NEDERLANDS ESPAÑOL ITALIANO FRANCAIS DEUTSCH ENGLISH

NOTE ON USE
• Avoid high temperatures.
Allow for sufficient heat dispersion when installed in a rack.
• Handle the power cord carefully.
Hold the plug when unplugging the cord.
• Keep the unit free from moisture, water, and dust.
• Unplug the power cord when not using the unit for long
periods of time.
• Do not obstruct the ventilation holes.
• Do not let foreign objects into the unit.
• Do not let insecticides, benzene, and thinner come in
contact with the unit.
• Never disassemble or modify the unit in any way.
HINWEISE ZUM GEBRAUCH
• Vermeiden Sie hohe Temperaturen.
Beachten Sie, dass eine ausreichende Belüftung gewährleistet
wird, wenn das Gerät auf ein Regal gestellt wird.
• Gehen Sie vorsichtig mit dem Netzkabel um.
Halten Sie das Kabel am Stecker, wenn Sie den Stecker
herausziehen.
• Halten Sie das Gerät von Feuchtigkeit, Wasser und Staub
fern.
• Wenn das Gerät längere Zeit nicht verwendet werden soll,
trennen Sie das Netzkabel vom Netzstecker.
• Decken Sie den Lüftungsbereich nicht ab.
•
Lassen Sie keine fremden Gegenstände in das Gerät kommen.
• Lassen Sie das Gerät nicht mit Insektiziden, Benzin oder
Verdünnungsmitteln in Berührung kommen.
• Versuchen Sie niemals das Gerät auseinander zu nehmen
oder zu verändern.
OBSERVATIONS RELATIVES A
L’UTILISATION
• Eviter des températures élevées.
Tenir compte d’une dispersion de chaleur suffisante lors de
l’installation sur une étagère.
• Manipuler le cordon d’alimentation avec précaution.
Tenir la prise lors du débranchement du cordon.
• Protéger l’appareil contre l’humidité, l’eau et la poussière.
• Débrancher le cordon d’alimentation lorsque l’appareil n’est
pas utilisé pendant de longues périodes.
• Ne pas obstruer les trous d’aération.
• Ne pas laisser des objets étrangers dans l’appareil.
• Ne pas mettre en contact des insecticides, du benzène et
un diluant avec l’appareil.
• Ne jamais démonter ou modifier l’appareil d’une manière
ou d’une autre.
NOTE SULL’USO
• Evitate di esporre l’unità a temperature elevate.
Assicuratevi che vi sia un’adeguata dispersione del calore
quando installate l’unità in un mobile per componenti audio.
• Manneggiate il cavo di alimentazione con attenzione.
Tenete ferma la spina quando scollegate il cavo dalla presa.
• Tenete l’unità lontana dall’umidità, dall’acqua e dalla
polvere.
• Scollegate il cavo di alimentazione quando prevedete di non
utilizzare l’unità per un lungo periodo di tempo.
• Non coprite i fori di ventilazione.
• Non inserite corpi estranei all’interno dell’unità.
• Assicuratevi che l’unità non entri in contatto con insetticidi,
benzolo o solventi.
• Non smontate né modificate l’unità in alcun modo.
NOTAS SOBRE EL USO
• Evite altas temperaturas.
Permite la suficiente dispersión del calor cuando está
instalado en la consola.
• Maneje el cordón de energía con cuidado.
Sostenga el enchufe cuando desconecte el cordón de
energía.
• Mantenga el equipo libre de humedad, agua y polvo.
• Desconecte el cordón de energía cuando no utilice el equipo
por mucho tiempo.
• No obstruya los orificios de ventilación.
• No deje objetos extraños dentro del equipo.
• No permita el contacto de insecticidas, gasolina y diluyentes
con el equipo.
• Nunca desarme o modifique el equipo de ninguna manera.
ALVORENS TE GEBRUIKEN
• Vermijd hoge temperaturen.
Zorg er bij installatie in een audiorack voor, dat de door
het toestel geproduceerde warmte goed kan worden
afgevoerd.
• Hanteer het netsnoer voorzichtig.
Houd het snoer bij de stekker vast wanneer deze moet
worden aan- of losgekoppeld.
• Laat geen vochtigheid, water of stof in het apparaat
binnendringen.
•
Neem altijd het netsnoer uit het stopkontakt wanneer het
apparaat gedurende een lange periode niet wordt gebruikt.
• De ventilatieopeningen mogen niet worden beblokkeerd.
• Laat geen vreemde voorwerpen in dit apparaat vallen.
• Voorkom dat insecticiden, benzeen of verfverdunner met dit
toestel in contact komen.
• Dit toestel mag niet gedemonteerd of aangepast worden.
OBSERVERA ANGÅENDE
ANVÄNDNINGEN
• Undvik höga temperaturer.
Se till att det finns möjlighet till god värmeavledning vid
montering i ett rack.
• Hantera nätkabeln varsamt.
Håll i kabeln när den kopplas från el-uttaget.
• Utsätt inte apparaten för fukt, vatten och damm.
• Koppla loss nätkabeln om apparaten inte kommer att
användas i lång tid.
• Täpp inte till ventilationsöppningarna.
• Se till att främmande föremål inte tränger in i apparaten.
• Se till att inte insektsmedel på spraybruk, bensen och
thinner kommer i kontakt med apparatens hölje.
• Ta inte isär apparaten och försök inte bygga om den.
V
ENGLISH DEUTSCH FRANCAIS ITALIANO ESPAÑOL NEDERLANDS SVENSKA

A NOTE ABOUT RECYCLING:
This product’s packaging materials are recyclable and can be
reused. Please dispose of any materials in accordance with the
local recycling regulations.
When discarding the unit, comply with local rules or regulations.
Batteries should never be thrown away or incinerated but
disposed of in accordance with the local regulations concerning
battery disposal.
This product and the supplied accessories, excluding the
batteries, constitute the applicable product according to the
WEEE directive.
HINWEIS ZUM RECYCLING:
Das Verpackungsmaterial dieses Produktes ist zum Recyceln geeignet und kann
wieder verwendet werden. Bitte entsorgen Sie alle Materialien entsprechend
der örtlichen Recycling-Vorschriften.
Beachten Sie bei der Entsorgung des Gerätes die örtlichen Vorschriften und
Bestimmungen.
Die Batterien dürfen nicht in den Hausmüll geworfen oder verbrannt werden;
bitte entsorgen Sie die Batterien gemäß der örtlichen Vorschriften.
Dieses Produkt und das im Lieferumfang enthaltene Zubehör (mit Ausnahme der
Batterien!) entsprechen der WEEE-Direktive.
UNE REMARQUE CONCERNANT LE RECYCLAGE:
Les matériaux d’emballage de ce produit sont recyclables et peuvent être
réutilisés. Veuillez disposer des matériaux conformément aux lois sur le
recyclage en vigueur.
Lorsque vous mettez cet appareil au rebut, respectez les lois ou réglementations
en vigueur.
Les piles ne doivent jamais être jetées ou incinérées, mais mises au rebut
conformément aux lois en vigueur sur la mise au rebut des piles.
Ce produit et les accessoires inclus, à l’exception des piles, sont des produits
conformes à la directive DEEE.
NOTA RELATIVA AL RICICLAGGIO:
I materiali di imballaggio di questo prodotto sono riutilizzabili e riciclabili. Smaltire
i materiali conformemente alle normative locali sul riciclaggio.
Per lo smaltimento dell’unità, osservare le normative o le leggi locali in vigore.
Non gettare le batterie, né incenerirle, ma smaltirle conformemente alla
normativa locale sui rifiuti chimici.
Questo prodotto e gli accessori inclusi nell’imballaggio sono applicabili alla direttiva
RAEE, ad eccezione delle batterie.
ACERCA DEL RECICLAJE:
Los materiales de embalaje de este producto son reciclables y se pueden volver
a utilizar. Disponga de estos materiales siguiendo los reglamentos de reciclaje
de su localidad.
Cuando se deshaga de la unidad, cumpla con las reglas o reglamentos locales.
Las pilas nunca deberán tirarse ni incinerarse. Deberá disponer de ellas siguiendo
los reglamentos de su localidad relacionados con los desperdicios químicos.
Este producto junto con los accesorios empaquetados es el producto aplicable a
la directiva RAEE excepto pilas.
EEN AANTEKENING MET BETREKKING TOT DE RECYCLING:
Het inpakmateriaal van dit product is recycleerbaar en kan opnieuw gebruikt
worden. Er wordt verzocht om zich van elk afvalmateriaal te ontdoen volgens de
plaatselijke voorschriften.
Volg voor het wegdoen van de speler de voorschriften voor de verwijdering van
wit- en bruingoed op.
Batterijen mogen nooit worden weggegooid of verbrand, maar moeten volgens
de plaatselijke voorschriften betreffende chemisch afval worden verwijderd.
Op dit product en de meegeleverde accessoires, m.u.v. de batterijen is de
richtlijn voor afgedankte elektrische en elektronische apparaten (WEEE) van
toepassing.
OBSERVERA ANGÅENDE ÅTERVINNING:
Produktens emballage är återvinningsbart och kan återanvändas. Kassera det
enligt lokala återvinningsbestämmelser.
När du kasserar enheten ska du göra det i överensstämmelse med lokala regler
och bestämmelser.
Batterier får absolut inte kastas i soporna eller brännas. Kassera dem enligt
lokala bestämmelser för kemiskt avfall.
Denna apparat och de tillbehör som levereras med den uppfyller gällande WEEE-
direktiv, med undantag av batterierna.
VI
SVENSKA NEDERLANDS ESPAÑOL ITALIANO FRANCAIS DEUTSCH ENGLISH

1. IMPORTANT NOTICE: DO NOT MODIFY THIS PRODUCT
This product, when installed as indicated in the instructions contained in
this manual, meets R&TTE directive requirements. Modification of the
product could result in hazardous Radio and EMC radiation.
2. CAUTION
• Separation distance of at least 20 cm must be maintained between the
antenna of this product and all persons.
• This product and its antenna must not be co-located or operating in
conjunction with any other antenna or transmitter.
1. WICHTIGER HINWEIS: NEHMEN SIE KEINE VERÄNDERUNGEN AN
DIESEM PRODUKT VOR
Wenn dieses Produkt entsprechend dieser Bedienungsanleitung aufgebaut
wird, entspricht es den Anforderungen der R&TTE-Richtlinie. Veränderungen
am Produkt können zu gefährlicher Funk- und EMV-Strahlung führen.
2. VORSICHT
• Zwischen der Antenne dieses Produkts und Personen muss ein
Schutzabstand von 20 cm eingehalten werden.
• Dieses Produkt und seine Antenne dürfen nicht neben anderen Antennen
oder Sendern aufgestellt oder zusammen mit ihnen verwendet werden.
1. MISE EN GARDE IMPORTANTE : NE JAMAIS MODIFIER CE PRODUIT
Si toutes les consignes indiquées dans ce mode ont été respectées
pendant son installation, ce produit est conforme aux directives R&TTE.
Toute modification du produit risquerait alors de générer des radiations
radio et EMC dangereuses.
2. ATTENTION
• L’antenne de l’appareil devra être située à une distance de 20 cm au
moins des personnes.
• Ce produit ainsi que son antenne ne devront en aucun cas être utilisés à
proximité d’une autre antenne ou transmetteur.
1. AVVERTENZA IMPORTANTE: NON MODIFICARE QUESTO PRODOTTO
Se installato come indicato nelle istruzioni del presente manuale, questo
prodotto soddisfa i requisiti della direttiva R&TTE. Eventuali modifiche
apportate al prodotto potrebbero causare pericolose radiazioni radio ed
EMC.
2. ATTENZIONE
• È necessario mantenere una distanza minima di 20 cm tra l’antenna di
questo prodotto e le persone.
• Questo prodotto e la relativa antenna non devono essere posizionati in
prossimità di altre antenne o trasmettitori e non devono essere utilizzati
congiuntamente a questi ultimi.
1. NOTA IMPORTANTE: NO MODIFIQUE ESTE PRODUCTO
Este producto, si es instalado de acuerdo con las instrucciones contenidas
en este manual, cumple los requisitos de la directiva R&TTE. La modificación
del producto puede producir radiación de Radio y EMC peligrosa.
2. PRECAUCIÓN
• Se debe mantener una separación de al menos 20 cm entre la antena del
producto y las personas.
• Este producto y su antena no debe instalarse ni utilizarse conjuntamente
con otra antena o transmisor.
1. BELANGRIJKE MEDEDELING: BRENG AAN DIT PRODUCT GEEN
AANPASSINGEN AAN
Dit product, indien geïnstalleerd volgens de aanwijzingen in deze
gebruiksaanwijzing, voldoet aan de vereisten van de R&TTE-richtlijn.
Aanpassing van dit product kan gevaarlijke radio- en EMC-straling tot gevolg
hebben.
2. LET OP
• Houd tussen antenne en personen altijd een afstand van tenminste 20 cm
aan.
• Dit product en zijn antenne mogen niet in de buurt van een andere
antenne of zender worden geplaatst of in combinatie daarmee worden
gebruikt.
1. VIKTIGT: APPARATEN FÅR INTE MODIFIERAS
Under förutsättning att apparaten installeras enligt anvisningarna i denna
bruksanvisning, uppfyller denna kraven i R&TTE-direktivet. Ev. modifiering
av apparaten kan resultera i farlig radio- och elektromagnetisk strålning.
2. FÖRSIKTIGT
• Se till att det finns ett avstånd på minst 20 cm mellan apparatens antenn
och personer i omgivningen.
• Apparaten och dess antenn får inte placeras eller användas i närheten av
andra antenner eller sändare.
VII
ENGLISH DEUTSCH FRANCAIS ITALIANO ESPAÑOL NEDERLANDS SVENSKA

Accesorios ·········································································································2
Precauciones al manipular ···············································································2
Acerca del mando a distancia······································································2, 3
Antes de utilizar el aparato
··············································································2
Colocación de las pilas
·····················································································3
Alcance del mando a distancia
········································································3
Nombres y funciones de las piezas ································································4
Panel superior / Panel delantero
······································································4
Panel trasero
····································································································4
Mando a distancia
····························································································4
Reproducción
Reproducción con un iPod
®
··········································································14
Preparativos ···································································································14
Reproducir música y vídeo
·······································································14, 15
Visualización de imágenes fijas en el iPod
·····················································15
Reproducción de audio en red ·································································15, 16
Procedimiento básico
····················································································17
Recepción de radio Internet
···········································································18
Registro de emisoras de radio Internet en la lista Favoritos
·····················18, 19
Reproducción de archivos almacenados en un ordenador
·······················19, 20
Conexiones
Contenidos
Instalación del adaptador universal en la base dock de control ··················5
Conexión a dispositivos equipados con Dock Control o LAN ······················6
Audio de red
································································································ 7, 8
Primeros pasos
Uso de los menús GUI
Ejemplo de visualización del símbolo de GUI en un título ··························9
Ejemplo de visualización de valores predeterminados ·································9
Ejemplos de indicaciones que aparecen en la pantalla GUI ·························9
Ejemplo: Menú de navegación (menú superior)
·············································9
Visualización de la posición del cursor
···························································10
Operaciones ····································································································10
Estructura de los menús GUI ·········································································10
Otra información ·····························································································20
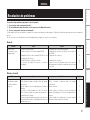
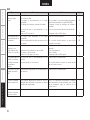
Resolución de problemas ········································································21, 22
Especificaciones ······························································································23
Configuración
GUI ···················································································································12
a Protección de pantalla ··············································································12
s Formato ····································································································12
d Tiempo esp. GUI ······················································································12
Idioma ··············································································································12
Otros ················································································································13
a Carga de iPod ···························································································13
s Presentación ····························································································13
d Intervalo ···································································································13
f Repetir ·····································································································13
g Aleatorio ···································································································13
h Actualizar firmware ··················································································13
ESPAÑOL
Red ···················································································································11
a Configuración de red ················································································ 11
s Información de red
···················································································11

Conexiones Configuración Reproducción Información Resolución de problemas
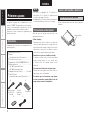
Compruebe que el producto va acompañado de las
piezas siguientes.
q Manual de instrucciones .................................. 1
w
Garantía
(sólo válida para modelos de Norteamérica)
...............1
e Lista de servicios técnicos............................... 1
r Adaptador de CA (KSAFC0600150W1UV–1) .... 1
t Mando a distancia ............................................ 1
• RC-1087: para modelo blanco
• RC-1088: para modelo negro
y Adaptador universal (3 tipos) ..............1 de cada
u Cable AV/Control
(Longitud del cable: aprox. 6,6 pies/2 m) .........
1
Le damos las gracias por la adquisición de este
producto DENON. Para garantizar un funcionamiento
correcto, lea atentamente las instrucciones de este
manual del usuario antes de utilizar el producto.
Después de leerlas, asegúrese de guardarlas para
futuras referencias.
Primeros pasos
Accesorios
r t
y
u
NOTA
• No utilice un adaptador de CA diferente al
especificado. De lo contrario se podría provocar
incendios o descargas eléctricas.
• El adaptador de CA se debe utilizar exclusivamente
en esta unidad. Nunca lo utilice con otro equipo.
(Para el modelo
de EE.UU. &
Canadá)
(Para el
modelo de
Europeo)
Precauciones al manipular
Antes de usar este equipo preste atención a las
siguientes indicaciones:
• Mover el equipo
Para evitar cortocircuitos o daños en los cables de
conexión, cuando quiera mover el equipo, antes de
hacerlo desenchufe siempre el cable de la fuente de
alimentación y desconecte los cables de conexión
entre todos los demás componentes de audio.
• Precauciones con el uso de teléfonos móviles
Al utilizar un teléfono móvil cerca de esta unidad
podría ocasionar ruidos. Si esto sucede, aleje
el teléfono móvil de la unidad cuando la esté
utilizando.
• Conserve estas instrucciones en lugar seguro.
Después de leerlas, guarde estas instrucciones en
lugar seguro, junto con la garantía.
• Se advierte que las ilustraciones que figuran
en estas instrucciones pueden diferir de las del
equipo real por motivos de explicación.
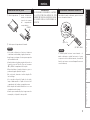
Acerca del mando a distancia
Antes de utilizar el aparato
Retire la lámina aislante antes de usar el mando a
distancia.
Lámina aislante
Con batería
Primeros pasos
ESPAÑOL

ESPAÑOL
Conexiones Configuración Reproducción Información Resolución de problemas
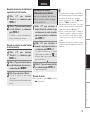
30°
30°
Aprox. 7 m
(RC-1087 o 1088)
Para utilizar el mando a distancia, apúntelo hacia el
sensor de mando a distancia.
NOTA
El sistema podría funcionar incorrectamente o el
mando a distancia no podría funcionar si el sensor
es expuesto a la luz solar directamente, a luz artificial
fuerte de un inversor como una lámpara fluorescente
o una luz infrarroja.
Alcance del mando a distancia
NOTA
• Si el mando a distancia no funciona ni siquiera a
corta distancia de la unidad, póngale pilas nuevas.
• Las pilas que se entregan sólo sirven para comprobar
que la unidad funciona.
• Cuando introduzca las pilas, asegúrese de hacerlo en
la posición correcta. Para ello, fíjese en las marcas
«q» y «w» del compartimento de las pilas.
• Para evitar dañar el mando a distancia y que se
produzcan fugas de líquido de las pilas:
• No cortocircuite, desmonte ni caliente las pilas. No
las tire al fuego.
• Si se producen fugas del líquido de las pilas,
limpie cuidadosamente el líquido del interior del
compartimento de las pilas y ponga pilas nuevas.
• Retire las pilas del mando a distancia si no se va a
usar durante mucho tiempo.
• Cuando vaya a cambiar las pilas, tenga a mano las
nuevas pilas y colóquelas lo antes posible.
q Retire la tapa trasera.
e Vuelva a poner la tapa trasera del mando.
CR2025
w Inserte la batería de
acuerdo con las indica-
ciones de las marcas
del compartimento
correspondiente.
Colocación de las pilas
PRECAUCIÓN
EXISTE RIESGO DE EXPLOSIÓN SI LA BATERÍA
SE SUSTITUYE POR UNA BATERÍA DEL TIPO
INCORRECTO. DESECHE LAS BATERÍAS USADAS
DE ACUERDO CON LAS INSTRUCCIONES AL
RESPECTO.
Primeros pasos

4
Conexiones Confi guración Reproducción Información Resolución de problemas
ESPAÑOL
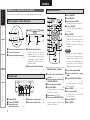
Para los botones no explicados aquí, vea la página indicada entre paréntesis ( ).
Nombres y funciones de las piezas
Panel superior / Panel delantero
Panel trasero
Mando a distancia
q
w
e
r t
q
w
e
r
t
q
Ranura para el mando a distancia
w Conector de base dock
e Ranura de adaptador universal
··················································· (5)
r
Indicador de alimentación
Cuando se introduce la clavija del
adaptador de CA en la toma de
pared, la unidad recibe alimentación
y la pantalla se enciende. Cuando la
salida de GUI y audio se detiene, la
pantalla se apaga.
t Sensor de mando a distancia
··················································· (3)
q Terminal DC IN ························· (6)
w Conector ETHERNET ·············· (7)
e Terminal de control
(mini clavija estéreo) ··············· (6)
r
Terminales de salida de audio
···· (6)
t Terminal de salida S Video ······ (6)
u Botón RANDOM
i Botón MEMORY
o Botón de silencio (MUTE)
Desconexión temporal del sonido.
Q0 Botónes VOLUME
Use este botón para regular el
volumen.
Q1 Botón POWER
Cuando se pulsa este botón, las
salidas de GUI y audio se detienen.
En ese caso (el indicador de
POWER se apaga), el iPod sigue
cargándose.
NOTA
Mientras la clavija del adaptador
de CA esté en la toma de pared, la
unidad estará encendida. Cuando
no vaya a usar la unidad durante un
cierto tiempo, retire la clavija del
adaptador del enchufe de la pared.
Q2
Botón omitir siguiente (9)
Q3 Botón de reproducción y pausa
(1/3)
Q4 Botón FAVORITES/ALL MUSIC
··················································(18)
Al pulsarlo, aparece el menú del
iPod en el monitor.
Q5 Botón ENTER ···························(14)
Q6 Botón del menú iPod
Al pulsarlo, aparece el menú del
iPod en el monitor.
Q7 Botónes PAGE (ui)
Q8 Botón REPEAT
q
Q1
Q2
Q3
Q4
Q5
Q6
Q7
Q8
w
e
r
t
y
u
i
o
Q0
b Esta unidad no ejecuta las funciones
CHARACTER SEARCH y ALL MUSIC.
b
q
Transmisor de la señal del mando a
distancia
······································(3)
w Botón de selección del modo iPod
(BROWSE/REMOTE) ················ (15)
e Botón omitir anterior (8)
r Botón TOP MENU ····················· (10)
Al pulsarlo, aparece el menú principal
de la GUI en el monitor.
t Botónes cursor (uiop)
y Botón de menú INTERNET RADIO
··················································· (15)
Al pulsarlo, aparece el menú de radio
Internet en el monitor.
Primeros pasos
b

ESPAÑOL
Primeros pasos Configuración Reproducción Información Resolución de problemas
Conexiones
Instalación del adaptador universal en la base
dock de control
Conecte el adaptador universal incluido apropiado para su iPod
®
en la ranura del adaptador universal de la base dock de control.
iPod es una marca comercial de Apple Inc.,
registrada en los E.E.U.U. y en otros países.
• Se puede montar en este ASD-3N un adaptador de base dock del iPod genuino.
• Para conectar un “iPod nano” o un iPod de 5ª generación, utilice el adaptador
dock incluido con el iPod.
• El iPod de 4ª generación (con Conector para base) requiere el uso del pack 3 de
adaptador para base universal de iPod de Apple correspondiente a su modelo de
iPod (disponible por separado en Apple Inc.) para poder conectarlo a ASD-3N.
Indicación estampada
Adaptador
Unidad principal
Indicación estampada iPod conectable al ASD-3N
mini iPod mini
Photo 20, 30GB iPod Photo 30GB/iPod 20GB con pantalla a color
Photo 60GB iPod Photo 60GB/iPod 40GB con pantalla a color
Superficie inferior del adaptador universal
Conexiones

Primeros pasos Configuración Reproducción Información Resolución de problemas
ESPAÑOL
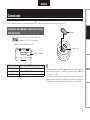
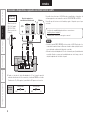
Conexión a dispositivos equipados con Dock Control o LAN
Es posible hacer funcionar el ASD-3N desde un amplificador o dispositivo de
sistema equipado con un terminal de control de DOCK CONTROL al ASD-3N.
Es posible que las funciones estén limitadas, según el dispositivo que se haya
conectado.
47*%&0
"6%*0 7*%&0
*/
"6%*0%0$,
$0/530-
3-
*/
R
L
R
L
47*%&0
7*%&0
*/
Monitor
Dispositivo equipado con
terminal de base dock de control
120 V CA, 60 Hz
(Para el modelo de
EE.UU. & Canadá)
230 V CA, 50 Hz
(Para el modelo de
Europeo)
Salidas de CA
(en la pared)
b Cuando se introduce la clavija del adaptador de CA en la toma de pared, la
unidad recibe alimentación. En ese momento, el indicador POWER se enciende.
Pasados entre 15 y 20 segundos, la pantalla de la GUI aparece en el monitor.
Las listas de compatibilidad más actuales se encuentran en
http.//blog.denon.com/asd-3/
También puede contactar con un agente comercial.
Dirección
de señal
Señal de audio
OUT IN
Señal de vídeo
OUT IN
NOTA
• Cuando el terminal DOCK CONTROL está conectado, el ASD-3N no obedece los
comandos del mando a distancia. Para usar el mando a distancia, diríjalo hacia el
sensor del mando a distancia del dispositivo conectado.
• Mientras la clavija del adaptador de CA esté en la toma de pared, la unidad estará
encendida. Cuando no vaya a usar la unidad durante un cierto tiempo, retire la
clavija del adaptador del enchufe de la pared.
o
b
Conexiones

Primeros pasos Configuración Reproducción Información Resolución de problemas
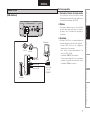
[LAN alámbrica]
Internet
Enrutador
Ordenador
Puerto LAN/
conector
ETHERNET
Módem
Al puerto LAN
Al puerto LAN
Al lado WAN
Audio de red
Sistema requerido
n Conexión a Internet de banda ancha
Se necesita una conexión a Internet de banda
ancha para poder utilizar la función de radio Internet
y actualización de firmware del ASD-3N.
n Módem
Se trata de un dispositivo que se conecta a la línea
de banda ancha para comunicarse con Internet.
En algunos casos, el módem viene integrado en
el enrutador.
n Enrutador
• Al utilizar el ASD-3N, se recomienda emplear un
enrutador equipado con las funciones siguientes:
· Servidor DHCP (Protocolo de configuración
dinámica de host) incorporado
Esta función asigna automáticamente las
direcciones IP de la LAN.
· Conmutador 100BASE-TX incorporado
Al conectar varios dispositivos, le recomendamos
utilizar un concentrador de conmutación con una
velocidad de 100 Mbps o superior.
Conexiones
ESPAÑOL

ESPAÑOL
Primeros pasos Configuración Reproducción Información Resolución de problemas
n Cable Ethernet
(CAT-5 o superior recomendado)
Se utiliza para una LAN alámbrica.
• El ASD-3N no se suministra con un cable
Ethernet.
• Algunos cables Ethernet del tipo plano son
fácilmente afectados por ruido.
Le recomendamos utilizar un cable de tipo
normal.
n Ordenador
Para poder utilizar un servidor de música, se
necesita un ordenador con las especificaciones
siguientes:
• Sistema operativo
Windows
®
XP Service Pack2, Windows Vista
• Software (Prepare alguno de los siguientes.)
· .NET Framework 1.1 y Windows Media Connect
(Windows XP)
· Windows Media Player versión 11
· Software de servidor compatible con DLNA
• Navegador de Internet
Microsoft Internet Explorer 5.01 o una versión
posterior
• Puerto LAN
• 300 MB o más de espacio disponible en el disco
duro
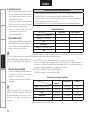
b Se necesita espacio disponible en el disco duro
para almacenar archivos de música y vídeo. Los
tamaños siguientes son aproximados.
Formato
Velocidad en
bits
Por
minuto
Por
hora
MP3 /
WMA
MPEG-4
AAC
128
kbps
Aprox.
1 MB
Aprox.
60 MB
192
kbps
Aprox.
1,5 MB
Aprox.
90 MB
256
kbps
Aprox.
2 MB
Aprox.
120 MB
392
kbps
Aprox.
3 MB
Aprox.
180 MB
WAV
(LPCM)
1400
kbps
Aprox.
10 MB
Aprox.
600 MB
FLAC
1080
kbps
Aprox.
7,7 MB
Aprox.
464 MB
NOTA
• Es necesario tener un contrato con un ISP para
poder conectarse a Internet.
Si ya tiene una conexión a Internet de banda ancha,
no es necesario que contrate otro servicio.
• Los tipos de enrutadores que se puede utilizar varían
según el ISP. Para más detalles, póngase en contacto
con un ISP o consulte en una tienda de informática.
• Dependiendo del servidor, es posible que lo archivos
de vídeo puedan visualizarse pero no reproducirse
en el ASD-3N.
Para la conexión a Internet, póngase en contacto con
un ISP (proveedor de servicios de Internet) o con una
tienda de equipos de informática.
n Otros
• Si ha contratado con un proveedor de Internet una
línea cuya configuración de red debe realizarse
manualmente, haga los ajustes correspondientes
en el menú GUI “Configuración” – “Red” –
“Configuración de red” (
vpágina 11).
• En el ASD-3N se puede realizar la configuración de
red automáticamente por medio de las funciones
DHCP y Auto IP.
• Cuando se utiliza un enrutador de banda ancha
(función DHCP), el ASD-3N establece la dirección
IP, etc., automáticamente.
Si utiliza el ASD-3N conectado a una red que
no tiene función DHCP, haga los ajustes para la
dirección IP, etc., en el menú GUI “Configuración”
– “Red” – “Configuración de red” (
vpágina 11).
• El ASD-3N no es compatible con PPPoE. Si ha
contratado una línea del tipo que utiliza PPPoE,
necesitará un enrutador compatible con PPPoE.
• Dependiendo del ISP con que tenga contrato,
puede ser necesario realizar una configuración de
servidor proxy para poder utilizar la función Radio
Internet. Si ha realizado la configuración de servidor
proxy en el ordenador que utiliza para conectarse a
Internet, realice la configuración de servidor proxy
en el ASD-3N de la misma forma.
Conexiones

ESPAÑOL
9
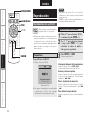
Primeros pasos Conexiones Reproducción Información Resolución de problemas
Red
Realizar confi guraciones de red
Los siguientes son algunos ejemplos de indicaciones típicas.
Music
Video
iPod
Select Up/Down
Nombre del elemento
seleccionado
Lista de los elementos subsiguientes
[Elementos seleccionables]
Activado
Desactivado
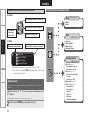
En el ASD-3N, el ajuste y control de la mayoría de las funciones puede realizarse
con los menús GUI que aparecen en la pantalla del monitor.
En las listas de elementos seleccionables, el elemento que aparece rodeado
por un círculo es el valor predeterminado.
Los elementos cuyo título aparece indicado con este símbolo pueden
controlarse desde la pantalla GUI.
Le recomendamos realizar estas operaciones desde la pantalla GUI.
Este icono de GUI corresponde al elemento de ajuste o a la
serie de menús a la que el elemento pertenece.
Uso de los menús GUI
Ejemplo de visualización del símbolo de GUI en
un título
Ejemplo de visualización de valores
predeterminados
Ejemplos de indicaciones que aparecen en la
pantalla GUI
Ejemplo: Menú de navegación (menú superior)
Confi guración

0
Primeros pasos Conexiones Reproducción Información Resolución de problemas
ESPAÑOL
n Icono
n Lista
Para cambiar el elemento seleccionado
Elemento seleccionado
Para cambiar
el elemento
seleccionado
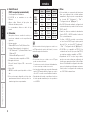
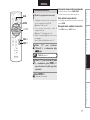
Operaciones
La misma operación puede realizarse en la unidad principal o en el mando a
distancia.
b Cambiar el elemento seleccionado utilizando ui.
b Use el botón de página PAGE ui para avanzar o retroceder
en la página de listado.
1
Pulse el botón u i p para seleccionar el menú que desea
utilizar.
b Para volver al elemento anterior, pulse el botón o.
2
Pulse el botón ENTER para introducir el ajuste.
Para cambiar el siguiente elemento
Visualización de la posición del cursor
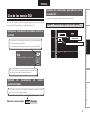
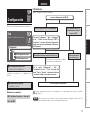
Estructura de los menús GUI
iPod
(vpágina 14)
n Music
n Video
Red
(vpágina 15)
n Favorites
n Internet Radio
n Music Server
n Recently Played
Confi guración
(vpágina 11)
n Red (vpágina 11)
• Confi guración de red
• Información de red
n GUI (vpágina 12)
• Protección de pantalla
• Formato
• Tiempo esp. GUI
n Idioma (vpágina 12)
n Otros (vpágina 13)
• Carga de iPod
• Presentación
• Intervalo
• Repetir
• Aleatorio
• Actualizar fi rmware
Favorites
Internet Radio
Music Server
Recently Played
Para cambiar el siguiente elemento
Elemento seleccionado
Confi guración

ESPAÑOL
Primeros pasos Conexiones Reproducción Información Resolución de problemas
Realice ajustes detallados para diversos parámetros.
Confi guración
Red
Realizar confi guraciones de red.
Confi guración
Red
a Configuración de red
s Información de red
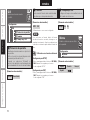
LAN alámbrica
Realizar confi guraciones para LAN cableada.
Para obtener la dirección IP
automáticamente utilizando
la función DHCP
Para introducir la dirección IP manualmente
Conecte la alimentación del ASD-3N.
En la opción “Confi guración” – “Red” – “Confi guración
de red” – “Detalle” del menú GUI, ajuste “DHCP” a
“Desactivado” e introduzca la dirección IP, máscara de
subred, puerta de enlace predeterminada, DNS primario
y DNS secundario.
Para no pasar a través
de un servidor proxy
Para realizar la conexión a través de un servidor proxy
En la opción “Confi guración”
– “Red”
–
“Confi guración de red” – “Proxy” del menú GUI,
ajuste “Proxy” a “Activado” e introduzca la dirección
o nombre de dominio y los números de puerto.
Este ajuste es necesario cuando se establece
la red a través de servidores proxy.
Vuelva a comprobar las conexiones y la confi guración si no logra establecer una conexión con Internet
(vpágina 7).
Con esto fi naliza la confi guración.
NOTA
Es necesario tener conocimientos sobre redes para realizar la confi guración de dirección IP y
proxy. Para más detalles, consulte a un administrador de redes.
a Confi guración de red
Confi gurar una LAN alámbrica .
s Información de red
Visualizar info. de red.
[Elementos a comprobar]
DHCP= Activado o Desactivado
Dirección IP
Dirección MAC
Confi gúrelo de acuerdo con el diagrama de la
derecha.
Confi guración

ESPAÑOL
Primeros pasos Conexiones Reproducción Información Resolución de problemas
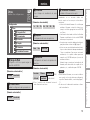
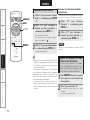
GUI
Realizar ajustes relacionados
con GUI.
Confi guración
GUI
a Protección de pantalla
s Formato
d Tiempo esp. GUI
[Elementos seleccionables]
Activado
Desactivado
NOTA
Si se selecciona un formato distinto al formato
de vídeo del monitor conectado, la imagen no se
visualizará correctamente. Siga el procedimiento que
se describe a continuación para cambiar el formato de
vídeo.
Utilización con el mando a distancia
GConfi gurado para NTSCH
• Pulse y mantenga pulsados los botones TOP MENU y
PAGEu durante tres segundos por lo menos.
Se ha confi gurado “NTSC”.
GConfi gurado para PALH
• Pulse y mantenga pulsados los botones TOP MENU y
PAGEi durante tres segundos por lo menos.
Se ha confi gurado “PAL”.
Idioma
Establece el idioma que se utiliza
en la pantalla.
Confi guración
Idioma
English
Deutsch
Français
Español
a Protección de pantalla
Realizar ajustes relacionados con el protector
de pantalla.
Utilice el protector de pantalla para evitar
quemar la pantalla del monitor.
Cuando se selecciona “Activado”, el
protector de pantalla se activa después de
aproximadamente 3 minutos de inactividad.
s Formato
Seleccionar el formato de la señal de salida
de vídeo que corresponda al monitor.
d Tiempo esp. GUI
Confi gure el tiempo de visualización de la
GUI cuando no esté en uso.
b Normalmente no es necesario confi gurarlo.
[Elementos seleccionables] [Elementos seleccionables]
[Elementos seleccionables]
NTSC
PAL
Siempre
30s
10s
Confi guración
La pagina si sta caricando...
La pagina si sta caricando...
La pagina si sta caricando...
La pagina si sta caricando...
La pagina si sta caricando...
La pagina si sta caricando...
La pagina si sta caricando...
La pagina si sta caricando...
La pagina si sta caricando...
La pagina si sta caricando...
La pagina si sta caricando...
La pagina si sta caricando...
La pagina si sta caricando...
-
 1
1
-
 2
2
-
 3
3
-
 4
4
-
 5
5
-
 6
6
-
 7
7
-
 8
8
-
 9
9
-
 10
10
-
 11
11
-
 12
12
-
 13
13
-
 14
14
-
 15
15
-
 16
16
-
 17
17
-
 18
18
-
 19
19
-
 20
20
-
 21
21
-
 22
22
-
 23
23
-
 24
24
-
 25
25
-
 26
26
-
 27
27
-
 28
28
-
 29
29
-
 30
30
-
 31
31
-
 32
32
-
 33
33


Denon ASD-3N Manuale utente
- Tipo
- Manuale utente
- Questo manuale è adatto anche per
in altre lingue
- español: Denon ASD-3N Manual de usuario
Documenti correlati
-
Denon ASD-3N Guida utente
-
Denon ASD-3W Guida utente
-
Denon AVR-1611 Manuale del proprietario
-
Denon ASD-1R - Digital Player Docking Station Operating Instructions Manual
-
Denon AVR-3310 Manuale del proprietario
-
-
-
Denon DBP-2012UD Manuale del proprietario
-
-