
Bedienungsanleitung
Operation Manual
Innovation,
die bewegt!
1. Wichtige Hinweise / Important information ..................................... 2
2. Einleitung / Introduction .................................................................. 3
3. Einbau / Mounting........................................................................... 3
4. Gewährleistung / Warranty ............................................................. 4
Magnetband, 5 m
8430
Magnetic tape, 5 m
CAR
motion

2
DE EN
1. Important information
Please read this manual completely and
attentively before using the product for the
first time. Keep this manual. It is part of the
product.
1.1 Safety instructions
Caution:
Risk of injury!
Tools are required for installation.
Possible dangers!
Wearers of pacemakers should be par
-
ticularly careful when handling magnets
or magnetic foils.
Magnets are not toys for children. Dan-
ger exists especially if the magnets are
swallowed; they must be kept away from
children when not packed or installed!
In addition, they can easily break or
splinter when subjected to mechanical
stress!
1.2 Using the product for its
correct purpose
This product is intended:
– For installation in model train layouts
and dioramas.
- For leading the guiding magnets of the
CarMotion vehicles.
– For use in dry rooms only.
Using the product for any other purpose is
not approved and is considered inappro-
priate. The manufacturer is not respon-
sible for any damage resulting from the im-
proper use of this product.
1. Wichtige Hinweise
Bitte lesen Sie vor der ersten Anwendung des
Produktes bzw. dessen Einbau diese Bedie-
nungsanleitung aufmerksam durch. Bewahren
Sie diese auf, sie ist Teil des Produktes.
1.1 Sicherheitshinweise
Vorsicht:
Verletzungsgefahr!
Für die Montage sind Werkzeuge nötig.
Mögliche Gefahren!
Beim Umgang mit Magneten bzw. Mag-
netfolien sollten Träger von Herzschrittma-
chern die übliche Vorsicht walten lassen.
Magnete sind kein Kinderspielzeug. Ge-
fahr besteht besonders bei Verschlu-
cken der Magnete, sie sind im nicht ver-
packten oder eingebauten Zustand von
Kindern unbedingt fernzuhalten!
Außerdem können diese bei mechani-
scher Belastung leicht zerbrechen oder
splittern!
1.2 Das Produkt richtig
verwenden
Dieses Produkt ist bestimmt:
- Zum Einbau in Modelleisenbahnan-
lagen und Dioramen.
- Zum Leiten der Führungsmagnete der
CarMotion Fahrzeuge.
- Zum Betrieb in trockenen Räumen.
Jeder darüber hinausgehende Gebrauch
gilt als nicht bestimmungsgemäß. Für
daraus resultierende Schäden haftet der
Hersteller nicht.

3
1.3 Packungsinhalt überprüfen
Kontrollieren Sie den Lieferumfang auf
Vollständigkeit:
- Magnetband, 5 m
- Anleitung
2. Einleitung
Das selbstklebende Magnetband ist auf sei-
ner Oberfläche polarisiert (Südpol oben). Es
leitet die Führungsmagnete der CarMotion
Fahrzeuge. Je nach Art der Straße wird es
in ein vorgefertigtes Straßensystem einge-
setzt oder mit Hilfe einer Oberfräse in die
Anlagenplatte eingebaut.
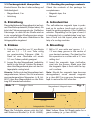
3. Einbau
1. Fräsen Sie eine Nut von 3,1 mm Breite
und ca. 1,1 – 1,2 mm Tiefe mittig
zur gewünschten Fahrspur (Abb. 1).
Dazu ist eine Oberfräse mit einem
3,1 mm Fräser perfekt geeignet.
2. Legen Sie das Magnetband (selbstkle-
bend) in die Nut ein. Achten Sie darauf,
dass das Magnetband plan mit der An-
lagenplatte verlegt wird.
Hinweis: Sollte sich das Magnetband ent-
magnetisieren, fahren Sie mit mehreren
aneinandergereihten Magneten (z. B. Art.
8431) über das Magnetband um die Rich-
tung N/S wiederherzustellen.
1.3 Checking the package contents
Check the contents of the package for
completeness:
- Magnetic tape, 5 m
- Manual
2. Introduction
The self-adhesive magnetic tape is polar-
ized on its surface (south pole on top). It
leads the guiding magnets of the CarMotion
vehicles. Depending on the type of road, it
is integrated into a prefabricated road sys-
tem or built into the layout plate with the
help of a routing machine.
3. Mounting
1. Mill a 3.1 mm wide and approx. 1.1 -
1.2 mm deep groove in the centre of
your desired roadway. The ideal tool for
this operation is a router with a 3.1 mm
milling tool.
2. Insert the magnetic tape (self-adhe-
sive) into the groove. Make sure that
the magnetic tape is flush with the lay-
out’s surface.
Note: Should the magnetic tape become
demagnetised, move several magnets
(e. g. item 8431) in a row over the magnetic
tape to restore the N/S direction.
1,1 – 1,2 mm
3,1 mm
Anlagenplatte / Plant plate
Fahrbahn / Road Magnetband / Magnetic tape
Fig. 1
Abb. 1
Tipp: Als Fahrbahn eignen sich die Voll
-
mer Steinkunst Straßen (z. B. Art. 48260).
Hint: Vollmer Stone Art Streets make for a
great roadway (e. g. item 48260)

Modellbauartikel, kein Spielzeug! Nicht geeignet für Kinder
unter 14 Jahren! Anleitung aufbewahren!
Model building item, not a toy! Not suitable for children under
the age of 14 years! Keep these instructions!
Ce n’est pas un jouet! Ne convient pas aux enfants de moins
de 14 ans! Conservez cette notice d’instructions!
Não é um brinquedo! Não aconselhável para menores de 14
anos! Conservar o manual de instruções!
Modelbouwartikel, geen speelgoed! Niet geschikt voor
kinderen onder 14 jaar! Gebruiksaanwijzing bewaren!
Articolo di modellismo, non è un giocattolo! Non adatto a
bambini al di sotto dei 14 anni! Conservare istruzioni per l’uso!
Artículo para modelismo ¡No es un juguete! No recomen-
dado para menores de 14 años! Conserva las instrucciones
de servicio!
DE
EN
FR
NL
IT
ES
PT
Made in Europe
Viessmann Modelltechnik GmbH
Bahnhofstraße 2a
D - 35116 Hatzfeld-Reddighausen
+49 6452 9340-0
www.viessmann-modell.de
Stand 01/sw
03/2022
Ho/Kf
Änderungen vorbehalten. Keine Haftung für
Druckfehler und Irrtümer.
Die aktuelle Version der Anleitung finden
Sie auf der Viessmann Homepage unter
der Artikelnummer.
Subject to change without prior notice. No
liability for mistakes and printing errors.
You will find the latest version of the man-
ual on the Viessmann website using the
item number.
Entsorgen Sie dieses Produkt
nicht über den (unsortierten)
Hausmüll, sondern führen Sie
es der Wiederverwertung zu.
Do not dispose of this product through
(unsorted) domestic waste, supply it to
recycling instead.
4
4. Gewährleistung
Jeder Artikel wurde vor Auslieferung auf
volle Funktionalität geprüft. Der Gewähr-
leistungszeitraum beträgt 2 Jahre ab Kauf-
datum. Tritt in dieser Zeit ein Fehler auf und
Sie finden die Fehlerursache nicht, nehmen
Sie bitte Kontakt mit uns auf (service@
viessmann-modell.com). Senden Sie uns
den Artikel zur Kontrolle bzw. Reparatur bit-
te erst nach Rücksprache zu. Wird nach
Überprüfung des Artikels ein Herstell- oder
Materialfehler festgestellt, wird er kostenlos
instandgesetzt oder ausgetauscht. Von der
Gewährleistung und Haftung ausgeschlos-
sen sind Beschädigungen des Artikels so-
wie Folgeschäden, die durch unsachgemä-
ße Behandlung, Nichtbeachten der Bedie-
nungsanleitung, nicht bestimmungsgemä-
ßen Gebrauch, eigenmächtigen Eingriff,
bauliche Veränderungen, Gewalteinwir-
kung, Überhitzung u. ä. verursacht werden.
4. Warranty
Each model is tested as to its full function-
ality prior to delivery. The warranty peri-
od is 2 years starting on the date of pur-
chase. Should a fault occur during this
period please contact our service depart-
ment ([email protected]).
Please send the item to the Viessmann
service department for check and repair
only after consultation. If we find a mate-
rial or production fault to be the cause of
the failure the item will be repaired free of
charge or replaced. Expressively exclud-
ed from any warranty claims and liability
are damages of the item and consequen-
tial damages due to inappropriate han-
dling, disregarding the instructions of this
manual, inappropriate use of the model,
unauthorized disassembling, construction
modifications and use of force, overheat-
ing and similar.
-
 1
1
-
 2
2
-
 3
3
-
 4
4


in altre lingue
- English: Viessmann 8430 User manual
- Deutsch: Viessmann 8430 Benutzerhandbuch
Documenti correlati
-
Viessmann 6336 Manuale del proprietario
-
-
-
-
-
-
-
-