
1
ProArt PA602ProArt PA602
USER GUIDE

Q22980
Revised Edition V4
November 2023
Copyright © 2023 ASUSTeK Computer Inc.
All Rights Reserved.
No part of this manual, including the products and software described in it, may be reproduced, transmitted, transcribed, stored in
a retrieval system, or translated into any language in any form or by any means, except documentation kept by the purchaser for
backup purposes, without the express written permission of ASUSTeK Computer Inc. (“ASUS”).
Product warranty or service will not be extended if: (1) the product is repaired, modified or altered, unless such repair, modification
of alteration is authorized in writing by ASUS; or (2) the serial number of the product is defaced or missing.
ASUS PROVIDES THIS MANUAL “AS IS” WITHOUT WARRANTY OF ANY KIND, EITHER EXPRESS OR IMPLIED, INCLUDING BUT NOT
LIMITED TO THE IMPLIED WARRANTIES OR CONDITIONS OF MERCHANTABILITY OR FITNESS FOR A PARTICULAR PURPOSE. IN NO
EVENT SHALL ASUS, ITS DIRECTORS, OFFICERS, EMPLOYEES OR AGENTS BE LIABLE FOR ANY INDIRECT, SPECIAL, INCIDENTAL,
OR CONSEQUENTIAL DAMAGES (INCLUDING DAMAGES FOR LOSS OF PROFITS, LOSS OF BUSINESS, LOSS OF USE OR DATA,
INTERRUPTION OF BUSINESS AND THE LIKE), EVEN IF ASUS HAS BEEN ADVISED OF THE POSSIBILITY OF SUCH DAMAGES ARISING
FROM ANY DEFECT OR ERROR IN THIS MANUAL OR PRODUCT.
SPECIFICATIONS AND INFORMATION CONTAINED IN THIS MANUAL ARE FURNISHED FOR INFORMATIONAL USE ONLY, AND ARE
SUBJECT TO CHANGE AT ANY TIME WITHOUT NOTICE, AND SHOULD NOT BE CONSTRUED AS A COMMITMENT BY ASUS. ASUS
ASSUMES NO RESPONSIBILITY OR LIABILITY FOR ANY ERRORS OR INACCURACIES THAT MAY APPEAR IN THIS MANUAL, INCLUDING
THE PRODUCTS AND SOFTWARE DESCRIBED IN IT.
Products and corporate names appearing in this manual may or may not be registered trademarks or copyrights of their respective
companies, and are used only for identification or explanation and to the owners’ benefit, without intent to infringe.

1
ACCESSORY KIT CONTENTS _______________________________ 2
INSTALLATION GUIDE ______________________________________ 3
Remove the Side Panels ________________________________________________________4
Install the Power Supply Unit (PSU) ______________________________________________ 6
Install the Cooler & RAM on the Motherboard _____________________________________ 8
Install the I/O Shield ____________________________________________________________ 9
Install the Motherboard Unit ____________________________________________________ 10
Attach the Front I/O Connectors ________________________________________________ 11
Fan Hub Connectivity __________________________________________________________ 12
Install the PCI-E Card __________________________________________________________ 14
Install the 2.5” Drives __________________________________________________________ 17
Install the 3.5” Drives __________________________________________________________20
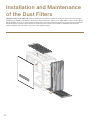
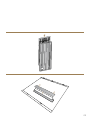
Installation and Maintenance of the Dust Filters __________________________________22
Additional Information _____________________________________ 24
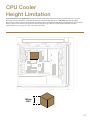
CPU Cooler Height Limitation ___________________________________________________25
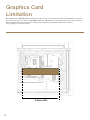
Graphics Card Limitation _______________________________________________________26
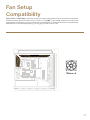
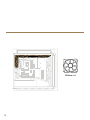
Fan Setup Compatibility ________________________________________________________27
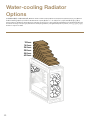
Water-cooling Radiator Options ________________________________________________30
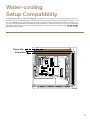
Water-cooling Setup Compatibility ______________________________________________ 31
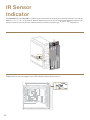
IR Sensor Indicator ____________________________________________________________34
Stow the Wi-Fi Antenna ________________________________________________________36
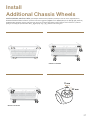
Install Additional Chassis Wheels _______________________________________________37
Safety Information ________________________________________ 38
Contents

2
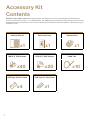
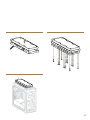
Accessory Kit
Contents
Vertical GPU Kit PCIe Lock Cover Standoff Tool
x1 x1 x1
MB/2.5” HDD Screws PSU/3.5” HDD Screws Cable Ties
x40 x20 x10
USB Type A Dust Covers USB Type-C® Dust Cover
x4 x1
配備零組件內容物 | 配备组件内容物 | Obsah sady příslušenství | Contenu du kit d’accessoires | Verpackungsinhalt des Zubehörsatzes |
Accessori contenuti nel kit | アクセサリーキット内容 | 액세서리 키트 내용물 | Zawartość zestawu akcesoriów | Conteúdo do kit de acessórios
| Содержимое комплекта | Contenido del kit de accesorios | Tillbehörssatsens innehåll | Aksesuar Kitinin İçindekiler | |

3
Installation Guide
安裝指南 | 安装指南 | Instalační příručka | Guide d’installation | Installationsanleitung |
Guida all’installazione | 組み立てガイド | 설치 설명서 | Instrukcja instalacji | Manual de
instalação | Руководство по установке | Guía de instalación | Installationsguide | Kurulum
Kılavuzu | |

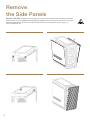
4
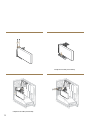
Remove
the Side Panels
STEP A-1 STEP A-2
STEP B-1 STEP B-2
移除側面板 | 移除侧面板 | Sejměte boční panely | Retirer les panneaux latéraux | Entfernen der Seitenwände | Rimuovete i
pannelli laterali | サイドパネルを取り外す | 측면 패널 제거 | Zdejmij panele boczne | Remover os painéis laterais | Снятие
боковых панелей | Quite los paneles laterales | Ta bort sidopanelerna | Yan Panelleri Çıkarın | |

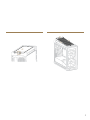
5
STEP C-1 STEP C-2

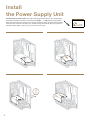
6
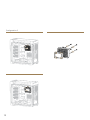
Install
the Power Supply Unit
STEP 1 STEP 2
PSU/3.5” HDD Screws
x20
STEP 3 STEP 4
安裝電源供應器 | 安装电源供应器 | Nainstalujte zdroj napájení (PSU) | Installer le bloc d’alimentation |
Installation des Netzteils | Installate l’alimentatore (PSU) | 電源ユニットを取り付ける | 전원 공급장치
(PSU) 설치 | Zainstaluj zasilacz (PSU) | Instalar a fonte de alimentação (PSU) | Установка блока питания |
Instalar la fuente de alimentación (PSU) | Sätt i strömförsörjningsenheten (PSU) | Güç Kaynağı Ünitesini
(PSU) Takın | |

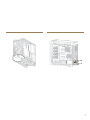
7
STEP 5 STEP 6

8
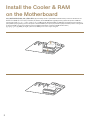
Install the Cooler & RAM
on the Motherboard
STEP 1
STEP 2
安裝主機板散熱器和記憶體 | 安装主板散热器和内存 | Nainstalujte chladič a paměť RAM na základní desku | Installer le refroidisseur et la
mémoire vive (RAM) sur la carte mère | Installation des Kühlers und der RAM-Module am Motherboard | Installate dissipatore e RAM sulla
scheda madre | CPU/クーラー/メモリーをマザーボードに取り付ける | 메인보드에 쿨러 및 RAM 설치 | Zainstaluj element chłodzący i
pamięć RAM na płycie głównej | Instalar o dissipador e memória RAM na placa principal | Установка кулера и памяти | Instalar el refrigerador
y la memoria RAM en la placa base | Montera kylare och RAM på moderkortet | Soğutucu ve RAM’i Anakarta Takın |
|

9
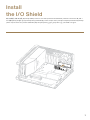
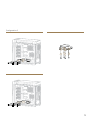
Install
the I/O Shield
安裝 I/O 擋板 | 安装 I/O 挡板 | Nainstalujte I/O štít | Installer le cache d’E/S | Installation der E/A-Blende | Installate la mascherina I/O | I/Oシー
ルドを取り付ける | I/O 쉴드 설치 | Zainstaluj osłonę portów We/Wy | Instalar a tampa de E/S | Установка заглушки разъемов ввода-вывода
| Instalar la protección de ES/ | Installera I/O-skölden | G/Ç Koruyucuyu Takın | |

10
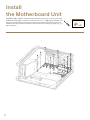
Install
the Motherboard Unit
MB/2.5” HDD Screws
x9
將主機板裝入機殼 | 将主板装入机箱 | Nainstalujte základní desku | Installer la carte mère | Installation
der Motherboard-Baugruppe | Installate la scheda madre | マザーボードを取り付ける | 메인보드 유닛
설치 | Zainstaluj płytę główną | Instalar a placa principal | Установка материнской платы | Instalar la
unidad de la placa base | Installera moderkortsenheten | Anakart Ünitesini Takın | |

11
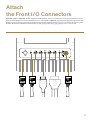
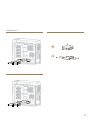
Attach
the Front I/O Connectors
連接前面板 I/O 插孔 | 连接前面板 I/O 插孔 | Připojte přední I/O konektory | Fixer les connecteurs d’E/S avants | Anschließen der E/A-Stecker
auf der Frontseite | Collegate i connettori di I/O frontali | フロントI/Oコネクターを接続する | 전면 I/O 커넥터 연결 | Zamocuj przednie złącza
We/Wy | Encaixar os conectores de E/S frontais | Подключение разъемов передней панели | Acoplar los conectores de E/S frontales | Anslut
de främre I/O-kontakterna | Ön G/Ç Konektörlerini Takın |
|

12
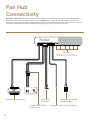
Connect to power supply
Connect to Front I/O control buttonConnect to IR Sensor
control board
Connect to
IR Sensor
Connect to fan header
on motherboard
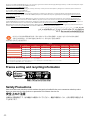
Fan control
* Fan readings for all fans connected are
based off the fan connected to MAIN PWM.
Fan Hub
Connectivity
風扇集線器 | 风扇集线器 | Možnosti připojení rozbočovače ventilátoru | Connectivité du hub pour ventilateur | Verbindungsfähigkeit
des Lüfter-Hubs | Connettività dell’hub per ventole | ファンハブの接続方法 | 주소 지정이 팬 허브 연결 | Połączenia koncentratora
wentylatorów | Conectividade de hub de ventiladores | Подключение концентратора для вентиляторов | Conectividad del concentrador
del ventilador | Hubbanslutning för fläkt | Fan Göbeği Bağlanabilirliği | |

13
MAX Fans connected to the Fan Control will operate at full speed.
AUTO Fans connected to the Fan Control will operate based on the
configurations set in BIOS.

14
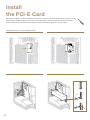
Install
the PCI-E Card
STEP 1 STEP 2
STEP 3 STEP 4
Installing a GPU in a horizontal position
安裝 PCI-E 卡 | 安裝 PCI-E 卡 | Nainstalujte PCI-E kartu | Installer la carte PCI-E | Installation der PCI-E-Karte | Installate la scheda
PCI-E | PCI-Eカードを取り付ける | PCI-E 카드 설치 | Zainstaluj kartę PCI-E | Instalar a placa PCI-E | Установка карты PCI-E |
Instalar la tarjeta PCI-E | Installera PCI-E-kortet | PCI-E Kartını Takın | | PCI-E

15
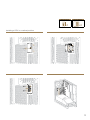
STEP 1 STEP 2
STEP 3 STEP 4
Installing a GPU in a vertical position
Vertical GPU Kit
x1
PCIe Lock Cover
x1

16
* Requires riser cable (not included)
STEP 5 STEP 6
STEP 7 STEP 8
* Requires riser cable (not included)

17
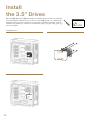
Install
the 2.5” Drives
MB/2.5” HDD Screws
x32
STEP 1 STEP 2
STEP 3
Configuration 1
安裝2.5 吋硬碟或固態硬碟 | 安裝 2.5 英寸硬盘或固态硬盘 | Nainstalujte 2,5” jednotky | Installer les
lecteurs 2.5” | Installation der 2,5-Zoll-Laufwerke | Installare i drive 2.5” | 2.5インチ ドライブを取り付 ける
| 2.5” 드라이브 설치 | Zainstaluj napędy 2,5” | Instalar as unidades de 2,5” | Установка 2,5-дюймового
привода | Instalar las unidades de 2,5” | Installera 2,5”-enheterna | 2,5” Sürücüleri Takın |
2,5 | 2.5

18
STEP 1 STEP 2
STEP 3
Configuration 2
La pagina si sta caricando...
La pagina si sta caricando...
La pagina si sta caricando...
La pagina si sta caricando...
La pagina si sta caricando...
La pagina si sta caricando...
La pagina si sta caricando...
La pagina si sta caricando...
La pagina si sta caricando...
La pagina si sta caricando...
La pagina si sta caricando...
La pagina si sta caricando...
La pagina si sta caricando...
La pagina si sta caricando...
La pagina si sta caricando...
La pagina si sta caricando...
La pagina si sta caricando...
La pagina si sta caricando...
La pagina si sta caricando...
La pagina si sta caricando...
La pagina si sta caricando...
La pagina si sta caricando...
La pagina si sta caricando...
La pagina si sta caricando...
La pagina si sta caricando...
La pagina si sta caricando...
-
 1
1
-
 2
2
-
 3
3
-
 4
4
-
 5
5
-
 6
6
-
 7
7
-
 8
8
-
 9
9
-
 10
10
-
 11
11
-
 12
12
-
 13
13
-
 14
14
-
 15
15
-
 16
16
-
 17
17
-
 18
18
-
 19
19
-
 20
20
-
 21
21
-
 22
22
-
 23
23
-
 24
24
-
 25
25
-
 26
26
-
 27
27
-
 28
28
-
 29
29
-
 30
30
-
 31
31
-
 32
32
-
 33
33
-
 34
34
-
 35
35
-
 36
36
-
 37
37
-
 38
38
-
 39
39
-
 40
40
-
 41
41
-
 42
42
-
 43
43
-
 44
44
-
 45
45
-
 46
46


in altre lingue
- English: Asus ProArt PA602 User manual
Documenti correlati
-
Asus EBE-4U Manuale utente
-
-
-
Asus ProArt B760-CREATOR Manuale utente
-
-
-
Asus Pro WS W790-ACE Manuale utente
-
-
-
Asus TUF Gaming GeForce® GTX 1660 Ti EVO OC Edition 6GB GDDR6 Manuale del proprietario