ACI Farfisa ML2002C Manuale del proprietario
- Tipo
- Manuale del proprietario

Mi 2458
ITALIANOENGLISHFRANÇAISESPAÑOLPORTUGUÊSDEUTSCH
Mi 2458
ITALIANOENGLISHFRANÇAISESPAÑOLPORTUGUÊSDEUTSCH
- 1 -
6
1
"
"
16
16
/
/
1
3
154
30
”
16
/
7
12
6
"
16
/
1
154
ok
ML2002C
Mi 2458
Videocitofono vivavoce a
colori per sistema digitale DUO
Dati tecnici
Alimentazione direttamente dalla linea
Assorbimento - a riposo: 8mA
- in funzionamento: 0,3A
Schermo: 4,3" LCD
Standard televisivo: PAL
Frequenza di riga: 15625Hz
Frequenza di quadro: 50Hz
Banda passante: >5MHz
Temperatura di funzionamento:0° ÷ +50°C
Massima umidità ammissibile: 90%RH
Hands Free Colour Video
Intercom for DUO digital system
Technical characteristics
Power supply directly from the line
Stand-by current: 8mA
Operating current: 0.3A
Screen: 4.3" LCD
Television standard: PAL
Horizontal frequency: 15625Hz
Vertical frequency: 50Hz
Band width: >5MHz
Operating temperature: 0° ÷ +50°C
Maximum admissible humidity: 90%RH
Vidéophone mains libres à
couleurs pour système DUO
Données techniques
Alimentation directe depuis la ligne
Absorption - à repos: 8mA
- pendant le fonctionnement: 0,3A
Écran: 4,3" LCD
Standard de télévision: PAL
Fréquence horizontale: 15625Hz
Fréquence verticale: 50Hz
Bande passante: >5MHz
Température de fonctionnement: 0° ÷ +50°C
Humidité maximum admissible: 90% RH
Videoportero viva voz a
colores por sistema digital DÚO
Datos técnicos
Alimentación directa desde la línea
Consumo - en reposo: 8mA
- durante el funcionamiento: 0,3A
Pantalla: 4,3" LCD
Standard televisivo: PAL
Frecuencia horizontal: 15625Hz
Frecuencia vertical: 50Hz
Banda pasante: >5MHz
Temperatura de funcionamiento: 0° ÷ +50°C
Humedad máxima permitida: 90% RH
Vídeo-porteiro viva voz a
cores para sistema digital DUO
Dados técnicos
Alimentação directamente da linha
Absorção - em repouso: 8mA
- durante o funcionamento: 0,3A
Ecrã: 4,3" LCD
Standard televisivo: PAL
Frequência horizontal: 15625Hz
Frequência vertical: 50Hz
Banda passante: >5MHz
Temperatura de funcionamento: 0°÷+50°C
Humidade máxima admissivel: 90% RH
Video-Freisprechgerät mit
farbigem LCD-Bildschirm für
DUO-Bussystem
Technische Daten
Versorgung direkt über die Leitung
Verbrauch - bei aufgelegtem Hörer: 8mA
- während de Betriebs: 0,3A
Bildschirm: 10,16 cm (4,2") LCD
Bildstandard: PAL
Horizontalfrequenz: 15625Hz
Vertikalfrequenz: 50Hz
Bandbreite: >5MHz
Betriebstemperatur: 0° bis +50°C
Max. Luftfeuchtigkeit: 90% RH
- 48 -
CERTIFICATO DI GARANZIA
(condizioni valide solo per il Territorio Italiano)
La garanzia ha la durata di 24 mesi dalla data di acquisto, accertata o accertabile, e viene
esercitata dalla Ditta rivenditrice e, tramite questa, dai Centri Assistenza Tecnica Autorizzati
FARFISA.
La garanzia deve essere esercitata, pena la decadenza, entro otto giorni dalla scoperta del
difetto.
LA GARANZIA NON E’ VALIDA SE NON DATATA E VIDIMATA CON TIMBRO E FIRMA DEL
RIVENDITORE ALL’ATTO DELL’ACQUISTO. CERTIFICATO UNICO ED INSOSTITUIBILE.
MATRICOLA - SET NUMBER - MATRICULE APPAREIL -
N° MATRICULA - N° DE MATRICULA - SERIENNUMMER
DATA DI ACQUISTO - DATE OF PURCHASE - DATE D’ACHAT - FECHA
DE COMPRA - DATA DE COMPRA - EINKAUFSDATUM
TIMBRO E FIRMA DEL RIVENDITORE
DEALER’S NAME AND ADDRESS
NOM ET ADRESSE DU REVENDEUR
NOMBRE Y DIRECCION DEL DISTRIBUIDOR
CARIMBO E ASSINATURA DO REVENDEDOR
STÄMPEL DES HÄNDLERS
Cod. 52704940 Mi 2458
Smaltire il dispositivo secondo quanto prescritto dalle norme per la
tutela dell'ambiente.
Dispose of the device in accordance with environmental regulations.
Écouler le dispositif selon tout ce qu'a été prescrit par les règles pour la
tutelle du milieu.
Eliminar el aparato según cuánto prescrito por las normas por la tutela
del entorno.
Disponha do dispositivo conforme regulamentos ambientais.
Werden Sie das Gerät in Übereinstimmung mit Umweltregulierungen
los.
La ACI Srl Farfisa Intercoms si riserva il diritto di modificare in qualsiasi momento i prodotti qui illustrati.
ACI Srl Farfisa Intercoms reserves the right to modify the products illustrated at any time.
La ACI Srl Farfisa Intercoms se réserve le droit de modifier à tous moments les produits illustrés.
ACI Srl Farfisa intercoms se reserva el derecho de modificar en cualquier momento los productos ilustrados
aquí.
E’ reservada à ACI Srl Farfisa intercoms o direito de modificar a qualquer momento os produtos aqui ilustrados.
Änderungen vorbehalten.
ACI srl Farfisa Intercoms
Via E. Vanoni, 3 • 60027 Osimo (AN) • Italy
Tel: +39 071 7202038 (r.a.) • Fax: +39 071 7202037 • e-mail: [email protected] • www.acifarfisa.it
one

Mi 2458
ITALIANOENGLISHFRANÇAISESPAÑOLPORTUGUÊSDEUTSCH
Mi 2458
ITALIANOENGLISHFRANÇAISESPAÑOLPORTUGUÊSDEUTSCH
- 2 -
AVVERTENZE DI SICUREZZA
Leggere attentamente le avvertenze conte-
nute nel presente manuale perché fornisco-
no importanti informazioni riguardanti la
sicurezza di installazione, uso e manuten-
zione. Conservarlo in modo appropriato per
future consultazioni.
Posizionare il videocitofono myLogic in
ambiente asciutto e lontano da fonti di calore
o apparecchiature che producono calore e
campi magnetici.
Per la pulizia del videocitofono non usare
acqua o solventi chimici, ma un panno
pulito.
Questo apparecchio deve essere destinato
solo all’uso per il quale è stato concepito. Il
costruttore non può essere considerato
responsabile per eventuali danni derivati da
usi impropri, erronei ed irragionevoli.
Non lasciare alla portata dei bambini le parti
dell’imballaggio (sacchetti di plastica, poli-
stirolo espanso, ecc.).
Non aprire l’apparecchio quando è acceso.
L’esecuzione dell’impianto deve essere ef-
fettuato da personale specializzato ed in
conformità con le leggi vigenti.
In caso di guasto, funzionamento irregolare
o modifica all’impianto avvalersi di persona-
le specializzato.
L’apparecchio è conforme alle direttive CEE
(marchio europeo CE).
SAFETY NOTICES
Read the instructions contained in this
manual carefully because they provide
important information about safe instal-
lation, use and maintenance. Keep this
manual appropriately for future refer-
ence.
Install your myLogic videointercom in a
dry place away from heat sources or
devices that produce heat and magnetic
fields.
Do not clean the videointercom with
water or chemical solvents, use a dry
cloth for cleaning.
This device must be exclusively oper-
ated for its intended use. The manufac-
turer cannot be held responsible for pos-
sible damage caused by improper, erro-
neous and unreasonable use.
Keep packing parts away from children
(i.e. plastic bags, expanded polystyrene,
etc.).
Do not open the device when it is on.
The installation must be made by spe-
cialized personnel in compliance with the
regulations in force.
Always refer to specialized personnel in
case of breakdown, irregular operation
or change in the installation.
The device complies with the EEC direc-
tives (CE European mark).
ADVERTENCIAS DE SEGURIDAD
Leer cuidadosamente las advertencias con-
tenidas en el presente manual porque
fornecen importantes informaciones con
respecto a la seguridad de instalación,
empleo y manutención. Conservarlo de
modo apropiado por futuras consultas.
Posicionar el videoportero myLogic en
entornos secos y lejos de fuentes de calor
o aparatos que producen calor y campos
magnéticos.
Por la limpieza del videoportero no usar
agua o solventes químicos sino un paño
limpio.
Este aparato tiene que sólo ser destinado
al empleo por el que ha sido concebido. El
constructor no puede ser considerado res-
ponsable por eventuales daños derivados
por empleos impropios, erróneos e irrazo-
nables.
No dejar al alcance de los niños las partes
del embalaje, bolsitas de plástico,
poliestireno, etcétera.
No abrir el aparato cuando es encendido.
La ejecución de la instalación tiene que ser
efectuada de personal especializado y en
conformidad con las leyes vigentes.
En caso de avería, funcionamiento irregular
o modificación a la instalación valerse de
personal especializado.
El aparato está conforme a las directivas
CEE (marca europea CE).
AVISOS DE SEGURANÇA
Leia atentamente os avisos contidos no
presente manual porque trazem impor-
tantes informações quanto à segurança
em termos de instalação, utilização e
manutenção. Guarde-o num lugar seguro
para eventuais consultas.
Posicione o vídeo porteiro myLogic num
ambiente seco e longe de fontes de calor
ou de equipamentos que produzam calor
e campos magnéticos.
Para a limpeza do vídeo porteiro, não use
água nem solventes químicos, mas
somente um pano limpo.
Este aparelho é destinado somente ao uso
para o qual foi concebido. O fabricante
não se responsabiliza por danos derivantes
de utilizações impróprias, erróneas ou
irracionais.
Não deixe os elementos da embalagem
(sacos de plástico, polistirene expandido
etc.) ao alcance das crianças.
Não abra o aparelho quando ele estiver
ligado.
A instalação e o ensaio do equipamento
devem ser feitos por pessoal especializado
e em conformidade com as leis vigentes.
Em caso de avaria, funcionamento irregular
ou alteração no equipamento, recorra a
pessoal especializado.
O aparelho é conforme as directivas CEE
(marca europeia CE).
NOTICE DE SECURITÉ
Lire attentivement les instructions contenues
dans le présent manuel parce qu'ils fournis-
sent d'importants renseignements concer-
nant la sécurité d’installation, d'usage et d'en-
tretien. On recommande le conserver de
manière appropriée pour consultations futu-
res.
Positionner le moniteur myLogic en milieu sec
et loin de sources de chaleur ou d'appareilla-
ges qui produisent chaleur ou champs ma-
gnétiques.
Pour la propreté du moniteur ne pas utiliser de
l'eau mais qu'un tissu propre.
Ce poste doit être destiné seulement à l’usage
pour lequel il a été conçu. Le constructeur ne
peut pas être considéré comme responsable
pour dommages éventuels dérivés par
l'utilisations impropres, erronés et
déraisonnables.
Ne pas laisser à la portée des enfants les
parties de l’emballage, sac en plastique,
polystyrène expansé, etc..
Ne pas ouvrir l’appareil quand il est en marche.
L’exécution du montage et mise en œuvre
doivent être effectuées par personnel
spécialisé et en conformité avec les lois en
vigueur.
En cas de panne, fonctionnement irrégulier
ou modification à l’installation il faut se servir
de personnel spécialisé.
L’appareil est conforme à la directive CEE,
marque européenne CE.
SICHERHEITSHINWEISE
Hinweise im vorliegenden Handbuch auf-
merksam durchlesen, da sie wichtige Infor-
mationen zur sicheren Installation, Verwen-
dung und Wartung enthalten. Handbuch sorg-
fältig aufbewahren, um es jederzeit wieder
einsehen zu können.
Videohaustelefon myLogic in einem
trockenen Raum, fern von Wärmequellen
oder Geräten aufstellen, die Wärme oder
Magnetfelder erzeugen.
Videohaustelefon nicht mit Wasser oder
chemischen Lösungsmitteln, sondern
ausschließlich mit einem feuchten Tuch
reinigen.
Dieses Gerät darf nur für den vorgesehenen
Verwendungszweck benutzt werden. Der
Hersteller haftet nicht für Schäden, die durch
unsachgemäße oder falsche Benutzung
entstehen.
Verpackungsteile (Plastikbeutel, Styropor
usw.) dürfen nicht in Kinderhände gelangen.
Gerät im eingeschalteten Zustand nicht
öffnen.
Die Installation der Anlage darf nur vom
Fachmann entsprechend den geltenden
gesetzlichen Vorschriften vorgenommen
werden.
Bei Defekten, Betriebsstörungen oder
Änderungen der Anlage ist ein Fachmann
hinzuzuziehen.
Gerät entspricht den EG-Richtlinien
(europäisches CE-Zeichen).
- 47 -

Mi 2458
ITALIANOENGLISHFRANÇAISESPAÑOLPORTUGUÊSDEUTSCH
Mi 2458
ITALIANOENGLISHFRANÇAISESPAÑOLPORTUGUÊSDEUTSCH
- 3 -
3 -Effettuare i collegamenti sulla morsettiera come
da schema da realizzare.
-Make the connections as required by the
electric diagram to wire.
- Procéder aux branchements sur le bornier tel
que détaillé dans le schéma.
-Realizar las conexiones en la caja de bornes
como en el esquema de realización.
- Efectuar as ligações sobre a caixa de terminais
de acordo com o esquema a ser realizado.
-Anschlüsse an die Klemmenbretter
entsprechend dem auszuführenden Schaltplan
vornehmen.
5 - Sfilare la calotta frontale per accedere ai 4 punti di fissaggio del
videocitofono.
-Remove the frontal plastic frame to approach the four fixing points
of the video intercom.
- Ôter le couvercle avant pour accéder aux 4 points de fixation du
vidéophone.
-Extraer la chapa frontal para acceder a los 4 puntos de anclaje
del videoportero.
-Desfiar a calota frontal para chegar aos 4 pontos de fixação do
vídeo-porteiro.
-
Die Blende entfernen, um Zugang zu den Befestigungspunkten
des Videohaustelefons zu erhalten.
GC
LMA1
LMGNGE
2
1
3
4
J2
3
2
1
J1
2 - Togliere la morsettiera dal videocitofono.
-Unplug the terminal block from the video intercom.
- Enlever le bornier du vidéophone.
-Extraer la caja de bornes del videoportero.
- Retirar a caixa de terminais do vídeo-porteiro.
- Klemmenbretter vom Videosprechgerät entfernen.
GC
LMA1
LMGNGE
2
1
3
4
J2
3
2
1
J1
4 - Reinserire la morsettiera sul videocitofono.
-Plug-in back the terminal block on the videointercom.
- Réintroduire le bornier dans le vidéophone.
-Reintroducir la caja de bornes en el videoportero.
- Recolocar a caixa de terminais no vídeo-porteiro.
- Klemmenbretter wieder am Videosprechgerät anbringen.
Installazione
Installation
Installation
Instalación
Instalação
Installation
1 - Murare la scatola da incasso ML2083 ad un'al-
tezza dalla pavimentazione di circa 1,5 m.
-Wall-up the back box ML2083 at an height of
about 1.5 meters above the floor.
-Murer le boîtier d’encastrement ML2083 à la
hauteur d’environ 1,5 mètres du sol.
- Colocar en la pared la caja de empotrar ML2083
a una altitud del pavimento de aprox. 1,5 metros.
- Prender a caixa de encaixe ML2083 a uma altura
do chão de aproximadamente 1,5 metros.
-Unterputzdose ML2083 auf einer Höhe von
circa 1,5 Meter über dem Boden einbauen.
- 46 -
La pagina si sta caricando...

Mi 2458
ITALIANOENGLISHFRANÇAISESPAÑOLPORTUGUÊSDEUTSCH
Mi 2458
ITALIANOENGLISHFRANÇAISESPAÑOLPORTUGUÊSDEUTSCH
- 5 -
Regolazioni
I livelli fonici sono regolati in fabbrica; modi-
ficare le regolazioni poste sul retro dell'appa-
recchio solamente in caso di effettiva neces-
sità.
Taratura dei livelli fonici.
- Se durante la conversazione si ode un audio
eccessivamente intermittente o se durante
una chiamata l'altoparlante tende a distorce-
re, si consiglia di ritoccare leggermente la
sensibilità del microfono agendo sul trimmer
SENS posto sul retro del videocitofono.
- In caso di difficoltà a prendere la linea in una
delle due direzioni, aumentare leggermente
il livello del canale in difficoltà e diminuire
leggermente l’altro agendo sul trimmer
VOL per il volume del microfono e sui tasti
menu per il volume dell'altoparlante (vedere
il capitolo "Regolazioni audio-video" a pagi-
na 19).
The audio levels are set in the factory;
settings on the back of the device must be
changed only if really necessary.
Setting the sound levels.
- If audio is excessively intermittent during
the conversation or the speaker tends to
distort it during the call, it is recommended
to slightly change the microphone sensitivity
using the SENS trimmer on the back of the
video-intercom.
- In case of problems in getting the line in one
of the two directions, slightly increase the
level of the disturbed channel and decrease
the level of the other channel using the
VOL trimmer for the microphone volume
and the menu buttons for the speaker
volume (see chapter "Audio-video
adjustment" on page 19).
Adjustments
Ajustes
Os níveis fónicos são regulados em fábrica;
altere tais regulações (situadas na parte traseira
do aparelho) só se for realmente necessário.
Calibragem dos níveis fónicos
- Se, durante a conversação, ouvir um áudio
excessivamente intermitente ou se, durante
uma chamada, o alto-falante tender a distorcer
o som, aconselha-se a retocar ligeiramente
a sensibilidade do microfone através do
compensador SENS instalado na parte
traseira do vídeo porteiro.
- Em caso de dificuldade em se obter a linha
numa das duas direcções, aumente
ligeiramente o nível do canal com problema
e diminua ligeiramente o outro, agindo no
compensador
VOL para o volume do
microfone, e nos botões de menu para o
volume do alto-falante (veja o capítulo "Ajustes
áudio e vídeo" na página 43).
Regulações
Los niveles fónicos son regulados en la
fábrica; modificar los ajustes puestas sobre
el reverso del aparato solo en caso de
efectiva necesidad.
Calibrado de los niveles fónicos
- Si durante la conversación se oye un audio
excesivamente intermitente o si durante
una llamada el altavoz tiende a torcer, se
aconseja retocar ligeramente la sensibili-
dad del micrófono actuando sobre el trimmer
SENS puesto en el reverso del videoportero.
- En caso de dificultad a tomar la línea en una
de las dos direcciones, aumentar ligera-
mente el nivel del canal en dificultad y
disminuir ligeramente lo otro actuando so-
bre el trimmer
VOL por el volumen del
micrófono y sobre las teclas de menú para
el volumen del altavoz (véase el capítulo
"Ajustes de audio-vídeo" en la página 31).
Réglages
Les niveaux de la phonie sont réglés en usine;
modifier les régulations mises au verso du
poste seulement en cas de nécessité effective.
Réglage des niveaux de la phonie
- Si pendant la conversation on entend un son
excessivement intermittent ou si pendant un
appel le haut-parleur tend à déformer, on
suggère de retoucher la sensibilité du micro-
phone légèrement en agissant sur le trimmer
SENS mis sur le derrière du moniteur.
- En cas de difficulté à prendre la ligne dans
une des deux directions, augmenter le niveau
du canal légèrement en difficulté et diminuer
l’autre légèrement en agissant sur le trimmer
VOL pour le volume du microphone et sur
les touches de menu pour le volume du haut-
parleur (voir le chapitre "Réglages audio-
vidéo" à la page 31).
Die Lautstärkeeinstellung erfolgen ab Werk.
Die Einstellung (auf der Rückseite des
Apparats) sollte nur im Bedarfsfall geändert
werden.
Einstellung der Lautstärke
- Sollte während des Sprechverkehrs ein
Störgeräusch zu hören sein oder der
Lautsprecher während des Anrufs zu
Verzerrungen neigen, empfiehlt es sich, die
Mikrofonempfindlichkeit durch Betätigen
des auf der Rückseite des Video-
haustelefons befindlichen Reglers SENS
nachzuregulieren.
- Falls Schwierigkeiten mit der Umschaltung
der Sprechrichtung auftreten, sollte der
Pegel der betroffenen Richtung leicht erhöht,
und die andere hingegen leicht vermindert
werden; hierzu ist der Regler
VOL für die
Mikrofonlautstärke bzw. der Menü-Tasten
für die Lautstärke der Lautsprecher (Siehe
Kapitel "Audio-Video
Regulierung" auf Seite 43).
Einstellungen
Regolazione sensibilità del microfono
Adjusting microphone sensitivity
Réglage de la sensibilité du microphone
Regulagem sensibilidade do microfone
Regulación sensibilidad del micrófono
Einstellung der Mikrofonempfindlichkeit
GC
LMA1
LMGNGE
2
1
3
4
J2
3
2
1
J1
Regolazione amplificazione del microfono
Adjusting microphone level
Réglage de l a du microphone
Regulagem da amplificação do microfone
Ajuste amplificación del micrófono
Einstellung Mikrofonverstärkunge
’ mplification
- 44 -
Chamada do posto externo
Ao efectuar uma chamada do posto externo, se ouvirá no alto-
falante do vídeo-porteiro os toques do som (como previsto na
programação) e na tela aparece a imagem de quem chama durante
aproximadamente 30 segundos. Se o tempo de chamada terminar
e o vídeo-porteiro se desligar, pressionar o botão
para
conectar-se novamente com o posto externo que chama.
Para conversar com o posto externo para um tempo de 90
segundos, pressionar o botão
.
Quando se desejar desativar a fonia em direcção ao posto externo
(microfone), continuando a ouvir o áudio proveniente do exterior,
pressionar brevemente o botão
; por todo o período da
desabilitação aparece no monitor o símbolo
. Para recuperar o
áudio externo, pressionar novamente
; o símbolo
desaparece.
Na eventualidade de chamada a um utilizador que possua no seu
apartamento mais de um vídeo-porteiro, todos os aparelhos tocam
paralelamente, mas apenas aquele no qual o endereço quarto seja
0 se acende. Para responder a este vídeo-porteiro, pode-se
proceder como descrito anteriormente.
Premindo o botão de
outro vídeo porteiro é possível ver a entrada que está a chamar,
desligando automaticamente a que foi ligada anteriormente.
Pres-
sionar
novamente para conversar com o posto externo.
Para accionar a abertura da fechadura elétrica, pressionar o botão
.
Para terminar a conversação e desligar o vídeo-porteiro, pressi-
onar
; o vídeo-porteiro também se apaga no final da temporização.
Ruf von Türstation
Bei einem Ruf von der Türstation sind über den Lautsprecher des
Videohaustelefons die (programmgemäßen) Klingeltöne des Läutwerkes
zu hören und auf dem Bildschirm erscheint das Bild für etwa 30
Sekunden. Nach Ablauf dieser Anrufzeit und Ausschalten des
Videohaustelefons ist die Taste
zu drücken, um eine erneute
Verbindung zur anrufenden Türstation herzustellen.
Zur Sprechverbindung mit der Türstation für einst von etwa 90 Sekunden
zu unterhalten, ist die Taste
zu drücken.
Wenn die Sprechverbindung zur Türstation unterbrochen werden soll
(Mikrofon), ist unter Aufrechterhaltung der von der Türstation eingehen-
den Hörverbindung kurz die Taste
zu drücken; Während der ganzen
Zeit, in der die Videosprechanlage ausgeschaltet ist, erscheint das
Symbol
auf dem Bildschirm. Zur Wiederherstellung der Audioverbindung
mit der Türstation ist erneut die Taste
zu drücken; das Symbol
verschwindet.
Wenn ein Teilnehmer angerufen wird, der mehr als ein Videohaustelefon
besitzt, läuten alle parallel geschalteten Videohaustelefone, aber nur das
mit der Adresse 0 schaltet sich ein. Um von diesem Videohaustelefon aus
zu antworten, ist wie zuvor beschrieben vorzugehen. Beim Drücken der
Taste
auf einer anderen Videosprechanlage ist es möglich, den
anrufenden Eingang sehen, indem der vorher eingeschaltete automatisch
ausgeschaltet wird.
Drücken Sie erneut, um mit dem Türstation zu
sprechen.
Zur Betätigung des elektrischen Türschließers ist die Taste
zu
drücken.
Zur Beendigung des Gesprächs und zum Ausschalten des
Videohaustelefons Taste
drücken. Das Videohaustelefon schaltet
sich auch nach Ablauf des Zeittaktes aus.
FUNCIONAMENTO BETRIEB
Funções-chave com vídeo porteiro em repouso
(monitor desligado)
Ligação de verificação do vídeo porteiro
Fechadura (abre a porta)
Agenda (listagem dos locais exteriores e interiores para
os quais se pretende ligar)
Menu configurações
Key-Funktionen mit Videosprechanlage in Stillstand
Modus (ausgeschalteter Bildschirm)
Einschalten der Videosprechanlage zur Kontrolle
Schloss (Türöffner)
Verzeichnis (Liste der externen und internen Räume, die man
rufen möchte)
Menü Einstellungen
Funções-chave com vídeo porteiro ligado e
conectado à linha de entrada de vídeo
Início e fim conversação
Fechadura (abre a porta)
Silenciador (exclusão/inclusão microfone)
Configurações do vídeo porteiro (selecção da entrada e
regulações áudio-vídeo)
Key-Funktionen mit Videosprechanlage eingeschaltet und
an die Leitung angeschlossen
Beginn und Ende der Konversation
Schloss (Türöffner)
Muting (Mikrophon eingeschaltet/ausgeschaltet)
Einstellungen Videosprechanlage (Eingangswahl und Audio-
Video Regulierung)
ok ok
ok ok

Mi 2458
ITALIANOENGLISHFRANÇAISESPAÑOLPORTUGUÊSDEUTSCH
Mi 2458
ITALIANOENGLISHFRANÇAISESPAÑOLPORTUGUÊSDEUTSCH
- 6 -
* Lettere di riferimento schematico (vedere lo schema a pagina 9).
** Distanza con il posto interno più lontano
*** La lunghezza totale dei cavi dal derivatore ai posti interni non deve
superare i 300 metri (somma di tutte le tratte "E").
Tabella delle distanze massime garantite
Table of the maximum permitted distances
Tableau des distances maximales garanties
Tabla de las distancias máximas garantizadas
Tabela das distâncias máximas garantidas
Tabelle der garantierten maximale Kabellängen
Cavo Farfisa art.2302
Cavo a 2 conduttori twistato con-
sigliato per la realizzazione di im-
pianti digitali DUO System. L'im-
piego di conduttori inadeguati po-
trebbe non garantire il corretto fun-
zionamento del sistema.
Dati tecnici
Numero dei conduttori: 2
Colore: rosso e nero
Sezione: 2x1mm²
Materiale: rame stagnato
Passo di cordatura: 40mm
Impedenza caratteristica: 100Ω
Tratta * Cavo Farfisa 2302 Cavo telefonico Cavo CAT5
Section Farfisa 2302 cable Twisted cable CAT5 cable
Tronçon* Câble Farfisa 2302 Câble torsadé Câble CAT5
Tramo* Cable Farfisa 2302 Cable trenzado Cable CAT5
Trecho Cabo Farfisa 2302 Cabo trançado Cabo CAT5
Strecke Farfisa 2302 Kabel gedrilltes Kabel Kabel CAT5
2x1mm² - AWG17 2x0,32mm² - AWG22 2x0,2mm² - AWG24
A 50 m - 164 ft 10 m - 33 ft 5 m - 17 ft
B 150 m - 328 ft 150 m - 328 ft 150 m - 328 ft
C ** 150 m - 328 ft 150 m - 328 ft 150 m - 328 ft
D 50 m - 164 ft 10 m - 33 ft 5 m - 17 ft
E *** 30 m - 164 ft 10 m - 33 ft 5 m - 17 ft
F ** 150 m - 328 ft 50 m - 164 ft 35 m - 115 ft
Art.2302 Farfisa cable
Twisted pair cable specified for
the digital installation with DUO
systems. The use of inappropriate
cables may have an adverse ef-
fect on the performance of the sys-
tem.
Technical characteristics
Number of conductors: 2
Colour: red and black
Cross-section: 2x1mm² (AWG17)
Material: tinned copper
Twisting pitch: 40mm
Nominal impedance: 100
Ω
* Letters for reference on the diagrams (see page 9)
** Farthest internal station
*** The total length of cables from line distributors to internal stations
should not exceed 300m (adding all the "E" sections).
* Lettres de référence schématique (voir à la page 9).
** Distance avec le poste interne plus éloigné.
*** La longueur totale des câbles du dérivateur aux postes internes ne doit
pas dépasser 300 mètres (somme de tous les tronçons “E”).
Câble Farfisa art.2302
Câble à 2 conducteurs torsadé
recommandé pour la réalisation
de systèmes DUO System. L’utili-
sation de câbles différents peut
influencer le fonctionnement cor-
rect du système.
Données techniques
Nombre de conducteurs: 2
Couleurs: rouge et noir
Section: 2x1mm²
Matériel: cuivre étamé
Pas du câblage: 40mm
Impédance caractéristique: 100Ω
Kabel Farfisa Art.2302
Verdrilltes Kabel speziell für den
Einsatz mit DUO Systeme. Bei
Verwendung anderer Kabelarten
kann die Funktion und die Leis-
tung des Systems beeinträchtigt
werden.
Technische Daten
Anzahl der Adern: 2
Farben: rot und schwarz
Querschnitt: 2x1mm² (AWG17)
Material: verzinntes Kupfer
Verdrillungsschritt: 40mm
Typische Impedanz: 100
Ω
Cable Farfisa art.2302
Cable trenzado a 2 conductores
encomendado por la realización de
instalaciones digitales DUO System.
El empleo de otros cables puede
afectar el correcto funcionamiento
del sistema y no asegura sus bue-
nas prestaciones.
Datos técnicos
Número de los conductores: 2
Colores: rojo y negro
Sección: 2x1mm²
Material: cobre estañado
Diámetro exterior: 40mm
Impedancia típica: 100
Ω
Cabo Farfisa Art.2302
Cabo trançado a 2 condutores
recomendado por a realização de
instalações digitais DUO System
.
O uso de outros cabos pode
influenciar o correto funcionamento
do sistema e não garante as
prestações do mesmo.
Dados técnicos
Número de condutores: 2
Cor: vermelho e preto
Secção: 2x1mm² (AWG17)
Material: cobre estagnado
Diâmetro externo: 40mm
Impedimento característica: 100Ω
* Letras de referencia (véase la página 9).
** Distancia con el aparato interno más distante.
*** La longitud total de los cables del derivador a los aparatos internos no
puede ser superior a los 300 metros (total de todos los tramos “E”).
* Letras de referência esquemática (ver a página 9).
** Distância com o posto interno mais afastado
*** O comprimento total dos cabos do derivador aos locais internos não
deve superar 300 metros (soma de todos os trechos “E”).
* Schaltplan-Bezugsbuchstaben (siehe Seite 9).
** Entfernung zum am weitesten entfernten Innen
*** Die Gesamtlänge der Kabel vom Nebenwiderstand zu den internen
Teilnehmern darf nicht mehr 300 Meter betragen (Summe aller „E”-
Abschnitte).
- 43 -
Câmara
Entrada
Aberturaportão
Aberturaportão
Programação
Volumedo áudio
Volume do áudio
Vídeo
Programação
Aberturaportão
Aberturaportão
Programação
Volumedo áudio
Volumedo áudio
Programação
Kamera
Eingang
Toröffnen
Tor öffnen
Programmierung
Lautstärke
Video
Programmierung
Toröffnen
Tor öffnen
Programmierung
Lautstärke
Programmierung
MENU CONFIGURAÇÃO MENÜ EINSTELLUNG
Ajustes áudio-vídeo
Para aceder aos ajustes de áudio e vídeo é necessário que o vídeo
porteiro esteja ligado e conectado a uma linha exterior através de uma
chamada feita a partir do teclado ou de uma ligação de verificação
(botão
).
Premindo “menu”; surgem as seguintes entradas: câmara, listagem
de entradas e de serviços (se tiverem sido inseridos - ver parágrafo
“contatos” na página 36), programação. Seleccionar “Programação”
e premir OK - seleccionar “volume do áudio” para ajustar com os botões
o nível áudio proveniente de fora (alto-falante) ou seleccionar
“Vídeo” para ajustar o brilho, o contraste e a cor da imagem.
Audio-Video Regulierung
Zur Regulierung von Audio und Video muss die Videosprechanlage
eingeschaltet und mit einem externen Bereich mit Hilfe eines Anrufs
durch die Tastatur oder Einschaltungskontrolle (Taste
)
angeschlossen sein.
“Menü” drücken; es erscheint die folgende Liste: Kamera, Verzeichnis
Eingänge und Service (wenn eingefügt - siehe Paragraph “Telefonbuch”
auf Seite 36), Programmierung. “Programmierung” wählen und OK
drücken - die Lautstärke wählen und mit Hilfe der Tasten
die von
außen kommende Stimmlage (Lautsprecher) regulieren oder das
Video wählen, um die Lichtstärke, den Kontrast und die Bildfarbe zu
regulieren.
Wenn die Videosprechanlage mit einem anderen Gerät kommuniziert
und man drückt “Menü”, werden nur die Punkte visualisiert, welche
sich auf die Inbetriebnahme und Audio Regulierungen beziehen
(Serviceliste und Audio Einstellungen).
Se o vídeo porteiro estiver emparelhado com outro dispositivo, ao
premir “menu”, só são visualizadas as entradas relacionadas com
activações e ajustes de áudio (lista de serviços e configurações de
áudio).
(premir durante
menos de 4 segundos)
(Weniger als 4
Sekunden drücken)
CONTATOS
TELEFONBUCH
LISTA DE NOMES
NAMENSLISTE
CAMPAINHA
ETAGENRUF
LISTA DE IDIOMAS
LISTE DER SPRACHEN
ETIQUETA
NAME
LISTAGEM DE SONS
LISTE RUFTÖNE
SELECCIONAR NOME
NAME WÄHLEN
ALTERAR
ÄNDERUNG
ALTERAR
ÄNDERUNG
DESLIGADO
AUS
NORMAL
NORMAL
AJUSTAR NÍVEL
LAUTSTÄRKE REGULIEREN
MOVER COM
VERSCHIEBEN MIT
CANCELAR
LÖSCHEN
ÁUDIO
AUDIO
ORDENAÇÃO
REIHENFOLGE
SOM
RUFTÖNE
DURAÇÃO SOM
RUFDAUER
SOM DAS TECLAS
TASTENTON
VOLUME DE SOM
RUFLAUTSTÄRKE
VOLUME DO TOM
TONLAUTSTÄRKE
LIGADO
EIN
GRANDE
GROSS
GUARDAR
SPEICHERN
ANULAR
NICHT SPEICHERN
IDIOMA
SPRACHE
TAMANHO DA FONTE
SCHRIFTGRAD
CANCELAR
LÖSCHEN
GUARDAR
SPEICHERN
ANULAR
NICHT SPEICHERN
Ordem dos nomes
Para modificar a ordem dos nomes existente na agenda, é necessário,
na página “Contatos”, seleccionar “Ordenação” e premir OK –
seleccionar o nome que se pretende mover e premir OK - com os
botões mover o nome para a posição desejada e premir OK para
confirmar. Premir
para voltar à página anterior.
Áudio - procedimento descrito na página 38.
Idioma - procedimento descrito na página 40.
Tamanho da fonte - procedimento descrito na página 41.
Zuordnung der Namen
Zur Zuordnung der Namen im Verzeichnis muss man in der Seite
“Telefonbuch” die “Reihenfolge” wählen und OK drücken - den zu
verschiebenden Namen wählen und OK drücken - mit den Tasten
den Namen in die gewünschte Position verschieben und zum
Bestätigen OK drücken.
drucken, um zur vorhergehenden Seite
zurückzukehren.
Audio - der Vorgang ist auf Seite 38 beschrieben.
Sprache - der Vorgang ist auf Seite 40 beschrieben.
Schriftgrad- der Vorgang ist auf Seite 41 beschrieben.
La pagina si sta caricando...
La pagina si sta caricando...
La pagina si sta caricando...

Mi 2458
ITALIANOENGLISHFRANÇAISESPAÑOLPORTUGUÊSDEUTSCH
Mi 2458
ITALIANOENGLISHFRANÇAISESPAÑOLPORTUGUÊSDEUTSCH
- 10 -
ok
Menu
Premendo sul tasto menu si può accedere alle programmazioni,
impostazioni e regolazioni del videocitofono. Le impostazioni attuali
sono indicate dal colore verde della scritta.
Principali funzioni dei tasti
I 4 pulsanti presenti nella parte centrale del videocitofono permettono
di accedere a tutte le modalità di funzionamento, impostazione e
programmazione del videocitofono. Le funzioni dei tasti variano secondo
la situazione operativa in cui si trova il videocitofono.
Attenzione. Un tono di dissuasione durante la pressione di un qualsiasi
tasto avverte che la funzione non è disponibile perchè il servizio non
è attivo o la linea videocitofonica è occupata da un altro utente.
Accensione videoci-
tofonica di controllo
Serratura
(apriporta)
Rubrica (elenco dei posti esterni ed interni che si desidera chiamare)
Menu impostazioni
Main functions of buttons
The 4 buttons, located on the front of videointercoms, allow to access
the operating modes, settings and programming of the videointercom.
The functions of the buttons vary according to the operating mode of
the videointercom.
Attention. A dissuasion tone, while pressing a button, means the
function is not available because the service has not been enabled,
or the intercom line is busy.
Videocitofono a riposo (schermo spento)
ok
Inizio e fine conversa-
zione
Serratura
(apriporta)
Muting (esclusione/inclusione microfono)
Impostazioni videocitofoniche (selezione ingresso e regolazioni audio-
video)
Videocitofono acceso e connesso alla linea
videocitofonica
ok
Pagina precedente o
uscita
Pagina
successiva
o conferma
Scorrimento verso il basso del cursore
Scorrimento verso l'alto del cursore
Videocitofono acceso durante la fase di
programmazione o impostazione
ok
Menu
By pressing the menu button it is possible to enter the programming,
settings and adjustment functions of videointercoms. Present settings
are displayed in green.
Monitor
Door Lock
release
Contacts (list of door stations or internal users you wish to call)
Settings
Videointercom in Stand-By mode (Display OFF)
ok
Start and close
communication
Door Lock
release
Muting (enable/disable microphone)
Videointercom Settings (door station selection and audio-video
adjustments)
Videointercom ON and connected to the videointercom
line
ok
Previous page or exit
Next page or
Enter
Cursor Down
Cursor Up
Videointercom ON during setting or programming
phase
- 39 -
Adresse
Zimmer
Zus.Adressen
Fernprogrammierung
A1Rufweitersch.
A1Rufweitersch.
System
Endereço
Quarto
EndereçoadicionalEndereço
adicional
Program.remotaProgram.
remota
Ligar A1
Sistema
100
Alterar
Cancelar
Guardar
Anular
Endereço
100
Änderung
Adresse
Löschen
Speichern
NichtspeichernNicht
speichern
0
Alterar
Cancelar
Guardar
Anular
Quarto
0
Änderung
Zimmer
Löschen
Speichern
NichtspeichernNicht
speichern
- Volume de som– permite aumentar ( ) ou diminuir ( ) o volume
de todos os toques activos no vídeo porteiro. Seleccionar “Volume
de som” e premir OK; no lado direito do monitor aparece uma barra
vertical e ouvir-se-á o nível actual do som. Com os botões
escolher o nível preferido e premir OK para confirmar e voltar à
página anterior.
- Volume do tom - permite aumentar (
) ou diminuir ( ) o volume
dos tons activos no vídeo porteiro. Seleccionar “Volume do tom”
e premir OK; no lado direito do monitor aparece uma barra vertical
e ouvir-se-á o nível actual do som. Com os botões escolher
o nível preferido e premir OK para confirmar e voltar à página
anterior.
Sistema – Colocar o
cursor em “Sistema” e
premir OK; passa-se para
as programações
principais do vídeo
porteiro: Endereço,
Quarto, Endereço
adicional, Programação remota, Ligar A1.
- Endereço de utilizador (endereços de
1 a 200) – colocar o cursor em
“Endereço” – premir OK; surgirá o
número do utilizador programado
anteriormente (de fábrica 100) – manter
premido o botão
ou para diminuir
ou aumentar o número do
endereço - premir OK para
ir para a página de
confirmação: - seleccionar
“Cancelar” para voltar à
página do endereço;
seleccionar “Guardar” para
sair e confirmar o novo
endereço - seleccionar “Anular” para sair sem o alterar.
- Endereço de quarto (de 0 a 7) –
colocar o cursor em “Quarto” - premir
OK; é visualizado o número do aposento
programado anteriormente – manter
premido os botões
ou para diminuir
ou aumentar o número do aposento -
premir OK para ir para a página de
confirmação: - seleccionar
“Cancelar” para voltar à
página do aposento -
seleccionar “Guardar” para
sair e confirmar o novo
número - seleccionar
“Anular” para sair sem o
alterar.
- Endereço adicional
É possível configurar o vídeo-porteiro de modo tal para responder
às chamadas destinadas a outros utentes (endereços alternativos)
como, por exemplo, a habitação de um profissional e o seu próprio
escritório, ou o apartamento dos pais e aquele dos filhos; desse
modo, o vídeo porteiro de um apartamento pode ser usado como
um dispositivo tanto principal como secundário de um outro
apartamento; é importante saber que, em caso de um vídeo
porteiro com endereço alternativo, ele comporta-se, para todos os
efeitos, como um aparelho do próprio apartamento, mas também
como vídeo porteiro de um apartamento alternativo, motivo pelo
qual deverão ser respeitadas as regras e as programações
também deste último. De maneira que, se no apartamento
alternativo já existir o número de posto 2, o vídeo porteiro
alternativo não poderá ser programado com aquele mesmo
número de posto; é claro que ele poderá ser o número de posto
2 do próprio apartamento; ou se no apartamento alternativo já
erscheint eine vertikale Leiste und man wird die aktuelle Lautstärke
des Klingeltons hören. Mit den Tasten wählt man die gewünschte
Lautstärke und dann drückt man OK, um die Lautstärke zu bestätigen
und zur vorgehenden Seite zurückzukehren.
- Tonlautstärke - erlaubt, alle aktiven Lautstärken der Töne in der
Videosprechanlage zu erhöhen (
) oder zu verringern ( ).
“Tonlautstärke” wählen und OK drücken; auf der rechten Bildschirmseite
erscheint eine vertikale Leiste und man wird die aktuelle Lautstärke
des Tones hören. Mit den Tasten wählt man die gewünschte
Lautstärke und dann drückt man OK, um die Lautstärke zu bestätigen
und zur vorgehenden Seite zurückzukehren.
System – Den Cursor aus
“System” positionieren und OK
drücken; man gelangt zu den
Hauptprogrammierungen der
Videosprechanlage: Adresse,
Zimmer, zus. Adressen,
Fernprogrammierung, A1
Rufweitersch.
- Adresse Benutzer (Adressen von 1 bis 200)
- Den Cursor auf “Adresse” positionieren -
OK drücken; die vorher programmierte
Benutzernummer wird visualisiert
(Voreinstellung im Werk 100) - die Taste
oder gedrückt lassen, um den Wert der
Adresse zu verringern oder zu erhöhen - OK
drücken, um zur Bestätigungsseite
zu gelangen: - “Löschen” wählen,
um zur Bildschirmseite der
Adresse zurückzukehren -
“Speichern” wählen, um die neue
Adresse zu bestätigen und die
Seite zu verlassen - “nicht
speichern”, um die Seite zu
verlassen, ohne zu bestätigen.
- Nummer des Zimmer (von 0 bis 7) - erscheint
nur, wenn sich die internen Geräte im gleichen
Appartement befinden (gleiche Adresse) und
muss wie folgt geändert werden: - den Cursor
auf “Zimmer” positionieren - OK drücken; die
vorher programmierte Raumnummer wird
visualisiert - die Taste
oder
gedrückt lassen, um den Wert
des Raumes zu verringern oder zu
erhöhen - OK drücken, um zur
Bestätigungsseite zu gelangen: -
“Löschen” wählen, um zur
Bildschirmseite Raum zurück-
zukehren - “Speichern” wählen,
um den neuen Wert zu bestätigen - “nicht speichern” wählen, um die
Seite zu verlassen ohne zu bestätigen.
- Zus. Adressen
Kann der Monitor eingestellt werden, dass auch die für andere
Teilnehmer bestimmten Anrufe (alternative Adressen) beantwortet
werden können. Zum Beispiel die Wohnung und das Büro eines
Freiberuflers oder die Wohnung der Eltern und die der Kinder. Auf
diese Weise kann das Videohaustelefon einer Wohnung die Funktion
eines Haupt- und eines Nebenapparats einer anderen Wohnung
übernehmen; hierbei muss berücksichtigt werden, dass sich ein
Videohaustelefon mit Zweitadresse in jeder Hinsicht wie ein
Videohaustelefon in der eigenen Wohnung, aber auch wie ein
Videohaustelefon der alternativen Wohnung verhält, weshalb auch die
Regeln und Programmierungen dieses Apparats beachtet werden
müssen. Beispiel. Wenn die alternative Wohnung bereits die
Zimmernummer 2 besitzt, kann das alternative Videohaustelefon
nicht ebenfalls mit der Zimmernummer 2 programmiert werden, aber
selbstverständlich kann die Zimmernummer 2 in der eigenen Wohnung
gegeben sein; wenn es in der alternativen Wohnung bereits ein

Mi 2458
ITALIANOENGLISHFRANÇAISESPAÑOLPORTUGUÊSDEUTSCH
Mi 2458
ITALIANOENGLISHFRANÇAISESPAÑOLPORTUGUÊSDEUTSCH
- 11 -
PROGRAMMAZIONI
Alla prima accensione, il videocitofono deve essere programmato
opportunamente dall'installatore per definirne il modo di funzionamento.
Un'errata programmazione può compromettere il regolare funzionamento
dell'intero impianto videocitofonico.
I modi possibili di programmazione sono due:
- remoto - consente di programmare velocemente solo il codice utente
effettuando una chiamata dal posto esterno o dal centralino (vedi
"programmazione remota" a pagina 16);
- manuale - consente di programmare tutte le funzioni direttamente dal
videocitofono (vedi "sistema" a pagina 15).
Programmazioni
Indirizzo utente (obbligatorio); indirizzo di identificazione
dell’appartamento (indirizzi da 1 a 200). Permette di ricevere la
chiamata da esterno o da altro apparecchio presente nello stesso
palazzo, accendere il videocitofono, conversare ed aprire la serratura
del posto esterno chiamante. L’indirizzo dovrà essere lo stesso
memorizzato nel tasto di chiamata della pulsantiera del posto esterno
o nel tasto di chiamata di un altro apparecchio intercomunicante di
palazzo.
Numero stanza (obbligatorio se vi sono più apparecchi nello stesso
appartamento); indirizzo di identificazione dell’apparecchio all’interno
dello stesso appartamento (indirizzi da 0 a 7). Il numero di stanza
stabilisce anche una gerarchia negli apparati interni in quanto
l’apparecchio che avrà l’indirizzo di stanza 0 (zero) sarà definito
principale, gli altri saranno tutti secondari. Eseguita questa
programmazione sarà possibile effettuare e ricevere chiamate
selettive con gli altri apparecchi all’interno dello stesso appartamento
cioè ogni apparecchio potrà chiamare singolarmente gli altri. Le
chiamate da esterno o da altro appartamento faranno invece squillare
tutti i dispositivi, il primo che risponderà attiverà la conversazione e
spegnerà le sonerie degli altri. All’arrivo di una chiamata da posto
esterno dotato di telecamera tutti gli apparecchi squillano, ma solo il
principale (indirizzo di stanza 0 -zero) mostra l’immagine della
telecamera. In questa fase è possibile, anche da un videocitofono
secondario, visualizzare l’immagine della telecamera senza rispondere
premendo il tasto “
” ; tale operazione spegne le sonerie di tutti i
dispositivi e mostra l’immagine della telecamera sul display del
videocitofono utilizzato rimuovendola da quello del videocitofono
principale. Per conversare con l'esterno è sufficiente ripremere il
tasto
" ". La chiamata di piano fa squillare solo il videocitofono a
cui il pulsante di chiamata è fisicamente connesso. Volendo rilanciare
tale chiamata anche agli altri videocitofoni seguire le istruzioni del
parag
rafo "Rilancio A1 (campanello)" a pagina 16.
Contatti; al suo interno si inseriscono i nomi ed indirizzi di:
- utenti di altri appartamenti che si possono chiamare selettivamente
(indirizzi da 1 a 200);
- videocitofoni dello stesso appartamento; consente di comunicare
tra dispositivi di altre stanze nello stesso appartamento (numero di
stanza da 0 a 7);
- posti esterni (non occorre se nel sistema vi è un solo posto esterno)
per consentire al videocitofono di collegarsi singolarmente con essi,
eseguire accensioni di controllo ed eventualmente aprire la serratura
(indirizzi da 231 a 250);
- attuatori per servizi supplementari (serrature supplementari,
accensioni luce-scale, ecc.) attivabili direttamente dal videocitofono
(indirizzi da 211 a 220).
Attenzione: gli indirizzi memorizzati nel videocitofono devono coincidere
con quelli programmati nei vari dispositivi da chiamare o abilitare.
PROGRAMMING
At the first start-up, the videointercom must be suitably programmed
to define its operating mode. A wrong programming can affect
negatively the operating of the whole system.
The possible programming ways are two:
- remote - it allows to quickly program only the user address of the
intercom by making a call from the door station or the digital PABX
(refer to the “remote programming” on page 16);
- manual - it allows to program all the parameters, by operating
directly on the videointercoms (refer to the “system” on page 15).
Programming
User address (mandatory); apartment identification address
(addresses from 1 to 200). It allows to receive an external call or
a call from another device installed in the same building, switch-ON
the videointercom, have a conversation and open the door lock of
the calling external door station. The address must be the same
address saved in the call button of the push-button panel of the
external door station or in the call button of another intercom device
of the building.
Room number (mandatory in case of multiple devices in the same
apartment); identification address of a device inside the same
apartment (addresses from 0 to 7). The room number establishes
a hierarchy in the internal devices since the device with room
address 0 (zero) will be the main device and all the other devices
will be the secondary lines. Once you have made this programming,
you will be able to make and receive selective calls with the other
devices inside the same apartment. In other words, each device can
individually call the other devices. The external calls or calls from
another apartment will make all devices ringing, the first device that
answers the call will activate the conversation and switch OFF the
ringer of the other devices. When you receive a call from an external
door station equipped with camera, all the devices will ring, but only
the main device (room address 0 - zero) will display the camera
image. In this phase you can display the camera image also from
a secondary videointercom without answering by pressing the
camera button “
”. This operation will switch OFF the ringer of all
the devices and will display the camera image on the display of the
used videointercom. To answer the call it is sufficient to press again
the button “
”. A floor call makes ringing only the videointercom
to which the call button is physically connected. To forward the call
to the other videointercoms you must follow the instructions
contained in the section “A1 Forward” on page 16.
Contacts; it is possible to save the name and the address of:
- users of other apartments; it allows to call them selectively
(addresses from 1 to 200);
- videointercoms in the same apartment; it allows to
intercommunicate with the equipment of other rooms in the same
apartment (room number from 0 to 7);
- door stations (not necessary in the case of a single door station);
it allows the videointercom to connect them selectively, monitor the
entrance and eventually release the door lock (addresses from 231
to 250);
- actuators for supplementary services (supplementary door lock
release, switch-ON of stair’s light, etc.); it allows the videointercom
to enable directly the actuators (addresses from 211 to 220).
Warning: the addresses stored in the videointercom must be the
same of those programmed in the devices to enable.
- 38 -
Campainha
Duraçãosom
Duraçãosom
Somdas teclas
Somdas teclas
Volume de som
Volume de som
Volume do tom
Volume do tom
Áudio
Etagenruf
Rufdauer
Tastenton
Ruflautstärke
Tonlautstärke
Audio
DinDon
DinDon
Scala
Piripiripi
Tiritiriti
Turkey
Som
DinDon
DinDon
Scala
Piripiripi
Tiritiriti
Turkey
Ruftöne
- Som – é possível atribuir um toque diferente a cada utilizador
mencionado na agenda.
Para tal, é necessário: -
colocar o cursor em
“Som” - premir OK; sur-
ge a listagem dos toques
disponíveis (o toque pro-
gramado anteriormente
está a verde). Utilizar os
botões
para percorrer a listagem e ouvir os diversos toques
disponíveis - premir OK para confirmar.
Para inserir outros nomes é necessário repetir as operações acima
descritas.
Se for necessário inserir na agenda dois nomes com o mesmo
endereço de utilizador (ex. esposa e marido; escritório-residência,
etc.) basta criar dois utilizadores com nome diferente mas com o
mesmo endereço.
Modificar um nome e/ou endereço
Para modificar os dados de determinado utilizador basta que,
dentro da página “contatos”, seleccione o nome e prima OK; a
página apresenta as seguintes entradas: Etiqueta, Endereço,
Quarto, Som, Eliminar. Seleccione a entrada que pretende modificar
e prima OK; proceda tal como descrito no capítulo “Inserir nomes
e endereços”.
Apagar um nome e respectivo endereço
Para apagar um utilizador é necessário seleccionar o nome na
listagem e premir OK; com os botões , seleccionar “Eliminar”
e premir OK; seleccionar “Cancelar” para não apagar o nome ou
“Confirmar” para o apagar, e premir OK. Premir uma vez
para
voltar à página anterior ou várias vezes para sair do modo de
programação.
Ordem dos nomes
Para mudar a ordem dos nomes existentes na agenda é necessário,
dentro da página “contatos”, seleccionar “Ordenação” e premir OK
- seleccione o nome que pretende retirar e prima OK - com os
botões
deslocar o nome para a posição desejada e premir OK
para confirmar. Premir
para voltar à página anterior.
Áudio
Permite escolher o tipo de toque para a chamada de andar e ajustar
o volume do som dos botões e dos toques. Na página “Programação”
seleccionar “Áudio” e
premir OK; surgem as
seguintes entradas:
Campainha (para chamada
de andar - terminal A1),
Duração som, Som das
teclas, Volume de som e
Volume do tom.
- Campainha - seleccionar “Campainha” e premir OK; com os
botões
, seleccionar o toque preferido e premir para
confirmar e sair.
- Duração som - seleccionar “Duração som” e premir OK; com os
botões seleccionar a duração do toque (de 0 a 255
segundos) e premir OK para ir para a página de confirmação: -
seleccionar “Cancelar” para voltar – seleccionar “Guardar” para
sair e confirmar a alteração – seleccionar “Anular” para sair sem
a alterar.
- Som das teclas – permite activar (ligado) ou não activar
(desligado) o som quando são premidos os botões do vídeo
porteiro. Seleccionar “Som das teclas” e premir OK; com os
botões escolher “Ligado” ou “Desligado” e premir OK para
confirmar; premir
para voltar à página anterior.
- Ruftöne - für jeden Benutzer des Adressenverzeichnisses kann ein
verschiedener Klingelton
zugeteilt werden und für diese
Programmierung geht man wie
folgt vor: -den Cursor auf
“Ruftöne ” positionieren - OK
drücken; es wird die Liste der
verfügbaren Klingeltöne
visualisiert (der vorher
programmierte Klingelton wird mit grüner Farbe gekennzeichnet). Die
Ta
sten , um sich im Verzeichnis zu bewegen und die verschiedenen
verfügbaren Klingeltöne anzuhören - zum Bestätigen, OK drücken.
Zur Eingabe von anderen Namen muss man soeben beschriebene
Vorgänge wiederholen.
Wenn man zwei Namen mit der gleichen Benutzeradresse in die
Verzeichnisliste eingeben muss (Beispiel Ehefrau und Ehemann; Büro-
Wohnung, usw.) ist es ausreichend zwei Benutzer mit verschiedene
Namen und mit der gleichen Adresse zu bilden.
Einen Namen und/oder eine Adresse ändern.
Zur Änderung der Benutzerdaten ist es ausreichend, den Namen in der
Seite “Telefonbuch” zu wählen und OK zu drücken; die folgende Seiten
werden visualisiert: Name, Adresse, Zimmer, Ruftöne, Löschen. Den
gewünschten Punkt für die Änderung wählen und OK drücken; dann so
fortfahren wie im Kapitel “Eingabe der Namen und Adressen” beschrieben.
Einen Namen und entsprechende Adresse löschen.
Zum Löschen eines Benutzers muss man den Namen aus dem Verzeichnis
wählen und OK drücken; mit den Tasten
wählt man “Löschen” und
man drückt OK; “Löschen” wählen, damit der Namen nicht gelöscht wird
oder “Bestätigen”, damit der Name gelöscht wird und OK drücken. Ein
Mal
drücken, um zur vorgehenden Seite zurückzukehren oder mehrmals
drücken, um die Programmierung zu verlassen.
Zuordnung der Namen.
Um die Zuordnung der Namen im Verzeichnis zu ändern, muss man in
der Seite “Telefonbuch” den Punkt “Reihenfolge” wählen und OK drücken
- den zu versetzenden Namen wählen und OK drücken - mit den Tasten
den Namen in die gewünschte Position versetzen und zum Bestätigen
OK drücken.
drücken, um zur vorgehenden Seite zurückzukehren.
Audio
Hier ist es möglich, den Klingelton für den Anruf von der Etage zu wählen
und die Lautstärke der Tastentöne und der Klingeltöne zu regulieren. Auf
der Seite “Programmierung” wählt
man “Audio” und dann OK drücken;
die folgenden Punkte werden
visualisiert: Etagenruf (für Rufe
von der Etage - Klemme A1),
Rufdauer, Tastenton, Ruflaut-
stärke und Tonlautstärke.
- Etagenruf - “Etagenruf” wählen und OK drücken; mit den Tasten
den gewünschten Klingelton wählen und zum Bestätigen drücken und
die Seite verlassen.
- Dauer des Klingeltons - “Rufdauer” wählen und OK drücken; mit den
Tasten
die Dauer des Klingeltons wählen (von 0 bis 255 Sekunden)
und OK drücken, um zur Bestätigungsseite zu gelangen: “Löschen”
wählen, um zurückzukehren - “Speichern” wählen, um die Seite zu
verlassen und die Änderung zu bestätigen - “nicht speichern” wählen,
um die Seite zu verlassen ohne sie zu ändern.
- Tastenton - erlaubt die Aktivierung (Ein) oder die Deaktivierung (Aus)
des Tones während dem Drücken der Tasten auf der Videosprechanlage.
“Tastenton” wählen und OK drücken; mit den Tasten
“Ein” oder
“Aus” wählen und zum Bestätigen OK drücken;
drücken, um zur
vorhergehenden Seite zurückzukehren.
- Ruflautstärke - erlaubt, alle aktiven Lautstärken in der
Videosprechanlage zu erhöhen (
) oder zu verringern ( ).
“Ruflautstärke” Wahlen und OK drucken. Auf der rechten Bildschirmseite

Mi 2458
ITALIANOENGLISHFRANÇAISESPAÑOLPORTUGUÊSDEUTSCH
Mi 2458
ITALIANOENGLISHFRANÇAISESPAÑOLPORTUGUÊSDEUTSCH
- 12 -
Contatti
Audio
Sistema
Lingua
Carattere
Impostazioni
Programmazione di fabbrica
Indirizzo utente = 100
Indirizzo stanza = 0
Indirizzi aggiuntivi = nessuno
Contatti = ingresso 231
Factoring settings
User address = 100
Room address = 0
Secondary addresses = none
Contacts = ingresso 231
Funzioni dei tasti durante le impostazioni e
programmazioni di sistema
Pagina precedente o uscita
Pagina successiva o conferma
Scorrimento verso il basso del cursore
Scorrimento verso l'alto del cursore
ok
Function of buttons during system settings and
programming
Next page or Enter
Previous page or exit
Cursor Down
Cursor Up
ok
Entrare in programmazione di sistema
Attenzione. Per accedere alle programmazioni occorre che tutti i
videocitofoni presenti nell'installazione (anche quello da programmare)
siano spenti. Se premendo il tasto "menu" si udirà un tono di
dissuasione, questa condizione non è rispettata.
A schermo spento (senza immagini ne conversazioni in corso), tenere
premuto il tasto "menu" per circa 4 secondi; si udirà un tono ed apparirà
la pagina delle "impostazioni"
con le seguenti voci: Contatti,
Audio, Sistema, Lingua,
Carattere, Default. Fare
attenzione, se la pressione del
tasto è troppo breve (inferiore
a 4 secondi), sullo schermo, al
posto di "impostazioni"
apparirà la pagina "menu".
Attendere alcuni secondi o premere il tasto
per uscire e poi riprovare.
Le scritte in verde indicano il parametro precedentemente programmato.
Attenzione. Durante la programmazione, lo schermo si può spegnere
improvvisamente per i seguenti motivi:
- è avvenuta una chiamata da un posto esterno ad un qualsiasi
videocitofono presente nell'impianto;
- da un qualsiasi posto interno è stata effettuata un'accensione di
controllo o una chiamata a un altro utente;
- per circa 20 secondi non si è premuto alcun tasto.
Contatti – All’interno della rubrica, consultabile dall'utente premendo
il tasto
, si possono inserire 30 nomi ed indirizzi di dispositivi
intercomunicanti, posti esterni e attuatori per servizi (es. cucina - 1;
Rossi Mario - 104; Ingresso via Marconi - 231; apertura cancello
- 211). Ogni categoria è
evidenziata dalla diversa
colorazione delle scritte.
Posizionare il cursore su
"Contatti" e premere OK; si
accede alle funzioni: Nuovo,
elenco di nominativi (se
inseriti in precedenza),
Ordinamento.
Enter system programming mode
Attention. To enter the programming mode it is necessary that all the
videointercoms in the installation (including the one to be programmed)
are switched OFF. If pressing the “menu” button a dissuasion tone is
heard, it means the above condition is not met.
With the display switched OFF (without images or running
conversations), keep pressed the “menu” button for about 4 seconds;
a confirmation tone will be emitted and the “settings menu” is
displayed, showing the
following contents: Contacts,
Audio, System, Language,
Font size, Default.
Pay attention, if the pressure
of the button is too short (less
than 4 seconds), the “user
menu” will be displayed
instead. Wait a few seconds or press button
to exit and then try
again.
Previously programmed parameters are in green.
Warning. During the programming phase the display could switch
OFF suddenly for the following reasons:
- a call from a door station to any videointercoms in the system has
been made;
- from any videointercom in the system the monitor function or a call
to another has been made;
- no operations on the videointercom for about 20 seconds.
Contacts - In the contacts list, which can be displayed pressing the
button, can be stored up to 30 names and addresses of
intercommunicating devices, door stations and actuators for
supplementary services (example: Living Room
– 1; Robert Brown
– 104; Oxford Street Entrance – 231; car gate – 211). Every category
is represented with a different
colours of characters.
Move the cursor to
“Contacts” and press OK;
the list of the following
functions will be displayed:
New, the list of names (if
any), Sorting.
Contacts
Audio
System
Language
Fontsize
Font size
Settings
Nuovo
Ingresso
Ordinamento
Contatti
New
Entrance
Sorting
Contacts
- 37 -
- Inserir (ou alterar) no-
mes e endereços
- Seleccionar “Novo” e
premir OK; acede-se às
seguintes entradas:
Etiqueta, Endereço,
Quarto, Som, Eliminar.
- Etiqueta – seleccionar “Etiqueta” para inserir o nome (máximo
16 caracteres: maiúsculas, minúsculas, números ou símbolos)
que se pretende dar ao dispositivo (ex. Cozinha; João Gomes;
entrada Rua Camões; abertura portão). Escrever o nome utilizando
os botões para pesquisar o caractere (mantê-los premidos
para pesquisa rápida) e
premir OK; o cursor passa
automaticamente para o
caractere seguinte.
Procurar o 2º caractere e
confirmar com OK;
continuar até o nome estar
totalmente escrito e premir
OK; premir novamente OK
para sair e ir para a página
de confirmação: -
seleccionar “Cancelar”
para voltar - seleccionar
“Guardar” para sair e
confirmar o nome –
seleccionar “Anular” para
sair sem memorizar.
Nota. Durante a fase de escrita, utilizar os botões para
percorrer os diversos caracteres e efectuar possíveis correcções.
- Endereço - colocar o cursor em
“Endereço” – premir OK; surgirá o número
do utilizador programado anteriormente
(de fábrica 100) – manter premido o botão
ou para diminuir ou aumentar o
número do endereço - premir OK para ir
para a página de confirmação
- seleccionar “Cancelar” para
voltar à página do endereço -
seleccionar “Guardar” para
sair e confirmar o novo
endereço - seleccionar
“Anular” para sair sem o
alterar.
Atenção: o endereço a inserir deve corresponder ao que foi
codificado no telefone ou no vídeo porteiro do apartamento do Sr.
Gomes (ex.104), ou corresponder ao endereço da linha exterior
(ex.231) ou ao endereço do actuador que activa a abertura do
portão (ex.211).
- Quarto – só surge se existirem aparelhos
intercomunicantes dentro do mesmo apar-
tamento (mesmo endereço) e é necessá-
rio alterá-lo da seguinte forma: - colocar o
cursor em “Quarto” - premir OK; é
visualizado o número do aposento progra-
mado anteriormente – manter premido os
botões ou para diminuir
ou aumentar o número do
aposento - premir OK para ir
para a página de confirmação
- seleccionar “Cancelar” para
voltar à página do aposento -
seleccionar “Guardar” para
sair e confirmar o novo núme-
ro - seleccionar “Anular” para sair sem o alterar.
- Eingabe (oder Änderung) der
Namen und Adressen
- “Neu” wählen und OK drücken.
Man gelangt zu der folgenden
Liste: Name, Adresse, Zimmer,
Ruftöne, Löschen.
- Name -
“Name” wählen, um
den Namen einzugeben (höchstens 16 Buchstaben: Großbuchstabe,
Kleinbuchstabe, Zahlen oder Symbole), die man der Sprechanlage
zuschreiben möchte (Beispiel Küche; Müller Karl; Eingang
Goethestraße; Tor öffnen). Den Namen schreiben und dabei die
Tasten für die Buchstabensuche benutzen (für eine schnelle
Suche, die Tasten gedrückt
lassen) und OK drücken; Der
Cursor positioniert sich
automatisch auf das
darauffolgende Kästchen. Den
2. Buchstaben suchen und OK
drücken; so fortfahren bis der
Name vollständig geschrieben
ist und OK drücken; nochmals
OK drücken, um die Seite zu
verlassen und zur
Bestätigungsseite zu gelangen:
- “Löschen” wählen, um
zurückzukehren - “Speichern”
wählen, um die Seite zu
verlassen und den Namen zu
bestätigen - “nicht speichern” wählen, um die Seite zu verlassen ohne
zu bestätigen. Die Tasten
, um von einem Kästchen zum anderen
zu gehen und eventuelle Korrekturen durchzuführen.
- Adresse - Den Cursor auf “Adresse”
positionieren - OK drücken; die vorher
programmierte Benutzernummer wird
visualisiert (Voreinstellung im Werk 100) - die
Taste
oder gedrückt lassen, um den
Wert der Adresse zu verringern oder zu erhöhen
- OK drücken, um zur Bestätigungsseite zu
gelangen: - “Löschen” wählen, um
zur Bildschirmseite der Adresse
zurückzukehren - “Speichern”
wählen, um die neue Adresse zu
bestätigen und die Seite zu
verlassen - “nicht speichern”, um
die Seite zu verlassen, ohne zu
bestätigen.
Achtung: Die einzugebende Adresse muss mit der in der Sprechanlage
oder in der Videosprechanlage kodifizierte Adresse des Appartements
von Herrn Müller (Beispiel 104), oder der Adresse des externen
Bereichs (Beispiel 231) oder dem Aktuator übereinstimmen, welcher
das Öffnen des Tors aktiviert. (Beispiel 211).
- Zimmer - erscheint nur, wenn sich die
internen Geräte im gleichen Appartement
befinden (gleiche Adresse) und muss wie
folgt geändert werden: - den Cursor auf
“Zimmer” positionieren - OK drücken; die
vorher programmierte Raumnummer wird
visualisiert - die Taste
oder
gedrückt lassen, um den Wert
des Raumes zu verringern oder
zu erhöhen - OK drücken, um zur
Bestätigungsseite zu gelangen:
- “Löschen” wählen, um zur
Bildschirmseite Raum zurück-
zukehren - “Speichern” wählen,
um den neuen Wert zu bestätigen - “nicht speichern” wählen, um die
Seite zu verlassen ohne zu bestätigen.
Etiqueta
Endereço
Quarto
Som
Eliminar
(Vazio) (0)
(Vazio) (0)
Alterar
Cancelar
Guardar
Anular
Etiqueta
Name
Adresse
Zimmer
Ruftöne
Löschen
(Leer) (0)
(Leer) (0)
Änderung
Löschen
Speichern
Nichtspeichern
Nichtspeichern
Name
100
Alterar
Cancelar
Guardar
Anular
Endereço
0
Alterar
Cancelar
Guardar
Anular
Quarto
100
Änderung
Adresse
Löschen
Speichern
Nichtspeichern
Nichtspeichern
0
Änderung
Zimmer
Löschen
Speichern
NichtspeichernNicht
speichern

Mi 2458
ITALIANOENGLISHFRANÇAISESPAÑOLPORTUGUÊSDEUTSCH
Mi 2458
ITALIANOENGLISHFRANÇAISESPAÑOLPORTUGUÊSDEUTSCH
- 13 -
- Inserimento (o modifica)
nominativi ed indirizzi
- Selezionare "Nuovo" e
premere OK; si accede al
seguente elenco: Etichetta,
Indirizzo, Stanza, Suoneria,
Elimina.
- Etichetta - selezionare "Etichetta" per introdurre il nome (massimo
16 caratteri: maiuscolo, minuscolo, numeri o simboli) che si desidera
attribuire al dispositivo (es. Cucina; Rossi Mario; ingresso via
Marconi; apertura cancello). Scrivere il nominativo utilizzando i tasti
per la ricerca del carattere (tenerli premuti per la ricerca veloce)
e premere OK; il cursore
automaticamente si
posiziona sulla casella
successiva. Cercare il 2°
carattere e confermare con
OK; proseguire fino al
termine della scrittura del
nome e premere OK;
premere nuovamente OK
per uscire ed accedere alla
pagina di conferma: -
selezionare "annulla" per
tornare indietro -
selezionare "salva" per
uscire confermando il
nominativo - selezionare
"non salvare" per uscire
senza accettarlo.
Nota. Durante la fase di scrittura usare i tasti
per spostarsi da
una casella all'altra per eventuali correzioni.
- Indirizzo - posizionare il cursore su
"Indirizzo" - premere OK; si visualizza il
numero utente precedentemente
programmato (di fabbrica 100) - tenere
premuto il tasto
o per diminuire od
aumentare il valore dell'indirizzo - premere
OK per accedere alla pagina di conferma: -
selezionare "annulla" per
ritornare alla videata dell'indirizzo
- selezionare "salva" per uscire
confermando il nuovo indirizzo
- selezionare "non salvare" per
uscire senza variarlo.
Attenzione: l’indirizzo da
inserire deve corrispondere a
quello codificato nel citofono o videocitofono dell’appartamento del
sig.Rossi (es.104), o all'indirizzo del posto esterno (es.231) o
all'indirizzo dell'attuatore che attiva l'apertura del cancello (es.211).
- Stanza - appare solamente se ci sono
apparecchi intercomunicanti all'interno dello
stesso appartamento (stesso indirizzo) ed
occorre variarlo procedendo nel seguente
modo: - posizionare il cursore su "stanza" -
premere OK; si visualizza il numero di stanza
precedentemente programmato - tenere pre-
muto il tasto
o per diminuire
od aumentare il valore della stan-
za - premere OK per accedere
alla pagina di conferma: - sele-
zionare "annulla" per ritornare
alla videata della stanza - sele-
zionare "salva" per uscire con-
fermando il nuovo valore - sele-
zionare "non salvare" per uscire senza variarlo.
- Insert (or modify) the
name and address of a
user.
-Select “new” and press
OK; the following functions
will be displayed: Label,
Address, Room, Ring tone,
Delete.
- Label – select “Label” to enter the name (max. 16 characters,
upper and lower cases, numbers or symbols) you want to give to
the device (example: Living Room; Robert Brown; Oxford Street
entrance; car gate). Insert the name using the buttons
to
search the characters (keep
them pressed for fast
searching) and press OK to
confirm; cursor
automatically moves to the
next character to enter.
Search the 2
nd
character
and confirm by pressing OK;
repeat the same procedure
to complete the name and
press OK; press OK again
to exit and display the “save”
menu: select “cancel” to
move back to the label page
– select “save” to exit and
store the name – select
“don’t save” to exit without
saving it.
Note. While entering the names, if you need to correct it, use
buttons
to move from one character to another.
- Address – move the cursor to “Address”
– press OK; the present address is shown
(100 from the factory) – keep pressed
buttons to increase or decrease the
number of the address - press OK to
confirm; the “save” menu is displayed:
select “cancel” to move back to the “Address”
page – select “save” to exit and
store the new address – select
“don’t save” to exit without
saving it.
Attention: the address stored
in the contacts list must be the
same address stored in the
device you want to call (eg.:
104 address of Mr. Brown’s videointercom; 231 address of Oxford
street’s door station; 211 address of car gate’s actuator).
- Room - it is shown only if there are intercommunicating devices
in the same apartment (having therefore all
the same user address) the room number
must be changed; to change it operate as
indicated in the following: – move the cursor
to “Room” – press OK; the present room
number is shown (0 from the factory) – keep
pressed buttons
to increase or
decrease the number of the
room - press OK to confirm;
the “save” menu is displayed:
select “cancel” to move back to
the “Room” page – select “save”
to exit and store the new room
number – select “don’t save” to
exit without saving it.
Etichetta
Indirizzo
Stanza
Suoneria
Elimina
(Vuoto) (0)(Vuoto) (0)
Modifica
Annulla
Salva
NonsalvareNon
salvare
Etichetta
Label
Address
Room
Ringtone
Ringtone
Delete
(Empty) (0)
(Empty) (0)
Edit
Cancel
Save
Don'tsave
Don'tsave
Label
100
Modifica
Annulla
Salva
Nonsalvare
Nonsalvare
Indirizzo
0
Modifica
Annulla
Salva
NonsalvareNon
salvare
Stanza
100
Edit
Cancel
Save
Don'tsave
Don'tsave
Address
0
Edit
Cancel
Save
Don'tsaveDon't
save
Room
- 36 -
Programação de fábrica
Endereço do usuário = 100
Número do quarto = 0
Endereços adicionais = não
Contactos = ingresso 231
Programmierung ab Werk
Adresse der Wohneinheit = 100
Zimmernummer = 0
Zus. Adressen = nicht
Kontakte = ingresso 231
Funções-chave durante a fase de configuração ou de
programação do sistema
Página anterior ou sair
Página seguinte ou confirmação
Deslocar cursor para baixo
Deslocar cursor para cima
Key-Funktionen während der Programmierungs-oder
Einstellungsphase eingeschaltet
Vorgehende Seite oder Seite verlassen
Nächste Seite oder Bestätigung
Den Cursor nach unten schieben
Den Cursor nach oben schieben
Entrar na programação do sistema
Atenção. Para aceder às programações é necessário que todos os
vídeo porteiros presentes na instalação (inclusive aquele que deve ser
programado) estejam desligados. Se ao premir o botão “menu” ouvir
um sinal intermitente, esta função não pode ser executada.
Com o monitor desligado (sem imagens ou conversações em curso),
manter premido o botão “menu” durante cerca de 4 segundos; ouvir-
se-á um sinal e surgirá a
página “Programação” com
as seguintes entradas:
Contatos, Áudio, Sistema,
Idioma, Tamanho da fonte,
Predefinição. Ter atenção
para não premir o botão menos
de 4 segundos; caso contrário,
surgirá no monitor a página
“menu” e não a página “Programação”. Aguardar alguns segundos ou
premir o botão
para sair e tentar novamente.
O texto a verde indica o parâmetro programado anteriormente.
Atenção. Durante a programação, o monitor pode desligar-se
repentinamente devido aos seguintes motivos:
- entrada de uma chamada da linha exterior para qualquer vídeo
porteiro existente no sistema;
- a partir de qualquer uma das linhas interiores foi efectuada uma
ligação de verificação ou uma chamada para outro utilizador;
- durante cerca de 20 segundos não foi premido nenhum botão.
Contatos – Na agenda, que pode ser consultada pelo utilizador
premindo o botão
, podem ser inseridos 30 nomes e endereços
de dispositivos intercomunicantes, linhas exteriores e actuadores
para serviços (ex. cozinha
- 1; João Gomes - 104;
Entrada Rua Camões - 231;
abertura portão - 211).
Cada uma das categorias é
destacada por cores
diferentes.
Colocar o cursor em
“Contatos” e premir OK; são
acedidas as funções: Novo, listagem de nomes (se tiverem sido
inseridos anteriormente), Ordenação.
Zur Programmierung des Systems gehen
Achtung. Für den Zugang zu den Programmierungen müssen alle
installierten Videosprechanlagen ausgeschaltet sein (auch die
Videosprechanlage, die zu programmieren ist). Wenn man die Taste
“Menü” drückt, hört man ein Signalton und diese Situation ist wird nicht
respektiert.
Bei ausgeschaltetem Bildschirm (ohne Bild und laufende
Konversation), die Taste “Menü” zirka 4 Sekunden drücken; man
hört ein Signalton und es wird
die Seite “Programmierung”
mit folgenden Punkten des
Menüs visualisiert:
Telefonbuch, Audio, System,
Sprache, Schriftgrad,
Grunddaten. Man muss
aufpassen, denn wenn die
Taste zu kurz gedrückt wird, erscheint auf dem Bildschirm die Seite
“Menü” anstatt “Programmierung”. Man muss einige Sekunden warten
oder man drückt die Taste
, um die Seite zu verlassen und dann
erneut zu probieren.
Die grüne Schrift weist auf den vorher programmierten Parameter
hin.
Achtung. Der Bildschirm kann sich während der Programmierung
aus folgenden Gründen plötzlich ausschalten:
- es wurde ein externer Anruf von irgendeiner Videosprechanlage,
die mit der Anlage verbunden ist, durchgeführt.
-es wurde von irgendeinem internen Raum eine
Einschaltungskontrolle oder ein Anruf von einem anderen
Benutzer durchgeführt;
- es wurde keine Taste für zirka 20 Sekunden gedrückt.
Telefonbuch - Im Adressenverzeichnis, das vom Benutzer benutzt
werden kann, indem er die
Taste
, kann man 30
Namen und Adressen der
internen Sprechanlagen,
externen Räume und
Aktuatoren für Service
(Beispiel Küche - 1; Müller
Karl - 104; Eingang Goethestraße - 231; Tor öffnen - 211) eingeben.
Jede Kategorie ist mit verschiedenen Schriftfarben gekennzeichnet.
Den Cursor aus “Telefonbuch” positionieren und OK drücken; man
gelangt zu den folgenden Funktionen: Neu, Namenliste (wenn
vorher eingegeben), Reihenfolge.
Contatos
Áudio
Sistema
Idioma
Tamanho da fonte
Tamanho da fonte
Programação
ok
ok
Telefonbuch
Audio
System
Sprache
Schriftgrad
Programmierung
Novo
Entrada
Ordenação
Contatos
Neu
Eingang
Reihenfolge
Telefonbuch

Mi 2458
ITALIANOENGLISHFRANÇAISESPAÑOLPORTUGUÊSDEUTSCH
Mi 2458
ITALIANOENGLISHFRANÇAISESPAÑOLPORTUGUÊSDEUTSCH
- 14 -
- Suoneria - ad ogni utente della rubrica può essere assegnata una
suoneria diversa, per ese-
guire questa programmazio-
ne è necessario: - posizio-
nare il cursore su "suoneria"
- premere OK; si visualizza
l'elenco delle suonerie di-
sponibili (in verde la suone-
ria precedentemente pro-
grammata). Utilizzare i tasti
per spostarsi nell'elenco ed ascoltare
le varie suonerie presenti - premere OK per la conferma.
Per inserire altri nominativi occorre ripetere le operazioni appena
descritte.
Se occorre inserire nella rubrica due nominativi con lo stesso indirizzo
utente (es. moglie e marito; ufficio-abitazione, ecc) è sufficiente
creare due utenti con nome diverso ma con lo stesso indirizzo.
Modificare un nominativo e/o indirizzo
Per modificare i dati relativi ad un utente è sufficiente, all'interno della
pagina "contatti", selezionare il nominativo e premere OK; si visualizza
la pagina: Etichetta, Indirizzo, Stanza, Suoneria, Elimina. Selezionare
la voce interessata alla modifica e premere OK; procedere come
descritto nel capitolo "Inserimento nominativi ed indirizzi".
Cancellare un nominativo e relativo indirizzo
Per la cancellazione di un utente occorre selezionare il nome dall'elen-
co e premere OK; tramite i tasti
selezionare "Elimina" e premere
OK; selezionare "annulla" per non cancellare il nominativo o "confer-
ma" per la sua cancellazione e premere OK. Premere una volta
per
tornare alla pagina precedente o più volte per uscire dalla modalità di
programmazione.
Ordinamento dei nominativi
Per cambiare l'ordinamento dei nominativi presenti in rubrica occorre,
all'interno della pagina "contatti", selezionare "Ordinamento" e premere
OK - selezionare il nominativo da spostare e premere OK - con i tasti
spostare il nominativo nella posizione desiderata e premere OK
per la conferma. Premere
per tornare alla pagina precedente.
Audio
Permette di scegliere il tipo di
suoneria per la chiamata da
piano e regolare il volume dei
toni dei tasti e delle suonerie.
Nella pagina "impostazioni"
selezionare "Audio" e premere
OK; si visualizzano le voci:
Campanello (per chiamata da
piano - morsetto A1), Durata suoneria, Suono tasti, Volume suoneria
e Volume toni.
- Campanello - selezionare "Campanello" e premere OK; con i tasti
scegliere la suoneria preferita e premere per confermare ed
uscire.
- Durata suoneria - selezionare "Durata suoneria" e premere OK; con
i tasti
scegliere la durata della suoneria (da 0 a 255 secondi) e
premere OK per accedere alla pagina di conferma: - selezionare
"annulla" per tornare indietro - selezionare "salva" per uscire e
confermare la modifica - selezionare "non salvare" per uscire senza
variarla.
- Suono tasti - consente di attivare (abilitato) o non attivare (disabilitato)
il tono durante la pressione dei tasti del videocitofono. Selezionare
"Suono tasti" e premere OK; con i tasti
scegliere "abilitato" o
"disabilitato" e premere OK per confermare; premere
per tornare
alla pagina precedente.
- Volume suoneria - consente di aumentare (
) o diminuire ( ) il
volume di tutte le suonerie attivate nel videocitofono. Selezionare
- Ringing Melody - it is possible to assign to any user a personal
ringing melody, to make this
programming it is
necessary: – move the
cursor to “Ringing Melody”
– press OK; the list of
available ringing melodies
are displayed (in green the
present assigned ringing
melody). Use buttons
to scroll the list and hear the melody; press OK to select the desired
one.
To insert other user names repeat all the above operations.
If, in the contacts list, it is necessary to store 2 users with the same
address (eg. wife and husband; apartment and professional office,
etc.) it is sufficient to create 2 users with different names but the same
address.
Modify a name or address.
To modify the data of a user it is sufficient, in the “contacts” menu,
select the name and press OK; the following list will be displayed:
Label, Address, Room, Ringing Melody, Delete; select the requested
item and press OK; proceed as indicated in the chapter “insert name
and address of a user”.
Cancel a name and address from the contacts list.
To delete a user from the list it is necessary to select the name and
press OK; using buttons
select “Delete” and press OK; the “save”
menu is displayed: select “cancel” to exit without erasing the name
or select “confirm” to erase it than press OK. Press
one time to go
back to the previous page or several times to exit the programming
mode.
Sorting
To change the order of the names in the contacts list it is necessary,
once in the menu “contacts”, select “Sorting” and press OK; select the
name you want to move and press OK – with the buttons move
the name up or down in the list until you reach the desired position
and press OK to confirm. Press
to go back to the previous page.
Audio
It allows to chose the sound
of door bell, the volume and
period for all the ringing
melodies and for the tones of
pressed keys. In the settings
menu select “Audio” and press
OK; the following menu will
be displayed: Door Bell (only
for “floor call” – A1 terminal), Ring tone period, Key tone, Ring tone
level, Tone level.
- Door bell – select “Door bell” and press OK; with buttons
select
the desired bell sound and press
to confirm and exit.
- Ring tone period – select “Ring tone period” and press OK; with
buttons increase or decrease ringing melody repetition period
(from 0 to 255 seconds) and press OK; the “save” menu is displayed:
select “Cancel” to go back to the previous page – select “Save” to
save and exit – select ”don’t save” to exit without saving the data.
- Key tone – it allows to activate (enable) or deactivate (disable) the
tone while pressing the buttons of the videointercom. Select “Key
tone” and press OK; with buttons select “enabled” or “disabled”
and press OK to confirm; press
to go back to the previous page.
- Ring tone level – it allows to increase (
) or decrease ( ) the
volume of all the ringing melodies of the videointercoms. Select
“Ring tone level” and press OK; on the right side of the screen a
Campanello
Duratasuoneria
Duratasuoneria
Suonotasti
Suonotasti
Volume suoneria
Volume suoneria
Volume toni
Volume toni
Audio
Doorbell
Door bell
Ringtone period
Ringtone period
Keytone
Keytone
Ringtone level
Ringtone level
Tone level
Tone level
Audio
DinDon
DinDon
Scala
Piripiripi
Tiritiriti
Turkey
Suoneria
DinDon
DinDon
Scala
Piripiripi
Tiritiriti
Turkey
Ring tone
Ring tone
- 35 -
PROGRAMAÇÕES
Ao ser ligado pela primeira vez, o vídeo porteiro deve ser programado
adequadamente pelo instalador para definir o seu modo de
funcionamento. Uma programação incorrecta pode comprometer o
funcionamento normal de todo o sistema de vídeo porteiro.
Existem dois modos possíveis de programação:
- remoto – permite programar rapidamente apenas o código do
utilizador, efectuando uma chamada da botoneira ou da central (ver
“programação remota” na página 40);
- manual - permite programar directamente todas as funções do vídeo
porteiro (ver “sistema” na página 39).
Programações
Endereço do usuário (obrigatório): endereço de identificação do
apartamento (endereços de 1 a 200). Permite: receber chamadas
vindas do posto exterior ou de um outro aparelho dentro do mesmo
edifício; acender o vídeo porteiro; conversar e abrir a fechadura do
posto exterior. O endereço deverá ser o mesmo memorizado na tecla
de chamada da botoneria instalada no posto exterior, ou na tecla de
chamada de um outro aparelho intercomunicante do prédio.
Número do quarto (obrigatório caso haja outros aparelhos no
mesmo apartamento): endereço de identificação do aparelho
dentro do mesmo apartamento (endereços de 0 a 7). O número do
aposento estabelece também uma hierarquia dos aparelhos internos,
ou seja, aquele com endereço de posto 0 (zero) será definido
“principal”, os outros serão todos “secundários”. Realizada tal
programação, será possível fazer e receber chamadas selectivas
dos outros aparelhos dentro do mesmo apartamento, isto é, de cada
aparelho poder-se-á chamar individualmente os outros. Nas
chamadas vindas do posto exterior, ou de outro apartamento,
tocarão todos os aparelhos; o primeiro a ser atendido activará a
conversação e desligará as campainhas dos demais. Na chegada
de uma chamada do posto exterior dotado de câmara de vídeo, todos
os aparelhos tocam, mas só o principal (endereço de posto 0 - zero)
mostra a imagem vinda da câmara. Nesta fase é possível, mesmo
a partir de um vídeo porteiro secundário, ver a imagem da câmara
sem responder, carregando na tecla “
”; tal operação desliga as
campainhas de todos os dispositivos e mostra a imagem da câmara
no monitor do aparelho utilizado, apagando aquela do vídeo porteiro
principal. Para conversar com o posto exterior basta pressionar
novamente o botão “
”. A chamada de andar faz com que toque
somente o vídeo porteiro ao qual o botão de chamada estiver
fisicamente conectado. Se desejar transferir tal chamada também
para os outros vídeo porteiros, siga as instrucções do parágrafo
“Ligar A1 (campainha)” na página 40.
Contactos; é aqui que são inseridos os nomes e os endereços de:
- utilizadores de outros apartamentos que podem ser selectivamente
chamados (endereços de 1 a 200);
- vídeo-porteiros do mesmo apartamento; permite a comunicação
entre dispositivos de outros aposentos do mesmo apartamento
(número do aposento de 0 a 7);
- postos exteriores (não é necessário se o sistema possuir um único
posto exterior). Para permitir que o vídeo porteiro possa conectar-
se independentemente com estos postos, é necessário efectuar
ligações de verificação e, eventualmente, abrir a fechadura
(endereços de 231 a 250);
- actuadores para serviços complementares (fechaduras
complementares, acendimento das luzes das escadas, etc.) que
podem ser activados directamente a partir do vídeo porteiro
(endereços de 211 a 220).
Atenção: os endereços memorizados no vídeo porteiro devem
coincidir com os que foram programados nos vários dispositivos para
chamar ou activar.
PROGRAMMIERUNG
Bei der ersten Inbetriebnahme muss die Videosprechanlage von
einem Installateur sachgerecht eingestellt werden, um die
Betriebsweise zu bestimmen. Eine unsachgemäße Programmierung
kann das regelrechte Funktionieren der ganzen Videosprechanlage
beeinträchtigen. Es gibt zwei mögliche Programmierungsmodi
- ferngesteuert - erlaubt nur die schnelle Programmierung des
Benutzerkodex, indem ein Türstation oder vom Pförtner-zentrale
durchgeführt wird (siehe “Fernprogrammierung” auf Seite 40);
- Manuell - erlaubt die Programmierung von allen Funktionen direkt
von der Videosprechanlage (siehe “System” auf Seite 39).
Programmierungen
Teilnehmeradresse (obligatorisch); Adresse zur Identifizierung der
Wohneinheit (Adressen von 1 bis 200). Ermöglicht den Empfang von
Anrufen von der Türstation oder einem anderen Haustelefon im
selben Haus, Einschaltung des Videohaustelefons, Sprechen und
Öffnen des Türschlosses der anrufenden Türstation. Die Adresse
muss in der Klingeltaste an der Türstation oder in der Ruftaste eines
anderen Haustelefons im selben Haus gespeichert sein.
Zimmernummer (obligatorisch, wenn mehrere Haustelefone in der
selben Wohneinheit installiert sind). Adresse zur Identifizierung des
Haustelefons innerhalb der Wohneinheit (Adressen von 0 bis 7).
Durch die Zimmernummer wird auch die Hierarchie der internen
Haustelefone festgelegt. Das Haustelefon mit der Zimmeradresse
0 (Null) als Hauptgerät definiert, während die übrigen Nebengeräte
sind. Nach dieser Programmierung ist es möglich, interne Anrufe
zwischen den Haustelefonen innerhalb der selben Wohneinheit
vorzunehmen und zu empfangen, d.h., dass jedes Haustelefon die
übrigen einzeln anrufen kann. Bei Anrufen von der Türstation oder
von einer anderen Wohneinheit läuten hingegen sämtliche
Haustelefone. Das erste der den Anruf entgegen nimmt kann die
Sprechverbindung aufnehmen und beendet den Ruf in den übrigen
Haustelefonen. Bei Eingang eines Anrufs von einer Türstation mit
Kamera läuten alle Haustelefone, aber nur auf dem Haupt-
Haustelefon (Zimmeradresse 0 - Null) ist das von der Kamera
gesendete Bild zu sehen. Jetzt ist es möglich, das Bild der Kamera,
ohne den Anruf zu beantworten, auch auf einem Neben-Haustelefon
zu sehen, wenn die Taste “
” gedrückt wird. Hiermit wird dann der
Ruf an allen anderen Geräte ausgeschaltet und das Bild der Kamera
erscheint auf dem Bildschirm des antwortenden Videohaustelefons.
Das Bildschirm des Haupt-Videohaustelefons wird dabei wieder
ausgeschaltet. Um mit dem Türstation zu sprechen ist es
ausreichend, die Taste “
” zu drücken. Bei einem Etagenruf
klingelt nur das Videohaustelefon, an das die Ruftaste direkt
angeschlossen wurde. Falls der Etagenruf auch an die übrigen
Videohaustelefone weitergeleitet werden soll, sind die Anweisungen
in Abschnitt “A1 Rufweiterschaltung” auf Seite 40 zu befolgen.
Telefonbuch; hier gibt man die Namen und die Adressen ein:
- Benutzer von anderen Appartements, die man anrufen kann
(Adressen von 1 bis 200);
- Videosprechanlagen vom gleichen Appartement; erlaubt die
Kommunikation zwischen den Sprechanlagen der anderen Räume
im gleichen Appartement (Raumnummer von 0 bis 7);
- Externe Türstationen (ist nicht notwendig, wenn im System nur
ein externer Türstation vorhanden ist); erlaubt der Video-
sprechanlage sich einzeln miteinander zu verbinden und die
Kontrollfunktion einzuschalten sowie eventuell das Schloss zu
öffnen (Adressen von 231 bis 250);
- Aktuatoren für zusätzlichen Service (zusätzliche Schlösser,
Einschalten für Treppenlicht, usw.), die direkt durch die Video-
sprechanlage aktiviert werden können (Adressen von 211 bis 220).
Achtung: die in der Videosprechanlage gespeicherten Adressen
müssen mit den in den verschiedenen anzurufenden oder befähigten
Vorrichtungen mit den programmierten Geräten übereinstimmen.

Mi 2458
ITALIANOENGLISHFRANÇAISESPAÑOLPORTUGUÊSDEUTSCH
Mi 2458
ITALIANOENGLISHFRANÇAISESPAÑOLPORTUGUÊSDEUTSCH
- 15 -
"Volume suoneria" e premere OK; sul lato destro dello schermo
appare una barra verticale e si udirà il livello attuale del suono. Con
i tasti scegliere il livello preferito e premere OK per confermare
e tornare alla pagina precedente.
- Volume toni - consente di aumentare (
) o diminuire ( ) il volume
dei toni attivati nel videocitofono. Selezionare "Volume toni" e premere
OK; sul lato destro dello schermo appare una barra verticale e si udirà
il livello attuale del suono. Con i tasti scegliere il livello preferito
e premere OK per confermare e tornare alla pagina precedente.
Sistema – Posizionare il
cursore su "Sistema" e
premere OK; si accede alle
programmazioni principali
del videocitofono: Indirizzo,
Stanza, Indirizzi aggiuntivi,
Programmazione remota,
Rilancio A1.
- Indirizzo utente (indirizzi da 1 a 200) –
Posizionare il cursore su "indirizzo" -
premere OK; si visualizza il numero utente
precedentemente programmato (di fabbrica
100) - tenere premuto il tasto o per
diminuire od aumentare il valore dell'indirizzo
- premere OK; si accede alla pagina di
conferma. Selezionare
"annulla" per ritornare alla
videata dell'indirizzo -
selezionare "salva" per uscire
confermando il nuovo indirizzo
- selezionare "non salvare" per
uscire senza variarlo.
- Indirizzo stanza (da 0 a 7) – Posizionare
il cursore su "stanza" - premere OK; si
visualizza il numero stanza precedentemente
programmato (di fabbrica 0) - tenere
premuto il tasto o per diminuire od
aumentare il valore - premere OK; si accede
alla pagina di conferma. Selezionare
"annulla" per ritornare alla
videata dell'indirizzo -
selezionare "salva" per uscire
confermando il nuovo indirizzo
- selezionare "non salvare" per
uscire senza variarlo.
- Indirizzi aggiuntivi
È possibile impostare il videocitofono in modo tale che risponda alle
chiamate destinate ad altri utenti (indirizzi alternativi); per esempio
in una situazione di abitazione di un professionista e del proprio
studio professionale oppure di appartamento dei genitori e
appartamento dei figli; in questo modo il videocitofono di un
appartamento può comportarsi come se fosse un videocitofono, sia
principale che secondario, di un’altro appartamento; è importante
tener presente che, nel caso di un videocitofono con indirizzo
alternativo, esso si comporta a tutti gli effetti come un videocitofono
del proprio appartamento, ma anche come videocitofono
dell’appartamento alternativo per cui dovrà rispettare le regole e le
programmazioni anche di quest’ultimo.
Esempio. Se nell’appartamento alternativo c’è già il numero di stanza
2, il videocitofono alternativo non potrà essere programmato con il
numero di stanza 2, naturalmente potrà essere il numero di stanza
2 del proprio appartamento, oppure se nell’appartamento alternativo
c’è già un videocitofono principale, il videocitofono alternativo non
potrà essere programmato come principale, naturalmente potrà
essere il principale per il proprio appartamento.
vertical graphic bar will be displayed and the present level will be
heard. With buttons select the desired level of volume and
press OK to confirm and go back to the previous page.
- Tone level – it allows to increase (
) or decrease ( ) the volume
of all the tones of the videointercoms. Select “Tone level” and press
OK; on the right side of the screen a vertical graphic bar will be
displayed and the present level will be heard. With buttons
select the desired level of tones and press OK to confirm and go back
to the previous page.
System – Move the cursor
to “System” and press OK;
the main settings menu of
the videointercom will be
displayed with the follow-
ing functions: Address,
Room, Additional address,
Remote programming, A1
forward.
- User Address (addresses from 1 to 200) -
Move the cursor to “Address” – press OK;
the previously programmed address will
be shown (100 from the factory) – keep
pressed the button or to increase or
decrease the number of the address –
once displayed the requested
address press OK; the “save”
menu is displayed: select
“cancel” to move back to the
address page – select “save”
to exit and store the new
address – select “don’t save”
to exit without saving it.
- Room number (from 0 to 7) - Move the
cursor to “Room” – press OK; the previously
room number will be shown (0 from the
factory) – keep pressed the button or
to increase or decrease the number of the
room – once displayed the requested
room number press OK; the
“save” menu is displayed:
select “cancel” to move back
to the room number page –
select “save” to exit and store
the new room number – select
“don’t save” to exit without
saving it.
- Secondary addresses
You can set the videointercom so that it answers the calls sent to
other users (secondary addresses); for example, the house of a
professional and his professional office, or parents’ apartment and
sons’ apartment. In this way the videointercom of an apartment can
operate as a videointercom, either main or secondary, of another
apartment. It is important to remember that, in case of a videointercom
with alternative address, the videointercom operates as a
videointercom of its own apartment, but also as videointercom of
the alternative apartment so that it must respect also the rules and
programming operations of the latter.
Example. If the room number 2 is already used in the alternative
apartment, the alternative videointercom cannot be programmed
with room number 2. Of course, it can be room number 2 of its own
apartment, if available. If there is a main videointercom in the
alternative apartment, the alternative videointercom cannot be
programmed as main videointercom, it can be the main videointercom
for its own apartment if requested.
Address
Room
Additionaladdress
Additional address
Remoteprogram.
Remoteprogram.
A1forward
A1forward
System
Indirizzo
Stanza
Ind.aggiuntiviInd.
aggiuntivi
Program.remotaProgram.
remota
RilancioA1
Sistema
100
Modifica
Annulla
Salva
Nonsalvare
Nonsalvare
Indirizzo
100
Edit
Cancel
Save
Don'tsave
Don'tsave
Address
0
Modifica
Annulla
Salva
NonsalvareNon
salvare
Stanza
0
Edit
Cancel
Save
Don'tsaveDon't
save
Room
- 34 -
ok
ok
ok
ok
ok
ok
Menu
Premindo o botão menu é possível aceder às programações,
configurações e ajustes do vídeo porteiro. As configurações actuais
são assinaladas pela mensagem a verde.
Principais funções dos botões
Os 4 botões existentes na parte central do vídeo porteiro permitem
aceder a todos os modos de funcionamento, configuração e
programação. As funções dos botões variam de acordo com a situação
operacional em que se encontra o vídeo porteiro.
Atenção. O tom intermitente ao premir qualquer um dos botões,
significa que a função não está disponível porque o serviço não está
activo ou porque outro utilizador está a ocupar a linha do vídeo porteiro.
Ligação de verificação
do vídeo porteiro
Fechadura
(abre a porta)
Agenda (listagem dos locais exteriores e interiores para os quais se
pretende ligar)
Menu configurações
Wichtigste Funktionstasten
Die 4 Schaltdruckknöpfe in der Mitte der Videosprechanlage erlauben
den Zugang zu allen Funktionen, Einstellungen und Programmierungen
der Videosprechanlage. Die Funktionen der Tasten variieren je nach
Betriebssituation, in der sich die Videosprechanlage befindet.
Achtung. Wenn die Funktion nicht verfügbar ist, ertönt ein Signalton
beim Drücken von irgendeiner Taste, wenn die Funktion nicht verfügbar
ist, weil der Service nicht befähigt oder die Videoanlage von einem
anderen Benutzer benutzt wird.
Vídeo porteiro em repouso (monitor desligado)
Início e fim
conversação
Fechadura
(abre a porta)
Silenciador (exclusão/inclusão microfone)
Configurações do vídeo porteiro (selecção da entrada e regulações
áudio-vídeo)
Vídeo porteiro ligado e conectado à linha de entrada de
vídeo
Página anterior ou sair
Página
seguinte ou
confirmação
Deslocar cursor para baixo
Deslocar cursor para cima
Vídeo porteiro ligado durante a fase de programação ou
de configuração
Menü
Beim Drücken der Taste hat man Zugang zu den Programmierungen,
Einstellungen und Regulierungen der Videosprechanlage. Die aktuellen
Einstellungen sind mit grüner Schrift gekennzeichnet.
Einschalten der
Videosprechanlage
zur Kontrolle
Schloss
(Türöffner)
Verzeichnis (Liste der externen und internen Räume, die man rufen
möchte)
Menü Einstellungen
Videosprechanlage in Stillstand Modus
(ausgeschalteter Bildschirm)
Beginn und Ende
der Konversation
Schloss
(Türöffner)
Muting (Mikrophon eingeschaltet/ausgeschaltet)
Einstellungen Videosprechanlage (Eingangswahl und Audio-Video
Regulierung)
Videosprechanlage eingeschaltet und an die Leitung
angeschlossen
Vorgehende Seite
oder Seite verlassen
Nächste
Seite oder
Bestätigung
Den Cursor nach unten schieben
Den Cursor nach oben schieben
Videosprechanlage während der Programmierungs-
oder Einstellungsphase eingeschaltet

Mi 2458
ITALIANOENGLISHFRANÇAISESPAÑOLPORTUGUÊSDEUTSCH
Mi 2458
ITALIANOENGLISHFRANÇAISESPAÑOLPORTUGUÊSDEUTSCH
- 16 -
To program the “secondary address” function you must proceed as
indicated below:
– move the cursor to
“secondary addresses” –
press OK; 10 empty labels
will be displayed if no one has
been previously programmed
– select the first empty one
and press OK; select
“address” and press OK; keep
pressed the button or to increase
or decrease the secondary address
(addresses from 1 to 200) – once
displayed the requested address
press OK; the “save” menu is
displayed; select “cancel” to move
back to the page “secondary
addresses” – select “save” to exit and
store the new address – select “don’t save” to exit without saving
it;
- select “room” - press OK; – keep pressed the button or to
increase or decrease the room number (from 0 to 7) – once
displayed the requested room number press OK; the “save” menu
is displayed; select “cancel” to move back to the secondary
addresses page – select “save” to exit and store the new room
number – select “don’t save” to exit without saving it.
- Remote programming – The user address of the videointercom
can be programmed from remote making a call from a door station
or a digital PABX.
- Move the cursor to “Remote programming” – press OK; within
2 minutes make a call from the door station or the digital PABX to
the address to be stored. In systems with the digital keypad
TD2100, key in the address to be stored and press “
”; in systems
with the digital encoding module CD2131, CD2132, CD2134 or
CD2138, press the button you want to assign to the videointercom
under programming; in systems with the digital PABX, PDX2000,
pick up the handset, key in the address to be stored and press
“
”. Automatically the videointercom will ring, press the button
“
” to communicate with the
calling device and check the correct
operations of the system; the calling
device will emit an acknowledge
tone if remote programming has
been accepted or a dissuasion tone
if remote programming has been
refused.
- Repeat the above described operations for all the videointercoms
in the system.
- A1 forward.
Upon a floor call, only the videointercom with terminals A1 and GND
connected to the chime button will ring. To forward A1 signal to all
the other videointercom of the apartment it is necessary to operate
as in the following:
- select “A1 forward” and press OK; select “disabled” to avoid the
forwarding of A1 command to other videointercoms or “enabled” to
forward A1 command.
Press OK to confirm and
to exit.
Language – Move the cursor
to “Language” and press OK;
list of available languages is
displayed, scroll the list with
buttons - select the
requested language and press
OK to confirm; press
to
move back to the previous
page.
Per eseguire la programmazione "indirizzi alternativi" occorre
procedere nel modo seguente:
– posizionare il cursore su
"ind. aggiuntivi" - premere
OK; si visualizzano 10
caselle vuote se nessuna è
stata programmata
precedentemente -
selezionare la prima libera e
premere OK;
- selezionare "indirizzo" e premere
OK - tenere premuto il tasto
o
per scegliere l'indirizzo aggiuntivo
desiderato (indirizzi da 1 a 200) -
premere OK; si accede alla pagina di
conferma. Selezionare "annulla" per
ritornare alla videata dell'indirizzo -
selezionare "salva" per uscire
confermando il nuovo indirizzo - selezionare "non salvare" per
uscire senza variarlo;
- selezionare "stanza"- premere OK - tenere premuto il tasto o
per scegliere l'indirizzo stanza desiderato (da 0 a 7) - premere
OK; si accede alla pagina di conferma. Selezionare "annulla" per
ritornare alla videata dell'indirizzo - selezionare "salva" per uscire
confermando il nuovo indirizzo - selezionare "non salvare" per
uscire senza variarlo.
- Programmazione remota – L'indirizzo utente può anche essere
memorizzato sul videocitofono effettuando una chiamata da un
posto esterno o centralino di portineria.
- Sul videocitofono posizionare il cursore su "Program. remota" -
premere OK; entro 2 minuti effettuare una chiamata da un posto
esterno o centralino di portineria. In impianti dove è presente la
tastiera digitale TD2100 comporre l'indirizzo che si vuol assegnare
al videocitofono e premere “
”; in impianti dove è presente il
codificatore digitale CD2131, CD2132, CD2134 o CD2138 premere
sulla pulsantiera il pulsante che si desidera assegnare all’utente; in
impianti con centralino di portineria PDX2000 sollevare il
microtelefono, comporre l'indirizzo e premere "
". Automatica-
mente il videocitofono riceve la
chiamata. Premere il pulsante
per entrare in conversazione con il
posto esterno e verificare il corretto
funzionamento dell’apparecchio; la
programmazione è segnalata sul
dispositivo chiamante da un tono di
conferma se accettata o di
dissuasione se errata.
- Ripetere le fasi di programmazione per tutti i videocitofoni presenti
nell’impianto.
- Rilancio A1 (campanello)
La chiamata di piano fa suonare solo il videocitofono ai cui morsetti
A1 e GN sono collegati i fili del pulsante campanello; se si vuole
rilanciare la suoneria anche su tutti gli altri videocitofoni presenti
nell’appartamento occorre procedere come riportato di seguito:
- selezionare "Rilancio A1" e premere OK; selezionare "disabilitato"
per non consentire il rilancio della chiamata del campanello agli altri
videocitofoni o "abilitato" per consentirla.
Premere OK
per confermare e poi per uscire.
Lingua – Posizionare il cursore
su "Lingua" e premere OK;
con i tasti selezionare la
lingua preferita e premere OK
per confermare; premere
per ritornare alla pagina
precedente.
___
Program. remota
Program. remota
___
Remote program.
Remote program.
Italiano
English
Español
Français
Lingua
Italiano
English
Español
Français
Language
Vuoto 1
Vuoto 1
Vuoto 2
Vuoto 2
Vuoto 3
Vuoto 3
Vuoto 4
Vuoto 4
Vuoto 5
Vuoto 5
Ind. aggiuntivi
Ind. aggiuntivi
Vuoto 1
Vuoto 1
Indirizzo
Stanza
Empty1
Empty1
Empty2
Empty3
Empty4
Empty5
Additional addr.
Additional addr.
Empty 1
Empty 1
Address
Room
- 33 -
Si dans l’installation il y a plusieurs plaques de rue, pour afficher les
différentes entrées, appuyer sur la touche “menu”; sur la liste qui
apparaît, sélectionner l’entrée souhaitée et appuyer sur la touche OK.
Faire attention à ne pas appuyer 2 fois sur la touche OK car dans ce
cas-ci la serrure pourrait s’ouvrir.
L’allumage de contrôle a une durée d’environ 30 secondes, mais est
interrompu si un appel depuis un poste extérieur est effectué dans
l’installation.
L’allumage du vidéophone peut se faire aussi en sélectionnant l’entrée
souhaitée dans la rubrique:
- appuyer sur la touche
- sélectionner le nom de l’entrée – appuyer
sur OK pour la confirmation.
Si en appuyant sur la touche
(ou OK durant la sélection dans la
rubrique), le vidéophone reste éteint et on entend que c’est occupé, il
faut attendre que l’installation soit de nouveau disponible.
Si une caméra supplémentaire
extérieure est branchée à la plaque de
rue, pour pouvoir changer l’image des
deux caméras, il faut: - appuyer sur la
touche “menu” - sélectionner “caméra”
– appuyer sur la touche OK (chaque
pression change l’image d’une caméra
à l’autre).
Effectuer ou recevoir un appel communicant d’un autre utilisateur
ou entre vidéophones d’un appartement
Quand l’installation est au repos, il est possible d’effectuer un appel
communicant à un autre utilisateur ou à un autre vidéophone de son
appartement. Pour effectuer cette opération, il faut avoir préalablement
mémorisé dans la rubrique les adresses des utilisateurs et des internes
qu’on souhaite appeler.
Entrer dans la rubrique en appuyant sur la touche
, dans la liste
qui apparaît sélectionner l’utilisateur souhaité et appuyer sur la touche
OK; sur l’écran apparaît le nom de l’utilisateur et un son confirme l’appel
effectif; si en revanche on souhaite une sonnerie indiquant que c’est
occupé, attendre que l’installation soit de nouveau disponible. Le
vidéophone de l’autre usager sonnera (sans s’allumer) avec le timbre
choisi lors de la phase de programmation. Si l’usager appelé répond
dans les 30 secondes suivantes, la conversation s’engage pour une
durée d’environ 90 secondes, sinon le système se rétablit en mode libre.
La conversation interne en cours est forcément interrompue par
n’importe quel appel en provenance du poste de rue et adressé à
n’importe quel usager.
Caméra
Entréeprincipal
Entréeprincipal
Ouvertureporte
Ouvertureporte
Réglages
apretar 2 veces la tecla OK porque se accionaría la apertura de la
cerradura.
El encendido de control tiene una duración de unos 30 segundos, pero
se interrumpe si en la instalación se produce una llamada desde una
placa de calle.
El encendido del videoportero también puede realizarse seleccionando
la entrada deseada desde la lista:
- apretar la tecla
- seleccionar el nombre de la entrada - apretar
OK para la confirmación.
Si apretando la tecla
(o OK durante la selección en la lista) el
videoportero permanece apagado y se escucha un tono de ocupado,
hay que esperar a que la instalación esté nuevamente libre.
Si en la placa de calle hay conectada
una telecámara adicional externa, para
poder conmutar la imagen de las dos
telecámaras, hay que: - apretar la
tecla “menú” - seleccionar “telecámara”
– apretar la tecla OK (cada vez que se
aprieta conmuta la imagen de una
telecámara con la de otra).
Efectuar o recibir una llamada intercomunicante de otro usuario
o entre videoporteros de un apartamento
Con la instalación desconectada, es posible realizar una llamada
intercomunicante a otro usuario o a otro videoportero del mismo
apartamento. Para realizar esta operación hace falta haber memorizado
previamente en la lista las direcciones de los usuarios y de los
residentes a los que se desea llamar.
Entrar en la lista apretando la tecla
, desde la lista que aparece,
seleccionar el usuario deseado y apretar la tecla OK; en la pantalla
aparece el nombre del usuario y un tono de libre confirma que se ha
realizado la llamada; si por el contrario se escucha un tono de
ocupado, esperar a que la instalación vuelva a estar libre. El
videoportero del otro usuario suena (sin encenderse) con el tono de
llamada seleccionado en la fase de programación.
Si el usuario llamado responde antes de 30 segundos se inicia una
conversación que puede durar hasta 90 segundos.
Una llamada desde placa de calle a cualquiera usuario de la
instalación finaliza forzosamente la conversación interna en curso.
Telecamara
Entrada
Aberturaportal
Aberturaportal
Configuración

Mi 2458
ITALIANOENGLISHFRANÇAISESPAÑOLPORTUGUÊSDEUTSCH
Mi 2458
ITALIANOENGLISHFRANÇAISESPAÑOLPORTUGUÊSDEUTSCH
- 17 -
Character
It allows to increase or decrease the size of characters on the
screen. Select “Character” and press OK – select large or
normal size and press OK – press
to go back to the previous
page.
Default – Back to the factory settings.
This command erase all the settings previously stored (except
contacts) and restore the videointercom back to the factory
settings.
Select “Default” and press OK, the “save” menu is displayed:
select “cancel” and press OK to go back to the previous page
without restoring data – select “confirm” and press OK to restore
the videointercom to the factory settings.
Press
to exit the programming page.
Carattere
Permette di ingrandire o ridurre la grandezza delle scritte visualizzabili
sullo schermo. Selezionare "Carattere" e premere OK - scegliere la
grandezza del carattere (normale o grande) e premere OK - premere
per tornare alla pagina precedente.
Default - Ritorno alla programmazione di fabbrica.
Il comando cancella tutti i dati e le programmazioni precedentemente
memorizzate (tranne i nominativi in rubrica) e ripristina il
videocitofono alle impostazioni di fabbrica.
Selezionare "Default" e premere OK; si accede alla pagina di conferma:
- scegliere "annulla" e premere OK per ritornare alla pagina precedente
senza variarla - scegliere "conferma" e premere OK per effettuare la
cancellazione delle programmazioni e ripristinare il videocitofono alla
configurazione di fabbrica.
Premere
per uscire dalla modalità di programmazione.
MENU PROGRAMMAZIONE
(tenere premuto per
oltre 4 secondi)
(keep pressed for
about4 seconds)
CONTATTI
CONTACTS
NUOVO
(o nome esistente)
NEW
(or existing name)
CAMPANELLO
DOOR BELL
INDIRIZZO
ADDRESS
INDIRIZZO
ADDRESS
ELENCO LINGUE
LANGUAGE LIST
ETICHETTA
LABEL
ELENCO SUONERIE
RINGING MELODY LIST
SELEZIONARE NOME
SELECT THE NAME
MODIFICA
EDIT
MODIFICA
EDIT
MODIFICA
EDIT
MODIFICA
EDIT
VUOTO 1÷10
EMPTY 1÷10
EFFETTUARE UNA CHIAMATA DA PULSANTIERA O CENTRALINO
MAKE A CALL FROM PUSH-BUTTON PANEL OR PABX
DISABILITATO
DISABLED
DISABILITATO
DISABLED
NORMALE
NORMAL
REGOLARE LIVELLO
ADJUST THE LEVEL
SPOSTARE CON
MOVE WITH
ANNULLA
CANCEL
ANNULLA
CANCEL
ANNULLA
CANCEL
AUDIO
AUDIO
ORDINAMENTO
SORTING
INDIRIZZO
ADDRESS
DURATA SUONERIA
RING TONE PERIOD
SUONO TASTI
KEY TONE
VOLUME SUONERIA
RING TONE LEVEL
VOLUME TONI
TONE LEVEL
STANZA
ROOM
STANZA
ROOM
STANZA
ROOM
IND.AGGIUNTIVI
ADDITIONAL ADDR.
PROG.REMOTA
REMOTE PROGRAM.
RILANCIO A1
A1 FORWARD
SUONERIA
RING TONE
ELENCO SUONERIE
RINGING MELODY LIST
ELIMINA
DELETE
ABILITATO
ENABLED
ABILITATO
ENABLED
GRANDE
LARGE
SALVA
SAVE
SALVA
SAVE
SALVA
SAVE
ANNULLA
CANCEL
ANNULLA
CANCEL
NON SALVARE
DON'T SAVE
NON SALVARE
DON'T SAVE
NON SALVARE
DON'T SAVE
CONFERMA
CONFIRM
CONFERMA
CONFIRM
SISTEMA
SYSTEM
LINGUA
LANGUAGE
CARATTERE
FONT SIZE
DEFAULT
PROGRAMMING MENU
- 32 -
Appel depuis un poste de rue
En effectuant un appel depuis le poste de rue, on entend la sonnerie
(telle que programmée) sur le haut-parleur et l’écran affiche l’image
de celui qui appelle pendant environ 30 secondes. Si le temps de
l’appel est échu et que le vidéophone s’est éteint, appuyer sur
pour se brancher de nouveau avec le poste de rue duquel l’appel
provient.
Pour parler avec le poste de rue pour environ 90 secondes, appuyer
sur le bouton-poussoir
.
Si l’on désire désactiver l’audio vers le poste de rue (microphone),
tout en continuant à écouter l’audio en provenance de l’externe,
appuyer brièvement sur le bouton-poussoir
; pendant toute la
période de la désactivation sur l’écran, le symbole
apparaît.
Pour rétablir l’audio avec le poste de rue, appuyer de nouveau sur
le bouton-poussoir
; le symbole disparaît.
En cas d’appel à un usager qui a plus d’un vidéophone en parallèle
dans son appartement, ce sont tous les vidéophones qui sonnent,
mais ce n’est que celui dont l’adresse d’interne correspond à 0 qui
se met sous tension. Pour répondre sur ce vidéophone, on peut
procéder comme détaillé plus haut. En appuyant sur la touche
sur un autre vidéophone, il est possible de voir l’entrée appelante
en éteignant automatiquement celle précédemment allumée. Ap-
puyer de nouveau sur
pour converser avec le poste de rue.
Pour activer l’ouverture de la gâche électrique, appuyer sur le
bouton-poussoir
.
Pour terminer la conversation et désactiver le vidéophone, appuyer
sur le bouton-poussoir
; le vidéophone s’éteint également à la fin
de la temporisation.
Allumages de contrôle et branchement à un ou plusieurs postes
externes.
Avec l’installation au repos et aucune conversation en cours, on
peut effectuer des allumages de contrôle en appuyant, sur le
vidéophone, sur le bouton-poussoir “
”.
Llamada desde placa de calle
Al realizar una llamada desde la placa de calle, el altavoz del videoportero
recibe los tonos de llamada (según programado) y la pantalla visualiza
la imagen del usuario llamante por un tiempo de unos 30 segundos. Si
el tiempo de llamada ha transcurrido y el monitor se ha apagado,
presionar el pulsador
para conectarse nuevamente con la placa de
calle llamante.
Para conversar con la placa de calle por un tiempo de unos 90 segundos,
presionar el pulsador
.
Si se desea disactivar la fonía de la placa de calle (micrófono) aunque
continuando con el audio proveniente de la misma, hay que presionar
brevemente el pulsador
; durante todo el periodo de la deshabilitación
aparece en la pantalla el símbolo
. Para retomar el audio de la placa
de calle presionar de nuevo
; el símbolo desaparece.
En caso de llamada a un usuario que tiene más de un monitor en paralelo
en su apartamento, suenan todos los monitores, pero se enciende
solamente el monitor cuya dirección de extensión es 0. Para responder
desde este monitor se puede actuar según ilustrado anteriormente.
Apretando la tecla
desde otro videoportero es posible visionar la
entrada entrante apagando automáticamente la encendida anteriormente.
Presionar de nuevo
para conversar con la placa de calle.
Para accionar la apertura de la cerradura eléctrica presionar el pulsador
Para terminar la conversación y apagar el videoportero presionar ;
el videoportero se apaga también al final del tiempo programado.
Encendidos de control y conexión con una o varias placas de calle.
Con la instalación en reposo y ninguna conversación en curso pueden
efectuarse encendidos de control presionando en el videoportero el
pulsador
..
Si en la instalación hay más placas de calle, para visionar las diferentes
entradas, apretar la tecla “menú”; de la lista que aparece, seleccionar
la entrada deseada y apretar la tecla OK. Prestar atención para no
FONCTIONNEMENT FUNCIONAMIENTO
Fonctions des touches avec vidéophone au repos
(écran éteint)
Allumage de contrôle vidéo
Serrure (ouvre-porte)
Rubrique (liste des postes externes et internes qu’on
souhaite appeler)
Menu paramètres (réglages)
Funciones de las teclas con videoportero en reposo
(pantalla apagada)
Encendido de control vídeo
Cerradura (apertura de puerta)
Sección (lista de las unidades externas e internas a las que
desea llamar)
Menú configuraciones
Fonctions des touches avec vidéophone allumé et
connecté à la ligne vidéophonique
Début et fin de la conversation
Serrure (ouvre-porte)
Muting (exclusion/inclusion du microphone)
Paramètres vidéophonique (sélection entrée et réglages
audio-vidéo)
Funciones de las teclas con videoportero encendido y
conectado a la línea de videoportero
Inicio y finalización de la conversación
Cerradura (apertura de puerta)
Modo silencio (exclusión/inclusión micrófono)
Configuraciones del videoportero (selección entrada y ajustes
de audio-vídeo)
ok
ok
ok
ok

Mi 2458
ITALIANOENGLISHFRANÇAISESPAÑOLPORTUGUÊSDEUTSCH
Mi 2458
ITALIANOENGLISHFRANÇAISESPAÑOLPORTUGUÊSDEUTSCH
- 18 -
IMPOSTAZIONI UTENTE
Le impostazioni seguenti possono essere variate dall'utente senza
pregiudicare il corretto funzionamento del videocitofono e dell'impianto ad
esso collegato. L'utente può scegliere di variare: - i nomi presenti in
rubrica - i volumi dei toni e delle suonerie - il tipo di suoneria - la lingua
- la grandezza dei caratteri dello schermo.
Quando il videocitofono è spento e
nel sistema non sono in corso altre
conversazioni o accensioni di
controllo, premere brevemente il tasto
"menu" (meno di 4 secondi); si
accede alla pagina: Contatti, Audio,
Lingua, Carattere.
Contatti – All’interno della rubrica, se inseriti durante la programmazione
del videocitofono, sono presenti nomi di utenti e/o di funzioni il cui
ordine, tipo di suoneria e nome
possono essere variati.
Posizionare il cursore su "Contatti"
e premere OK; si accede all'elenco
dei nominativi (es. Rossi Mario;
Ingresso; Apertura cancello) ed
Ordinamento.
Per cambiare un nome e la
suoneria associata occorre
selezionare il nome usando i tasti
e premere OK; si visualizza
etichetta e suoneria.
- Etichetta - selezionare
"Etichetta" per variare il nome (es.
cambiare "Rossi Mario" con "zio
Mario"). Usare i tasti
per
posizionarsi sul carattere da
modificare, tenere premuti i tasti
per la ricerca veloce del
nuovo carattere e premere OK; il
cursore automaticamente si
posiziona sulla casella successiva; proseguire fino al termine della
correzione del nome e premere OK. Premere nuovamente OK per
uscire ed accedere alla pagina di conferma: - selezionare "annulla" per
tornare indietro - selezionare "salva" per uscire confermando il
nominativo - selezionare "non salvare" per uscire senza variarlo.
- Suoneria - posizionare il cursore
su "suoneria" - premere OK; si
visualizza l'elenco delle suonerie
disponibili (in verde la suoneria
attualmente in funzione). Utilizzare
i tasti
per spostarsi nell'elenco
ed ascoltare le suonerie - premere
OK per la conferma - premere
per uscire.
Ripetere le operazioni appena descritte per variare altri nominativi o uscire
premendo il tasto
.
Modifica
z i o
M
ario
U n cle Robert
Edit
USER SETTINGS
The following settings can be changed by the user without affecting
the correct operations of the videointercom or of the whole system.
User can change: - user name in the contacts – volume levels of
ringing melodies and tones – ringing melodies – language –
character size on the screen.
While the videointercom is OFF,
press shortly the "menu" button
(less than 4 seconds); user
menu is displayed: Contacts,
Audio, Language, Font size.
Contacts – In contacts, if
programmed during the installation of the videointercom, are
listed the name of users, door stations and actuators whose
sorting, ringing melody and
name can be changed. Move
the cursor to “Contacts” and
press OK; the list of users
(eg. Mr. Robert Brown, Oxford
street entrance, Car gate) and
the “Sorting” option are
displayed.
To change a name and the
associated ringing melody it
is necessary to select the
name to change using buttons
and press OK; functions
label and ringing melody are
displayed.
- Label – select “Label” to change the name (eg. from “Mr. Robert
Brown” to “Uncle Robert”); press buttons
to move to the
character to change, keep pressed buttons to quickly
search the new character and
press OK; automatically the
cursor moves to the next
character; continue until all
the corrections have been
made and press OK. Press
OK again to exit the page; the
“save” menu will be displayed:
select “clear” to go back, select “save” to exit saving the new
name, select “don’t save” to exit without saving the new name.
- Ring tone– move the cursor
to “Ring Tone” – press OK;
list of available ringing
melodies is displayed (in
green the present one). Use
buttons
to scroll the list
and hear the melodies – press
OK to select the desired one – press
to exit.
Repeat all the above operations to change other user names or
press
to exit.
DinDon
DinDon
Scala
Piripiripi
Tiritiriti
Turkey
Suoneria
Din Don
DinDon
Scala
Piripiripi
Tiritiriti
Turkey
Ring tone
Ring tone
Contatti
Audio
Lingua
Carattere
Menu
Funzioni dei tasti durante le impostazioni utente
Pagina precedente o uscita
Pagina successiva o conferma
Scorrimento verso il basso del cursore
Scorrimento verso l'alto del cursore
ok
Function of buttons during user settings
Next page or Enter
Previous page or exit
Cursor Down
Cursor Up
ok
Contacts
Audio
Language
Fontsize
Font size
Menu
RossiMario
RossiMario
Ingresso
Aperturacancello
Aperturacancello
Ordinamento
Contatti
RobertBrown
RobertBrown
Oxfordstreet entrance
Oxfordstreet entrance
Cargate
Cargate
Sorting
Contacts
Etichetta
Suoneria
Rossi Mario
Rossi Mario
(104)
Label
Ring tone
Ring tone
Robert Brown
Robert Brown
(104)
- 31 -
MENU PARAMÈTRES
MENÚ CONFIGURACIÓN
CONTACTS
CONTACTOS
LIST NAMES
LISTA DE NOMBRES
SONNETTE
TIMBRE
LIST DE LANGUES
LISTA DE IDIOMAS
VISUEL
ETIQUETA
LISTE DES SONNERIES
LISTA SONERIAS
SÉLECTIONNER NOM
SELECCIONAR NOMBRE
MODIFIÉ
MODIFICACIÓN
MODIFIÉ
MODIFICACIÓN
INTERDIT
DESHABILITADO
NORMAL
NORMAL
RÉGLER NIVEAU
AJUSTAR NIVEL
DÉPLACER AVEC
DEPLAZAR CON
ANNULER
ANULA
AUDIO
AUDIO
ORDRE
ORDEN
SONNERIE
SONERIA
DURÉE SONNERIE
DURACIÓN SONERIA
SON DES TOUCHES
SONIDO TECLAS
VOLUME SONNERIE
VOLUMEN SONERIA
VOLUME TONALITÉS
VOLUMEN TONOS
AUTORISÉ
HABILITADO
GRAND
GRANDE
SAUVEGARDER
GUARDA
NE PAS SAUVEGARDER
NO GUARDAR
LANGUE
IDIOMA
CARACTÈRE
TAMAÑO FUENTE
ANNULER
ANULA
SAUVEGARDER
GUARDA
NE PAS SAUVEGARDER
NO GUARDAR
(Appuyer pendant au
moins 4 secondes)
(Apretar durante
menos de 4 segundos)
Répéter les opérations qui viennent d’être décrites pour changer
d’autres noms ou abandonner en appuyant sur la touche
.
Tri des noms
Pour changer l’ordre des noms présents dans la rubrique, il faut, à
l’intérieur de la page “Contacts”, sélectionner “Ordre” et appuyer sur
OK - sélectionner le nom à déplacer et appuyer sur OK - avec les
touches
, déplacer le nom dans la position souhaitée et appuyer
sur OK pour la confirmation. Appuyer sur
pour revenir à la page
précédente.
Audio - procédure décrite à page 10.
Langue - procédure décrite à page 12.
Caractère - procédure décrite à page 12.
Repetir las operaciones que se acaban de describir para variar otros
nombres o salir apretando la tecla
.
Orden de los nombres
Para cambiar el orden de los nombres presentes en la lista hay que,
dentro de la página “Contactos”, seleccionar “Orden” y apretar OK –
seleccionar el nombre a desplazar y apretar OK - con las teclas
desplazar el nombre a la posición deseada y apretar OK para la
confirmación. Apretar
para volver a la página anterior.
Audio - procedimiento descrito en la página 10.
Idioma- procedimiento descrito en la página 12.
Tamaño fuente - procedimiento descrito en la página 12.
Caméra
Entréeprincipal
Entréeprincipal
Ouvertureporte
Ouverture porte
Réglages
Volume
Vidéo
Réglages
Ouvertureporte
Ouvertureporte
Réglages
Volume
Réglages
Telecamara
Entrada
Aberturaportal
Aberturaportal
Configuración
Volumen
Video
Configuración
Aberturaportal
Aberturaportal
Configuración
Volumen
Configuración
Réglages audio-vidéo
Pour accéder aux réglages audio et vidéo, il faut que le vidéophone soit
allumé et connecté à un poste extérieur par l’intermédiaire d’un appel
depuis la plaque de rue ou allumage de contrôle (touche
).
Appuyer sur “menu”; la liste suivante apparaît: caméra, liste des
entrées et des services (si saisies - voir paragraphe “contacts” page
24), réglages. Sélectionner “réglages” et appuyer sur OK - sélectionner
volume pour régler, en utilisant les touches
, le niveau de la phonie
provenant de l’extérieur (haut-parleur) ou sélectionner la vidéo pour
régler la luminosité, le contraste et la couleur de l’image.
Ajustes de audio-vídeo
Para acceder a los ajustes de audio y vídeo hace falta que el
videoportero esté encendido y conectado a un puesto externo
mediante una llamada de la placa de calle o encendido de control
(tecla
).
Apretar “menú”; aparece la siguiente lista: telecámara, lista entradas
y servicios (si se han introducido – véase apartado “contactos” en
página 24), configuración. Seleccionar “configuración” y apretar OK
– seleccionar volumen para ajustar, mediante las teclas
, el nivel
de la fonía procedente del exterior (altavoz) o seleccionar vídeo para
ajustar la luminosidad, el contraste y el color de la imagen.
Si el videoportero está intercomunicando con otro aparato, apretando
“menú”, se visualizan únicamente los campos que se refieren a las
habilitaciones y ajustes de audio (lista de los servicios y configuraciones
de audio).
Si le vidéophone communique avec un autre appareil, en appuyant sur
“menu”, les rubriques concernant les activations et réglages audio (liste
des services et paramètres audio) s’activent.

Mi 2458
ITALIANOENGLISHFRANÇAISESPAÑOLPORTUGUÊSDEUTSCH
Mi 2458
ITALIANOENGLISHFRANÇAISESPAÑOLPORTUGUÊSDEUTSCH
- 19 -
Telecamera
Ingresso
Aperturacancello
Aperturacancello
Impostazioni
Volume
Video
Impostazioni
Aperturacancello
Aperturacancello
Impostazioni
Volume
Impostazioni
Camera
Entrance
Gate
Settings
Audiolevel
Audiolevel
Video
Settings
Gate
Settings
Audio level
Audio level
Settings
Ordinamento dei nominativi
Per cambiare l'ordinamento dei nominativi presenti in rubrica occorre,
all'interno della pagina "Contatti", selezionare "Ordinamento" e preme-
re OK - selezionare il nominativo da spostare e premere OK - con i
tasti spostare il nominativo nella posizione desiderata e premere
OK per la conferma. Premere
per tornare alla pagina precedente.
Audio - procedura descritta a pagina 10.
Lingua - procedura descritta a pagina 12.
Carattere - procedura descritta a pagina 12.
Sorting of names
To change the order of names in the contact list it is necessary to
select “Sorting” in the “Contact” menu and press OK – select the name
to move and press OK – with buttons move the name up or down
until it reaches the desired position and press OK to confirm.
Press
to go back to the previous page.
Audio - procedure described on page 10.
Language - procedure described on page 12.
Font size - procedure described on page 12.
(premere per
meno di 4 secondi)
(press for less than
4 seconds)
CONTATTI
CONTACTS
ELENCO NOMI
NAME LIST
CAMPANELLO
DOOR BELL
ELENCO LINGUE
LANGUAGE LIST
ETICHETTA
LABEL
ELENCO SUONERIE
RINGING MELODY LIST
SELEZIONARE NOME
SELECT THE NAME
MODIFICA
EDIT
MODIFICA
EDIT
DISABILITATO
DISABLED
NORMALE
NORMAL
REGOLARE LIVELLO
ADJUST THE LEVEL
SPOSTARE CON
MOVE WITH
ANNULLA
CANCEL
AUDIO
AUDIO
ORDINAMENTO
SORTING
SUONERIA
RING TONE
DURATA SUONERIA
RING TONE PERIOD
SUONO TASTI
KEY TONE
VOLUME SUONERIA
RING TONE LEVEL
VOLUME TONI
TONE LEVEL
ABILITATO
ENABLED
GRANDE
LARGE
SALVA
SAVE
NON SALVARE
DON'T SAVE
LINGUA
LANGUAGE
CARATTERE
FONT SIZE
ANNULLA
CANCEL
SALVA
SAVE
NON SALVARE
DON'T SAVE
MENU IMPOSTAZIONE
SETUP MENU
Regolazioni audio-video
Per accedere alle regolazioni audio e video occorre che il videocito-
fono sia acceso e connesso con un posto esterno tramite una chiamata
dalla pulsantiera od accensione di controllo (tasto
).
Premere "menu"; appare il seguente elenco: telecamera, elenco
ingressi e servizi (se inseriti - vedere paragrafo "contatti" a pagina 12),
impostazioni. Selezionare "impostazioni" e premere OK - selezionare
volume per regolare, tramite i tasti
, il livello della fonia proveniente
dall'esterno (altoparlante) o selezionare video per regolare la lumino-
sità, il contrasto ed il colore dell'immagine.
Audio-video adjustments
To adjust audio and video parameters it is necessary that the
videointercom will be ON and connected to an external door station
after a call from the door station or a monitor function (button
).
Press “menu”; the following list will be displayed: camera, list of
entrances or services (if previously stored – see paragraph “contacts”
on page 12), settings. Select “settings” and press OK – select “volume”
to adjust, pressing buttons
, the volume level (loudspeaker) or
select “video” to adjust contrast, brightness and colour of the image.
If the videointercom, instead of communicating with the door station
is intercommunicating with another user, pressing “menu” only audio
adjustments are displayed (because there is no image on the screen).
Se il videocitofono sta intercomunicando con un altro apparato,
premendo "menu", si visualizzano solo le voci riguardanti le abilitazioni
e regolazioni audio (elenco dei servizi ed impostazioni audio).
- 30 -
PARAMÈTRES UTILISATEUR
Les paramètres suivants peuvent être changés par l’utilisateur sans
compromettre le bon fonctionnement du vidéophone et de l’installation à
laquelle il est connecté. L’utilisateur peut choisir de changer: -les noms
présents dans la rubrique - les volumes des tons et des sonneries - le type
de sonnerie - la langue - la grandeur des caractères de l’écran.
Quand le vidéophone est éteint et que
d’autres conversations ou allumages
de contrôle ne sont pas en cours dans
le système, appuyer brièvement sur la
touche “menu” (moins de 4 secondes);
on accède à la page: Contacts, Audio,
Langue, Caractère.
Contacts – Dans la rubrique, si une fois des noms insérés durant le
programmation du vidéophone, sont
présents des noms d’utilisateur et/
ou de fonctions dont l’ordre, le type
de sonnerie et de nom peuvent être
changés.
Positionner le curseur sur “Contacts”
et appuyer sur OK; on accède à la
liste des noms (ex. Dupont Marcel;
Entrée; Ouverture du portail) et
Ordre.
Pour changer un nom et la sonnerie
associée, il faut sélectionner le nom
en utilisant les touches et
appuyer sur OK; le visuel et la
sonnerie s’affichent.
- Visuel - sélectionner “Visuel” pour changer le nom (ex. changer
“Dupont Marcel” avec “tonton
Marcel”). Utiliser les touches
pour se positionner sur le caractère
à modifier, tenir enfoncées les
touches pour la recherche
rapide du nouveau caractère et
appuyer sur OK; le curseur se
positionne automatiquement sur la case suivante; poursuivre jusqu’à la
fin de la correction du nom et appuyer sur OK. Appuyer de nouveau
sur OK pour abandonner et accéder à la page de confirmation: -
sélectionner “annuler” pour revenir en arrière - sélectionner
“sauvegarder” pour abandonner en
confirmant le nom - sélectionner
“ne pas sauvegarder” pour
abandonner sans changer.
- Sonnerie - positionner le curseur
sur “sonnerie” – appuyer sur OK; la
liste des sonneries disponibles (en
vert la sonnerie actuellement en marche). Utiliser les touches
pour
se déplacer dans la liste et écouter les sonneries – appuyer sur OK pour
la confirmation – appuyer sur
pour abandonner.
CONFIGURACIONES USUARIO
Las siguientes configuraciones pueden ser variadas por el usuario
sin alterar el correcto funcionamiento del videoportero y de la
instalación conectada al mismo. El usuario puede elegir variar: - los
nombres presentes en la lista – los volúmenes de los tonos y de
las melodías – el tipo de melodía – el idioma – el tamaño de los
caracteres de la pantalla.
Cuando el videoportero está
apagado y en el sistema no hay
en curso otras conversaciones o
encendidos de control, apretar
brevemente la tecla “menú”
(menos de 4 segundos); se
accede a la página: Contactos,
Audio, Idioma, Tamaño fuente.
Contactos – Dentro de la lista,
si se introducen durante la
programación del videoportero,
hay nombres de usuarios y/o
de funciones cuyo orden, tipo
de melodía o nombre pueden
ser variados. Colocar el cursor
en “Contactos” y apretar OK; se accede a la lista de los nombres
(ej. Navarro Juan; Entrada;
Apertura cancela) y Orden.
Para cambiar un nombre y la
melodía asociada hay que
seleccionar el nombre usando
las teclas
y apretar OK;
se visualiza etiqueta y sonería.
- Etiqueta - seleccionar “Etiqueta” para variar el nombre (ej.
cambiar “Navarro Juan” por “tío Juan”). Usar las teclas
para
colocarse sobre el carácter a
modificar, manteniendo
apretadas las teclas para
la búsqueda veloz del nuevo
carácter y apretar OK; el cursor
se coloca automáticamente
sobre la siguiente casilla;
proseguir hasta la finalización de la corrección del nombre y
apretar OK. Apretar nuevamente OK para salir y acceder a la
página de confirmación: - seleccionar “anular” para volver atrás
- seleccionar “guardar” para salir confirmando el nombre -
seleccionar “no guardar” para salir sin realizar variaciones.
- Sonería – colocar el cursor en
“sonería” - apretar OK; se
visualiza la lista de las melodías
disponibles (en verde la melodía
actualmente en uso). Utilizar
las teclas
para despla-
zarse por la lista y escuchar las
melodías - apretar OK para la confirmación - apretar
para salir.
Fonctions des touches pendant les paramètres-utilisateur
Page précédente ou sortie
Page suivante ou confirmation
Déroulement vers le bas du curseur
Déroulement vers le haut du curseur
Funciones de las teclas durante las configuraciones
usuario
Página anterior o salida
Página siguiente o confirmación
Deslizamiento hacia la parte inferior del cursor
Deslizamiento hacia la parte superior del
cursor
Modifié
ot n ton
M
arcel
Modificación
to
J
uaní
DinDon
DinDon
Scala
Piripiripi
Tiritiriti
Turkey
Sonnerie
DinDon
DinDon
Scala
Piripiripi
Tiritiriti
Turkey
Soneria
Contacts
Audio
Langue
Caractère
Menu
ok
ok
Contactos
Audio
Idioma
Tamaño fuente
Tamaño fuente
Menu
DupontMarcel
DupontMarcel
Entréeprincipal
Entréeprincipal
Ouvertureporte
Ouverture porte
Ordre
Contacts
NavarroJuan
NavarroJuan
Entrada
Aberturaportal
Aberturaportal
Orden
Contactos
Visuel
Sonnerie
Dupont Marcel
Dupont Marcel
(104)
Etiqueta
Soneria
Navarro Juan
Navarro Juan
(104)

Mi 2458
ITALIANOENGLISHFRANÇAISESPAÑOLPORTUGUÊSDEUTSCH
Mi 2458
ITALIANOENGLISHFRANÇAISESPAÑOLPORTUGUÊSDEUTSCH
- 20 -
Chiamata da posto esterno
Effettuando una chiamata dal posto esterno, squilla (come da
programmazione) e sullo schermo appare l'immagine del chiaman-
te per circa 30 secondi. Se il tempo di chiamata è scaduto ed il
videocitofono si è spento, premere il tasto
per collegarsi
nuovamente con il posto esterno chiamante.
Per conversare con il posto esterno per un tempo di circa 90
secondi, premere il tasto
.
Qualora si desideri disattivare la fonia verso il posto esterno
(microfono), continuando ad ascoltare l'audio proveniente dal-
l'esterno, premere brevemente il tasto
; per tutto il periodo della
disabilitazione sullo schermo appare il simbolo
. Per ripristinare
l'audio con l'esterno, premere nuovamente
; il simbolo
scompare.
Nel caso di chiamata ad un utente che ha nel proprio appartamento
più di un videocitofono in parallelo tutti i videocitofoni squillano, ma
solo quello il cui indirizzo stanza è 0 si accende. Per rispondere da
questo videocitofono si può procedere come descritto in preceden-
za. Premendo il tasto
da un altro videocitofono è possibile
visionare l'ingresso chiamante spegnendo automaticamente quello
precedentemente acceso. Premere nuovamente
per conver-
sare con il posto esterno.
Per azionare l'apertura della serratura elettrica premere il tasto
.
Per terminare la conversazione e spegnere il videocitofono preme-
re
. Il videocitofono si spegne anche a fine temporizzazione.
Accensioni di controllo e collegamento con uno o più posti
esterni.
Ad impianto a riposo e nessuna conversazione in corso, è possibile
effettuare l'accensione di controllo premendo sul videocitofono il
tasto “
”.
Call from the door station
When a call is made from the external door station, the videointercom
starts ringing (according to programming), the calling user is displayed
on the screen for around 30 seconds. If time has expired and the
videointercom turns OFF, press the button
to reconnect with the
external door station.
To start the conversation with the external door station, for around 90
seconds, press the button
.
If it is desired to disable the audio to the door station, but continuing
hearing the audio from the door station, press shortly the button
;
while audio is disabled on the screen it is shown symbol
. To restore
the audio to the door station, press again the button
; the symbol
disappears from the screen.
In case of a call to a user with more than one videointercom in parallel
in the same apartment, all the videointercoms will ring, but only the
videointercom with room address 0 will turn ON. To answer from this
videointercom follow the instructions above. It is also possible to answer
from any other videointercom of the apartment by pressing on it button
, this videointercom will turn ON and at the same time the intercom
that had been turned ON before, switches OFF. If, after having seen the
image, you wish to talk with the calling door station, press again the button
.
To operate the electric door lock release press the button
.
To end the communication and switch OFF the videointercom press the
button
. The videointercom switches OFF automatically also when the
communication time expires.
Monitor function and connection with one or more external door
stations.
With the system in stand-by and no any conversation in progress, it is
be possible to monitor the external door stations by pressing the button
on the videointercom.
FUNZIONAMENTO OPERATION
Funzioni dei tasti con videocitofono a riposo (schermo
spento)
Accensione di controllo videocitofonica
Serratura (apriporta)
Rubrica (elenco dei posti esterni ed interni che si desidera
chiamare)
Menu impostazioni
ok
Function of buttons with videointercom in stand-by (screen
OFF)
Monitor
Door Lock release
Contacts (list of door stations or internal users you wish to call)
Settings
ok
Funzioni dei tasti con videocitofono acceso e
connesso alla linea videocitofonica
Inizio e fine conversazione
Serratura (apriporta)
Muting (esclusione/inclusione microfono)
Impostazioni videocitofoniche (selezione ingresso e
regolazioni audio-video)
ok
Function of buttons with videointercom ON and connected
to the videointercom line
Start and close communication
Door Lock release
Muting (enable/disable microphone)
Videointercom Settings (door station selection and audio-video
adjustments)
ok
- 29 -
MENU PROGRAMMATION MENU PROGRAMACIÓN
(tenir enfoncé pendant
plus de 4 secondes)
(mantener apretado
durante más de 4
segundos)
CONTACTS
CONTACTOS
NOUVEAU
(o nom existant)
NUEVO
(o nombre existente)
SONNETTE
TIMBRE
ADRESSE
DIRECCIÓN
ADRESSE
DIRECCIÓN
LIST DE LANGUES
LISTA DE IDIOMAS
VISUEL
ETIQUETA
LISTE DES SONNERIES
LISTA SONERIAS
SÉLECTIONNER NOM
SELECCIONAR NOMBRE
MODIFIÉ
MODIFICACIÓN
MODIFIÉ
MODIFICACIÓN
MODIFIÉ
MODIFICACIÓN
MODIFIÉ
MODIFICACIÓN
VIDE 1÷10
VACIO 1÷10
EFFECTUER UN APPEL DEPUIS LA PLAQUE DE RUE OU STANDARD
REALIZAR UNA LLAMADA DESDE PLACA DE CALLE O CENTRALITA
INTERDIT
DESHABILITADO
INTERDIT
DESHABILITADO
NORMAL
NORMAL
RÉGLER NIVEAU
AJUSTAR NIVEL
DÉPLACER AVEC
DEPLAZAR CON
ANNULER
ANULA
ANNULER
ANULA
ANNULER
ANULA
AUDIO
AUDIO
ORDRE
ORDEN
ADRESSE
DIRECCIÓN
DURÉE SONNERIE
DURACIÓN SONERIA
SON DES TOUCHES
SONIDO TECLAS
VOLUME SONNERIE
VOLUMEN SONERIA
VOLUME TONALITÉS
VOLUMEN TONOS
PIÈCE
ESTANCIA
PIÈCE
ESTANCIA
PIÈCE
ESTANCIA
ADRESSE SUPPLÈM.
DIR.ADICIONAL
PROG.À DISTANCE
PROGRAM.REMOTA
RELANCE A1
RELANZAR A1
SONNERIE
SONERIA
LISTE DES SONNERIES
LISTA SONERIAS
SUPPRIMER
ELIMINA
AUTORISÉ
HABILITADO
AUTORISÉ
HABILITADO
GRAND
GRANDE
SAUVEGARDER
GUARDA
SAUVEGARDER
GUARDA
SAUVEGARDER
GUARDA
ANNULER
ANULA
ANNULER
ANULA
NE PAS SAUVEGARDER
NO GUARDAR
NE PAS SAUVEGARDER
NO GUARDAR
NE PAS SAUVEGARDER
NO GUARDAR
CONFIRMER
CONFIRMA
CONFIRMA
CONFIRMER
SYSTÈME
SISTEMA
LANGUE
IDIOMA
CARACTÈRE
TAMAÑO FUENTE
PAR DÉFAUT
DE FABRICA
Carácter
Permite aumentar o reducir el tamaño de los textos visualizables
en la pantalla. Seleccionar “Tamaño fuente” y apretar OK – elegir
el tamaño del carácter (normal o grande) y apretar OK - apretar
para volver a la página anterior.
De fábrica – Regreso a la programación de fabricación.
El mando elimina todos los datos y las programaciones
anteriormente memorizadas (excepto los nombres en la lista)
y restablece el videoportero con las configuraciones de
fabricación.
Seleccionar “De fabrica” y apretar OK; se accede a la página de
confirmación: - elegir “anula” y apretar OK para volver a la página
anterior sin hacer variaciones - elegir “confirma” y apretar OK
para realizar la eliminación de las programaciones y restablecer
el videoportero con la configuración de fabricación.
Apretar
para salir del modo de programación.
Caractère
Cette fonction permet d’agrandir ou de réduire la grandeur des
inscriptions affichables sur l’écran. Sélectionner “Caractère” et appuyer
sur OK - choisir la grandeur du caractère (normal ou grand) et appuyer
sur OK – appuyer sur
pour revenir à la page précédente.
Défaut - Retour à la programmation d’usine.
La commande efface toutes les données et les programmations
précédemment mémorisées (sauf les noms dans la rubrique) et
restaure les paramètres d’usine du vidéophone.
Sélectionner “Par défaut” et appuyer sur OK; on accède à la page de
confirmation: - choisir “annuler” et appuyer sur OK pour revenir à la page
précédente sans la changer - choisir “confirmer” et appuyer sur OK pour
effectuer l’élimination des programmations et restaurer la configuration
d’usine du vidéophone.
Appuyer sur
pour abandonner le mode de programmation.

Mi 2458
ITALIANOENGLISHFRANÇAISESPAÑOLPORTUGUÊSDEUTSCH
Mi 2458
ITALIANOENGLISHFRANÇAISESPAÑOLPORTUGUÊSDEUTSCH
- 21 -
Se nell’impianto vi sono più posti esterni, per visionare i vari ingressi,
premere il tasto "menu"; dall'elenco che appare selezionare l'ingresso
desiderato e premere il tasto OK. Fare attenzione a non premere 2 volte
il tasto OK perché si azionerebbe l'apertura della serratura.
L’accensione di controllo ha una durata di circa 30 secondi, ma è
interrotta se nell’impianto avviene una chiamata da un posto esterno.
L'accensione del videocitofono può avvenire anche selezionando
l'ingresso desiderato dalla rubrica:
premere il tasto
- selezionare il nome dell'ingresso - premere OK
per la conferma.
Se premendo il tasto
(o OK durante la selezione in rubrica) il
videocitofono rimane spento e si ode un tono di occupato, occorre
attendere che l'impianto ritorni libero.
Se alla pulsantiera di un posto esterno
è collegata una telecamera aggiuntiva
esterna, per poter commutare l'imma-
gine delle due telecamere, occorre: -
premere il tasto "menu" - selezionare
"telecamera" - premere il tasto OK
(ogni pressione commuta l'immagine
da una telecamera all'altra).
Effettuare o ricevere una chiamata intercomunicante da altro
utente o tra videocitofoni di un appartamento
Con impianto a riposo, è possibile effettuare una chiamata
intercomunicante ad un altro utente o ad un altro videocitofono del
proprio appartamento. Per eseguire questa operazione bisogna avere
preventivamente memorizzato in rubrica gli indirizzi degli utenti e degli
interni che si desidera chiamare.
Entrare in rubrica premendo il tasto
, dall'elenco che appare
selezionare l'utente desiderato e premere il tasto OK; sullo schermo
appare il nome dell'utente ed un tono di libero conferma l'avvenuta
chiamata; se invece si ode un tono di occupato, attendere che l'impianto
ritorni libero. Il videocitofono dell’altro utente suonerà (senza accendersi)
con il timbro scelto nella fase di programmazione. Se l’utente chiamato
risponde entro 30 secondi ha inizio una conversazione che può durare
fino a 90 secondi, altrimenti l’impianto ritorna libero.
Una chiamata da posto esterno ad un qualunque utente dell’impianto
concluderà forzatamente la conversazione interna in corso.
Telecamera
Ingresso
Aperturacancello
Aperturacancello
Impostazioni
If the installation includes more external door stations to monitor them
selectively it is necessary to press the button "menu"; from the list
select the requested entrance and press button OK. Pay attention to
press the button only once because a second pressure of this button
will activate the door lock release.
The monitor function lasts about 30 seconds, but will be interrupted
in case of a call from an external door station.
Monitor function can be executed also selecting the entrance to
monitor from the list:
Press button
– select the entrance – press OK to confirm.
If pressing the button (or OK when selecting the door station from
the list) the videointercom remains switched OFF and a busy tone is
heard, the system is busy and it is necessary to wait until the system
becomes free.
If a supplementary camera is
connected to the door station, to switch
the signal between the 2 cameras it is
necessary to: -press button “menu” –
select “camera” - press button OK
(any time you press button OK the
image switches from one camera to
the other).
Making or receiving a call from another user or from another
device in the same apartment.
When the installation is in stand-by, you can make an
intercommunicating call to another user or to another device in the
same apartment; you must have stored the names and address of the
desired users or devices in the “Contacts” list.
Display the contact list by pressing button
, from the list select
the requested user or device and press the button
OK; on the screen
appears the name of the user and you will hear a calling tone to confirm
the call has been made; if you get a busy tone, wait until the system
becomes free.
The videointercom of the other user will ring (without switching-ON)
with the programmed melody. If the called user answers within 30
seconds, a 90-second conversation starts, otherwise the system
goes back to free.
The internal conversation will be automatically interrupted in case of
call from external door station to any other user.
Camera
Entrance
Gate
Settings
- 28 -
___
Progr.àdistance
Progr. à distance
___
Program. remota
Program. remota
Italiano
English
Español
Français
Langue
Italiano
English
Español
Français
Idioma
Vide1
Vide1
Vide2
Vide2
Vide 3
Vide 3
Vide4
Vide4
Vide5
Vide5
Adresse supplém.
Adresse supplém.
Vide1
Vide1
Adresse
Pièce
Vacio 1
Vacio 1
Vacio 2
Vacio 3
Vacio 4
Vacio 5
Dir. adicional
Dir. adicional
Vacio 1
Vacio 1
Dirección
Estancia
programado como principal, naturalmente podrá ser el lo principal
por el propio piso.
Para programar la función
“dirección adicional” hace falta
proceder en el modo siguiente:
– colocar el cursor en “dir.
adicional” - apretar OK; se
visualizan 10 casillas vacías
si ninguna se ha programado
anteriormente – seleccionar
la primera libre y apretar OK;
- seleccionar “dirección” y apretar
OK – mantener apretada la tecla
o
para elegir la dirección adicional
deseada (direcciones del 1 al 200) –
apretar OK para acceder a la página
de confirmación: - seleccionar “anula”
para volver a la pantalla de la dirección - seleccionar “guarda” para
salir confirmando la nueva dirección - seleccionar “no guardar” para
salir sin hacer variaciones.
- seleccionar “estancia”- apretar OK – mantener apretada la tecla
o para elegir la dirección de habitación deseada (del 0 al 7)
– apretar OK para acceder a la página de confirmación: - seleccionar
“anula” para volver a la pantalla de la habitación - seleccionar
“guarda” para salir confirmando el nuevo valor - seleccionar “no
guardar” para salir sin hacer variaciones.
- Programación remota – La dirección del usuario también puede
memorizarse en el videoportero realizando una llamada desde
una placa de calle o centralita de conserjería.
- En el videoportero colocar el cursor en “Program.remota” -
apretar OK; efectuar una llamada de la placa de calle o centralita
de conserjería en menos de 2 minutos. En instalaciones donde
existe una placa digital TD2100 marcar el número que se quiere
asignar al monitor y pulsar “
”; en instalaciones donde hay
codificador CD2131, CD2132, CD2134 o CD2138 presionar el
pulsador de la placa que se quiere asignar a esa vivienda; en
instalaciones con centralita de conserjería PDX2000 descolgar el
micro-teléfono, marcar la dirección y apretar “
”.
Automáticamente, el videoportero
recibe la llamada. Presionar el
pulsador para entrar en
conversación con la placa de calle
y verificar el correcto funciona-
miento del aparato; la programación
se indica la placa de calle con un
tono de confirmación en caso de
aceptación o con un tono de disuasión en caso de error.
- Repetir las fases de programación para todos los monitores de
la instalación.
- Relanzar A1 (Timbre).
La llamada de piso hace sólo tocar el videoportero a cuyos bornes
( A1 y GN) son conectados los hilos del pulsador timbre; si se quiere
también reenviar el timbre sobre todos los otros videoporteros
presentes en el piso hace falta proceder como indicado siguiendo:
- seleccionar “Relanzar A1” y apretar OK; seleccionar “deshabilitado”
para no permitir la reactivación de la llamada del timbre a los otros
videoporteros o “habilitado” para permitirla.
Apretar OK
para confirmar y después para salir.
Idioma – Colocar el cursor en
“Idioma” y apretar OK; con
las teclas seleccionar el
idioma preferido y apretar OK
para confirmar; apretar
para volver a la página
anterior.
Pour programmer la fonction “adresse supplémentaire” il faut procéder
de la manière suivante:
– positionner le curseur sur
“adresse supplém. “ – appuyer
sur OK; 10 cases vides
s’affichent si aucune n’a été
programmée précédemment
- sélectionner la première de
libre et appuyer sur OK;
- sélectionner “adresse” et appuyer
sur OK - tenir enfoncée la touche
ou pour choisir l’adresse
supplémentaire souhaitée (adresses
de 1 à 200) - appuyer sur OK pour
accéder à la page de confirmation: -
sélectionner “annuler” pour retourner
à la page-écran de l’adresse -
sélectionner “sauvegarder” pour sortir en confirmant la nouvelle
adresse - sélectionner “ne pas sauvegarder” pour abandonner
sans aucune modification.
- sélectionner “pièce”- appuyer sur OK - tenir enfoncée la touche
ou pour choisir l’adresse de la pièce souhaitée (de 0 à 7) -
appuyer sur OK pour accéder à la page de confirmation: -
sélectionner “annuler” pour revenir à la page-écran de la pièce -
sélectionner “sauvegarder” pour abandonner en confirmant la
nouvelle valeur - sélectionner “ne pas sauvegarder” pour abandonner
sans changer.
- Programmation à distance – L’adresse de l’utilisateur peut aussi
être mémorisée sur le vidéophone en effectuant un appel d’une
plaque de rue ou d’un standard de conciergerie.
- Sur le vidéophone, positionner le curseur sur “Progr. à distance”
– appuyer sur OK; effectuer un appel depuis un poste de rue ou
standard pour portier dans les 2 minutes suivantes. Si l’installation
prévoit le clavier digital TD2100, composer le numéro que l’on veut
affecter au vidéophone et appuyer sur “
”; si l’installation prévoit
le codeur digital CD2131, CD2132, CD2134 ou CD2138, il faut
appuyer, sur la plaque de rue, sur le bouton poussoir que l’on
souhaite affecter à l’usager; sur des installations avec standard de
conciergerie PDX2000, soulever le micro-téléphone, composer
l’adresse et appuyer sur “
”. Le vidéophone reçoit
automatiquement l’appel. Appuyer
sur
pour commencer à parler
avec le poste de rue et vérifier que
l’appareil fonctionne correctement;
la programmation est signalée sur le
poste de rue par une tonalité de
confirmation si elle a été acceptée ou
de dissuasion si elle est incorrecte.
- Il faut répéter les phases de programmation sur tous les vidéophones
présents dans l’installation.
-Relance A1 (sonnette)
L’appel d’étage fait toucher seulement le moniteur auxquels bornes,
A1 et GN sont raccordés les fils du bouton de la sonnette; si on veut
relancer aussi la sonnerie sur tous les autres moniteurs présents
dans l’appartement il faut procéder comme suite:
- sélectionner “Relance A1” et appuyer sur OK; sélectionner
“interdit” pour ne pas autoriser la relance de l’appel de la sonnette
aux autres vidéophones ou “autorisé” pour l’autoriser.
Appuyer sur OK pour confirmer puis sur pour abandonner.
Langue – Positionner le
curseur sur “Langue” et
appuyer sur OK; avec les
touches , sélectionner la
langue préférée et appuyer
sur OK pour confirmer;
appuyer sur
pour revenir à
la page précédente.
La pagina si sta caricando...
La pagina si sta caricando...
La pagina si sta caricando...
-
 1
1
-
 2
2
-
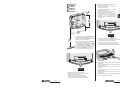 3
3
-
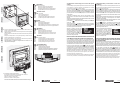 4
4
-
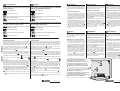 5
5
-
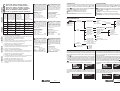 6
6
-
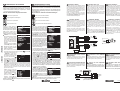 7
7
-
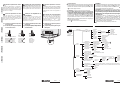 8
8
-
 9
9
-
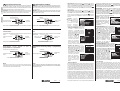 10
10
-
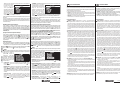 11
11
-
 12
12
-
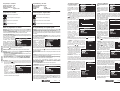 13
13
-
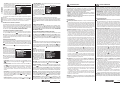 14
14
-
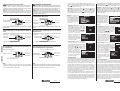 15
15
-
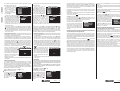 16
16
-
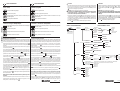 17
17
-
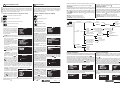 18
18
-
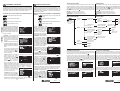 19
19
-
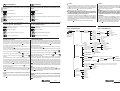 20
20
-
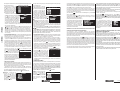 21
21
-
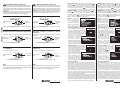 22
22
-
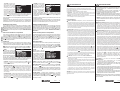 23
23
-
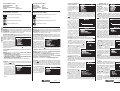 24
24


ACI Farfisa ML2002C Manuale del proprietario
- Tipo
- Manuale del proprietario
in altre lingue
- English: ACI Farfisa ML2002C Owner's manual
- français: ACI Farfisa ML2002C Le manuel du propriétaire
- español: ACI Farfisa ML2002C El manual del propietario
- Deutsch: ACI Farfisa ML2002C Bedienungsanleitung
- português: ACI Farfisa ML2002C Manual do proprietário
Documenti correlati
-
ACI Farfisa ZH1262W / ZH1262B Manuale del proprietario
-
ACI Farfisa EH9161CW Manuale del proprietario
-
-
-
-
-
-
-
-
Altri documenti
-
Amplicomms RF 200 Istruzioni per l'uso
-
-
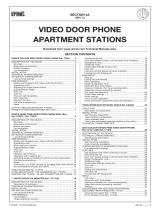 urmet domus MT124-027 Technical Manual
-
Aiphone GF-2B Manuale utente
-
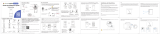 Ismartgate Doorbell Manuale del proprietario
-
Bticino 306905 Istruzioni per l'uso
-
 SCS Sentinel CSF0041 Manuale del proprietario
-
-
-


