Rane BLACK & BLUE Guida utente
- Categoria
- Amplificatore per strumenti musicali
- Tipo
- Guida utente

User Guide
English (3–11)
Guía del usuario
Español (12–20)
Guide d’utilisation
Français (21–29)
Guida per l’uso
Italiano (30–38)
Benutzerhandbuch
Deutsch (39–47)
A
ppendi
x
English (48–49)

2

3
User Guide (English)
Introduction
Thank you for purchasing the Black & Blue. At Rane, performance and reliability mean as
much to us as they do to you. That’s why we design our equipment with only one thing in
mind—to make your performance the best it can be.
Box Contents
Black & Blue
Power Cable
Euroblock
(3) Bluetooth antennas
User Guide
Rack Ears (attached to unit)
Safety & Warranty Manual
Support
For the latest information about this product (documentation, technical specifications, system
requirements, compatibility information, etc.) and product registration, visit rane.com.
For additional product support, visit rane.com/support.

4
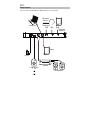
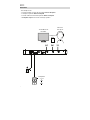
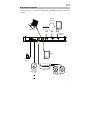
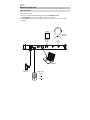
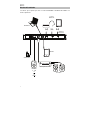
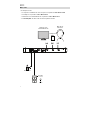
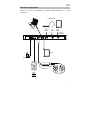
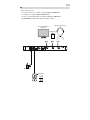
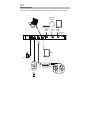
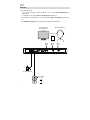
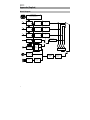
Setup Diagram
Items not listed under Introduction > Box Contents are sold separately.
Compute
r
Bluetooth
Sources
Tablet
Loudspeake
r
4 - 8
or
70 V
or
100 V
Powe
r
Bluetooth
A
ntennas
Amplifier
Loudspeakers

5
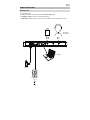
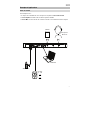
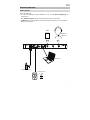
Application Examples
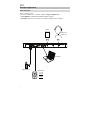
Meeting Room
This example shows:
- a head-worn Bluetooth microphone paired to Bluetooth input A
- the Amplifier output connected to full-range speakers
- the Mix button is depressed to monitor a mix of the Bluetooth A and Computer sources
Tablet
Computer
Power
Loudspeaker
4 - 8
or
70 V
or
100 V
Bluetooth
microphone

6
Coffee Bar
This example shows:
- a head-worn Bluetooth microphone paired to Bluetooth input A
- a smartphone paired to Bluetooth input B
- a TV with a Bluetooth transmitter paired to Bluetooth input C
- the Amplifier output connected to full-range speakers
Smartphone
TV with Bluetooth
transmitter
Bluetooth
microphone
Power
Loudspeaker
4 - 8
or
70 V
or
100 V

7
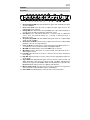
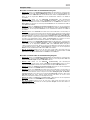
Features
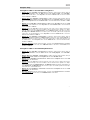
Front Panel
1. Bluetooth Signal LED: This LED will illuminate green when the Bluetooth signal
exceeds -40 dBFS.
2. Input Level Knob: Turn this knob to adjust the input signal level for the
individual Bluetooth channels.
3. Pairing LED: This LED flashes when the Pair button is pressed and held for 3
seconds and is lit solid when paired to a Bluetooth source.
4. Pair Button: Press and hold this button for 3 seconds to pair to a Bluetooth
source. Press and hold this button for 3 seconds to disconnect from a
Bluetooth source.
5. Computer Signal LED: This LED will illuminate green when the computer USB
signal exceeds -40 dBFS.
6. Computer Level Knob: Turn this knob to adjust the level for the computer USB
playback or the 1/8” (3.5 mm) TRS input.
7. Listen To Knob: Turn this knob to select which input signal (Bluetooth A, B, C,
or Computer) is sent to the Master output and Amplifier output.
8. Mix LED: This LED illuminates yellow when Mix mode is selected.
9. Mix Button: Depress this button to monitor a blend of the Bluetooth A, B, C,
and Computer sources.
10. Low EQ: Adjust this knob to increase or decrease the low (bass) frequencies
for all signals.
11. High EQ: Adjust this knob to increase or decrease the high (treble) frequencies
for all signals.
12. Signal LED: This LED illuminates green when the master volume exceeds -40
dBFS, illuminates yellow when the signal exceeds -10 dBFS, and illuminates
red when the signal exceeds 0 dBFS. When the LED illuminates red, reduce the
Input Level knob settings to prevent “clipping” and distortion.
13. Master Volume Knob: Turn this knob to increase or decrease the signal level
sent to the Master output, Amplifier output, and USB port.
14. Power LED: This LED illuminates yellow when the unit is powered on.
9
1
2
3
4
1
2
3
4
1
2
3
4
5
6
7
8
10
10
11
11
12
12
13
13
14
14
12 34
5
6
7

8
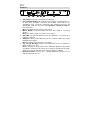
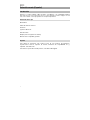
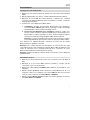
Rear Panel
1. Power Input: Connect the included power cable here.
2. Power Amplifier Output: This sends the master signal to your loudspeaker. 4 –
32 ohms, 70 V, and 100 V connections are provided. Connect this to your
loudspeaker using a properly terminated 4-pin Euroblock connector and
appropriately sized wire. See the section Operation > Euroblock Setup for
more information.
Note: This output always provides a mono signal.
3. Master Output: Connect this balanced mono XLR output to a powered
speaker.
Note: This output is always summed to a mono signal.
4. USB LED: This LED will illuminate when the USB port is connected to a
computer’s USB port.
5. USB Port: Connect a USB cable from here to a computer’s USB port for audio
playback and recording.
Note: This output always provides a mono signal.
6. 1/8” (3.5 mm) TRS Input: Connect a line-level device such as a smartphone,
tablet, CD player, etc. here.
Note: Connecting to this jack disconnects USB input (playback). USB output
(recording) is unaffected. This allows for recording of three Bluetooth signals
and the 1/8" (3.5 mm) TRS input to the computer using the USB port.
7. Bluetooth Antenna: Connect the 3 included Bluetooth antennas here for
pairing to Bluetooth sources.
9
1
2
3
4
1
2
3
4
1
2
3
4
5
6
7
8
10
11
12
13
14
1 2 3 4
5
6 7

9
Operation
Pairing Bluetooth Sources
1. Connect the 3 included Bluetooth antennas to the connectors on Black & Blue’s
rear panel.
2. Power on Black & Blue. The power LED will illuminate solid.
3. Press and hold the Pair button for 3 seconds for the particular Bluetooth input
you desire to connect to for your Bluetooth source. The Pair LED will flash.
4. Pair your Bluetooth source to Black & Blue.
a. Smartphone: open Bluetooth settings in your smartphone, find Black &
Blue-A, and connect. The pair LED on Black & Blue will be lit solid when
connected.
b. Bluetooth headset mic: turn on the headset mic. The mic LED will flash
quickly when searching for Black & Blue. When paired successfully, the
mic LED will flash slowly and Black & Blue’s pair LED will be lit solid.
Note: Bluetooth audio cannot be sent to a headset’s headphones.
Bluetooth audio will only be sent from a Bluetooth headset’s microphone to
Black & Blue.
To disconnect from a Bluetooth source, press and hold the Bluetooth input’s Pairing
button for 3 seconds.
Note: If the mic connects with a different Bluetooth source which is not desired (for
example, Black & Blue-A), press the search button on the Bluetooth headset mic
and connect to the next Bluetooth source (Black & Blue-B or Black & Blue-C).
Note: Repeat the above steps to connect additional Bluetooth sources.
Selecting Sources
1. Connect the included Bluetooth antennas to the connectors on Black & Blue’s
rear panel.
2. Press and hold the Pair button(s) for 3 seconds to connect to your Bluetooth
source(s).
3. Connect a USB cable from Black & Blue's USB port to an available USB port on
your computer.
4. Adjust the Listen To knob to select Bluetooth A, B, C, or Computer as source.
Press the Mix button to hear a blend of all sources from the Master output and
Power Amplifier output.
5. Turn the Master Volume knob to adjust the signal level sent to the Master
output and Power Amplifier output.

10
Recording
1. Connect a USB cable from Black & Blue's USB port to an available USB port on
your computer.
2. See the section Computer Setup > Setting Black & Blue as the Default
Recording Device
to set Black & Blue as the default recording device.
3. On your computer, open your preferred recording software.
Note: To hear music while it’s playing or to monitor recording content, listen
through your computer's speakers, or connect Black & Blue's Master output to
an amplifier or powered speakers.
Playback
You can listen to the music on your computer through Black & Blue. See the section
Computer Setup > Setting Black & Blue as the Default Playback Device before
playing back your computer music.
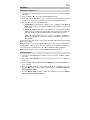
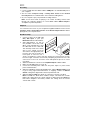
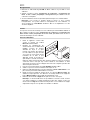
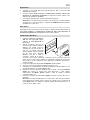
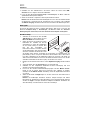
Euroblock Setup
1. Connect a device to the 1/8” (3.5
mm) TRS Input or pair your
Bluetooth source to Black & Blue.
2. Strip approximately 1/4 inch (6
mm) insulation off the wire ends.
When using stranded wires, twist
the cable ends to form a taut lead.
This will help avoid short circuits
due to loose strands. Insert the
wire end into the appropriate port.
Push the wire until it reaches the
lowest point in connector. Use a
small (-) screwdriver to secure each wire. Ensure the connections fit securely,
but not too tight. Check the connection by attempting to pull the wire out of the
connector. If it comes out, loosen the screw and repeat the process to secure
more firmly.
3. Attach the Euroblock connector to the Amplifier Output on Black & Blue.
4. Make sure all Level knobs are set to “0”.
5. Connect the included power cable from the power input to a power outlet;
power on Black & Blue.
6. Adjust the individual channel input Level knobs and the Master Volume knob
to get a strong signal without distortion or “clipping”. Reduce the Master
Volume setting when Signal LED continuously illuminates red.
7. Adjust the Low and High tone knobs to contour the sound for your liking.
Note: The Low tone knob affects rumbles, thumps, and other bass sounds.
Reduce this setting when only speech signals are being mixed. The High tone
knob affects brightness and clarity. Reduce this setting when the content
sounds shrill or harsh.

11
Computer Setup
Setting Black & Blue as the Default Recording Device
• Windows XP: Click Start Menu Control Panel (or Settings Control Panel in Classic View)
Sound and Audio Devices. Click the Audio tab and under Sound recording, select USB Audio
Codec as the default device. Select Properties and click the Advanced tab to select the Default
Format, 44100 Hz or 48000 Hz.
• Windows Vista: Click Start Menu Control Panel (or Settings Control Panel in Classic View)
Hardware and Sound Sound. Click the Recording tab and select USB Audio Codec as the default
device. Select Properties and click the Advanced tab to select the Default Format, 44100 Hz or 48000
Hz.
• Windows 7: Click Start Menu Control Panel Sound. Click the Recording tab and select USB
Audio Codec as the default device. Select Properties and click the Advanced tab to select the Default
Format, 44100 Hz or 48000 Hz.
• Windows 8: From the Start Menu, click the lower-left corner of the screen to bring yourself to the
Desktop. In the bottom-right corner of the Taskbar, locate the Volume Control "Speaker" icon. Right-
click the speaker and select Playback Devices. In the Windows Sound control panel select the
Recording tab. If USB Audio Codec does not have a green "check mark" symbol next to it, right-click
it and select "Set as Default Device". Select Properties and click the Advanced tab to select the
Default Format, 44100 Hz or 48000 Hz.
• Windows 10: Click Start Menu Control Panel (or Settings Control Panel in Classic View)
Hardware and Sound Sound. In the Windows Sound control panel select the Recording tab. If
USB Audio Codec does not have a green "check mark" symbol next to it, right-click it and select "Set
as Default Device". Select Properties and click the Advanced tab to select the Default Format,
44100 Hz or 48000 Hz.
• Mac OS X 10.4-10.11: Click the upper-left "apple" icon then click System Preferences Sound.
Click the Input tab. From the menu, select USB Audio Codec as the device. Under Format, select
44100 Hz or 48000 Hz.
Setting Black & Blue as the Default Playback Device
• Windows XP: Click Start Menu Control Panel (or Settings Control Panel in Classic View)
Sound and Audio Devices. Click the Audio tab and under Sound playback, select USB Audio
Codec.
• Windows Vista: Click Start Menu Control Panel (or Settings Control Panel in Classic View)
Hardware and Sound Sound. Click the Playback tab and select USB Audio Codec.
• Windows 7: Click Start Menu Control Panel Sound. Click the Playback tab and select USB
Audio Codec as the default device.
• Windows 8: From the Start menu, click the lower-left corner of the screen to bring yourself to the
Desktop. In the bottom-right corner of the Taskbar, locate the Volume Control "Speaker" icon. Right-
click the speaker and select Playback Devices. The Windows Sound control panel should appear set
on the Playback tab. If USB Audio Codec does not have a green "check mark" symbol next to it, right-
click it and select "Set as Default Device".
• Windows 10: Click Start Menu Control Panel Sound. Click the Playback tab and select USB
Audio Codec as the default device.
• Mac OS X 10.4-10.11: Click the upper-left "apple" icon then click System Preferences Sound.
Click the Output tab. From the menu, select USB Audio Codec as the device.

12
Guía del usuario (Español)
Introducción
Gracias por comprar el Black & Blue. En Rane, el rendimiento y la confiabilidad significan
tanto para nosotros como para usted. Por eso es que diseñamos nuestros equipos con una
sola cosa en mente—hacer que pueda tocar su mejor interpretación.
Contenido de la caja
Black & Blue
Cable del suministro eléctrico
Euroblock
(3) antenas Bluetooth
Guía del usuario
Orejetas para rack (sujetas a la unidad)
Manual sobre la seguridad y garantía
Soporte
Para obtener la información más reciente acerca de este producto (documentación,
especificaciones técnicas, requisitos de sistema, información de compatibilidad, etc.) y
registrarlo, visite rane.com.
Para obtener soporte adicional del producto, visite rane.com/support.

13
Diagrama de instalación
Los elementos que no se enumeran en Introducción > Contenido de la caja se venden por
separado.
Ordenador
Fuentes
Bluetooth
Tableta
Black Series
4 - 8
o
70 V
o
100 V
Suministro
eléctrico
Bluetooth
Antenas
Amplificador
Altavoces

14
Ejemplos de aplicación
Salas de reunión
Este ejemplo muestra:
- Un micrófono Bluetooth de diadema apareado a la entrada Bluetooth
A
- La salida Amplifier conectada a los altavoces de rango completo
- El botón
Mix se pulsa para monitorizar una mezcla de las fuentes de Bluetooth A y
Computer
Tableta
Ordenador
Suministro
eléctrico
Black Series
4 - 8
o
70 V
o
100 V
Micrófono
Bluetooth

15
Cafetería
Este ejemplo muestra:
- Un micrófono Bluetooth de diadema apareado a la entrada Bluetooth
A
- Un teléfono inteligente (smartphone) apareado con la
entrada Bluetooth B
- Una TV con un transmisor Bluetooth apareado a la entrada Bluetooth
C
- La salida Amplifier conectada a los altavoces de rango completo
Teléfono
inteligente
(smartphone)
Una TV con un
transmisor Bluetooth
Micrófono
Bluetooth
Suministro eléctrico
Black Series
4 - 8
o
70 V
o
100 V

16
Características
Panel frontal
1. LED de señal Bluetooth: Este LED se iluminará de color verde cuando la señal
Bluetooth supere los -40 dBFS.
2. Perilla de nivel de entrada: Gire esta perilla para ajustar el nivel de la señal de
entrada de los
canales Bluetooth individuales.
3. LED de apareamiento: Este LED parpadea cuando el botón Pair se mantiene
pulsado durante 3 segundos y se enciende de forma permanente cuando está
apareado con una fuente Bluetooth.
4. Botón Pair: Mantenga pulsado este botón durante 3 segundos para aparear la
unidad con una fuente Bluetooth. Mantenga pulsado este botón durante 3
segundos para desconectar la unidad de una fuente Bluetooth.
5. LED de señal del ordenador: Este LED se iluminará de color verde cuando la
señal USB del ordenador supere los -40 dBFS.
6. Perilla de nivel Computer: Gire esta perilla para ajustar el nivel de la
reproducción USB del ordenador o la entrada TRS de 3,5 mm (1/8 pulg.).
7. Perilla Listen To: Gire esta perilla para seleccionar la señal de entrada
(Bluetooth A, B, C o Computer) que se envía a la salida Master y a la salida
Amplifier.
8. LED
Mix: Este LED se enciende de color amarillo cuando se selecciona el
modo mezcla.
9. Botón
Mix: Pulse este botón para monitorizar una mezcla de las fuentes
Bluetooth A, B, C y Computer.
10. Ecualización de graves: Ajuste esta perilla para aumentar o disminuir las
frecuencias bajas (graves) de todas las señales.
11. Ecualización de agudos: Ajuste esta perilla para aumentar o disminuir las
frecuencias altas (agudos) de todas las señales.
12. LED de señal: Este LED se enciende de color verde cuando el volumen
maestro excede los -40 dBFS, se entiende color amarillo cuando excede los -
10 dBFS y se ilumina de color rojo cuando excede los 0 dBFS. Cuando el LED
se encienda de color rojo, disminuye el ajuste de la perilla de nivel de entrada
para evitar el "recorte" y la distorsión.
13. Perilla
Master Volume: Gire esta perilla para aumentar o disminuir el nivel de
la señal enviada a la salida maestra, la salida del amplificador y el puerto USB.
14. LED de encendido: Este LED se enciende de color amarillo cuando la unidad
está encendida.
9
1
2
3
4
1
2
3
4
1
2
3
4
5
6
7
8
10
10
11
11
12
12
13
13
14
14
12 34
5
6
7

17
Panel trasero
1. Entrada de corriente: Conecte aquí el cable de alimentación incluido.
2. Salida del amplificador de potencia: Esta salida envía la señal maestra a su
altavoz. Se proveen conexiones de 4 – 32 ohmios, y 70 y 100 V. Conecte esta
salida su altavoz utilizando un conector Euroblock de 4 patillas correctamente
terminado y un cable del tamaño apropiado. Consulte la sección
Funcionamiento > Configuración de Euroblock para obtener más
información.
Nota: Esta salida siempre emite una señal mono.
3. Salida
Master: Conecte esta salida XLR mono balanceada a un altavoz
alimentado.
Nota: Esta salida siempre se suma a una señal mono.
4. LED USB: Este LED se enciende cuando el puerto USB se conecta al puerto
USB de un ordenador.
5. Puerto USB: Conecte un cable USB desde aquí hasta el puerto USB de un
ordenador para reproducir y grabar audio.
Nota: Esta salida siempre emite una señal mono.
6. Entrada TRS de 3,5 mm (1/8 pulg.): Conecte aquí un dispositivo de nivel de
línea tal como un teléfono inteligente (smartphone), tableta, reproductor de CD,
etc.
Nota: Al conectar un dispositivo a este conector, se desconecta la entrada
USB (reproducción). La salida de USB (grabación) no se ve afectada. Esto
permite la grabación de tres señales Bluetooth y de la entrada TRS de 3,5 mm
(1/8 pulg.) en el ordenador a través del puerto USB.
7. Bluetooth Antenna: Conecte aquí las 3 antenas Bluetooth incluidas a fin de
aparearse con fuentes Bluetooth.
9
1
2
3
4
1
2
3
4
1
2
3
4
5
6
7
8
10
11
12
13
14
1 2 3 4
5
6 7

18
Funcionamiento
Apareamiento de fuentes Bluetooth
1. Conecte las 3 antenas Bluetooth incluidas en los conectores del panel trasero
del Black & Blue.
2. Encienda el Black & Blue. El LED de encendido se enciende de forma
permanente.
3. Mantenga pulsado durante 3 segundos el botón Pair de la entrada Bluetooth en
particular a la cual desea conectarse para utilizar como fuente Bluetooth. Su
LED de apareamiento parpadeará.
4. Aparee su fuente Bluetooth con el Black & Blue.
a. Teléfono inteligente (smartphone): abra los ajustes de Bluetooth en su
teléfono inteligente, busque Black & Blue-A, y establezca la conexión. El
LED de apareamiento del Black & Blue se encenderá de forma permanente
una vez conectado.
b. Micrófono con auriculares Bluetooth: encienda el micrófono con
auriculares. El LED del micrófono parpadeará rápidamente mientras busca al
Black & Blue. Una vez apareado exitosamente, el LED del micrófono
parpadeará lentamente y el LED de apareamiento del Black & Bluese
encenderá de forma permanente.
Nota: No se puede enviar audio Bluetooth a los auriculares. El audio Bluetooth sólo
se puede enviar desde un micrófono con auriculares Bluetooth al Black & Blue.
Para desconectarse de una fuente Bluetooth, mantenga pulsado el botón de
apareamiento de la entrada Bluetoothdurante 3 segundos.
Nota: Si el micrófono se conecta a una fuente Bluetooth distinta no deseada (por
ejemplo, el Black & Blue-A), pulse el botón de búsqueda del micrófono con
auriculares Bluetooth y conéctese a la siguiente fuente Bluetooth (Black & Blue-B o
Black & Blue-C).
Nota: Repita los pasos anteriores para conectarse a fuentes Bluetooth adicionales.
Selección de fuentes
1. Conecte las antenas Bluetooth incluidas en los conectores del panel trasero del
Black & Blue.
2. Mantenga pulsado el/los botón(es) Pair durante 3 segundos para conectar su(s)
fuente(s) Bluetooth.
3. Conecte un cable USB desde el puerto USB del Black & Blue a un puerto USB
disponible en el ordenador.
4. Ajuste la perilla Listen To para seleccionar Bluetooth A, B, C o Computer como
fuente. Pulse el botón Mix para escuchar una mezcla de todas las fuentes
desde la
salida Master y la salida del amplificador de potencia.
5. Gire la perilla Master Volume para ajustar el nivel de la señal enviada a la salida
Master y la salida del amplificador de potencia.

19
Grabación
1. Conecte un cable USB desde el puerto USB del Black & Blue a un puerto USB disponible
en el ordenador.
2. Consulte la sección Configuración del ordenador > Configuración del Black & Blue
como dispositivo de grabación predeterminado
para configurar al Black & Blue como
dispositivo de grabación predeterminado.
3. En su ordenador, abra su software de grabación preferido.
Nota: Para escuchar la música mientras se reproduce o para monitorizar el contenido que
se está grabando, escuche a través de los altavoces de su ordenador o conecte la salida
Master del Black & Blue a un amplificador o a altavoces alimentados.
Reproducción
Puede escuchar la música en su ordenador a través del Black & Blue. Consulte la sección
Configuración del ordenador > Configuración del Black & Blue como dispositivo de
reproducción predeterminado
antes de reproducir la música de su ordenador.
Configuración de Euroblock
1. Conecte un dispositivo a la entrada
TRS de 3,5 mm (1/8 pulg.) o aparee
su fuente Bluetooth con el Black &
Blue.
2. Pele aproximadamente 6 mm (1/4
pulgadas) de aislamiento de los
extremos del cable. Si utiliza cables
trenzados, retuerza los extremos de los
cables para formar un cable tenso.
Esto ayudará a evitar cortocircuitos
debido a cables sueltos. Inserte el
extremo del cable en el puerto
apropiado. Empuje el cable hasta que
llegue al punto más bajo del conector. Utilice un destornillador (-) pequeño para sujetar
cada cable. Asegúrese de que las conexiones queden firmes pero no demasiado
apretadas. Verifique la conexión intentando tirar del cable para arrancarlo del conector.
Si el cable se sale, afloje el tornillo y repita el proceso para sujetarlo con mayor firmeza.
3. Conecte el conector Euroblock a la salida
Amplifier en el Black & Blue.
4. Asegúrese de que todas las perillas Level estén ajustadas en “0”.
5. Conecte el cable de corriente incluido desde la entrada de corriente a la toma de
corriente; encienda el Black & Blue.
6. Ajuste las perillas Level de cada canal individual y la perilla Master Volume para obtener
una señal fuerte sin distorsiones ni "recortes". Disminuya el ajuste de Master Volume
cuando el LED de señal se encienda continuamente de color rojo.
7. Ajuste las perillas de tono Low y High para darle al sonido el contorno que desee.
Nota: La perilla de tono Low afecta los retumbos los golpes y otros sonidos graves.
Disminuya este ajuste únicamente cuando se estén mezclando señales de voz. La perilla
de tono High afecta el brillo y la claridad. Disminuya este ajuste cuando el contenido
suene estridente o chillón.

20
Configuración del ordenador
Cómo ajustar el Black & Blue como dispositivo de grabación predeterminado
• Windows XP: Haga clic en el menú Start (Inicio) Control Panel (Panel de control) (o Settings [Ajustes] Control Panel
[Panel de control] en la vista clásica) Sound and Audio Devices (Dispositivos de sonido y audio). Haga clic en la
pestaña Audio y bajo Sound recording (Grabación de sonido), seleccione USB Audio Codec como dispositivo
predeterminado. Seleccione Properties (Propiedades) y haga clic en la pestaña Advanced (Avanzado) para seleccionar
el formato predeterminado, 44100 o 48000 Hz.
• Windows Vista: Haga clic en el menú Start (Inicio) Control Panel (Panel de control) (o Settings Control Panel
[Configuración > Panel de control] en la vista clásica) Hardware and Sound (Hardware y sonido) Sound (Sonido).
Haga clic en la pestaña Recording (Grabación) y seleccione USB Audio Codec (Códec de audio USB) como dispositivo
predeterminado. Seleccione Properties (Propiedades) y haga clic en la pestaña Advanced (Avanzado) para seleccionar
el formato predeterminado, 44100 o 48000 Hz.
• Windows 7: Haga clic en el menú Start (Inicio) Control Panel (Panel de control) Sound (Sonido). Haga clic en la
pestaña Recording (Grabación) y seleccione USB Audio Codec (Códec de audio USB) como dispositivo
predeterminado. Seleccione Properties (Propiedades) y haga clic en la pestaña Advanced (Avanzado) para seleccionar
el formato predeterminado, 44100 o 48000 Hz.
• Windows 8: Desde el menú Start (Inicio), haga clic en la esquina inferior izquierda de la pantalla para entrar al escritorio.
En la esquina inferior derecha de la barra de tareas, localice el icono del "Altavoz" de control de volumen. Haga clic
derecho en el altavoz y seleccione Playback Devices (Dispositivos de reproducción). En el panel de control Windows
Sound (Sonido de Windows), seleccione la pestaña Recording. Si el Códec de audio USB no tiene el símbolo de la
"marca de verificación" verde junto a ella, haga clic derecho en la misma y seleccione "Set as Default Device"
(Configurar como dispositivo predeterminado). Seleccione Properties (Propiedades) y haga clic en la pestaña Advanced
(Avanzado) para seleccionar el formato predeterminado, 44100 o 48000 Hz.
• Windows 10: Haga clic en el menú Start (Inicio) Control Panel (Panel de control) (o Settings Control Panel
[Configuración > Panel de control] en la vista clásica) Hardware and Sound (Hardware y sonido) Sound (Sonido).
En el panel de control Windows Sound (Sonido de Windows), seleccione la pestaña Recording. Si el Códec de audio
USB no tiene el símbolo de la "marca de verificación" verde junto a ella, haga clic derecho en la misma y seleccione "Set
as Default Device" (Configurar como dispositivo predeterminado). Seleccione Properties (Propiedades) y haga clic en la
pestaña Advanced (Avanzado) para seleccionar el formato predeterminado, 44100 o 48000 Hz.
• Mac OS X 10.4-10.11: Haga clic en el icono superior izquierdo de la manzana y luego en System Preferences Sound
(Preferencias del sistema > Sonido). Haga clic en la pestaña Input. En el menú seleccione USB Audio Codec (Códec de
audio USB) como dispositivo. En Format (Formato), seleccione 441000 o 48000 Hz.
Cómo ajustar el Black & Blue como dispositivo de reproducción predeterminado
• Windows XP: Haga clic en el menú Start (Inicio) Control Panel (Panel de control) (o Settings [Ajustes] Control
Panel [Panel de control] en la vista clásica) Sound and Audio Devices (Dispositivos de sonido y audio). Haga clic en
la pestaña Audio y bajo Sound playback (Reproducción de sonido), seleccione USB Audio Codec (Códec de audio
USB).
• Windows Vista: Haga clic en el menú Start (Inicio) Control Panel (Panel de control) (o Settings Control Panel
[Configuración > Panel de control] en la vista clásica) Hardware and Sound (Hardware y sonido) Sound (Sonido).
Haga clic en la pestaña Playback (Reproducción) y seleccione USB Audio Codec (Códec de audio USB).
• Windows 7: Haga clic en el menú Start (Inicio) Control Panel (Panel de control) Sound (Sonido). Haga clic en la
pestaña Playback (Reproducción) y seleccione USB Audio Codec (Códec de audio USB) como dispositivo
predeterminado.
• Windows 8: Desde el menú Start (Inicio), haga clic en la esquina inferior izquierda de la pantalla para entrar al escritorio.
En la esquina inferior derecha de la barra de tareas, localice el icono del "Altavoz" de control de volumen. Haga clic
derecho en el altavoz y seleccione Playback Devices (Dispositivos de reproducción). El panel de control Windows
Sound (Sonido de Windows) debe aparecer en la pestaña Playback (Reproducción). Si el Códec de audio USB no tiene
el símbolo de la "marca de verificación" verde junto a ella, haga clic derecho en la misma y seleccione "Set as Default
Device" (Configurar como dispositivo predeterminado).
• Windows 10: Haga clic en el menú Start (Inicio) Control Panel (Panel de control) Sound (Sonido). Haga clic en la
pestaña Playback (Reproducción) y seleccione USB Audio Codec (Códec de audio USB) como dispositivo
predeterminado.
• Mac OS X 10.4-10.11: Haga clic en el icono superior izquierdo de la manzana y luego en System Preferences
Sound (Preferencias del sistema > Sonido). Haga clic en la pestaña Output (Salida). En el menú seleccione USB Audio
Codec (Códec de audio USB) como dispositivo.
La pagina si sta caricando...
La pagina si sta caricando...
La pagina si sta caricando...
La pagina si sta caricando...
La pagina si sta caricando...
La pagina si sta caricando...
La pagina si sta caricando...
La pagina si sta caricando...
La pagina si sta caricando...
La pagina si sta caricando...
La pagina si sta caricando...
La pagina si sta caricando...
La pagina si sta caricando...
La pagina si sta caricando...
La pagina si sta caricando...
La pagina si sta caricando...
La pagina si sta caricando...
La pagina si sta caricando...
La pagina si sta caricando...
La pagina si sta caricando...
La pagina si sta caricando...
La pagina si sta caricando...
La pagina si sta caricando...
La pagina si sta caricando...
La pagina si sta caricando...
La pagina si sta caricando...
La pagina si sta caricando...
La pagina si sta caricando...
La pagina si sta caricando...
La pagina si sta caricando...
La pagina si sta caricando...
La pagina si sta caricando...
-
 1
1
-
 2
2
-
 3
3
-
 4
4
-
 5
5
-
 6
6
-
 7
7
-
 8
8
-
 9
9
-
 10
10
-
 11
11
-
 12
12
-
 13
13
-
 14
14
-
 15
15
-
 16
16
-
 17
17
-
 18
18
-
 19
19
-
 20
20
-
 21
21
-
 22
22
-
 23
23
-
 24
24
-
 25
25
-
 26
26
-
 27
27
-
 28
28
-
 29
29
-
 30
30
-
 31
31
-
 32
32
-
 33
33
-
 34
34
-
 35
35
-
 36
36
-
 37
37
-
 38
38
-
 39
39
-
 40
40
-
 41
41
-
 42
42
-
 43
43
-
 44
44
-
 45
45
-
 46
46
-
 47
47
-
 48
48
-
 49
49
-
 50
50
-
 51
51
-
 52
52


Rane BLACK & BLUE Guida utente
- Categoria
- Amplificatore per strumenti musicali
- Tipo
- Guida utente
in altre lingue
- français: Rane BLACK & BLUE Mode d'emploi
- español: Rane BLACK & BLUE Guía del usuario
- Deutsch: Rane BLACK & BLUE Benutzerhandbuch
Documenti correlati
Altri documenti
-
 Denon Professional DN-200AZB Manuale utente
-
Alto TS 215 W Manuale del proprietario
-
Denon DN-200AVB Manuale utente
-
Akai BT500 Manuale utente
-
-
iON Pro500BT Black Guida Rapida
-
 Denon Professional Denon DN-280 Manuale utente
-
Marantz Pro Turret Manuale utente
-
-
Alto Trouper Manuale utente

