Rane ZONETECH Guida Rapida
- Categoria
- Ricevitori musicali Bluetooth
- Tipo
- Guida Rapida


2

3
Quickstart Guide (English)
Introduction
Thank you for purchasing the Zonetech. At Rane, performance and reliability mean as much to
us as they do to you. That’s why we design our equipment with only one thing in mind—to
make your performance the best it can be.
Box Contents
Zonetech
(1) 6-pin 3.8 mm Euroblock input
(green, for audio inputs)
(3) 6-pin 3.8 mm Euroblock outputs
(orange, for zone outputs)
(1) 3-pin 3.8 mm Euroblock output
(orange, for zone outputs)
(1) 3-pin 3.8 mm Euroblock input
(black, for logic input)
Bluetooth
®
Antenna
Power Cable
Quickstart Guide
Safety & Warranty Manual
Important: Visit rane.com to download the
full User Guide.
Support
For the latest information about this product (documentation, technical specifications, system
requirements, compatibility information, etc.) and product registration, visit rane.com.
For additional product support, visit rane.com/support.
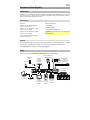
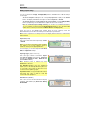
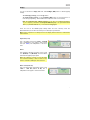
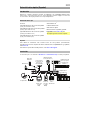
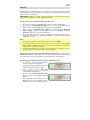
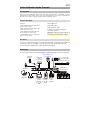
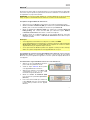
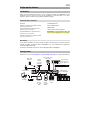
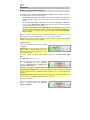
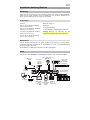
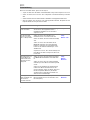
Setup
Items not listed under Introduction > Box Contents are sold separately.
ZONE 2
SOURCE
ZONE 3 ZONE 3
SOURCE STATUS DIMMER
VIDEO
AUX 1
SETUP MICL - AUDIO - R
1 CBL/SAT 3 GAME4 NETWORK
QUICK SELECT
2 Blu-ray
PHONES BACK
ENTER
INFO
SETUP
ZONE 2
SOURCE SELECT
MASTER VOLUME
ON/OFF
AUX 1
HDMI 7 5V/1A
ON/OFF
OPTION
Master
Remote
(e.g., Rane
DR6)
Zone
Remote
(e.g., Rane
DRZH)
Bluetooth
Device
Power
Router
Stereo Audio
Inputs
(Receiver, DVD
Player, etc.)
Powered
Stereo
Speakers
Paging
Remote
(e.g., Rane
RAD16z)
Mono Audio Inputs
(Microphones)
Computer
Zone Amplifier
and Speakers

4
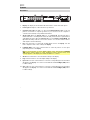
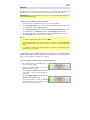
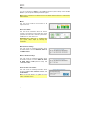
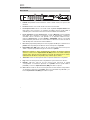
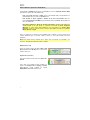
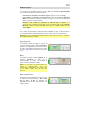
Features
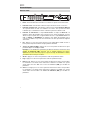
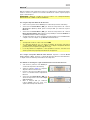
Front Panel
1
2
4
3
56
7
8
9
10
1. Display: This display shows information about Zonetech’s current status and options.
2. Power Light: This light is on when Zonetech is powered on.
3. Computer Link Light: This light is on when the Computer Ethernet port on the rear
panel is connected to a computer (powered on). You can then use the computer to
control Zonetech remotely using a web-based interface.
4. Stream Light: When the Stream Source is set to Bluetooth, this light will flash to
indicate Zonetech is in Pairing Mode and be lit solidly when Zonetech is paired with an
active Bluetooth device. When the Stream Source is set to AirPlay or UPnP/DLNA, this
light will be lit solidly to indicate a successful connection. You can then send the device's
audio signal to Zonetech wirelessly.
5. Info: Press this knob to cycle through the Info pages shown in the display. Turn this
knob to adjust the value of each setting in the display.
6. Left/Right (/): Press each of these buttons to select the previous or next option
(respectively) shown in the display.
Note: To reset Zonetech to factory default settings, press and hold both Left/Right
(/) buttons while powering on. Keep holding the buttons until the factory reset
message appears on the display, then release the buttons to continue.
7. Stream: Press this button to show the Stream settings in the display.
8. Page: Press this button to show the Pager settings in the display.
9. Input 1–6: Press each of these buttons to select the corresponding input. Its information
will appear in the display. You can then use the Info knob and Left/Right (/) buttons
to edit its settings.
10. Zone 1–6: Press each of these buttons to select the corresponding input. Its information
will appear in the display. You can then use the Info knob and Left/Right (/) buttons
to edit its settings.

5
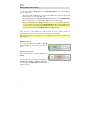
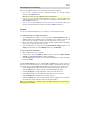
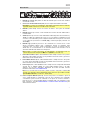
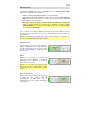
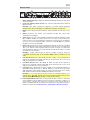
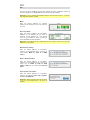
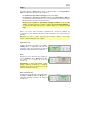
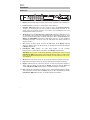
Rear Panel
1
2
4
3333
555
5
67
8
9
10
1. Power Input (IEC): Use a standard IEC cable to connect this input to a power outlet.
2. Bluetooth Antenna Connector (SMA): Connect the included Bluetooth antenna here.
Important: For compliance, you must use the included antenna only. No substitutions or
modifications to the antenna are permitted.
3. Inputs (stereo RCA): Connect audio sources to these stereo input pairs.
4. Inputs (Euroblock): Connect balanced or unbalanced audio sources to these mono inputs.
5. Outputs (Euroblock): Connect line-level (-10 dBV to +4 dBu) devices to these balanced
outputs. The outputs for Zones 1–5 are mono; the Zone 6 output is stereo. Alternatively,
you can configure the Zone 6 output for mono use with a subwoofer (connected to the
R(LO) output) and main loudspeaker (connected to the L(HI) output).
6. Logic Input (Euroblock): Connect normally open external control contacts (relay or
equivalent) to these terminals. When the terminals are connected to each other (i.e., when
the switch is closed), all outputs will be muted. This would typically be used with a fire
alarm system to silence audio output during an emergency.
Note: When this mute function is active, all front-panel controls will be locked. Mute will
appear in the display with a red background.
7. Zone Remotes Ports (RJ45, shielded Cat5e or Cat6 cables): Connect optional Rane
DRZH devices to these ports, which will allow you to select sources and adjust levels for
the zones remotely.
8. Master Remote Port (RJ45, shielded Cat5e or Cat6 cables): Connect an optional Rane
DR6 remote control to this port, which will allow you to select sources and adjust levels
for all zones remotely.
9. Pager Port (RJ45, shielded Cat5e or Cat6 cables): Connect an optional Rane RAD device
(e.g., RAD16z, RAD26, etc.) to provide analog audio and logic inputs. Available functions
will depend on the RAD model. Please see rane.com/zonetech for additional
information.
Note: If you do not need the pager function, you can connect an optional Rane DR6 to
this port instead. This will provide the same functions as a DR6 connected to the Master
Remote port (see #8 above).
10. Computer Ethernet Port (Ethernet): Connect this port to a router or similar access point
during setup. After Zonetech is properly configured, you can connect a computer to
another port on the same router or access point, allowing you to use a web browser to
access an interface to control Zonetech. See Operation > Controlling Zonetech
Remotely for more information.

6
Operation
Editing Input Settings
You can use Zonetech’s display, Left/Right (/) buttons, and Info knob to edit the settings
of each input.
To select an input to edit, press the corresponding Input button (1–6) or the Stream
button. The display will indicate which input is selected: Input 1–6 or Stream.
To show the previous or next setting for the selected input, use the Left/Right (/)
buttons (respectively). Turn the Info knob to adjust the value of each setting.
Note: To control the input settings remotely, you can also use a web-based interface
on your computer (connected to the Computer Ethernet port), or up to two Rane DR6
master remote controls (connected to the Master Remote and Pager port).
These are some of the editable input settings which are most commonly used. The
abbreviated name (shown when the setting is not selected) is in parentheses.
Note: For the complete list of settings shown in the display and their functions, download the
full User Guide.
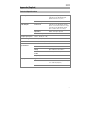
Input Level (Level)
This is the volume level at the input stage: -88.0 to
+12.0 dB.
Tip: If you are unsure of what this level should be,
it is better to use a lower setting to allow for
headroom and to prevent clipping/distortion.
For each input, you can also adjust the Low Shelf,
PEQ, and High Shelf settings.
Input Type (Type)
(Inputs 5 and 6 only)
This is the type of device connected to Input 5
and Input 6: Dynamic (microphone), Condenser
(microphone), Unbalanced Line+, Balanced Line
(default: Balanced Line).
Note: Phantom power is enabled only when
Condenser is selected.
Tip: Unbalanced Line+ sums two unbalanced
signals (such as left and right RCA lines) when one
is connected to the positive (+) input and one is
connected to the negative (-) input.
Tip: Balanced Line is a typical fully balanced line-
level input (e.g., TRS or XLR) as used with
commercial audio equipment.
Stream Source (Source)
This is the source from which Zonetech will play
streamed audio: None (off), Bluetooth, AirPlay,
UPnP/DLNA.

7
Bluetooth
®
In addition to the six audio inputs on the rear panel, you can send an audio signal wirelessly
through Zonetech to any zone using Bluetooth. This signal uses its own input channel.
IMPORTANT: Bluetooth and WiFi may not both be in use at the same time. When Bluetooth is
enabled, WiFi will be disabled.
To pair/connect your Bluetooth device to Zonetech:
1. On Zonetech, press the Stream button to access the Stream settings.
2. Use the Left/Right (/) buttons to select the Stream Source (Source) setting. Then,
turn the Info knob to select the Bluetooth option.
3. Use the Left/Right (/) buttons to select the Bluetooth Pairing (Pairing) setting. Then,
turn the Info knob to select Enabled. Zonetech's Stream Light will begin flashing.
4. On your Bluetooth device, enter its Bluetooth settings, find Zonetech and connect to it.
The Stream Light will be solid blue when it is connected.
Notes:
• If your device requires a passcode or PIN, enter 0000.
• If your Bluetooth device is not able to connect to Zonetech, set the Stream Source
(Source) to None to disconnect previous Bluetooth connections, and try the above steps
again.
• If you experience trouble connecting or playing music, make sure your Bluetooth device’s
operating system is up to date.
To unpair/disconnect your Bluetooth device from Zonetech, set the Stream Source
(Source) setting to None. Zonetech will disconnect from your Bluetooth device. Alternatively,
disconnect using the Bluetooth settings on your device.
To stream the Bluetooth audio signal to an output on Zonetech:
1. On Zonetech, press the Stream button to
access the Stream settings.
2. Follow the directions above to pair your
Bluetooth device to Zonetech.
3. Press and release the Zone button (1–6) for the
zone where you want to send the Bluetooth
audio signal.
4. Use the Left/Right (/) buttons to select the
Input Source (In Source) setting.
5. Turn the Info knob to select the Stream
option. That zone is now receiving the audio
signal from your Bluetooth device.

8
Editing Output (Zone) Settings
You can use Zonetech’s display, Info knob, and Left/Right (/) buttons to edit the settings
of each output (zone):
To select a zone to edit, press the corresponding Zone button (1–6). The display will
indicate which zone is selected: Zone 1–6.
To show the previous or next setting for the selected zone, use the Left/Right (/)
buttons (respectively). Turn the Info knob to adjust the value of each setting.
Note: To control the zone settings remotely, you can also use a web-based interface
on your computer (connected to the Computer Ethernet port), one Rane DRZH remote
control per zone (connected to the Zone Remotes ports), or up to two Rane DR6 master
remote controls (connected to the Master Remote and Pager ports).
These are some of the editable zone settings which are most commonly used. The
abbreviated name (shown when the setting is not selected) is in parentheses.
Note: For the complete list of settings shown in the display and their functions, download the
full User Guide.
Output Level (Level)
This is the output volume level: -30.0 to +12.0 dB
(default: 0.0 dB). This is the master volume of the
zone.
Input Source (In Source)
This is the audio source of the zone: Input 1–6 or
Stream.
For each zone, you can also adjust the settings for
Priority Source, Paging, and Limiter. Additionally,
you can adjust the Output Mode and Crossover
settings for Zone 6.

9
Paging
You can use Zonetech’s display, Info knob, and Left/Right (/) buttons to edit the paging
settings.
To view Paging settings, press the Page button.
To edit the Paging settings, use the Left/Right (/) buttons to show the previous or
next setting (respectively). Turn the Info knob to adjust the value of each setting.
Note: To control the page settings remotely, you can also use a web-based interface
on your computer (connected to the Computer Ethernet port), or an optional Rane RAD
device (e.g., RAD16z, RAD26, etc.) connected to the Pager port.
These are some of the editable pager settings which are most commonly used. The
abbreviated name (shown when the setting is not selected) is in parentheses.
Note: For the complete list of settings shown in the display and their functions, download the
full User Guide.
Input Level (Level)
This is the pager volume level: -88.0 to +12.0 dB.
This is independent of the pager’s chime volume
level (see below) and independent of the Zone
level.
Chime
This determines whether the pager’s chime sound
is on (Enabled) or off (Disabled). The chime will be
mixed with the paging output signal.
Tip: If this setting is on when you use the pager,
we recommend waiting a brief moment for the
chime to end before making an announcement.
Chime Level (CH Level)
This is the volume level of the pager’s chime sound:
-30.0 to +12.0 dB (default: 0 dB). This is
independent of the pager’s overall volume level.

10
Info
You can use Zonetech’s display to view additional Zonetech system settings. Press the Info
knob to cycle through the following information pages.
Note: For the complete list of settings shown in the display and their functions, download the
full User Guide.
Meters
This view shows multicolor level meters for all
inputs and zones.
Device/Port Status
This view shows information about the devices
currently connected to Zonetech and their current
operations. Use this view to evaluate system faults,
hardware errors, and other issues.
Important: When diagnosing or troubleshooting
your system, always begin by reviewing this
information.
Wired Network Settings
This view shows the following information about
the wired network connection: DHCP IP, Static IP,
and MAC address.
Wireless Network Settings
This view shows the following information about
the wireless network connection: DHCP IP, Static
IP, MAC address, SSID (network name), and
connection status.
Zonetech Device Information
This view shows the following information about
the device: Venue name, Firmware version, and
Serial Number.
Note: Use the web interface to update the venue
name or firmware version.

11
Controlling Zonetech Remotely
There are a few different ways to control various Zonetech functions remotely:
• You can use a computer to access a web-based interface to control all Zonetech
functions. See Computer below.
Note: Some controls are only available through the web interface.
• You can use up to two Rane DR6 master remote controls to control all input levels,
output (zone) levels, and zone source selections. Download the full User Guide or visit
rane.com/HAL to learn more.
• You can use one Rane DRZH remote control per zone to control the output (zone)
functions. Download the full User Guide or visit rane.com/HAL to learn more.
Computer
You can use a web-based interface on your computer to control Zonetech remotely.
To set up Zonetech for use with its web interface:
1. Use standard Ethernet cables to connect Zonetech’s Computer Ethernet port to a
DHCP (Dynamic Host Configuration Protocol)-enabled router or similar access point, and
then connect your computer to another port on the same router or access point.
2. Once connected to a network, Zonetech will automatically acquire a dynamic IP address
that you can use. This may take a few seconds.
3. Press the Info button on Zonetech until the Wired Network Settings appear on the
display, and then make note of the DHCP IP address (e.g., 10.10.10.182).
To open the Zonetech web interface:
1. Open a web browser on your computer.
2. In the browser, enter the DHCP IP address shown in Zonetech's Wired Network
Settings (e.g., http://10.10.10.182) to load the web interface.
3. Press the Login button, and then enter the password for Full access mode. The default
password is admin.
To use the web interface, log-in to either the Full or Limited access options using your
password. If no password has been set, users will be logged in automatically at that access
level. These are some of the editable settings in Full access which are most commonly used:
• Select an Input 1–6 tab to adjust input levels and input type (for Inputs 5 and 6 only).
• Select the Stream tab to select the stream source and view Bluetooth status.
• Select the Paging tab to set the paging level, chime on/off, and chime level.
• Select a Zone 1–6 tab to set the output levels and audio source for each zone.
• Select the Naming tab to edit the names of inputs and zones.
• Sel
ect the Settings tab to view and edit network settings, manage access passwords,
save and restore system settings, and check for firmware updates.
Note: For the complete list of settings shown in the Full web interface and their functions,
download the full User Guide.

12
Troubleshooting
If you encounter a problem, try doing these things first:
• Make sure all cables and other connected devices are properly and securely connected.
• Make sure you are using Zonetech as described in this Quickstart Guide.
• Make sure your other devices or media are working properly.
• If you believe Zonetech is not working properly, check the following table for your
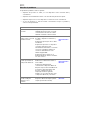
problem and solution.
Problem: Solution: Please see:
Power does not turn on.
Make sure Zonetech’s power input is
properly connected to a power outlet
using the included power cable.
Setup
Zonetech does not
produce any sound, or the
sound is distorted.
Make sure all cable and device
connections are secure and correct.
Make sure none of the cables are
damaged.
Make sure all devices connected to
Zonetech are properly powered,
connected, and supported. Check the
hardware connections as well as the Info
pages.
Make sure the settings on your Bluetooth
device, loudspeaker, mixer, etc. are
correct.
Setup,
Operation > Info
Audio from my Bluetooth
device does not play
through Zonetech.
Make sure WiFi is turned off. Bluetooth
will be disabled when WiFi is active.
Make sure you have properly paired your
Bluetooth device.
Improve the Bluetooth signal reception
by moving your Bluetooth device closer
to Zonetech. Also, remove obstacles
(walls, furniture, etc.) so there is a clear
line of sight between your Bluetooth
device and Zonetech.
Setup,
Operation >
Bluetooth
Pairing my Bluetooth
device to Zonetech
requires a PIN.
Enter 0000 as the PIN. (Some older
Bluetooth devices may require you to
enter a PIN.)
Operation >
Bluetooth

13
Guía del inicio rápido (Español)
Introducción
Gracias por comprar el Zonetech. En Rane, el rendimiento y la confiabilidad significan tanto
para nosotros como para usted. Por eso es que diseñamos nuestros equipos con una sola
cosa en mente—hacer que pueda tocar su mejor interpretación.
Contenido de la caja
Zonetech
(1) Entrada Euroblock de 3,8 mm de 6 patillas
(verde, para entradas de audio)
(3) Entradas Euroblock de 3,8 mm de 6 patillas
(naranjas, para salidas de zona)
(1) Entrada Euroblock de 3,8 mm de 3 patillas
(naranja, para salidas de zona)
(1) Entrada Euroblock de 3,8 mm de 3 patillas
(negra, para entradas lógicas)
Antena Bluetooth
®
Cable de alimentación
Guía del inicio rápido
Manual sobre la seguridad y garantía
Importante: Visite rane.com para
descargar la guía del usuario completa.
Soporte
Para obtener la información más reciente acerca de este producto (documentación,
especificaciones técnicas, requisitos de sistema, información de compatibilidad, etc.) y registrarlo,
visite rane.com.
Para obtener soporte adicional del producto, visite rane.com/support.
Instalación
Los elementos que no se enumeran en Introducción > Contenido de la caja se venden por separado.
ZONE 2
SOURCE
ZONE 3 ZONE 3
SOURCE STATUS DIMMER
VIDEO
AUX 1
SETUP MICL - AUDIO - R
1 CBL/SAT 3 GAME4 NETWORK
QUICK SELECT
2 Blu-ray
PHONES BACK
ENTER
INFO
SETUP
ZONE 2
SOURCE SELECT
MASTER VOLUME
ON/OFF
AUX 1
HDMI 7 5V/1A
ON/OFF
OPTION
Control
remoto
maestro (por
ej., Rane
DR6)
Control
remoto de
zona (por
ej., Rane
DRZH
)
Dispositivo
Bluetooth
Alimentacion
Enrutador
Entradas de audio
estéreo (receptor,
reproductor de
DVD, etc.)
Altavoces
estéreo
alimentados
Control remoto
de la función de
aviso (por ej.,
Rane RAD16z)
Entradas de audio
mono (micrófonos)
Computadora
Amplificador de
zona y altavoces

14
Características
Panel frontal
1
2
4
3
56
7
8
9
10
1. Pantalla: Esta pantalla muestra información sobre el estado actual y las opciones del
Zonetech.
2. Luz Power: Esta luz se enciende cuando el Zonetech está encendido.
3. Luz Computer Link: Esta luz se enciende cuando el puerto Computer Ethernet del
panel trasero está conectado a un ordenador (encendido). Entonces podrá utilizar el
ordenador para controlar el Zonetech de forma remota mediante una interfaz web.
4. Luz de transmisión: Cuando Stream Source se ajusta a Bluetooth, esta luz parpadea
para indicar que el Zonetech se encuentra en modo de apareamiento y permanece
encendida cuando el Zonetech está apareado con un dispositivo Bluetooth activo.
Cuando el Stream Source se ajusta a AirPlay o UPnP/DLNA, esta luz se encenderá
permanentemente para indicar una conexión exitosa. Podrá entonces enviar la señal de
audio del dispositivo al Zonetech de forma inalámbrica.
5. Info: Mantenga pulsada la perilla para recorrer las páginas de Info que se muestran en la
pantalla. Gire esta perilla para modificar el valor de cada ajuste en la pantalla.
6. Izquierda/Derecha (/): Pulse cada uno de estos botones para seleccionar la opción
anterior o siguiente (respectivamente) que se muestra en la pantalla.
Nota: Para restaurar los ajustes predeterminados de fábrica del Zonetech mantenga
pulsado los ambos botones izquierda/derecha (/) durante el encendido. Mantenga
pulsados ambos botones hasta que aparezca el mensaje de restauración de los ajustes
predeterminados de fábrica en la pantalla y luego suéltelos para continuar.
7. Transmisión: Pulse este botón para mostrar los ajustes de transmisión en la pantalla.
8. Page: Pulse este botón para mostrar en la pantalla los ajustes de la función de aviso.
9. Entradas 1–6: Pulse cada uno de estos botones para seleccionar la entrada
correspondiente. Su información aparecerá en la pantalla. Entonces podrá utilizar la
perilla Info y los botones izquierda/derecha (/) para editar sus ajustes.
10. Zona 1–6: Pulse cada uno de estos botones para seleccionar la entrada correspondiente.
Su información aparecerá en la pantalla. Entonces podrá utilizar la perilla Info y los
botones izquierda/derecha (/) para editar sus ajustes.

15
Panel trasero
1
2
4
3333
555
5
67
8
9
10
1. Entrada de corriente (IEC): Utilice el cable IEC estándar para conectar esta entrada a
una toma de corriente.
2. Conector de la antena Bluetooth (SMA): Conecte aquí la antena Bluetooth incluida.
Importante: Por motivos de cumplimiento, debe utilizar solamente la antena incluida. No
se permite realizar sustituciones o modificaciones a la antena.
3. Entradas (estéreo RCA): Conecte las fuentes de audio a estos pares de entradas
estéreo.
4. Entradas (Euroblock): Conecte a estas entradas mono fuentes de audio balanceadas o
no balanceadas.
5. Salidas (Euroblock): Conecte a estas salidas balanceadas dispositivos de nivel de línea (-
10 dBV a +4 dBu). Las salidas de las zonas 1-5 son monoaurales; la salida de la zona 6
es estéreo. Como alternativa, puede configurar la salida de la zona 6 para uso monoaural
con un subwoofer (conectado a la salida R (LO)) y el altavoz principal (conectado a la
salida L (HI)).
6. Entrada Logic (Euroblock): Conecte a estos terminales los contactos de un control
externo normalmente abiertos (relé o equivalente). Cuando los terminales están
conectados entre sí (es decir, cuando el interruptor se cierra), se silencian todas las
salidas. Esto se usa normalmente con un sistema de alarma contra incendios a fin de
silenciar la salida de audio durante una emergencia.
Nota: Cuando se activa esta función de silenciamiento, se bloquearan todos los
controles del panel central. Aparecerá Mute en la pantalla con un fondo rojo.
7. Puertos Zone Remotes (RJ45, cables blindados Cat5e o Cat6): Conecte a estos puertos
dispositivos Rane DRZH opcionales que le permitirán seleccionar fuentes y ajustar los
niveles de las zonas de forma remota.
8. Puerto Master Remote (RJ45, cables blindados Cat5e o Cat6): Conecte a este puerto
un control remoto Rane DR6 opcional que le permitirá seleccionar fuentes y ajustar los
niveles de todas las zonas de forma remota.
9. Puerto Pager (RJ45, cables blindados Cat5e o Cat6): Conecte un dispositivo Rane RAD
opcional (por ej., RAD16z, RAD26, etc.) para añadir entradas lógicas y de audio
analógico. Las funciones disponibles dependerán del modelo de RAD. Consulte
información adicional en rane.com/Zonetech.
Nota: Si no necesita la función de aviso, puede conectar a este puerto un Rane DR6
opcional como alternativa. Este le brindará las mismas funciones que un DR6 conectado
al puerto Master Remote (consulte el n.º 8 más arriba).
10. Puerto Computer Ethernet (Ethernet): Conecte este puerto a un enrutador o punto de
acceso similar durante la configuración. Una vez que el Zonetech esté configurado
correctamente, podrá conectar un ordenador a otro puerto en el mismo enrutador o
punto de acceso, lo que le permitirá utilizar un navegador web como interfaz de control
para el Zonetech. Consulte Funcionamiento > Control remoto del Zonetech para
obtener más información.

16
Funcionamiento
Cómo editar los ajustes de entrada
Puede utilizar la pantalla del Zonetech, los botones izquierda/derecha (/) y la perilla Info
para editar los ajustes de cada entrada.
Para seleccionar una entrada a editar, pulse el botón Input (1–6) correspondiente o el
botón Stream. La pantalla indicará la entrada seleccionada actualmente: Input 1–6 o
Stream.
Para mostrar el ajuste siguiente o anterior de la entrada seleccionada, utilice los
botones izquierda/derecha (/) (respectivamente). Gire la perilla Info para modificar el
valor de cada ajuste.
Nota: Para controlar los ajustes de entrada remotamente, también puede utilizar una
interfaz basada en la web desde su ordenador (conectada al puerto Computer
Ethernet) o hasta dos controles remotos maestros Rane DR6 (conectados a los puertos
Master Remote y Pager).
Estos son algunos de los ajustes de entrada editables que se utilizan con mayor frecuencia. El
nombre abreviado (que se muestra cuando el ajuste no está seleccionado) está entre
paréntesis.
Nota: Para obtener la lista completa de los ajustes que se muestran en la pantalla y sus
funciones, descárguese la Guía del usuario completa.
Input Level (Level)
Este es el nivel de volumen en la etapa de entrada:
-88,0 a +12,0 dB.
Consejo: Si no está seguro de cuál debería ser
este nivel, es mejor utilizar un ajuste más bajo para
tener algo de margen y evitar recortes/
distorsiones.
Para cada entrada, también puede modificar los ajustes Low Shelf, PEQ y High Shelf.
Input Type (Type)
(entradas 5 y 6 solamente)
Este es el tipo de dispositivo conectado a la
entrada 5 y entrada 6: Dynamic (micrófono),
Condenser (micrófono), Unbalanced Line+,
Balanced Line (predeterminado: Balanced Line).
Nota: La potencia fantasma se activa solamente cuando se selecciona Condenser.
Consejo: Unbalanced Line+ suma dos señales no balanceadas (tales como las líneas RCA
izquierda y derecha) cuando una de ellas se conecta a la entrada positiva (+) y la otra se
conecta a la entrada negativa (-).
Consejo: Balanced Line es la típica entrada de nivel de línea totalmente balanceada (por ej.,
TRS o XLR), tal como la que se utiliza para equipos de audio comerciales.
Stream Source (Source)
Es la entrada desde la cual el Zonetech
reproducirá el audio transmitido: None
(desactivada), Bluetooth, AirPlay, UPnP/DLNA.

17
Bluetooth
®
Además de las seis entradas de audio del panel trasero, puede enviar una señal de audio de
forma inalámbrica a través del Zonetech hacia cualquier zona mediante Bluetooth. Esta señal
utiliza su propio canal de entrada.
IMPORTANTE: El Bluetooth y el WiFi no pueden estar ambos en funcionamiento al mismo
tiempo. Cuando el Bluetooth se activa, el WiFi se desactivará.
Para aparear/conectar su dispositivo Bluetooth al Zonetech:
1. En el Zonetech, pulse el botón Stream para acceder a los ajustes de transmisión.
2. Utilice los botones izquierda/derecha (/) para seleccionar el ajuste Stream Source
(Source). Luego, gire la perilla Info para seleccionar la opción Bluetooth.
3. Utilice los botones izquierda/derecha (/) para seleccionar el ajuste Bluetooth
Pairing (Pairing). Luego gire la perilla Info para seleccionar Enabled. La luz de
transmisión del Zonetech comenzará a parpadear.
4. En su dispositivo Bluetooth, acceda su configuración Bluetooth busque la opción
Zonetech y realice la conexión. La luz de transmisión se encenderá permanentemente
cuando esté conectado.
Notas:
• Si su dispositivo requiere un código de contraseña o PIN, ingrese 0000.
• Si su dispositivo Bluetooth no es capaz de conectarse con el Zonetech, coloque Stream
Source (Source) en None para desconectar las conexiones de Bluetooth anteriores y
realice los pasos anteriores nuevamente.
• Si experimenta problemas al conectarse o al reproducir música, asegúrese de que el
sistema operativo de su dispositivo Bluetooth esté actualizado.
Para desaparear/desconectar su dispositivo Bluetooth del Zonetech, coloque el ajuste
Stream Source (Source) en None. El Zonetech se desconectará de su dispositivo Bluetooth.
Como alternativa, desconéctese utilizando los ajustes de Bluetooth de su dispositivo.
Para transmitir una señal de audio Bluetooth a una salida del Zonetech:
1. En el Zonetech, pulse el botón Stream para
acceder a los ajustes de transmisión.
2. Siga las instrucciones anteriores para aparear
su dispositivo Bluetooth con el Zonetech.
3. Pulse y suelte el botón Zone (1–6)
correspondiente a la zona a la cual desea
enviar la señal de audio Bluetooth.
4. Utilice los botones izquierda/derecha (/)
para seleccionar el ajuste Input Source (In
Source).
5. Gire la perilla Info para seleccionar la opción
Stream. Esa zona ahora recibirá la señal de
audio proveniente de su dispositivo Bluetooth.

18
Cómo editar los ajustes de salida (Zona)
Puede utilizar la pantalla del Zonetech, la perilla Info los botones izquierda/derecha (/)
para editar los ajustes de cada salida (zona):
Para seleccionar una zona a editar, pulse el botón Zone (1–6) correspondiente. La
pantalla indicará la zona seleccionada: Zone 1–6.
Para mostrar el ajuste siguiente o anterior de la zona seleccionada, utilice los
botones izquierda/derecha (/) (respectivamente). Gire la perilla Info para modificar el
valor de cada ajuste.
Nota: Para controlar los ajustes de la zona remotamente, también puede utilizar una
interfaz basada en la web desde su ordenador (conectada al puerto Computer
Ethernet), un control remoto Rane DRZH por zona (conectado a los puertos Zone
Remotes) o hasta dos controles remotos maestros Rane DR6 (conectados a los puertos
Master Remote y Pager).
Estos son algunos de los ajustes de zona editables que se utilizan con mayor frecuencia. El
nombre abreviado (que se muestra cuando el ajuste no está seleccionado) está entre
paréntesis.
Nota: Para obtener la lista completa de los ajustes que se muestran en la pantalla y sus
funciones, descárguese la Guía del usuario completa.
Output Level (Level)
Este es el nivel de volumen de salida: -30,0 a +12,0
dB (predeterminado: 0,0 dB). Este es el volumen
maestro de la zona.
Input Source (In Source)
Esta es la fuente de audio de la zona. Input 1–6 o
Stream.
Para cada zona, también puede modificar los
ajustes de Priority Source, Paging y Limiter.
Adicionalmente, puede modificar los ajustes
Output Mode y Crossover de la zona 6.

19
Función de aviso
Puede utilizar la pantalla del Zonetech, la perilla Info los botones izquierda/derecha (/)
para editar los ajustes de la función de aviso:
Para ver los ajustes de la función de aviso, pulse el botón Page.
Para editar los ajustes de la función de aviso, utilice los botones izquierda/derecha
(/) para mostrar el ajuste siguiente o anterior (respectivamente). Gire la perilla Info
para modificar el valor de cada ajuste.
Nota: Para controlar los ajustes la función de aviso remotamente, también puede
utilizar una interfaz basada en la web desde su ordenador (conectado al puerto
Computer Ethernet) o a un dispositivo Rane RAD opcional (por ej., RAD16z, RAD26,
etc.) conectado al puerto Pager.
Estos son algunos de los ajustes editables de la función de aviso que se utilizan con mayor
frecuencia. El nombre abreviado (que se muestra cuando el ajuste no está seleccionado) está
entre paréntesis.
Nota: Para obtener la lista completa de los ajustes que se muestran en la pantalla y sus
funciones, descárguese la Guía del usuario completa.
Input Level (Level)
Este es el nivel de volumen de la función de aviso:
-88,0 a +12,0 dB. Este nivel es independiente del
nivel de volumen del tono de la función de aviso
(consulte a continuación) e independiente del
nivel de la zona.
Chime
Determina si el sonido del tono de la función de
aviso está activado (Enabled) o desactivado
(Disabled). El tono se mezclará con la señal de
salida de la función de aviso.
Consejo: Si este ajuste está activado cuando
utiliza la función aviso, le recomendamos esperar
un instante a que el tono termine antes de realizar
un aviso.
Chime Level (CH Level)
Este es el nivel de volumen del sonido del tono de
la función de aviso: -30,0 a +12,0 dB
(predeterminado: 0 dB). Este nivel es
independiente del nivel de volumen general de la
función de aviso:

20
Info
Puede utilizar la pantalla del Zonetech para visualizar los ajustes adicionales del sistema de
Zonetech. Pulse la perilla Info para recorrer las siguientes páginas de información.
Nota: Para obtener la lista completa de los ajustes que se muestran en la pantalla y sus
funciones, descárguese la Guía del usuario completa.
Meters
Esta lista muestra medidores de nivel multicolores
para todas las entradas y zonas.
Device/Port Status
Esta vista muestra información sobre los
dispositivos actualmente conectados al Zonetech y
sus operaciones actuales. Utilice esta vista para
evaluar fallas del sistema, errores del hardware y
otros problemas.
Importante: Al diagnosticar o solucionar los problemas de su sistema, siempre comience
revisando esta información.
Wired Network Settings
Esta vista muestra la siguiente información sobre la
conexión de red cableada: DHCP IP, Static IP y
MAC address.
Wireless Network Settings
Esta vista muestra la siguiente información sobre la
conexión de red inalámbrica: DHCP IP, Static IP,
MAC address, SSID (nombre de la red) y
connection status.
Zonetech Device Information
Esta vista muestra la siguiente información sobre el
dispositivo: Venue name, Firmware version y
Serial Number.
Nota: Utilice la interfaz web para actualizar el
nombre del lugar o la versión del firmware.
La pagina si sta caricando...
La pagina si sta caricando...
La pagina si sta caricando...
La pagina si sta caricando...
La pagina si sta caricando...
La pagina si sta caricando...
La pagina si sta caricando...
La pagina si sta caricando...
La pagina si sta caricando...
La pagina si sta caricando...
La pagina si sta caricando...
La pagina si sta caricando...
La pagina si sta caricando...
La pagina si sta caricando...
La pagina si sta caricando...
La pagina si sta caricando...
La pagina si sta caricando...
La pagina si sta caricando...
La pagina si sta caricando...
La pagina si sta caricando...
La pagina si sta caricando...
La pagina si sta caricando...
La pagina si sta caricando...
La pagina si sta caricando...
La pagina si sta caricando...
La pagina si sta caricando...
La pagina si sta caricando...
La pagina si sta caricando...
La pagina si sta caricando...
La pagina si sta caricando...
La pagina si sta caricando...
La pagina si sta caricando...
La pagina si sta caricando...
La pagina si sta caricando...
La pagina si sta caricando...
La pagina si sta caricando...
-
 1
1
-
 2
2
-
 3
3
-
 4
4
-
 5
5
-
 6
6
-
 7
7
-
 8
8
-
 9
9
-
 10
10
-
 11
11
-
 12
12
-
 13
13
-
 14
14
-
 15
15
-
 16
16
-
 17
17
-
 18
18
-
 19
19
-
 20
20
-
 21
21
-
 22
22
-
 23
23
-
 24
24
-
 25
25
-
 26
26
-
 27
27
-
 28
28
-
 29
29
-
 30
30
-
 31
31
-
 32
32
-
 33
33
-
 34
34
-
 35
35
-
 36
36
-
 37
37
-
 38
38
-
 39
39
-
 40
40
-
 41
41
-
 42
42
-
 43
43
-
 44
44
-
 45
45
-
 46
46
-
 47
47
-
 48
48
-
 49
49
-
 50
50
-
 51
51
-
 52
52
-
 53
53
-
 54
54
-
 55
55
-
 56
56


Rane ZONETECH Guida Rapida
- Categoria
- Ricevitori musicali Bluetooth
- Tipo
- Guida Rapida
in altre lingue
- English: Rane ZONETECH Quick start guide
- français: Rane ZONETECH Guide de démarrage rapide
- español: Rane ZONETECH Guía de inicio rápido
- Deutsch: Rane ZONETECH Schnellstartanleitung