Denon DCM-5001 Manuale utente
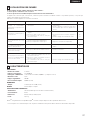
- Categoria
- Amplificatori audio per auto
- Tipo
- Manuale utente

STEREO CD PLAYER
DCM
-
5001
OPERATING INSTRUCTIONS
MODE D’EMPLOI
INSTRUCCIONES DE OPERACION
FOR ENGLISH READERS PAGE 05 ~ PAGE 15
POUR LES LECTEURS FRANCAIS PAGE 16 ~ PAGE 27
PARA LECTORES DE ESPAÑOL PAGINA 28 ~ PAGINA 39

2
IMPORTANT TO SAFETY
WARNING:
TO PREVENT FIRE OR SHOCK HAZARD, DO NOT
EXPOSE THIS APPLIANCE TO RAIN OR MOISTURE.
LABELS (for U.S.A. model only)
CERTIFICATION
THIS PRODUCT COMPLIES WITH DHHS RULES 21 CFR SUBCHAPTER
APPLICABLE AT DATE OF MANUFACTURE.
CAUTION:
1. Handle the power supply cord carefully
Do not damage or deform the power supply cord. If it is damaged or
deformed, it may cause electric shock or malfunction when used. When
removing from wall outlet, be sure to remove by holding the plug
attachment and not by pulling the cord.
2. Do not open the top cover
In order to prevent electric shock, do not open the top cover.
If problems occur, contact your DENON dealer.
3. Do not place anything inside
Do not place metal objects or spill liquid inside the CD player.
Electric shock or malfunction may result.
Please, record and retain the Model name and serial number of your set
shown on the rating label.
Model No. DCM-5001 Serial No.
CAUTION:
TO REDUCE THE RISK OF ELECTRIC
SHOCK, DO NOT REMOVE COVER (OR
BACK). NO USER-SERVICEABLE PARTS
INSIDE. REFER SERVICING TO QUALIFIED
SERVICE PERSONNEL.
The lightning flash with arrowhead symbol, within
an equilateral triangle, is intended to alert the
user to the presence of uninsulated “dangerous
voltage” within the product’s enclosure that may
be of sufficient magnitude to constitute a risk of
electric shock to persons.
The exclamation point within an equilateral
triangle is intended to alert the user to the
presence of important operating and maintenance
(servicing) instructions in the literature
accompanying the appliance.
CAUTION:
USE OF CONTROLS OR ADJUSTMENTS OR REFORMANCE OF PROCE-
DURES OTHER THAN THOSE SPECIFIED HEREIN MAY RESULT IN HAZ-
ARDOUS RADIATION EXPOSURE.
THE COMPACT DISC PLAYER SHOULD NOT BE ADJUSTED OR REPAIRED
BY ANYONE EXCEPT PROPERLY QUALIFIED SERVICE PERSONNEL.
This device complies with Part 15 of the FCC Rules. Operation is
subject to the following two conditions : (1) This device may not
cause harmful interference, and (2) this device must accept any
interference received, including interference that may cause
undesired operation.
This Class B digital apparatus meets all requirements of the
Canadian Interference-Causing Equipment Regulations.
Cet appareil numérique de la classe B respecte toutes les
exigences du Règlement sur le matériel brouilleur du Canada.
• FOR U.S.A. & CANADA MODEL ONLY
CAUTION
TO PREVENT ELECTRIC SHOCK DO NOT USE THIS
(POLARIZED) PLUG WITH AN EXTENSION CORD,
RECEPTACLE OR OTHER OUTLET UNLESS THE BLADES
CAN BE FULLY INSERTED TO PREVENT BLADE EXPOSURE.
• POUR LES MODELES AMERICAINS ET
CANADIENS UNIQUEMENT
ATTENTION
POUR PREVENIR LES CHOCS ELECTRIQUES NE PAS
UTILISER CETTE FICHE POLARISEE AVEC UN
PROLONGATEUR UNE PRISE DE COURANT OU UNE AUTRE
SORTIE DE COURANT, SAUF SI LES LAMES PEUVENT ETRE
INSEREES A FOND SANS EN LAISSER AUCUNE PARTIE A
DECOUVERT.
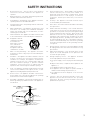
Use compact discs that include the mark.
CD’s with special shapes (heart-shaped CD’s, octagonal CD’s etc.) cannot be played
on this set.
Attempting to do so may damage the set. Do not use such CD’s.
DIGITAL AUDIODIGITAL AUDIO
COMPACTCOMPACT
Utiliser des disques compacts portant le logo .
Des CD avec des formes spéciales (CD en forme de coeur, des CD octogonaux, etc.)
ne peuvent pas être lus sur cet appareil.
Le fait de l’essayer, risque d’endommager le lecteur. Ne pas utiliser de tels CD.
DIGITAL AUDIODIGITAL AUDIO
COMPACTCOMPACT
Use discos compactos con la marca .
En este equipo no es posible reproducir CDs con formas especiales (CDs con forma de
corazón, CDs octagonales, etc.).
Si intenta hacerlo, el equipo podrá resultar dañado. No use este tipo de CDs.
DIGITAL AUDIODIGITAL AUDIO
COMPACTCOMPACT
NOTE:
This CD player uses the semiconductor laser. To allow you to enjoy music at a
stable operation, it is recommended to use this in a room of 5 °C (41 °F) ~ 35
°C (95 °F).

3
SAFETY INSTRUCTIONS
1. Read Instructions – All the safety and operating
instructions should be read before the appliance is
operated.
2. Retain Instructions – The safety and operating instructions
should be retained for future reference.
3. Heed Warning – All warnings on the appliance and in the
operating instructions should be adhered to.
4. Following Instructions – All operating and use instructions
should be followed.
5. Water and Moisture – The appliance should not be used
near water – for example, near a bathtub, washbowl,
kitchen sink, laundry tub, in a wet basement, or near a
swimming pool, and the like.
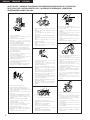
6. Carts and Stands – The appliance should be used only with
a cart or stand that is recommended by the manufacturer.
6A. An appliance and cart
combination should be
moved with care.
Quick stops, excessive
force, and uneven
surfaces may cause
the appliance and cart
combination to overturn.
7. Wall or Ceiling Mounting – The appliance should be
mounted to a wall or ceiling only as recommended by the
manufacturer.
8. Ventilation – The appliance should be situated so that its
location or position does not interfere with its proper
ventilation. For example, the appliance should not be
situated on a bed, sofa, rug, or similar surface that may
block the ventilation openings; or, placed in a built-in
installation, such as a bookcase or cabinet that may
impede the flow of air through the ventilation openings.
9. Heat – The appliance should be situated away from heat
sources such as radiators, heat registers, stoves, or other
appliances (including amplifiers) that produce heat.
10. Power Sources – The appliance should be connected to a
power supply only of the type described in the operating
instructions or as marked on the appliance.
11. Grounding or Polarization – Precautions should be taken so
that the grounding or polarization means of an appliance is
not defeated.
12. Power-Cord Protection – Power-supply cords should be
routed so that they are not likely to be walked on or
pinched by items placed upon or against them, paying
particular attention to cords at plugs, convenience
receptacles, and the point where they exit from the
appliance.
14. Cleaning – The appliance should be cleaned only as
recommended by the manufacturer.
15. Power Lines – An outdoor antenna should be located away
from power lines.
16. Outdoor Antenna Grounding – If an outside antenna is
connected to the receiver, be sure the antenna system is
grounded so as to provide some protection against voltage
surges and built-up static charges. Article 810 of the
National Electrical Code, ANSI/NFPA 70, provides
information with regard to proper grounding of the mast
and supporting structure, grounding of the lead-in wire to
an antenna-discharge unit, size of grounding conductors,
location of antenna-discharge unit, connection to grounding
electrodes, and requirements for the grounding electrode.
See Figure A.
17. Nonuse Periods – The power cord of the appliance should
be unplugged from the outlet when left unused for a long
period of time.
18. Object and Liquid Entry – Care should be taken so that
objects do not fall and liquids are not spilled into the
enclosure through openings.
19. Damage Requiring Service – The appliance should be
serviced by qualified service personnel when:
A. The power-supply cord or the plug has been damaged;
or
B. Objects have fallen, or liquid has been spilled into the
appliance; or
C. The appliance has been exposed to rain; or
D. The appliance does not appear to operate normally or
exhibits a marked change in performance; or
E. The appliance has been dropped, or the enclosure
damaged.
20. Servicing – The user should not attempt to service the
appliance beyond that described in the operating
instructions. All other servicing should be referred to
qualified service personnel.
FIGURE A
EXAMPLE OF ANTENNA GROUNDING
AS PER NATIONAL
ELECTRICAL CODE
ANTENNA
LEAD IN
WIRE
GROUND
CLAMP
ELECTRIC
SERVICE
EQUIPMENT
ANTENNA
DISCHARGE UNIT
(NEC SECTION 810-20)
GROUNDING CONDUCTORS
(NEC SECTION 810-21)
GROUND CLAMPS
POWER SERVICE GROUNDING
ELECTRODE SYSTEM
(NEC ART 250, PART H)
NEC - NATIONAL ELECTRICAL CODE

4
ENGLISH FRANCAIS
NOTE ON USE / HINWEISE ZUM GEBRAUCH/OBSERVATIONS RELATIVES A L’UTILISATION
NOTE SULL’USO / NOTAS SOBRE EL USO / ALVORENS TE GEBRUIKEN / OBSERVERA
OBSERVAÇÕES QUANTO AO USO
• Avoid high temperatures.
Allow for sufficient heat dispersion when
installed on a rack.
• Vermeiden Sie hohe Temperaturen.
Beachten Sie, daß eine ausreichend
Luftzirkulation gewährleistet wird, wenn das
Gerät auf ein Regal gestellt wird.
• Eviter des températures élevées
Tenir compte d’une dispersion de chaleur
suffisante lors de l’installation sur une étagère.
• Evitate di esporre l’unità a temperature alte.
Assicuratevi che ci sia un’adeguata dispersione
del calore quando installate l’unità in un mobile
per componenti audio.
• Evite altas temperaturas.
Permite la suficiente dispersión del calor
cuando está instalado en la consola.
• Vermijd hoge temperaturen.
Zorg voor een degelijk hitteafvoer indien het
apparaat op een rek wordt geplaatst.
• Undvik höga temperaturer.
Se till att det finns möjlighet till god
värmeavledning vid montering i ett rack.
• Evite temperaturas altas.
Conceda suficiente dispersão de calor quando o
equipamento for instalado numa prateleira.
• Keep the set free from moisture, water, and
dust.
• Halten Sie das Gerät von Feuchtigkeit, Wasser
und Staub fern.
• Protéger l’appareil contre l’humidité, l’eau et
lapoussière.
• Tenete l’unità lontana dall’umidità, dall’acqua e
dalla polvere.
• Mantenga el equipo libre de humedad, agua y
polvo.
• Laat geen vochtigheid, water of stof in het
apparaat binnendringen.
• Utsätt inte apparaten för fukt, vatten och
damm.
• Mantenha o aparelho livre de qualquer
umidade, água ou poeira.
• Do not let foreign objects in the set.
• Keine fremden Gegenstände in das Gerät
kommen lassen.
• Ne pas laisser des objets étrangers dans
l’appareil.
• E’ importante che nessun oggetto è inserito
all’interno dell’unità.
• No deje objetos extraños dentro del equipo.
• Laat geen vreemde voorwerpen in dit apparaat
vallen.
• Se till att främmande föremål inte tränger in i
apparaten.
• Não deixe objetos estranhos no aparelho.
• Do not let insecticides, benzene, and thinner
come in contact with the set.
• Lassen Sie das Gerät nicht mit Insektiziden,
Benzin oder Verdünnungsmitteln in Berührung
kommen.
• Ne pas mettre en contact des insecticides, du
benzène et un diluant avec l’appareil.
• Assicuratevvi che l’unità non venga in contatto
con insetticidi, benzolo o solventi.
• No permita el contacto de insecticidas, gasolina
y diluyentes con el equipo.
• Laat geen insektenverdelgende middelen,
benzine of verfverdunner met dit apparaat in
kontakt komen.
• Se till att inte insektsmedel på spraybruk,
bensen och thinner kommer i kontakt med
apparatens hölje.
• Não permita que inseticidas, benzina e
dissolvente entrem em contacto com o
aparelho.
• Never disassemble or modify the set in any
way.
• Versuchen Sie niemals das Gerät auseinander
zu nehmen oder auf jegliche Art zu verändern.
• Ne jamais démonter ou modifier l’appareil
d’une manière ou d’une autre.
• Non smontate mai, nè modificate l’unità in
nessun modo.
• Nunca desarme o modifique el equipo de
ninguna manera.
• Nooit dit apparaat demonteren of op andere
wijze modifiëren.
• Ta inte isär apparaten och försök inte bygga om
den.
• Nunca desmonte ou modifique o aparelho de
alguma forma.
• Unplug the power cord when not using the set
for long periods of time.
• Wenn das Gerät eine längere Zeit nicht
verwendet werden soll, trennen Sie das
Netzkabel vom Netzstecker.
• Débrancher le cordon d’alimentation lorsque
l’appareil n’est pas utilisé pendant de longues
périodes.
• Disinnestate il filo di alimentazione quando
avete l’intenzione di non usare il filo di
alimentazione per un lungo periodo di tempo.
• Desconecte el cordón de energía cuando no
utilice el equipo por mucho tiempo.
• Neem altijd het netsnoer uit het stopkontakt
wanneer het apparaat gedurende een lange
periode niet wordt gebruikt.
• Koppla ur nätkabeln om apparaten inte kommer
att användas i lång tid.
• Desligue o fio condutor de força quando o
aparelho não tiver que ser usado por um longo
período.
* (For sets with ventilation holes)
• Do not obstruct the ventilation holes.
• Die Belüftungsöffnungen dürfen nicht verdeckt
werden.
• Ne pas obstruer les trous d’aération.
• Non coprite i fori di ventilazione.
• No obstruya los orificios de ventilación.
• De ventilatieopeningen mogen niet worden
beblokkeerd.
• Täpp inte till ventilationsöppningarna.
• Não obstrua os orifícios de ventilação.
• Handle the power cord carefully.
Hold the plug when unplugging the cord.
• Gehen Sie vorsichtig mit dem Netzkabel um.
Halten Sie das Kabel am Stecker, wenn Sie den
Stecker herausziehen.
• Manipuler le cordon d’alimentation avec
précaution.
Tenir la prise lors du débranchement du cordon.
• Manneggiate il filo di alimentazione con cura.
Agite per la spina quando scollegate il cavo
dalla presa.
• Maneje el cordón de energía con cuidado.
Sostenga el enchufe cuando desconecte el
cordón de energía.
• Hanteer het netsnoer voorzichtig.
Houd het snoer bij de stekker vast wanneer
deze moet worden aan- of losgekoppeld.
• Hantera nätkabeln varsamt.
Håll i kabeln när den kopplas från el-uttaget.
• Manuseie com cuidado o fio condutor de
energia.
Segure a tomada ao desconectar o fio.
ESPAÑOL

5
ENGLISH
Thank you for purchasing the DENON compact disc player. Read the Operating Instructions thoroughly, and operate this player properly.
TABLE OF CONTENTS
z
MAIN FEATURES ……………………………………………………5
x
BEFORE USING ………………………………………………………5
c
CAUTIONS ON INSTALLATION ……………………………………6
v
CAUTIONS DURING USE ……………………………………………6
b
INSTALLATION ……………………………………………………7, 8
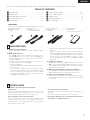
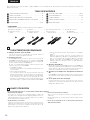
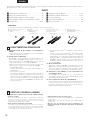
• ACCESSORIES
Check that the following parts are included in addition to the main unit.
n
STAND-ALONE PLAYBACK ……………………………………9~11
m
DAISY CHAIN PLAYBACK………………………………………11~14
,
COMPACT DISCS …………………………………………………14
.
TROUBLESHOOTING ………………………………………………15
⁄0
SPECIFICATIONS ……………………………………………………15
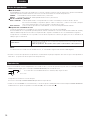
MAIN FEATURES
BEFORE USING
Pay attention to the following before using this unit:
• Moving the set.
To prevent short circuits or damaged wires in the connection cords,
always unplug the power cord and disconnect the connection cords
between all other audio components when moving the set.
• Before turning the power operation switch on.
Check once again that all connections are proper and that there are
not problems with the connection cords. Always set the power
operation switch to the standby position before connecting and
disconnecting connection cords.
• Store this instructions in a safe place.
After reading, store this instructions along with the warranty in a
safe place.
Also fill in the items on the back page for your convenience.
• Note that the illustrations in this instructions may differ from
the actual set for explanation purpose.
W Warranty.………………………1
Y Connection cords
(COAX for daisy chain).....……2
(1) 100-CD rack type CD changer
The CDs are stored in a rack so they can be loaded and replaced
easily.
(2) Daisy chain connection
The DCM-5001 can be connected as a sub unit in a daisy chain to
the DCM-5000 (main unit). In this case, up to five DCM-5001s can
be connected, transforming the system into a CD changer with a
maximum of 600 discs.
In addition, the features described below can be used when
connected in daisy chain to the DCM-5000.
• CD-TEXT compatibility
The CD-TEXT data is automatically transferred to the main unit.
• Disc file function
The disc file input operations (disc titles, track titles, artists’
names and group registration) can be performed from the main
unit. This information can be viewed on the main unit’s display
or on the on-screen display. For details on disc files, refer to the
DCM-5000’s operating instructions.
• AL24 Processing and HDCD
®
(High Definition Compatible
Digital
®
)
When connected in a daisy chain, the audio signals are
transferred digitally, providing high quality sound. In addition,
sound can be played through the AL24 Processing and HDCD
®
decoder built into the DCM-5000. For details on AL24
Processing and HDCD
®
, refer to the DCM-5000’s operating
instructions.
(3) Stand-alone operation
In addition to connecting DCM-5001s in a daisy chain, the DCM-
5001 can also be operated independently (stand alone). The zone,
random playback and cross fade modes can be selected using the
mode switches on the rear panel.
(4) Multi-zone system with two CD drive mechanisms
The DCM-5001 is equipped with two CD drive mechanisms, so
separate playback signals can be output from the two zones.
(5) Quick access (in the single zone mode)
The two CD drive mechanisms can be used alternately so that CDs
can be played consecutively with no waiting time when switching
to the next CD.
4 5 6 7
Q Operating instructions .………1
T Connection cords
(audio).…………………………2
R Connection cord
(5P MINI-DIN)
for daisy chain connection..…1
E Service station list ……………1
U CD booklet file
and label.....……………………1
1
2

ENGLISH
6
The CD player uses a microcomputer for controlling internal
electronic circuits. In the event that the player is used while a
near-by tuner or TV is turned on, although unlikely, interference
could occur either in the sound from the tuner or the picture of
the TV. To avoid this, please take the following precautions.
• Keep the CD player as far away from the tuner or TV set as
possible.
• Keep the power cord and connecting cords of the CD player
separate from the antenna wires of the tuner and TV.
• Interference is particular likely to occur when an indoor
antenna or a 300 Ω/ohms feeder cable is used. Thus, use of an
outdoor antenna and 75 Ω/ohms coaxial cable is strongly
recommended.
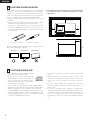
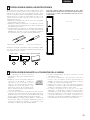
CAUTIONS ON INSTALLATION
CAUTIONS DURING USE
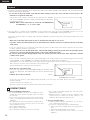
• This compact disc player is capable of playing
discs which have the mark at right.
• During track selection, during search and
when the player sustains a strong impact, the
disc’s rotational speed changes greatly,
causing a small noise to be emitted. This is
not a malfunction of the player.
• If the CD player is operated while an FM or AM broadcast is
being received, there may be noise in the FM or AM reception.
Please switch the power to the CD player off at such times.
• The DCM-5000 has a broad dynamic range. Please exercise
caution when turning up the volume on the amplifier in cases
when the playback volume is low. If the volume is turned up
too high, it could damage the speakers.
C
• Do not use any discs but exclusive audio discs with this CD
player.
• Placing this player or its connection cords near a TV or other
audio device could cause a humming sound to be emitted. if
this occurs, relocate the player or reroute the connection
cords.
• Be sure to remove the disc from the player before moving it.
The discs could be damaged if left in the player while it is
being moved.
• Do not move the player from a cold place to a warm place
suddenly. If the player is cold when brought into a warm room,
condensation could form, preventing proper operation of the
player. If condensation does form on the player when it is
brought into a warm room, wait at least 30 minutes before
use.
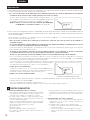
MULTI ZONE / QUICK ACCESS
CD CHANGER
PCM AUDIO TECHNOLOGY / 100 CD CHANGER DCM-5001
ON / STANDBY
OFF
DOOR OPEN
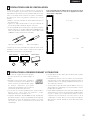
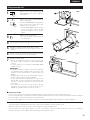
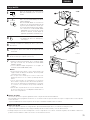
Wall
10 cm or more
For heat dispersal, leave at least 10 cm of space between the
top, back and sides of this unit and wall or other
components.
Be sure to install the player on a flat surface. Setting it at a slant
may result in malfunction or damage.
3
4
300 Ω/ohms feeder cable 75 Ω/ohms coaxial cable
Flat surface Uneven surface Slanted surface
10 cm or more

ENGLISH
7
MULTI ZONE / QUICK ACCESS
CD CHANGER
PCM AUDIO TECHNOLOGY / 100 CD CHANGER DCM-5001
ON / STANDBY
¢
£ OFF
DOOR OPEN
1
DIGITAL COAX IN
DAISY CHAIN IN
REMOTE CONTROL IN
2
1
2
ANALOG OUT
RL
CONTROL
EXTERNAL
¢ RS232C
£ RS422A
ATTENTION
ATTENTION
DIGITAL COAX OUT
DAISY CHAIN OUT
1
2
1234
CONTROL
DAISY CHAIN
MODE SWITCH
10
2
1
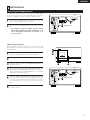
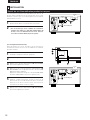
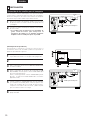
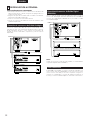
The internal mechanisms are locked in place with shipping
screws to protect them from shocks and vibrations. Be sure to
remove the shipping screws (three) before using the player.
1
Turn the three shipping screws on section A of the rear
panel counterclockwise and remove them.
1
Remove all the CDs from the disc rack following the
procedure described under “Loading CDs” (page 8).
4
Press the power operation switch (¢ ON/STANDBY) while
pressing in the DOOR OPEN button to turn the power on.
Press and hold in the DOOR OPEN button. The DOOR
OPEN LED starts flashing (green).
3
Press the power operation switch (¢ ON/STANDBY) to
turn the power off.
6
Press the power operation switch (¢ ON/STANDBY) to
turn the power off.
5
When the DOOR OPEN LED stops flashing (remaining lit),
release the button, remove the three shipping screws from
section B of the rear panel, put them in the holes in section
A, then tighten them to lock the internal mechanism in
place.
2
2
Fasten the removed shipping screws in the holes in section
B.
* The shipping screws and rubber washers will be
needed when shipping the player in the future, so be
sure to fasten them to the holes in section B so as
not to lose them.
1234
1
DIGITAL COAX IN
DAISY CHAIN IN
DIGITAL COAX OUT
DAISY CHAIN OUT
REMOTE CONTROL IN
2
1
2
1
2
ANALOG OUT
RL
CONTROL
DAISY CHAIN
CONTROL
EXTERNAL
MODE SWITCH
¢ RS232C
£ RS422A
10
ATTENTION
ATTENTION
1
2
Shipping screws
[When moving the player]
When shipping the player, be sure to protect the internal
mechanisms from shocks and vibrations using the procedure
described below.
Close the front cover.
Section
A
INSTALLATION
5
Removing the Shipping Screws
Section
B
Section
B
Section
A
Shipping screws

ENGLISH
8
ON / STANDBY
OFF
DOOR OPEN
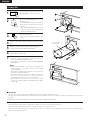
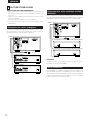
Loading CDs
1
2
3
Press the power operation switch (¢
ON/STANDBY) to turn on the power.
Press the DOOR OPEN button to open
the front cover.
The DOOR OPEN button is operational
about 10~20 seconds after the power is
turned on.
• The DOOR OPEN LED flashes (red).
Once the cover is open, the LED stops
flashing remaining lit (red).
Press the eject button.
• The disc rack unlocks and pops out a
little.
4
Grasp the disc rack’s handle and pull the disc rack toward
you.
6
Grasp the disc rack’s handle and push the disc rack in until
it locks (until you hear a click).
7
Close the front cover.
• Push the front cover in until it locks (until you hear a
click). The DOOR OPEN LED turns off.
• If no discs are loaded in the set, the DOOR OPEN LED
lights (green).
NOTES:
• Never put your hands or other objects inside the set
when the front cover is open. Doing so may result in
injury or damage.
• Never place anything other than CDs on the disc rack.
Doing so may result in damage.
• If you drop a disc into the player or drop a disc from the
disc rack inside the player, disconnect the power
immediately and contact your store of purchase.
• This model is for 12 cm CD. Do not insert an 8 cm CD
nor 8 cm CD with an adaptor. It damages both the player
and the disc.
2
Booklet file
The liner notes or lyric cards for up to 100 CDs can be stored in the included booklet file.
We recommend attaching number stickers with the same numbers as the slits in which the discs are loaded to the booklet file’s
pockets.
600 number seals are provided for use should extra units be installed in a daisy chain.
2
Removing CDs
Following the procedure under “Loading CDs” to draw out the disc rack, then remove the CDs.
After removing the CDs, push the disc rack all the way in and close the front cover.
* Always remove all the CDs when moving the player. If discs are loaded, shocks or vibrations may cause scratches or damage to the
CDs or the internal mechanisms.
5
Insert the CDs in the slits with the desired numbers.
• Set the discs with the label side facing back.
Back
Front
Handle
Set with the label
side facing back
Disc rack

ENGLISH
9
STAND-ALONE PLAYBACK
CONNECTION PRECAUTIONS
• Before proceeding with connections or disconnections of cable and
power cords, be sure to turn all system components off.
• Ensure that all cables are connected properly to the L (left) and R
(right) jacks.
• Insert plugs fully into the terminals.
• Connect the output jacks to the amplifier CD, AUX or TAPE PLAY
input jacks.
Connect one end of the connection cord supplied with the CD player to
the output terminals, left (L) and right (R) of the CD player, and the
other end to the CD, AUX, or TAPE PLAY input terminals, left (L) and
right (R), of the amplifier.
1234
1
DIGITAL COAX IN
DAISY CHAIN IN
REMOTE CONTROL IN
2
1
2
ANALOG OUT
RL
CONTROL
DAISY CHAIN
CONTROL
EXTERNAL
MODE SWITCH
¢ RS232C
£ RS422A
10
ATTENTION
ATTENTION
2
1
DIGITAL COAX OUT
DAISY CHAIN OUT
1
2
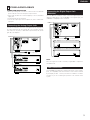
Use a 75 Ω/ohms coaxial pin cord to connect the digital output jack
(DIGITAL COAX OUT) of the DCM-5001 to the digital input jack
(COAXIAL) on a digital processor or D/A unit.
The DCM-5001 is provided with computer and remote control interface
ports, for compatibility with external remote control solutions offered
by third party vendors. Contact your dealer or installation consultant
for advice if you are considering the purchase of an external control
system.
NOTE:
When the single zone mode is selected, no digital data is output from
the ZONE 2 side.
6
Connecting the Analog Output Jacks
ZONE 2 Amplifier
ZONE 1 Amplifier
Power Supply outlet
Connecting the Digital Output Jack
(COAXIAL)
Other Connections
Power Supply outlet
ZONE 1 Digital processor or D/A converter unit (Amplifier)
ZONE 2 Digital processor or D/A converter unit (Amplifier)
DCM-5001
DCM-5001

ENGLISH
10
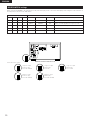
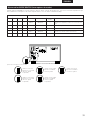
When using the DCM-5001 in the stand alone mode, first set the play mode. Select the desired play mode using the mode switches on
the rear panel, as shown on the table below.
Switch setting
SW1
1
1
1
1
1
SW2
1
1
1
0
0
SW3
1
0
0
1
0
SW4
0
1
0
1
1
Mode
Zone mode
SINGLE
SINGLE
SINGLE
MULTI
MULTI
Continuous/Random
CONTINUE
RANDOM
RANDOM
CONTINUE
RANDOM
Cross fade
—
ON
OFF
—
—
Play mode
Continuous playback in the single zone mode.
Random, cross fade playback in the single zone mode.
Random playback in the single zone mode.
Continuous playback in the multi zone mode.
Random playback in the multi zone mode.
DCM-5001 used in the stand-alone mode
Switch and function settings
Single zone output
Continuous play
(Cross fade disabled)
Multi-zone output
Continuous play
(Cross fade disabled)
Single zone output
Random play
Cross fade
Multi-zone output
Random play
(Cross fade disabled)
Single zone output
Random play
No cross fade
MODE SWITCH settings

ENGLISH
11
2
Zone modes
The DCM-5001 has two sets of outputs (zone 1 and zone 2), and different playback signals can be output from each zone when in
the multi zone mode.
Select the zone mode before starting playback.
SINGLE: The same signals are output from zone 1 and zone 2.
MULTI: Separate playback signals are output from zone 1 and zone 2.
2
Continuous and random modes
Continuous mode: All tracks of all discs are played in order starting from the lowest disc number.
In the multi-zone mode, disc 1 in zone 1 and disc 2 in zone 2 are played first, after which the next
appropriate discs are selected and played in order.
Random mode: All the CDs are played in random order. One track is selected at random from each of the CDs.
2
Cross fade playback
The cross fade play function can only be used in the single zone mode.
The cross fade mode allows you to play tracks continuously without breaks in the sound by fading in and out when switching from
playback on one disc to a track on the next disc.
Cross fade playback is possible, as described on the table below.
Cross fade playback is performed between tracks on discs selected at random (one track per disc).
Order of playback: Disc 3, Tr 5 e Disc 18, Tr 1 e Disc 56 Tr 3 e Disc 29, Tr 4 e …
Random mode:
* In all play modes, playback starts over from the beginning of the first disc once the last disc is played. (The repeat play mode is set.)
NOTE:
• No signals are output from the digital outputs when the cross fade mode is selected.
Playback
• Once connection to the amplifier, disc setting and setting of the play mode with the mode switches are completed, once press the
POWER OPERATION switch to turn off, and press the POWER OPERATION switch again to turn on.
Playback begins in the set mode.
Turn off the POWER OPERATION switch to stop playback.
* When the DCM-5001 is used in the stand-alone mode, there is no standby mode for the POWER OPERATION switch. The power can
only be set to ON (
¢
) or OFF (£).
ON / STANDBY
OFF
Off
Play modes
The indicator lights (green) if there is no disc. Load a disc.
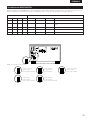
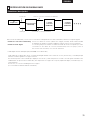
DAISY CHAIN PLAYBACK
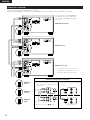
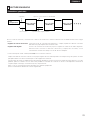
7
To amplifier
Audio signal
Digital output
Main unit
(DCM-5000)
1st sub unit
(DCM-5001)
Daisy chain control signal (5P MINI-DIN)
Audio (digital audio) signal (COAXIAL)
To connect in daisy chain, connect as shown on the diagram above. For details, refer to the following page.
• Daisy chain control signals: Connect the connector cords (5-pin cords, included) from the last sub unit in the chain to the next
higher one, and so on.
• Digital audio signals: These are connected in the same way as the daisy chain control signals. Be sure to connect both
connector cords (included) between the units, whether you select the single zone mode or the multi
zone mode.
* Digital output from the main unit (DCM-5000) with the daisy chain.
Each unit in the daisy chain has its own digital output signals based on the each system clock and the main unit transfers its digital
data to outside equipments.
So it may cause the digital-unlock for a while and may result a pause in the sound or a spike noise when switching to another unit
during the daisy chain operation. It depends on the receiving equipments (digital amp, D/A converter etc.) respectively.
In this case, do not connect the digital output to other equipments.
(We recommed to use the Audio signal output)
Connections (outline)
2nd sub unit
(DCM-5001)

ENGLISH
12
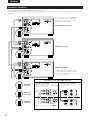
(Connections when using a DCM-5000 as the main unit)
• When using DCM-5001s as sub units, up to five DCM-5001s can be connected (resulting in a 600-disc CD changer).
For connections of the DCM-5000 to
the amplifier and other components,
refer to the DCM-5000’s operating
instructions.
DCM-5000 (main unit)
DCM-5001 (first)
DCM-5001 (second)
DCM-5001
(third)
DCM-5001
(fourth)
DCM-5001
(fifth)
Cautions on daisy chain connections
Daisy chain connection (COAX)
• Connect the input and output jacks to the
output and input jacks (respectively) with the
same numbers.
Daisy chain connection (control)
• The cord can be connected to either the 1
or 2 jack.
Connections (detailed)
Next higher
sub unit
A sub unit
* Be sure to connect both ( z , x ) cords.
* To avoid the hum, noise and other
troubles during operation, please
connect the supplied connector cords.

ENGLISH
13
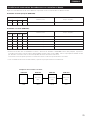
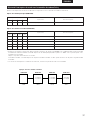
Mode switch setting with daisy chain connection
Set the mode switches of the different components as described on the tables below.
Main unit (DCM-5000) setting
Switch setting
SW1
1
SW2
0
SW3
0
SW4
0
Setting (ID No.)
Main unit of a daisy chain
Disc no. assignment
1 ~ 100
Sub unit (DCM-5001) setting
Switch setting
SW1
0
0
0
0
0
SW2
0
0
0
1
1
SW3
0
1
1
0
0
SW4
1
0
1
0
1
Setting (ID No.)
1st sub unit in daisy chain
2nd sub unit in daisy chain
3rd sub unit in daisy chain
4th sub unit in daisy chain
5th sub unit in daisy chain
Disc no. assignment
101 ~ 200
201 ~ 300
301 ~ 400
401 ~ 500
501 ~ 600
* Be sure to make the above settings. Be sure to set the DCM-5000 as the main unit. The first sub unit (the sub unit connected after
the main unit) must be set to “0001”. It cannot be set as the second or third sub unit.
It is also not possible to skip numbers in the middle. The sub unit connected after the first sub unit must be set to the ID number for
the second sub unit.
Example: For the 3rd sub unit
DCM-5000 DCM-5001 DCM-5001 DCM-5001
1st sub unit
“1000” “0001” “0010” “0011”
2nd sub unit 3rd sub unit
* If the mode switches are set wrong, the system cannot be operated normaly.

ENGLISH
14
Playback
1. Check the connections between all the components and the ID number settings of the different units (set with the mode
switches), then turn on the power.
* Do not turn on the power switch of the main unit before turning on the power of the sub units. (It is necessary for the
main unit to recognize the other unit.)
123
PLAYER
123
PLAYER
2. Once the above is completed, the DCM-5001s can be operated in the same way as the DCM-5000 using the keys on the
DCM-5000’s front panel or the remote control unit. (For details, refer to the DCM-5000’s operating instructions.)
The system can be used as a CD changer with a maximum of 600 discs, and various operations can be performed (disc files, group
playback, etc.).
* Before turn on the daisy chain system, be sure to check that the each unit’s door is closed.
If you turn on the power with any unit open, its unit and the lower sub units can not be recognized as the part of the daisy
chain system.
* If you once open the door of one unit (main or sub unit) in the system, the daisy chain system stops its operation. Close the doors
in order to restart the operation of the system.
* If you once turn off one of the unit (main unit or other sub unit) during operation, the system cannot be operated properly.
So in this case, once turn off all the units and turn on the power of all the units again.
* Do not turn off the sub units during playback in any case. It will produce the noise from the audio output due to unusual
condition of the system.
* If the connection cords (daisy chain control cords or digital audio cords for daisy chain) are not connected properly. Error message
“Error 0*80 000” or “Error 1000 000” (* is a number code) appears on the display under circumstances.
If this happens, once turn off all the units of the system and check that the each connection cords are properly connected or not.
After correct the connection, turn on the power of the each unit again.
(If the problem persists, contact your store of purchase)
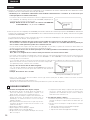
1. Cautions in Handling Compact discs
• Do not get fingerprints, oil, dirt or other substances on the
compact disc. If the disc becomes dirty, wipe it off with a
dry, soft cloth.
• Do not clean compact discs with benzene, paint thinner,
water, record spray, anti-static agent, silicon cloth or similar
substances.
• Take particular care to prevent scratches to the back side of
the compact disc when removing it from the case and
when inserting it in its case.
• Do not bend compact discs.
• Do not apply to compact discs.
• Do not attempt to enlarge the center hole of the disc.
• Do not write on the label (printed) side of the disc with a
ball point pen or pencil.
• Bringing a CD into a warm room from a cold place could
cause moisture to condense on the disc surface. Do not
attempt to dry the disc with a hair dryer, etc.
2. Storage of Compact Discs
• To prevent dust, scratches, deformation, etc., be sure to
store compact discs in their case.
• Do not store compact discs in the following locations.
1. Places where direct sunlight strikes for long periods of
time.
2. Places with a high humidity or a lot of dust.
3. Places reached by heat from a heater or similar
appliance.
COMPACT DISCS
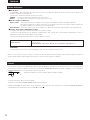
8
The numbers of the currently connected sub units appear in the “PLAYER”
area of the DCM-5000’s fluorescent display, indicating that the sub units are
recognized as sub units.
Example: When a total of three units are connected (one DCM-5000 and
two DCM-5001s): “1”, “2” and “3” light.
123
PLAYER
123
PLAYER
* About the error code in daisy chain
If the error code appears on the DCM-5000
’s display in the daisy chain
system, the player No. that caused the error is also showed on the
display.
Example: Error in the 1st sub unit.
In this case, open the door of the displayed player depends on the error type. (For details, please refer to the DCM-5000’s
instruction manual.)
Close the door after check the disc, etc.
Once turn off the power of all units and turn on the daisy chain system again.
DCM-5000 (Main unit) display
Flashes

ENGLISH
15
Page
CD cannot be played or no sound
is produced when connected in
daisy chain.
If a problem should arise, first check the following.
1. Are all connections correct ?
2. Have you operated the player according to the Operating Instructions ?
If this unit is not operating properly, check the items listed in the table below. Should the problem persist, there may be a malfunction.
Disconnect the power immediately and contact your store of purchase.
Symptom Cause Measures
LED not lit when power switch
set to on.
• Power cord not plugged in securely. • Check the insertion of the power cord plug.
• Turn the power on with the remote control unit
after turning the POWER switch on.
9
—
Playback does not start in the
stand alone mode.
• There are no discs in the disc rack.
• Is the disc dirty or scratched ?
•
The mode switches are not properly set.
• Insert a CD.
• Wipe the dirt off the disc or replace the disc.
• Check the mode switch setting.
8
14
10
There is no sound, or it is
distorted.
• Is the output cord properly connected to the
amplifier ?
• Have the amplifier controls been set correctly ?
• Check the connections.
• Adjust the amplifier’s controls.
9
–
A specific position of the disc
will not play.
• Is the disc dirty or scratched ? • Wipe the dirt off the disc or replace the disc. 14
No data is output from the digital
output jack.
• Is the pin cord properly connected ? • Check the connections. 9
• Is the pin cord (Digital out, in) properly
connected?
• Is the daisy chain control code properly
connected?
•
The mode switches are not properly set.
• Check the connections.
• Check the mode switch setting.
12
12, 13
TROUBLESHOOTING
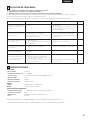
9
ANALOG
No. of Channels: 2 Channels
Frequency Response: 2 ~ 20,000 Hz
Wow & Flutter: Below measurable limit: (
±
0.001 % W.peak)
Output Level: 2.0 V
Signal-to-noise Ratio: 100 dB
Harmonic Distortion: 0.008 % (1 kHz)
DIGITAL
Output: COAXIAL (0.5 V
P-P
75 Ω/ohms)
DISCS Compact Disc format
GENERAL CHARACTERISTICS
Power Supply: AC 120 V, 60 Hz (for North America model)
Power Consumption: 42 W
Dimensions: 434 (W) x 243 (H) x 474.5 (D) mm (17-3/32”) x (9-9/16”) x (18-43/64”)
Weight: 16.2 kg (35 lbs 11 oz)
SPECIFICATIONS
10
HDCD
®
and High Definition Compatible Digital
®
are registered trademarks of Pacific Microsonics, Inc.
* Design and specifications are subject to change without notice in the course of product improvement.

FRANCAIS
16
Merci d’avoir choisi le lecteur de disque compact DENON. Il est recommandé de lire attentivement les instructions d’utilisation et d’utiliser cet
appareil correctement.
TABLE DES MATIERES
z
CARACTERISTIQUES PRINCIPALES ………………………………16
x
AVANT UTILISATION ………………………………………………16
c
PRECAUTIONS LORS DE L’INSTALLATION ……………………17
v
PRECAUTIONS A PRENDRE PENDANT L’UTILISATION ………17
b
INSTALLATION…………………………………………………18, 19
• ACCESSOIRES
Vérifier que les composants suivants sont bien livrés avec l’appareil.
n
LECTURE STAND-ALONE………………………………………20~22
m
LECTURE EN BOUCLE …………………………………………23~26
,
DISQUE COMPACTS ………………………………………………26
.
LOCALISATION DES PANNES ……………………………………27
⁄0
CARACTERISTIQUES ………………………………………………27
CARACTERISTIQUES PRINCIPALES
AVANT UTILISATION
Il est recommandé d’observer les conseils suivants avant d’utiliser l’appareil:
• Déplacement de l’appareil.
Pour éviter les courts-circuits ou d’endommager les câbles de
raccordement lors du déplacement de l’appareil, débrancher tous les
câbles d’alimentation de tous les éléments audio et tous les câbles
de raccordement des éléments entre eux.
• Avant de mettre sous tension.
Vérifier encore une fois que les connexions sont correctes et que les
câbles de raccordement sont en bon état. Toujours placer la touche
d’alimentation sur la position Standby avant de raccorder ou de
débrancher les câbles de raccordement.
• Conserver les instructions en lieu sûr.
Après les avoir lues, ranger les instructions et la garantie dans un
endroit sûr.
Remplissez également les articles de la dernière page à votre
convenance.
• Noter que les illustrations de ces instructions peuvent être
différentes de la réalité.
W Garantie..………………………1
Y Codes de connexion
(COAX en boucle) .......………2
(1) Chargeur vertical à casier de 100 CD
Les CD sont stockés à la verticale dans un casier de manière à
pouvoir être chargés et remplacés facilement.
(2) Connexion en boucle
Le DCM-5001 peut être connecté en boucle à une sous-unité de
DCM-5000 (unité principale). Dans ce cas, jusqu’à cinq DCM-5001
peuvent être connectés, transformant le système en changeur de
CD d’une capacité maximum de 600 disques.
En plus, les caractéristiques décrites ci-dessous peuvent être
utilisées en boucle avec le DCM-5000.
• Compatiblité CD-TEXT
Les données CD-TEXT sont automatiquement transférées vers
l’unité principale.
• Fonction du dossier de disque.
Les commandes d’entrée du dossier de disque (titres des
disques, titres des pistes, noms des artistes et enregistrement
de groupe) peuvent être opérées à partir de l’unité principale.
Cette information peut être vue sur l’affichage de l’unité
principale ou sur l’affichage à l’écran. Pour plus de détails sur les
dossiers de disques, consultez le mode d’emploi du DCM 5000.
• Traitement AL24 et HDCD
®
(High Definition Compatible
Digital
®
)
Quand ils sont connectés en boucle, le signaux audio sont
transférés digitalement, apportant une grande qualité de son. En
plus, le son peut passer par le traitement AL24 et le décodeur
HDCD
®
, inclus dans le DCM-5000. Pour les détails sur le
traitement AL24 et le HDCD
®
, se référer au guide d’utilisation
du DCM-5000.
(3) Opération Stand-Alone
En plus de connecter les DCM-5001 en boucle, le DCM-5001 peut
aussi opérer indépendemment (Stand Alone). La zone de mode de
lecture aléatoire et de fondu enchaîné peut être sélectionnée en
utilisant les commutateurs de mode sur le panneau arrière.
(4) Système à zone multiple avec deux platines de lecture de
CD
Le DCM-5001 est équipé de deux platines de lecture de CD, ainsi,
des signaux de lecture séparés peuvent être émis à partir de deux
zones.
(5) Accès rapide (en mode zone unique)
Les deux platines de lecture de CD peuvent être utilisées
séparément et permettent de supprimer toute attente lors du
passage d’un disque à l’autre.
4 5 6 7
Q Instructions d’utilisation ..……1
T Codes de connexion
(audio).…………………………2
R Code de connexion
(5P MINI-DIN)
Connexion en boucle.......……1
E Liste des points de SAV ..……1
U Fichier livret et
étiquette de CD ....……………1
1
2

FRANCAIS
17
Le lecteur CD utilise un micro-ordinateur pour contrôler les
circuits électriques internes. Bien qu’il soit pratiquement
impossible que des interférences se produisent dans le son d’un
tuner ou de l’image d’une télévision en marche et installée à
proximité, pour éviter tout problème, observer les conseils
suivants.
• Gardez le lecteur de CD aussi loin que possible d’un tuner ou
d’un poste de TV.
• Séparer les câbles d’alimentation et de raccordement du
lecteur CD des câbles d’antenne du tuner et de la TV.
• Il est fort probable qu’une interférence se produise lorsqu’une
antenne intérieure ou un câble d’alimentation 300 Ω/ohms est
utilisé. L’usage d’une antenne extérieure et d’un câble coaxial
75 Ω/Ohms est donc fortement recommandé.
PRECAUTIONS LORS DE L’INSTALLATION
PRECAUTIONS A PRENDRE PENDANT L’UTILISATION
• Ce lecteur de compact disc peut reproduire
les discs qui portent la marque indiquée à
droite.
• Pendant la sélection de piste, pendant la
recherche et lorsque le lecteur subit un choc
violent, la vitesse de rotation du disc change
de manière importante, provoquant
l’émission d’un petit bruit. Cela n’est pas un
fonctionnement défectueux du lecteur.
• Si le lecteur CD est utilisé pendant qu’une émission FM ou
AM est reçue, celle-ci peut être parasitée. Couper
l’alimentation du lecteur CD dans ce cas.
• La gamme dynamique du DCM-5000 est large. Prendre des
précautions lorsque le volume de l’amplificateur est augmenté
pendant que le volume de reproduction est bas. Si le volume
est réglé trop haut, les haut-parleurs pourraient être
endommagés.
C
• Ne pas utiliser de discs autres que des discs audio exclusifs
avec ce lecteur CD.
• L’installation du lecteur ou de ses cordons de connexion près
d’un téléviseur ou autre dispositif audio pourrait provoquer un
ronflement. Dans ce cas, changer l’emplacement du lecteur ou
des cordons de connexion.
• Toujours retirer le disc du lecteur avant de déplacer celui-ci. Le
disc pourrait être endommagé s’il est laissé dans le lecteur
pendant qu’il est déplacé.
• Ne pas déplacer brusquement le lecteur d’un endroit froid à un
endroit chaud. Si le lecteur est froid lorsqu’il est apporté dans
une pièce chaude, de la condensation pourrait se former,
empêchant un fonctionnement correct du lecteur. Si de la
condensation se forme dans le lecteur lorsqu’il est apporté
dans une pièce chaude, attendre au moins 30 minutes avant
de l’utiliser.
Mur
10 cm ou plus
Pour la dissipation de la chaleur, laisser un espace de 10 cm
entre le haut, l’arrière, les côtés de cet appareil et les murs
ou les autres composants.
S’assurer que le lecteur est installé sur un plan de niveau. Toute
installation sur une surface inclinée risque de provoquer un
défaut de fonctionnement ou des dommages.
3
4
Câble d’amenée de 300 Ω/ohms Câble coaxial 75 Ω/Ohms
Surface de niveau Surface inégale Surface inclinée
10 cm ou plus

FRANCAIS
18
Les mécanismes internes sont immobilisés par des vis de
blocage avant l’expédition pour les protéger des chocs et des
vibrations. S’assurer que ces vis de blocage (trois) sont retirées
avant d’utiliser le lecteur.
1
Tourner les trois vis de transport de la section A du
panneau arrière dans le sens anti-horaire et les retirer.
1
Retirer tous les CD du chargeur en suivant les conseils de
la rubrique “Chargement des CD” (page 19).
4
Appuyer sur la touche d’opération d’alimentation (
¢
ON/STANDBY) tout en appuyant sur sur le bouton DOOR
OPEN pour allumer l’appareil.
Appuyez et maintenez le doigt sur le bouton DOOR OPEN.
La LED de DOOR OPEN commence à clignoter (vert).
3
Appuyer sur le bouton d’alimentation (¢ ON/STANDBY)
pour mettre l’appareil hors tension.
6
Appuyer sur la touche d’alimentation (¢ ON/STANDBY)
pour mettre l’appareil hors tension.
5
Quand la LED de DOOR OPEN arrête de clignoter (et reste
allumée), relâchez le bouton, retirez les trois vis de
protection de la section B du panneau arrière, mettez-les
dans les trous de la section A, puis serrez-les pour
verrrouiller le mécanisme intérieur en place.
2
2
Visser ces vis dans les trous de la section B.
*
Ces vis de blocage et les rondelles de caoutchouc
peuvent être utiles lors d’un futur déplacement du
lecteur, il est recommandé de les visser dans les
trous de la section B afin de ne pas les perdre.
1234
1
DIGITAL COAX IN
DAISY CHAIN IN
DIGITAL COAX OUT
DAISY CHAIN OUT
REMOTE CONTROL IN
2
1
2
1
2
ANALOG OUT
RL
CONTROL
DAISY CHAIN
CONTROL
EXTERNAL
MODE SWITCH
¢ RS232C
£ RS422A
10
ATTENTION
ATTENTION
1
2
Vis de transport
[Lors du déplacement du lecteur]
Avant d’expédier le lecteur, prendre soin de protéger les
mécanismes internes des chocs et des vibrations en suivant la
procédure suivante.
Fermer la trappe avant.
Section
A
INSTALLATION
5
Retrait des vis d’immobilisation pendant le transport
Section
B
MULTI ZONE / QUICK ACCESS
CD CHANGER
PCM AUDIO TECHNOLOGY / 100 CD CHANGER DCM-5001
ON / STANDBY
¢
£ OFF
DOOR OPEN
1
DIGITAL COAX IN
DAISY CHAIN IN
REMOTE CONTROL IN
2
1
2
ANALOG OUT
RL
CONTROL
EXTERNAL
¢ RS232C
£ RS422A
ATTENTION
ATTENTION
DIGITAL COAX OUT
DAISY CHAIN OUT
1
2
1234
CONTROL
DAISY CHAIN
MODE SWITCH
10
2
1
Section
B
Section
A
Vis de transport

FRANCAIS
19
/ STANDBY
OFF
DOOR OPEN
Chargement des CD
1
2
3
Appuyer sur la touche d’alimentation (¢
ON/STANDBY) pour mettre l’appareil
sous tension.
Appuyer sur le bouton DOOR OPEN pour
ouvrir le capot avant.
Le bouton DOOR OPEN est opérationnel
environ 10~20 secondes après que
l’appareil soit mis en marche.
•
La LED DOOR OPEN clignote (rouge).
Une fois la trappe ouverte, la LED
s’arrête de clignoter et reste allumée
(rouge).
Appuyer sur
la touche
EJECT.
• Le casier de disque se déverrouille et
sort un petit peu.
4
Saisir la poignée du casier de disque et le tirer vers soi.
6
Saisir la poignée du casier de disque et le pousser jusqu’à
ce qu’il se verrouille (un déclic se fait entendre).
7
Refermer la trappe avant.
• Pousser la trappe avant jusqu’à ce qu’elle se verrouille
(un déclic se fait entendre). La LED DOOR OPEN
s’éteint.
• Si aucun disque n’a été chargé, la LED DOOR OPEN
s’allume (en vert).
REMARQUES:
• Ne jamais introduire les mains ou tout objet à l’intérieur
de l’appareil lorsque la trappe avant est ouverte. Cela
risque de causer des blessures ou de provoquer des
dégâts.
• Ne jamais placer autre chose que des CD dans le casier à
disque. Cela risque de provoquer des dégâts.
•
Si vous faites tomber un disque dans le lecteur ou du
plateau dans le lecteur, déconnectez l’alimentation tout
de suite et contactez le magasin où vous avez effectué
votre achat.
•
Ce modèle est conçu pour les CD de 12cm. Ne pas
introduire de CD de 8cm, ni des CD de 8cm avec
adaptateur. Cela abîme à la fois le CD et le lecteur.
2
Fichier livret de CD
Les notes de couverture et les paroles de jusqu’à 100 CD peuvent être mémorisées dans le fichier livret inclus.
Il est recommandé de faire correspondre les numéros d’autocollants numérotés avec les numéros de fente dans lesquels les disques
ont été introduits et l’ordre de saisie des poches du fichier livret.
Des joints numéro 600 sont nécessaires pour l’usage éventuel d’unités supplémentaires installées en chaîne marguerite.
2
Retrait des CD
Suivre la procédure “Chargement des CD” pour extraire le casier à disques et retirer ensuite les CD.
Après avoir retiré tous les CD, repousser le casier à disques et refermer la trappe avant.
* Toujours retirer tous les CD avant de déplacer le lecteur. Si des disques sont présents dans le chargeur, les chocs ou les vibrations
risquent de les rayer ou de les abîmer et d’endommager les mécanismes internes.
5
Introduire le nombre souhaité de CD dans les fentes.
•
Placer les disques avec le côté étiquette tourné vers
l’arrière.
Arrière
Avant
Poignée
Placer avec le côté
étiquette tourné vers
l’arrière.
Casier à disques

FRANCAIS
20
LECTURE STAND-ALONE
PRECAUTIONS LORS DES CONNEXIONS
• Avant de raccorder ou débrancher les câbles de raccordement ou
d’alimentation, s’assurer que tous les composants du système sont
hors tension.
• Vérifier que tous les câbles sont correctement connectés aux jacks
L (gauche) et R (droit).
• Insérer les fiches à fond dans les connecteurs femelles.
• Connecter les sorties aux entrées CD, AUX ou TAPE PLAY de
l’amplificateur.
Connecter une extrémité du câble de raccordement fourni aux sorties
(L) et (D) du lecteur CD et l’autre extrémité aux entrées CD, AUX, ou
TAPE PLAY gauche (L) et droite (R) de l’amplificateur.
1234
1
DIGITAL COAX IN
DAISY CHAIN IN
REMOTE CONTROL IN
2
1
2
ANALOG OUT
RL
CONTROL
DAISY CHAIN
CONTROL
EXTERNAL
MODE SWITCH
¢ RS232C
£ RS422A
10
ATTENTION
ATTENTION
2
1
DIGITAL COAX OUT
DAISY CHAIN OUT
1
2
Utiliser le câble à fiche coaxiale de 75 Ω/ohms pour raccorder la sortie
numérique (DIGITAL COAX OUT) du DCM-5001 à l’entrée numérique
(COAXIAL) d’un processeur numérique ou d’un convertisseur N/A.
Le DCM-5001 est équipé de fenêtres interface ordinateur et
télécommande, pour être compatible avec des solutions de
télécommande externe offertes par un tiers vendeur. Demandez
conseil à votre revendeur ou votre réparateur si vous envisagez
l’achat d’un système de contrôle externe.
REMARQUE:
Lorsque le mode zone unique est sélectionné, aucune donnée
numérique n’est émise du côté ZONE 2.
6
Connexions des sorties analogiques
Amplificateur ZONE 2
Amplificateur ZONE 1
Sortie alimentation
Connexion de la sortie numérique coaxiale
(COAXIAL)
Autres Connexions
Sortie alimentation
Processeur numérique ou convertisseur N/A de ZONE 1 Digital (Amplificateur)
Processeur numérique ou convertisseur N/A de ZONE 2 Digital (Amplificateur)
DCM-5001
DCM-5001
La pagina si sta caricando...
La pagina si sta caricando...
La pagina si sta caricando...
La pagina si sta caricando...
La pagina si sta caricando...
La pagina si sta caricando...
La pagina si sta caricando...
La pagina si sta caricando...
La pagina si sta caricando...
La pagina si sta caricando...
La pagina si sta caricando...
La pagina si sta caricando...
La pagina si sta caricando...
La pagina si sta caricando...
La pagina si sta caricando...
La pagina si sta caricando...
La pagina si sta caricando...
La pagina si sta caricando...
La pagina si sta caricando...
La pagina si sta caricando...
-
 1
1
-
 2
2
-
 3
3
-
 4
4
-
 5
5
-
 6
6
-
 7
7
-
 8
8
-
 9
9
-
 10
10
-
 11
11
-
 12
12
-
 13
13
-
 14
14
-
 15
15
-
 16
16
-
 17
17
-
 18
18
-
 19
19
-
 20
20
-
 21
21
-
 22
22
-
 23
23
-
 24
24
-
 25
25
-
 26
26
-
 27
27
-
 28
28
-
 29
29
-
 30
30
-
 31
31
-
 32
32
-
 33
33
-
 34
34
-
 35
35
-
 36
36
-
 37
37
-
 38
38
-
 39
39
-
 40
40


Denon DCM-5001 Manuale utente
- Categoria
- Amplificatori audio per auto
- Tipo
- Manuale utente
in altre lingue
- English: Denon DCM-5001 User manual
- français: Denon DCM-5001 Manuel utilisateur
- español: Denon DCM-5001 Manual de usuario