Clay Paky CJ3000 Manuale utente
- Categoria
- Stroboscopi
- Tipo
- Manuale utente
Questo manuale è adatto anche per

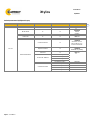
Xtylos – User Menu
1
Default parameters highlighted in grey
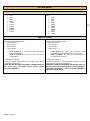
Main Menu
Level 1
Level 2
Level 3
Choices / Values
SET UP
DMX Address
001-512
Work Mode
Standard
Smart
Service
Fixture ID
000-255
Ethernet Interface
Control Protocol
Disabled
Art-net IP 2.x.x.x.
Art-net IP 10.x.x.x.
Art-net Custom IP
Repeat on DMX
Disabled
Enabled on primary
Universe
000-255
Custom IP Address
IP address byte 1
000-255
IP address byte 2
000-255
IP address byte 3
000-255
IP address byte 4
000-255
Custom IP Mask
IP mask byte 1
000-255
IP mask byte 2
000-255
IP mask byte 3
000-255
IP mask byte 4
000-255
Xtylos
User Menu
04/2020

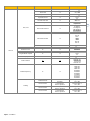
Xtylos – User Menu
2
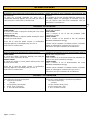
Main Menu
Level 1
Level 2
Level 3
Choices / Values
OPTION
Pan / Tilt
Invert Pan
On / Off
Invert Tilt
On / Off
Swap Pan-Tilt
On / Off
Speed Pan-Tilt
Standard
Fast
Encoder Pan-Tilt
On / Off
P/T Homing mode
Standard
Sequenced
Pan Home Def Pos
0 degree
90 degrees
180 degrees
270 degrees
Tilt Home Def Pos
0 %
12.5 %
25 %
50 %
75 %
87.5 %
100 %
P/T Enable
On / Off
Dimmer Curve
Standard
Chg RotGobo Speed
Normal
Fast
Display
On / Off
RGB Gamma
Gamma 1.0
Gamma 1.5
Gamma 2.0
PWM Frequency
4700 Hz
6000 Hz
7300 Hz
8600 Hz
10000 Hz
12000 Hz
15000 Hz
17578 Hz
20000 Hz
22000 Hz
Setting
Default Preset
Reset To Default
Go Back
Are you sure ?
Yes / No
User Preset 1
Load preset 1
Save to preset 1
Are you sure ?
Yes / No
User Preset 2
Load preset 2
Save to preset 2
Are you sure ?
Yes / No
User Preset 3
Load preset 3
Save to preset 3
Are you sure ?
Yes / No

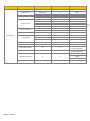
Xtylos – User Menu
3
Main Menu
Level 1
Level 2
Level 3
Choices / Values
INFORMATION
System Errors
Read / Reset
Fixture Hours
Total Hours
Read
Partial Hours
Read / Reset
Laser Hours
Total Hours
Read
Partial Hours
Read / Reset
System Version
CPU brd
Fw.rev. / Hw.rev.
com.dev
Fw.rev.
Lsr Drv
Fw.rev. / Hw.rev.
0: P&T
Fw.rev. / Hw.rev.
1: 8 ch
Fw.rev. / Hw.rev.
Board Diagnostic
0: P&T
Status / Err%
1: 8 ch
Status / Err%
DMX Monitor
Channels
Value / Percentage
Fans Monitor
PwrSp
Speed (RPM)
Led Out
Speed (RPM)
Led Out
Speed (RPM)
RDM Unique ID
ID: xxxxxxxxx
Sensor status
Channel name
n.a / On / Off
Rot Gobos Indexing
Indexing Active
Indexing Required
3 Prisms Indexing
Indexing Active
Indexing Required
Network parameters
IP Address
IP Mask
MAC Address
Serial Number
??XXXXXX

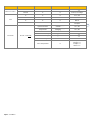
Xtylos – User Menu
4
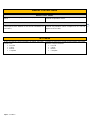
Main Menu
Level 1
Level 2
Level 3
Choices / Values
MANUAL CONTROL
Reset
Yes / No
Channel
Value / Percentage
TEST
Pan / Tilt
Colour
Effects
Complete
ADVANCED
Access Code 1234
Upload Firmware
Transfer ……..
Are you sure ?
Yes / No
Setup Model
Changing ……..
Are you sure ?
Yes / No
Calibration
Channels
000 - 255
Rot. Gobo Indexing
Starting procedure …..
Yes / No
3 Prisms Indexing
Starting procedure …..
Yes / No
Menu Locking
Unlock Code XXXX
Laser Temperature
TempR: ?°C
TempG: ?°C
TempB: ?°C
Board: ?°C

Xtylos – User Menu
5
SET UP MENU
Setup - DMX ADDRESS
PLEASE NOTE: Without the DMX input signal, the
displayed address (DMX Address) blinks.
It lets you select the address (DMX Address) for the control
signal. A DMX address between 001 and 512 can be
selected.
NOTA: Senza il segnale DMX in ingresso, l'indirizzo
(DMX Address) visualizzato sul display lampeggia.
Permette di selezionare l'indirizzo (DMX Address) per il
segnale di controllo, è possibile selezionare un indirizzo
DMX compreso tra 001 e 512.
Setup – WORK MODE
It lets you enable (ON) the Work Mode:
Standard Mode
Smart Mode (chiedere la password a Claypaky)
Service Mode
WARNING: Before servicing the luminaire, Service
Mode must be engaged: this will result in limiting
potential exposure inside the luminaire to Class 3R
level.
Permette di selezionare (ON) il Work Mode desiderato:
Standard Mode
Smart Mode (ask the password to Claypaky)
Service Mode
ATTENZIONE: prima di eseguire la manutenzione
dell'apparecchio, è necessario attivare la modalità
Service Mode: ciò comporterà la limitazione
dell'esposizione potenziale all'interno dell'apparecchio
al livello di Classe 3R.

Xtylos – User Menu
6
SET UP MENU
Setup - FIXTURE ID
It lets you set the “Fixture ID” to be assigned to the
projector. An “ID” between 000 and 255 can be assigned.
Permette di impostare il “Fixture ID” da attribuire al
proiettore, è possibile assegnare un “ID” compreso tra 000
e 255.
Setup - ETHERNET INTERFACE
It lets you set Ethernet settings to be assigned to the
projector as indicated below:
CONTROL PROTOCOL
It lets you select the “Control Protocol” Art-net to be
assigned according to the control unit used; the options
available are the following:
Disabled
Art-net on IP 2
Art-net on IP 10
Art-net Custom IP
If the Control Protocol option is set on Disabled, when an
IP address (IP2, IP10 or IP Custom) is selected, the
projector immediately initializes the IP address that was
just selected.
If the Control Protocol option is enabled (IP2, IP10 or IP
Custom) and a new one is selected that is different from
the previous one, the projector must be restarted so that it
will be correctly initialized.
REPEAT ON DMX
It lets you enable/disable the transmission of the Ethernet
protocol by DMX signal to all the connected projectors.
Disabled: DMX transmission disabled.
Enabled on primary: DMX transmission enabled.
UNIVERSE
It lets you set the “DMX Universe” to be assigned to a
series of projectors with values between 000 and 255.
CUSTOM IP ADDRESS
It lets you to set the select the “IP Address” Art-net to be
assigned, according to the control unit used, with values
between 000 and 255.
CUSTOM IP MASK
It lets you to set the select the “IP Mask” Art-net to be
assigned, according to the control unit used, with values
between 000 and 255.
Permette di impostare le impostazioni Ethernet da
assegnare al proiettore qui di seguito indicate:
CONTROL PROTOCOL
Permette di selezionare il “Control Protocol” Art-net da
assegnare in base alla centralina di controllo utilizzata, le
opzioni disponibili sono le seguenti:
Disabled
Art-net on IP 2
Art-net on IP 10
Art-net Custom IP
Se l’opzione Control Protocol è settata su Disabled, alla
selezione di un indirizzo IP (IP2, IP10 o IP Custom), il
proiettore inizializza immediatamente sull’indirizzo IP
appena selezionato.
Se l’opzione Control Protocol è abilitata (IP2, IP10 o IP
Custom) e se ne seleziona una nuova diversa da quella
precedente, è indispensabile riavviare il proiettore per far
sì che venga inizializzato correttamente.
REPEAT ON DMX
Permette di abilitare/disabilitare la trasmissione del
protocollo Ethernet tramite segnale DMX a tutti i proiettori
connessi.
Disabled: Trasmissione DMX disabilitata.
Enabled on primary: Trasmissione DMX abilitata.
UNIVERSE
Permette di impostare il “DMX Universe” da assegnare ad
una serie di proiettori, valori compresi tra 000 e 255.
CUSTOM IP ADDRESS
Permette di selezionare l’ “IP Address” Art-net da
assegnare in base alla centralina di controllo utilizzata,
valori compresi tra 000 e 255.
CUSTOM IP MASK
Permette di selezionare l’ “IP Mask” Art-net da assegnare
in base alla centralina di controllo utilizzata, valori
compresi tra 000 e 255.

Xtylos – User Menu
7
OPTION MENU
Option - PAN / TILT
INVERT PAN
It lets you enable (ON) Pan reverse movement. Select
OFF to turn off or disable this option.
INVERT TILT
It lets you enable (ON) Tilt reverse movement. Select OFF
to turn off or disable this option.
SWAP PAN-TILT
It lets you enable (ON) Pan and Tilt channel inversion (and
simultaneously Pan fine and Tilt fine). Select OFF to turn
off or disable this option.
SPEED PAN-TILT
It lets you set the Pan and Tilt Speed to be assigned:
Standard
Fast
ENCODER PAN-TILT
It lets you enable (ON) or disable (OFF) Pan and Tilt
Encoder operations.
You can quickly disable the Pan and Tilt Encoder by
simultaneously pressing the UP (↑) and DOWN(↓) keys in the
''Main Menu''.
P/T HOMING MODE
It lets you set the initial Pan and Tilt Reset mode.
Standard: Pan & Tilt are simultaneously reset.
Sequenced: Tilt is reset first followed by Pan.
PAN HOME DEF POS
It lets you assign the Pan channel “home” position at the
end of Reset (without a DMX input signal), selecting one
from the 4 available positions:
0 degree
90 degrees
180 degrees
270 degrees
TILT HOME DEF POS
It lets you assign the Tilt channel “home” position at the
end of Reset (without a DMX input signal), selecting one
from the 7 available positions:
0%
12.5%
25%
50%
75%
87.5%
100%
PAN / TILT ENABLE
Allows you to disable Pan and Tilt movement (Select OFF)
to use the fixture as a follow-spot.
Select ON to disable this option.
INVERT PAN
Permette di abilitare (ON) l’inversione del movimento Pan.
Selezionare OFF per non abilitare o disabilitare questa
opzione.
INVERT TILT
Permette di abilitare (ON) l’inversione del movimento Tilt.
Selezionare OFF per non abilitare o disabilitare questa
opzione.
SWAP PAN-TILT
Permette di abilitare (ON) l’inversione dei canali Pan e Tilt
(e contemporaneamente Pan fine e Tilt fine). Selezionare
OFF per non abilitare/disabilitare questa opzione.
SPEED PAN-TILT
Permette di impostare la velocità di movimento di Pan e
Tilt:
Standard
Fast
ENCODER PAN-TILT
Permette di abilitare (ON) o disabilitare (OFF) il
funzionamento degli Encoder di Pan e Tilt.
E’ possibile disabilitare gli Encoder di Pan e Tilt in modo
rapido, premendo contemporaneamente il tasto UP (↑) ed il
tasto DOWN(↓), una volta entrati nel ''Main Menu''.
P/T HOMING MODE
Permette di impostare la modalità di Reset iniziale di Pan e
Tilt.
Standard: Pan & Tilt resettano contemporaneamente.
Sequenced: Prima resetta il Tilt e successivamente
resetta il Pan.
PAN HOME DEF POS
Permette di assegnare una posizione di ''home'' predefinita
del canale Pan a fine Reset (in assenza di segnale DMX in
ingresso), selezionando tra le 4 disponibili:
0 degree
90 degrees
180 degrees
270 degrees
TILT HOME DEF POS
Permette di assegnare una posizione di ''home'' predefinita
del canale Tilt a fine Reset (in assenza di segnale DMX in
ingresso), selezionare tra le 7 disponibili:
0%
12.5%
25%
50%
75%
87.5%
100%
PAN / TILT ENABLE
Permette di disabilitare Pan e Tilt (Selezionando OFF) per
usare il faro come segui-persona.
Selezionare ON per disabilitare questa opzione.

Xtylos – User Menu
8
OPTION MENU
Option – DIMMER CURVE
It allows you to select one of the three available Dimmer
curves:
Standard
Not implemented yet
Permette di selezionare una tra le tre curve Dimmer
disponibili ossia:
Standard
Not implemented yet
Option – CHANGE ROTATING GOBO SPEED
It lets you select the speed of the Rotating Gobo Change
from the two available:
Normal
Fast
Permette di selezionare una tra le due velocità di Cambio
Gobo Rotante disponibili:
Normal
Fast
Option - DISPLAY
It lets you activate (ON) display brightness reduction after
about 30 seconds in idle status. Select OFF to turn off or
disable this option.
Permette di attivare (ON) la riduzione della luminosità del
display trascorso un tempo di circa 30 secondi in stato di
riposo. Selezionare OFF per non abilitare/disabilitare
questa opzione.
Option – RGB GAMMA
Lets you select three different RGBW gamma curves (see
details below):
Gamma 1.0
Gamma 1.5
Gamma 2.0
Permette di selezionare tre differenti curve
gamma RGB (vedi dettagli qui di seguito):
Gamma 1.0
Gamma 1.5
Gamma 2.0

Xtylos – User Menu
9
OPTION MENU
Option – PWM FREQUENCY
Lets you select ten different base PWM frequencies:
4700
6000
7300
8600
10000
12000
15000
17578
20000
22000
Permette di selezionare la frequenza PWM base di
lavoro:
4700
6000
7300
8600
10000
12000
15000
17578
20000
22000
Option - SETTINGS
Used to save 3 different settings of the items in the option
menu and relevant submenus.
Default preset (*)
User preset 1
User preset 2
User Preset 3
- Load preset 'X’ is used to recall a previously
stored configuration.
- Save to preset ‘X’ is used to save the current
configuration.
(*) DEFAULT PRESET
It lets you restore default values on all option menu items
and relevant submenus.
Press the left and right arrows/keys simultaneously in
the "main menu” to quickly restore default values
(DEFAULT PRESET).
Permette di salvare 3 diversi settaggi delle voci del menu
opzioni e dei relativi sottomenu.
Default preset (*)
User preset 1
User preset 2
User Preset 3
- Load preset ‘X’ serve per richiamare una
configurazione precedentemente memorizzata.
- Save to preset ‘X’ serve per memorizzare la
configurazione corrente.
(*) DEFAULT PRESET
Permette di ripristinare i valori di default su tutte le voci del
menu opzioni e dei relativi sottomenu.
Premendo contemporaneamente il tasto/freccia DX e il
tasto/freccia SX una volta entrati nel ''menu principale''
è possibile ripristinare i valori di default (DEFAULT
PRESET) in modo rapido.

Xtylos – User Menu
10
INFORMATION MENU
Information - SYSTEM ERRORS
It displays a list of errors that occurred when the projector
was turned on.
To reset the SYSTEM ERRORS list, press OK. A
confirmation message appears (Are you sure you want to
clear error list?). Select YES to confirm reset.
Mostra una lista di errori verificatisi dall'accensione del
proiettore.
Per resettare la lista dei SISTEM ERRORS premere OK,
sul display appare un messaggio di conferma (Are you
sure you want to clear error list?) selezionare YES per
confermare la cancellazione.
Information - FIXTURE HOURS
It lets you view projector working hours (total and partial).
Total counter
It counts the number of projector working life hours (from
construction to date).
Partial counter
It counts the number of projector partial working life hours
from the last reset to date.
Press OK to reset the partial counter. A confirmation
message appears on the display (Are you sure ?)
Select YES to confirm reset.
Permette di visualizzare le ore di funzionamento (totali e
parziali) del proiettore.
Total counter
Conta il numero di ore di vita del proiettore (dalla
costruzione ad oggi).
Partial counter
Conta il numero di ore parziali di vita del proiettore
dall’ultimo azzeramento ad oggi.
Premere OK per resettare il contatore parziale, sul display
appare un messaggio di conferma (Are you sure ?)
Selezionare YES per confermare la cancellazione.
Information - LASER HOURS
It lets you view Laser working hours (total and partial).
Total counter
It counts the number of projector working hours with the
Laser on (from construction to date).
Partial counter
It counts the number of Laser partial working hours from
the last reset to date.
Press OK to reset the partial counter. A confirmation
message appears on the display (Are you sure ?)
Select YES to confirm reset.
Permette di visualizzare le ore di funzionamento (totali e
parziali) della sorgente Laser.
Total counter
Conta il numero di ore di funzionamento del proiettore con
Laser acceso (dalla costruzione ad oggi).
Partial counter
Conta il numero di ore di funzionamento del Laser
dall’ultimo azzeramento ad oggi.
Premere OK per resettare il contatore parziale, sul display
appare un messaggio di conferma (Are you sure ?)
Selezionare YES per confermare la cancellazione.
Information - SYSTEM VERSION
It lets you view the hardware and software versions for
each electronic board in the projector.
CPU brd (CPU board)
com.dev
Lsr Drv (Driver Laser board)
0: P&T (Pan / Tilt board)
1: 8-Ch (8-channel board)
Permette di visualizzare la versione 'hardware' e 'software'
di ciascuna scheda elettronica presente nel proiettore.
CPU brd (scheda CPU)
Com.dev
Lsr Drv (Scheda driver Laser)
0: P&T (scheda Pan / Tilt)
1: 8-Ch (scheda 8 canali)

Xtylos – User Menu
11
INFORMATION MENU
Information - BOARD DIAGNOSTIC
It lets you view the percent errors for each electronic
board installed in the projector
0: P&T (Pan / Tilt board)
1: 8-Ch (8-channel board)
Permette di visualizzare la percentuale di errore di ogni
scheda elettronica installata nel proiettore
0: P&T (scheda Pan / Tilt)
1: 8-Ch (scheda 8 canali)
Information - DMX MONITOR
It lets you view the level of projector DMX channels in bit
(Val) and in percent.
Permette di visualizzare il livello dei canali DMX del
proiettore in bit (Val) ed in percentuale.
Information - FANS MONITOR
It lets you view the speed of each fan installed in the
projector:
PwrSp (PSU cooling fan, air flow IN)
Led OUT (Led cooling fan, air-flow OUT)
Permette di visualizzare la velocità di ogni ventola installata
nel proiettore:
PwrSp (ventola raffreddamento PSU, flusso d’aria in
ingresso)
Led OUT (ventola raffreddamento Led, flusso d’aria in
uscita)
Information – RDM UNIQUE ID
Shows the exclusive address of the fixture to use
communicate via RDM.
Mostra l'indirizzo esclusivo del dispositivo da utilizzare per
comunicare via RDM.
Information - SENSOR STATUS
It lets you check the correct operations of each "sensor”
installed in the projector, each channel is associated with
one of the following three parameters:
n.a.= sensor not available (it could be that are not
used sensor on that effect)
ON= Sensor reading (It means the magnet is
positioned on the sensor)
OFF= Sensor is not reading (It means the magnet is
not positioned on the sensor)
Permette di verificare il corretto funzionamento di ogni
‘’sensore’’ installato nel proiettore, ad ogni canale è
associato uno dei seguenti tre parametri:
n.a.= sensore non disponibile (potrebbe essere che
l’effetto non utilizzi nessun sensore)
ON= Sensore in lettura (Il magnete è posizionato in
lettura sul sensore)
OFF= Sensore non in lettura (Il magnete non è
posizionato in lettura sul sensore)

Xtylos – User Menu
12
INFORMATION MENU
Information – ROTATING GOBO INDEXING
It lets you check whether the rotating gobo wheel 1 gobo
indexing procedure should be run, if indexed, "Indexing
Active" appears on the display, otherwise "Indexing
required!” appears
If necessary, indexing should be activated from the
Advanced menu.
Permette di verificare se è necessario attivare la procedura
di indicizzazione dei gobo della ruota gobo 1 rotanti, se
indicizzati viene indicato sul display “Indexing Active”,
altrimenti viene indicato “Indexing required!”
Se necessaria, l’operazione di indicizzazione va attivata
accendendo al menu Advanced.
Information – 3 PRISMS INDEXING
It lets you check whether the 3 prisms wheel indexing
procedure should be run, if indexed, "Indexing Active"
appears on the display, otherwise "Indexing required!”
appears
If necessary, indexing should be activated from the
Advanced menu.
Permette di verificare se è necessario attivare la procedura
di indicizzazione della ruota 3 prismi, se indicizzati viene
indicato sul display “Indexing Active”, altrimenti viene
indicato “Indexing required!”
Se necessaria, l’operazione di indicizzazione va attivata
accendendo al menu Advanced.
Information – NETWORK PARAMS
Lets you view the projector "Network" parameters
meaning:
IP address: Internet Protocol address (two projectors
must not have the same IP address)
IP mask: 255.0.0.0
Mac address: Media Access Control; the projector’s
Ethernet Address.
Permette di visualizzare i parametri “Network” del proiettore
ossia:
IP address: Indirizzo di Protocollo Internet (due proiettori
non devono avere lo stesso indirizzo IP)
IP mask: 255.0.0.0
Mac address: Media Access Control; Indirizzo Ethernet del
proiettore.
Information – SERIAL NUMBER
Lets you view the fixture Serial Number. Information
available only for fixtures from January 2020.
Permette di visualizzare il Serial Number del prodotto.
Informazione disponibile solo per prodotti costruiti da
Gennaio 2020.

Xtylos – User Menu
13
MANUAL CONTROL MENU
Manual Control - RESET
It lets you reset the projector from the projector control
panel.
Permette di eseguire il reset del proiettore dal pannello
comandi del proiettore stesso.
Manual Control - CHANNEL
It lets you set the channel DMX levels from the projector
control panel (value between 0 and 255 bit or between 0%
and 100%).
Permette di impostare il livello DMX dei canali dal pannello
comandi del proiettore (valore compreso tra 0 e 255 bit
oppure tra 0% e 100%).
TEST MENU
It lets you test the correct operations of effects using pre-
saved Tests:
Pan/Tilt
Colour
Effects
Complete
Permette di verificare il corretto funzionamento degli effetti
attivando Test memorizzati:
Pan/Tilt
Colour
Effects
Complete

Xtylos – User Menu
14
ADVANCED MENU
To open the “Advanced Menu”, enter the code (1234)
Per accedere al "Menu Advanced" impostare il codice
(1234)
Advanced - UP LOAD FIRMWARE
It lets you transfer "firmware" from one projector to all other
connected projectors. A confirmation message appears on
the display (Are you sure ?) Select YES to confirm or NO
to abort this operation.
Permette di trasferire il "firmware" da un proiettore a tutti gli
altri proiettori ad esso connessi, sul display appare un
messaggio di conferma (Are you sure ?) Selezionare YES
per confermare oppure NO per non eseguire tale
operazione.
Advanced - SETUP MODEL
It lets you change the projector model (operation probably
necessary after replacing the CPU during repairs). A
confirmation message (Are you sure ?) appears on the
display Select YES to confirm (the list of available and
selectable projectors appears) or NO to abort this
operation.
Permette di cambiare il modello del proiettore (operazione
probabilmente necessaria dopo aver sostituito la CPU in
fase di riparazione). Sul display appare un messaggio di
conferma (Are you sure ?) Selezionare YES per
confermare (apparirà l’elenco dei proiettori disponibili e
selezionabili) oppure NO per non eseguire tale operazione.
Advanced - CALIBRATION
It lets you make small mechanical adjustments on some
effects to perfectly align projectors from the control panel.
Factory default
It lets you restore default "Calibration” values (128 bit) on
all channels.
Permette di eseguire tramite pannello comandi delle
piccole regolazioni meccaniche di alcuni effetti per ottenere
una perfetta uniformità tra i proiettori.
Factory default
Permette di ripristinare i valori “Calibration” di default (128
bit) di tutti i canali.
Advanced – ROT GOBO INDEXING
It lets you run the rotating gobo wheel gobo indexing
procedure. This operation may be necessary after
projector maintenance/cleaning.
Permette di eseguire l’indicizzazione dei gobo della ruota
gobo rotanti, questa operazione potrebbe essere
necessaria dopo una fase di manutenzione/pulizia del
proiettore.
Advanced – 3 PRIMS INDEXING
It lets you run the 3 prisms wheel indexing procedure. This
operation may be necessary after projector
maintenance/cleaning.
Permette di eseguire l’indicizzazione della ruota 3 prismi,
questa operazione potrebbe essere necessaria dopo una
fase di manutenzione/pulizia del proiettore.
Advanced - MENU LOCKING
It allows you to assign a password to lock the access to the
user menu, so that only users know the password can
change settings. The password is 4-digit number.
Permette di assegnare una password di blocco d’accesso
al menu utente, di modo che solo gli utenti a conoscenza
della password possano modificare le impostazioni. La
password è numerica a 4 cifre.
Advanced – LASER TEMPERATURE
It allows you to monitor the temperature of the Laser
Module.
Permette di monitorare la temperatura del modulo Laser.
-
 1
1
-
 2
2
-
 3
3
-
 4
4
-
 5
5
-
 6
6
-
 7
7
-
 8
8
-
 9
9
-
 10
10
-
 11
11
-
 12
12
-
 13
13
-
 14
14


Clay Paky CJ3000 Manuale utente
- Categoria
- Stroboscopi
- Tipo
- Manuale utente
- Questo manuale è adatto anche per
in altre lingue
- English: Clay Paky CJ3000 User manual
Documenti correlati
Altri documenti
-
ProLights RAZOR440 Manuale utente
-
-
-
-
-
-
-
-
-
Cameo F2 FC IP Manuale utente