La pagina si sta caricando...


i
To view manuals, videos, drivers, downloads, technical drawings, and more visit www.startech.com/support
Compliance Statements
Use of Trademarks, Registered Trademarks, and other
Protected Names and Symbols
This manual may make reference to trademarks, registered trademarks, and
other protected names and/or symbols of third-party companies not related in
any way to StarTech.com. Where they occur these references are for illustrative
purposes only and do not represent an endorsement of a product or service
by StarTech.com, or an endorsement of the product(s) to which this manual
applies by the third-party company in question. Regardless of any direct
acknowledgement elsewhere in the body of this document, StarTech.com
hereby acknowledges that all trademarks, registered trademarks, service marks,
and other protected names and/or symbols contained in this manual and
related documents are the property of their respective holders.
PHILLIPS® is a registered trademark of Phillips Screw Company in the United
States or other countries.

ii
To view manuals, videos, drivers, downloads, technical drawings, and more visit www.startech.com/support
Safety Statements
Safety Measures
• Product installation and/or mounting should be completed by a certied
professional as per the local safety and building code guidelines.
Mesures de sécurité
• L’installation et/ou le montage du produit doit être réalisé par un
professionnel certié et dans le respect des normes locales et du code de
construction local.
安全対策
• 製品の設置やマウントは、使用地域の安全ガイドラインおよび建築基準に
従い、有資格の専門業者が行うようにしてください。
Misure di sicurezza
• L’installazione e/o il montaggio dei prodotti devono essere eseguiti da un
tecnico professionale certicato che conosca le linee guida locali sulle norme
edilizie e sulla sicurezza.
Säkerhetsåtgärder
• Installation och/eller montering får endast göras av behöriga yrkespersoner
och enligt gällande lokala förordningar för säkerhet och byggnormer.

iii
To view manuals, videos, drivers, downloads, technical drawings, and more visit www.startech.com/support
Warning Statements
• Assemble this product according to the instructions.
• Read the entire manual and ensure the instructions are fully understood
before assembling and/or using this product.
• Do not exceed the weight capacity of this product. Overloading this product
might result in injury or property damage.
• Weight capacity of the monitor mount: 8 kg (17.6 lb.)
• Weight capacity of the laptop mount: 4.5 kg (9.9 lb.)
• Do not allow children to climb on this product, or use this product without
proper supervision.
• This product is intended for indoor use only and should not be used
outdoors.
• Do not over-tighten the screws. If any resistance is encountered, stop
tightening.
• Assembling this product is a two-person task. Do not attempt to assemble
this product and install equipment without assistance.
• Before adding equipment to this product, ensure the product has been
properly assembled, and that the product can support the weight of the
added equipment.
• Make sure all of the equipment has been properly secured before adjusting
this product.
• Pinch hazard! Keep your ngers clear from moving components.
Varningsmeddelanden
• Se till att du monterar produkten i enlighet med instruktionerna.
• Läs hela manualen och se till att du förstår instruktionerna innan du börjar
montera och använda produkten.
• Överskrid inte produktens viktkapacitet. Överbelastning av produkten kan
orsaka skada på person eller egendom.
• Skärmfästets viktkapacitet: 8 kg (17,6 lb.)
• Viktkapacitet för bärbar datorfäste: 4,5 kg (9,9 lb.)
• Låt inte barn klättra på produkten eller använda produkten utan uppsikt.
• Produkten är endast avsedd för användning inomhus och ska inte användas
utomhus.
• Dra inte åt skruvarna för hårt när du monterar produkten. Om du måste ta i
när du skruvar åt kan du sluta skruva åt.
• Det krävs Monitorå personer för att montera produkten. Försök inte montera
produkten och installera utrustning utan hjälp.

iv
To view manuals, videos, drivers, downloads, technical drawings, and more visit www.startech.com/support
• Innan du lägger till utrustning på produkten, se till att produkten är korrekt
monterad, installerad och att produkten klarar av vikten på utrustningen som
du lägger till.
• Se till att all utrustning är korrekt installerad innan du börjar justera
produkten.
• Innan du börjar ytta på vagnen, se till att hjulen är upplåsta.
• Klämrisk! Håll ngrarna borta från rörliga komponenter.
Waarschuwingen
• Zorg dat u dit product volgens de instructies in elkaar zet.
• Lees de gehele handleiding en zorg dat u de instructies begrijpt voordat u dit
product in elkaar zet en gebruikt.
• Overschrijd de maximale capaciteit van dit product niet. Overbelasting van
dit product kan letsel of materiële schade veroorzaken.
• Gewichtscapaciteit van de monitorsteun: 8 kg (17,6 lb.)
• Gewichtscapaciteit van de laptopbevestiging: 4,5 kg (9,9 lb.)
• Geef kinderen geen toestemming om op dit apparaat te klimmen of dit
product zonder goed toezicht te gebruiken.
• Dit product is alleen bedoeld voor binnengebruik en mag niet buiten worden
gebruikt.
• Draai de schroeven niet te strak vast wanneer u dit product in elkaar zet. Als u
weerstand voelt tijdens het vastdraaien van de schroeven, stop dan.
• Dit product moet met twee personen in elkaar worden gezet. Probeer dit
product niet zonder hulp in elkaar te zetten en apparatuur te installeren.
• Voordat u apparatuur aan dit product toevoegt, moet u ervoor zorgen dat
u het op de juiste manier in elkaar hebt gezet en geïnstalleerd, en dat het
product het gewicht van de toe te voegen apparatuur kan ondersteunen.
• Voordat u de wagen gaat verplaatsen, moet u de zwenkwielen ontgrendelen.
• Gevaar voor beknelling! Houd uw vingers weg van de bewegende
onderdelen als u.
注意
• 必ず取扱説明書に従って本製品の組み立てを行って下さい。
• 最初に取扱説明書を最後まで読み、本製品の組み立て方をすべて理解して
から組み立て作業を始めて下さい。
• 本製品で定められた最大積載重量を超えないようにして下さい。最大積載
重量をオーバーした場合、怪我をする恐れや器物破損の恐れがあります。
• モニターマウントの耐荷重:8kg(17.6ポンド)
• ラップトップマウントの耐荷重:4.5kg(9.9lb.)

v
To view manuals, videos, drivers, downloads, technical drawings, and more visit www.startech.com/support
• 本製品に小さなお子様が乗って遊ばないようにして下さい。お子様が使用
する際には、適切な監視を怠らないようにして下さい。
• 本製品は、室内での使用を想定しています。戸外では使用しないで下さい。
• 本製品を組み立てる際、ネジを締めすぎないようにして下さい。ネジを締め
ているうちに手応えを感じたら、締めるのを止めてください。
• 本製品は、二人がかりでの組み立てを想定しています。手助けなしに単独で
組み立てと設置を行わないで下さい。
• コードやケーブルの上、または凹凸のある床面でカートを移動させないで
下さい。
• 危険!可動部品に近づかないでください。
Dichiarazioni di avvertenza
• Assicurarsi di Assemblare il prodotto secondo le istruzioni.
• Leggere l’intero manuale e assicurarsi di aver compreso tutte le istruzioni
prima di iniziare ad assemblare e a utilizzare questo prodotto.
• Non superare la capacità di carico del prodotto. Il sovraccarico del prodotto
potrebbe causare danni o lesioni.
• Capacità di peso del supporto del monitor: 8 kg (17,6 lb.)
• Capacità di peso del supporto per laptop: 4,5 kg (9,9 lb.)
• Non consentire ai bambini di arrampicarsi sul prodotto o di utilizzarlo senza
un’adeguata supervisione.
• Il prodotto è destinato all’uso in ambienti interni. Se ne sconsiglia l’impiego
in ambienti esterni.
• Durante l’assemblaggio del prodotto, non stringere troppo le viti. Se si
incontra resistenza mentre si stringono le viti, interrompere l’operazione.
• L’assemblaggio di questo prodotto richiede la presenza di due persone.
Non tentare di assemblare il prodotto e installare le apparecchiature senza
assistenza.
• Prima di aggiungere altre apparecchiature al prodotto, assicurarsi di averlo
assemblato e installato correttamente e che sia in grado di sostenere il peso
dell’apparecchiatura in questione.
• Prima di procedere allo spostamento del carrello, vericare di aver sbloccato
le rotelle.
• Pericolo di Schiacciamento! Tenere lontane le dita da parti in movimento.
Avertissements
• Assemblez ce produit conformément aux instructions.
• Lisez tout le manuel et assurez-vous que vous comprenez les instructions
avant de commencer à assembler et utiliser ce produit.

vi
To view manuals, videos, drivers, downloads, technical drawings, and more visit www.startech.com/support
• Ne dépassez pas la capacité pondérale du produit. Une surcharge du produit
peut entraîner des blessures ou des dommages matériels.
• Capacité de poids du support de moniteur: 8 kg (17,6 lb)
• Capacité de poids du support pour ordinateur portable : 4,5 kg (9,9 lb.)
• N’autorisez pas les enfants à grimper sur ce produit ni à l’utiliser sans
surveillance.
• Ce produit est uniquement destiné à une utilisation en intérieur et ne doit
pas être utilisé à l’extérieur.
• Ne serrez pas trop les vis lors de l’assemblage de ce produit. Si vous
rencontrez une résistance lors du serrage des vis, cessez de serrer.
• L’assemblage de ce produit nécessite deux personnes. Ne tentez pas
d’assembler le produit et d’installer les équipements sans aide.
• Avant d’ajouter des équipements au produit, vériez que vous l’avez
correctement assemblé et installé, et que le produit peut supporter le poids
des équipements que vous y ajoutez.
• Avant de déplacer le meuble, veillez à débloquer les roulettes.
• Risque de pincement ! Ne pas approcher les doigts des composants mobiles.
Mensagens de aviso
• Certique-se de que monta este produto de acordo com as instruções.
• Leia todo o manual e certique-se de que entende as instruções antes de
começar a montar e a utilizar este produto.
• Não exceda a capacidade de peso deste produto. Sobrecarregar este produto
pode resultar em ferimentos ou danos de propriedade.
• Capacidade de peso do suporte do monitor: 8 kg (17,6 lb.)
• Capacidade de peso do suporte para laptop: 4,5 kg (9,9 lb.)
• Não deixar as crianças trepar neste produto ou utilizar este produto sem a
devida supervisão.
• Este produto destina-se apenas a uma utilização no interior e não deve ser
utilizado no exterior.
• Quando montar este produto, não aperte demasiado os parafusos. Se
encontrar resistência enquanto aperta os parafusos, pare de apertar.
• Montar este produto é uma tarefa para duas pessoas. Não tentar montar este
produto e instalar o equipamento sem assistência.
• Antes de adicionar o equipamento a este produto, certique-se de que o
montou e instalou devidamente e de que o produto pode suportar o peso do
equipamento que está a adicionar ao mesmo.
• Antes de começar a mover o carro, certique-se de que desbloqueia os
rodízios.

vii
To view manuals, videos, drivers, downloads, technical drawings, and more visit www.startech.com/support
• Risco de dedos trilhados! Mantenha os dedos afastados dos componentes
em movimento.
Advertencias de uso
• Asegúrese de ensamblar este producto según las instrucciones.
• Lea todo el manual y asegúrese de haber comprendido bien las instrucciones
antes de proceder con el ensamblaje y el uso de este producto.
• Asegúrese de no exceder la capacidad de peso de este producto. La
sobrecarga de este producto puede causar lesiones personales o daños en la
propiedad.
• Capacidad de peso del soporte del monitor: 8 kg (17,6 lb)
• Capacidad de peso del soporte para computadora portátil: 4,5 kg (9,9 lb.)
• No permita que los niños se suban a este producto o que lo utilicen sin la
debida supervisión de un adulto.
• El uso de este producto es solo para interiores y no debe utilizarse en
exteriores.
• Cuando ensamble este producto, no apriete los tornillos más de lo debido. Si
al apretar los tornillos siente resistencia, no los apriete más.
• Se requieren dos personas para el ensamblaje de este producto. No intente
ensamblar este producto e instalar otros equipos sin la debida asistencia de
otra persona.
• Antes de instalar equipos en este producto, asegúrese de haberlo
ensamblado correctamente, a n de que pueda soportar el peso del equipo
que vaya a instalar.
• Antes de empezar a mover el carrito, asegúrese de haber desbloqueado
las ruedas. Antes de empezar a mover el carrito, asegúrese de haber
desbloqueado las ruedas.
• ¡Peligro de Aplastamiento! Mantenga sus dedos alejados de las partes
móviles.
Warnhinweise
• Beachten Sie bei der Montage dieses Produkts die Montageanweisungen.
• Bevor Sie dieses Produkt montieren und verwenden, lesen Sie das gesamte
Handbuch und vergewissern Sie sich, dass Sie die Anweisungen verstanden
haben.
• Überschreiten Sie nicht die Tragkraft dieses Produkts. Ein Überladen dieses
Produkts kann zu Verletzungen oder zur Beschädigung des Produkts führen.
• Gewichtskapazität der Monitorhalterung: 8 kg (17,6 lb.)
• Belastbarkeit der Laptophalterung: 4,5 kg (9,9 lb.)

viii
To view manuals, videos, drivers, downloads, technical drawings, and more visit www.startech.com/support
• Gestatten Sie Kindern nicht, auf das Produkt zu klettern oder das Produkt
ohne Aufsicht zu benutzen.
• Dieses Produkt ist nur zum Gebrauch in Innenräumen vorgesehen und sollte
nicht im Freien verwendet werden.
• Achten Sie bei der Montage des Produkts darauf, die Schrauben nicht zu
fest anzuziehen. Sobald Sie beim Anziehen der Schrauben auf Widerstand
stoßen, stellen Sie das Anziehen ein.
• Die Montage dieses Produkts ist auf die Ausführung von zwei Personen
ausgelegt. Versuchen Sie nicht ohne Hilfe, dieses Produkt zu montieren und
Geräte zu installieren.
• Bevor Sie Geräte zu diesem Produkt hinzufügen, vergewissern Sie sich, dass
Sie es ordnungsgemäß montiert und installiert haben und dass das Produkt
das Gewicht der Geräte, die Sie hinzufügen möchten, tragen kann.
• Stellen Sie sicher, dass die Rollen entriegelt sind, bevor Sie den Wagen in
Bewegung setzen.
• Einklemmgefahr! Halten Sie Ihre Finger fern von beweglichen Teilen.

Table of Contents
Compliance Statements ........................................................................i
Safety Statements ..................................................................................ii
Warning Statements ..............................................................................iii
Product Diagram ....................................................................................1
Front View .................................................................................................................................................... 1
Product Dimensions ..............................................................................2
Front View .................................................................................................................................................... 2
Product Information ..............................................................................2
Requirements ............................................................................................................................................. 2
Package Contents .....................................................................................................................................3
Installation ..............................................................................................5
Mounting Option #1 - Desk Mount .................................................................................................... 5
Attach the Pole Cap (H) to the Pole (G) ............................................................................................. 5
Attach the Pole (G) to the Mounting Surface .................................................................................. 5
Mounting Option #2 - Grommet Mount ...........................................................................................7
Assemble the Grommet Mount .......................................................................................................... 7
Attach the Arms (B) to the Pole Assembly ....................................................................................... 8
Mount the Display ....................................................................................................................................9
Attach the VESA Mount (A) to a Monitor .......................................................................................... 9
Attach the Monitor Mount Assembly to the Arm (B) ................................................................... 13
Attach the Laptop Tray (C) to the Pole Assembly .......................................................................... 14
Attach the Laptop Arms .........................................................................................................................14
To view manuals, videos, drivers, downloads, technical drawings, and more visit www.startech.com/support

24
To view manuals, videos, drivers, downloads, technical drawings, and more visit www.startech.com/support
Attach the VESA Mount (A) to the Laptop Tray (C) ........................................................................ 15
Attach the Laptop Mount Assembly to the Arm (B) ..................................................................... 15
Mount the Laptop ..................................................................................................................................... 16
Cable Management ..................................................................................................................................17
Adjustment Tool Storage ........................................................................................................................17
Operation ................................................................................................18
Adjust the Tilt Angle of the Laptop/Monitor ................................................................................... 18
Adjust the Swivel Angle of the Laptop/Monitor ............................................................................ 19
Rotate the Monitor ................................................................................................................................... 19
Warranty Information ............................................................................ 20
To view manuals, videos, drivers, downloads, technical drawings, and more visit www.startech.com/support

1
To view manuals, videos, drivers, downloads, technical drawings, and more visit www.startech.com/support
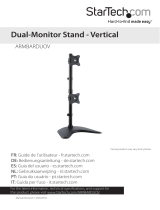
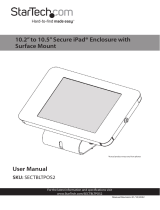
Product Diagram
Front View
Pole (G)
Arm (B)
Cable
Management
Clip (I)
VESA Mount
(A)
Laptop Tray (C)
Desk Clamp(F) Desk
Mount
Grommet
Mount
Laptop Arm Clip (D)

2
To view manuals, videos, drivers, downloads, technical drawings, and more visit www.startech.com/support
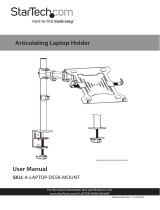
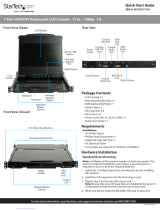
Product Dimensions
Front View
Product Information
Requirements
For the latest manuals, product information, technical
specications, and Declarations of Conformance, please visit:
www.StarTech.com/A2-LAPTOP-DESK-MOUNT
• Phillips Head Screwdriver

3
To view manuals, videos, drivers, downloads, technical drawings, and more visit www.startech.com/support
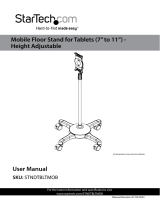
Package Contents
Note: The following images are not to scale.
VESA Mounts (A)
Qty: 2
Arms (B)
Qty: 2
Laptop Tray (C)
Qty: 1
Laptop Arm Clips
(D)
Qty: 2
Laptop Arm Pads
(E)
Qty: 2
Desk Clamp (F)
Qty: 1
Pole (G)
Qty: 1
Pole Cap (H)
Qty: 1
Cable
Management
Clip (I)
Qty: 1
Grommet Base
Plate (J)
Qty: 1
Grommet Clamp
Plate (K)
Qty: 1
Laptop Tray
Mounting Screws
(L)
Qty: 4

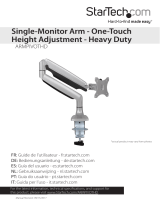
4
VESA Mount
Knobs (M)
Qty: 2
Rubber Pads (N)
Qty: 5
Pole Mounting
Screws (O)
Qty: 3
4 mm Hex Key (P)
Qty: 1
6 mm Hex Key (Q)
Qty: 1
M4 x 12 mm
Screws (M-A)
Qty: 8
M4 x 16 mm
Screws (M-B)
Qty: 8
M5 x 12 mm
Screws (M-C)
Qty: 8
M5 x 16 mm
Screws (M-D)
Qty: 8
Washers (M-E)
Qty: 8
Spacers (M-F)
Qty: 8
User Manual
Qty: 1

5
Installation
Note: Do not overtighten any of the screws.
Pinch hazards! Keep hands away from any pinch points
created by the mechanical components when moving the
arm assembly. Failure to do so may result in serious personal
injury.
Mounting Option #1 - Desk Mount
Attach the Pole Cap (H) to the Pole (G)
• Insert the Pole Cap (H) into the end of the Pole (G) that does
not feature any screw holes.
(Figure 1)
Figure 1
To view manuals, videos, drivers, downloads, technical drawings, and more visit www.startech.com/support

Attach the Pole (G) to the Mounting Surface
1. Align the holes in the Desk Clamp (F) with the holes in one
end of the Pole (G). (Figure 2)
2. Insert three Pole Mounting Screws (O) through the holes,
located in the top of the Desk Clamp (F), and into the Pole
(G) and tighten, using the 4 mm Hex Key (P), to complete
the Desk Pole Assembly.
3. Loosen the Hand Screw, located on the Desk Pole
Assembly, until the Desk Clamp is wider than the thickness
of the Mounting Surface (e.g. Desk or Table).
4. Slide the Desk Pole Assembly Clamp onto the Mounting
Surface.
5. Tighten the Hand Screw, located on the Desk Pole
Assembly, by hand, until hand-tight.
6
Figure 2
To view manuals, videos, drivers, downloads, technical drawings, and more visit www.startech.com/support

7
Mounting Option #2 - Grommet Mount
Assemble the Grommet Mount
1. Remove the two Screws, located on the back of the Desk
Clamp (F), using the 4 mm Hex Key (P).
2. Remove the Screw that fastens Pressure Plate to the Hand
Screw. (Figure 3)
3. Remove the Pressure Plate and Washer, and remove the
Hand Screw from the Desk Clamp (F).
4. Slide the Grommet Clamp Plate (K) over the end of the
Hand Screw, completing the Grommet Hand Screw.
5. Ax the Rubber Pads (N)(x5) to the side of the Grommet
Base Plate (J) that does not feature the Peg.
To view manuals, videos, drivers, downloads, technical drawings, and more visit www.startech.com/support
Figure 3
Pressure Plate

8
To view manuals, videos, drivers, downloads, technical drawings, and more visit www.startech.com/support
6. Insert the Peg, located on the Grommet Base Plate (J),
into the non-threaded hole, located in the base of the Pole
(G) and push to attach the two pieces, completing the
Grommet Pole Assembly.
7. Align the Grommet Pole Assembly over the Grommet
Hole.
8. Insert the Grommet Hand Screw through the bottom of the
Grommet Hole and into the Grommet Pole Assembly and
tighten, by hand, until hand tight.
Attach the Arms (B) to the Pole Assembly
1. Slide one Arm (B) onto the Pole Assembly, ensuring the
hole in the VESA Mount Attachment Point is oriented
towards the top. (Figure 4)
Figure 4
VESA Mount
Attachment
Point
Tension
Adjustment
Screw

2. Slide the Cable Management Clip (I) onto the Pole
Assembly.
3. Slide the second Arm (B) onto the Pole Assembly, ensuring
the hole in the VESA Mount Attachment Point is oriented
towards the top.
4. Adjust the height of the Arms (B) to the desired mounting
heights for the Laptop and Display and tighten the Tension
Adjustment Screws, using the 6 mm Hex Key (Q).
Mount the Display
Attach the VESA Mount (A) to a Monitor
Non-Recessed Monitor VESA Holes
1. Place the Monitor screen side down on a at, clean surface.
2. Remove any Screws or Place Holders from the VESA
Mounting Holes on the back of the Monitor. (Figure 5)
Note: Be careful not to remove any of the Screws holding
the Monitor’s Casing together.
9
Figure 5
To view manuals, videos, drivers, downloads, technical drawings, and more visit www.startech.com/support
1/32