i
To view manuals, videos, drivers, downloads, technical drawings, and more visit www.startech.com/support
Compliance Statements
Use of Trademarks, Registered Trademarks, and other
Protected Names and Symbols
This manual may make reference to trademarks, registered trademarks, and
other protected names and/or symbols of third-party companies not related in
any way to StarTech.com. Where they occur these references are for illustrative
purposes only and do not represent an endorsement of a product or service
by StarTech.com, or an endorsement of the product(s) to which this manual
applies by the third-party company in question. Regardless of any direct
acknowledgement elsewhere in the body of this document, StarTech.com
hereby acknowledges that all trademarks, registered trademarks, service marks,
and other protected names and/or symbols contained in this manual and
related documents are the property of their respective holders.
PHILLIPS® is a registered trademark of Phillips Screw Company in the United
States or other countries.
Apple and iPad are trademarks of Apple Inc., registered in the U.S. and other
countries and regions.

ii
To view manuals, videos, drivers, downloads, technical drawings, and more visit www.startech.com/support
Safety Statements
Safety Measures
• Product installation and/or mounting should be completed by a certied
professional as per the local safety and building code guidelines.
Mesures de sécurité
• L’installation et/ou le montage du produit doit être réalisé par un
professionnel certié et dans le respect des normes locales et du code de
construction local.
安全対策
• 製品の設置やマウントは、使用地域の安全ガイドラインおよび建築基準に
従い、有資格の専門業者が行うようにしてください。
Misure di sicurezza
• L’installazione e/o il montaggio dei prodotti devono essere eseguiti da un
tecnico professionale certicato che conosca le linee guida locali sulle norme
edilizie e sulla sicurezza.
Säkerhetsåtgärder
• Installation och/eller montering får endast göras av behöriga yrkespersoner
och enligt gällande lokala förordningar för säkerhet och byggnormer.

iii
To view manuals, videos, drivers, downloads, technical drawings, and more visit www.startech.com/support
Warning Statements
• Assemble this product according to the instructions.
• Read the entire manual and ensure the instructions are fully understood
before assembling and/or using this product.
• This product is intended for indoor use only and should not be used
outdoors.
• Do not over-tighten the screws. If any resistance is encountered, stop
tightening.
• Pinch hazard! Keep your ngers clear from moving components.
Varningsmeddelanden
• Se till att du monterar produkten i enlighet med instruktionerna.
• Läs hela manualen och se till att du förstår instruktionerna innan du börjar
montera och använda produkten.
• Produkten är endast avsedd för användning inomhus och ska inte användas
utomhus.
• Dra inte åt skruvarna för hårt när du monterar produkten. Om du måste ta i
när du skruvar åt kan du sluta skruva åt.
• Klämrisk! Håll ngrarna borta från rörliga komponenter.
Waarschuwingen
• Zorg dat u dit product volgens de instructies in elkaar zet.
• Lees de gehele handleiding en zorg dat u de instructies begrijpt voordat u dit
product in elkaar zet en gebruikt.
• Dit product is alleen bedoeld voor binnengebruik en mag niet buiten
worden gebruikt.
• Draai de schroeven niet te strak vast wanneer u dit product in elkaar zet. Als
u weerstand voelt tijdens het vastdraaien van de schroeven, stop dan.
• Gevaar voor beknelling! Houd uw vingers weg van de bewegende
onderdelen als u.
注意
• 必ず取扱説明書に従って本製品の組み立てを行って下さい。
• 最初に取扱説明書を最後まで読み、本製品の組み立て方をすべて理解して
から組み立て作業を始めて下さい。
• 本製品は、室内での使用を想定しています。戸外では使用しないで下さい。

iv
To view manuals, videos, drivers, downloads, technical drawings, and more visit www.startech.com/support
• 本製品を組み立てる際、ネジを締めすぎないようにして下さい。ネジを締め
ているうちに手応えを感じたら、締めるのを止めてください。
• 危険!可動部品に近づかないでください。
Dichiarazioni di avvertenza
• Assicurarsi di Assemblare il prodotto secondo le istruzioni.
• Leggere l’intero manuale e assicurarsi di aver compreso tutte le istruzioni
prima di iniziare ad assemblare e a utilizzare questo prodotto.
• Il prodotto è destinato all’uso in ambienti interni. Se ne sconsiglia l’impiego
in ambienti esterni.
• Durante l’assemblaggio del prodotto, non stringere troppo le viti. Se si
incontra resistenza mentre si stringono le viti, interrompere l’operazione.
• Pericolo di Schiacciamento! Tenere lontane le dita da parti in movimento.
Avertissements
• Assemblez ce produit conformément aux instructions.
• Lisez tout le manuel et assurez-vous que vous comprenez les instructions
avant de commencer à assembler et utiliser ce produit.
• Ce produit est uniquement destiné à une utilisation en intérieur et ne doit
pas être utilisé à l’extérieur.
• Ne serrez pas trop les vis lors de l’assemblage de ce produit. Si vous
rencontrez une résistance lors du serrage des vis, cessez de serrer.
• Risque de pincement ! Ne pas approcher les doigts des composants mobiles.
Mensagens de aviso
• Certique-se de que monta este produto de acordo com as instruções.
• Leia todo o manual e certique-se de que entende as instruções antes de
começar a montar e a utilizar este produto.
• Este produto destina-se apenas a uma utilização no interior e não deve ser
utilizado no exterior.
• Quando montar este produto, não aperte demasiado os parafusos. Se
encontrar resistência enquanto aperta os parafusos, pare de apertar.
• Risco de dedos trilhados! Mantenha os dedos afastados dos componentes
em movimento.

v
To view manuals, videos, drivers, downloads, technical drawings, and more visit www.startech.com/support
Advertencias de uso
• Asegúrese de ensamblar este producto según las instrucciones.
• Lea todo el manual y asegúrese de haber comprendido bien las instrucciones
antes de proceder con el ensamblaje y el uso de este producto.
• El uso de este producto es solo para interiores y no debe utilizarse en
exteriores.
• Cuando ensamble este producto, no apriete los tornillos más de lo debido. Si
al apretar los tornillos siente resistencia, no los apriete más.
• ¡Peligro de Aplastamiento! Mantenga sus dedos alejados de las partes
móviles.
Warnhinweise
• Beachten Sie bei der Montage dieses Produkts die Montageanweisungen.
• Bevor Sie dieses Produkt montieren und verwenden, lesen Sie das gesamte
Handbuch und vergewissern Sie sich, dass Sie die Anweisungen verstanden
haben.
• Dieses Produkt ist nur zum Gebrauch in Innenräumen vorgesehen und sollte
nicht im Freien verwendet werden.
• Achten Sie bei der Montage des Produkts darauf, die Schrauben nicht zu
fest anzuziehen. Sobald Sie beim Anziehen der Schrauben auf Widerstand
stoßen, stellen Sie das Anziehen ein.
• Einklemmgefahr! Halten Sie Ihre Finger fern von beweglichen Teilen.

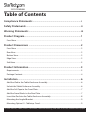
Table of Contents
Compliance Statements ........................................................................i
Safety Statements ..................................................................................ii
Warning Statements ..............................................................................iii
Product Diagram ....................................................................................1
Front View .................................................................................................................................................... 1
Product Dimensions ..............................................................................2
Front View ................................................................................................................................................... 2
Rear View ...................................................................................................................................................... 2
Bottom View ................................................................................................................................................2
Edge View .....................................................................................................................................................2
Side View ...................................................................................................................................................... 3
Product Information ..............................................................................3
Requirements ............................................................................................................................................. 3
Package Contents .....................................................................................................................................4
Installation ..............................................................................................6
Add the iPad to the Tablet Enclosure Assembly............................................................................. 6
Unlock the Tablet Enclosure Assembly ............................................................................................. 6
Add the Felt Tape to the Front Plate ...................................................................................................7
Add the Foam Blocks to the Rear Plate ............................................................................................. 7
Insert the iPad into the Tablet Enclosure Assembly ...................................................................... 8
Mounting the Angled Bracket .............................................................................................................. 9
Mounting Option #1 - Tabletop- Fixed .............................................................................................. 9
To view manuals, videos, drivers, downloads, technical drawings, and more visit www.startech.com/support

To view manuals, videos, drivers, downloads, technical drawings, and more visit www.startech.com/support
Mounting Option #2 - Tabletop - Rotating ...................................................................................... 10
Mounting Option #3 - Wall Mount ...................................................................................................... 11
Attach the Tablet Enclosure Assembly to the Angled Bracket .................................................. 12
Warranty ..................................................................................................13

1
To view manuals, videos, drivers, downloads, technical drawings, and more visit www.startech.com/support
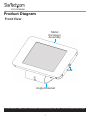
Product Diagram
Front View
Angled Bracket
Tablet
Enclosure
Assembly
Lock

2
To view manuals, videos, drivers, downloads, technical drawings, and more visit www.startech.com/support
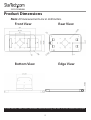
Product Dimensions
Note: All measurements are in millimeters.
Front View Rear View
Bottom View Edge View

3
To view manuals, videos, drivers, downloads, technical drawings, and more visit www.startech.com/support
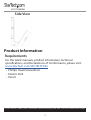
Side View
Product Information
Requirements
For the latest manuals, product information, technical
specications, and Declarations of Conformance, please visit:
www.StarTech.com/SECTBLTPOS2
• Phillips Head Screwdriver
• Electric Drill
• Pencil

4
To view manuals, videos, drivers, downloads, technical drawings, and more visit www.startech.com/support
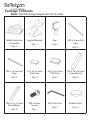
Package Contents
Note: The following images are not to scale.
Tablet Enclosure
Assembly
Qty: 1
Angled Bracket
Qty: 1
Keys
Qty: 2
200 x 5 mm Felt
Tape
Qty: 2
150 x 10 mm Felt
Tape
Qty: 2
20 x 15 x 3 mm
EVA Pads
Qty: 4
45 x 15 x 2 mm
EVA Pads
Qty: 2
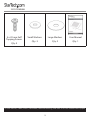
100 x 25 x 20 mm
Foam Blocks
Qty: 2
100 x 15 x 12 mm
Foam Blocks
Qty: 2
M4 x 8 mm
Screws
Qty: 4
M2.5 Hex Key
Qty: 1
Rubber Pads
Qty: 4

5
5 x 20 mm Self
Tapping Screws
Qty: 3
Small Washers
Qty: 3
Large Washers
Qty: 2
User Manual
Qty: 1
To view manuals, videos, drivers, downloads, technical drawings, and more visit www.startech.com/support

6
Installation
Note: Do not overtighten any of the screws.
Pinch hazards! Keep hands away from any pinch points
created by the mechanical components. Failure to do so may
result in serious personal injury.
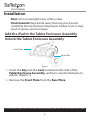
Add the iPad to the Tablet Enclosure Assembly
Unlock the Tablet Enclosure Assembly
1. Insert the Key into the Lock, located on the side of the
Tablet Enclosure Assembly, and turn counterclockwise to
unlock. (Figure 1)
2. Remove the Front Plate from the Rear Plate.
To view manuals, videos, drivers, downloads, technical drawings, and more visit www.startech.com/supportTo view manuals, videos, drivers, downloads, technical drawings, and more visit www.startech.com/support
Figure 1
Front Plate
Rear Plate

7
To view manuals, videos, drivers, downloads, technical drawings, and more visit www.startech.com/support
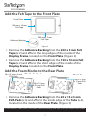
Add the Felt Tape to the Front Plate
1. Remove the Adhesive Backing from the 200 x 5 mm Felt
Tape (x 2) and ax to the long edges of the inside of the
Display Frame, located on the Front Plate. (Figure 2)
2. Remove the Adhesive Backing from the 150 x 10 mm Felt
Tape (x 2) and ax to the short edges of the inside of the
Display Frame, located on the Front Plate.
Add the Foam Blocks to the Rear Plate
1. Remove the Adhesive Backing from the 20 x 15 x 3 mm
EVA Pads (x 4) and ax to the inside edge of the Tabs (x 4),
located on the inside of the Rear Plate. (Figure 3)
Figure 2
Front Plate
200 mm x 5 mm
Felt Tape
150 mm x 10 mm
Felt Tape
Adhesive Backing
Figure 3 Figure 4
20 x 15 mm x 3 mm
EVA Pads
100 x 25 mm
x 20 mm EVA
Pads
100 x 15 mm
x 12 mm EVA
Pads

8
To view manuals, videos, drivers, downloads, technical drawings, and more visit www.startech.com/support
2. (Optional) Remove the Adhesive Backing from the 100 x
25 x 20 mm Foam Blocks (x 2) and ax next to the Tabs,
towards the center of the Rear Plate.
3. (Optional) Remove the Adhesive Backing from the 100 x 15
x 12 mm Foam Blocks (x 2) and ax along the inside edge
on the top and bottom of the Rear Plate. (Figure 4)
Insert the iPad into the Tablet Enclosure Assembly
1. Insert the Power/Data Cable through one of the openings,
located in the rear/sides of the Rear Plate, and into the iPad.
(Figure 5)
2. Place the iPad into the Tablet Enclosure Assembly, routing
the Power/Data Cable around the EVA Pads. Ensure the
Power/Data Cable is routed without any sharp bends.
3. Attach the Front Plate to the Rear Plate and Lock the
Tablet Enclosure Assembly, using the Key. (Figure 6)
Figure 5 Figure 6
Charging
Cord
Front
Plate
Rear Plate

9
To view manuals, videos, drivers, downloads, technical drawings, and more visit www.startech.com/support
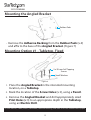
Mounting the Angled Bracket
• Remove the Adhesive Backing from the Rubber Pads (x 4)
and ax to the base of the Angled Bracket. (Figure 7)
Mounting Option #1 - Tabletop- Fixed
1. Place the Angled Bracket in the intended mounting
location, on a Tabletop.
2. Mark the location of the Screw Holes (x 3), using a Pencil.
3. Remove the Angled Bracket and drill appropriately sized
Pilot Holes (x 3) to an appropriate depth in the Tabletop,
using an Electric Drill.
Figure 7
Rubber Pads
Figure 8
5 x 20 mm Self Tapping
Screws
Small Washers

10
To view manuals, videos, drivers, downloads, technical drawings, and more visit www.startech.com/support
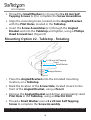
4. Thread the Small Washers (x 3) over the 5 x 20 mm Self
Tapping Screws (x 3) to complete the Screw Assemblies.
5. Align the mounting holes, located on the Angled Bracket,
with the Pilot Holes, located in the Tabletop.
6. Insert the Screw Assemblies (x 3) through the Angled
Bracket and into the Tabletop and tighten, using a Phillips
Head Screwdriver. (Figure 8)
Mounting Option #2 - Tabletop - Rotating
1. Place the Angled Bracket onto the intended mounting
location, on a Tabletop.
2. Mark the location of the Screw Hole, located closest to the
front of the Angled Bracket, using a Pencil.
3. Remove the Angled Bracket and drill an appropriately sized
Pilot Hole in the Tabletop, using an Electric Drill.
4. Thread a Small Washer over a 5 x 20 mm Self Tapping
Screw to complete the Screw Assembly.
Figure 9
5 x 20 mm Self Tapping
Screw
Small Washer
Large Washers

11
To view manuals, videos, drivers, downloads, technical drawings, and more visit www.startech.com/support
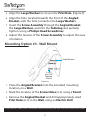
5. Align the Large Washers (x 2) over the Pilot Hole. (Figure 9)
6. Align the hole, located towards the front of the Angled
Bracket, with the hole, located in the Large Washers.
7. Insert the Screw Assembly through the Angled Bracket,
the Large Washers, and into the Tabletop and partially
tighten, using a Phillips Head Screwdriver.
8. Adjust the tension of the Screw Assembly to adjust the ease
of rotation.
Mounting Option #3 - Wall Mount
1. Place the Angled Bracket onto the intended mounting
location, on a Wall.
2. Mark the location of the Screw Holes (x 3), using a Pencil.
3. Remove the Angled Bracket and drill appropriately sized
Pilot Holes (x 3) in the Wall, using an Electric Drill.
Figure 10
5 x 20
mm Self
Tapping
Screws
Small Washers

12
To view manuals, videos, drivers, downloads, technical drawings, and more visit www.startech.com/support
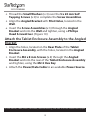
4. Thread the Small Washers (x 3) over the 5 x 20 mm Self
Tapping Screws (x 3) to complete the Screw Assemblies.
5. Align the Angled Bracket with Pilot Holes, located in the
Wall.
6. Insert the Screw Assemblies (x 3) through the Angled
Bracket and into the Wall and tighten, using a Phillips
Head Screwdriver. (Figure 10)
Attach the Tablet Enclosure Assembly to the Angled
Bracket
1. Align the holes, located on the Rear Plate of the Tablet
Enclosure Assembly, with the holes, located in the Angled
Bracket.
2. Insert the M4 x 8 mm Screws (x 4) through the Angled
Bracket and into the rear of the Tablet Enclosure Assembly
and tighten, using the M2.5 Hex Key.
3. Attach the Power/Data Cable to an available Power Source.
La pagina si sta caricando...
La pagina si sta caricando...
-
 1
1
-
 2
2
-
 3
3
-
 4
4
-
 5
5
-
 6
6
-
 7
7
-
 8
8
-
 9
9
-
 10
10
-
 11
11
-
 12
12
-
 13
13
-
 14
14
-
 15
15
-
 16
16
-
 17
17
-
 18
18
-
 19
19
-
 20
20
-
 21
21
-
 22
22


in altre lingue
- English: StarTech com SECTBLTPOS2 User manual
Documenti correlati
-
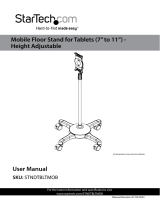 StarTech com STNDTBLTMOB Manuale utente
-
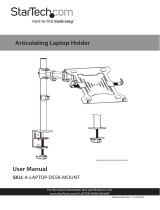 StarTech com A-LAPTOP-DESK-MOUNT Manuale utente
-
StarTech com 10-Port Industrial USB 2.0 Hub Guida utente
-
StarTech com PEX10GSFP Guida utente
-
StarTech com PEXUSB312C3 Guida utente
-
StarTech com P2DD46A22-KVM 2-Port Dual Monitor KVM Switch Guida utente
-
StarTech com C2-H46-UC2-PD-KVM Guida utente