MokerLink 28 Port Gigabit Managed Wireless Outdoor Bridge Guida d'installazione
- Tipo
- Guida d'installazione

Wireless Outdoor Bridge
Quickly Installation Guide
EN/DE/FR/IT/ES

5
10
15
20
24
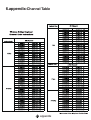
6. appendix

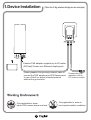
1.Device Installation
(Take the 5.8g wireless bridge as an example)
Passive PoE adapter supports up to 60 meter
(200 feet) Power over Ethernet deployment
Connect the PoE
adapter’s LAN to
PC,router or switch
Please prepare a long enough network cable to
connect the POE adapter and CPE.Recommend
to use a Cate5 (or above) shielded network
cable with a ground wire.
Only applicable to areas
below 2000 meters above sea level
Only applicable to areas to
non-tropical weather conditions
1

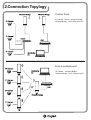
2.Connection Topylogy
Point to Point
IP Camera - Switch - Wireless Bridge
Wireless Bridge - DVR - Monitoring PC
IP Camera - Wireless Bridge
Wireless Bridge - DVR - Monitoring PC
Point to multiple point
H C
H C
H C
H C
H C
2

(*Two bridge ways:One Key Bridge & LED Display Bridge)
3.Bridge Ways
Quick Installation Guide
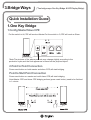
1.One Key Bridge
1.Config Master/Slave CPE
Put the switch to H,CPE will work as Master.Put the switch to C,CPE will work as Slave.
2.Point to Point Connection
Press reset button on both master and slave CPE,will start bridging.
Point to Mult Point Connection
Press reset button on master and multi slave CPE,will start bridging.
Note:Master CPE and slave CPE bridging actions (press reset button) need to be finished
in 1 minute.
*Note:The pictures of the above products may change slightly according to the
production cycle,and the final apperance is based on the physical object.
H C
H C H C
H C
H C
3

3.Point to Point Connection
Press reset button on both master and slave CPE,will start bridging.
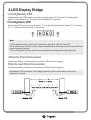
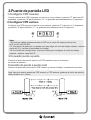
2.LED Display Bridge
1.Config Master CPE
2.Config Slave CPE
Point to muit Point Connection
When bridge two CPEs,make one work as master:press “F” to make H/C blinking,and
press “S” to change to “H”,it will save automatically in 5 seconds
Set another CPE to work as slave:press “F” to make H/C blinking, and press “S” to change
to “C” ,it will save automatically in 5 seconds.
Press reset button on master and multi slave CPE,will start bridging.
Note:
1.CPE default working mode is AP mode after reset,IP is 192.168.188.253
2.F is select button,can be used to choose master/slave working mode,wifi channel,IP,and
checking signal strength.
3.S is config button,can be used to set master/slave working mode,wifi channel,IP.
Note:Master CPE and slave CPE bridging actions (Press reset button) need to be
finished in 1 minute,
4

Wireless Outdoor Bridge
Schnellinstallationsanleitung
5

Arbeitsumfeld
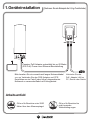
(Nehmen Sie als Beispiel die 5,8-g-Funkbrücke)
Passiver PoE-Adapter unterstützt bis zu 60 Meter
(200 Fuß) Power-over-Ethernet-Bereitstellung
Verbinden Sie das
PoE ,Adapter LAN zu
PC, Router oder Switch
Bitte bereiten Sie ein ausreichend langes Netzwerkkabel
vor, um Verbinden Sie den POE-Adapter und CPE.
Empfehlenum ein Cate5 (oder höher) abgeschirmtes
Netzwerk zu verwendenKabel mit Erdungskabel.
Gilt nur für Bereiche unter 2000
Meter über dem Meeresspiegel
Gilt nur für Bereiche bis
nicht-tropische
Wetterbedingungen
1.Geräteinstallation
6

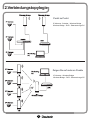
2.Verbindungstopylogie
Punkt zu Punkt
IP-Kamera - Schalter - Wireless Bridge
Wireless Bridge - DVR - Überwachungs-PC
IP-Kamera - Wireless Bridge
Wireless Bridge - DVR - Überwachungs-PC
Zeigen Sie auf mehrere Punkte
H C
H C
H C
H C
H C
7

(*Zwei Brückenwege: One Key Bridge & LED Display Bridge)
3.Brückenwege
Schnellinstallationsanleitung
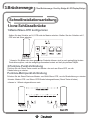
1.Eine Schlüsselbrücke
1.Master/Slave-CPE konfigurieren
Stellen Sie den Schalter auf H, CPE wird als Master arbeiten. Stellen Sie den Schalter auf C,
CPE wird als Slave arbeiten.
2.Punkt-zu-Punkt-Verbindung
Punkt-zu-Mehrpunkt-Verbindung
Hinweis: Master-CPE- und Slave-CPE-Überbrückungsaktionen (Reset-Taste drücken)
müssen in 1 Minute abgeschlossen sein.
* Hinweis: Die Bilder der oben genannten Produkte können sich je nach geringfügig ändern
Produktionszyklus, und das endgültige Aussehen basiert auf dem physischen Objekt.
H C
H C H C
H C
H C
Drücken Sie die Reset-Taste sowohl am Master- als auch am Slave-CPE, um die
Überbrückung zu starten.
Drücken Sie die Reset-Taste am Master- und Multi-Slave-CPE, um die Überbrückung zu starten.
8

3.Punkt-zu-Punkt-Verbindung
Drücken Sie die Reset-Taste sowohl am Master- als auch am Slave-CPE, um die
Überbrückung zu starten.
2.LED-Anzeigenbrücke
1.Master-CPE konfigurieren
2. Slave-CPE konfigurieren
Punkt-zu-Muit-Punkt-Verbindung
Wenn Sie zwei CPEs überbrücken, machen Sie einen als Master: Drücken Sie "F", damit H/C blinkt, und
Drücken Sie "S", um zu "H" zu wechseln, es wird automatisch in 5 Sekunden gespeichert
Stellen Sie ein anderes CPE als Slave ein: Drücken Sie „F“, damit H/C blinkt, und drücken
Sie „S“, um zu ändern auf „C“ wird automatisch in 5 Sekunden gespeichert.
Drücken Sie die Reset-Taste am Master- und Multi-Slave-CPE, um die Überbrückung zu starten.
Hinweis:
1. Der Standardarbeitsmodus von CPE ist der AP-Modus nach dem Zurücksetzen, die IP
ist 192.168.188.253
2.F ist die Auswahltaste, kann verwendet werden, um den Master / Slave-Arbeitsmodus,
den WLAN-Kanal, die IP und auszuwählen Signalstärke überprüfen.
3.S ist die Konfigurationstaste, kann verwendet werden, um den Master/Slave-Arbeitsmodus,
den WLAN-Kanal und die IP einzustellen.
Hinweis: Master-CPE- und Slave-CPE-Überbrückungsaktionen (Reset-Taste drücken)
müssen need in 1 Minute fertig,
9

Wireless Outdoor Bridge
Guida rapida all'installazione
10

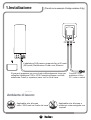
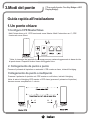
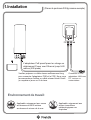
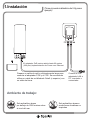
1.Installazione
Ambiente di lavoro:
(Prendi come esempio il bridge wireless 5.8g)
L'adattatore PoE passivo supporta fino a 60 metri
(200 piedi) Distribuzione Power over Ethernet
Connetti il PoE
adattatore LAN a
PC, router o switch
Si prega di preparare un cavo di rete sufficientemente lungo per
collegare l'adattatore POE e CPE.Consiglia utilizzare una rete
schermata Cate5 (o superiore) cavo con un filo di terra.
Applicabile solo alle aree
sotto i 2000 metri sul livello del mare
Applicabile solo alle aree a
condizioni meteorologiche non
tropicali
11

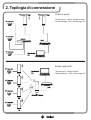
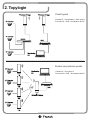
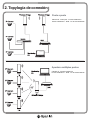
2. Topilogia di connessione
Punto a punto
Telecamera IP - Switch - Bridge wireless
Wireless Bridge - DVR - Monitoraggio PC
Telecamera IP - Bridge wireless
Wireless Bridge - DVR - Monitoraggio PC
Punta a più punti
H C
H C
H C
H C
H C
12

(* Due modi di ponte: One Key Bridge e LED
Display Bridge)
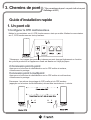
3.Modi del ponte
Guida rapida all'installazione
1.Un ponte chiave
1.Configura CPE Master/Slave
Metti l'interruttore su H, CPE funzionerà come Master. Metti l'interruttore su C, CPE
funzionerà come Slave.
2. Collegamento da punto a punto
Collegamento da punto a multipunto
Nota: le azioni di bridging CPE master e CPE slave (premere il pulsante di ripristino)
devono essere completate in 1 minuto.
* Nota: le immagini dei prodotti di cui sopra possono variare leggermente in base al ciclo
di produzione e l'aspetto finale si basa sull'oggetto fisico.
H C
H C H C
H C
H C
Premere il pulsante di ripristino su entrambi i CPE master e slave, inizierà il bridging.
Premere il pulsante di ripristino sul CPE master e multi slave, inizierà il bridging.
13

3. Collegamento da punto a punto
Premere il pulsante di ripristino su entrambi i CPE master e slave, inizierà il bridging.
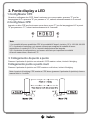
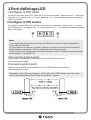
2. Ponte display a LED
1.Config Master CPE
2.Config Slave CPE
Collegamento punto a punto muit
Quando si collegano due CPE, farne funzionare uno come master: premere "F" per far
lampeggiare H/C e premere "S" per passare a "H", salverà automaticamente in 5 secondi
Imposta un altro CPE per funzionare come slave: premi "F" per far lampeggiare H/C e premi
"S" per passare a "C", salverà automaticamente in 5 secondi.
Premere il pulsante di ripristino sul CPE master e multi slave, inizierà il bridging.
Nota:
1. La modalità di lavoro predefinita CPE è la modalità AP dopo il ripristino, l'IP è 192.168.188.253
2.F è il pulsante di selezione, può essere utilizzato per scegliere la modalità di lavoro
master/slave, il canale Wi-Fi, l'IP e il controllo della potenza del segnale.
3.S è il pulsante di configurazione, può essere utilizzato per impostare la modalità
di lavoro master/slave, canale wifi, IP.
Nota: le azioni di bridging CPE master e CPE slave (premere il pulsante di ripristino) devono
essere finito in 1 minuto,
14

Wireless Outdoor Bridge
Guide d'installation rapide
15

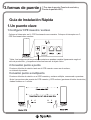
1.Installation
(Prenez le pont sans fil 5.8g comme exemple)
L'adaptateur PoE passif prend en charge un
déploiement Power over Ethernet jusqu'à 60
mètres (200 pieds)
Connectez le PoE
adaptateur LAN vers
PC, routeur ou
commutateur
Veuillez préparer un câble réseau suffisamment long
pour connecter l'adaptateur POE et le CPE. Nous vous
recommandons d'utiliser un câble réseau blindé Cate5
(ou supérieur) avec un fil de terre.
Applicable uniquement aux zones
au-dessous de 2000 mètres
au-dessus du niveau de la mer
Applicable uniquement aux
zones à conditions
météorologiques non
tropicales
Environnement de travail:
16

2. Topylogie
Point à point
Caméra IP - Commutateur - Pont sans fil
Pont sans fil - DVR - Surveillance de PC
Caméra IP - Pont sans fil
Pont sans fil - DVR - Surveillance de PC
Pointer sur plusieurs points
H C
H C
H C
H C
H C
17

(* Deux manières de pont : un pont à clé et un pont
d'affichage à LED)
3. Chemins de pont
Guide d'installation rapide
1. Un pont clé
1.Configurer le CPE maître/esclave
Mettez le commutateur sur H, CPE fonctionnera en tant que maître. Mettez le commutateur
sur C, CPE fonctionnera en tant qu'esclave.
2.Connexion point à point
Connexion point à multipoint
Remarque : les actions de pontage du CPE maître et du CPE esclave
(appuyez sur le bouton de réinitialisation) doivent être terminées en 1 minute.
* Remarque : les images des produits ci-dessus peuvent changer légèrement en fonction
du cycle de production et l'apparence finale est basée sur l'objet physique.
H C
H C H C
H C
H C
Appuyez sur le bouton de réinitialisation sur le CPE maître et esclave,
commencera le pontage.
Appuyez sur le bouton de réinitialisation sur le CPE maître et multi-esclave,
commencera le pontage.
18
La pagina sta caricando ...
La pagina sta caricando ...
La pagina sta caricando ...
La pagina sta caricando ...
La pagina sta caricando ...
La pagina sta caricando ...
La pagina sta caricando ...
La pagina sta caricando ...
-
 1
1
-
 2
2
-
 3
3
-
 4
4
-
 5
5
-
 6
6
-
 7
7
-
 8
8
-
 9
9
-
 10
10
-
 11
11
-
 12
12
-
 13
13
-
 14
14
-
 15
15
-
 16
16
-
 17
17
-
 18
18
-
 19
19
-
 20
20
-
 21
21
-
 22
22
-
 23
23
-
 24
24
-
 25
25
-
 26
26
-
 27
27
-
 28
28


MokerLink 28 Port Gigabit Managed Wireless Outdoor Bridge Guida d'installazione
- Tipo
- Guida d'installazione
in altre lingue
Altri documenti
-
Planet Technology WBS-200N Manuale utente
-
Planet WBS-900AC-KIT Manuale utente
-
Planet WBS-512AC Manuale utente
-
Trendnet TEW-730APO Scheda dati
-
Trendnet TEW-734APO Scheda dati
-
Trendnet TEW-740APBO Scheda dati
-
-
Trendnet TEW-676APBO Scheda dati
-
 Tranzeo TR-WMX-3.5 Manuale utente
