TallyGenicom T2240-24 Manuale del proprietario
- Tipo
- Manuale del proprietario

Operator’s Manual Matrix Printer
Bedienungsanleitung Matrixdrucker
Manuel d’utilisation Imprimante matricielle
Istruzioni per l’uso Stampante a Matrice
Instrucciones de servicio Impresora matricial
T2240/9
T2240/24
T2340/9
T2340/24

Important Information
This equipment generates and uses radio frequency energy and if not
installed and used properly, that is, in accordance with the manufacturer’s
instructions, may cause interference in radio and television reception. It
has been type tested and found to comply with the limits for class B
computing devices in accordance with the specification in subpart J of part
15 of FCC rules, which are designed to provide reasonable protection
against such interference in a residential installation. However, there is no
guarantee that interference will not occur in a partial installation. If this
equipment does cause interference to radio or television reception, which
can be determined by turning the equipment off and on, the user is
encouraged to try to correct the interference by one or more of the following
measures:
Reorient the receiving antenna,
Relocate the peripheral away from the receiver,
Move the peripheral away from the receiver
Plug the peripheral into a different outlet, so that the peripheral and
receiver are on different branch circuits
If necessary, the user should consult the dealer or an experienced
radio/television technician for additional suggestions. The user may find
the following booklet, prepared by the Federal Communications Com-
mission, helpful: “How to Identify and Resolve Radio-TV Interference
Problems”.
This booklet is available from the U.S. Government Printing Office, Wash-
ington DC 20402 Stock No. 004.000.00345.4.
WARNING:
To comply with FCC regulations on electromagnetic inter-
ference for a class B computing device, the printer cable must be shielded.
To assure compliance with FCC regulations for a computing device, use
a shielded interface cable with a metal shell connector. The use of cables
not properly shielded may result in violating FCC regulations.
This digital apparatus does not exceed the class B limits for radio noise
emissions from digital apparatus as set out in the radio interference
regulations of the Canadian department of communications.
This unit complies with DOC standard C108.8-M 1983
ATTENTION: Le présent appareil numérique n’ement pas de bruits
radioélectriques déspassant les limites applicables aux appareils
numériques de la classe B prescrites dans le règlement sur le brouillage
radio- électrique édicté par le minstère des communications du Canada.
The paper used is made of raw materials treated with a chlorine-free
bleaching process.
Das verwendete Papier ist aus chlorfrei gebleichten Rohstoffen
hergestellt.
Le papier utilisé est fabriqué à partir de matières premières blanchis sans
chlore.
La carta utilizzata è prodotta con materiali sbiancati senza cloro.
El papel utilizado ha sido fabricado con un proceso de blanqueo libre de
cloro.
WARNING Only trained and qualified personnel may open covers or remove parts that are not explicitly shown and described in the User Guide as being accessible to
the operator.
WARNUNG Das Entfernen oder Öffnen von Abdeckungen und Teilen darf nur durch geschultes Fachpersonal vorgenommen werden. Ausgenommen hiervon sind nur
solche Abdeckungen und Teile, deren Entfernen bzw. Öffnen in der Bedienungsanleitung ausdrücklich gekennzeichnet und beschrieben sind.
ATTENTION Seul un personnel qualifié et formé est habilité à démonter les sous-ensembles de la machine qui ne sont pas formellement indiqués dans le Manuel
d’utilisation meme s’ils sont accessibles par l’opérateur.
ATTENZIONE Solo personale qualificato puo’accedere a parti che non siano esplicitamente descritte nelle Istruzioni per l’operatore come accessibill all’operatore.
ADVERTENCIA Las cubiertas y piezas sólo deberán ser quitadas o abiertas por personal especializado. Se exceptúan de esta regla sólo las cubiertas y piezas cuya
retirada y apertura estén indicadas y descritas expresamente en las Instrucciones de uso.
This device fulfils the European standards requirements by complying with the Directive of the Commission
dated May 3, 1989 (89/336/EEC) relating to electromagnetic compatibility and the Directive dated February 19,
1973 (73/23/EEC) relating to low-voltage electrical equipment. Conformity with the above mentioned Directives
is indicated by the CE symbol attached to the device.
Note: Conformity may be affected by:
using interface cables not complying with the specifications
non-observance of important instructions in the operator’s manual
installing components not approved for this device by the manufacturer
unauthorized manipulation
Dieses Gerät erfüllt die Anforderungen der Europäischen Normen durch Einhaltung der Richtlinie des Rates
vom 3. Mai 1989 (89/336/EWG) bezüglich der Elektromagnetischen Verträglichkeit sowie die Richtlinie vom 19.
Februar 1973 (73/23/EWG) bezüglich Elektrischer Betriebsmittel mit Niederspannungen. Die Konformität zu
den oben angeführten Richtlinien ist durch das am Gerät angebrachte CE-Zeichen gekennzeichnet.
Hinweis: Die Konformität kann beeinflußt werden durch:
Benutzung von nicht spezifizierten Schnittstellenkabeln
Nichtbeachtung wichtiger Hinweise der Bedienungsanleitung
Ersetzen von Bauteilen, die nicht vom Hersteller für dieses Gerät freigegeben wurden
Eingriffe durch Unbefugte
Cet appareil remplit aux exigences des normes européennes en respectant la directive du Conseil du 3 mai
1989 (89/336/CE) relative à la compatibilité électromagnétique et la directive du 19février 1973 (73/23/CE) en
matière du matériel à basse tension. La conformité aux directives mentionnées ci-dessus est repérée par la
marque de conformité de la Communauté Européenne (CE).
Remarque: La conformité peut être influencée par:
l’utilisation de câbles d’interface non spécifiés
le non-respect de consignes importantes du manuel d’utilisation
le remplacement de composants qui n’ont pas été homologués pour cet appareil par le constructeur
l’intervention de personnes non autorisées
Questo apparecchio soddisfa le richieste delle norme europee rispettando la direttiva del consiglio del 3 Maggio
1989 (89/336/CEE) relativa alla compatibilità elettromagnetica nonché la direttiva del 19 Febbraio 1973
(73/23/CEE) relativa a mezzi di produzione elettrici a bassa tensione. La conformità alle direttive sopra citate
è contrassegnata con il simbolo CE applicato sull’apparecchio.
Nota: La conformità può essere influenzata tramite:
Utilizzo di cavi interfaccia non specificati
Inosservanza di importanti indicazioni delle istruzioni per l’uso
Sostituzione di componenti per i quali non è stato dato il benestare dal produttore per questo apparecchio
Interventi tramite persone non autorizzate
Este equipo corresponde a lo exigido en las normas europeas a base del cumplimiento de la directriz del Consejo
del 3 de mayo de 1989 (89/336/CEE) en lo que se refiere a la compatibilidad electromagnética así como de la
directriz del 19 de febrero de 1973 (73/23/CEE) en lo que se refiere a los materiales eléctricos con bajas
tensiones. Para señalizar la confor
midad con las directrices antes mencionadas, el equipo está dotado de la marca CE.
Indicación:
La conformidad puede estar influida por:
la utilización de cables de interface no especificados
la inobservancia de indicaciones importantes contenidas en el manual de servicio
la sustitución por componentes, que no han sido homologados por el fabricante para el equipo en cuestión
intervenciones de personas no autorizadas
La pagina si sta caricando...
La pagina si sta caricando...
La pagina si sta caricando...
La pagina si sta caricando...
La pagina si sta caricando...
La pagina si sta caricando...
La pagina si sta caricando...
La pagina si sta caricando...
La pagina si sta caricando...
La pagina si sta caricando...
La pagina si sta caricando...
La pagina si sta caricando...
La pagina si sta caricando...
La pagina si sta caricando...

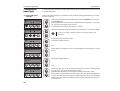
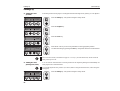
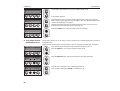
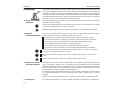
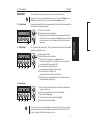
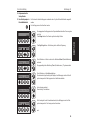
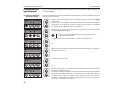
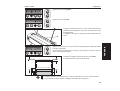
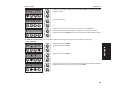
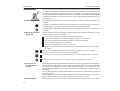
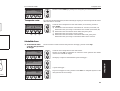
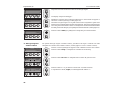
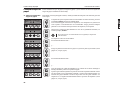
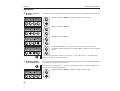
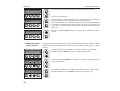
Press the Online key to make the printer ready for operation.
Paper transport Loaded paper (fanfold paper/single sheets) can be transported in the printer in different ways.
Make sure that the printer is in Offline status; press the Online key, if
necessary.
➀ Short keypress: Line feed (LF) is initiated
Long keypress: Form feed (FF) is initiated
➁ Short keypress: Paper is transported downwards step by step
Long keypress: Continuous transport down
➂ Short keypress: Paper is transported upwards step by step
Long keypress: Continuous transport up
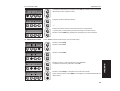
Using
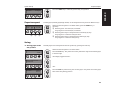
➤ Moving paper to the
tear position
Fanfold paper can be transported to the tear position by pressing the Tear key.
Make sure that the printer is in Online status.
Press the Tear key. The printer moves the perforation edge of the fanfold paper
to the tear edge.
The display toggles between…
and…
Press the Exit key after having torn off the paper. The printer moves the paper
back to the first printing position.
Setup
Online
Online Single
Setup
Online
Offline Trac.1
Park LF/FF
➂
➀
➁
Setup
Online
Online Trac.1
Tear
Setup
Online
Tear position
Tractor1
Setup
Online
Online Tear
Exit
ENGLISH
Quick start-up Paper transport
15
La pagina si sta caricando...

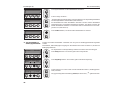
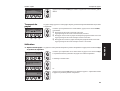
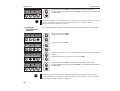
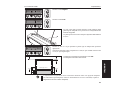
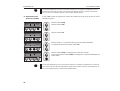
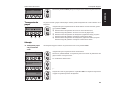
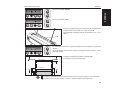
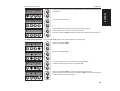
Press the Adjust key.
Press the TOF key.
The bottom edge of the currently validfirst printingline A ofthe
paper is transported to the tear edge B.
The factory setting for the first printing position is 12/72".
Press the < or > key to move the first printing line to the appropriate position.
You cansetvalues from 0 to 220/72"for fanfoldpaper, from 0to 72/72" forsingle
sheets.
Confirm the setting by pressing the Set key.
The printer returns to its initial status.
The setting made will be retained after printer power-off. For more detailed information, refer to
the online documentation on the CD-ROM, chapter 3 (Mechanical adjustments to the printer).
Setup
Online
Adjust Paperway
Menu Char
Setup
Online
TOF
Tear
B
A
Setup
Online
FormAdj=12/72" *
Set Exit
Standard 1. print line 12/72"
Newly set 1. print line
ENGLISH
Quick start-up Settings (I)
17

Settings (II)
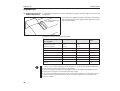
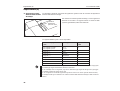
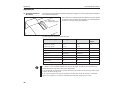
➤ Setting the print
head gap
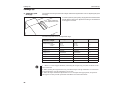
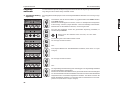
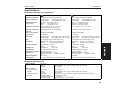
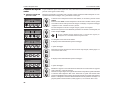
The printer has been provided with a Paper Thickness Adjustment Lever for adjusting the print
head gap
Toobtainoptimumprintquality,thegapbetweenthePrint Head
and the Platen needs to be adjusted according to the thickness
of the paper to be used.
The following table shows the adjustable range:
Number of Copies/
Thickness of Paper
Ream (kg) g/m
2
Lever Position
Original only Thin
Normal
Thick
45–55
55–77
77–110
50–65
65–90
90–130
1
1–2
2
Original + 1 34/34 40/40
2–3
Original + 2 34/34/34 40/40/40
2–4
Original + 3 34/34/34/34 40/40/40/40
3–4
Original + 4 34/34/34/34/34 40/40/40/40/40
4–5
Original + 5 34/34/34/34/34/34 40/40/40/40/40/40
5–6
Postal Card 110 130
3
Reserved — —
7–8
1. “Ream” is a unit of paper thickness, indicating the weight in kg, of 1,000 cut sheets at 788
mm x 1091 mm.
2. When printing the original sheet only, Cut Sheet Paper of 45 kg and thicker or Continuous
Form Feed Paper of 50 kg and thicker can be used.
3. When the Paper Thickness Adjustment Lever is set higher than appropriate, the printout
will appear scratchy and the print head and ribbon lives will be shortened.
Paper Thickness
Adjustment Lever
Settings (II) Quick start-up
18
La pagina si sta caricando...
La pagina si sta caricando...

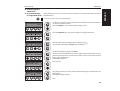
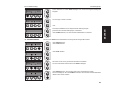
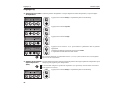
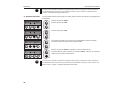
Confirm the setting by pressing the Set key. An acoustic signal acknowledges the
input.
The display toggles between…
and…
Shift the Paper Type Selection Lever to the position needed.
The printer is now ready for printing fanfold paper.
Press the Online key to make the printer ready for operation.
➤ Selecting a font You can use the Font key to select fonts in Setup mode.
Press the Setup key.
Press the Char key.
Press the Font key.
Press the < or > key to select the desired font.
Confirm your selection by pressing the Set key.
Press the Setup key. The printer returns to its initial status.
You can also press the Online key. The printer changes directly in Online mode.
Setup
Online
Tractor1
Set Exit
Setup
Online
Offline Trac.1
Park LF/FF
Setup
Online
Turn paperlever
Setup
Online
Adjust Paperway
Menu Char
Setup
Online
Font CPI
Setup
Online
DRAFT COPY *
Set Exit
Setup
Online
Font CPI
ENGLISH
Quick start-up Settings (II)
21
La pagina si sta caricando...

Specifications
➤Printer specifications
ENGLISH
Quick start-up Specifications
23
➤ Paper specifications
Printing method serial printing with 9-pin matrix print head serial printing with 24-pin matrix print head
Print width narrow printer 80 characters at 10 cpi
wide printer 136 characters at 10 cpi
narrow printer 80 characters at 10 cpi
wide printer 136 characters at 10 cpi
Print speed (bidirectional) LN-Draft 413 cps at 10 cpi
Draft 310 cps at 10 cpi
NLQ 77 cps at 10 cpi
Draft 409 cps at 10 cpi
Draft Copy 275 cps at 10 cpi
NLQ/LQ 92 cps at 10 cpi
Character densities 5, 6, 7.5, 8.6, 10, 12, 15, 17.1, 20 cpi
(HS-Draft: 10, 12 cpi only)
5, 6, 7.5, 8.6, 10, 12, 15, 17.1, 20 cpi
Graphics print density horizontal 240 dpi / vertical 144 dpi horizontal 360 dpi / vertical 180 dpi
Ribbon life 4 million char. 4 million char.
Acoustic noise levell ca. 55 dB (A) ca. 55 dB (A)
Dimensions narrow printer 485 x 206 x 272 mm (W x H x D)
wide printer 625 x 206 x 272 mm (W x H x D)
narrow printer 485 x 206 x 272 mm (W x H x D)
wide printer 625 x 206 x 272 mm (W x H x D)
Weight narrow printer 9 kg / wide printer 11 kg narrow printer 9 kg / wide printer 11 kg
Power supply USA/Canada AC 120 V 10% / 60 Hz 3%
Europe AC 230 V 10%/ 5 0Hz 3%
USA/Canada AC 120 V 10% / 60 Hz 3%
Europe AC 230 V 10% / 5 0 Hz 3%
Power consumption at 100% throughput < 60 VA
in the Ready state < 10 VA
at 100% throughput < 60 VA
in the Ready state < 10 VA
Operating environment Temperature 10ºC to 40ºC
Humidity 20% to 80%
Temperature 10ºC to 40ºC
Humidity 20% to 80%
Print head specifications Number of pins 9
Pin diameters 0,3 mm
Number of copies 1 original + 5 copies
Number of pins 24
Pin diameters 0,22 mm
Number of copies 1 original + 3 copies
Interface buffer max. 64 kB max. 64 kB
Regulations UL 1950, VDE-GS, CE, FCC Class B, UL/Ulc UL 1950, VDE-GS, CE, FCC Class B, UL/ULc
Cut sheets Paper weight
Width
Length
60 – 120 g/m
2
narrow printer: 76 – 220 mm / wide printer: 76 – 420 mm
76 – 559 mm
Fanfold paper
Simple forms
Sets of forms
Paper weight
Width
Length
Paper weight
Width/Length
Form thickness
Number of copies
60 – 120 g/m
2
narrow printer: 76 – 254 mm / wide printer: 76 – 420 mm
76 – 559 mm
original: 45 – 65 g/m
2
/ copy: 45 – 56 g/m
2
/ last page: 45 – 65 g/m
2
see simple forms
max. 0,5 mm
1+5 (9 wire) / 1+3 (24 wire)
La pagina si sta caricando...
La pagina si sta caricando...
La pagina si sta caricando...
La pagina si sta caricando...
La pagina si sta caricando...
La pagina si sta caricando...
La pagina si sta caricando...
La pagina si sta caricando...
La pagina si sta caricando...
La pagina si sta caricando...
La pagina si sta caricando...
La pagina si sta caricando...
La pagina si sta caricando...
La pagina si sta caricando...
La pagina si sta caricando...
La pagina si sta caricando...
La pagina si sta caricando...
La pagina si sta caricando...

Einstellungen(II)
➤Druckkopfabstand
einstellen
DerDruckeristmiteinemPapierdickenhebelausgestattet,derzumEinstellendesDruckkopfab-
standsdient.
UmeineoptimaleDruckqualitätzuerzielen,mußderAbstand
zwischenDruckkopfundGegenlagerentsprechendderDicke
desverwendetenPapierseingestelltwerden.
DiefolgendeTabellezeigtdeneinstellbarenBereich:
Durchschläge/Papierdicke Ream(kg) g/m
2
Hebelstellung
NurOriginal,dünn
NurOriginal,normal
NurOriginal,dick
45–55
55–77
77–110
50–65
65–90
90–130
1
1–2
2
Original+1 34/34 40/40
2–3
Original+2 34/34/34 40/40/40
2–4
Original+3 34/34/34/34 40/40/40/40
3–4
Original+4 34/34/34/34/34 40/40/40/40/40
4–5
Original+5 34/34/34/34/34/34 40/40/40/40/40/40
5–6
Postkarte 110 130
3
Reserviert — —
7–8
1.„Ream“isteineEinheit,diedasPapiergewichtanzeigt.GemessenwirddazudasGewicht
von1000EinzelblätternimFormat788mmx1091mminKilogramm.
2.WirdnureinOriginalbedruckt,könnenEinzelblättervon45kgReamundmehroderEnd-
lospapiervon50kgReamundmehrverwendetwerden.
3.WirdderPapierdickenhebelaufeinenhöherenWertalsnötigeingestellt,werdendie
AusdruckeungleichmäßigunddieLebensdauervonDruckkopfundFarbbandverkürztsich.
Papierdickenhebel
Einstellungen(II) DerschnelleEinstieg
18
La pagina si sta caricando...
La pagina si sta caricando...
La pagina si sta caricando...
La pagina si sta caricando...

DEUTSCH
Der schnelle Einstieg Technische Daten
23
Technische Daten
➤ Druckerspezifikationen
➤ Papierspezifikationen
Druckprinzip seriell mit 9-Nadel Druckkopf seriell mit 24-Nadel Druckkopf
Druckbreite schmaler Drucker 80 Zeichen bei 10 cpi
breiter Drucker 136 Zeichen bei 10 cpi
schmaler Drucker 80 Zeichen bei 10 cpi
breiter Drucker 136 Zeichen bei 10 cpi
Druckgeschwindigkeit
(bidirektional)
L
N-Draft 413 cps bei 10 cpi
Draft 310 cps bei 10 cpi
NLQ 77 cps bei 10 cpi
Draft 409 cps bei 10 cpi
Draft Copy 275 cps bei 10 cpi
NLQ/LQ 92 cps bei 10 cpi
Zeichendichten 5, 6, 7.5, 8.6, 10, 12, 15, 17.1, 20 cpi
(HS-Draft: nur 10, 12 cpi)
5, 6, 7.5, 8.6, 10, 12, 15, 17.1, 20 cpi
Grafikauflösung horizontal 240 dpi / vertikal 144 dpi horizontal 360 dpi / vertikal 180 dpi
Lebensdauer Farbband 4 Millionen Zeichen 4 Millionen Zeichen
Geräuschpegel ca. 55 dB (A) ca. 55 dB (A)
Abmessungen schmaler Drucker 485 x 206 x 272 mm (W x H x D)
breiter Drucker 625 x 206 x 272 mm (W x H x D)
schmaler Drucker 485 x 206 x 272 mm (W x H x D)
breiter Drucker 625 x 206 x 272 mm (W x H x D)
Gewicht schmaler Drucker 9 kg / breiter Drucker 11 kg schmaler Drucker 9 kg / breiter Drucker 11 kg
Stromversorgung USA/Canada AC 120 V 10% / 60 Hz 3%
Europa AC 230 V 10%/ 5 0Hz 3%
USA/Canada AC 120 V 10% / 60 Hz 3%
Europa AC 230 V 10% / 5 0 Hz 3%
Stromverbrauch bei 100% Durchsatz < 60 VA
im Leerlauf < 10 VA
bei 100% Durchsatz < 60 VA
im Leerlauf < 10 VA
Umgebungsbedingungen Temperatur 10ºC bis 40ºC
Luftfeuchtigkeit 20% bis 80%
Temperatur 10ºC bis 40ºC
Luftfeuchtigkeit 20% bis 80%
Technische Daten Druck-
kopf
Anzahl Nadeln 9
Nadeldurchmesser 0,3 mm
Anzahl Kopien 1 Original + 5 Kopien
Anzahl Nadeln 24
Nadeldurchmesser 0,22 mm
Anzahl Kopien 1 Original + 3 Kopien
Schnittstellenpuffer max. 64 kB max. 64 kB
Zulassungen UL 1950, VDE-GS, CE, FCC Class B, UL/Ulc UL 1950, VDE-GS, CE, FCC Class B, UL/ULc
Einzelblätter Papiergewicht
Breite
Länge
60 – 120 g/m
2
schmaler Drucker: 76 – 220 mm / breiter Drucker: 76 – 420 mm
76 – 559 mm
Endlospapier
Einfachformat
Formularsatz
Papiergewicht
Breite
Länge
Papiergewicht
Breite/Länge
Formularsatzdicke
Zahl der Durchschläge
60 – 120 g/m
2
schmaler Drucker: 76 – 254 mm / breiter Drucker: 76 – 420 mm
76 – 559 mm
Original: 45 – 65 g/m
2
/ Kopie: 45 – 56 g/m2 / Letzte Seite: 45 – 65 g/m
2
siehe Einfachformat
max. 0,5 mm
1+5 (9-Nadeldrucker) / 1+3 (24-Nadeldrucker)
La pagina si sta caricando...
La pagina si sta caricando...
La pagina si sta caricando...
La pagina si sta caricando...
La pagina si sta caricando...
La pagina si sta caricando...
La pagina si sta caricando...
La pagina si sta caricando...
La pagina si sta caricando...
La pagina si sta caricando...
La pagina si sta caricando...
La pagina si sta caricando...
La pagina si sta caricando...
La pagina si sta caricando...
La pagina si sta caricando...
La pagina si sta caricando...

Réglages (I)
➤ Réglagedelaposition
de séparation
Quand la position de séparation n’est pas alignée sur l’arête de séparation, on peut la régler.
Appuyer sur la touche Setup. L’imprimante passe en mode Setup.
Appuyer sur la touche Ajuster.
Appuyer sur la touche Coupe.
Appuyer sur la touche < ou > pour amener la perforation dans la position
appropriée.
Confirmer le réglage en appuyant sur la touche Valid.
L’imprimante revient dans son mode initial.
La correction effectuée (au maximum environ. 2,5 cm [1"] dans les deux sens) est enregistrée
après arrêt de l’imprimante.
➤ Réglage de la première
ligne d’impression
(TOF)
On peut utiliser la fonction TOF pour régler la position de la ligne supérieure d’impression pour
chaque type de papier et pour chaque menu.
Il est conseillé d’aligner la position de séparation (voir plus haut) avant d’utiliser la fonction
TOF (papier en continu).
Appuyer sur la touche Setup. L’imprimante passe en mode Setup.
Setup
Online
Offline Trac.1
Park LF/FF
Setup
Online
Ajuster Chem-Pap
Menu Char
Setup
Online
TOF
Coupe
Setup
Online
Ajust.C= 00/72"*
Valid Quit
Setup
Online
Ajuster Chem-Pap
Menu Char
Réglages (I) Initiation rapide
16
La pagina si sta caricando...

Réglages(II)
➤ Réglage de l’écart de
la tête d’impression
L’imprimante est équipée d’un levier d’épaisseur de papier servant à régler l’écart de la tête
d’impression.
Pour obtenir une qualité d’impression optimale, l’écart entre la
tête d’impression et lecontre-appuidoit être régléselonl’épais-
seur du papier utilisé.
Le tableau ci-dessous montre la plage réglable:
Nombre de copies/ épais-
seur du papier
Rame (kg) g/m
2
Position du
levier
Original seul, mince
Original seul, normal
Original seul, épais
45–55
55–77
77–110
50–65
65–90
90–130
1
1–2
2
Original + 1 34/34 40/40 2–3
Original + 2 34/34/34 40/40/40 2–4
Original + 3 34/34/34/34 40/40/40/40 3–4
Original + 4 34/34/34/34/34 40/40/40/40/40 4–5
Original + 5 34/34/34/34/34/34 40/40/40/40/40/40 5–6
Carte postale 110 130 3
Réservé — — 7–8
1. “Rame” est une unité indiquant le poids du papier. Le poids de 1000 feuilles individuelles
format 788 mm x 1091 mm est mesuré en kilogramme.
2. Si un seul original est imprimé, il est possible d’utiliser des feuilles individuelles de rame
45 kg et plus ou du papier en continu de rame 50 kg et plus.
3. Si le levier d’épaisseur du papier est réglé sur une valeur supérieure à celle requise, les im-
pressions seront irrégulières et la durée de vie de la tête d’impression et du ruban encreur
pourra en souffrir.
Levier d’épaisseur
du papier
Réglages (II) Initiation rapide
18
La pagina si sta caricando...
La pagina si sta caricando...

Confirmer le réglage en appuyant sur la touche Valid. Un signal acoustique
confirme l’entrée.
L’écran alterne entre…
et…
Amenez le levier de choix du papier dans la position correspondante.
L’imprimante est maintenant prête pour l’impression sur papier en continu.
Appuyersurla toucheOnlinepour mettrel’imprimanteen attente, prêteàutiliser.
➤ Sélection d’une police
de caractères
La touche Police permet de sélectionner des polices de caractères en mode Setup.
Appuyer sur la touche Setup.
Appuyer sur la touche Char.
Appuyer sur la touche Police.
Appuyer sur la touche < ou > pour sélectionner la police de caractères souhaitée.
Confirmer la sélection en appuyant sur la touche Valid.
Setup
Online
Tract 1
Valid Quit
Setup
Online
Offline Trac.1
Park LF/FF
Setup
Online
Levier Choix Pap
Setup
Online
Ajuster Chem-Pap
Menu Char
Setup
Online
Police CPI
Setup
Online
DRAFT FAST *
Valid Quit
FRANÇAIS
Initiation rapide Réglages (II)
21

Appuyer sur la touche Setup. L’imprimante revient dans son état initial.
Onpeut égalementappuyer surlatouche Online.L’imprimantepassedirectement
en mode Online.
La sélection n’est pas conservée après arrêt de l’imprimante. Pour des informations sur la ma-
nière de sélectionner une police de caractères permanente, voir la Online CD-ROM,
chapitre 1 (Table d’explication des menus).
➤ Réglage de
l’espacement des
caractères
La touche CPI permet de régler le nombre de caractères imprimés par pouce en mode Setup.
Appuyer sur la touche Setup.
Appuyer sur la touche Char.
Appuyer sur la touche CPI.
Appuyer sur la touche < ou > pour sélectionner l’espacement des caractères
souhaité.
Confirmer la sélection en appuyant sur la touche Valid.
Appuyer sur la touche Setup. L’imprimante revient dans son état initial.
Onpeut égalementappuyer surlatouche Online.L’imprimantepassedirectement
en mode Online.
La sélection n’est pas conservée après arrêt de l’imprimante. Pour des informations sur la ma-
nière de sélectionner une réglage de l’espacement des caractères permanente, voir la Online CD-
ROM, chapitre 1 (Table d’explication des menus).
Setup
Online
Police CPI
STOP
Setup
Online
Ajuster Chem-Pap
Menu Char
Setup
Online
Police CPI
Setup
Online
DRAFT FAST *
Valid Quit
Setup
Online
Police CPI
STOP
Réglages (II) Initiation rapide
22

FRANÇAIS
Initiation rapide Spécifications
23
Spécifications
➤ Données techniques de l’imprimante
➤ Spécifications du papier
Méthode d’impression série avec tête matricielle à 9 aiguilles série avec tête matricielle à 24 aiguilles
Largeur d’impression version étroites 80 caractères pour 10 cpi
version larges 136 caractères pour 10 cpi
version étroites 80 caractères pour 10 cpi
version larges 136 caractères pour 10 cpi
Vitesse d’impression
(bidirectionale)
LN-Draft 413 cps pour 10 cpi
Draft 310 cps pour 10 cpi
NLQ 77 cps pour 10 cpi
Draft 409 cps pour 10 cpi
Draft Copy 275 cps pour 10 cpi
NLQ/LQ 92 cps pour 10 cpi
Densités des caractères 5, 6, 7.5, 8.6, 10, 12, 15, 17.1, 20 cpi
(HS-Draft: seulement 10, 12 cpi)
5, 6, 7.5, 8.6, 10, 12, 15, 17.1, 20 cpi
Densité de l’impression
graphique
horizontale 240 dpi / verticale 144 dpi horizontale 360 dpi / verticale 180 dpi
Durée de vie du ruban 4 millions de caractères 4 millions de caractères
Niveau sonore ca. 55 dB (A) ca. 55 dB (A)
Dimensions version étroites 485 x 206 x 272 mm (W x H x D)
version larges 625 x 206 x 272 mm (W x H x D)
version étroites 485 x 206 x 272 mm (W x H x D)
version larges 625 x 206 x 272 mm (W x H x D)
Poids version étroites 9 kg / version larges 11 kg version étroites 9 kg / version larges 11 kg
Alimentation USA/Canada AC 120 V 10% / 60 Hz 3%
Europa AC 230 V 10%/ 5 0Hz 3%
USA/Canada AC 120 V 10% / 60 Hz 3%
Europa AC 230 V 10% / 5 0 Hz 3%
Puissance absorbée au débit 100% < 60 VA
à vide < 10 VA
au débit 100% < 60 VA
à vide < 10 VA
Conditions de
fonctionnement
Tempé
rature 10C à 40C
H
umidité ambiante 20% à 80%
Temp
érature 10C à 40C
Humidité a
mbiante 20% à 80%
Spécifications de la tête
d’impression
Nombre d’aiguilles 9
Diamètre des aiguilles 0,3 mm
Nombre de copies 1 original + 5 copies
Nombre d’aiguilles 24
Diamètre des aiguilles 0,22 mm
Nombre de copies 1 original + 3 copies
Mémoire d’interface max. 64 kB max. 64 kB
Homologations UL 1950, VDE-GS, CE, FCC Class B, UL/Ulc UL 1950, VDE-GS, CE, FCC Class B, UL/ULc
Feuilles séparées Grammage
Largeur
Longueur
60 – 120
g/m
2
version étroites: 76 – 220 mm / version larges: 76 – 420 mm
76 – 559 mm
Papier en continu
Formulaire simple
paravent
Liasse de formulaire
paravent
Grammage
Largeur
Longueur
Grammage
Largeur/Longueur
Epaisseur du formulaire
Nombre de copies
60 – 120 g/m
2
version étroites: 76 – 254 mm / version larges: 76 – 420 mm
76 – 559 mm
Ori
ginal: 45 – 65 g/m
2
/ copie: 45 – 56 g/m
2
/ dernière feuille: 45 – 65 g/m
2
voir formulaire simple
max. 0,5 mm
1+5 (9 aiguilles) / 1+3 (24 aiguilles)
La pagina si sta caricando...

Indice
Introduzione 2
Simboli utilizzati 2
Norme di sicurezza importanti 2
Lavoro con la documentazione on-line 2
Ricerca guasti 2
Vista d’insieme della stampante 3
Installazione 5
Apertura dell’imballo 5
Posizionamento della stampante 5
Collegamento della stampante 6
Accensione/spegnimento della stampante 6
Pannello di controllo 7
Modo Online 7
Modo Offline 7
Modo Setup 7
Sostituzione della cartuccia nastro 8
Caricamento della carta 10
Inserimento di fogli singoli 10
Carta a moduli continui 12
Cambio del tipo di carta 14
Selezione rapida del percorso carta 14
Trasporto carta 15
Modalità d’uso 15
Avanzamento della carta fino alla posizione
di strappo 15
Impostazioni (I) 16
Impostazione della posizione di strappo 16
Impostazione della posizione della prima
riga di stampa (TOF) 16
Impostazioni (II) 18
Impostazione della distanza della testina
di stampa 18
Cambio della carta nel modo Setup 19
Da moduli continui iu fogli singoli 19
Dai fogli singoli ai moduli continui 20
Selezionediunfont 21
Impostazione del passo dei caratteri 22
Specifiche tecniche 23
Stampante 23
Caratteristiche della carta 23
Accessori 24
Manuale Utente
GUIDA ALL’
AVVIAMENTO RAPIDO
ITALIANO
Per cominciare subito Indice
1

Introduzione Le presenti istruzioni per l’uso consentono di cominciare subito a utilizzare la stampante, anche
agli utenti senza esperienza. Queste istruzioni descrivono le principali funzioni della stampante
e contengono informazioni essenziali per il lavoro quotidiano con la stessa. Una descrizione
dettagliatadellastampanteedellesuecaratteristiche,unitamenteadaltreinformazionidettagliate,
ècontenutanelmanualed’usosuCD-ROMon-line,inseritonella penultimapaginadellapresente
documentazione.
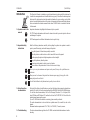
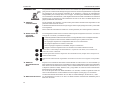
➤Simboli utilizzati Per evidenziare le informazioni più importanti, nel presente manuale vengono utilizzati due tipi
di simboli.
Il simbolo ATTENZIONE mette in evidenza le informazioni che devono essere osservate per
evitare rischi per l’incolumità personale dell’utilizzatore e danni alla stampante.
Il simbolo NOTA contrassegna informazioni generiche o aggiuntive in merito a un determinato
argomento.
➤Norme di sicurezza
importanti
Prima di mettere in funzione la stampante, leggere attentamente le seguenti istruzioni per evitare
lesioni personali e danni alla stampante.
Tenere sempre le presentè istruzioni per l’uso a portata di mano.
Collocare la stampante su una superficie stabile per evitare che cada a terra.
Non esporre la stampante a temperature elevate o alla luce solare diretta.
Evitare il contatto di liquidi con la stampante.
Non esporre la stampante a urti violenti o vibrazioni.
Prima di accendere la stampante, verificare sempre che sia impostata su un valore di tensio-
ne corretto.
Non tentare mai di effettuare interventi di manutenzione o riparazione da sè; rivolgersi
sempre a un tecnico dell’assistenza debitamente qualificato.
Per scollegare la stampante dalla rete di alimentazione, estrarre sempre la spina dalla presa.
Altre informazioni di sicurezza sono riportate nelle pagine seguenti del manuale.
➤Lavoro con la
documentazione
on-line
Installare dapprima Adobe Acrobat Readersull’hard disk (se questo programma non è già presente).
Per l’installazione, attenersi alle istruzioni fornite nel file Readme, posto nella directory READER.
Per lanciare la documentazione on-line, in File Manager (Windows 3.1) o in Explorer (Win-
dows 95/Windows 98/Windows NT), cliccare due volte sul file START.PDF. Attenersi quindi alla
guida utente.
Se il CD-ROM non fosse compreso nella dotazione della stampante o fosse difettoso, rivolgersi al
proprio rivenditore.
La documentazione on-line è anche disponibile in formato cartaceo (a pagamento) o in Internet.
Requisiti hardware minimi: PC AT 486, CD-ROM 4x, schermo da 15", mouse.
➤Ricerca guasti La documentazione on-line su CD-ROM contiene informazioni dettagliate per la ricerca guasti.
STOP
STOP
STOP
Ah ha!
Introduzione Per cominciare subito
2

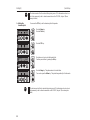
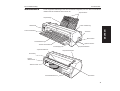
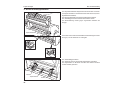
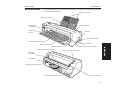
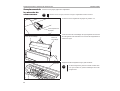
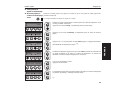
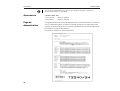
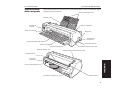
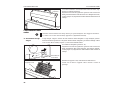
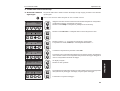
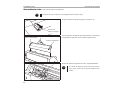
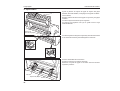
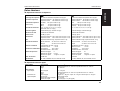
Vista d’insieme
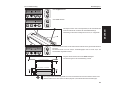
della stampante
Nelle seguenti figure sono riportate tutte le parti della stampante, mentre la tabella alla pagina
seguente ne elenca le funzioni.
Supporto carta
Pannello di
controllo
Guida carta sinistra
Guida inserimento fogli singoli
Guida carta destra
Coperchio frontale
Levetta di selezione tipo carta
Connettore opzioni
Interruttore di
accensione
Manopola
Coperchio superiore
Vassoi di prolunga carta
Levetta di regolazione spessore carta
Bordo di strappo carta
Levetta di blocco
Connettore di interfaccia
Presa di alimentazione
Levetta di blocco
Coperchio
posteriore
ITALIANO
Per cominciare subito Vista d’insieme della stampante
3

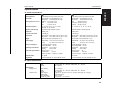
Nome del
componente
Funzione
Pannello di controllo Indica lo stato della stampante e consente di eseguire numerose
impostazioni.
Supporto carta Ha la funzione di raccogliere i fogli singoli già stampati quando il
parametro “F-Eject” nelle impostazioni di menu è impostato su OFF.
Vassoi di prolunga
carta
Consentono di prolungare il supporto carta.
Coperchio
superiore
In caso di sostituzione della cartuccia toner o di eliminazione di un
inceppamento carta, è possibile rimuovere questo coperchio per avere
accesso alle parti interessate. Ha inoltre la funzione di proteggere l’utente
dai movimenti meccanici interni alla stampante.
Manopola Viene utilizzato, per avanzamento o retrocessione manuale della carta.
Interruttore di
accensione
Accende e spegne la stampante.
Connettore opzioni Per il collegamento del cassetto di alimentazione automatica fogli singoli
(ASF) o del secondo trascinamoduli opzionale.
Levetta di selezione
carta
Consente di selezionare il tipo di carta da utilizzare nella stampante:fogli
singoli (levetta in posizione superiore)carta a moduli continui (levetta in
posizione inferiore).
Coperchio frontale Viene aperto per caricare la carta a moduli continui. Viene invece rimosso
per l’installazione del cassetto di alimentazione automatica fogli singoli
(ASF) o del trascinamoduli opzionale.
Guida carta destra Allineando il bordo destro del foglio singolo con questa guida si evita che
la carta venga alimentata in obliquo.
Guida inserimento fogli
singoli
Viene aperta per inserire i fogli singoli e funge anche da supporto carta.
Viene inoltre utilizzata come vassoio di raccolta dei fogli stampati quando il
parametro “F-Eject” nelle impostazioni di menu è impostato su ASF, Single o
ALL.
Guida carta sinistra Consente di allineare il bordo sinistro dei fogli singoli.
Levetta di blocco Tirandola in direzione del lato anteriore della stampante, questa levetta si
sblocca e consente di aprire il coperchio superiore.
Bordo di strappo carta Per strappare la carta a moduli continui. Premendo il tasto Stp.lacarta
viene trasportata in questa posizione.
Levetta di regolazione
spessore carta
Consente di regolare la distanza della testina di stampa in funzione della
grammatura della carta utilizzata. Per i dettagli, vedere pagina 18,
Impostazione della distanza della testina di stampa
.
Connettore di
interfaccia
Per inserire il cavo di collegamento al computer.
Presa di alimentazione Per il collegamento del cavo di alimentazione.
Coperchio posteriore Serve a ridurre la rumorosità della stampante. Va rimosso al ribaltamento
del cassetto carta.
Vista d’insieme della stampante Per cominciare subito
4

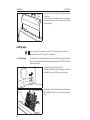
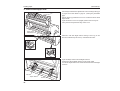
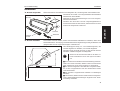
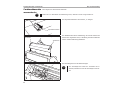
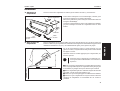
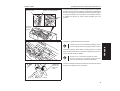
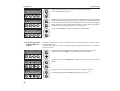
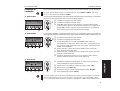
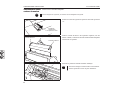
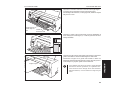
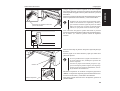
Installazione
➤ Apertura dell’imballo Aprire il cartone contenente la stampante e controllare che siano presenti tutte le seguenti parti.
Se si riscontrano danni dovuti al trasporto o in caso di accessori
mancanti, contattare immediatamente il rivenditore.
Rimuovereifermiperiltrasportocomedescrittonelleistruzioni
di rimozione dell’imballaggio.
Conservare il cartone e il materiale di imballo per un eventuale
trasporto futuro della stampante.
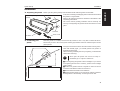
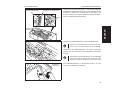
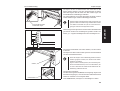
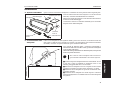
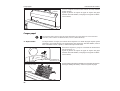
➤ Posizionamento della
stampante
Colloca re la stampante su una superficie stabile, piana e non scivolosa, in modo da evitare che
cada a terra. Verificare che il pannello di controllo e gli alimentatori carta risultino facilmente
accessibili, e lasciare uno spazio sufficiente per la fuoriuscita della carta.
Se si prevede di utilizzare spesso i comandi di avanzamento e
retrocessionedella carta amoduli continui,posizionare lastampante
come mostrato nella figura.
Nellasceltadelluogodiinstallazionedellastampante,tenerepresente
anche la seguente indicazione:
■Evitare di esporre lastampantealla luce solare diretta.Se non
si può fare a meno di installare la stampante vicino a una
finestra, proteggerla dalla luce con una tenda.
■ Posizionare la stampante vicino al computer cui deve essere
collegata. La distanza non deve essere superiore a 2,0 metri.
■ Verificare che la stampante sia posta ad una distanza suffi-
ciente dai caloriferi.
■ Verificare che la stampante non risulti esposta a variazioni
estreme di temperatura o di umidità nell’aria. Evitare di esporla
alla polvere.
Stampante
Cartuccia
nastro
Istruzioni per l’uso
Cavo di
alimentazione
CD-ROM
Istruzioni di rimozione
dell’imballaggio
Non collocare mai la stampante nelle vicinanze di
gas facilmenteinfiammabili odi sostanzeesplosive.
STOP
ITALIANO
Per cominciare subito Installazione
5

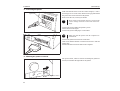
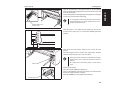
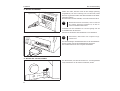
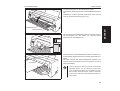
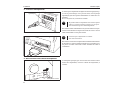
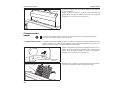
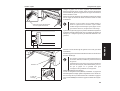
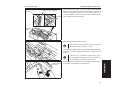
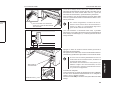
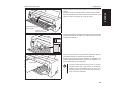
➤ Collegamento della stampante
Verificare che la stampante sia impostata per una tensione
corretta (cioè 230 V perl’Europa, e120 V pergli USA).Vedere
a questo proposito la targhetta identificativa posta vicino alla
presa di alimentazione sul retro della stampante.
Se il valore di tensione non è corretto, contattare il rivenditore.
Collegareil cavodi alimentazioneall’appositapresa dellastam-
pante, come mostrato nella figura.
Inserire la spina del cavo di alimentazione in una presa.
Collegare il connettore del cavo di trasmissione dei dati (lato
stampante) al connettore di interfaccia femmina e fissarlo con
le apposite clip a molla.
Collegare l’altra estremità del cavo al computer.
➤ Accensione/spegnimento della stampante
L’interruttore di accensione, che consente di accendere e spe-
gnere la stampante, è posto sul retro della stampante.
Targhetta di
identificazione
Nonaccenderemai lastampantese non èimpostata
sulvaloreditensionecorrettopoichéquestopotreb-
be danneggiare seriamente la macchina.
STOP
Verificare che la stampante e il computer siano
spenti.
STOP
Interruttore di
accensione
Installazione Per cominciare subito
6
La pagina si sta caricando...
La pagina si sta caricando...
La pagina si sta caricando...
La pagina si sta caricando...
La pagina si sta caricando...
La pagina si sta caricando...
La pagina si sta caricando...
La pagina si sta caricando...
La pagina si sta caricando...
La pagina si sta caricando...
La pagina si sta caricando...
La pagina si sta caricando...
La pagina si sta caricando...
La pagina si sta caricando...
La pagina si sta caricando...
La pagina si sta caricando...
La pagina si sta caricando...
La pagina si sta caricando...
La pagina si sta caricando...
La pagina si sta caricando...
La pagina si sta caricando...
La pagina si sta caricando...
La pagina si sta caricando...
La pagina si sta caricando...
La pagina si sta caricando...
La pagina si sta caricando...
La pagina si sta caricando...
La pagina si sta caricando...
La pagina si sta caricando...
La pagina si sta caricando...
La pagina si sta caricando...
La pagina si sta caricando...
La pagina si sta caricando...
La pagina si sta caricando...
La pagina si sta caricando...
La pagina si sta caricando...
La pagina si sta caricando...
La pagina si sta caricando...
La pagina si sta caricando...
La pagina si sta caricando...
La pagina si sta caricando...
La pagina si sta caricando...
La pagina si sta caricando...
La pagina si sta caricando...
-
 1
1
-
 2
2
-
 3
3
-
 4
4
-
 5
5
-
 6
6
-
 7
7
-
 8
8
-
 9
9
-
 10
10
-
 11
11
-
 12
12
-
 13
13
-
 14
14
-
 15
15
-
 16
16
-
 17
17
-
 18
18
-
 19
19
-
 20
20
-
 21
21
-
 22
22
-
 23
23
-
 24
24
-
 25
25
-
 26
26
-
 27
27
-
 28
28
-
 29
29
-
 30
30
-
 31
31
-
 32
32
-
 33
33
-
 34
34
-
 35
35
-
 36
36
-
 37
37
-
 38
38
-
 39
39
-
 40
40
-
 41
41
-
 42
42
-
 43
43
-
 44
44
-
 45
45
-
 46
46
-
 47
47
-
 48
48
-
 49
49
-
 50
50
-
 51
51
-
 52
52
-
 53
53
-
 54
54
-
 55
55
-
 56
56
-
 57
57
-
 58
58
-
 59
59
-
 60
60
-
 61
61
-
 62
62
-
 63
63
-
 64
64
-
 65
65
-
 66
66
-
 67
67
-
 68
68
-
 69
69
-
 70
70
-
 71
71
-
 72
72
-
 73
73
-
 74
74
-
 75
75
-
 76
76
-
 77
77
-
 78
78
-
 79
79
-
 80
80
-
 81
81
-
 82
82
-
 83
83
-
 84
84
-
 85
85
-
 86
86
-
 87
87
-
 88
88
-
 89
89
-
 90
90
-
 91
91
-
 92
92
-
 93
93
-
 94
94
-
 95
95
-
 96
96
-
 97
97
-
 98
98
-
 99
99
-
 100
100
-
 101
101
-
 102
102
-
 103
103
-
 104
104
-
 105
105
-
 106
106
-
 107
107
-
 108
108
-
 109
109
-
 110
110
-
 111
111
-
 112
112
-
 113
113
-
 114
114
-
 115
115
-
 116
116
-
 117
117
-
 118
118
-
 119
119
-
 120
120
-
 121
121
-
 122
122
-
 123
123
-
 124
124


TallyGenicom T2240-24 Manuale del proprietario
- Tipo
- Manuale del proprietario
in altre lingue
Documenti correlati
Altri documenti
-
TALLY T2130-9 Manuale del proprietario
-
Tally Genicom T2245 Manuale utente
-
Copystar FS-C5100DN Guida d'installazione
-
Panasonic Printer KX-P3626 Manuale utente
-
Panasonic KXP3196 Istruzioni per l'uso
-
Compaq LA36 Manuale utente
-
Lexmark Dot Matrix Manuale utente
-
Epson LC-7211 Manuale utente
-
Star Micronics LC-4511 Manuale utente
-