
PVD 830 N
PIANO VETROCERAMICA - Istruzioni per l'uso
VITROCERAMIC HOB - User instructions
TABLE VETROCERAMIQUE - Notice d'utilisation
ELEKTRO-GLASKERAMIKMULDE - Gebrauchsanweisung
PLANO DE VIDRO DE CERAMICA - Manual de utilización
PLANOVITRO-CERÂMICO - Manual do usuário
I
GB
F
D
E
P


- 3 -
Fig.1
Fig.2
Fig.3
Area Timer
Tasti regolazione temperatura Display zona di cottura
Timer Zone
Zone Timer
Timer Zone
Keys for temperature reguletion
Taste Wärmeregulierung
Touches reglage temperature
Cooking zone display
Display kochzone
Display zone de cuisson
Area Timer
Pulsante para ajustar la temperatura
Display zona de cocción
Display de zona de cozedura
Teclas de regulação da temperatura
Zona Timer
Orologio / Timer / Count-down
Clock / Timer / Count-down
Uhr / Timer / Count-down
Moutre / Timer / Count-down
Reloj / Timer / Cuenta-Atras
Relog / Timer / Count-down
Spia zona estesa
Extended zone led
Led erweiterte Kochzone
Voyant zone etendue
Piloto otra zone de cocción
on/off e indicatore zona di cottura
on/off and cooking zone display
on/off und kochzonen-Anzeiger
on/off et indicateur zone de cuisson
on/off - indicador zona de cocción
Indicador de zona de cozedura
on/off - indicador da zona de cozedura
Tasto Memory
Memory Key
Taste Memory
Touche memoire
Función Memoty
Função Memória
Spia on/off tasto chiave
on/off led key lock
Led on/off u.Schlüsseltaste
Voyant on/off touche cle
Piloto On/Off Pulsante llave
Ind. Luminoso da Tacla Chave
Tasto chiave
key lock key
Sicherheits-u.Schlüsseltaste
Touche cle
Pulsante llave
Tacla Chave

GENERALITA'
Leggere attentamente il contenuto del presente libretto in quanto fornisce importanti indicazioni riguardanti la
sicurezza di installazione, d'uso e di manutenzione. Conservare il libretto per ogni ulteriore consultazione.Tutte le
operazioni relative all’installazione (connessioni elettriche) devono essere effettuate da personale specializzato in
conformità delle norme vigenti.
AVVERTENZE PER LA SICUREZZA
Si consigliano recipienti a fondo piatto dal diametro uguale o leggermente superiore a quello dell’area riscaldata. Non
utilizzare recipienti con base ruvida, per evitare di graffiare la superficie termica del piano (Fig.1). Questo apparecchio
non è adatto per l'uso da parte di bambini o persone che necessitano di supervisione. Fare attenzione che i bambini
non giochino con l'apparecchio.
IMPORTANTE
- evitare le fuoriuscite di liquido.
- non lasciare gli elementi riscaldanti accesi con pentole e padelle vuote oppure senza recipienti.
- una volta terminato di cucinare, spegnere la relativa resistenza tramite il comando indicato in seguito.
- Non utilizzare la superficie in vetro per tagliare i cibi.
- Non utilizzare il piano di cottura come superficie di appoggio di oggetti
ATTENZIONE: Se la superficie è incrinata, spegnere l'apparecchio per evitare l'eventualità di scosse elettriche.
Questo apparecchio è contrassegnato in conformità alla Direttiva Europea 2002/96/EC, Waste Electrical and Electronic
Equipment (WEEE). Assicurandosi che questo prodotto sia smaltito in modo corretto, l’utente contribuisce a prevenire
le potenziali conseguenze negative per l’ambiente e la salute.
Il simbolo
sul prodotto o sulla documentazione di accompagnamento indica che questo prodotto non deve essere
trattato come rifiuto domestico ma deve essere consegnato presso l’idoneo punto di raccolta per il riciclaggio di
apparecchiature elettriche ed elettroniche. Disfarsene seguendo le normative locali per lo smaltimento dei rifiuti. Per
ulteriori informazioni sul trattamento, recupero e riciclaggio di questo prodotto, contattare l’idoneo ufficio locale, il
servizio di raccolta dei rifiuti domestici o il negozio presso il quale il prodotto è stato acquistato.
ISTRUZIONI PER L'INSTALLAZIONE
Le presenti istruzioni sono rivolte ad un installatore specializzato e fungono da guida per l’installazione in conformità
delle leggi e delle norme vigenti.
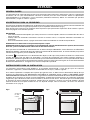
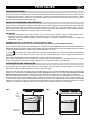
Se un forno da incasso o qualsiasi altra apparecchiatura che genera calore deve essere montato direttamente sotto
il piano di cottura in vetroceramica, È NECESSARIO CHE TALE APPARECCHIATURA (forno) E IL PIANO DI COTTURA
IN VETROCERAMICA SIANO ADEGUATAMENTE ISOLATI, in modo tale da garantire il corretto funzionamento del
sistema TOUCHCONTROL.
Nel caso in cui sotto il piano venga installato un forno da incasso assicurarsi che questo sia dotato di impianto di
raffreddamento tangenziale e comunque la distanza tra il piano ed il forno deve essere di almeno 10cm (Fig.5). Nel
caso in cui il forno installato al di sotto del piano di cottura non sia dotato di tangenziale di raffreddamento inserire
tra il piano ed il forno un pannello in legno o altro materiale isolante di almeno 1,5cm di spessore, lasciando comunque
una distanza minima tra il piano di cottura ed il forno di 12cm (Fig.6).
ITALIANO
I
Fig.5 Fig.6
10 cm
12 cm
1,5 cm
USCITA
ARIA
CALDA
INGRESSO
ARIA
FREDDA
VENTOLA TANGENZIALE

- 5 -
L
3
L
2
L
1
220-240V 3~ H05V2V2-F 4G 2.5mm
2
N
L
1
L
2
L
3
380-415V 3N~ H05V2V2-F 5G 2.5mm
2
L
N
220-240V 1N ~ H05V2V2-F 3G 2.5mm
2
L
2
L
1
N
380-415V 2N~ H05V2V2-F 4G 2.5mm
2
L
1
L
2
220-240V 2~ H05V2V2-F 3G 2.5mm
2
25
min.
30 mm
40 mm
755
305
50
Min
50
Min
53.5
Min
320
770
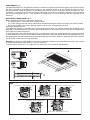
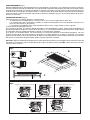
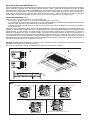
POSIZIONAMENTO (Fig.7)
L’elettrodomestico è realizzato per essere incassato in un piano di lavoro, come illustrato nella figura specifica.
Predisporre materiale sigillante lungo l’intero perimetro (dimensioni del taglio Fig.7B). Bloccare l’elettrodomestico sul
piano di lavoro mediante i 4 sostegni, tenendo presente lo spessore del piano di lavoro (Fig.7A). Se la parte inferiore
dell'apparecchio, dopo l'installazione, è accessibile dalla parte inferiore del mobile è necessario montare un pannello
separatore rispettando le distanze indicate (Fig.7C). Se si installa sotto un forno questo non è necessario.
CONNESSIONI ELETTRICHE (Fig.8)
Prima di effettuare le connessioni elettriche assicurarsi che:
- il cavo elettrico della terra deve essere di 2 cm. più lungo rispetto agli altri cavi;
- le caratteristiche dell’impianto siano tali da soddisfare le indicazioni sulla targhetta identificativa applicata sulla
parte inferiore del piano di lavoro;
- l’impianto sia dotato di una messa a terra efficiente conforme alle norme e alle disposizioni di legge in vigore.
La messa a terra è obbligatoria per legge.
Nel caso in cui l’elettrodomestico non sia dotato di cavo e/o della relativa spina, utilizzare materiale adatto per
l’assorbimento indicato nella targhetta identificativa e per la temperatura di funzionamento. In nessun punto il cavo
deve raggiungere una temperatura di 50°C superiore alla temperatura ambiente.
Se si desidera una connessione diretta alla linea elettrica, è necessario interporre un interruttore omnipolare, con
un’apertura minima di 3mm fra i contatti, appropriato al carico indicato nella targhetta e conforme alle norme vigenti
(il conduttore di terra giallo/verde non deve essere interrotto dal commutatore).
Terminata l’installazione dell’apparecchiatura, l'interruttore omnipolare deve essere facilmente raggiungibile.
ATTENZIONE: La scheda elettronica è protetta contro eventuali errori di connessione alla rete elettrica da un fusibile
a bordo scheda con le seguenti caratteristiche: T40mA 250V
Fig.7
Fig.8
A
B
C

USO E MANUTENZIONE
MANUTENZIONE
Rimuovere eventuali residui di cibo e gocce di unto dalla superficie di cottura utilizzando lo speciale raschietto fornito
su richiesta (fig.2). Pulire l’area riscaldata nel miglior modo possibile utilizzando SIDOL, STAHLFIX o prodotti simili ed
un panno-carta, quindi sciacquare con acqua e asciugare con un panno pulito. Mediante lo speciale raschietto
(opzionale) rimuovere immediatamente dall’area riscaldata di cottura frammenti di fogli di alluminio e materiale plastico
scioltisi inavvertitamente o residui di zucchero o di cibi ad elevato contenuto di zucchero (fig.2). In questo modo si
evita ogni possibile danno alla superficie del piano.In nessun caso si devono utilizzare spugnette abrasive o
detergenti chimici irritanti quali spray per forno o smacchiatori.
• Area comandi (Fig.3)
- Alla prima accensione il piano di cottura si troverà in posizione di sicurezza, cioè la” Spia on/off tasto chiave”
accesa.
- Per utilizzare il piano è necessario tenere premuto il “ tasto chiave” per 3 secondi fino allo spegnimento della ” Spia
on/off tasto chiave ”
- Per accendere la piastra desiderata:
- premere il tasto on/off corrispondente. Si vedrà il “led” del “ Display zona cottura “ lampeggiare.
- premere entro 10 secondi il tasto - per andare in posizione 4 oppure il tasto + per andare in posizione 9.
- Per regolare la temperatura della zona di cottura agire su i tasti + o -.
- Se la piastra è dotata di zona estesa, per accendere la seconda zona portare il “Diplay della zona cottura” alla
posizione 9 e premere il tasto + per 2 sec: fino all'accensione del punto decimale come conferma.
- Per spegnere la piastra premere il relativo tasto on/off.
NOTA: Durante il funzionamento è possibile bloccare/sbloccare la zona comandi premendo il tasto chiave per 3
secondi.
• Area Timer (fig.3)
Il piano ha la possibilità di settare contemporaneamente il timer su ogni zona di cottura. Il timer è una funzione che
permette di fissare un tempo (da 1 a 99 minuti) per lo spegnimento automatico della zona di cottura selezionata.
- Premere il tasto “Timer” per 2 secondi:il display mostrerà “00” al centro e mostrerà quale elemento è attivo sul lato
destro e sinistro.
- Continuando a premere il tasto “Timer” si seleziona la piastra tra quelle attive.
- Premere + o - per selezionare il valore “Timer”.
Nota:
- Se la funzione “Timer” è stata impostata per più di una zona di cottura , il “Display Timer” mostrerà ogni 3 secondi
il tempo rimanente per ogni zona programmata.
- Per annullare la funzione “Timer”, spegnere la relativa zona di cottura.
• Funzione “MEMORY”
Nel caso in cui il vostro prodotto è dotato della funzione MEMORY, questa permette la programmazione e l’esecuzione
di un ciclo di cottura su ogni elemento riscaldante.
Note:
- Si può eseguire un ciclo alla volta in registrazione o in esecuzione.
- Le variazioni del livello di potenza per tempi inferiori ai 15 sec. non sono registrate.
- Può essere memorizzato un ciclo di cottura della durata massima di 10 ore e con un massimo di 10 variazioni del
livello di potenza.
• Memorizzazione di un ciclo di cottura:
- Premere il tasto “Memory” e poi selezionare la piastra desiderata tramite il relativo tasto di “ON/OFF”.
- Premere i tasti +
o - fino a selezionare la potenza desiderata.
- Per terminare il ciclo di memorizzazione premere nuovamente il tasto di “ON/OFF”.
• Esecuzione di un ciclo di cottura:
- Per eseguire un ciclo di cottura già memorizzato è sufficiente premere il tasto “ON/OFF” della zona di cottura
interessata e di seguito il tasto “Memory”.
• Display:
piano di cottura è dotato di un display che in funzione normale è un “OROLOGIO” ed inoltre può svolgere la funzione
di “COUNT-DOWN” quando il piano è spento.
• Regolazione dell'orologio:
In fase d’installazione impostare l’ora nel seguente modo:
- Sbloccare il piano di cottura tenendo premuto il “tasto chiave” per 3 secondi fino allo spegnimento della “spia
chiave”.
- Premere i tasti + o - sotto il display fino a che lo stesso inizierà a lampeggiare.
- Premere (+) o (-) per impostare l’ora desiderata.
- Premere il tasto “Timer” per confermare la selezione.

• Funzioni Count-Down:
- Sbloccare il piano di cottura tenendo premuto il “tasto chiave” per 3 secondi fino allo spegnimento della “spia
chiave”.
- Premere il tasto “Timer” finchè non compare la scritta “00” sul display.
- Premere + o - per selezionare il numero dei minuti.
- Premere il tasto “Timer” per confermare la selezione.
Al termine del tempo impostato si attiverà un segnale acustico.
SISTEMI DI SICUREZZA
1. Nel caso in cui un oggetto viene posizionato sopra i comandi, il piano di cottura si spegnerà e si inserirà
automaticamente la chiave andando in autoprotezione, questo accadrà anche in caso di versamento di liquidi (acqua,
latte, ecc.) sulla zona comandi.
2. La tastiera comandi ha internamente un sensore di temperatura che , nel caso in cui la temperatura interna
raggiunga 90°(condizioni anormali uso del piano senza pentole) automaticamente il piano entra in un sistema di
limitazione di temperatura automatico: spegnendosi automaticamente.
• RESIDUO CALORE
ATTENZIONE: quando una zona di cottura viene spenta, la sua superficie ha una temperatura molto elevata e
pericolosa.
Questa pericolosità è evidenziata dal fatto che il “display della zona di cottura” lampeggerà fino a che la temperatura
sulla superficie non sarà scesa sotto i 50°C.
SI DECLINA OGNI RESPONSABILITA' PER EVENTUALI DANNI PROVOCATI DALLA INOSSERVANZA DELLE SUDDETTE
AVVERTENZE
Dichiarazione di conformità. Quest'apparecchiatura, nelle parti destinate a venire a contatto con sostanze alimentari,
è conforme alla prescrizione della dir.CEE 89/109 e al D.L. d'attuazione n°108 del 25/01/92.
CE Apparecchio conforme alle direttive europee 89/336 CEE, 73/23 CEE e successive modifiche.

SERVIZIO ASSISTENZA CLIENTI
CERTIFICATO DI GARANZIA CONVENZIONALE: cosa fare?
Il Suo prodotto è garantito, alle condizioni e nei termini riportati sul certificato inserito nel prodotto ed
in base alle previsioni del decreto legislativo 24/02, nonché del decreto legislativo 6 settembre 2005,
n. 206, per un periodo di 24 mesi decorrenti dalla data di consegna del bene.
Così come riportato nei testi dei Decreti Legislativi citati, il certificato di garanzia dovrà essere da Lei
conservato, debitamente compilato, per essere mostrato al Servizio Assistenza Tecnica Autorizza-
to, in caso di necessità, unitamente ad un documento fiscalmente valido rilasciato dal rivenditore al
momento dell’acquisto (bolla di consegna, fattura, scontrino fiscale, altro) sul quale siano indicati il
nominativo del rivenditore, la data di consegna, gli estremi identificativi del prodotto ed il prezzo di
cessione
Resta pure inteso che, salvo prova contraria, poiché si presume che i difetti di conformità che si
manifestano entro sei mesi dalla consegna del bene esistessero già a tale data, a meno che tale
ipotesi sia incompatibile con la natura del bene o con la natura del difetto di conformità, il Servizio di
Assistenza Tecnica Autorizzato Gias, verificato il diritto all’intervento, lo effettuerà senza addebitare
il diritto fisso di intervento a domicilio, la manodopera ed i ricambi. Per contro, nel successivo periodo
di diciotto mesi di vigenza della garanzia, sarà invece onere del consumatore che intenda fruire dei
rimedi accordati dalla garanzia stessa provare l’esistenza del difetto di conformità del bene sin dal
momento della consegna; nel caso in cui il consumatore non fosse in grado di fornire detta prova, non
potranno essere applicate le condizioni di garanzia previste e pertanto il Servizio di Assistenza
Tecnica Autorizzato Gias effettuerà l’intervento addebitando al consumatore tutti i costi relativi.
ESTENSIONE DELLA GARANZIA FINO A 5 ANNI: come?
Le ricordiamo inoltre che sullo stesso certificato di garanzia convenzionale Lei troverà le informazio-
ni ed i documenti necessari per prolungare la garanzia dell’apparecchio sino a 5 anni e così, in caso
di guasto, non pagare il diritto fisso di intervento a domicilio, la manodopera ed i ricambi.
Per qualsiasi informazione necessitasse, La preghiamo rivolgersi al numero telefonico del Servizio
Clienti 0392086811.
ANOMALIE E MALFUNZIONAMENTI: a chi rivolgersi ?
Per qualsiasi necessità il centro assistenza autorizzato è a Sua completa disposizione per fornirLe
i chiarimenti necessari; comunque qualora il Suo prodotto presenti anomalie o mal funzionamenti,
prima di rivolgersi al Servizio Assistenza Autorizzato, consigliamo vivamente di effettuare i controlli
indicati:
- verificare il buon inserimento della spina nella presa di corrente
Nel caso non si individui la causa di mal funzionamento:
- spegnere l'apparecchio non manometterlo e chiamare il Servizio di Assistenza Tecnica.
UN SOLO NUMERO TELEFONICO PER OTTENERE ASSISTENZA.
Qualora il problema dovesse persistere, componendo il “Numero Utile” sotto indicato, sarà messo
in contatto direttamente con il Servizio Assistenza Tecnica Autorizzato che opera nella Sua zona di
residenza.
Attenzione, la chiamata è a pagamento; il costo verrà comunicato, tramite messaggio vocale, dal
Servizio clienti dell’operatore telefonico utilizzato. Dettagli sono presenti sul sito internet www.candy.it
MATRICOLA DEL PRODOTTO. Dove si trova?
E’ indispensabile che comunichi al Servizio Assistenza Tecnica Autorizzato la sigla del prodotto ed il
numero di matricola (16 caratteri che iniziano con la cifra 3) che troverà sul certificato di garanzia.
In questo modo Lei potrà contribuire ad evitare trasferte inutili del tecnico, risparmiando oltretutto i
relativi costi.

GENERAL
Carefully read the contents of this leaflet since it provides important instructions regarding safety of installation, use
and maintenance. Keep the leaflet for possible future consultation. All the operations relating to installation/replace-
ment (electrical connections) must be carried out by specialised personnel in conformity with the regulations in force.
SAFETY WARNINGS
It is recommended to use flat-bottom pans with a diameter equal to or slightly larger than that of the heated area. Do
not use pans with a rough base to prevent scratching the heat surface of the cooktop (Fig.1). This appliance is not
suitable for use by children or persons requiring supervision. Do not let children play with the appliance.
IMPORTANT
- Avoid spilling liquid, therefore to boil or heat liquids, reduce the heat.
- Do not leave the heating elements on with empty pots and pans or without receptacles.
- When you have finished cooking, switch off the relevant heating element with the control indicated below.
ATTENTION: Steam cleaners must not be used.
WARNING: If the surface is cracked, switch off the appliance to prevent electric shock.
This appliance conforms to the European Directive EC/2002/96, Waste Electrical and Electronic Equipment (WEEE).
By making sure that this appliance is disposed of in a suitable manner, the user is helping to prevent potential
damage to the environment or to public health.
The
symbol on the product or on the accompanying paperwork indicates that the appliance should not be treated
as domestic waste, but should be delivered to a suitable electric and electronic appliance recycling collection point.
Follow local guidelines when disposing of waste. For more information on the treatment, re-use and recycling of this
product, please contact your local authority, domestic waste collection service or the shop where the appliance was
purchased.
INSTALLATION INSTRUCTIONS
These instructions address specialised installers and serve as a guide for installation, adjustment and maintenance
in conformity with the laws and regulations in force.
If a recessed oven or any other type of heat-generating appliance must be fitted directly underneath the glass
ceramic hob, THE APPLIANCE (oven) AND THE GLASS CERAMIC HOB MUST BE APPROPRIATELY INSULATED, so
that the TOUCHCONTROL system operates correctly.
If a recessed oven is fitted underneath the hob, make sure that it is fitted with a tangential cooling system; the
distance between the hob and the oven must be at least 10 cm (Fig. 5). If the oven installed below the hob is not fitted
with a tangential cooling system, place a wooden panel (or a panel made from a different insulating material) with a
minimum thickness of 1.5 cm between the hob and the oven, maintaining a minimum distance of 12 cm between the
hob and the oven (Fig. 6).
ENGLISH
GB
Fig.5 Fig.6
10 cm
12 cm
1,5 cm
WARM
AIR
OUTLET
COLD
AIR
OUTLET
TANGENTIAL FAN

L
3
L
2
L
1
220-240V 3~ H05V2V2-F 4G 2.5mm
2
N
L
1
L
2
L
3
380-415V 3N~ H05V2V2-F 5G 2.5mm
2
L
N
220-240V 1N ~ H05V2V2-F 3G 2.5mm
2
L
2
L
1
N
380-415V 2N~ H05V2V2-F 4G 2.5mm
2
L
1
L
2
220-240V 2~ H05V2V2-F 3G 2.5mm
2
25
min.
30 mm
40 mm
755
305
50
Min
50
Min
53.5
Min
320
770
POSITIONING (Fig.7)
The domestic appliance is designed to be built into a worktop as illustrated in the specific figure. Apply sealant around
the entire perimeter (cut-out dimensions Fig.7B). Fix the domestic appliance on the worktop by means of the 4
brackets provided, taking the thickness of the worktop into account (Fig.7A). If the lower part of the appliance, after
installation, is accessible via the lower part of the cabinet then it is necessary to mount a separator panel respecting
the distances indicated (Fig.7C). If the appliance is installed with an oven underneath then the separator is not
necessary.
ELECTRICAL CONNECTIONS (Fig.8)
Before making the electrical connections, check that:
- the ground cable is 2 cm longer than the other cables;
- the system ratings meet the ratings indicated on the identification plate fixed on the lower part of the worktop;
- the system is fitted with efficient earthing compliant to the laws and regulations in force.
Earthing is obligatory by law.
If the domestic appliance is not fitted with a cable and/or relevant plug, use material suited to the absorption value
indicated on the identification plate and the operating temperature. At no point must the cable reach a temperature
50°C higher than room temperature.
If wishing to make a direct connection to the mains, an omnipolar switch must be interposed with a minimum opening
of 3 mm between the contacts and suited to the load indicated on the plate and conform to the regulations in force
(the yellow/green ground conductor must not be interrupted by the switch). When the appliance has been installed,
the omnipolar switch must be easily reachable.
Attention: On the basis of the model in possession the electronic board may be protected by eventual errors caused
in the electrical network connection by a fuse on the board.
If replacement is necessary, use a fuse that has exactly the same technical specifications.
Fig.7
Fig.8
A
B
C

USE AND MAINTENANCE
MAINTENANCE
Remove any residues of food and drops of grease from the cooking surface using the special scraper supplied on
request (Fig.2)
Clean the heated area as thoroughly as possible using SIDOL, STAHLFIX or similar products and a cloth/paper, then
rinse with water and dry with a clean cloth.
Using the special scraper (optional) immediately remove any fragments of aluminium and plastic material that have
unintentionally melted on the heated cooking area or residues of sugar or food with a high sugar content (Fig.2). In
this way, any damage to the cooktop surface is prevented.
Under no circumstances use abrasive sponges or irritating chemical detergents such as oven sprays or stain
removers.
· CONTROL AREA (Fig.3)
- At the first ignition the cook top will be in the safety position, that is the “key button warning light on/off” will be
switched on.
- To use the cook top it will be necessary to keep the “key button” depressed for 3 seconds until the “key button
warning light on/off” switches off.
To turn on the desired heating element :
- depress the corresponding on/off key. The “led” of the “Cooking zone display” will be visualized flickering .
- depress the key within 10 seconds - to go to position 4 or the + key to go to position 9.
- To regulate the temperature of the cooking zone use the + or - keys.
- If the hotplate is supplied with an extensive area, to switch the second area on bring the “Display of the cooking
area” to position 9 and press the button + for 2 sec: until the decimal point is switched on to confirm.
- To switch the hotplate off press the relative on/off button.
NOTE:( During operation it will be possible to block / unblock the control zone by depressing the key button for 3
seconds).
· Timer Area (Fig.3)
The surface has the possibility to set the timer simultaneously on every cooking area. The timer is a function that
allows setting a time (from 1 to 99 minutes) to automatically switch off the selected cooking area.
- Press the “Timer” button for 2 seconds: the display shows “00” in the centre and it will show which element is active
on the right and left side.
- By continuing to press the “Timer” button the hotplate is selected amongst those active.
- Press + or - to select the “Timer” value.
NOTE:
- If the “Timer” function has been imposed for more than one cooking area, the “Timer Display” will show every 3
seconds the remaining time for every programmed area.
- To cancel the “Timer” function, switch off the relative cooking area.
· “MEMORY” function
If your product has the MEMORY function, the programming and execution of a cooking cycle on very heating
element is permitted.
Note:
- One cycle at a time can be carried out in registration or in execution.
- The variations of power level for the times inferior to 15 sec. are not registered.
- One cooking cycle with a maximum duration of 10 hours and a maximum of 10 variations of the power level can be
memorised.
· Memorisation of a cooking cycle
- Press the “Memory” button and then select the desired hotplate by means of the relative “ON/OFF” button.
- Press the buttons + or - until the desired power is selected.
- To terminate the memorisation cycle press once again the button “ON/OFF”.
· Executing a cooking cycle
- To execute a cooking cycle already memorised, it is sufficient to press the “ON/OFF
” button of the interested
cooking area followed by the “Memory” button.
· Display
The cooking surface is supplied with a display that in normal function is a “WARCH” and can also carry out the
“COUNTDOWN” function when the surface is off.
· Regulation of the Watch
In the installation phase set the clock in the following way:
- Unblock the cooking surface by keeping the “key button” pressed down for 3 seconds until the “indicator light
button” is switched off.

- Press the buttons + or - under the display until it begins flashing.
- Press + or - to set the desired time.
- Press the “Timer” button to confirm the selection.
· Countdown Function
- Unblock the cooking surface by keeping the “key button” pressed down for 3 seconds until the “indicator light
button” is switched off.
- Press the “Timer” button until the writing “00” appears on the display.
- Press + or - to select the number of the minutes.
- Press the “Timer” button to confirm the selection.
At the end of the set time, an acoustic signal will be activated.
· Safety Systems
1. In the instance where an object is placed over the controls, the cook top will switch off and the auto-protection
system will activate automatically, this occurs even in cases of liquid spills (water, milk, etc.) over the controls zone.
2. The commands keyboard has an internal temperature sensor that, in the case that the internal temperature
reaches 90° (abnormal use conditions of the surface without pots) the surface will automatically enter in an automatic
system of temperature limitation: switching itself off automatically.
WARNING : when a cooking zone is switched off, the surface of the cook top has a very high and dangerous
temperature level.
The danger is highlighted by the fact that the “cooking zone display” will flicker until the temperature of the surface
will not decrease to under 50°C.
AFTER-SALES SERVICE
Before contacting the Technical Assistance Service
If the hob does not operate at all, we advise you to:
- check that the plug has been inserted into the power socket correctly
If you cannot identify the cause of the operating anomaly:
switch off the appliance (do not subject it to rough treatment) and contact the Technical Assistance Service.
THE MANUFACTURER DECLINES ALL RESPONSIBILITY FOR EVENTUAL DAMAGES CAUSED BY BREACHING THE
ABOVE WARNINGS.
Declaration of conformity: The parts of this appliance which may come into contact with foodstuffs conform to the
prescriptions set out in EEC Directive 89/109 and the Decree Law of enforcement, number 180 dated 25/01/92.
CE Appliance conforms to the European Directives 89/336 EEC, 73/23 EEC and subsequent modifications.

CARACTÉRISTIQUES GÉNÉRALES
Lire attentivement le contenu du présent livret, étant donné qu’il fournit d’importantes indications concernant la
sécurité d’installation, d’utilisation et d’entretien. Conserver le livret pour toute consultation ultérieure. Toutes les
opérations concernant l’installation /remplacement (connexions électriques) doivent être effectuées par un personnel
spécialisé en conformité avec les normes en vigueur.
CONSIGNES POUR LA SÉCURITÉ
Il est préférable d’utiliser des récipients au fond plat ayant un diamètre égal ou légèrement supérieur à celui de la
surface chauffée. Il ne faut pas avoir recours à des récipients ayant une base rugueuse, afin d’éviter d’érafler la
surface thermique du plan (Fig.1).
Cet appareil n’est pas prévu pour que les enfants s’en servent de même que pour les personnes qui nécessitent d’un
supervision. Faire attention à ce que les enfants ne jouent pas avec l’appareil.
IMPORTANT
- éviter les sorties de liquide, dans ce but, si on veut faire bouillir ou chauffer des liquides, réduire l’alimentation de
chaleur
- ne pas laisser les éléments chauffants mis sous tension avec des casseroles et poêles vides ou bien sans
récipients
- une fois que l’on a terminé de cuisiner, éteindre la résistance au moyen de la commande indiquée ci-après
ATTENTION : NE PAS UTILISER UN NETTOYEUR A VAPEUR
ATTENTION: Si la surface est fêlée, éteindre l’appareil, afin d’éviter l’éventualité de décharges électriques.
Cet appareil est marqué conformément à la Directive européenne 2002/96/CE sur les déchets d'équipements
électriques et électroniques (DEEE). Assurez-vous que cet appareil soit mis au rebus selon la réglementation en
vigueur, vous éviterez ainsi des conséquences néfastes sur l'environnement et la santé.
Le symbole
appliqué sur le produit ou sur la documentation jointe rappelle que cet appareil ne doit pas être traité
comme un déchet domestique mais faire l'objet d'une collecte sélective dans une déchetterie spécialisée dans le
recyclage des appareils électriques et électroniques.
Conformez-vous aux réglementations locales sur la collecte et l'élimination des déchets.
Pour tout autre renseignement sur le traitement, la récupération et le recyclage de cet appareil, veuillez contacter le
bureau concerné de votre ville, le service de collecte des déchets domestiques ou le magasin où vous avez acheté
votre appareil.
INSTRUCTIONS POUR L’INSTALLATION
Les instructions suivantes s’adressent à un installateur spécialisé et servent de guide pour l’installation, le réglage
et l’entretien en conformité avec les lois et les normes en vigueur.
Si un four à encastrer ou tout autre appareil produisant de la chaleur doit être monté directement au-dessous de la
table de cuisson en vitrocéramique, IL FAUT QUE CET APPAREIL (four) ET LA TABLE DE CUISSON EN
VITROCÉRAMIQUE SOIENT BIEN ISOLÉS, de manière à assurer le bon fonctionnement du système TOUCHCONTROL.
Si un four encastré est installé au-dessous de la table de cuisson, assurez-vous que le four est équipé d'un système
de refroidissement tangentiel et que la distance entre la table et le four est d'au moins 10 cm (Fig. 5). Si le four installé
au-dessous de la table de cuisson n'est pas équipé d'un système de refroidissement tangentiel, intercalez entre la
table et le four un panneau en bois ou tout autre matériau servant d'isolation d'au moins 1,5 cm d'épaisseur, tout en
respectant la distance de sécurité de 12 cm entre la table de cuisson et le four (Fig. 6).
FRANÇAIS
F
Fig.5 Fig.6
10 cm
12 cm
1,5 cm
SORTIE
AIR
CHAUDE
ENTREE
AIR
CHAUDE
HELICE DE VENTILATION TANGENTIELLE

L
3
L
2
L
1
220-240V 3~ H05V2V2-F 4G 2.5mm
2
N
L
1
L
2
L
3
380-415V 3N~ H05V2V2-F 5G 2.5mm
2
L
N
220-240V 1N ~ H05V2V2-F 3G 2.5mm
2
L
2
L
1
N
380-415V 2N~ H05V2V2-F 4G 2.5mm
2
L
1
L
2
220-240V 2~ H05V2V2-F 3G 2.5mm
2
25
min.
30 mm
40 mm
755
305
50
Min
50
Min
53.5
Min
320
770
POSITIONNEMENT (Fig.7)
L’appareil électroménager est réalisé pour être encastré dans un plan de travail, suivant l’illustration sur la figure
spécifique. Préparer la colle pour sceller le périmètre dans le sens de toute sa longueur (dimensions de la coupe
Fig.7B).
Bloquer l’appareil électroménager sur le plan de travail au moyen des 4 brides fournies, compte tenu de l’épaisseur
du plan de travail (Fig.7A). Si la partie inférieure de l’appareil, après l’installation, est accessible par la partie
inférieure du meuble, il faut monter un panneau de séparation en respectant les distances indiquées (Fig.7C). Ceci
n’est pas nécessaire si l’installation se fait sous un four.
CONNEXIONS ÉLECTRIQUES (Fig.8)
Avant d’effectuer les connexions électriques, s’assurer que:
- le câble électrique de la terre est bien de 2 cm plus long que les autres câbles
- les caractéristiques de l’installation sont conformes aux indications sur la plaquette d’identification appliquée sur
la partie inférieure du plan de travail
- l’installation est dotée d’une mise à la terre efficace conforme aux normes et aux dispositions de la loi en vigueur
La mise à la terre est obligatoire aux termes de la loi.
Au cas où l’appareil électroménager ne serait pas doté de câble et/ou de la fiche relative, avoir recours à un matériel
indiqué pour l’absorption figurant sur la plaquette d’identification et pour la température de fonctionnement. En aucun
point le câble ne doit atteindre une température de 50°C supérieure à la température ambiante. Si on souhaite une
connexion directe à la ligne électrique, il est nécessaire d’interposer un interrupteur omnipolaire, ayant un orifice
minimum de 3 mm entre les contacts, s’adaptant à la charge figurant sur la plaquette et conforme aux normes en
vigueur (le conducteur de terre jaune/vert ne doit pas être coupé par le commutateur). Une fois l’installation de
l’appareillage terminée, on doit pouvoir arriver aisément à l’interrupteur omnipolaire.
Attention: Sur la base du modèle en votre possession, la fiche électronique pourrait être protégée contre d’éventuelles
erreurs de connexion au réseau électrique par un fusible à bord.
En cas de remplacement, utiliser un fusible possédant les mêmes caractéristiques techniques.
Fig.7
Fig.8
A
B
C

UTILISATION ET ENTRETIEN
ENTRETIEN
Éliminer tous résidus de nourriture éventuels ainsi que les gouttes de graisse de la surface de cuisson à l’aide du
racloir spécial fourni sur demande (Fig.2).
Nettoyer le mieux possible l’emplacement chauffé en ayant recours à du SIDOL, STAHLFIX ou à d’autres produits
similaires et à un chiffon-papier, ensuite rincer à l’eau et sécher avec un chiffon bien propre.
Au moyen du racloir spécial (en option) éliminer immédiatement de l’emplacement chauffé de cuisson les fragments
de feuilles d’aluminium et la matière plastique qui ont fondu par mégarde ou les résidus de sucre ou d’aliments ayant
un contenu de sucre élevé (Fig.2). De cette façon, tout dommage possible à la surface du plan est évité.
En aucun cas il faut se servir d’éponges abrasives ou de détergents chimiques irritants tels que spray pour le four
ou dégraisseurs.
• ZONE COMMANDES (fig.3)
- Au premier allumage, la table de cuisson se trouvera en position de sécurité, c-à-d avec le “Voyant on/off touche
clé” allumé.
- Pour utiliser la table, il faut tenir appuyée la “ touche clé ” pendant 3 secondes jusqu’à l’extinction du ” Voyant on/
off touche clé ”
- Pour allumer la plaque désirée:
- appuyer la touche on/off correspondante. On verra la “led” du “ Display zone cuisson “ clignoter.
- appuyer, 10 secondes, la touche - pour aller en position 4 ou bien la touche + pour aller en position 9.- Pour régler
la température de la zone de cuisson, agir sur les touche + ou -.
- Si la plaque est équipée d’une zone étendue, pour allumer la deuxième zone, porter le “Diplay de la zone cuisson”
à la position 9 et appuyer sur la touche + pendant 2 sec jusqu’au moment où le point décimal s’allume comme
confirmation.
- Pour éteindre la plaque, appuyer sur la relative touche “ON/OFF”.
NOTE:(Pendant le fonctionnement, on peut bloquer/débloquer la zone commandes en appuyant la touche clé pendant
3 secondes).
• Zone Timer (fig.3)
La table a la possibilité de programmer le minuter simultanément sur chaque zone de cuisson.
Le minuter est une fonction qui permet de fixer le temps (de 1 à 99 minutes) pour éteindre automatiquement la zone
de cuisson sélectionnée.
- Appuyer sur la touche “Timer” pendant 2 secondes: le display indiquera “00” au milieu et indiquera quel élement
est actif sur le côté droit et le côté gauche.
- En continuant à appuyer sur la touche “Timer”, on sélectionne la plaque parmi celles actives.
- Appuyer sur (+) ou (-) pour sélectionner la valeur “Timer”.
Note:
- Si la fonction “Timer” a été établie pour plus d’une zone de cuisson, le “Display Timer” indiquera, toutes les 3
secondes, le temps qui reste pour chaque zone programmée.
- Pour annuler la fonction “Timer”, éteindre la zone de cuisson relative.
• Fonction “MEMORY”
Dans le cas où votre produit est équipé de la fonction MEMORY, celle-ci permet la programmation et l’exécution d’un
cycle de cuisson sur chaque élément chauffant.
Notes:
- On peut exécuter un cycle à la fois, en enregistrement ou en exécution.
- Les variations du niveau de puissance pour des temps inférieurs aux 15 sec ne sont pas enregistrées.
- On peut mémoriser un cycle de cuisson d’une durée maximum de 10 heures et avec un maximum de 10 variations
du niveau de puissance..
• Mémorisation d’un cycle de cuisson:
- Appuyer sur la touche “Memory” et ensuite sélectionner la plaque désirée avec la touche relative “ON/OFF”.
- Appuyer sur les touches (+) ou (-) jusqu’à la sélection de la puissance désirée.
- Pour terminer le cycle de mémorisation, appuyer de nouveau sur la touche “ON/OFF”.
• Exécution d’un cycle de cuisson:
- Pour exécuter un cycle de cuisson déjà mémorisé, il suffit d’appuyer sur la touche “ON/OFF” de la zone de cuisson
concernée et ensuite sur la touche “Memory”.
• Display:
La table de cuisson est équipée d’un display qui, dans sa fonction normale, est une “
HORLOGE” et peut en outre
effectuer une fonction de “MINUTEUR SONORE ” lorsque la table est éteinte.
• Réglage de l’horloge:
En phase d’installation, établir l’heure de la manière suivante:
- Débloquer la table de cuisson en appuyant sur la “touche clé” pendant 3 secondes jusqu’au moment où le “voyant
clé” s’éteint.
- Appuyer sur (+) ou (-) en-dessous du display jusqu’au moment où celui-ci commencera à clignoter.
- Appuyer sur (+) ou (-) pour établir l’heure souhaitée.
- Appuyer sur la touche “Timer” pour confirmer la sélection.
• Fonction MINUTEUR SONORE:
- Débloquer la table de cuisson en appuyant sur la “touche clé” pendant 3 secondes jusqu’au moment où le“voyant

clé” s’éteint.
- Appuyer sur la touche “Timer” jusqu’au moment où l’écriture “00” apparaît sur le display.
- Appuyer sur (+) ou (-) pour sélectionner le numéro des minutes.
- Appuyer sur la touche “Timer” pour confirmer la sélection.
A la fin du temps établi, un signal sonore serà activé
SYSTEMES DE SECURITE
1. Dans le cas où un objet est posé sur les commandes, la table de cuisson s’éteint et la clé s’introduit automatique-
ment en se portant en auto-protection; cela se produira également si des liquides sont versés (eau, lait, etc..) au-
dessus de la zone commandes.
2. Le clavier de commandes possède un capteur de température qui, dans le cas où la température interne atteint les
90° (conditions anormales d’utilisation de la table sans casseroles), permet à la table d’entrer automatiquement dans
un système de limitation de température: en s’éteignant donc automatiquement..
• ATTENTION: lorsqu’une zone de cuisson est éteinte, sa surface a une température très élevée et très dangeureuse.
Ce danger est mis en évidence par le fait que le “display de la zone cuisson” clignottera jusqu’au moment où la
température descendra en-dessous des 50°.
SERVICE ASSISTANCE CLIENT
Avant de faire appel au service d'assistance technique
En cas de non fonctionnement de la table de cuisson nous vous conseillons de :
- vérifier que la fiche est bien enfoncée dans la prise de courant
Si vous n'arrivez pas à identifier la cause du mauvais fonctionnement :
mettez hors tension l'appareil, n'essayez pas de le réparer et faites appel au service d'assistance technique.
NOUS DECLINON TOUTE RESPONSABILITÉ POUR LES EVENTUELS DÉGATS PROVOQUÉS PAR L'INOBSERVA-
TION DES SUSDITES INSTRUCTIONS.
Déclaration de conformité. Cet appareil, concernant les parties destinées à entrer en contact avec des denrées
alimentaires, est conforme aux prescriptions de la dir. CEE 89/109 et au D.L. d'application n°108 du 25/01/92.
CE Appareil conforme aux directives européennes 89/336 CEE, 73/23 CEE et modifications suivantes.

ALLGEMEINE INFORMATIONEN
Lesen Sie bitte aufmerksam den Inhalt der vorliegenden Betriebsanleitung, weil sie wichtige Hinweise über die
Installation, den Gebrauch und die Wartung erteilt. Bewahren Sie die Betriebsanleitung zum späteren Nachschlagen
auf. Alle mit der Installation/dem Austausch im Zusammenhang stehende Vorgänge (Stromanschlüsse) sind laut
gültiger Vorschriften von Fachpersonal auszuführen.
SICHERHEITSWARNUNGEN
Es werden Behälter mit ebenem Boden mit einem Durchmesser, der gleich dem erhitzten Bereich oder etwas größer
ist, empfohlen. Keine Behälter mit rauher Unterseite verwenden, damit die Heizfläche des Kochfelds nicht zerkratzt
wird (Abb.1).
Dieses Gerät ist nicht für Kinder oder Personen geeignet, die überwacht werden müssen. Darauf achten, dass Kinder
nicht mit diesem Gerät spielen.
WICHTIG
- Vermeiden, dass Flüssigkeit überläuft; deshalb zum Kochen oder Erhitzen von Flüssigkeiten die Hitzezufuhr
verringern.
- Die Heizelemente nicht brennen lassen, wenn die Töpfe oder Pfannen leer oder nicht vorhanden sind.
- Wenn das Kochen beendet ist, den zutreffenden Heizwiderstand anhand der nachstehend angegebenen Bedie-
nung ausschalten.
ACHTUNG: ES DARF KEIN DAMPFREINIGUNGSGERÄT GEBRAUCHT WERDEN.
ACHTUNG: Falls die Oberfläche gesprungen ist, das Gerät ausschalten, um etwaige Stromschläge zu vermeiden.
Dieses Gerät ist gemäß der EU-Richtlinie 2002/96/EC, Waste Electrical Electronic Equipment (WEEE) gekennzeichnet.
Sorgen Sie bitte dafür, dass das Gerät korrekt entsorgt wird, der Benutzer trägt dazu bei, den potentiellen negativen
Folgen für Umwelt und Gesundheit vorzubeugen.
Das auf dem Produkt oder auf den Begleitpapieren befindliche Symbol
sagt aus, dass dieses Produkt nicht wie
normaler Hausmüll behandelt werden darf, sondern dass es einer geeigneten Sammelstelle für das Recycling der
elektrischen und elektronischen Geräteteile zugeführt werden muss. Entsorgen Sie bitte das Altgerät gemäß der
lokalen Richtlinien. Für weitere Informationen hinsichtlich der Behandlung, der Wiederverwertung und des Recycling
des Produkts wenden Sie sich bitte an die zuständige lokale Stelle, an die Sammelstelle für Hausmüll, oder an den
Händler, bei dem Sie das Gerät erworben haben.
INSTALLATIONSANLEITUNG
Die vorliegenden Anweisungen sind für einen Fachinstallateur gedacht und dienen als Führer für die Installation,
Einstellung und Wartung laut geltender Gesetze und Vorschriften.
Soll ein Einbaubackofen oder ein anderes Gerät, welches Wärme erzeugt, direkt unter dem Glaskeramik-Kochfeld
installiert werden, MÜSSEN DIESES GERÄT (Backofen) UND DAS GLASKERAMIK-KOCHFELD AUSREICHEND
ISOLIERT WERDEN, damit das korrekte Funktionieren des TOUCHCONTROL-Systems garantiert werden kann.
Sollte unter dem Kochfeld ein Einbaubackofen installiert werden, stellen Sie sicher, dass dieser über eine Tangential-
Kühlanlage verfügt und zwischen Kochfeld und Backofen ein Mindestabstand von 10 cm besteht (Abb. 5). Sollte der
unter dem Kochfeld installierte Backofen nicht über eine solche Anlage verfügen, ist zwischen Kochfeld und
Backofen ein Holzpaneel oder ein anderes Isoliermaterial mit einer Stärke von mindestens 1,5 cm einzufügen und
zwischen Kochfeld und Backofen sollte ein Mindestabstand von 12 cm (Abb. 6) eingehalten werden.
DEUTSCH
D
Abb.5 Abb. 6
10 cm
12 cm
1,5 cm
AUSGANG
WARMLUFT
EINGANG
KALTLUFT
TANGENTIALES LÜFTERRAO

L
3
L
2
L
1
220-240V 3~ H05V2V2-F 4G 2.5mm
2
N
L
1
L
2
L
3
380-415V 3N~ H05V2V2-F 5G 2.5mm
2
L
N
220-240V 1N ~ H05V2V2-F 3G 2.5mm
2
L
2
L
1
N
380-415V 2N~ H05V2V2-F 4G 2.5mm
2
L
1
L
2
220-240V 2~ H05V2V2-F 3G 2.5mm
2
25
min.
30 mm
40 mm
755
305
50
Min
50
Min
53.5
Min
320
770
AUFSTELLUNG (Abb.7)
Das Elektrogerät ist zur Einlassung in ein Arbeitsfeld konzipiert, wie in der zutreffenden Abbildung zu sehen ist.
Längs des ganzen Umfangs (Schnittmaße Abb.7B) Isoliermaterial anbringen.
Das Elektrogerät anhand der mitgelieferten 4 Haltebügel am Arbeitsfeld befestigen und dabei die Dicke des Arbeits-
felds berücksichtigen (Abb.7A). Wenn das Unterteil des Geräts nach der Installation vom Unterteil des Schranks aus
zugänglich ist, muss eine Trennwand eingebaut werden, unter Einhaltung der vorgeschriebenen Abstände (Abb.7C).
Wenn die Installation hingegen unter einem Ofen erfolgt, ist dies nicht erforderlich.
STROMANSCHLÜSSE (Abb.8)
Vor der Verwirklichung der Stromanschlüsse folgendes sicherstellen:
- dass das Erdungskabel 2 cm länger als die anderen Kabel ist;
- die Anlagenmerkmale derartig sind, dass sie den Angaben auf dem Typenschild entsprechen, das an der Unter-
seite des Arbeitsfeldes angebracht ist;
- die Anlage über eine wirksame, den geltenden Vorschriften und Gesetzesbestimmungen entsprechende Erdung
verfügt.
Die Erdung ist laut Gesetz vorgeschrieben.
Falls das Elektrogerät nicht mit dem Kabel und/oder dem dazugehörigen Stecker ausgestattet ist, für die auf dem
Typenschild angegebene Entnahme und die Betriebstemperatur geeignetes Material verwenden. Das Kabel darf an
keiner Stelle eine Temperatur erreichen, die 50°C höher als die Raumtemperatur ist.
Ist ein Direktanschluß an die Stromleitung gewünscht, muß ein allpoliger Schalter mit 3 mm Mindestöffnung zwischen
den Kontakten angebracht werden, der für die auf dem Schild angegebene Last geeignet ist und den geltenden
Vorschriften entspricht (der gelb/grüne Erdungsleiter darf nicht durch den Umschalter unterbrochen sein). Bei
beendeter Gerätinstallation muß der allpolige Schalter leicht erreichbar sein.
Achtung: Je nach dem erworbenen Modell könnte die elektronische Platine durch eine am Gerät befindliche Schmelz-
sicherung gegen unkorrektes Anschließen an das Stromnetz geschützt sein.
Im Falle eines Austauschs muss eine Schmelzsicherung, die die gleichen Eigenschaften besitzt, verwendet werden.
Abb. 7
Abb. 8
A
B
C

GEBRAUCH UND WARTUNG
WARTUNG
Eventuelle Speisereste und Fettspritzer mit dem auf Wunsch gelieferten, speziellen Schaber (Abb. 2) entfernen.
Den erhitzten Bereich mit Hilfe von SIDOL, STAHLFIX oder anderen ähnlichen Produkten und einem Papiertuch
sorgfältig reinigen, dann mit Wasser nachwischen und mit einem trockenen Tuch abtrocknen.
Bruchstücke von Aluminiumfolie und aus versehen zerschmolzenes Material aus Kunststoff oder Rückstände von
Zucker oder Speisen mit hohem Zuckergehalt sofort mit Hilfe des auf Wunsch gelieferten Schabers entfernen (Abb.
2). Auf diese Weise lassen sich etwaige Beschädigungen der Kochfläche vermeiden.
Keinesfalls Scheuerschwämme oder angreifende chemische Backofensprays oder Fleckenentferner verwenden.
• BEDIENFELD (Abb.3)
· Beim ersten Einschalten befindet sich das Kochfeld in Sicherheitseinstellung, d.h. die Anzeigeleuchte der Haupt-
taste ist eingeschaltet.
· Um das Kochfeld in Benutzung zu nehmen, muß die Haupttaste 3 Sekunden lang gedrückt gehalten werden, bis sich
die Anzeigeleuchte der Haupttaste ausschaltet.
· Um die gewünschte Kochplatte einzuschalten:
- drücken Sie die entsprechende ON/OFF-Taste. Dann sehen Sie die Anzeigeleuchte des Displays der Kochzone
blinken.
- Drücken Sie innerhalb von 10 Sekunden die Taste – um auf Position 4 zu gehen oder die Taste + um auf Position
9 zu gehen.
- Um die Temperatur der Kochzone zu regulieren, drücken Sie die Tasten + oder –.
- Wenn die Kochplatte über eine zusätzliche Zone verfügt: zum Einschalten der zweiten Zone das Display der
Kochzone auf die Position 9 einstellen und die Taste + 2 Sekunden lang gedrückt halten: bis sich der Dezimalpunkt
als Bestätigung einschaltet.
- Um die Kochplatte auszuschalten, die entsprechende Taste ON/OFF betätigen.
HINWEIS:Während der Benutzung ist es möglich, das Bedienfeld zu sperren bzw. entsperren, indem für 3 Sekunden
die Haupttaste gedrückt wird.
• Timer-Feld (Abb.3)
Bei diesem Kochfeld ist es möglich, gleichzeitig für jede Kochzone den Timer einzustellen.
Der Timer ist eine Funktion, durch die eine Zeit (von 1 bis 99 Minuten) festgelegt werden kann, nach der sich die
ausgewählte Kochzone automatisch abschaltet.
- Die Taste Timer 2 Sekunden lang drücken: im Display erscheint dann in der Mitte “00” und es wird angezeigt,
welches Element auf der rechten und linken Seite eingeschaltet ist.
- Durch weiteres Drücken der Taste Timer wählt man die Kochplatte unter den eingeschalteten aus.
- Um den Timer-Einstellungswert auszuwählen, auf die Tasten (+) oder (-) drücken.
Hinweis:
- Wenn die Funktion Timer für mehr als eine Kochzone eingestellt wurde, zeigt das Timer Display alle 3 Sekunden
die verbleibende Zeit für jede programmierte Kochzone an.
- Um die Timer-Funktion abzubrechen, die entsprechende Kochzone ausschalten.
• Funktion “MEMORY”
Fall Ihr Produkt mit der Funktion MEMORY ausgestattet ist, ermöglicht diese die Programmierung und Ausführung
eines Kochzyklus auf jedem Heizelement.
HINWEISE:
- Es kann immer nur ein Zyklus zu einer Zeit entweder aufgenommen oder ausgeführt werden.
- Veränderungen der Heizstufe für einen Zeitraum von weniger als 15 Sekunden werden nicht aufgenommen.
- Es können Kochzyklen mit einer maximalen Dauer von 10 Stunden und mit höchstens 10 Veränderungen der
Heizstufe aufgezeichnet werden.
• Aufzeichnung eines Kochzyklus:
- Die Taste Memory drücken, dann über die entsprechende ON/OFF
-Taste die gewünschte Kochplatte auswählen.
- Auf die Tasten (+) oder (-) drücken, bis die gewünschte Heizleistung ausgewählt ist.
- Um den Aufzeichnungszyklus zu beenden, erneut die Taste ON/OFF drücken.
• Ausführung eines Kochzyklus:
- Um einen bereits aufgezeichneten Kochzyklus auszuführen, genügt es, die ON/OFF-Taste der jeweiligen Kochzone
und anschließend die Memory-Taste zu drücken.
• Display:
Das Kochfeld ist mit einem Display ausgestattet, das in Normalbetrieb als UHR funktioniert und darüber hinaus die
COUNT-DOWN-Funktion ausführen kann, wenn das Kochfeld ausgeschaltet ist.
• Einstellung der Uhr:
Bei der Installation die Zeit wie folgt einstellen:
- Entsperren Sie das Kochfeld, indem Sie die Haupttaste 3 Sekunden lang gedrückt halten, bis sich die Hauptanzeige-
leuchte ausschaltet.
- Auf die Tasten (+) oter (-) unter dem Display drücken, bis dieses anfängt zu blinken.
- Um die gewünschte Uhrzeit einzustellen, auf die Tasten (+) oder (-) drücken.
- Die Timer-Taste drücken, um die Auswahl zu bestätigen.

• Count-Down Funktion:
- Entsperren Sie das Kochfeld, indem Sie die Haupttaste 3 Sekunden lang gedrückt halten, bis sich die Hauptanzeige-
leuchte ausschaltet.
- Die Timer-Taste drücken, bis “00” auf dem Display erscheint.
- Um die Minutenanzahl auszuwählen, auf die Tasten (+) oder (-) drücken.
- Die Timer-Taste drücken, um die Auswahl zu bestätigen.
Nach Ablauf der eingestellten Zeit schaltet sich ein Tonsignal ein.
SICHERHEITSVORRICHTUNGEN
1. Im Falle, dass ein Gegenstand auf das Bedienfeld gestellt wird, schaltet sich das Kochfeld aus und geht
automatisch auf Selbstschutz, dies geschieht auch im Falle des Verschüttens von Flüssigkeit (Wasser, Milch etc.)
über dem Bedienfeld.
2. Das Bedienfeld hat im Innern einen Temperatursensor, der im Falle, dass die interne Temperatur 90° erreicht (kein
normaler Zustand, Benutzung des Kochfeldes ohne Töpfe), dazu führt, dass das Kochfeld in ein System automati-
scher Temperaturbeschränkung eintritt: und sich automatisch ausschaltet.
ACHTUNG: Wenn eine Kochzone ausgeschaltet wird, hat ihre Oberfläche eine sehr hohe und gefährliche Temperatur.
Diese Gefahr wird dadurch angezeigt, dass das Display der Koch zone solange blinkt, bis die Temperatur an der
Oberfläche unter 50°C gesunken ist.
KUNDENSERVICE
Vor dem Verständigen des Kundendienstes
Bei Nichtfunktionieren des Kochfeldes gehen Sie bitte wie folgt vor:
- Überprüfen Sie, ob der Netzstecker korrekt mit der Steckdose verbunden ist.
Sollte der Grund für die Betriebsstörung nicht ermittelt werden können:
Schalten Sie das Gerät aus und beschädigen Sie es nicht. Verständigen Sie den Kundendienst.
FÜR SCHÄDEN, DIE AUF DIE NICHTBEACHTUNG DER OBEN GENANNTEN ANWEISUNGEN ZURUCKZUFÜHREN
SIND, WIRD KEINERLEI VERANTWORTUNG ÜBERNOMMEN.
Konformitätserklärung: Dieses Gerät - bzw. die Teile, die mit Nahrungsmitteln in Berührung kommen, - entspricht den
Vorschriften der Richttlinie 89/109/EWG und dem Vollziehungsbeschluss Nr. 108 vom 25.01.92.
EG Gerät entspricht den europäischen Richtlinien 89/336/EWG, 73/23/EWG und nachfolgenden Änderungen.
La pagina si sta caricando...
La pagina si sta caricando...
La pagina si sta caricando...
La pagina si sta caricando...
La pagina si sta caricando...
La pagina si sta caricando...
La pagina si sta caricando...
La pagina si sta caricando...
La pagina si sta caricando...
La pagina si sta caricando...
La pagina si sta caricando...
La pagina si sta caricando...
-
 1
1
-
 2
2
-
 3
3
-
 4
4
-
 5
5
-
 6
6
-
 7
7
-
 8
8
-
 9
9
-
 10
10
-
 11
11
-
 12
12
-
 13
13
-
 14
14
-
 15
15
-
 16
16
-
 17
17
-
 18
18
-
 19
19
-
 20
20
-
 21
21
-
 22
22
-
 23
23
-
 24
24
-
 25
25
-
 26
26
-
 27
27
-
 28
28
-
 29
29
-
 30
30
-
 31
31
-
 32
32


Documenti correlati
Altri documenti
-
AIRLUX AT32K01 Manuale del proprietario
-
Castorama DV29 Guida utente
-
Prima LPR955 Operating Instructions Manual
-
-
Krona IEC 2634T IX Manuale utente
-
Electrolux DMGL8371SW Manuale utente
-
Scholtes TIS 842 User Instructions
-
-
M-system MKK - 902 Manuale del proprietario
-
Barazza 1FWLMI Istruzioni per l'uso