Nortel BayStack 820 Installation Instructions Manual
- Tipo
- Installation Instructions Manual


2
Copyright © 1999 Nortel Networks
All rights reserved. Printed in Taiwan. November 1999.
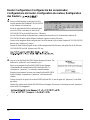
These instructions describe how to install the BayStack 820 ISDN Router and configure the router for remote office access.
Before you begin, you should have ISDN service from your telephone company and know the telephone company’s switch
type, SPID number(s) (if required), and Directory Number(s).
The BayStack 820 ISDN Router is automatically configured to be the DHCP server on your network. If your network already
has a DHCP server, you must isolate a workstation from the network before you configure the router. The workstation you use
to configure the router must also have TCP/IP installed.
Estas instrucciones describen cómo instalar el encaminador ISDN BayStack 820 y cómo configurarlo para el acceso desde
oficinas remotas. Antes de empezar, se deberá tener servicio ISDN de una compañía telefónica y saber el tipo de conmutador
de la compañía telefónica, el número (o números) SPID (si hacen falta) y el número (o números) de directorio.
El encaminador ISDN BayStack 820 se configura automáticamente para que sea el servidor DHCP de la red. Si la red ya tiene
un servidor DHCP, se debe aislar una estación de trabajo de la red antes de configurar el encaminador. La estación de trabajo
que se use para configurar el encaminador deberá tener también instalado TCP/IP.
Le istruzioni seguenti descrivono l'installazione di BayStack 820 ISDN Router e la configurazione del router per consentire
l'accesso a sedi remote. Prima di cominciare, bisogna ricevere il servizio ISDN fornito dall'azienda dei telefoni e conoscere il
tipo di centrale, i numeri SPID (Service Profile ID, se necessario) ed i numeri di telefono.
BayStack 820 ISDN Router è configurato automaticamente in modo da essere il server DHCP sulla rete. Se la rete in
dotazione ha già un server DHCP, bisogna isolare una workstation dalla rete prima di configurare il router. Anche sulla
workstation usata per configurare il router deve essere installato TCP/IP.
Ces instructions expliquent comment installer le routeur RNIS BayStack 820 et comment le configurer pour l'accès à un
bureau distant. Avant de commencer, faites-vous raccorder au réseau RNIS (Réseau Numérique à Intégration de Services) par
votre compagnie de téléphone et notez le type de commutation utilisé par cette dernière ainsi que le(s) numéro(s) d'identifiant
SPID (si besoin est), et le(s) numéro(s) d'annuaires.
Le routeur RNIS BayStack 820 est automatiquement configuré pour être le serveur DHCP de votre réseau. Si ce dernier
dispose déjà d'un serveur DHCP, vous devez isoler une station de travail du réseau avant de configurer le routeur. Notez que
TCP/IP doit être installé sur la station de travail que vous utilisez pour la configuration du routeur.
Diese Anweisungen beschreiben die Installation des BayStack 820 ISDN Routers und das Konfigurieren des Geräts für den
Zugriff auf ferne Standorte. Bevor Sie beginnen, sollte Ihre Telefongesellschaft Ihnen einen ISDN-Zugang bereitgestellt
haben. Außerdem sollten Sie den Switch-Typ, die SPID-Nummer(n) (falls erforderlich) und die Verzeichnisnummern
(Directory-Nummern) der Telefongesellschaft kennen.
Der BayStack 820 ISDN Router wird automatisch als DHCP-Server in Ihrem Netzwerk konfiguriert. Wenn Ihr Netzwerk
bereits über einen DHCP-Server verfügt, müssen Sie eine Workstation im Netzwerk isolieren, bevor Sie den Router
konfigurieren. Auf der Workstation, die Sie zum Konfigurieren des Routers verwenden, muß TCP/IP installiert sein.

3
Installation (Instalación, Installazione, Installation,
Installation, )
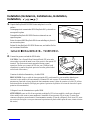
1. Unpack the BayStack 820 ISDN Router and place it on a flat
surface.
Desempaquetar el encaminador ISDN BayStack 820 y colocarlo en
una superficie plana.
Disinstallare BayStack 820 ISDN Router e sistemarlo su una
superficie piana.
Sortez le routeur RNIS BayStack 820 de son emballage et placez-le
sur une surface plane.
Packen Sie den BayStack 820 ISDN Router aus, und stellen Sie ihn
auf eine ebene Oberfläche.
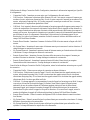
2. Connect the power cord and the ISDN cable.
CAUTION: Use a Green/Yellow Protected Earth (PE) wire and a
star washer to ground the metal case of the router to the nearest PE
terminal. The router must remain grounded during normal
operation. (Before you connect the PE wire, use a Phillips-head
screwdriver to remove the plastic protector from the ground outlet
on the back of the router.)
Conectar el cable de alimentación y el cable ISDN.
PRECAUCIÓN: Usar un cable de tierra protegida (PE) verde/amarillo y una arandela dentada para
conectar la caja metálica del encaminador al terminal PE más cercano. El encaminador deberá
permanecer conectado a tierra durante el funcionamiento normal. (Antes de conectar el cable PE, utilizar
un destornillador de estrella (Phillips) para quitar el protector de plástico de la toma de tierra de la parte
posterior del encaminador).
Collegare il cavo di alimentazione e quello ISDN.
ATTENZIONE: usare un filo di terra protetto verde/giallo (PE) ed una rondella a stella per collegare il
telaio metallico del router a massa mediante il terminale di terra protetto PE più vicino. Il router deve
rimanere collegato a massa durante il funzionamento normale. (Prima di collegare il filo di terra PE, usare
un cacciavite con taglio a croce per rimuovere la protezione di plastica dalla presa di terra, situata sul retro
del router.)
9557FA
9555EA

4
Branchez le cordon d'alimentation et le câble RNIS.
ATTENTION : utilisez un câble Vert/Jaune de protection ainsi qu'une rondelle en étoile pour mettre à la
terre le boîtier métallique du routeur sur le plus proche terminal mis à la terre. Pendant son fonctionnement
normal, le routeur doit rester à la terre (avant de brancher le câble de protection, ôtez la protection
plastique de la sortie terre située à l'arrière du routeur à l'aide d'un tournevis cruciforme).
Schließen Sie das Netzkabel und das ISDN-Kabel an.
ACHTUNG: Verwenden Sie ein grün-/gelbes geschütztes Erdungskabel und eine Erdungsklammer, um das
Metallgehäuse des Routers am nächsten geeigneten Terminal zu erden. Der Router muß während des
normalen Betriebs geerdet bleiben. (Bevor Sie das Kabel anschließen, entfernen Sie mit einem
Kreuzschlitzschraubendreher die Plastikschutzabdeckung von der Erdungsdose an der Rückseite des
Routers.)
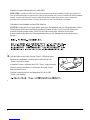
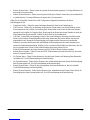
3. Turn the router on and verify that the “Power” LED glows green.
Encender el encaminador y verificar que el indicador LED de
“Power” luce con luz verde.
Accendere il router e verificare che il LED “Power” verde sia acceso.
Mettez le routeur sous tension et vérifiez que le voyant “Power”
émet une lumière verte.
Schalten Sie den Router ein, und überprüfen Sie, ob die LED
“Power” grün leuchtet.
9556FA
ON

5
4. You must use a standalone workstation to configure the router. If
necessary, isolate a workstation from the LAN. Connect the
standalone workstation to port “1” on the router.
Se debe usar una estación de trabajo autónoma para configurar el
encaminador. Si es necesario, aislar una estación de trabajo de la
LAN. Conectar la estación de trabajo autónoma al puerto “1” del
encaminador.
Per configurare il router, bisogna usare una workstation autonoma.
Se necessario, isolarne una dalla LAN. Collegare la workstation
autonoma alla porta “1” situata sul router.
Pour configurer le routeur, utilisez une station de travail autonome. Si besoin est, isolez une station de travail
du réseau local. Connectez la station de travail autonome au port “1” du routeur.
Sie müssen den Router mit einer Standalone-Workstation konfigurieren. Isolieren Sie, falls dies erforderlich
ist, eine Workstation vom LAN. Schließen Sie die Standalone-Workstation an Port “1” des Routers an.
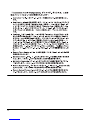
5. Connect up to three more devices directly to ports “2,” “3,” and
“4/Uplink” on the router or set port “4/Uplink” to “Uplink” and
connect an Ethernet hub.
Conectar hasta tres dispositivos más directamente a los puertos “2,”
“3,” y “4/Uplink” del encaminador o poner el puerto “4/Uplink” en
“Uplink” y conectar un hub Ethernet.
Collegare al massimo altri tre dispositivi direttamente alle porte “2,”
“3,” e “4/Uplink”, situate sul router oppure impostare la porta
“4/Uplink” su “Uplink” e collegare uno hub Ethernet.
Vous pouvez connecter au maximum trois autres unités aux ports
“2”, “3” et “4/Uplink” du routeur ou paramétrer le port “4/Uplink” sur “Uplink” et connecter un
concentrateur Ethernet.
Verbinden Sie bis zu drei weitere Geräte mit den Ports “2”, “3” und “4/Uplink” auf dem Router, oder setzen
Sie Port “4/Uplink” auf “Uplink”, und schließen Sie einen Ethernet-Hub an.
9620FA
9559EA
UPLINK
NORMAL

6
6. Connect up to two telephone or fax devices directly to ports “A” and
“B” on the router.
Conectar hasta dos aparatos de teléfono o de fax directamente a los
puertos “A” y “B” del encaminador.
Collegare un massimo di due dispositivi telefonici o fax alle porte
“A”e“B”situatesulrouter.
Vous pouvez connecter au maximum deux unités de téléphone ou de
télécopie directement aux ports “A” et “B” du routeur.
Verbinden Sie bis zu zwei Telefone oder Faxgeräte direkt mit den Anschlüssen “A” und “B” auf dem Router.
9560EA

7
Workstation Configuration (Configuración de la estación de trabajo,
Configurazione della workstation, Configuration de la station de
travail, Workstation-Konfiguration, )
1. On the workstation you connected to port “1,” from the Windows Start menu, choose
Settings > Control Panel. In the Control Panel window, double-click the Network icon.
En la estación de trabajo que se ha conectado al puerto “1,” en el menú Inicio de Windows,
seleccionar Configuración > Panel de control. En la ventana Panel de control, hacer doble clic en
el icono Network.
Sulla workstation che si è collegata alla porta “1,” dal menu Avvio di Windows, selezionare Impostazioni >
Pannello di controllo. Nella finestra Pannello di controllo, fare doppio clic su Network icon.
Sur la station de travail que vous avez connectée au port “1”, choisissez, dans le menu Démarrer de
Windows, Paramètres > Panneau de configuration. Dans la fenêtre Panneau de configuration, cliquez deux
fois sur l'icône Network.
Wählen Sie auf der Workstation, die Sie an Port “1” angeschlossen haben, im Menü -Start von Windows
Einstellungen > Systemsteuerung. Klicken Sie in der Systemsteuerung auf das Symbol Network.
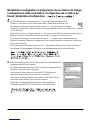
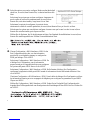
2. In the Network dialog box, select TCP/IP from the list of installed network
components and then click Properties.
En el diálogo Network, seleccionar TCP/IP de la lista de componentes de red
instalados y luego hacer clic en Properties.
Nella finestra di dialogo Network, selezionare TCP/IP dall'elenco di
componenti installati nella rete e poi fare clic su Properties.
Dans la boîte de dialogue Network, sélectionnez TCP/IP dans la liste des
composants réseau installés, puis cliquez sur Properties.
Wählen Sie im Dialogfeld Netzwerk aus der Liste der installierten
Netzwerkkomponenten TCP/IP, und klicken Sie auf Eigenschaften.

8
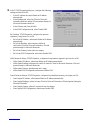
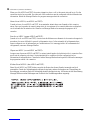
3. In the TCP/IP Properties dialog box, configure the following
settings and then click OK.
• In the IP Address tab, select Obtain an IP address
automatically.
• In the Bindings tab, select the Client for Microsoft
Networks check box and the File and printer sharing for
Microsoft Networks check box.
• In the Gateway tab, clear all fields.
• In the DNS Configuration tab, select Disable DNS.
En el diálogo TCP/IP Properties, configurar las opciones
siguientes y luego hacer clic en OK.
• En la ficha IP Address , seleccionar Obtain an IP address
automatically.
• En la ficha Bindings, seleccionar las casillas de
verificación Client for Microsoft Networks y File and
printer sharing for Microsoft Networks.
• En la ficha Gateway, borrar todos los campos.
• En la ficha DNS Configuration, seleccionar Disable DNS.
Nella finestra di dialogo TCP/IP Properties, configurare le impostazioni seguenti e poi fare clic su OK.
• Nella scheda IP Address , selezionare Obtain an IP address automatically.
• Nella scheda Bindings, selezionare le caselle di controllo Client for Microsoft Networks e File and
printer sharing for Microsoft Networks.
• Nella scheda Gateway, deselezionare tutti i campi.
• Nella scheda DNS Configuration selezionare Disable DNS.
Dans la boîte de dialogue TCP/IP Properties, configurez les paramètres suivants, puis cliquez sur OK.
• Dans l'onglet IP Address , sélectionnez Obtain an IP address automatically.
• Dans l'onglet Bindings, cochez les cases Client for Microsoft Networks et File and printer sharing for
Microsoft Networks.
• Dans l'onglet Gateway, effacez le contenu de tous les champs.
• Dans l'onglet DNS Configuration, sélectionnez Disable DNS.

9
Konfigurieren Sie im Dialogfeld Eigenschaften für TCP/IP folgende Eigenschaften, und klicken Sie
anschließend auf OK.
• Wählen Sie auf der Registerkarte IP-Adresse die Option IP-Adresse automatisch beziehen.
• Wählen Sie auf der Registerkarte Bindungen das Kontrollkästchen Client for Microsoft Networks und
das Kontrollkästchen File and printer sharing for Microsoft Networks.
• Löschen Sie auf der Registerkarte Gateway alle Felder.
• Wählen Sie auf der Registerkarte DNS-Konfiguration die Option DNS deaktivieren.
4. With the router connected to the workstation and turned on, reboot the workstation.
Con el encaminador conectado a la estación de trabajo y encendido, reiniciar la estación de trabajo.
Con il router collegato alla workstation ed acceso, riavviare la workstation.
Une fois le routeur connecté à la station de travail et mis sous tension, réinitialisez la station de travail.
Sorgen Sie dafür, daß der Router an die Workstation angeschlossen und eingeschaltet ist, und starten Sie die
Workstation neu.

10
Router Configuration (Configuración del encaminador,
Configurazione del router, Configuration du routeur, Konfiguration
des Routers, )
1. Start your Web browser (configured for LAN
access) and enter the IP address 192.168.168.230
in the Address or Location box.
Iniciar el explorador de Web (configurado para
acceso de LAN) e introducir la dirección IP
192.168.168.230 en la casilla Dirección o Ubicación.
Avviare il browser Web (configurato per consentire l'accesso alla LAN) ed immettere l'indirizzo IP
192.168.168.230 nella casella Address (Indirizzo) oppure Location (Percorso).
Lancez votre navigateur Web (configuré pour l'accès au réseau local) et entrez l'adresse IP 192.168.168.230
dans la zone Address ou Location.
Starten Sie Ihren für den Zugriff auf das LAN konfigurierten Web-Browser, und geben Sie die IP-Adresse
192.168.168.230 im Feld Adresse oder URL ein.
2. Log on to the BayStack 820 ISDN Router Manager software. The
Password is “password” and is entered for you.
Entrar en el programa BayStack 820 ISDN Router Manager
(Administrador de encaminadores ISDN BayStack 820). La
contraseña es “password” y se introduce automáticamente.
Eseguire la procedura di accesso al software BayStack 820 ISDN
Router Manager. La password è “password” ed è immessa dal
sistema.
Ouvrez le logiciel de gestion du routeur RNIS BayStack 820. Le mot de passe est “password” et est défini
par défaut.
Melden Sie sich bei der BayStack 820 ISDN Router Manager-Software an. Das Kennwort lautet “password”
und wird für Sie eingegeben.

11
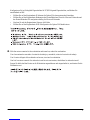
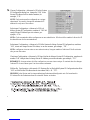
3. Select the options you want to configure. Make sure that the default
check box, Access to/from Remote Site, is selected and then click
Next.
Seleccionar las opciones que se desee configurar. Asegurarse de
que la casilla de verificación predeterminada, Access to/from
Remote Site, esté seleccionada y luego hacer clic en Next.
Selezionare le opzioni da configurare. Accertarsi che sia
selezionata la casella di controllo predefinita, Access to/from Remote Site e poi fare clic su Next.
Sélectionnez les options que vous désirez configurer. Assurez-vous que la case à cocher Access to/from
Remote Site est sélectionnée, puis cliquez sur Next.
Wählen Sie die Optionen, die Sie konfigurieren möchten. Das Standard-Kontrollkästchen Access to/from
Remote Site muß ausgewählt sein. Klicken Sie anschließend auf Next.
4. Choose Configuration > WAN Interfaces > ISDN. In the
Port Configuration dialog box, use the information
provided by your telephone company to configure the
ISDN port settings. Click APPLY.
Seleccionar Configuration > WAN Interfaces > ISDN. En
el diálogo Port Configuration, usar la información
proporcionada por la compañía telefónica para configurar
las opciones del puerto ISDN. Hacer clic en APPLY.
Selezionare Configuration > WAN Interfaces > ISDN. Nella finestra di dialogo Port Configuration,
configurare le impostazioni della porta ISDN usando le informazioni fornite dall'azienda telefonica. Fare
clic su APPLY.
Choisissez Configuration > WAN Interfaces > ISDN. Dans la boîte de dialogue Port Configuration, utilisez
les informations fournies par votre compagnie de téléphone pour configurer les paramètres du port RNIS.
Cliquez sur APPLY.
Wählen Sie Configuration > WAN Interfaces > ISDN. Geben Sie im Dialogfeld Port Configuration die
Angaben Ihrer Telefongesellschaft zum Konfigurieren der Einstellungen für den ISDN-Port ein. Klicken Sie
auf APPLY.

12
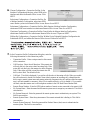
5. Choose Configuration > Advanced > IP. In the System
IP Configuration dialog box, change the “168” in the
Private IP Address field to another number, for
example, “170.”
NOTE: Each router must be configured on a unique
subnetwork. You need to change the subnetwork IP
address for only one of the routers.
Seleccionar Configuration > Advanced > IP. En el
diálogo System IP Configuration, cambiar el “168” del
campo Private IP Address por otro número, por
ejemplo, «170».
NOTA: Cada encaminador debe configurarse en una subred única. Sólo hace falta cambiar la dirección IP
de subred de uno de los encaminadores.
Selezionare Configuration > Advanced > IP. Nella finestra di dialogo System IP Configuration, cambiare
“168”, situato nel campo Private IP Address, in un altro numero, per esempio, “170”.
NOTA: configurare ciascun router su una sottorete unica; bisogna cambiare l'indirizzo IP della sottorete
solo per uno dei router.
Choisissez Configuration > Advanced > IP. Dans la boîte de dialogue System IP Configuration, remplacez le
nombre “168” indiqué dans le champ Private IP Address par un autre nombre, par exemple, “170”.
REMARQUE : chaque routeur doit être configuré sur un sous-réseau unique. Il convient donc de changer
l'adresse IP du sous-réseau pour l'un des routeurs seulement.
Wählen Sie Configuration > Advanced > IP. Ersetzen Sie im Dialogfeld System IP Configuration den Wert
“168” im Feld Private IP Address durch eine andere Zahl, z. B. “170”.
HINWEIS: Jeder Router muß in einem eindeutigen Subnetzwerk konfiguriert sein. Sie brauchen die
IP-Adresse für das Subnetzwerk nur für einen der Router zu ändern.

13
6. Choose Configuration > Connection Profiles. In the
Interface Configuration dialog box, select ISDN as the
interface and select the Remote Office Access. Click
NEXT.
Seleccionar Configuration > Connection Profiles. En
el diálogo Interface Configuration, seleccionar ISDN
como interfaz y seleccionar Remote Office Access. Hacer clic en NEXT.
Selezionare Configuration > Connection Profiles. Nella finestra di dialogo Interface Configuration,
selezionare ISDN come interfaccia e selezionare Remote Office Access. Fare clic su NEXT.
Choisissez Configuration > Connection Profiles. Dans la boîte de dialogue Interface Configuration,
sélectionnez l'interface ISDN et sélectionnez Remote Office Access. Cliquez sur NEXT.
Wählen Sie Configuration > Connection Profiles. Wählen Sie im Dialogfeld Interface Configuration als
Schnittstelle ISDN, und wählen Sie Remote Office Access. Klicken Sie auf NEXT.
7. In the Connection Profile Configuration dialog box, enter the
following information for this connection profile:
• Connection Profile - Enter a unique name for this remote
office connection.
• Call Direction - Select the call direction. If the remote site
will only dial in to the router, select Incoming Only. If the
router willonly dial out to the remote site, select Outgoing
Only. If the router will dial out and the remote site will
dial in, select Both. The default is Both.
• Call Back - This field is displayed if you set the call direction to Incoming or Both. When you enable
the call back security feature, the Product Name (short) answers an incoming call, authenticates the
dial-in user’s remote system name and remote password, disconnects the call, and then dials the remote
user’s call back number to reconnect. Select Yes to enable call back, or No to disable it. If you enable
call back, enter the remote user’s call back phone number in the Call Back Phone Number field.
• Remote Phone Number - Enter the ISDN phone number of remote router connected to the remote LAN.
• My System Name - Enter the name that the remote system uses to recognize your network. This field is
case sensitive.
• My System Password - Enter the password the remote system uses to authenticate your system. This
field is case sensitive.
• Remote System Name - Enter the system name of the remote network that is dialing in. This field is
case sensitive.
• Remote System Password - Enter the password the Product Name (short) uses to authenticate the
remote system. This field is case sensitive.

14
Nella finestra di dialogo Connection Profile Configuration, immettere le informazioni seguenti per il profilo
di collegamento:
• Connection Profile - Immettere un nome unico per il collegamento alla sede remota.
• Call Direction - Selezionare la direzione della chiamata. Se solo il sito remoto comporrà il numero per
accedere al router, selezionare Incoming Only. Se solo il router comporrà il numero per accedere al sito
remoto, selezionare Outgoing Only. Se il router comporrà il numero per accedere al sito e viceversa,
selezionare Both. L'impostazione predefinita è Both.
• Call Back - Se si imposta la direzione della chiamata su Incoming oppure Both appare questo campo.Se
si attiva la caratteristica di sicurezza di richiamata, Product Name (short) risponde ad una chiamata in
arrivo, esegue l'autenticazione del nome di sistema e della password remoti dell'utente che compone il
numero per l'accesso, disconnette la chiamata e poi compone il numero di richiamata dell'utente remoto
per effettuare di nuovo il collegamento. Selezionare Yes per attivare la richiamata oppure No per
disattivarla. Se si attiva la richiamata, immettere il relativo numero di telefono dell'utente remoto nel
campo Call Back Phone Number.
• Remote Phone Number - Immettere il numero di telefono ISDN del router remoto collegato alla LAN
remota.
• My System Name - Immettere il nome usato dal sistema remoto per riconoscere la rete in dotazione. Il
campo distingue tra maiuscole e minuscole.
• My System Password - Immettere la password usata dal sistema remoto per l'autenticazione del sistema
in dotazione. Il campo distingue tra maiuscole e minuscole.
• RemoteSystemName-Immettereilnomedisistemadellareteremotachecomponeilnumeroper
accedere al sistema in dotazione. Il campo distingue tra maiuscole e minuscole.
• Remote System Password - Immettere la password usata da Product Name (short) per eseguire
l'autenticazione del sistema remoto. Il campo distingue tra maiuscole e minuscole.
Dans la boîte de dialogue Connection Profile Configuration, entrez les informations suivantes pour ce profil
de connexion :
• Connection Profile - Entrez un nom unique de connexion au bureau à distance.
• Call Direction - Sélectionnez le sens de l'appel. Si seul le site distant émet des appels entrants vers le
routeur, sélectionnez Incoming Only. Si seul le routeur émet des appels sortants vers le site distant,
sélectionnez Outgoing Only. Si le routeur émet des appels sortants et le site distant des appels entrants,
sélectionnez Both. La valeur par défaut est Both.
• Call Back - Ce champ apparaît si vous paramétrez le sens de l'appel sur Incoming ou sur Both. Lorsque
vous activez la fonction de sécurité de rappel, le Product Name (short) répond à l'appel entrant,
authentifie le nom du système distant de l'utilisateur appelant ainsi que le mot de passe distant,
interrompt l'appel, puis compose le numéro de rappel de l'utilisateur distant pour se reconnecter.
Sélectionnez Yes pour activer le rappel ou No pour le désactiver. Si vous activez le rappel, entrez le
numéro de téléphone de rappel de l'utilisateur distant dans le champ Call Back Phone Number.
• Remote Phone Number - Entrez le numéro de téléphone RNIS du routeur distant connecté au réseau
local distant.
• My System Name - Entrez le nom utilisé par le système distant pour reconnaître votre réseau. Ce champ
différencie les majuscules et les minuscules.
• My System Password - Entrez le mot de passe utilisé par le système distant pour authentifier votre
système. Ce champ différencie les majuscules et les minuscules.

15
• Remote System Name - Entrez le nom du système du réseau distant appelant. Ce champ différencie les
majuscules et les minuscules.
• Remote System Password - Entrez le mot de passe utilisé par le Product Name (short) pour authentifier l
• e système distant. Ce champ différencie les majuscules et les minuscules.
Geben Sie im Dialogfeld Connection Profile Configuration folgende Informationen für dieses
Verbindungsprofil ein:
• Connection Profile - Geben Sie einen eindeutigen Namen für diese ferne Verbindung ein.
• Call Direction - Wählen Sie die Richtung des Anrufs aus. Wenn immer vom fernen Standort aus der
Router angerufen wird, wählen Sie Incoming Only. Wenn immer vom Router aus der ferne Standort
angerufen wird, wählen Sie Outgoing Only. Wenn sowohl der Router den fernen Standort als auch der
ferne Standort den Router anwählt, wählen Sie Both. Both ist der Standardwert.
• Call Back - Dieses Feld wird angezeigt, wenn Sie die Anrufrichtung auf Incoming oder Both setzen.
Wenn Sie die Rückruf-Sicherheitsfunktion aktivieren, beantwortet der Product Name (short) einen
eingehenden Anruf, überprüft die Berechtigung des Systems und das Kennwort des anrufenden
Benutzers, trennt den Anruf und wählt anschließend die Rückrufnummer des fernen Benutzers, um
erneut eine Verbindung herzustellen. Wählen Sie Yes, um diese Rückruffunktion zu aktivieren, oder No,
um sie zu deaktivieren. Wenn Sie die Rückruffunktion aktivieren, müssen Sie die
Rückruf-Telefonnummer des fernen Benutzer im Feld Call Back Phone Number eingeben.
• Remote Phone Number - Geben Sie hier die ISDN-Telefonnummer des fernen Routers ein, der an das
ferne LAN angeschlossen ist.
• My System Name - Geben Sie den Namen ein, den das ferne System zur Erkennung Ihres Netzwerks
verwenden soll. Groß-/Kleinschreibung wird berücksichtigt.
• My System Password - Geben Sie das Kennwort ein, anhand dessen das ferne System die Berechtigung
Ihres Systems prüfen soll. Groß-/Kleinschreibung wird berücksichtigt.
• Remote System Name - Geben Sie den Systemnamen des fernen Netzwerks an, das sich einwählt.
Groß-/Kleinschreibung wird berücksichtigt.
• Remote System Password - Geben Sie das Kennwort ein, anhand dessen der Product Name (short) die
Berechtigung des fernen Systems prüfen soll. Groß-/Kleinschreibung wird berücksichtigt.


17
8. Click APPLY (or APPLY and TEST).
When you click APPLY and TEST, the router attempts to place a call to the remote site and log in. For the
connection test to be successful, the other end of the connection must be configured with the authentication
information. Watch the Message Window for progress messages about the connection.
Hacer clic en APPLY (o en APPLY and TEST).
Cuando se hace clic en APPLY and TEST, el encaminador intenta hacer una llamada al sitio remoto y
entrar. Para que la prueba de conexión tenga éxito, el otro extremo de la conexión debe estar configurado
con la información de autenticación. Observar en Message Window los mensajes de progreso de la
conexión.
Fare clic su APPLY (oppure APPLY and TEST).
Quando si fa clic su APPLY and TEST, il router tenta di effettuare una chiamata al sito remoto ed eseguire le
procedura di accesso. Affinché la prova di collegamento riesca, l'altra estremità del collegamento deve
essere configurata con le informazioni per l'autenticazione. Per i messaggi relativi all'avanzamento del
collegamento, osservare Message Window.
Cliquez sur APPLY (ou sur APPLY and TEST).
Lorsque vous cliquez sur APPLY and TEST, le routeur tente d'appeler le site distant et de s'y connecter. Pour
que le test de connexion soit réussi, l'autre extrémité de la connexion doit être configurée avec les
informations d'authentification. Consultez la fenêtre Message Window dans laquelle s'affichent les messages
de progression relatifs à la connexion.
Klicken Sie auf APPLY (oder APPLY and TEST).
Wenn Sie auf APPLY and TEST klicken, versucht der Router, den fernen Standort anzurufen und sich
anzumelden. Damit der Verbindungstest erfolgreich sein kann, müssen die Angaben zur Überprüfung der
Berechtigung am anderen Ende der Verbindung ebenfalls konfiguriert sein. Im Fenster mit der Bezeichnung
Message Window werden Meldungen zum Fortschritt des Verbindungsaufbaus angezeigt.

18
9. If you isolated a workstation from the LAN, reconnect it to the LAN. Reboot all devices that will use the
router to connect to the remote office.
Si se ha aislado una estación de trabajo de la LAN, volver a conectarla a la LAN. Reiniciar todos los
dispositivos que van a usar el encaminador para conectar con la oficina remota.
Se si è isolata una workstation dalla LAN, ricollegarla alla LAN stessa. Riavviare tutti i dispositivi che
useranno il router per effettuare il collegamento alla sede remota.
Si vous avez isolé une station du réseau local, reconnectez-la à celui-ci. Réinitialisez toutes les unités qui
utilisent le routeur pour se connecter au bureau distant.
Wenn Sie eine Workstation vom LAN isoliert haben, verbinden Sie sie wieder mit dem LAN. Starten Sie alle
Geräte neu, die über den Router eine Verbindung mit dem fernen Standort herstellen sollen.
Congratulations!
The installation is complete and users can now access the remote office through the router.
¡Enhorabuena!
Ha terminado la instalación y ahora se puede acceder a la oficina remota a través del encaminador.
L'installazione è completa ed a questo punto gli utenti possono accedere alla sede remota mediante il router.
Félicitations !
L'installation est terminée et les utilisateurs peuvent désormais accéder au bureau distant par l'intermédiaire du
routeur.
Herzlichen Glückwunsch!
Die Installation ist beendet. Die Benutzer können nun über den Router mit dem fernen Standort kommunizieren.
-
 1
1
-
 2
2
-
 3
3
-
 4
4
-
 5
5
-
 6
6
-
 7
7
-
 8
8
-
 9
9
-
 10
10
-
 11
11
-
 12
12
-
 13
13
-
 14
14
-
 15
15
-
 16
16
-
 17
17
-
 18
18


Nortel BayStack 820 Installation Instructions Manual
- Tipo
- Installation Instructions Manual
in altre lingue
- français: Nortel BayStack 820
Altri documenti
-
Lancom 8011 VPN Manuale del proprietario
-
3com OfficeConnect 3C892A Manuale utente
-
 US Robotics USR8001 Guida d'installazione
-
-
Juniper J6350 Getting Started Manual
-
Nortel Networks Business Policy Switch 2000 Guida d'installazione
-
Axis AXIS 213 PTZ Guida d'installazione
-
Auerswald COMpact 4000 Istruzioni per l'uso
-
US-Robotics USR5461 Manuale del proprietario
