
1
Aufbauanleitung Gerätehaus „Europa“
Assembly manual for garden shed “Europa“
Notice de montage pour l´abri de jardin “Europa“
Opbouwbeschrijving berging “Europa“
Instrucciones de montaje de la caseta “Europa”
Istruzioni di montaggio Casetta portattrezzi “Europa”
Monteringsvejledning for redskabsskuret “Europa”
GB
FR
NL
DE
IT
ES
BIOHORT GmbH
www.biohort.com
Hitta din översättning ...
Finn din oversettelse ...
Találja meg fordítását ...
Najděte svůj překlad ...
www.biohort.com/downloads
Poiščite vaš prevod na ...
DK

2
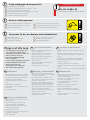
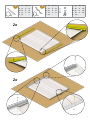
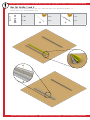
Um Kratzer zu vermeiden, verwenden Sie bitte geeignete Unterlagen!
Please use a suitable underlay to avoid scratches!
Pour éviter les rayures, utilisez les supports appropriés!
Om krassen te voorkomen raden wij u aan er iets onder te leggen!
Por favor, coloque en el suelo una base protectora adecuada para evitar posibles arañazos.
Utilizzare una base adatta per evitare graffi!
Benyt venligst et passende underlag for at undgå skrammer!
GB
FR
NL
IT
ES
GB
FR
NL
IT
ES
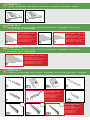
Schraubverbindungen grundsätzlich erst am Ende der Montage festziehen!
Nuts not to be tightened before the end of assembly!
Ne serrer les écrous à fond qu´à la fin du montage!
Schroeven pas aan het einde van de montage vastdraaien!
En principio, no apriete fijamente las tuercas hasta que no haya terminado de
montar la caseta.
I dadi devono essere serrati a fondo soltanto alla fine del montaggio!
Møtrikkerne må ikke strammes før slutningen af opsætningen!
GB
FR
NL
IT
ES
optionales Zubehör - Accesso...
Optionales Zubehör - Symbol:
Arbeitsschritte, die blau eingerahmt sind, zeigen den Einbau eines optionalen Zubehörteiles.
Symbol of optional accessories: Blue framed assembly steps show the installation
of optional accessories.
Accessoires en option-Symbole: La trame entourée en bleu indique une étape avec
accessoires en option. A réaliser uniquement si vous avez commandé cet accessoire.
Extra Toebehoor: Montagestappen met een blauwe rand betreffen de inbouw van
extra toebehoor.
Accesorio opcional – símbolo: Los pasos de montaje que se encuentran enmarcados
en azul muestran el montaje de una pieza de un accesorio opcional.
Simbolo per accessori opzionali: Le fasi del montaggio incorniciate in colore azzurro mostrano l’installazione di un accessorio opzionale.
Symbol for ekstra udstyr: Blåt indrammet samletrin viser installationen af ekstraudstyr
GB
FR
NL
IT
ES
Wasserwaagen - Symbol:
Betreffendes Einbauteil mit der Wasserwaage ausrichten.
Symbol of spirit level: Align the respective parts by using the spirit level.
Symbole niveau à bulle : lorsque ce symbole apparaît, vous devez ajuster l´élément à l´aide d´un niveau
à bulle.
Waterpas – symbool: Bij montagestappen waar dit symbool bijstaat is het noodzakelijk het betreffende
onderdeel waterpas in te bouwen.
Símbolo del nivelador: Indica que se debe ajustar y centrar la pieza con la ayuda de un nivelador.
Simbolo di livella a bolla d‘aria: Allineare il componente in questione con l‘ausilio di una livella a bolla d’aria.
Symbol for vaterpas: Juster de respektive dele ved hjælp af vaterpas.
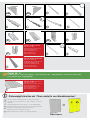
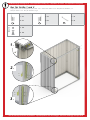
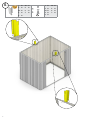
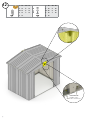
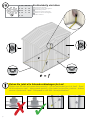
Wichtige Punkte für den Aufbau!
Vorliegende Aufbauanleitung zeigt den Zusammenbau von Gerätehaus „Europa“ Größe „3“;
sie gilt sinngemäß auch für alle anderen Größen. Für einige Montageschritte benötigen Sie 1 bis 2 Helfer.
Important details regarding assembly! This assembly manual shows the erection of the garden shed model “Europa” size “3”;
in the general sense it is valid for all sizes. For several assembly steps additional assistance of 1 or 2 persons will be required.
Points importants lors du montage! Cette notice de montage décrit l´assemblage de l´abri “Europa” taille « 3 »; celle-ci est
valable pour toutes les tailles. Pour certaines étapes, demandez l´aide d´une ou deux personnes.
Belangrijke punten voor de montage! Deze montage instructies hebben betrekking op de opbouw van de “Europa”, grootte 3,
De instructies zijn van toepassing op alle maten. Voor enkele montage stappen heeft u 1 of 2 extra mensen nodig.
Notas importantes para el montaje! Estas instrucciones muestran el montaje de la caseta “Europa” en tamaño 3; Son válidas para
todos los tamaños. Es recomendable realizar el montaje entre dos o tres personas.
Indicazioni importanti per il montaggio! Le seguenti istruzioni di montaggio fanno riferimento all‘assemblaggio di “Europa” misura “3”;
in senso generale è valido per tutte le misure. Per alcune fasi di assemblaggio vi serviranno 1 - 2 aiutanti.
Vigtige punkter ved samling! Samlemanualen viser opsætningen af haveskur modellen “Europa” str. “3”; fremgangsmåde er også tilsvaren-
de for øvrige størrelser. Ved flere punkter af opsætningen er yderligere hjælp påkrævet af 1 eller 2 personer.
GB
FR
NL
IT
ES
Floor Frame - Cadre de sol
DK
DK
DK
DK
DK

3
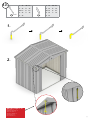
Verwenden Sie bei der Montage Arbeitshandschuhe!
Wear working gloves!
Portez des gants de travail!
Handschoenen gebruiken!
GB
FR
NL
Utilice unos guantes de trabajo.
Utilizzare guanti da lavoro
Brug arbejdshandsker!
ES
IT
Nicht bei Wind aufbauen!
Do not assemble the shed on a windy day!
Ne pas assembler quand il y a du vent !
Niet bij wind opbouwen!
GB
FR
NL
No monte la caseta si hace mucho viento.
Non montare la casetta in giornate di vento!
Saml ikke skuret på en blæsende dag!
ES
IT
Größenabhängiger Montageschritt!
Size-Dependent assembly step!
L´étape d´assemblage dépend de la taille de l´abri!
Montagestap afhankelijk van de grootte!
Paso de montaje dependiente del tamaño de la caseta!
Misura-dipendente fase di montaggio!
Størrelses-anhængig montage skridt
GB
FR
NL
IT
ES
Größenabhängiger Montageschritt
Nur für Größe 2A
Only for size 2A- Uniquement pour taille 2A
• Keine aggressiven Chemikalien wie
z.B. Chlor oder Streusalz lagern!
• Sonnenmilch und andere Cremen mit
Wasser und Seife entfernen.
• Keine scheuernden Reinigungs-
mittel verwenden!
• Laub vom Dach regelmäßig entfernen!
• Dachrinnenauslauf kontrollieren!
• Tiefe Kratzer sofort mit
beiliegendem Lack ausbessern!
• Ölen Sie das Schloss jährlich!
Pflege und Wartung
EN FR
NL ITES
Onderhoud
Care and maintenance
Entretien et maintenance
Cuidado y mantenimiento Manutenzione
•Donotstoreaggressivesubstancesi.e.
chlorine or road salt!
•Removesuntanlotionoranyother
creams with water and rinse aid!
•Donotuseabrasivecleaningagents!
•Keeptherooffreeofleaves!
•Checkthegutter!
•Touch-upscratchesimmediatelywith
the paint provided.
•Lubricatethelockonceayear!
•Nepasstockerdeproduitschimiques(chlore,sel,
etc…)!
•Nettoyezuniquementavecdel´eaulescrèmes
solairesetautrescrèmes(pasdenettoyantchi-
mique).
•Nepasutiliserdeproduitsnettoyantabrasifs!
•Débarrassezvousrégulièrementdesfeuilles
mortes sur le toit!
•Contrôlezl‘évacuationdelagauttière!
•Corrigezimmédiatementlesrayuresaveclalaque
jointe!
•Graissezlaserrureetlescharnièreschaqueannée!
•Geenchemicaliënindebergingopslaan!
•Zonnebrandolie/melkenanderecremes
met water en glansmiddel verwijderen.
•Gebruikgeenschuurmiddelen!
•Regelmatigbladerenvandakverwijde-
ren!
•Dakgootuitloopcontroleren.
•Krassendirectmetdemeegeleverdelak
behandelen.
•Slotjaarlijksoliën
•Noalmaceneproductosquímicosagresi-
vos dentro de la caseta como por ejemplo
cloro y sal antiescarcha.
•Evitedejarhuellasorestosdecremas
solares sobre la chapa. Limpie la caseta
siempre con agua y jabón.
•Noutiliceningúnproductoparafregar.
En general, evite siempre cualquier pro-
ductoquímicoparalimpiarlacaseta.
•Mantengaeltejadolibredehojassecas.
Controle el desagüe del canalón.
•Reparelosarañazosloantesposiblecon
el barniz que se incluye.
•Apliqueaceiteenlacerraduraylas
bisagras una vez al año.
•Nonlasciareprodottichimiciaggressivi
(comeadesempiocloroosaleperstrade)
all’interno della casetta!
•Rimuoverecremasolareealtrecreme
con acqua e brillantante!
•Nonutilizzaredetergenticontenenti
sostanze aggressive!
•Mantenereiltettoliberodafoglie!
•Controllarelagrondaia!
•Ritoccareimmediatamenteeventuali
graffi con la vernice fornita nella confe-
zione!
•Lubrificarelaserraturaelecernierea
cadenza annuale!
DK
Pleje og vedligeholdelse
•Opbevarikkeaggressivestofferdvs.Klor
eller vejsalt!
•Fjernsolcremeellerandretyperaf
creme med vand og rensemiddel!
•Brugikkeaggressiverengøringsmidler!
•Holdtagetfriforblade!
•Kontrollerrendestenen!
•Vedskrammer,brugstraksmalingensom
er stillet til rådighed!
•Smørlåsenårligt!
DK
DK
DK

4
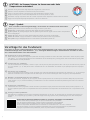
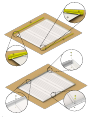
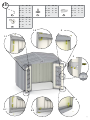
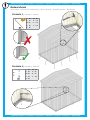
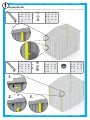
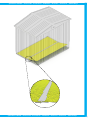
Bitte achten Sie bei der Fundamentgestaltung darauf, dass Niederschlagswasser nicht seitlich unter den Bodenprofilen in das
Gerätehaus eindringen kann! (siehe Varianten 1, 2, 3). Aufsteigende Bodenfeuchtigkeit und Kondensation vermeiden Sie mittels
einer starken Kunststofffolie unter dem Fundament.
Vorschläge für das Fundament
GB
FR
NL
IT
ES
Proposals for a secure foundation
When making the foundation arrangements please take necessary precaution to ensure that water cannot leak in under the floor profiles
(seeoption1,2,3).Risinggroundmoistureandcondensationcanbeavoidedbyusingastrongplasticsheetunderneaththepavingslabs
or underneath the concrete foundation.
Conseils pour les fondations
Lorsdelaréalisationdelafondation,veillezàcequel´eaudepluienepuissepaspénétrerdansl´abriouparlescôtéssouslesprofilsde
sol(voirvariantes1,2,3).Vouspouvezéviterl´humiditédusoletlacondensationenmettantunfilmplastiqueépaissouslesplaques
de béton.
Voorstellen voor fundament
Leterbijhetmakenvandefunderingopdatregenwaternietonderhetbodemprofielkandoorlopen(zievoorbeeld1,2,3).Eenvochtige
bodem en condensatie kunt u vermijden door het aanbrengen van een sterke kunststoffolie onder de tegels of het betonfundament.
Medidas y recomendaciones para los cimientos:
Alcolocarloscimientos,asegúresedequeelaguadelluvianopuedepenetrarenlacasetaporloslateralesdebajodelperfildelsuelo
(véasevariante1,2y3).Evitelahumedadylacondensaciónenelsuelocolocandounaláminadeplásticobajolaslosasoloscimientos
de hormigón.
Proposte per il basamento:
llbasamentodeveessereprogettatoinmododaevitareinfiltrazionidiacquapiovanaall‘internodellacasetta(vedereproposta1-2-3).
Un telo di plastica spesso posto in corrispondenza dell‘area di pavimento evita infiltrazioni di umidità dal terreno e la formazione di con-
densa.
Forslag til sikkert fundament:
Vedetableringaffundamentskaldutagedenødvendigeforholdsreglerforatsikre,atvandikkekansiveindundergulvprofilerne(se
mulighed 1, 2, 3). Stigende fugt og kondens i jorden kan undgås ved at bruge plastik under flisebelægningen eller under betonfunda-
mentet.
Weitere Details betreffend Fundament finden Sie auch unter www.biohort.com/Fundament
Furtherdetailsaboutfoundationsyouwillfindonwww.biohort.com/foundation
Pourdesdétailssupplémentaires,veuillezconsulterwww.biohort.com/foundations
Verderedetailsoverhetfundamentvindtuookopwww.biohort.com/fundament
Encuentre información detallada sobre los cimientos en: www.biohort.com > servicios > cimientos
Perulterioridettaglisipregadiconsultarewww.biohort.com/it/servizi/suggerimenti-per-le-fondamenta/
Yderligereinformationeromfundamenterfinderdupåwww.biohort.com/foundation
DK
ACHTUNG: Im Sommer können im Innenraum sehr hohe
Temperaturen entstehen!
Attention: during the summer high temperature might arise in the interior.
Attention : en été la température à l’intérieur de l’abri peut être élevée!
Let op: in de zomer kunnen in de berging zeer hoge temperaturen bereikt worden.
Tenga en cuenta que en el verano las temperaturas en el interior pueden ser altas.
Attenzione: Si prega di prendere nota che in estate si possono essere temperature molto elevate all‘interno.
Vigtigt: Der kan opstå meget høje temperaturer i skuret om sommeren.
GB
FR
NL
ES
IT
DK
Nagel - Symbol:
Bitte verwenden Sie den beiliegenden Nagel, um die Löcher der einzelnen Bleche auszurichten.
Symbol of nail: Please use the attached nail to align the holes of each sheet.
Symbole clou : veuillez utiliser le clou fourni pour aligner les trous sur chaque paroi.
Spijker-symbool: Bij montagestappen waar dit symbool bijstaat dient de spijker voor het laten corresponderen
van 2 schroefgaatjes.
Símbolo del clavo: Utilice los clavos suministrados para alinear los orificios de cada chapa.
Simbolo del chiodo: Si prega di utilizzare il chiodo incluso per allineare i buchi di ogni lamiera.
Søm-symbol: Brug de medfølgende søm til at rette hullerne på de enkelte plader ind
!
GB
FR
NL
IT
ES
DK

5
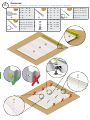
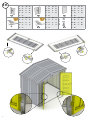
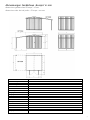
Maße für das Fundament
Foundation dimensions
Dimensions pour la fondation
Maat voor het fundament
GB
FR
NL
IT
ES
Medidas de los cimientos
Dimensioni del basamento
Fundament dimensioner
2990
2270
6
G G A
A
A A
AA
A
A
2990
2990
7
G G G G
2270
2270
4
G G
2990
2270
5
G G G G
1550
1550
2
G G
1550
2990
4A
G G G G
1550
2220
2270
3
G G
1550
830
1
G G
2270
830
2A
G G
DK

6
Maßstabsgetreue Abbildung der zu verwendenden Schrauben:
M 1:1
M4 x 10
8 x 60
Scale drawing 1:1 of the screws in use
Reproduction selon l´échelle 1:1.
Afbeelding:schaal1:1(waregrootte)
GB
FR
NL
IT
ES
Reproducciónaescala1:1delostornillosqueseutilizanparaelmontaje.
Immagine in scala delle viti da utilizzare!
Skala tegning af skruer er 1:1
M6 x 18 6,3 x 22
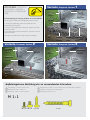
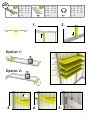
Variante, Proposal, Variant
1
Bodenprofil
Floor Profile
Profil de sol
Bodenplatte
Floor Panel
Plaque de fond
Seitenwand
Side wall
Paroi latérale
Bodenrahmen
Floor Frame
Cadre de sol
Z-Winkel
Z-Angle
Ancrages
Bodenanker
Ground Anchor
Ancrages
Splittbett
gravel bed
Lit de gravier
Erde
Earth
Terre
2-3 cm XPS-Platten
2-3 cm XPS-panels
2-3 cm de XPS-expansé
Variante, Proposal, Variant
2
Folie ca. 0,2mm
(Dampfsperre)
Plastic sheet ca. 0,2mm
(moisture barrier)
Feuille env. 0,2mm
(barrière étanche)
ca. 50 x 50 cm
Betonplatte
Paving slab
Dalles de béton
Seitenwand
Side wall
Paroi latérale
Bodenrahmen
Floor Frame
Cadre de sol
Erde
Earth
Terre
Splittbett
gravel bed
Lit de gravier
Bodenprofil
Floor Profile
Profil de sol
Variante, Proposal, Variant
3
Schotterbett
Gravel bed
Lit de macadam
Betonfundament
Concrete foundation
Fondation en béton
ca. 2 cm
mind. 7 cm
Folie ca. 0,2mm
(Dampfsperre)
Plastic sheet ca. 0,2mm
(moisture barrier)
Feuille env. 0,2mm
(barrière étanche)
Seitenwand
Side wall
Paroi latérale
Erde
Earth
Terre
Bodenprofil
Floor Profile
Profil de sol
Fundamentmaße
Foundation dimensions
Dimensions pour la fondation
DK
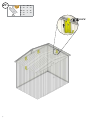
Die Verankerung ist wichtig, denken Sie an Sturmböen!
Do not forget to anchor the shed against gale force wind!
L´ancrage est important, pensez aux rafales de vent!
Verankering niet vergeten!
El anclaje es muy importante. Piense por ejemplo en rachas
fuertes de viento.
L‘ancoraggio della casetta è importante - pericolo in caso di
raffiche di vento!
Glem ikke at forankre skuret mod vinde af stormstyrke
ACHTUNG ATTENTION
ATTENTION | ATTENTIE |
ATENCIÓN | ATTENZIONE |
OBS.

7
Paket Nr. 1
C E
F
D1
D2
B
ZA
Paket Nr. 1
Türpaket · Doorpackage · Carton de portes · Deurpakket · Kit de puerta · Pacco porta · Dørpakke
1
Paket Nr. 3
Profilpaket · Profile package · Carton de profils · Profielpakket · Kit de perfiles · Pacco profili · Profilpakke
3
J1
J2 J3
G
Paket Nr. 2
Seitenwandpaket · Side panel package · Carton de parois latérales · Zijwandpakket · Panel la teral ·
Pacco pareti laterali · Sidepladepakke
2
Nur für Größe 5 und 7
Only for size 5 and 7
Uniquement pour les taille 5 et 7
Alleen voor grootte 5 en 7
sólo para los tamaños 5 y 7
solo per misura 5 e 7
Kunforstørrelse5og7
Nur für Größe 5 und 7
Only for size 5 and 7
Uniquement pour les taille 5 et 7
Alleen voor grootte 5 en 7
sólo para los tamaños 5 y 7
solo per misura 5 e 7
Kunforstørrelse5og7
J4
Paket Nr. 2a
Seitenwandpaket · Side panel package · Carton de parois latérales · Zijwandpakket · Panel la teral ·
Pacco pareti laterali · Sidepladepakke
2a
G
Nur für Größe 1, 2, 2A, 3, 4A
Only for size 1, 2, 2A, 3, 4A
Uniquement pour les taille 1, 2, 2A, 3, 4A
Alleen voor grootte 1, 2, 2A, 3, 4A
sólo para los tamaños 1, 2, 2A, 3, 4A
solo per misura 1, 2, 2A, 3, 4A
Kunforstørrelse1,2,2A,3,4A
Y
Nur für Größe 2A, 3, 4, 6
Only for size 2A, 3, 4, 6
Uniquement pour les taille 2A, 3, 4, 6
Alleen voor grootte 2A, 3, 4, 6
sólo para los tamaños 2A, 3, 4, 6
solo per misura 2A, 3, 4, 6
Kunforstørrelse2A,3,4,6
A
Nur für Größe 3, 4, 4A, 5, 6, 7
Only for size 3, 4, 4A, 5, 6, 7
Uniquement pour les taille 23, 4, 4A, 5, 6, 7
Alleen voor grootte 3, 4, 4A, 5, 6, 7
sólo para los tamaños 3, 4, 4A, 5, 6, 7
solo per misura 3, 4, 4A, 5, 6, 7
Kunforstørrelse3,4,4A,5,6,7

8
AS
Paket Nr. 4
Dach-Blechpaket · roof panel package · carton de tôles de toit · dakplaatpakket · kit de paneles del tejado ·
pacco lamiera tetto · tagpladepakke
4
AK
AI
H
Z
U
R
X
Nur für Größe 2A und 4A
Only for size 2A and 4A
Uniquement pour les taille 2A et 4A
Alleen voor grootte 2A en 4A
sólo para los tamaños 2A y 4A
solo per misura 2A e 4A
Kunforstørrelse2Aog4A
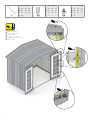
Einbaumöglichkeiten der Türen anstelle von Wandelementen!
The door can be installed instead of a side wall element!
Laportepeutêtreinstalléesurlecôtéàlaplaced´uneparoi
latérale !
Inbouwmogelijkheden van de deuren i.p.v. de wandelementen
GB
FR
NL
IT
ES
Es posible colocar las puertas en lugar de los paneles laterales.
Considerare la possibilità di montare una porta
standard al posto di una parete laterale!
Døren kan monteres i stedet for et sidevæg element!
=
GG
B
ZA
DK
Nur für Größe 5 und 7
Only for size 5 and 7
Uniquement pour les taille 5 et 7
Alleen voor grootte 5 en 7
sólo para los tamaños 5 y 7
solo per misura 5 e 7
Kunforstørrelse5og7
H1
K
M
L
AM
O
AN
P
Nur für Größe 4, 5, 6, 7
Only for size 4, 5, 6, 7
Uniquement pour les taille 4, 5, 6, 7
Alleen voor grootte 4, 5, 6, 7
sólo para los tamaños 4, 5, 6, 7
solo per misura 4, 5, 6, 7
Kunforstørrelse4,5,6,7
Y

9
1: 2x 4A: 4x
2: 2x 5: 4x
2A: 3x 6: 3x
3: 3x 7: 4x
4: 3x
1: 1x 4A: 1x
2: 1x 5: 1x
2A: 1x 6: 1x
3: 1x 7: 1x
4: 1x
1:1x(1490mm) 4A:1x(2930mm)
2:1x(1490mm) 5: 1x(2930mm)
2A:1x(2210mm) 6: 1x(2210mm)
3: 1x (2210mm) 7: 1x(2930mm)
4: 1x (2210mm)
1:1x(1490mm) 4A:1x(2930mm)
2:1x(1490mm) 5: 1x(2930mm)
2A:1x(2210mm) 6: 1x(2210mm)
3: 1x (2210mm) 7: 1x(2930mm)
4: 1x (2210mm)
1: 8x 4A: 16x
2: 8x 5: 16x
2A: 12x 6: 12x
3: 12x 7: 16x
4: 12x
P
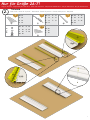
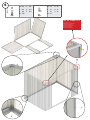
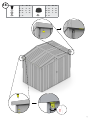
1.
G C
G
G
G
C
G
3
3
3
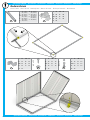
M4 x 10
D2
L
innen / inside
außen / outside
Rückwand
Rearwall-Paroiarrière-Achterwand-Panelposterior-Pareteposteriore-Bagplade
2/2a

10
L
P
L
G
P

11
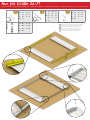
A
M
2A: 2x
3: 2x
4: 2x
6: 2x
2A: 1x 5: 1x
3: 1x 6: 1x
4: 1x 7: 1x
4A: 1x
2A: 2x 5: 2x
3: 2x 6: 2x
4: 2x 7: 2x
4A: 2x
2A: 6x 5: 6x
3: 6x 6: 6x
4: 6x 7: 6x
4A: 6x
4A: 2x
5: 2x
7: 2x
2
3 3
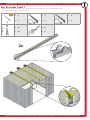
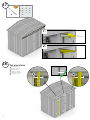
2.
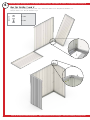
M4 x 10
D2
C
M
A
C
A
G
Nur für Größe 2A-7!
Only for size
2A-7 -
Uniquement pour taille
2A-7 -
Alleen voor maat
2A-7 -
Sólo para los tamaños
2A-7 -
Solo per misura
2A-7 -
Kunforstørrelse
2A-7
Türwand
Door wall - Paroi de la porte - Deurwand - Panel de puerta - Parete della porta - Dørplade
2/2a
G
G

12
L
E
2A: 1x 5: 1x
3: 1x 6: 1x
4: 1x 7: 1x
4A: 1x
1: 1x 4A: 1x
2: 1x 5: 1x
2A: 1x 6: 1x
3: 1x 7: 1x
4: 1x
2A: 1x 5: 1x
3: 1x 6: 1x
4: 1x 7: 1x
4A: 1x
2A: 8x 5: 8x
3: 8x 6: 8x
4: 8x 7: 8x
4A: 8x
3 3
3
EP
P
L
M4 x 10
D2
*
*
Teil E entfällt bei Bodenschwellenrampe
GB
FR
NL
IT
ES
Part E does not apply to threshold access ramp
La partie E ne s‘applique pas au seuil de rampe
Deel E is niet van toepassing op Oprijplaat
Parte E no se aplica con la rampa de acceso
Parte E non si applica alla rampa da soglia
Del E er ikke nødvendig med gulvrampe
Nur für Größe 2A-7!
Only for size
2A-7 -
Uniquement pour taille
2A-7 -
Alleen voor maat
2A-7 -
Sólo para los tamaños
2A-7 -
Solo per misura
2A-7 -
Kunforstørrelse
2A-7
DK

13
2A: 2x 5: 2x
3: 2x 6: 2x
4: 2x 7: 2x
4A: 2x
2A: 2x 5: 2x
3: 2x 6: 2x
4: 2x 7: 2x
4A: 2x
2A: 4x 5: 4x
3: 4x 6: 4x
4: 4x 7: 4x
4A: 4x
2A: 8x 5: 8x
3: 8x 6: 8x
4: 8x 7: 8x
4A: 8x
M4 x 10
D2
D1
D1
D1
L
L
R
R
Nur für Größe 2A-7!
Only for size
2A-7 -
Uniquement pour taille
2A-7 -
Alleen voor maat
2A-7 -
Sólo para los tamaños
2A-7 -
Solo per misura
2A-7 -
Kunforstørrelse
2A-7

14
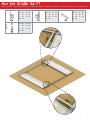
G
G
G
1: 2x 4A: 4x
2: 4x 5: 6x
2A: 2x 6: 8x
3: 4x 7: 8x
4: 6x
1: 2x 4A: 2x
2: 2x 5: 2x
2A: 2x 6: 2x
3: 2x 7: 2x
4: 2x
1: 4x 4A: 8x
2: 8x 5: 12x
2A: 4x 6: 16x
3: 8x 7: 16x
4: 12x
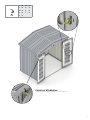
3.
M4 x 10
3
2x
2x
D2
G
C
C
Seitenwand 2x
Sidewall2x-Paroilatérale2x-Zijwand2x-panellateral2x-Paretelaterale2x-Sideplade2x
2/2a

15
M4 x 10
D2
1: 2x 4A: 2x
2: 2x 5: 2x
2A: 2x 6: 2x
3: 2x 7: 2x
4: 2x
1: 2x 4A: 2x
2: 2x 5: 2x
2A: 2x 6: 2x
3: 2x 7: 2x
4: 2x
1: 4x 4A: 12x
2: 8x 5: 12x
2A: 4x 6: 16x
3: 8x 7: 16x
4: 12x
2x
2x
L
P
3 3
P

16
optionales Zubehör - Accessories - Accessoires - toebehoor - Accessori - Accesorios optionales Zubehör - Accessories - Accessoires - Toebehoor - Accessori - Accesorios - Ekstraudstyr
optionales Zubehör - Accessories - Accessoires - Toebehoor - Accessori - Accesorios - Ekstraudstyr
1: 1x 4A: 1x
2: 1x 5: 1x
2A: 1x 6: 1x
3: 1x 7: 1x
4: 1x
1: 1x 4A: 1x
2: 1x 5: 1x
2A: 1x 6: 1x
3: 1x 7: 1x
4: 1x
1: 1x 4A: 1x
2: 1x 5: 1x
2A: 1x 6: 1x
3: 1x 7: 1x
4: 1x
1: 2x (700mm)
2x (1420mm)
2: 4x (1420mm)
2A: 2x (1420mm)
2x (2140mm)
3: 2x (1420mm)
2x (2140mm)
4: 4x (2140mm)
4A: 2x (1420mm)
2x ( 1 4 2 0 m m )
5: 2X (2140mm)
2x (2860mm)
6: 2x (2140mm)
2x (2860mm)
7: 4x (2860mm)
1: 4x 4A: 4x
2: 4x 5: 4x
2A: 4x 6: 4x
3: 4x 7: 4x
4: 4x
ZB ZC
ZD
6,3 x 22
ZF
M4 x 10
D2
Bodenrahmen
Floor Frame - Cadre de sol - Bodemframe - Marco de suelo - Telaio perimetrale - Bundramme

17
optionales Zubehör - Accessories - Accessoires - toebehoor - Accessori - Accesorios optionales Zubehör - Accessories - Accessoires - Toebehoor - Accessori - Accesorios - Ekstraudstyr optionales Zubehör - Accessories - Accessoires - Toebehoor - Accessori - Accesorios - Ekstraudstyr
optionales Zubehör - Accessories - Accessoires - Toebehoor - Accessori - Accesorios - Ekstraudstyr optionales Zubehör - Accessories - Accessoires - Toebehoor - Accessori - Accesorios - Ekstraudstyr
1: 4x 4A: 8x
2: 6x 5: 10x
2A: 6x 6: 10x
3: 8x 7: 10x
4: 8x
1: 16x 4A: 16x
2: 16x 5: 16x
2A: 16x 6: 16x
3: 16x 7: 16x
4: 16x
1: 15x 4A: 15x
2: 15x 5: 15x
2A: 15x 6: 15x
3: 15x 7: 15x
4: 15x
6,3 x 22
M4 x 10
ZD
ZF
D2
Bodenrahmen
Floor Frame - Cadre de sol - Bodemframe - Marco de suelo - Telaio perimetrale - Bundramme

18
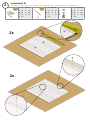
Größenabhängiger Montageschritt - Size-Dependent assembly step - Dépendant de la taille - Size-Dependent montagestap
Größenabhängiger Montageschritt - Size-Dependent assembly step - Dépendant de la taille - Size-Dependent montagestap
Paso de montaje de tamaño Dependiente - Taglia-Dependent fase di montaggio - Størrelses-anhængig montage skridt
1: 10x
2: 10x
M4 x 10
Nur für Größe 1 und 2
Only for size
1 and 2 -
Uniquement pour taille
1 et 2-
Alleen voor maat
1 en 2-
Sólo para los tamaños
1 y 2 -
Solo per misura
1 e 2 -
Kunforstørrelse
1 og 2
4.

19
Größenabhängiger Montageschritt - Size-Dependent assembly step - Dépendant de la taille - Size-Dependent montagestap
Größenabhängiger Montageschritt - Size-Dependent assembly step - Dépendant de la taille - Size-Dependent montagestap
Paso de montaje de tamaño Dependiente - Taglia-Dependent fase di montaggio - Størrelses-anhængig montage skridtPaso de montaje de tamaño Dependiente - Taglia-Dependent fase di montaggio - Størrelses-anhængig montage skridt
Größenabhängiger Montageschritt - Size-Dependent assembly step - Dépendant de la taille - Size-Dependent montagestap
1: 4x
2: 4x
1: 1x
2: 1x
1: 1x
2: 1x
1.
2.
3.
M4 x 10
3
E
L
3

20
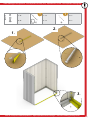
Größenabhängiger Montageschritt - Size-Dependent assembly step - Dépendant de la taille - Size-Dependent montagestap
Paso de montaje de tamaño Dependiente - Taglia-Dependent fase di montaggio - Størrelses-anhængig montage skridt
Größenabhängiger Montageschritt - Size-Dependent assembly step - Dépendant de la taille - Size-Dependent montagestap
1: 9x
2: 9x
1: 2x
2: 2x
1: 1x
2: 1x
M4 x 10
M
3
3
C
Nur für Größe 1 und 2
Only for size
1 and 2 -
Uniquement pour taille
1 et 2-
Alleen voor maat
1 en 2-
Sólo para los tamaños
1 y 2 -
Solo per misura
1 e 2 -
Kunforstørrelse
1 og 2
La pagina si sta caricando...
La pagina si sta caricando...
La pagina si sta caricando...
La pagina si sta caricando...
La pagina si sta caricando...
La pagina si sta caricando...
La pagina si sta caricando...
La pagina si sta caricando...
La pagina si sta caricando...
La pagina si sta caricando...
La pagina si sta caricando...
La pagina si sta caricando...
La pagina si sta caricando...
La pagina si sta caricando...
La pagina si sta caricando...
La pagina si sta caricando...
La pagina si sta caricando...
La pagina si sta caricando...
La pagina si sta caricando...
La pagina si sta caricando...
La pagina si sta caricando...
La pagina si sta caricando...
La pagina si sta caricando...
La pagina si sta caricando...
La pagina si sta caricando...
La pagina si sta caricando...
La pagina si sta caricando...
La pagina si sta caricando...
La pagina si sta caricando...
La pagina si sta caricando...
La pagina si sta caricando...
La pagina si sta caricando...
-
 1
1
-
 2
2
-
 3
3
-
 4
4
-
 5
5
-
 6
6
-
 7
7
-
 8
8
-
 9
9
-
 10
10
-
 11
11
-
 12
12
-
 13
13
-
 14
14
-
 15
15
-
 16
16
-
 17
17
-
 18
18
-
 19
19
-
 20
20
-
 21
21
-
 22
22
-
 23
23
-
 24
24
-
 25
25
-
 26
26
-
 27
27
-
 28
28
-
 29
29
-
 30
30
-
 31
31
-
 32
32
-
 33
33
-
 34
34
-
 35
35
-
 36
36
-
 37
37
-
 38
38
-
 39
39
-
 40
40
-
 41
41
-
 42
42
-
 43
43
-
 44
44
-
 45
45
-
 46
46
-
 47
47
-
 48
48
-
 49
49
-
 50
50
-
 51
51
-
 52
52


in altre lingue
- dansk: Biohort Europa Brugermanual
Documenti correlati
-
Castorama Highline Manuale utente
-
Biohort HighLine Series Guida utente
-
Biohort Highline Guida utente
-
-
-
-
-
-
-
