Candy FPP 6021/1 X Manuale utente
- Categoria
- Forni
- Tipo
- Manuale utente

Vi ringraziamo per aver scelto uno dei nostri prodotti, per ottenere da questo elettrodomestico le migliori prestazioni consigliamo di:
• Leggere attentamente le avvertenze contenute nel presente libretto.
• Conservare con cura questo libretto per ogni ulteriore consultazione.
Durante l’uso il forno diventa caldo, fare attenzione a non toccare gli elementi riscaldanti all’interno del forno.
Alla prima accensione del forno può svilupparsi fumo di odore acre, causato dal primo riscaldamento del collante dei pannelli d’isola-
mento avvolgenti il forno. Si tratta di un fenomeno assolutamente normale e, in caso si verificasse, occorre attendere la cessazione
del fumo prima di introdurre le vivande.
Il forno è per sua natura un apparecchio che diventa caldo, in modo particolare in corrispondenza del cristallo porta. È buona norma
quindi impedire che i bambini possano avvicinarsi al forno quando è in funzione, in particolare quando funziona il grill.
AVVERTENZE GENERALI
1 IT
DICHIARAZIONE DI CONFORMITÀ
Questa apparecchiatura nelle parti destinate a venire a
contatto con sostanze alimentari, è conforme alla prescrizione
della dir. CEE 89/109 e al D.L. di attuazione N° 108 del
25/01/92.
Apparecchio conforme alle Direttive Europee 73/23/CEE e
89/336/CEE, sostituite rispettivamente da 2006/95/CE e
2004/108/CE, e successive modifiche.
INFORMAZIONI SULLA SICUREZZA
• Questo apparecchio dovrà essere destinato solo all’uso per
il quale è stato espressamente concepito, e cioè per la cottura
di alimenti.
Ogni altro uso (ad esempio riscaldamento ambiente) è da
considerarsi improprio e quindi pericoloso. Il costruttore non
può essere considerato responsabile per eventuali danni
derivanti da usi impropri, erronei ed irragionevoli.
• L’uso di un qualsiasi apparecchio elettrico comporta
l’osservanza di alcune regole fondamentali.
In particolare:
- non tirare il cavo di alimentazione per staccare la spina dalla
presa di corrente
- non toccare l’apparecchio con mani o piedi bagnati o umidi
- non usare l’apparecchio a piedi nudi
- non permettere che l’apparecchio sia usato dai bambini
o da incapaci, senza sorveglianza
- in generale è sconsigliabile l’uso di adattatori, prese multiple
e prolunghe.
- In caso di guasto e/o di cattivo funzionamento dell’apparecchio,
spegnerlo e non manometterlo.
• In caso di danneggiamento del cavo, provvedere tempesti-
vamente alla sua sostituzione secondo le seguendi indicazioni:
aprire il coperchio morsettiera, togliere il cavo di alimentazione
e sostituirlo con uno corrispondente,(tipo H05RR-F, H05VV-
F,H05V2V2-F) e adeguato alla portata dell’apparecchio.
Tale operazione dovrà essere eseguita da personale professio-
nalmente qualificato. Il conduttore di terra (giallo-verde), deve
obbligatoriamente essere più lungo di circa 10 mm rispetto
ai conduttori di linea.
Per l’eventuale riparazione rivolgersi solamente ad un centro
di assistenza tecnica autorizzato e richiedere l’utilizzo di
ricambi originali.
Il mancato rispetto di quanto sopra può compromettere la
sicurezza dell’apparecchio.
• Questo apparecchio non è destinato ad essere usato da
bambini e persone incapaci o inesperte all'uso del prodotto,
a meno che non vengano sorvegliate o istruite riguardo all'uso
dell'apparecchio da una persona responsabile della loro
sicurezza.
• Sorvegliare i bambini in modo tale da assicurarsi che non
giochino con l'apparecchio.
INSTALLAZIONE
L’installazione è a carico dell’acquirente e la Casa Costruttrice
è esonerata da questo servizio; gli eventuali interventi richiesti
alla Casa Costruttrice che dipendono da una errata installazione
non sono compresi nella garanzia.
L’installazione deve essere effettuata secondo le istruzioni da
personale professionalmente qualificato. Una errata installazione
può causare danni a persone, animali o cose, nei confronti dei
quali il costruttore non può essere considerato responsabile.
INSERIMENTO DEL MOBILE
Inserire l’apparecchio nel vano del mobile (sottopiano o in
colonna). Il fissaggio si esegue con 2 viti attraverso i fori della
cornice, visibili aprendo la porta.(vedere ultima pagina).
Per consentire la migliore aerazione del mobile, i forni devono
essere incassati rispettando le misure e le distanze indicate nella
figura in ultima pagina.
Nota: per i forni da abbinamento con piano cottura è indispensabile
rispettare le istruzioni contenute nel libretto allegato all’apparec-
chiatura da abbinare.
IMPORTANTE
Per garantire un buon funzionamento dell’apparecchio da incasso
è necessario che il mobile sia di caratteristiche adatte.
I pannelli dei mobili adiacenti il forno dovranno essere in materiale
resistente al calore. In particolare nel caso di mobili in legno
impiallicciato le colle dovranno essere resistenti alla temperatura
di 120°C: materiali plastici o collanti non resistenti a questa
temperatura sono causa di deformazioni o scollature. In conformità
alle norme di sicurezza, una volta incassato l’apparecchio, non
debbono essere possibili eventuali contatti con le parti elettriche.
Tutte le parti che assicurano la protezione debbono essere fissate
in modo tale da non poter essere tolta senza l’aiuto di qualche
utensile.
Per garantire una buona areazione è necessario eliminare
la parete posteriore del vano; inoltre il pianale di appoggio
deve avere una luce posteriore di almeno 45 mm.
ALLACCIAMENTO ELETTRICO
Inserire la spina in una presa di corrente munita di un terzo
contatto corrispondente alla presa di terra, che deve essere
collegata in modo efficiente.
Per i modelli sprovvisti di spina, montare sul cavo una spina
normalizzata che sia in grado di sopportare il carico indicato in
targa. Il conduttore di messa a terra e contraddistinto dai colori
giallo - verde. Tale operazione dovrà essere eseguita da personale
professionalmente qualificato.
In caso di incompatibilità tra la presa e la spina dell’apparecchio
fare sostituire la presa con altra di tipo adatto, da personale
professionalmente qualificato. Si può effettuare anche l’allac-
ciamento alla rete interponendo tra l’apparecchio e la rete un
interruttore omnipolare dimensionato al carico e rispondente alle
norme in vigore. Il cavo di terra giallo-verde non deve essere
interrotto dall’interruttore. La presa o l’interruttore omnipolare
usati per l’allacciamento devono essere facilmente accessibili
ad elettrodomestico installato.
Importante: in fase di installazione, posizionare il cavo di
alimentazione in modo che in nessun punto si raggiungano
temperature superiori di 50 °C alla temperatura ambiente.
L’apparecchio è conforme ai requisiti di sicurezza previsti dagli
istituti normativi. La sicurezza elettrica di questo apparecchio è
assicurata soltanto quando lo stesso è correttamente collegato
ad un efficace impianto di messa a terra come previsto dalle
vigenti norme di sicurezza elettrica, (in caso di dubbio, richiedere
un controllo accurato dell’impianto da parte di personale
professionalmente qualificato).
Importante: la ditta costruttrice resta sollevata da ogni
responsabilità per eventuali danni a persone o cose, derivanti
dal mancato allacciamento della linea di terra.
ATTENZIONE: la tensione e la frequenza di alimentazione
sono indicate in targa matricola (figura in ultima pagina).
Verificare che la portata elettrica dell’impianto e delle prese
di corrente siano adeguate alla potenza massima dell’appa-
recchio indicate in targa. In caso di dubbio rivolgersi ad una
persona professionalmente qualificata.
La griglia semplice serve da supporto
per teglie, pirofile, stampi per i dolci.
La griglia porta-piatto serve in particolare
per le grigliate di carne poiché sostiene
anche la leccarda che raccoglie i grassi
che colano.
Grazie ai loro profili speciali, le griglie
restano sempre in orizzontale, anche
quando vengono estratte verso l'esterno.
Non c'é nessun rischio quindi che i tegami
scivolino o si ribaltino.
DOTAZIONE DEL FORNO (secondo modello)
Prima di utilizzare gli accessori del forno per la prima volta
è necessario pulirli. Per questa operazione si consiglia di
utilizzare una spugna. Successivamente risciacquare ed
asciugare gli accessori.

2 IT
CONSIGLI UTILI
LA COTTURA AL GRILL
Questo tipo di cottura consente la doratura rapida dei cibi.
A questo scopo consigliamo di inserire la griglia generalmente nel
3° o 4° ripiano, secondo le dimensioni dei cibi (Fig. pag. 8).
Quasi tutte le carni possono essere cotte al grill, fanno eccezione
alcune carni magre di selvaggina ed i polpettoni.
La carne ed il pesce da cucinare al grill vanno leggermente unti
con olio.
TEMPI DI COTTURA
Alle pagine 8-9 riportiamo una tabella indicativa dove sono indicati
tempi e temperature consigliati per le prime cotture. Ad esperienza
acquisita potrete variare a vostro piacimento i valori riportati nella
tabella stessa.
FORNO AUTOPULENTE CATALITICO
Speciali pannelli autopulenti ricoperti da uno smalto a struttura
microporosa, offerti come accessori opzionali per tutti i modelli,
eliminano la pulizia manuale del forno.
I grassi proiettati sulle pareti durante la cottura, vengono decomposti
dallo smalto, mediante un processo catalitico di ossidazione e
trasformati in prodotti gassosi.
Schizzi eccessivi di grasso possono ostruire i pori e quindi impedire
l’autopulizia. Tale caratteristica può essere ripristinata mediante
un riscaldamento per circa 10-20 minuti del forno vuoto impostando
la manopola forno in corrispondenza della massima temperatura.
Non usare prodotti abrasivi, pagliette metalliche, oggetti appuntiti,
panni ruvidi, prodotti chimici o detersivi che possono danneggiare
irrimediabilmente lo smalto.
Si consiglia inoltre di utilizzare pentole a bordi alti nel caso di
cotture di vivande particolarmente grasse (arrosti, ecc.) e di usare
la leccarda quando si esegue la cottura al grill.
Qualora, per particolari condizioni di sporco, non fosse sufficiente
l’azione precedente, si consiglia di intervenire asportando i grassi
con un panno morbido od una spugna inumiditi con acqua calda.
La porosità dello smalto è fondamentale per garantire l’azione
autopulente.
N.B.: Tutti i pannelli autopulenti in commercio hanno un’efficacia
di rendimento di circa 300 ore di funzionamento forno. Dopo tale
limite i pannelli dovrebbero essere sostituiti.
PULIZIA E MANUTENZIONE
Per la pulizia dei vetri della porta del forno non utilizzare materiali
abrasivi raschietti o oggetti che possono graffiare la superficie del
vetro.
Non utilizzare getti di vapore per la pulizia dell’apparecchio.
Pulire le superfici in acciaio inox e smaltate con acqua tiepida e
sapone, oppure con appositi prodotti in commercio, evitando
assolutamente l’uso di polveri abrasive che danneggerebbero le
superfici e le parti estetiche.
La pulizia del forno è molto importante e deve essere effettuata
ogni volta che questo viene usato. Infatti, sulle pareti si depositano
grassi sciolti durante la cottura che potrebbero, alla successiva
accensione, produrre odori sgradevoli che nuocerebbero al buon
esito della cottura. Per la pulizia usare acqua calda e detersivo,
sciacquando accuratamente.
Per eliminare questo fastidioso intervento, su tutti i modelli possono
essere inseriti pannelli autopulenti, offerti come accessori opzionali:
vedere apposito paragrafo «FORNO AUTOPULENTE CATA-
LITICO».
Usare detersivi e pagliette d’acciaio per le griglie inox. La pulizia
delle superfici in cristallo temperato deve essere eseguita quando
le superfici sono fredde. Eventuali rotture dovute alla non
osservanza di questa regola elementare non rientrano nei termini
di garanzia.
La lampada forno può essere sostituita disinserendo elettricamente
l’apparecchio e svitando l’ampolla che la racchiude, sostituendo
la lampada non funzionante con una analoga resistente alle alte
temperature.
La leccarda serve a raccogliere i grassi che colano durante la cottura con il grill. Deve essere utilizzata sola-
mente con il grill, il girarrosto o il turbo girarrosto, secondo il modello.
Attenzione: in tutti gli altri modi di cottura, la leccarda deve essere tolta dal forno.
Non usare mai la leccarda per cuocere gli arrosti perché ne risulterebbe un eccessivo sviluppo di fumo e
vapori e il forno si sporcherebbe inultimente.
Gli accessori devono essere tolti dal forno se non vengono utilizzati.
Pizza set é l'idéale per la cottura delle
pizze. Il set deve essere utilizzato in
abbinamento alla funzione Pizza.
La griglia piatta da combinare con la leccarda
per tutti i tipi di grigliate. Una presina è fornita per
permettere di estrarre l’insieme dal forno senza
scottarsi.
Non lasciare mai la presina nel forno.
GRIGLIE FORNO - SISTEMA DI ARRESTO
Il forno è dotato di un nuovo sistema di
arresto griglie. Questo sistema consente
di estrarre le griglie quasi completamente
senza che queste fuoriescano dal forno
mantenendole perfettamente in piano,
consentendo di verificare e mescolare il
cibo con la massima tranquillità e
sicurezza.
Per estrarre le griglie è sufficiente, come indicato sul disegno,
alzarle, prendendole dalla parte anteriore e tirarle.
SECONDO MODELLO
E’ un sistema che si sostituisce all’illuminazione con tradizionali
lampadine ad incandescenza; nella controporta del forno,
completamente in vetro temprato, sono stati inseriti 14 Led, di
altissima qualità a luce bianca, che illuminano l’interno del forno
con una luce diffusa permettendo una visione della cottura senza
ombre, su più livelli.
Il design creato per il supporto dei 14 Led regala un elegante
effetto high-tech.
Vantaggi del sistema
:
• Visibilità forno ottimale,
• Durata prolungata nel tempo,
• Consumo energetico estremamemente
basso -95% dei tradizionali sistemi
di illuminazione forni,
• Elevato rendimento,
• Design high tech.
“Apparecchio con luce LED bianca di classe 1M secondo la IEC 60825-
1:1993 + A1:1997 + A2:2001 (equivalente a EN 60825-1: 1994 + A1:2002
+ A2:2001) ; massima potenza ottica emessa
=459nm < 150uW. Non
osservare direttamente con strumenti ottici.”
Secondo modello pacchetto di funzioni
del sistema
I forni sono dotati di controllo elettronico della
ventilazione di cottura, brevettato VarioFan; il sistema cambia
automaticamente la velocità della ventola del multifunzione per
ottimizzare le correnti d’aria e la temperatura interna della cavità
mentre il forno sta cucinando.
Tutti i forni sono dotati di funzione ,
permettendo una gestione della distribuzione di umidità
e temperatura. Riduce la perdita degli alimenti fino al
50%, donando morbidezza e fragranza alle pietanze.
Una cottura cosí delicata è indicata sopratutto per il pane
e la pasticceria.
Riduce il tempo di preriscaldamento dei forni: sono
sufficienti solo 8 minuti per raggiungere i 200°C.
Offre la possibilità di personalizzare il livello e l’intensità
di grigliatura, fino al 50% in più rispetto ad un forno
multifunzione tradizionale.
La nuova porta WIDE DOOR ha un’ampia superficie in vetro
che assicura una più facile pulizia e un miglior isolamento termico.

3 IT
Questo elettrodomestico è marcato conformemente
alla Direttiva Europea 2002/96/CE sui rifiuti da
apparecchiature elettriche ed elettroniche (WEEE).
Assicurandovi che questo prodotto sia smaltito
correttamente, aiuterete ad evitare possibili
conseguenze negative all’ambiente e alla salute delle
persone, che potrebbero verificarsi a causa di un
errato trattamento di questo prodotto giunto a fine vita. Il simbolo
sul prodotto indica che questo apparecchio non può essere
trattato come un normale rifiuto domestico; dovrà invece essere
consegnato al punto più vicino di raccolta per il riciclo delle
apparecchiature elettriche ed elettroniche. Lo smaltimento deve
essere effettuato in accordo con le regole ambientali vigenti per
lo smaltimento dei rifiuti. Per informazioni più dettagliate sul
trattamento, recupero e riciclo di questo prodotto, per favore
contattare l’ufficio pubblico di competenza (del dipartimento
ecologia e ambiente), o il vostro servizio di raccolta rifiuti a
domicilio, o il negozio dove avete acquistato il prodotto.
SERVIZIO ASSISTENZA CLIENTI
CERTIFICATO DI GARANZIA CONVENZIONALE: cosa fare?
Il Suo prodotto è garantito, alle condizioni e nei termini riportati
sul certificato inserito nel prodotto ed in base alle previsioni del
decreto legislativo 24/02, nonché del decreto legislativo 6 settembre
2005, n. 206, per un periodo di 24 mesi decorrenti dalla data di
consegna del bene.
Così come riportato nei testi dei Decreti Legislativi citati, il certificato
di garanzia dovrà essere da Lei conservato, debitamente compilato,
per essere mostrato al Servizio Assistenza Tecnica Autorizzato,
in caso di necessità, unitamente ad un documento fiscalmente
valido rilasciato dal rivenditore al momento dell’acquisto (bolla di
consegna, fattura, scontrino fiscale, altro) sul quale siano indicati
il nominativo del rivenditore, la data di consegna, gli estremi
identificativi del prodotto ed il prezzo di cessione.
Resta pure inteso che, salvo prova contraria, poiché si presume
che i difetti di conformità che si manifestano entro sei mesi dalla
consegna del bene esistessero già a tale data, a meno che tale
ipotesi sia incompatibile con la natura del bene o con la natura
del difetto di conformità, il Servizio di Assistenza Tecnica Autorizzato
Gias, verificato il diritto all’intervento, lo effettuerà senza addebitare
il diritto fisso di intervento a domicilio, la manodopera ed i ricambi.
Per contro, nel successivo periodo di diciotto mesi di vigenza della
garanzia, sarà invece onere del consumatore che intenda fruire
dei rimedi accordati dalla garanzia stessa provare l’esistenza del
difetto di conformità del bene sin dal momento della consegna;
nel caso in cui il consumatore non fosse in grado di fornire detta
prova, non potranno essere applicate le condizioni di garanzia
previste e pertanto il Servizio di Assistenza Tecnica Autorizzato
Gias effettuerà l’intervento addebitando al consumatore tutti i costi
relativi.
ESTENSIONE DELLA GARANZIA FINO A 5 ANNI: come?
Le ricordiamo inoltre che sullo stesso certificato di garanzia
convenzionale Lei troverà le informazioni ed i documenti necessari
per prolungare la garanzia dell’apparecchio sino a 5 anni e così,
in caso di guasto, non pagare il diritto fisso di intervento a domicilio,
la manodopera ed i ricambi.
Per qualsiasi informazione necessitasse, La preghiamo rivolgersi
al numero telefonico del Servizio Clienti 199.12.13.14.
ANOMALIE E MALFUNZIONAMENTI: a chi rivolgersi?
Per qualsiasi necessità il centro assistenza autorizzatoèaSua
completa disposizione per fornirLe i chiarimenti necessari;
comunque qualora il Suo prodotto presenti anomalie o mal
funzionamenti, prima di rivolgersi al Servizio AssistenzaAutorizzato,
consigliamo vivamente di effettuare i controlli indicati sopra.
UN SOLO NUMERO TELEFONICO PER OTTENERE
ASSISTENZA.
Qualora il problema dovesse persistere, componendo il “Numero
Utile” sotto indicato, sarà messo in contatto direttamente con il
ServizioAssistenza Tecnica Autorizzato
che opera nella Sua zona di residenza.
Attenzione, la chiamata è a pagamento;
il costo verrà comunicato, tramite
messaggio vocale, dal Servizio clienti
dell’operatore telefonico utilizzato. Dettagli sono presenti sul sito
internet www.candy-group.com
MATRICOLA DEL PRODOTTO. Dove si trova?
E’ indispensabile che comunichi al Servizio Assistenza Tecnica
Autorizzato la sigla del prodotto ed il numero di matricola (16
caratteri che iniziano con la cifra 3) che troverà sul certificato di
garanzia oppure sulla targa matricola del prodotto (figura in ultima
pagina). In questo modo Lei potrà contribuire ad evitare trasferte
inutili del tecnico, risparmiando oltretutto i relativi costi.

• Premere tasto
• Selezionare la funzione di
cottura con la manopola
commutatore
ATTENZIONE: la prima operazione da eseguire dopo l’installazione
o dopo una interruzione di corrente (tali situazioni si riconoscono
perchè sul dispay lampeggia l’ora ) è la regolazione dell’ora,
come di seguito descritto.
• Premere e tenere premuto i tasti TIMER e END (oppure e TIMER
su alcuni modelli)
• Premere i tasti o per regolare l’ora
• Lasciare i tasti
• Al termine della durata im-
postata la funzione si spe-
gne da sola ed avvisa con
un segnale sonoro (il se-
gnale sonoro si ferma da
solo; per fermarlo subito
premere il tasto )
• Premere e tenere premu-
to il tasto
• Premere i tasti o per
regolare la durata
• Lasciare i tasti
USO DEL PROGRAMMATORE ELETTRONICO
FUNZIONE COME SI ATTIVA COME SI SPEGNE COSA FA A COSA SERVE
CONTAMINUTI
• Permette di utilizzare il
programmatore del forno
come una sveglia (può
essere usato con forno
funzionante o spento.
• Da un segnale sonoro al
termine di un tempo sta-
bilito
• Per visualizzare il tempo
rimanente premere il
tasto
• Realizzare le cotture
volute
FUNZIONAMENTO
MANUALE
• Riportare manopola com-
mutatore in posizione
O.
• Permette il funzionamen-
to del forno
DURATA
COTTURA
• Premere e tenere premu-
to il tasto TIMER
• Premere i tasti o per
regolare la durata
• Lasciare i tasti
• Selezionare la funzione
di cottura con la manopo-
la commutatore
• Al termine della durata
impostata il forno si
spegne da solo; se deve
essere fermato prima si
deve portare la manopola
commutatore in posi-
zione O oppure portare
a 0:00 la durata della cot-
tura (tasti TIMER e o ).
• Permette di impostare la
durata della cottura del
cibo inserito nel forno
• Per visualizzare il tempo
rimanente premere il ta-
sto TIMER.
• Per modificare il tempo
rimanente premere il ta-
sto TIMER + o
• Al termine della durata
impostata il forno si spe-
gne automaticamente ed
avvisa con un segnale
sonoro.
FINE
COTTURA
• Tipicamente si utilizza
questa funzione con la
funzione DURATA COT-
TURA–adesempioil
cibo desiderato deve cuo-
cere per 45 minuti e desi-
dero che sia pronto per le
ore 12:30; in tal caso:
Selezionare la funzione di
cottura desiderata
Impostare la durata cottura
a 45 minuti (Timer + o )
Impostare la fine cottura alle
ore 12:30 (End + o )
La cottura avrà automatica-
mente inizio alle 11:45
(12:30 meno 45 minuti),
all’ora impostata come fine
cottura il forno si spegne
automaticamente.
ATTENZIONE: impostando
solo la fine cottura e non la
durata della cottura, il
forno si accenderà subito e
si spegnerà all’ora di fine
cottura impostata
• Premere e tenere premu-
to il tasto END
• Premere i tasti o per
regolare l’ora di fine
cottura
• Lasciare i tasti
• Selezionare la funzione di
cottura con la manopola
commutatore
• All’ora impostata il forno
si spegne da solo; se de-
ve essere fermato prima
ènecessarioportarela
manopola commutatore
in posizione O.
• Permette di memorizzare
l’ora di fine cottura
• Per visualizzare l’ora pro-
grammata premere il
tasto END
• Per modificare l’ora pro-
grammata premere i
tasti END + o
ATTENZIONE: il forno funziona solo se impostato in manuale o cottura programmata
N.B.: per regolare le varie funzioni del forno, in alcuni modelli compaiono i simboli o in
altri modelli abbiamo + o -
REGOLAZIONE ORA
Lettura tempo
selezionato
Per regolare l’ora, premere la manopola e ruotare a sinistra fino a leggere l’ora esatta.
Per l’impiego come contaminuti, selezionare la durata del tempo ruotando la manopola
in senso antiorario (senza premere) fino a leggere nella finestrella il tempo desiderato
(max. 180’). Allo scadere del tempo entrerà in funzione la suoneria ed occorrerà spegnere
il forno; per farla cessare ruotare la manopola su .
USO DEL CONTAMINUTI
Per selezionare il tempo prescelto,
ruotare la manopola di un giro completo,
quindi ritornare con l’indice nella
posizione corrispondente al tempo
desiderato. Allo scadere del tempo,
entrerà in azione la suoneria per alcuni
secondi.
USO DEL TEMPORIZZATORE
Con questo meccanismo è possibile
programmare la durata espressa in
minuti della cottura e quindi lo
spegnimento automatico del forno al
termine del tempo desiderato (max. 120
minuti).
Allo scadere del tempo prescelto, la
manopola raggiungerà la posizione di
suoneria O in corrispondenza della
quale il forno si spegne
automaticamente.
Il forno può essere acceso solo impostando un tempo di
cottura o girando la manopola in posizione .
4 IT

ATTENZIONE: il forno funziona solo se impostato in manuale
o cottura programmata
USO DEL PROGRAMMATORE ANALOGICO
(F)
(E)
REGOLAZIONE ORA
Per regolare l’orologio premere e girare in senso anti-orario
la manopola fino a leggere l’ora esatta dopodiché rilasciare
la manopola
FUNZIONE COME SI ATTIVA COME SI SPEGNE COSA FA A COSA SERVE
• All’ora impostata la
funzione si spegne auto-
maticamente e viene
segnalata da una suoneria.
• Per fermare prima la
funzione impostata girare
la manopola in senso anti-
orario fino a far coincidere
con l’indice del qua-
drante (E)
• La suoneria deve essere
interrotta manualmente,
girando la manopola fino
a fare coincidere con
l’indice del quadrante (E)
• Realizzare le cotture
volute
FUNZIONAMENTO
MANUALE
• Girare la manopola in sen-
so anti-orario (senza pre-
mere) fino ad avere il sim-
bolo nel quadrante (E)
• Riportare manopola com-
mutatore in posizione
O.
• Permette il funzionamen-
to del forno
DURATA
COTTURA
• Prima dell’impostazione
selezionare la temperatura e
la funzione desiderata
• Selezionare la durata della
cottura girando la mano-
pola in senso antiorario
fino a far coincidere il
tempo selezionato nel
quadrante (E).
• L’inizio cottura parte im-
mediatamente e termina
automaticamente allo sca-
dere del tempo selezionato
• Durata max. cottura 180
minuti (3 ore)
• Al termine della durata
impostata il forno si
spegne automaticamente
e viene emesso un
segnale sonoro.
• Per fermare la funzione
impostata girare la mano-
pola fino a fare coincidere
con l’indice del
quadrante (E)
• Permette di impostare la
durata della cottura del
cibo inserito nel forno
• Al termine della durata
impostata il forno si spe-
gne automaticamente ed
avvisa con un segnale
sonoro.
• Esempio: il cibo desiderato
deve cuocere per 45 minuti
e desidero che sia pronto
per le ore 12:30; in tal caso:
- Selezionare la funzione di
cotture desiderata
- Impostare l’ora di inizio
cottura alle 11:45 (12:30
meno 45 minuti)
- Impostare la durata della
cottura a 45 minuti
Al termine della cottura il
forno si spegne automa-
ticamente.
• Prima dell’impostazione
selezionare la temperatura
e la funzione desiderata
• Selezione ora inizio cot-
tura: tirare e girare la
manopola in senso anti-
orario fino a far coincidere
la lancetta (F) con l’ora di
inizio cottura desiderata.
• Selezione durata
cottura:
girare, senza premere, la
manopola in senso orario
fino a far coincidere il
tempo selezionato con
l’indice del quadrante (E).
• Permette di programmare
una cottura in modo che il
cibo sia pronto all’ora
desiderata.
FINE
COTTURA
(Non disponibile
sul modello 2D 364)
5 IT

UTILIZZO DEL PROGRAMMATORE ELETTRONICO (Type A)
6 IT
•
Questa funzione vi
permette di regolare l’ora
utilizzando i tasti + e –
Nota: impostare l’ora al
momento dell'installazio-
ne del vostro forno o
subito dopo un’interru-
zione di corrente (12:00
lampeggia sullo schermo).
•
Impostare la manopola
sulla posizione
“impostazione
dell’orologio”
•
Usare i tasti + e -
per impostare l'ora.
•
Ruotare la manopola del
programmatore sulla
“Modalità Silenziosa”
FUNZIONI
COME SI UTILIZZANO? COME SI DISATTIVANO? COSA FA A COSA SERVE?
•
Questa funzione è
utilizzata per spegnere il
suono del timer
•
Ruotare la manopola sulla
posizione off
•
Permette di regolare l’ora
che appare sul display
Modalità silenziosa
Impostazione
dell’orologio
•
Questa funzione attiva un
allarme sonoro di qualche
secondo alla fine del
tempo impostato.
•
Utile per ricordare,
l’allarme sonoro funziona
indipendentemente dal
fatto che il forno sia acceso.
•
Regolare la manopola del
programmatore sulla
posizione TIMER.
•
Regolare il tempo di
cottura utilizzando i tasti
+ e -.
•
Regolare il tempo su
00:00, posizionando la
manopola del program-
matore sulla posizione
TIMER, ed utilizzando i
tasti + e -.
Sicurezza
bambini
•
Riposizionare la manopola
sulla funzione Sicurezza
bambini e premere il tasto
– per 3 secondi.
•
L’indicazione sul display
sparisce.
•
Il forno non può essere
utilizzato.
•
Questa funzione è utile
quando ci sono dei
bambini in casa.
•
Regolare la manopola del
programmatore sulla
posizione Sicurezza
Bambini.
•
Premere sul tasto + per 3
secondi.
•
La sicurezza bambini è in
funzione quando sul
display appare STOP.
•
Quando il tempo di cot-
tura è finito, la cottura si
arresta automaticamente
e l'allarme suona per
qualche secondo.
•
Una volta che il tempo è
trascorso, il forno viene
automaticamente disat-
tivato. Per fermare la
cottura prima, si deve
impostare la manopola
delle funzioni su OFF, o
regolare il tempo di cottura
su 00:00, posizionando la
manopola sulla Durata
della cottura e utilizzando
il tasto + e -.
•
Permette di regolare il
tempo di cottura.
•
Quando il tempo di cottura
è regolato, posizionare la
manopola su OFF per
ritornare alla visualiz-
zazione dell’ora attuale.
•
Per visualizzare l’ora
selezionata, posizionare il
selettore delle funzioni di
sinistra su Durata di cottura.
•
Selezionare una funzione
di cucina
• Impostare la manopola del
programmatore sulla
durata di cottura
• Regolare il tempo di
cottura utilizzando
i tasti + e -.
• Auto display si illumina.
Durata di cottura
•
Permette di spegnere il
suono del timer
•
Questa funzione è anche
utilizzata per le cotture
che possono essere
programmate
in anticipo. Ad esempio,
se il tuo piatto deve essere
cucinato per 45 minuti e
deve essere pronto alle
12.30: impostare sempli-
cemente la durata
di 45 minuti e l'ora di Fine
cottura alle 12:30.
La cottura inizierà automa-
ticamente alle 11:45 (12:30
meno 45 min) e proseguirà fino
a che l'ora di fine cottura è
stata raggiunta.
A questo punto il forno si
spegnerà automaticamente.
•
Selezionare una funzione
di cottura.
•
Regolare la manopola sul-
la posizione Fine di cot-
tura.
•
Regolare l’ora di fine
cottura utilizzando i
tasti + e -.
• Auto display si illumina
•
Quando la cottura è
terminata, il forno si
spegne automaticamente.
Per bloccare la cottura
anticipatamente, ruotare
la manopola delle funzioni
su OFF.
•
Permette di regolare l’ora
di fine cottura.
•
Quando l’ora di fine cottura
è regolata, ruotare il
selettore di funzione su
OFF per ritornare all’ora
attuale.
•
Per vedere il tempo di
cottura selezionato, ruotare
il selezionatore di funzione
di sinistra sulla posizione
Fine di cottura.
Fine di cottura
•
Ruotare la manopola sulla
posizione off
Il Led " ° " della temperatura lampeggia fino a che la temperatura visualizzata non è stata raggiunta.
Display per
temperatura o orologio
Luce: Timer /
Modalità automatica
Manopola di selezione
programmatore
Luce
:
Funzione con ventola
Funzione con ventola a sistema variabile
Modalità scongelamento
Bottoni di regolazione
*
/
* secondo modello
Manopola di selezione funzione
1
2
3
4
5
6
7
9
8
1.Luce: Timer / Modalità automatica
2.Luce
3.Funzione con ventola
4.Funzione con ventola a sistema
variabile
5.Modalità scongelamento
6.Display per temperatura o
orologio
7.Bottoni di regolazione
8.Manopola di selezione funzione
9.Manopola di selezione
programmatore
La prima operazione da fare dopo l’installazione o dopo l'interruzione di corrente (situazioni di questo tipo
possono essere riconosciute in quanto il display è acceso e lampeggia 12:00) è l'impostazione del tempo.
Attenzione!
Quando un programma è finito, se il forno è ancora caldo, il display mostra "HOT", in alternanza con il tempo e anche se le
maniglie sono posizionate su "OFF"
TIMER

Sprinter
Questa posizione permette un preriscaldamento rapido del forno. Una volta impostata questa
funzione consente un'immediato riscaldamento del forno (ad es. 8 minuti per raggiungere
200°C), la temperatura desiderata puó essere impostata tramite l'apposita manopola. Il termine
della fase di preriscaldamento è indicato tramite la spia del termostato "°C" che si spegne. Una
volta conclusa questa fase è possibile selezionare la funzione di cottura desiderata ed inserire
le pietanze da cucinare. Prestare attenzione a non inserire alimenti nel forno durante la fase
di preriscaldamento rischierebbero di subire danni.
TURBO-GRILL (a) : l'utilizzo del turbo-grill richiede la porta chiusa.
Utilizzando la ventilazione e la resistenza cielo contemporaneamente.
Si cuociono perfettamente grandi pezzi di cibo, come arrosti, pollame, ecc.. Mettete la griglia
a metà del forno e posizione la leccarda sotto di essa per raccogliere i grassi. Assicuratevi
che il cibo non sia troppo vicino al grill. Girate la carne a metà cottura.
ISTRUZIONI PER L’USO
7 IT
Accende la luce interna.
Convezione naturale
Sono in funzione le resistenze superiore e inferiore.
È la cottura tradizionale, ottima per arrostire cosciotti, selvaggina, ideale per biscotti, mele al
forno e per rendere i cibi molto croccanti.
Forno ventilato
L’aria calda, viene ripartita sui diversi ripiani; è l’ideale per cuocere contemporaneament e
diversi tipi di cibo (carne, pesce), senza miscelare sapori e odori. Cottura delicata - indicata
per pan di Spagna, torte Margherita, pasta sfoglia, ecc...
Suola ventilata
Adatta per cotture delicate (torte-soufflè).
Grigliatura tradizionale a porta chiusa
In questa posizione viene inserita la resistenza del grill. Ottima nella cottura di carni di medie
e piccolo spessore (salsicce, costine, bacon).
Funzione
Grill più girarrosto
Inserimento resistenza grill e motorino girarrosto.
Serve per effettuare cotture allo spiedo.
Scongelamento
Questa posizione permette di far circolare l’aria a temperatura ambiente intorno al cibo surgelato
facendolo così scongelare in pochi minuti senza modificare od alterare il contenuto proteico.
Funzione pizza
Il calore avvolgente in questa funzione ricrea un ambiente simile a quello
dei forni a legna di pizzeria.
-
220
200
160
190
Livello 4
Livello 4
Livello 4
200
220
MAX MAX
SUPER GRILL: il forno ha due posizioni Grill
Grill : 2200 W Grill Super : 3000 W
SOFT COOK (a)
Soft cook è la funzione ideale per la pasticceria ed il pane. Grazie alla velocità ridotta della
ventola, questa funzione aumenta l'umidità presente all'interno del forno. Una maggiore umidità
crea le condizioni di cottura ideali per quegli alimenti che hanno bisogno di mantenere una
consistenza elastica mentre cuociono (es. torte, pane, biscotti) e, di conseguenza, per non
sbriciolarsi.
(a) SU ALCUNI MODELLI - Funzione con VARIO FAN : Vario Fan é l'esclusivo sistema di funzionamento sviluppato da Candy per ottimizzare i
risultati di cottura, la gestione della temperatura e la gestione dell'umidità. Il sistema Vario Fan modifica automaticamente la velocità di rotazione
della ventola per tutte le cotture in multifunzione. Questo sistema si attiva automaticamente tutte le volte che viene selezionata una funzione
all'interno dell'area tratteggiata sul pannello di controllo.
Manopola
termostato
Manopola
commutatore
Temperatura
proposta
e regolazione
(Type A)

TABELLA TEMPI DI COTTURA
I tempi suggeriti nelle seguenti tabelle sono indicativi, infatti possono variare secondo la qualità, la freschezza, la dimensione e lo
spessore degli alimenti e secondo il vostro gusto. Lasciare sempre riposare per alcuni minuti prima di servire, perché tutti gli alimenti
continuano a cuocere dopo averli tolti dal forno.
Posizione ripiani
Pietanza Quantità Ripiano Tempera-
tura forno
Tempo
di cottura
in minuti
RipianoTempe-
ratura
forno
Tempo
di cottura
in minuti
Osservazioni
Forno elettrico statico Forno elettrico ventilato
Preparate la pasta a forma di pagnotta e
incidere con un coltello una croce sulla parte
superiore della forma. Lasciare lievitare
a temperatura ambiente almeno 2 ore,
ungere la leccarda e posizionate la forma
bene al centro della stessa.
Pane
Kg 1
di pasta
2
35
prerisc.10
200 2
30 ÷ 35
prerisc.10
180
•Pasta
Inserire le lasagne nel forno freddo
Lasagne Kg 3,5 2 70 ÷ 75 220 2 60 ÷ 65 200
Inserire i cannelloni nel forno freddo
Cannelloni Kg 1,8 2 50 ÷ 60 220 2 40 ÷ 50 200
Inserire la pasta al forno nel forno freddo
Pasta al forno Kg 2,5 2 55 ÷ 60 220 2 45 ÷ 50 200
• Paste salate
Preriscaldate per 15 min. il forno e preparate
le pizze nella leccarda smaltata con pomo-
dori, mozzarella e prosciutto, olio, sale,
origano
Pizze Kg 1 1 190 1 19025 ÷ 35 20 ÷ 25
Disponete 24 vol au vent nella leccarda
e cuocete.
Pasta sfoglia
Vol au vent
(Surgelati)
n° 24 1 220 2 20030 ÷ 35 25 ÷ 30
Preriscaldate per 15 min., ungere la teglia
del forno, disporre le 4 focacce oliate e
salate prima di infornare, lasciare lievitare
a temperatura ambiente per almeno 2 ore.
Focaccia
(n° 4)
gr. 200
di pasta cad.
2
200 2 18025 ÷ 30 20 ÷ 25
• Carne
Tutte le carni possono essere cotte in recipiente con bordo basso o bordo alto.
È consigliabile coprire il recipiente a bordo basso con un coperchio per evitare di sporcare il forno con schizzi del condimento.
Le carni coperte risultano più morbide e succose, mentre quelle scoperte risultano più croccanti.
I tempi indicati valgono per cotture con recipiente coperto o scoperto.
Disporre la carne in una teglia Pirex a bordo
alto con sale pepe. Voltare a metà cottura
Roastbeef
intero
Kg 1 3 220 3 20070 ÷ 80 50 ÷ 60
Cuocere come sopra
Arrosto di maiale
arrotolato
Kg 1 2 220 2 200100 ÷ 110 80 ÷ 90
Arrosto di vitello
arrotolato
Kg 1,3 1 220 2 20090 ÷ 110 90 ÷ 100
Cuocere come sopra
Arrosto di manzo
filetto
Kg 1 2 220 2 20080 ÷ 90 80 ÷ 90
Cuocere come sopra
• Pesci
Trota 3 intere / Kg 1 2 220 2 20040 ÷ 45 35 ÷ 40
Cuocere le trote coperte con olio, sale e
cipolle in teglia Pirex.
Salmone
700 g a fette
2,5 cm s.p.
2 220 2 20030 ÷ 35 30 ÷ 25
Cuocere il salmone non coperto in teglia
Pirex con sale, pepe e olio.
Sogliola Filetti / Kg 1 2 220 2 20040 ÷ 45 35 ÷ 40
Cuocete la sogliola con sale e un cucchiaio
d’olio.
Orata 2 intere 2 220 2 20040 ÷ 45 35 ÷ 40
Cuocere in recipiente coperto le orate con
olio e sale
CONSIGLIO UTILE: Per non rendere le superfici troppo secche
è consigliato abbassare la temperatura e allungare i tempi di
cottura.
8 IT

Pietanza Quantità Ripiano Tempera-
tura forno
Tempo
di cottura
in minuti
RipianoTempe-
ratura
forno
Tempo
di cottura
in minuti
Osservazioni
Forno elettrico statico Forno elettrico ventilato
Faraona Kg 1-1,3 2 60 ÷ 80 220 2 60 ÷ 70 200
• Pollame, Coniglio
Sistemare la faraona in teglia Pirex o
ceramica a bordo alto condita con aromi
naturali e pochissimo olio.
Pollo Kg 1,5-1,7 2 110 ÷ 120 220 2 100 ÷ 110 200
Come per la faraona
Coniglio a pezzi Kg 1-1,2 2 55 ÷ 65 220 2 50 ÷ 60 200
Mettete i pezzi di uguali dimensioni nella
leccarda smaltata, condite con aromi
naturali. Se necessario voltate i pezzi.
• Dolci, Torte
Torta cacao scatola 1 55 180 1 50 160
In teglia per torte Ø 22. Prerisc. per 10 min.
Torta margherita scatola 1 55 175 1 40 ÷ 45 160
In teglia per torte Ø 22. Prerisc. per 10 min.
Torta di carote scatola 1 65 180 1 50 ÷ 60 160
In teglia per torte Ø 22. Prerisc. per 10 min.
Torta crostata
albicocca
700 gr 1 40 200 2 30 ÷ 35 180
In teglia per torte Ø 22. Prerisc. per 10 min.
• Verdura
Finocchi 800 gr 1 70 ÷ 80 220 1 60 ÷ 70 200
Disponete i finocchi tagliati in 4 parti e
coperti in teglia di Pirex con burro e sale e
possibilmente con la parte interna verso
l’alto
Zucchine 800 gr 1 70 220 1 60 ÷ 70 200
Affettate le zucchine e cuocete in teglia
Pirex coperte con burro e sale
Patate 800 gr 2 60 ÷ 65 220 2 60 ÷ 65 200
Tagliate le patate in parti uguali e cuocetele
coperte con olio, sale e origano o rosmarino
in teglia Pirex.
Carote 800 gr 1 80 ÷ 85 220 1 70 ÷ 80 200
Tagliate le carote a fettine, copritele e
cuocetele in teglia Pirex.
• Frutta
Mele intere Kg 1 1 45 ÷ 55 220 2 45 ÷ 55 200
Cuocere la frutta in teglia di Pirex o ceramica
non coperta. Lasciare raffreddare in forno.
Come sopra
Pere Kg 1 1 45 ÷ 55 220 2 45 ÷ 55 200
Come sopra
Pesche Kg 1 1 45 ÷ 55 220 2 45 ÷ 55 200
• Cottura a grill
La cottura con il grill deve essere eseguita ponendo il cibo sotto il grill elettrico. Attenzione: durante il funzionamento il grill diventa di colore
rosso vivo. La leccarda deve essere inserita sotto la griglia per raccogliere i sughi.
Pane carrè
tostato
4 fette 4 5 (5 prerisc.) grill 4 5 (10 prerisc.) grill
Inserire il pane carrè sulla griglia supporto.
Dopo la 1° cottura capovolgere fino a cottura
ultimata.
Toasts farciti 4 3 10 (5 prerisc.) grill 3
5/8
(10 prerisc.)
grill
Inserire i toasts sulla griglia supporto
leccarda; dopo la prima brunitura
capovolgere i toasts fino a brunitura ultimata.
Salsiccie n°6 / Kg 0,9 4
25/30
(5 prerisc.)
grill 4
15/20
(10 prerisc.)
grill
Tagliare le salsiccie a metà e disporle sulla
griglia, con la parte interna verso l’alto. A
metà cottura capovolgere le salsiccie fino
a cottura ultimata. Avvertenza: ogni tanto
controllate visivamente l’uniformità di
cottura. Nel caso di disuniformità intercam-
biare quelle cotte con quelle meno cotte.
Costate di manzo n°4 / Kg 1,5 4
25
(5 prerisc.)
grill 4
15/20
(10 prerisc.)
grill
Disporre le fette bene sotto l’azione del grill
e voltarle due volte.
Coscie di pollo n°4 / Kg 1,5 3
50/60
(5 prerisc.)
grill 3
50/60
(10 prerisc.)
grill
Condite con aromi naturali e voltatele ogni
tanto.
TABELLA TEMPI DI COTTURA
9 IT

EN
BUILT-IN OVENS
USER MANUAL

Thank you for choosing one of our products. To get the most out of your oven we recommend that you:
• Read the notes in this manual carefully: they contain important instructions on how to install, use and service this oven safely.
• Keep this booklet in a safe place for easy, future reference.
All accessible parts are hot when the appliance is in operation, take care to not touch these elements.
When the oven is first switched on it may give out acrid smelling fumes. This is because the bonding agent for insulating panels around
the oven has been heated up for the first time.
This is a completely normal, if it does occur you merely have to wait for the fumes to clear before putting the food into the oven.
An oven by its very nature becomes very hot. Especially the glass of the oven door.
Do not allow children to go near the oven when it is hot, especially when the grill is on.
GENERAL WARNINGS
10 GB
Note: For ovens that are combined with a hob unit the instructions
contained in the manual for the hob unit must be followed.
IMPORTANT
If the oven is to work properly, the kitchen housing must be suitable.
The panels of the kitchen unit that are next to the oven must be
made of a heat resistant material. Ensure that the glues of units
made of veneered wood can withstand temperatures of at least
120 °C. Plastics or glues that cannot withstand such temperatures
will melt and deform the unit. Once the oven has been lodged
inside the unit, the electrical parts must be completely insulated.
This is a legal safety requirement. All guards must be firmly fixed
into place so that it is impossible to remove them without using
special tools.
Remove the back of the kitchen unit to ensure an adequate
current of air circulates around the oven. The hob must have
a rear gap of at least 45 mm.
CONNECTING TO THE POWER SUPPLY
Plug into the power supply. Ensure first that there is a third contact
that acts as earthing for the oven. The oven must be properly
earthed.
If the model of oven is not fitted with a plug, fit a standard plug
to the power cable. It must be able to bear the power supply
indicated on the specifications plate. The earthing cable is yellow-
green. The plug must be fitted by a properly qualified person.
If the socket and the plug are incompatible the socket must be
changed by a properly qualified person. A properly qualified person
must also ensure that the power cables can carry the current
required to operate the oven.
An ON/OFF switch may also be connected to the power supply.
The connections must take account of the current supplied and
must comply with current legal requirements. The yellow-green
earthing cable must not be governed by the ON/OFF switch. The
socket or the ON/OFF switch used for connecting to the power
supply must be easily accessible when the oven has been installed.
Important: During installation, position the power cable in such a
way that it will not be subjected to temperatures of above 50°C
at any point.
The oven complies with safety standards set by the regulatory
bodies. The oven is safe to use only if it has been adequately
earthed in compliance with current legal requirements on wiring
safety. You must ensure that the oven has been adequately
earthed.
The manufacturers cannot be held responsible for any harm
or injury to persons, animals or belongings caused by failure
to properly earth the oven.
WARNING: the voltage and the supply frequency are showed
on the rating plate (fig. on last page).
The cabling and wiring system must be able to bear the maximum
electric power required by the oven. This is indicated on the
specifications plate. If you are in any doubt at all, use the services
of a professionally qualified person.
OVEN EQUIPMENT (according to the model)
The simple shelf can take moulds
and dishes.
The tray holder shelf is especially good
for grilling things. Use it with the drip
tray.
The special profile of the shelves
means they stay horizontal even when
pulled right out. There is no risk of a
dish sliding or spilling.
It is necessary to do an initial cleaning of the equipment
before the first use of each of them. Wash them with a sponge.
Rinse and dry off
.
DECLARATION OF COMPLIANCE
• The parts of this appliance that may come into contact with
foodstuffs comply with the provisions of EEC Directive 89/109.
Appliance complies with European Directives 73/23/EEC
and 89/336/EEC, replaced by 2006/95/EC and 2004/108/EC,
and subsequent amendments.
When you have unpacked the oven, make sure that it has not
been damaged in any way. If you have any doubts at all, do
not use it: contact a professionally qualified person.
Keep packing materials such as plastic bags, polystyrene, or
nails out of the reach of children because they are dangerous
for children.
SAFETY HINTS
•
The oven must be used only for the purpose for which it was
designed: it must only be used for cooking food.
Any other use, e.g. as a form of heating, is an improper use
of the oven and is therefore dangerous.
•
The manufacturers cannot be held responsible for any damage
caused by improper, incorrect or unreasonable use.
When using any electrical appliance you must follow a
few basic rules.
– Do not pull on the power cable to remove the plug from the
socket.
– Do not touch the oven with wet or damp hands or feet.
– Do not use the oven unless you are wearing something on
your feet.
– Do not allow children or irresponsible people to use the oven
unless they are carefully supervised.
– It is not generally a good idea to use adapters, multiple sockets
for several plugs and cable extensions.
– If the oven breaks down or develops a fault switch it off at the
mains and do not touch it.
•
If the cable is at all damaged it must be replaced promptly.
When replacing the cable, follow these instructions.
Remove the power cable and replace it with one of the HO5RR-
F, H05VV-F, H05V2V2-F type. The cable must be able to bear
the electrical current required by the oven. Cable replacement
must be carried out by properly qualified technicians.
The earthing cable (yellow-green) must be 10 mm longer than
the power cable.
Use only an approved service centre for repairs and ensure
that only original parts are used. If the above instructions are
not adhered to the manufacturers cannot guarantee the safety
of the oven.
•
This appliance is not intended for use by persons (including
children) with reduced physical, sensory or mental capabilities,
or lack of experience and knowledge, unless they have been
given supervision or instruction concerning use of the appliance
by a person responsible for their safety.
•
Children should be supervised to ensure that they do not play
with the appliance.
INSTALLATION
Installation is the customer’s responsibility. The manufacturers
have no obligation to carry this out. If the assistance of the
manufacturer is required to rectify faults arising from incorrect
installation, this assistance is not covered by the guarantee.
The installation instructions for professionally qualified personal
must be followed. Incorrect installation may cause harm or injury
to people, animals or belongings. The manufacturer cannot be
held responsible for such harm or injury.
FITTING THE OVEN INTO THE KITCHEN UNIT
Fit the oven into the space provided in the kitchen unit; it may be
fitted underneath a work top or into an upright cupboard.
Fix the oven in position by screwing into place, using the two fixing
holes in the frame.(Fig.on last page).
To locate the fixing holes, open the oven door and look inside.
To allow adequate ventilation, the measurements and distances
indicated in the diagram on last page must be adhered to when
fixing the oven.

SELF-CLEANING OVEN WITH CATALYTIC
Special self-cleaning panels covered in a micro-porous coating
are available as optional extras for all models. If they are fitted,
the oven no longer needs to be cleaned by hand.
The fat that is splattered onto the sides of the oven during roasting
is eliminated by the microporous coating which breaks the fat
down by catalysis and transforms it into gas.
Excessive splattering may nevertheless block the pores and
therefore hinder self-cleaning. The self-cleaning capacity may be
restored by switching on the empty oven to maximum for about
10-20 minutes.
Do not use abrasive products, metal cleaning wads, sharp objects,
rough cloths, or chemical products and detergents that may
permanently damage the catalytic lining.
It is a good idea to use deep roasting trays to roast fatty foods
such as joints of meat etc. and to put a tray underneath the grill
to catch surplus fat.If the walls of the oven are so thickly coated
in grease that the catalytic lining is no longer effective remove
surplus grease with a soft cloth or sponge soaked in hot water.
The lining must be porous for self-cleaning to be effective.
N.B.: All catalytic linings currently on the market have a working
life of about 300 hours. They should therefore be replaced after
about 300 hours.
The drip tray catches the juices from grilled foods. It is only used with the Grill, Rotisserie, or Fan Assisted Grill ;
remove it from the oven for other cooking methods.
Never use the drip tray as a roasting tray as this creates smoke and fat will spatter your oven making it dirty.
The tray holder
The tray holder shelf is ideal for grilling. Use it in
conjunction with the drip tray. A handle is included to
assist in moving the both accessories safely. Do no
leave the handle inside the oven.
The pizza set is designed for pizza
cooking. In order to obtain the best
results the set must be used together
with Pizza function.
11 GB
USEFUL TIPS
SHELF SAFETY SYSTEM
The oven features a new shelf safety
system.
This allows you to pull out the oven shelves
when inspecting the food without danger
of food spillages or shelves falling
accidentally out of the oven.
To remove the shelves pull out and lift.
GRILLING
Grilling makes it possible to give food a rich brown colour quickly.
For browning we recommend that you insert the grill onto the
fourth level, depending on the proportions of the food (see fig.
page 16).
Almost all food can be cooked under the grill except for very lean
game and meat rolls.
Meat and fish that are going to be grilled should first be lightly
doused with oil.
COOKING TIME
For recommended cooking times and temperatures the first time
you use the oven, refer to the tables on pages 16, 17. You may
then wish to vary these times and settings in the light of your own
experience.
SERVICE CENTRE
Before calling the Service Centre
If the oven is not working, we recommend that:
you check that the oven is properly plugged into the power supply.
If the cause of the fault cannot be detected:
disconnect the oven from the mains, do not touch the oven and
call the after sales service.
Before calling the Service Centre remember to make a note
of the serial number on the specifications plate (see fig. on
last page).
The oven is supplied with a guarantee certificate that ensures that
it will be repaired free of charge by the Service Centre.
The MODELS
ovens have an electronic control of the fan speed,
called and patented VARIOFAN. During the cooking, this system
changes automatically the speed of the fan (in multifunction mode)
in order to optimize the air flow and the internal temperature in
the cavity of the oven.
All ovens feature the function.
This allows a management of the distribution of moisture
and temperature. It reduces the loss of humidity of the
50 %, which guarantees the food remains tender and
tastes better. This a delicate cooking is recommended
for the baking of the bread and pastry.
It reduces the time of preheating of ovens: only 8 minutes
to reach 200 degrees Celsius.
It gives the possibility of setting level and intensity of
grilling, up to 50 % more power in comparison with a
traditional multifunction oven.
Some ovens are equipped with the new door " WIDE DOOR "
which has a bigger window area, this allows better maintenance
and a improved thermal insulation.
According to the model
Is an illumination system which replaces the traditional « light bulb ».
14 LED lights are integrated within the door. These produce white
high quality illumination which enables to view the inside of the
oven with clarity without any shadows on all the shelves.
CLEANING AND MAINTENANCE
Never use a steam or high pressure spray to clean the appliance.
Never use abrasive cleaners, wire wool or sharp objects to clean
the glass oven door.
Clean the stainless steel and enamelled surfaces with warm,
soapy water or with suitable brand products. On no account use
abrasive powders that may damage surfaces and ruin the oven’s
appearance. It is very important to clean the oven each time that
it is used. Melted fat is deposited on the sides of the oven during
cooking. The next time the oven is used this fat could cause
unpleasant odours and might even jeopardise the success of the
cooking. Use hot water and detergent to clean; rinse out thoroughly.
To make this chore unnecessary all models can be lined with
catalytic self-cleaning panels: these are supplied as an optional
extra (see the section SELF-CLEANING OVEN WITH CATALYTIC
LINING).
Use detergents and abrasive metal pads like «brillo pads» for the
stainless steel grills.
The glass surfaces as the top, oven door and warming compartment
door must be cleaned when they are cold. Damage that occurs
to them because this rule was not adhered to are not covered by
the guarantee.
To replace the interior light:
. switch off the mains power supply and unscrew bulb.
Replace with an identical bulb that can withstand very high
temperatures.
Advantages :
system, besides providing excellent illumination inside
the oven, lasts longer than the traditional light bulb its easier and
to maintain and most of all saves energy.
• Optimum view
• Long life illumination
• Very low energy consumption, -95% in
comparison with the traditional
illumination High
“Appliance with white light LED of the 1M Class according to IEC 60825-
1:1993 + A1: 1997 + A2: 2001 (equivalent to EN 60825-1: 1994 + A1:
2002 + A2: 2001); the maximum light power emitted
459nm < 150uW.
Not observed directly with optical instruments. "

WARNING : the first operation to carry out after the oven has been
installed or following the interruption of power supply (this
is recognizable the display pulsating and showing )
is setting the correct time. This is achieved as follows
• Press and hold the TIMER and END buttons ( and TIMER on some
models
• Set time with buttons
• Release all buttons
• Sounds an alarm at the
end of the set time.
• To check how long is
left to run press the
button
To set the time, push the control knob and turn anti-clockwise to position at the correct time.
To set as minute minder, set the cooking time by turning anticlockwise the knob without pushing,
until the desired time is shown at the small window on the left of the clock (max. 180 minutes).
When the preset time is elapsed the alarm will ring and the oven must be switched off manually.
To stop the alarm turn the knob until appears in the window.
• When the set time as
elapsed an audible alarm
is activated (this alarm will
stop on its own, however
it can be stopped
immediately by pressing
the button)
• Press and hold the
button
• Press the buttons or
to set the required time
• Release all the buttons
• Press and hold the END
button
• Press the buttons
to set the time at which you
wish the oven to switch off
• Release the buttons
• Set the cooking function
with the oven function
selector
USE OF THE ELECTRONIC PROGRAMMER
FUNCTION
HOW TO ACTIVATE IT HOW TO SWITCH IT OFF WHAT IT DOES WHAT IT IS FOR
MINUTE MINDER
• Allows to use the oven as
alarm clock (could be
activated either with
operating the oven or
with out operating the
oven)
• For cooking the desired
recipes
MANUAL
FUNCTION
• Turn the oven function
selector to position O.
• Enables you to operate
the oven.
COOKING
TIME
• Press and hold the
TIMER button
• Press the buttons or
to set the lenght of coo-
king required
• Release all buttons
• Set the cooking function with
the oven function selector
• When the time is elapsed
the oven will switch off
automatically. Should you
wish to stop cooking
earlier either turn the
function selector to 0, or
set time to 0:00
(TIMER and buttons)
• It allows to preset the
cooking time required
for the recipe chosen
• To check how long is
left to run press the
TIMER button.
• To alter/change the
preset time press
TIMER and buttons
• At the end of the
cooking set time,
the oven will switch
off automatically and an
audible alarm will ring.
END OF
COOKING
• This function is typically
used with “cooking time”
function. For example
if the dish has to be cooked
for 45 minutes and needs
to be ready by 12:30,
simply select the required
function, set the cooking
time to 45 minutes and the
end of cooking time to
12:30.
• Cooking will start automa-
tically at 11:45 (12:30
minus 45 mins) and will
continue until the pre-set
end-of-cooking-time, when
the oven will switch itself
off automatically.
WARNING.
If the END of cooking is
selected without setting
the length of cooking time,
the oven will start cooking
immediately and it will
stop at the END of
cooking time set.
• At the time set, the oven
will switch off. To switch
off manually, turn the
oven function selector
to position O.
• Enables you to set the
end of cooking time
• To check the preset
time press the END
button
• To modify the preset
time press buttons
END +
• Press the button
• Set the cooking function
with the oven function
selector
ATTENTION the oven only operates if set on manual function or preset time.
N.B.: on some models the symbols are replaced by + and - .
SETTING THE CORRECT TIME
Reading of the
time selected
12 GB
USING THE MINUTE TIMER
To set the cooking time, turn dial one
complete revolution and then position
the index to the required time. When
the time has lapsed, the signal will ring
for a few seconds.
USING THE END OF COOKING TIMER
This control enables to set the desired
cooking time (max. 120 min.) the oven
will automatically switch off at the end
of the set time.
The timer will count down from the set
time return to the O position and switch
off automatically.
For normal use of oven set the timer to
the position.
To set the oven ensure the timer is not on the O position.

USE OF ANALOGUE CLOCK/PROGRAMMER
(F)
(E)
13 GB
FUNCTION
HOW TO ACTIVATE IT HOW TO SWITCH IT OFF WHAT IT DOES WHAT IT IS FOR
• At the end of the set time
the oven switches off
automatically, this is
indicated by an audible
alarm.
• To cancel the setting turn
the control knob until the
symbol appears in the
window (E)
• It allows you to preset the
cooking time required for
the recipe chosen.
• Example: if the dish has
to be cooked for 45
minutes and needs to be
ready by 12:30;
- Select the required
function
- Set start cooking time at
11:45 (12:30 minus 45
minutes)
- Set cooking time at 45
minutes
At the end of cooking the
oven will automatically
switch off.
• Enables you to operate
the oven.
• At the end of cooking time
set the oven will switch off
automatically and an
audible alarm will ring.
• To cancel the set function
turn the control knob anti-
clockwise until the symbol
appears in the window
(E)
• The alarm have to be
stopped by turning the
control knob until the
symbol appears in the
window (E)
• For cooking the desired
recipes
MANUAL
FUNCTION
• Turn the control knob anti-
clockwise, without pushing,
until the symbol appears
in the window (E)
• Turn the oven function
selector to position O.
• First of all select the
cooking function and the
temperature required
• Set the length of cooking
required by turning the
control knob anticlockwise
until the time matches the
length of time shown in the
window (E)
• The oven will start
immediately and it will
switch off automatically at
the end of the preset time
• Max time 180 minutes
(3 hours)
• At the end of the cooking
time set, the oven will
switch off automatically
and an audible alarm will
ring.
• First of all select the
cooking function and the
temperature required.
• To set the cooking start
time pull and turn the
control knob anticlockwise
until the hand F is in the
position indicating the start
time required.
• To set the length of
cooking required turn
clockwise the control knob
without pushing it, until the
time required appears in
the window (E).
• Enables to program the
oven so that the recipe is
ready at the desired time
COOKING
TIME
END OF
COOKING
(Not available
on model 2D 364.)
ATTENTION : the oven only operates if set on manual function
or preset time.
SETTING THE CORRECT TIME
To set the correct time push and turn anti-clockwise the knob
until the clock shows the correct time. Once this is done
release the control.

Display for
Temperature or Time
Lights:
Minute Minder or
Auto light
Function
Timer knob
Lights: Function with fan
Function with VARIOFAN
Defrost
Setting buttons
*
/
Function selector knob
1
2
3
4
6
7
9
8
USE THE ELECTRONIC PROGRAMMER (Type A)
14 GB
•
To set the time
NB : Set the time when
you first install your oven
or just after a black out
(the clock is showing a
pulsating 12.00)
•
Rotate the left function
selector to the position
“Set the time
”.
•
Use the buttons " + " or
" - " to set the time
•
Rotate the left function
selector to the position
" Silence mode "
FUNCTION
HOW TO ACTIVATE
IT?
HOW TO SWITCH
IT OFF?
WHAT IT DOES ? WHAT IT IS FOR ?
•
To turn off the sound of the
minute minder
•
Rotate the function
selector to the position
OFF.
•
Enables you to set the
time which appears on the
display
SILENCE MODE
SET THE TIME
MINUTE MINDER
•
Sounds an alarm at a few
seconds at the end of the
set time
•
Allow to use the oven as
alarm even if the oven is
switch off
•
Turn the left function
selector to the position
Minute Minder
•
Set the time of cooking
by using buttons " + " and
"-"
•
Set the time on 00.00 by
turning the left function
selector to the position
Minute Minder, and using
the button " - "
CHILD LOCK
•
Turn back the left function
selector to Child lock and
press button " + " during 3
seconds
• Indication STOP
disappears
•
The oven cannot be used
•
Useful especially when
children are at home
•
Turn the left function
selector to the position
Child lock.
Press the button " + "
during 3 seconds
•
Child lock is available
when " STOP " appears
on display
•
For cooking the desired
recipes
•
When the cooking time has
elapsed, the oven switch off
automatically and the alarm
rings for few seconds
To stop the cooking
functions early, turn the
function control to OFF or
set the time on 00.00 ; by
rotating the function selector
to Cooking Time Duration
and by using the buttons "
+ " and " - "
•
It allows to preset the
cooking time required for
the recipe chosen.
• When the cooking time is
set, turn the function
selector to OFF to go back
to actual time.
• To view the cooking time
selected, turn the left
function selector to
Cooking Time duration
.
•
Turn the right function
selector to a cooking
function
•
Rotate the left function
selector to the position
"
Cooking Time Duration
"
•
Set the time of cooking
by using buttons " + " and
"-"
•
Lighting Auto appears
COOKING TIME
DURATION
•
Enables you to turn off the
sound of the minute
minder
•
This function is used for
cooking we want to program
in advance. For example,
your recipe needs to be
cooked 45 min and to be
ready at 12.30pm ; simply
set the cooking time
duration on 45 min and the
end of cooking time on
12.30pm.
The cooking will start
automatically at 11.45
(12.30 minus 45 min) and
will continue until the pre-
set end of cooking time,
then the oven will switch
itself off automatically
•
Turn the right function
selector to a cooking
function
•
Rotate the left function
selector to the position
"End of cooking"
•
Set the end time of
cooking by using buttons
" + " and " - "
•
Lighting Auto appears.
•
When the cooking time
has elapsed, the oven
switch off automatically.
•
To stop the cooking
functions early, turn the
function control to OFF
•
It allows to preset the end
of cooking time you want.
•
When the cooking time is
set, turn the function
selector to OFF to go back
to actual time.
•
To view the cooking time
selected, turn the left
function selector to End of
cooking Time
END OF
COOKING TIME
•
Rotate the function
selector to the position
OFF.
The Led “°” of the temperature indicator pulsates until the pre-set temperature is not reached.
HOT : When a cooking program is finished, if the oven is still hot, « HOT » appears on the display, alternately with the time
displays, even if the two function selectors are switched on OFF.
* according to the model
1. Minute Minder or Auto light
2. Lights
3. Function with fan
4. Function with VARIOFAN
5. Defrost
6. Display for Temperature or Time
7. Setting buttons
8. Function selector knob
9. Function Timer knob
The first operation to carry out after the oven has been installed or following the interruption of power supply (this
is recognizable the display pulsating and showing12:00) is setting the correct time.
WARNING !
5

15 GB
OPERATING INSTRUCTIONS
* Tested in accordance with the CENELEC EN 50304.
** Tested in accordance with the CENELEC EN 50304 used for definition of energy class.
Natural convection
Bottom and top oven elements are used. This is the traditional form of baking and roasting. It
is ideal for roasting joints of meat and game, baking biscuits and apples and making the food
nice and crunchy.
Fan cooking
Both top and bottom heating elements are used with the fan circulating the air inside the oven.
We recommend you use this method for poultry, pastries, fish and vegetables. Heat penetrates
into the food better and both the cooking and preheating times are reduced. You can cook
different foods at the same time with or without the same preparation in one or more positions.
This cooking method gives even heat distribution and the smells are not mixed. Allow about
ten minutes extra when cooking foods at the same time.
Fan plus lower element
This function is ideal for delicate dishes (pies-souffle).
FAN ASSISTED GRILL (a): use the turbo-grill with the door closed.
The top heating element is used with the fan circulating the air inside the oven. Preheating
is necessary for red meats but not for white meats. Ideal for cooking thick food items, whole
pieces such as roast pork, poultry, etc. Place the food to be grilled directly on the shelf centrally,
at the middle level. Slide the drip tray under the shelf to collect the juices. Make sure that the
food is not too close to the grill. Turn the food over halfway through cooking.
GRILL: use the grill with the door closed.
The top heating element is used alone and you can adjust the temperature. Five minutes
preheating is required to get the elements red-hot. Success is guaranteed for grills, kebabs
and gratin dishes. White meats should be put at a distance from the grill; the cooking time is
longer, but the meat will be tastier. You can put red meats and fish fillets on the shelf with the
drip tray underneath.
Function
Function
dial
Grill/spit element.
This is used for roasting on the spit.
SUPER GRILL: the oven has two grill positions
Grill : 2200 W Grill SUPER : 3000 W
Defrosting
When the dial is set to this position. The fan circulates air at room temperature around the,
frozen food so that it defrosts in a few minutes without the protein content of the food being
changed or altered.
(a) on some models : function with “Vario Fan” is the exclusive system developed by Candy to optimize the cooking results, temperature
management and damp management. The Vario Fan system is a self-activating system that changes automatically fan speed when a fan function
is chosen: the fan functions are the one inside the outlined area on control panel.
Soft Cook (a)
Soft Cook is the function for the confectionery and the bread. Thanks to its reduced fan speed,
this function increases oven internal damp. The increased damp creates the ideal conditions
of cooking for those foods that need to maintain an elastic consistence while they are cooking
(ex. cakes, bread, biscuits) avoiding surface breakages.
Function Pizza
This function with hot air circulated in the oven ensure perfect result for
dishes such as pizza or focaccia.
-
220
200
160
190
Level 4
Level 4
Level 4
200
220
MAX MAX
Thermostat
dial
Turns on the oven light
This will automatically activate the cooling fan (on fan cooled models only)
Super Grill
This function allows to set food crunchiness. The Super Grill function is characterized by a
50% power increase in comparison to the standard grill.
Temperature
pre-set and
setting.
(Model with
electronic
programmer)
(Type A)

TABLES OF COOKING TIMES
The overall suggested cooking times set out below are intended as a rough guide only. They may in fact vary according to the quality,
the freshness, the size and the thickness of the food cooked and of course cooking time is also partly a matter of taste. Let the food
stand for a few minutes before serving because the ingredients continue cooking after they
have been removed from the oven.
Shelf position
Food Quantity Shelf Oven
tempe-
rature
Time
of cooking
in minutes
Remarks
Static electric oven Electric fan oven
Form the dough into a loaf and make a
cross with a knife on top of the dough leave
the dought to rise for at least 2 hours.
Grease the baking tin and put the dough in
the middle of it.
Bread
Kg 1
di pasta
2
35
10 (pre-heating)
200 2
30 ÷ 35
10
(pre-heating)
180
•Pasta
Put the lasagne into an unheated oven
Lasagne Kg 3,5 2 70 ÷ 75 220 2 60 ÷ 65 200
Put the cannelloni into an unheated oven
Cannelloni Kg 1,8 2 50 ÷ 60 220 2 40 ÷ 50 200
Put the oven baked pasta into an unhea-
ted oven
Oven baked pasta Kg 2,5 2 55 ÷ 60 220 2 45 ÷ 50 200
Warm the oven for 15 minutes and place
the pizzas on the greased baking tray.
Garnish them with tomatoes, mozzarella,
ham, oil, salt and origano.
Pizza Kg 1 1 190 1 19025 ÷ 35 20 ÷ 25
Place 24 vol au vents in the oven and
bake.
Pastry (frozen)
vol au vents
n° 24 1 220 2 20030 ÷ 35 25 ÷ 30
Focaccia
(n° 4)
gr. 200
of dough each
2
200 2 18025 ÷ 30 20 ÷ 25
• Meat
All meats can be roasted in shallow or deep roasting trays.
It is advisable to cover the shallow trays to avoid splattering the sides of the oven with grease.
The roasting times are the same whether the meat has been covered up or not.
Put the meat into a deep Pyrex dish and
season with salt and pepper; turn the meat
half way through cooking.
Whole joint of
beef
Kg 1 3 220 3 20070 ÷ 80 50 ÷ 60
Cook the meat in a covered Pyrex dish with
herbs, spice, oil and butter.
Joint of
deboned
Kg 1 2 220 2 200100 ÷ 110 80 ÷ 90
Joint of
deboned veal
Kg 1,3 1 220 2 20090 ÷ 110 90 ÷ 100
Cook as indicated above.
Joint of
fillet of beef
Kg 1 2 220 2 20080 ÷ 90 80 ÷ 90
Cook as indicated above.
•Fish
Trout
3 whole trout
or / Kg 1
2 220 2 20040 ÷ 45 35 ÷ 40
Cover the trout with salt, oil and onions and
cook in a Pyrex dish.
Salmon
700 g
2,5 cm slice
2 220 2 20030 ÷ 35 30 ÷ 25
Cook the salmon in an open Pyrex dish with
salt, pepper and oil.
Sole Kg 1 2 220 2 20040 ÷ 45 35 ÷ 40
Cook the sole with salt and a spoonful of
oil.
Bream 2 whole ones 2 220 2 20040 ÷ 45 35 ÷ 40
Cook the bream in oil and salt in a covered
dish.
HANDY TIP: Lower the temperature so as to avoid the
surface of the food becoming hard and dry.
Shelf Time
of cooking
in minutes
Oven
tempe-
rature
• Baking (not cakes)
Warm the oven for 15 minutes, grease the
baking tray, season the 4 focaccia with oil
and salt and leave them to
rise at room temperature for at least 2 hours
before putting them in the oven.
16 GB

TABLES OF COOKING TIMES
Food Quantity Shelf Oven
tempe-
rature
Time
of cooking
in minutes
Remarks
Static electric oven Electric fan oven
Shelf Time
of cooking
in minutes
Oven
tempe-
rature
Guinea fowl Kg 1-1,3 2 60 ÷ 80 220 2 60 ÷ 70 200
• Rabbits and Poultry
Place the guinea fowl in a deep Pyrex or
pottery dish with very little oil and season with
herbs and spices.
chicken Kg 1,5-1,7 2 110 ÷ 120 220 2 100 ÷ 110 200
Follow the procedure for cooking the guinea
fowl.
Rabbit pieces Kg 1-1,2 2 55 ÷ 65 220 2 50 ÷ 60 200
Put all the pieces of the same size in the
glazed tray. Season with herbs and spices.
Turn the pieces as and when required.
• Cakes
1 55 180 1 50 160
Use a tin that is 22 cm deep. Pre-heat for
10 mins.
Sponge cake
1 55 175 1 40 ÷ 45 160
Carrot cake baked
in a tin
1 65 180 1 50 ÷ 60 160
Apricot pie
700 gr 1 40 200 2 30 ÷ 35 180
• Vegetable
Fennel 800 gr 1 70 ÷ 80 220 1 60 ÷ 70 200
Cut the fennel into four pieces, add butter,
salt and potatoes if required and place in
a Pyrex face up. Cover the dish.
Courgettes 800 gr 1 70 220 1 60 ÷ 70 200
Slice the courgettes, place in a Pyrex
dish and add butter and salt.
Potatoes 800 gr 2 60 ÷ 65 220 2 60 ÷ 65 200
Cut the potatoes into equal parts and place
in a Pyrex dish. Season with salt, origano
and rosemary. Cook in oil.
Carrots 800 gr 1 80 ÷ 85 220 1 70 ÷ 80 200
Slice the carrots, place in a Pyrex dish and
cook.
• Fruit
Whole apples Kg 1 1 45 ÷ 55 220 2 45 ÷ 55 200
Bake the fruit in an open Pyrex or earthen-
ware dish. Leave it to cool inside the oven.
Follow procedure above.
Pears Kg 1 1 45 ÷ 55 220 2 45 ÷ 55 200
Follow procedure above.
Peaches Kg 1 1 45 ÷ 55 220 2 45 ÷ 55 200
• Grilling
Place the food to be grilled underneath the infra-red grill. Warning: When the grill is on it takes on a bright red colour. Place the tray
underneath the grill to collect juices and fat from the food being grilled.
Squares of bread
for toasting
4 pieces 4
5
(5 to heat up grill)
grill 4
5
(10 to heat up grill)
grill
Lay the bread on the grill tray. When one
side of the bread has been toasted, turn
over and toast the other side. Remember:
keep the toast warm at the bottom of the
oven until you are ready to serve it.
Toasted
sandwiches
43
10
(10 to heat up grill)
grill 3
5/8
(10 to heat up grill)
grill
Lay the bread on the grill tray. When one
side of the sandwich has been toasted, turn
over and toast the other side.
Sausages n°6 / Kg 0,9 4
25/30
(5 to heat up grill)
grill 4
15/20
(10 to heat up grill)
grill
Cut the sausages in half and lay them face
down on the grill. Half way through grilling
turn them over. Every so often, check that
they are being cooked equally all over. (If
this is not happening, turn and reposition
the ones being cooked ether less or more
than the others.
Ribs of beef n°4 / Kg 1,5 4
25
(5 to heat up grill)
grill 4
15/20
(10 to heat up grill)
grill
Make sure that the ribs of beef are exposed
to the full effect on the main grill.
Chicken legs n°4 / Kg 1,5 3
50/60
(5 to heat up grill)
grill 3
50/60
(10 to heat up grill)
grill
Turn them over twice during grilling.
Coconut cake
baked in a tin
Use a tin that is 22 cm deep. Pre-heat for
10 mins.
Use a tin that is 22 cm deep. Pre-heat for
10 mins.
Use a tin that is 22 cm deep. Pre-heat for
10 mins.
17 GB
This appliance is marked according to the European directive 2002/96/EC on Waste Electrical and Electronic Equipment (WEEE).
By ensuring this product is disposed of correctly, you will help prevent potential negative consequences for the environment and
human health, which could otherwise be caused by inappropriate waste handling of this product.
The symbol on the product indicates that this product may not be treated as household waste. Instead it shall be handed over tothe applicablecollection
point for the recycling of electrical and electronic equipment Disposal must be carried out in accordance with local environmental regulations for
waste disposal. For more detailed information about treatment, recovery and recycling of this product, please contact your local city office, your
household waste disposal service or the shop where you purchased the product.

— Lire attentivement les instructions contenues dans cette brochure, elles fournissent d’importantes indications sur la sécurité d’installation,
l’emploi du four et son entretien.
— Conserver soigneusement cette notice d’utilisation pour toutes consultations ultérieures.
— Après avoir déballé votre four, vérifier que l’appareil est complet.
— Les emballages comme le plastique, le polystyrène, peuvent constituer un danger pour les enfants. Ne pas les laisser à leur portée.
ATTENTION
Lors de la première utilisation du four, il peut se produire un dégagement de fumée âcre provoqué par la premier échauffement du
collant des panneaux d’isolation enveloppant le four. Ce phénomène est normal. Attendez que la fumée cesse avant de cuire des
aliments.
Lorsque le four est en fonctionnement, la porte en verre est particulièrement chaude, les éléments chauffants sont brûlants ; nous
recommandons donc de ne pas toucher. Eloigner les jeunes enfants.
ATTENTION: La tension et la fréquence d’alimentation sont indiquées sur la plaque signalétique (illustration dernière page).
Faites appel à un professionnel pour l’installation de votre four.
INSTRUCTIONS GENERALES
DECLARATION DE CONFORMITÉ:
• Les parties de cet appareil pouvant être en contact avec des
substances alimentaires sont conformes à la prescription de
la Dir. CEE 89/109.
Produit compatible avec les Directives Européennes 73/23/EEC
et 89/336/EEC, remplacées par 2006/95/EC et 2004/108/EC,
et les modifications successives.
CONSIGNES DE SECURITE
Cet appareil est conçu pour cuire des aliments. Tout autre
utilisation (ex. chauffage d’appoint) doit être considéré
comme impropre.
Le constructeur ne peut être tenu comme responsable en cas
de dommages liés à une mauvaise utilisation ou à des modifications
techniques du produit.
L’emploi d’un appareil électrique nécessite quelques règles de
sécurité.
— Ne pas tirer sur le fil électrique pour débrancher la prise.
— Ne pas toucher l’appareil avec les pieds ou les mains mouillés.
— Evitez d’utiliser l’appareil pieds nus.
— Veillez à ne pas laisser les enfants en bas âge manipuler le
four.
L’utilisation de multiprises et de rallonges pour raccorder votre
appareil est fortement déconseillé. En cas de panne ou de mauvais
fonctionnement il faut éteindre le four avant de le démonter. En
cas de détérioration du fil électrique, remplacez-le rapidement en
suivant les indications suivantes: ôtez le fil d’alimentation électrique
et remplacez-le par un (du type H05RR-F, H05VV-F, H05V2V2F)
adapté à la puissance de l’appareil. Vous veillerez à ce que cette
opération soit effectuée par un centre technique agréé. Pour
l’utilisateur c’est la certitude d’obtenir des pièces de rechange
d’origine. Le non-respect de ces règles peut compromettre la
sécurité de l’appareil.
Cet appareil n’est pas destiné à être utilisé par des personnes
(notamment les enfants) incapables, irresponsables ou sans
connaissance sur l’utilisation du produit, à moins qu’elles ne
soient surveillées, ou instruites sur l’utilisation de l’appareil, par
une personne responsable de leur sécurité.
Surveillez les enfants pour être sûr qu’ils ne jouent pas avec
l’appareil.
INSTALLATION
La mise en service de l’appareil est à la charge de l’acheteur, le
constructeur est dégagé de ce service. Les pannes liées à une
mauvaise installation ne seront pas couvertes par la garantie.
Une mauvaise installation peut provoquer des dommages aux
personnes, aux animaux domestiques; dans ce cas la responsabilité
du constructeur ne peut être engagée.
MISE EN PLACE DU FOUR DANS SON
MEUBLE
Une fois le four inséré dans son meuble, I’ancrage se fait par 2
vis visibles en ouvrant la porte du four, voir illustration sur dernière
page.
Pour permettre une meilleure aération du meuble, les fours doivent
être encastrés conformément aux mesures et distances indiquées
sur l’illustration de la dernière page.
N.B.: Pour les fours à associer avec des plaques de cuisson, il
est indispensable de respecter les instructions contenues dans
la brochure jointe à l’appareil à associer.
42 FR
EQUIPEMENT DU FOUR
EQUIPEMENT DIFFERENT SELON LE TYPE DE FOUR
Avant la première utilisation des différents accessoires, nous
recommandons un nettoyage avec une éponge additionnée
de produit lessiviel, suivi d'un rinçage et d'un séchage.
La grille simple sert de support aux
moules et aux plats.
La grille porte-plat sert plus particu-
lièrement à recevoir les grillades.
Elle est à associer au plat récolte sauce.
Grâce à leur profil spécial, les grilles
restent à l'horizontale jusqu'en butée.
Aucun risque de glissement ou de
débordement du plat.
Le plat récolte-sauce est destiné à
recevoir le jus des grillades. Il n'est à
utiliser qu'en mode grilloir,
Tournebroche ou Turbogril (selon
modèle de four).
Attention : en cuisson autre que les modes Grilloir,Tournebroche,
et Turbo-gril, le plat récolte-sauce doit être retiré du four.
Ne jamais utiliser le plat récolte-sauce comme plat à rôtir, il en
résulterait des dégagements de fumée, des projections de graisse
et un encrassement rapide du four.

LA CUISSON AU GRIL
Le préchauffage est superflu. La cuisson peut se faire porte close
et les aliments doivent être placés par rapport au gril en fonction
des résultats que l’on souhaite obtenir.
— Plus près pour les aliments dorés en surface et saignants.
— Plus loin pour les aliments bien cuits à l’intérieur.
Le lèchefrite permet la récupération du jus.
Ne jamais utiliser le lèchefrite comme plat à rotir, il en résulterait
dégagements de fumée, des projections de graisse et un
encrassement rapide du four.
TEMPS DE CUISSON
Dans les pages 48, 49 un tableau récapitulatif indique les temps
de cuisson et les températures selon les préparations.
CONSEILS DE NETTOYAGE ET D’ENTRETIEN
Ne jamais utiliter de produits abrasifs, d’éponges métalliques ou
d’objets tranchants pour le nettoyage des verres de porte de four.
Ne jamais utiliser de nettoyeur vapeur ou à haute pression pour
le nettoyage de l’appareil.
Pour nettoyer les surfaces en inox et en émail, utilisez de l’eau
tiède légèrement savonneuse. Vous pouvez utiliser un produit
adapté au nettoyage de ce type de surface. Eviter absolument
les produits abrasifs qui pourraient endommager la surface du
four. En cas de salissures tenaces, évitez d’utiliser des ustensiles
susceptibles de rayer irrémédiablement la surface de votre four.
Il est conseillé de nettoyer régulièrement l’intérieur de votre four
après chaque cuisson.
Si vous ne respectez pas le nettoyage de votre four après chaque
cuisson vous aurez une odeur désagréable, et les projections de
graisse seront encore plus difficiles à enlever. Pour l’intérieur du
four utiliser de l’eau chaude avec une éponge grattoir. Il existe
dans le commerce des produits adaptés au nettoyage du four. Le
nettoyage du four est fastidieux. Il existe en option des panneaux
autonettoyants spéciaux avec un émail microporeux qui peuvent
s’adapter sur les fours (voir paragraphe four autonettoyant par
catalyse).
Pour nettoyer les grilles inox, utilisez une éponge avec grattoir.
La vitre intérieure du four peut se démonter pour en faciliter le
nettoyage.
Attendre que la surface soit froide avant de la nettoyer. L’utilisation
d’eau froide au contact de la vitre chaude peut briser la vitre. Si
cela devait arriver la garantie ne couvrirait pas ce dommage.
Pour changer l’ampoule d’éclairage du four veillez à débrancher
électriquement le four. Les ampoules de four sont spécifiques,
elles sont conçues pour résister à une température élevée.
ASSISTANCE TECHNIQUE
En cas de de mauvais fonctionnement, vérifier si la prise est
branchée. Après ces vérifications, adressez vous à votre revendeur
ou prévenez directement notre service technique qui interviendra
dans les plus brefs délais. Veiller à ce que le coupon de garantie
fourni avec le produit soit correctement rempli, avec la date d’achat
du four.
43 FR
FOUR AUTONETTOYANT PAR CATALYSE
Les panneaux autonettoyants à émail microporeux disponibles
en option évite le nettoyage manuel du four.
Pendant la cuisson les projections de graisse sont “l’absorbées”
par les parois catalytiques. La graisse est ensuite détruite par
oxydation en devenant de la poussière. En cas de cuisson
particulièrement grasse, il peut arriver que la graisse bouche les
pores de l’émail. Pour détruire un surplus de graisse mettez en
fonctionnement votre four à vide sur la position maximale de
température pendant environ 10 à 20 minutes.
Ne jamais utiliser de grattoir, de produit chimique pour nettoyer
la catalyse. Utilisez plutôt de l’eau chaude et une éponge.
Si jamais vous cuisinez un plat très gras ou une viande au gril,
utiliser un plat avec de grands rebords pour limiter les projections
de graisse.
La porosité de la catalyse est primordiale pour vous assurer un
nettoyage optimal.
N.B.: Les panneaux autonettoyants ont une durée de
fonctionnement d’environ 300 heures. En cas de baisse d’efficacité
il est alors possible de les changer.
CONSIGNES UTILES
Pendant l'utilisation du four, les accessoires non utilisés doivent être retirés du four.
Le set Pizza est l'idéal pour la
cuisson de pizza. Le set doit être
utilisé avec le mode de cuisson
Pizza.
GRILLES DU FOUR, NOUVEAU SYSTÈME
D’ARRÊT
Tous les fours bénéficient d’un
nouveau système d’arrêt des
grilles. Ce système permet de
sortir complètement la grille en
totale sécurité. Parfaitement
bloquée elle ne peut pas
basculer vers l’avant malgré la
présence d’un poids important.
Plus stables, ces grilles assurent
une plus grande sécurité et
tranquillité.
Selon modèle Le PACK
Les fours sont dotés de contrôle électronique de la
turbine de cuisson, breveté “VARIO FAN”. Le Système change
automatiquement la vitesse de la turbine en multifonction pour
optimiser la distribution de l’air et de la température dans l’enceinte
du four pendant la cuisson.
Tous les fours sont dotés de la fonction
permettant une gestion de l’humidité et de la température.
Elle réduit la perte d’humidité des aliments jusqu’à 50%
ce qui garantit une douceur et une meilleure saveur du
mets. Une cuisson aussi délicate est recommandée pour
la cuisson du pain et des pâtisseries,
selon modèle, elle réduit le temps de préchauffage des
fours : seulement 8 minutes pour atteindre les 200°C.
Donne la possibilité de personnaliser le niveau et
l’intensité de grillade, jusq’à 50% en plus par rapport à
un four multifonction traditionnel.
Certains fours sont équipés de la nouvelle porte WIDE DOOR
a une plus ample superficie en verre qui permet un meilleur
entretien et un meilleur isolement thermique.
Selon modèle
« Les appareils dotés de LED blanches de classe 1M selon la norme
IEC 60825-1:1993 + A1: 1997 + A2: 2001 (équivalente à la norme EN
60825-1: 1994 + A1: 2002 + A2: 2001); la puissance maximale lumineuse
émise est de
459nm < 150uW. Donnée non observée directement avec
des instruments optiques. »
Le gril plat
Il est à combiner avec le plat récolte-
sauce pour tous types de grillades.
Une poignée est fournie, pour
permettre de retirer l’ensemble sans
se brûler.
Ne pas stocker la poignée dans l’enceinte du four.
La pagina si sta caricando...
La pagina si sta caricando...
La pagina si sta caricando...
La pagina si sta caricando...
La pagina si sta caricando...
La pagina si sta caricando...
La pagina si sta caricando...
La pagina si sta caricando...
La pagina si sta caricando...
La pagina si sta caricando...
La pagina si sta caricando...
La pagina si sta caricando...
La pagina si sta caricando...
La pagina si sta caricando...
La pagina si sta caricando...
La pagina si sta caricando...
La pagina si sta caricando...
La pagina si sta caricando...
La pagina si sta caricando...
La pagina si sta caricando...
La pagina si sta caricando...
La pagina si sta caricando...
La pagina si sta caricando...
-
 1
1
-
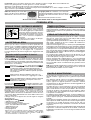 2
2
-
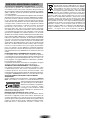 3
3
-
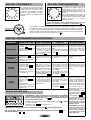 4
4
-
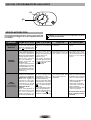 5
5
-
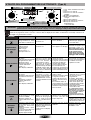 6
6
-
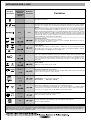 7
7
-
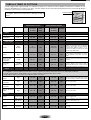 8
8
-
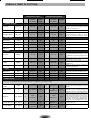 9
9
-
 10
10
-
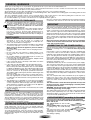 11
11
-
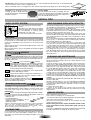 12
12
-
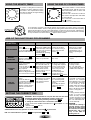 13
13
-
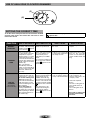 14
14
-
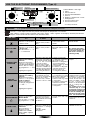 15
15
-
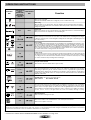 16
16
-
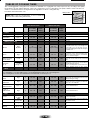 17
17
-
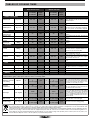 18
18
-
 19
19
-
 20
20
-
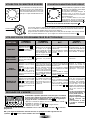 21
21
-
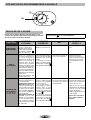 22
22
-
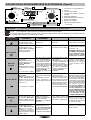 23
23
-
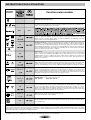 24
24
-
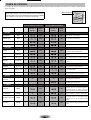 25
25
-
 26
26
-
 27
27
-
 28
28
-
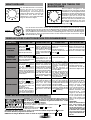 29
29
-
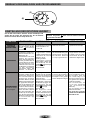 30
30
-
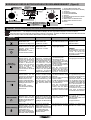 31
31
-
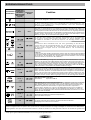 32
32
-
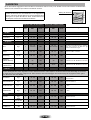 33
33
-
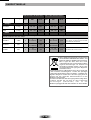 34
34
-
 35
35
-
 36
36
-
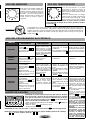 37
37
-
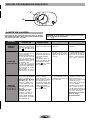 38
38
-
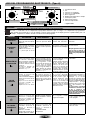 39
39
-
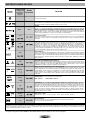 40
40
-
 41
41
-
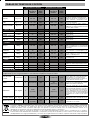 42
42
-
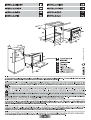 43
43


