
viscount
v
2.6
v 3.8
Passive
Loudspeaker
Units
INSTALLATION GUIDE
GUIDA ALL’INSTALLAZIONE
viscount

GUIDA ALL’INSTALLAZIONE
Suggerimenti
• Effettuate i collegamenti con tutti gli apparati spenti.
Attivando e disattivando i vostri dispositivi audio, di pre-
ferenza accendete l’amplificatore finale per ultimo e spe-
gnetelo per primo.
• Utilizzate cavi di qualità, verificandone periodicamente
le condizioni di efficienza.
Evitate di stendere i cavi audio vicini e/o paralleli a linee
elettriche, linee telefoniche, reti informatiche e linee di dif-
fusori a 70V o 100V o altri conduttori a basso voltaggio.
• L’apparato genera campi magnetici: evitate collo-
cazioni troppo ravvicinate a TV e monitor video, com-
puter.
• Preferite l’uso di materiali che garantiscano un com-
portamento ignifugo, specialmente nelle grandi instal-
lazioni, anche quando non strettamente richiesto dalle
norme di sicurezza.
• L’apparato supporta una potenza in ingresso pari a
100 W R.M.S (200 W con programma musicale). Non
collegate amplificatori che erogano potenze superiori,
pena il danneggiamento del dispositivo.
Cura del prodotto
• Evitate esposizioni prolungate dell’apparato all’irradi-
azione solare diretta, a intense fonti di calore, a forti vi-
brazioni, ad ambienti particolarmente umidi o polverosi
o alla pioggia, poiché possono causare malfunziona-
menti, deterioramenti e perfino shock elettrici. Non in-
serire corpi estranei e non versare liquidi all’interno
dell’apparato.
• Per la pulizia usate un panno morbido “a secco” o un
pennello. Non usate mai alcool, acetone o solventi vari.
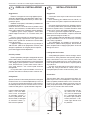
Collegamenti
Spellate entrambi i fili del cavo di potenza che collegherà
la cassa V2.6 o V3.8 al vostro amplificatore per circa 1,5
cm. Premete la linguetta del connettore verso il basso e,
tenendola premuta, inserite il terminale del cavo nel con-
nettore fino alla guaina e quindi rilasciate la linguetta.
Il polo negativo dell’amplifi-
catore, il cui cavo solita-
mente è nero, va collegato
al connettore sinistro (–)
mentre il polo positivo, soli-
tamente rosso, va collegato
al connettore destro (+).
Non invertite le polarità.
INSTALLATION GUIDE
Suggestions
• Connections must only be made with all the devices
switched off.
• When switching your audio devices on and off, it is
best to switch on the power amplifier last and switch it off
first.
• Use quality cables and check their condition regularly
• Do not lay audio cables close and/or parallel to elec-
trical lines, telephone lines, IT networks and 70V or 100V
speaker lines, or other low-voltage conductors.
• The device generates magnetic fields: do not place it
too close to TVs or video monitors, computers, audio and
video tapes and magnetic media, etc.
• Flame retardant materials should be used, especially
in large installations, even when not strictly necessary
under safety regulations.
• This Loudspeaker unit supports a input power of
100W R.M.S. (200W musical program). Do no connect
power amplifiers able to supply higher power as this will
damage the device.
Looking After the Product
• Avoid prolonged exposure to direct sunlight, intense
heat sources, strong vibrations and especially damp or
dusty environments or rain, since they may cause mal-
functions, deterioration and even electric shocks. Never
insert foreign bodies inside the device or pour liquids of
any kind into it
• Any dust which does collect on the device can be re-
moved “dry” using a soft cloth or a brush. Never use
methylated spirits, acetone or solvents of any kind.
Connections
Take the power cable, which will connect the power am-
plifier to your V2.6 or V3.8 loudspeaker, and remove the
rubber (or plastic) sheath for about 1.5 cm. Push the con-
nector’s lever and, while holding it pressed, insert the
cable you prepared inside, till the plastic sheath. Now re-
lease the lever and the cable will be locked.
The negative pole, that usu-
ally comes with a black
wire, has to be hooked into
the “-“ connector (left), while
the positive pole (usually a
red wire) into to the “+” con-
nector (right). Do not invert
the polarities.
IT EN
Viscount V2.6 - Viscount V3.8 Classic Organ Loudspeaker Units

Installazione sospesa
E’ possibile sospendere la cassa ad una
parete facendo uso di una apposita
staffa. Tale staffa va acquistata separata-
mente dal proprio rivenditore. Per il mon-
taggio di tale staffa si rimanda alle
indicazioni del produttore della stessa.
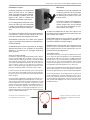
Per il montaggio della staffa sulla cassa,
avvitare la staffa sulla cassa utilizzando
le quattro viti predisposte già presenti sul
retro della cassa (vd. figura a fondo pa-
gina).
Per regolare l’inclinazione della cassa rispetto alla parete
e per collocare e fissare la cassa alla parete fare riferi-
mento alle indicazioni del produttore della staffa.
ATTENZIONE: Assicurarsi che la staffa sia in grado di
reggere il peso della cassa (riportato nel capitolo SPECI-
FICHE TECNICHE).
ATTENZIONE: Non effettuare l’operazione di montaggio
sospeso della cassa se non si dispone di attrezzatura
adeguata e di esperienza nel montaggio sospeso di
casse acustiche.
NOTE SULL’INSTALLAZIONE:
L’installazione sospesa di oggetti di grandi dimensioni e di peso
notevole in spazi pubblici deve sottostare a numerose leggi e
regolamentazioni ai differenti livelli locali e nazionali che NON
sono oggetto di questo manuale. In ogni caso l’utente deve as-
sumersi ogni responsabilità relativamente all’uso dei sistemi di
casse acustiche Viscount in ogni particolare circostanza e
luogo, in conformità alle leggi e regolamenti vigenti per quelle
particolari condizioni di utilizzo, circostanza, luogo e tempo.
L’utente dei sistemi di casse acustiche Viscount deve predis-
porre misure di sicurezza supplementari oltre quelle delineate
in questo manuale in funzione della particolarità dell’instal-
lazione sospesa.
Come precauzione addizionale, è opportuna una ispezione ac-
curata dei punti di aggancio prima di sospendere le casse acu-
stiche Viscount, particolarmente qualora l’installazione avvenga
in locali o sedi di non recente costruzione. In ogni caso, le casse
acustiche Viscount vanno utilizzate in installazioni sospese so-
lamente su attrezzature approvate, delle quali siano note le
caratteristiche relative ai carichi sospesi sopportati e che con-
sentano ampi margini per il peso delle casse acustiche Viscount
sospese mediante tali attrezzature.
Wall mount
It is possible to mount the loudspeaker to
a wall using a bracket. You can purchase
the bracket from your local dealer. For
the mounting of the bracket refer to the
bracket manual.
To mount the bracket to the loudspeaker,
screw the bracket to the loudspeaker
chassis using the four screws available
on the rear of the loudspeaker (see pic-
ture on bottom of the page).
To adjust the loudspeaker tilt angle with respect to the
wall and to hang the loudspeaker to the wall please refer
to the bracket user manual.
IMPORTANT: Make sure that the bracket is capable of
bearing the weight of the loudspeaker (reported in the
TECHNICAL SPECIFICATIONS chapter).
WARNING: Don’t proceed with the suspension of the
speaker if you are not in possess of the equipment suited
to the purpose and you are not experienced in the sus-
pended mounting of loudspeakers.
ADDITIONAL NOTES:
The suspension of large, heavy objects in public places is sub-
ject to numerous laws and regulations at the national/federal,
state/provincial, and local levels, that are not addressed in this
manual. However, the user must assume responsibility for mak-
ing sure that use of any Viscount loudspeaker system and its
components in any particular circumstance or venue conforms
to all applicable laws and regulations in force at the time.
Users of Viscount loudspeakers should be prepared to take ad-
ditional safety assurance measures beyond those outlined in
this manual, depending on the specific suspended installation.
As an extra precaution, careful inspection of the attachment
points is advised before mounting, particularly in older venues.
In any case, Viscount systems are intended only for suspen-
sion from approved rigging points, each known to have ample
safe working loads margins for the system components sus-
pended below them.
Viscount V2.6 - Viscount V3.8 Classic Organ Loudspeaker Units
LE QUATTRO VITI SUL RETRO DELLA CASSA
PER IL MONTAGGIO DELLA STAFFA
THE FOUR SCREWS, ON THE BACK OF THE
LOUDSPEAKER, INTENDED TO SCREW THE
BRACKET IN

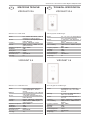
SPECIFICHE TECNICHE
VISCO
UNT V2.6
VISCOUNT V2.6
Sistema 2 vie in cassa chiusa
Woofer 6,5", bobina da 38mm, cono in
polipropilene, bordo in gomma
Tweeter 1" soft dome ad ampia dispersione,
bobina da 25mm
Crossover passivo, 12db/ottava, 4,7Khz
Potenza 100W continui - 200W con pro-
gramma musicale
Risposta in frequenza 65Hz - 20Khz
Sensibilità 89db
SPL di picco 108db
Impedenza nominale 8 ohm
Dimensioni (mm) 410x250x197
Peso (Kg) 6,6
VISCOUNT 3.8
VISCOUNT 3.8
Sistema 3 vie in cassa bass-reflex
Woofer 8" al neodimio, bobina da 38mm,
cono in polipropilene, bordo in
gomma
Midrange 5", bobina da 25mm, cono in fibra di
carta, bordo in gomma
Tweeter 1" soft dome ad ampia dispersione,
bobina da 25mm
Crossover passivo, 12db/ottava, 1,6KHz-6Khz
Potenza 100W continui - 200W con pro-
gramma musicale
Risposta in frequenza 45Hz - 20Khz
Sensibilità 91db
SPL di picco 112db
Impedenza nominale 8 ohm
Dimensioni (mm) 645x354x296
Peso (Kg) 13,8
TECHNICAL SPECIFICATION
VISCOUNT V2
.6
VISCOUNT V2.6
Two way system closed box type
Woofer 6.5", 1.5" voice coil, polypropylene
cone, cone-rubber surround
Tweeter 1" soft dome, wide dispersion, 1"
voice coil
Crossover passive, 12db/octave, 4,7Khz
Power handling 100W continuos - 200W musical pro-
gram
Frequency response 65Hz - 20Khz
Sensitivity 89db
SPL peak 108db
Nominal Impedence 8 ohm
Dimensions (mm) 410x250x197
Weight (Kg) 6,6
VISCOUNT 3.8
VISCOUNT 3.8
Three way system vented box type
Woofer 8" neodymium, 1.5" voice coil,
polypropylene cone, cone-rubber
surround
Midrange 5", 1” voice coil, paper-fiber cone,
rubber cone sorround
Tweeter 1" soft dome, wide dispersion, 1"
voice coil
Crossover passive, 12db/octave, 1.6KHz-6Khz
Power handling 100W continuos - 200W musical
program
Frequency response 45Hz - 20Khz
Sensitivity 91db
SPL peak 112db
Nominal Impedence 8 ohm
Dimensions (mm) 645x354x296
Weight (Kg) 13.8
IT EN
Viscount V2.6 - Viscount V3.8 Classic Organ Loudspeaker Units


-
 1
1
-
 2
2
-
 3
3
-
 4
4
-
 5
5
-
 6
6


in altre lingue
- English: Viscount V26 Installation guide
Documenti correlati
-
Viscount V3.12A Manuale utente
-
Viscount CM-100 Manuale utente
-
Viscount Sonus 60 Manuale del proprietario
-
-
-
-
Viscount Chorum 60 Manuale del proprietario
-
-
-
Viscount LEGEND LIVE Manuale utente