Sony XAV-V630BT Istruzioni per l'uso

Categoria
Ricevitori multimediali per auto
Tipo
Istruzioni per l'uso

Questo manuale è adatto anche per

XAV-W651BT/XAV-V631BT
4-687-624-53(1)
AV Center
To cancel the demonstration (Demo) display, see page 19.
For the connection/installation, see page 30.
Para cancelar la pantalla de demostracion (Demostración),
consulte la página 20.
Para la conexión/instalación, consulte la página 33.
Per annullare la dimostrazione (Demo), vedere a pagina 20.
Per l’installazione e i collegamenti, consultare pagina 33.
Operating Instructions
GB
Manual de instrucciones
ES
Istruzioni per l’uso
IT
2GB
Laser Diode Properties
Emission Duration: Continuous
Laser Output: Less than 390 μW
(This output is the value measurement at a distance
of 70 mm from the objective lens surface on the
Optical Pick-up Block with 7 mm aperture.)
The nameplate indicating operating voltage, etc., is
located on the bottom of the chassis.
Warning
To prevent fire or shock hazard, do not
expose the unit to rain or moisture.
To avoid electrical shock, do not open the
cabinet. Refer servicing to qualified personnel
only.
CAUTION
The use of optical instruments with this product will
increase eye hazard. As the laser beam used in this
CD/DVD player is harmful to eyes, do not attempt
to disassemble the cabinet. Refer servicing to
qualified personnel only.
Made in China
Hereby, Sony Corporation, declares that this
equipment is in compliance with Directive 2014/53/
EU.
The full text of the EU declaration of conformity is
available at the following internet address:
http://www.compliance.sony.de/
The validity of the CE marking is restricted to only
those countries where it is legally enforced, mainly
in the countries EEA (European Economic Area).
Notice for customers: the following
information is only applicable to equipment
sold in countries applying EU Directives
Manufacturer: Sony Corporation, 1-7-1 Konan
Minato-ku Tokyo, 108-0075 Japan
For EU product compliance: Sony Belgium,
bijkantoor van Sony Europe Limited, Da Vincilaan
7-D1, 1935 Zaventem, Belgium
Disposal of waste batteries and
electrical and electronic
equipment (applicable in the
European Union and other
European countries with separate
collection systems)
This symbol on the product, the battery or on the
packaging indicates that the product and the
battery shall not be treated as household waste. On
certain batteries this symbol might be used in
combination with a chemical symbol. The chemical
symbols for mercury (Hg) or lead (Pb) are added if
the battery contains more than 0.0005% mercury or
0.004% lead.
By ensuring these products and batteries are
disposed of correctly, you will help prevent
potentially negative consequences for the
environment and human health which could
otherwise be caused by inappropriate waste
handling. The recycling of the materials will help to
conserve natural resources.
In case of products that for safety, performance or
data integrity reasons require a permanent
connection with an incorporated battery, this
battery should be replaced by qualified service staff
only.
To ensure that the battery and the electrical and
electronic equipment will be treated properly, hand
over these products at end-of-life to the applicable
collection point for the recycling of electrical and
electronic equipment.
For all other batteries, please view the section on
how to remove the battery from the product safely.
Hand the battery over to the applicable collection
point for the recycling of waste batteries.
For more detailed information about recycling of
this product or battery, please contact your local
Civic Office, your household waste disposal service
or the shop where you purchased the product or
battery.
For safety, be sure to install this unit in the
dashboard of the car as the rear side of the unit
becomes hot during use.
For details, see “Connection/Installation”
(page 30).
This manual contains instructions for XAV-
W651BT and XAV-V631BT.
XAV-W651BT is the model representatively used
for illustration purposes.
3GB
WARNING: Do not ingest battery,
Chemical Burn Hazard.
The remote commander contains a coin/
button cell battery. If the coin/button cell battery is
swallowed, it can cause severe internal burns in just
2 hours and can lead to death.
Keep new and used batteries away from children. If
the battery compartment does not close securely,
stop using the product and keep it away from
children.
If you think batteries might have been swallowed or
placed inside any part of the body, seek immediate
medical attention.
Note on the lithium battery
Do not expose the battery to excessive heat such as
direct sunlight, fire or the like.
Disclaimer regarding services offered by third
parties
Services offered by third parties may be changed,
suspended, or terminated without prior notice.
Sony does not bear any responsibility in these sorts
of situations.
Caution
IN NO EVENT SHALL SONY BE LIABLE FOR ANY
INCIDENTAL, INDIRECT OR CONSEQUENTIAL
DAMAGES OR OTHER DAMAGES INCLUDING,
WITHOUT LIMITATION, LOSS OF PROFITS, LOSS OF
REVENUE, LOSS OF DATA, LOSS OF USE OF THE
PRODUCT OR ANY ASSOCIATED EQUIPMENT,
DOWNTIME, AND PURCHASER’S TIME RELATED TO
OR ARISING OUT OF THE USE OF THIS PRODUCT, ITS
HARDWARE AND/OR ITS SOFTWARE.
Dear customer, this product includes a radio
transmitter.
According to UNECE Regulation no. 10, a vehicle
manufacturers may impose specific conditions for
installation of radio transmitters into vehicles.
Please check your vehicle operation manual or
contact the manufacturer of your vehicle or your
vehicle dealer, before you install this product into
your vehicle.
Emergency calls
This BLUETOOTH car handsfree and the electronic
device connected to the handsfree operate using
radio signals, cellular, and landline networks as well
as user-programmed function, which cannot
guarantee connection under all conditions.
Therefore do not rely solely upon any electronic
device for essential communications (such as
medical emergencies).
On BLUETOOTH communication
Microwaves emitting from a BLUETOOTH device
may affect the operation of electronic medical
devices. Turn off this unit and other BLUETOOTH
devices in the following locations, as it may cause
an accident.
where inflammable gas is present, in a hospital,
train, airplane, or petrol station
near automatic doors or a fire alarm
This unit supports security capabilities that
comply with the BLUETOOTH standard to provide
a secure connection when the BLUETOOTH
wireless technology is used, but security may not
be enough depending on the setting. Be careful
when communicating using BLUETOOTH wireless
technology.
We do not take any responsibility for the leakage
of information during BLUETOOTH
communication.
If you have any questions or problems concerning
your unit that are not covered in this manual,
consult your nearest Sony dealer.
Warning if your car’s ignition has no ACC
position
After turning the ignition off, be sure to press
and hold HOME on the unit until the display
disappears.
Otherwise, the display does not turn off and this
causes battery drain.
Important notice
4GB
Table of Contents
Warning . . . . . . . . . . . . . . . . . . . . . . . . . . . . . . . . . . . 2
Guide to Parts and Controls . . . . . . . . . . . . . . . . . . . 5
Getting Started
Resetting the Unit . . . . . . . . . . . . . . . . . . . . . . . . . . . 7
Setting the Clock . . . . . . . . . . . . . . . . . . . . . . . . . . . . 7
Preparing a BLUETOOTH Device. . . . . . . . . . . . . . . . 7
Connecting a USB Device . . . . . . . . . . . . . . . . . . . . . 9
Connecting Other Portable Audio/Video
Devices. . . . . . . . . . . . . . . . . . . . . . . . . . . . . . . . . 9
Connecting Rear View Camera . . . . . . . . . . . . . . . . 9
Listening to the Radio
Listening to the Radio. . . . . . . . . . . . . . . . . . . . . . . 10
Using Radio Data System (RDS) . . . . . . . . . . . . . . . 11
Playback
Playing a Disc (XAV-W651BT) . . . . . . . . . . . . . . . . . 12
Playing a USB Device . . . . . . . . . . . . . . . . . . . . . . . 13
Playing a BLUETOOTH Device. . . . . . . . . . . . . . . . . 13
Searching and Playing Tracks. . . . . . . . . . . . . . . . . 14
Other Settings During Playback. . . . . . . . . . . . . . . 14
Handsfree Calling (via BLUETOOTH
only)
Receiving a Call . . . . . . . . . . . . . . . . . . . . . . . . . . . . 15
Making a Call . . . . . . . . . . . . . . . . . . . . . . . . . . . . . . 15
Available Operations During a Call . . . . . . . . . . . . 15
Useful Functions
SongPal with Android Phone . . . . . . . . . . . . . . . . . 16
Using Siri Eyes Free . . . . . . . . . . . . . . . . . . . . . . . . . 17
Settings
Basic Setting Operation . . . . . . . . . . . . . . . . . . . . . 18
General Settings . . . . . . . . . . . . . . . . . . . . . . . . . . . 18
Sound Settings . . . . . . . . . . . . . . . . . . . . . . . . . . . . 19
Screen Settings . . . . . . . . . . . . . . . . . . . . . . . . . . . . 19
Visual Settings. . . . . . . . . . . . . . . . . . . . . . . . . . . . . 19
Additional Information
Precautions . . . . . . . . . . . . . . . . . . . . . . . . . . . . . . . 20
Maintenance (XAV-W651BT) . . . . . . . . . . . . . . . . . . 22
Specifications . . . . . . . . . . . . . . . . . . . . . . . . . . . . . 23
Troubleshooting . . . . . . . . . . . . . . . . . . . . . . . . . . . 25
Language Code List (XAV-W651BT) . . . . . . . . . . . . 29
Connection/Installation
Cautions . . . . . . . . . . . . . . . . . . . . . . . . . . . . . . . . . 30
Parts List for Installation . . . . . . . . . . . . . . . . . . . . 30
Connection . . . . . . . . . . . . . . . . . . . . . . . . . . . . . . . 31
Installation . . . . . . . . . . . . . . . . . . . . . . . . . . . . . . . 34
5GB
Guide to Parts and Controls
SOURCE
Change the source. Each time it is pressed, it
displays a selectable source in a popup on the
current display.
VOICE
Press and hold to activate the voice command
function.
To assign the DSPL function to this button, select
[DSPL] in [SOURCE Key Func.] (page 19).
Volume control dial
Rotate to adjust the volume.
N-Mark
Makes a BLUETOOTH connection when touched
with an Android™ phone.
HOME
Turn on the power.
Open the HOME menu.
Press to pause playback when Disc (XAV-
W651BT), iPod/USB or BT Audio source is
selected.
To resume playback, touch .
Press and hold for more than 2 seconds to turn
off the unit. When the unit is turned off, remote
commander operation is not available (XAV-
W651BT).
ATT (attenuate)
Press and hold for a second, but less than 2
seconds, then rotate the volume control dial to
attenuate the sound.
Receptor for the remote commander
Disc slot (XAV-W651BT)
 (disc eject) (XAV-W651BT)
USB port
AUX input jack
Reset button
Display/touch panel
Main unit
6GB
The remote commander can be used to operate the
audio controls. For menu operations, use the touch
panel.
OFF
Turn the source off.
Press and hold for 2 seconds to turn off the
power and display.
MONITOR OFF
Turn off the monitor.
To turn back on, press again.
POSITION
This button is not supported.
 (return)
Return to the previous display.
Return to the menu on a Video CD (VCD) (XAV-
W651BT).
EQ (equalizer)
Select an equalizer curve.
Number buttons (0 – 9)
CLEAR
 (play/pause)
/ (previous/next)
/ (fast-reverse/fast-forward)
DVD playback setting buttons (XAV-W651BT)
ZAP (ZAPPIN™) (page 10)
///
Select a setup item, etc.
ENTER
Enter the selected item.
MODE
Select the radio band.
VOL (volume) +/
Remove the insulation film before use.
Playback screen:
Home screen:
RM-X170 remote commander
(XAV-W651BT)
Screen displays
7GB
Status indication
(EXTRA BASS)
Touch to select the EXTRA BASS setting: [1], [2],
[off].
(sound setting menu)
Access the sound setting menu directly
(page 19).
(option)
Open the option menu. The available items
differ depending on the source.
Clock (page 7)
When the AUX or Rear Camera source is
selected, the clock is not displayed.
Application specific area
Display playback controls/indications or show
the unit’s status. Displayed items differ
depending on the source.
(return to the playback screen)
Switch from the HOME screen to the playback
screen.
/
Move to the next/previous page (This does not
necessarily appear on the screen).
Sources and Settings select keys
Change the source or make various settings.
Resetting the Unit
You must reset the unit before operating the unit
for the first time, after replacing the car battery, or
changing connections.
Note
Pressing the reset button will erase the clock setting and
some stored contents.
Setting the Clock
1 Press HOME, then touch [Settings].
2 Touch , then touch [Clock Adjust].
The setting display appears.
3 Touch / to set the hour and minute.
4 After setting the hour and minute, touch
[Set].
The setting is complete and the clock starts.
Preparing a BLUETOOTH Device
You can enjoy music or perform handsfree calling
depending on the BLUETOOTH compatible device
such as smartphones, cellular phones, and audio
devices (hereafter “BLUETOOTH device” if not
otherwise specified). For details on connecting,
refer to the operating instructions supplied with the
device.
Before connecting the device, turn down the
volume of this unit; otherwise, a loud sound may
result.
Lights up when the sound is attenuated.
Lights up when AF (Alternative
Frequencies) is available.
Lights up when the current traffic
information (TA: Traffic Announcement)
is available.
Lights up when the “SongPal”
connection is established between this
unit and your Android phone.
Lights up when the BLUETOOTH signal is
on. Flashes when the connection is in
progress.
Lights up when the audio device is
playable by enabling the A2DP
(Advanced Audio Distribution Profile).
Lights up when handsfree calling is
available by enabling HFP (Handsfree
Profile).
Indicates the signal strength status of
the connected cellular phone.
Indicates the remaining battery status of
the connected cellular phone.
Getting Started
8GB
By touching the N-Mark on the unit with an NFC*
compatible smartphone, the unit is paired and
connected with the smartphone automatically.
* NFC (Near Field Communication) is a technology enabling
short-range wireless communication between various
devices, such as mobile phones and IC tags. Thanks to the
NFC function, data communication can be achieved easily
just by touching the relevant symbol or designated
location on NFC compatible devices.
For a smartphone with Android OS 4.0 or lower
installed, downloading of the app “NFC Easy
Connect” available at Google Play™ is required. The
app may not be downloadable in some countries/
regions.
1 Activate the NFC function on the
smartphone.
For details, refer to the operating instructions
supplied with the smartphone.
2 Touch the N-Mark part of the unit with the
N-Mark part of the smartphone.
Make sure that lights up on the status bar of
the unit.
To disconnect by One touch
Touch the N-Mark part of the unit with the N-Mark
part of the smartphone again.
Notes
• When making the connection, handle the smartphone
carefully to prevent scratches.
• One touch connection is not possible when the unit is
already connected to another NFC compatible device. In
this case, disconnect the other device, and make a
connection with the smartphone again.
When connecting a BLUETOOTH device for the first
time, mutual registration (called “pairing”) is
required. Pairing enables this unit and other devices
to recognize each other.
1 Place the BLUETOOTH device within 1 m (3
ft) of this unit.
2 Press HOME, then touch [Settings].
3 Touch .
4 Touch [Bluetooth Connection], then set the
signal to [ON].
The BLUETOOTH signal is turned on and lights
up on the status bar of the unit.
5 Touch [Pairing].
flashes while the unit is in pairing standby
mode.
6 Perform pairing on the BLUETOOTH device
so it detects this unit.
7 Select [XAV-xxxx] (your model name) shown
in the display of the BLUETOOTH device.
If your model name does not appear, repeat
from step 5.
8 If passkey* input is required on the
BLUETOOTH device, input [0000].
* Passkey may be called “passcode,” “PIN code,” “PIN
number,” “password,” etc., depending on the
BLUETOOTH device.
When pairing is made, stays lit.
9 Select this unit on the BLUETOOTH device to
establish the BLUETOOTH connection.
or lights up when the connection is made.
Connecting with a smartphone by One
touch (NFC)
Pairing and connecting with a
BLUETOOTH device
[0000]
Input passkey
9GB
Note
While connecting to a BLUETOOTH device, this unit cannot
be detected by another device. To enable detection, enter
the pairing mode and search for this unit from another
device.
To start playback
For details, see “Playing a BLUETOOTH Device”
(page 13).
To cancel pairing
Perform step 5 to cancel the pairing mode after this
unit and the BLUETOOTH devices are paired.
To use a paired device, connection with this unit is
required. Some paired devices will connect
automatically.
1 Press HOME, then touch [Settings].
2 Touch [Bluetooth Connection], then touch
[ON].
Make sure that lights up on the status bar of
the unit.
3 Activate the BLUETOOTH function on the
BLUETOOTH device.
4 Operate the BLUETOOTH device to connect
to this unit.
or lights up on the status bar.
To connect the last-connected device from
this unit
When the ignition is turned to on with the
BLUETOOTH signal activated, this unit searches for
the last-connected BLUETOOTH device, and
connection is made automatically.
If it does not work, touch [Reconnect] to search for
the last-paired device again. If the problem is not
solved, follow the pairing procedure.
Note
While streaming BLUETOOTH audio, you cannot connect
from this unit to the cellular phone. Connect from the
cellular phone to this unit instead.
To install the microphone
For details, see “Installing the microphone”
(page 33).
Connecting a USB Device
1 Turn down the volume on the unit.
2 Connect the USB device to the unit.
To connect an iPod/iPhone, use the USB
connection cable for iPod (not supplied).
Connecting Other Portable
Audio/Video Devices
1 Turn off the portable audio/video device.
2 Turn down the volume on the unit.
3 Connect the portable audio/video device to
the AUX input jack on the unit with a
connecting cord (not supplied).
4 Press HOME, then touch [AUX].
To match the volume level of the connected
device to other sources
Start playback of the portable audio/video device
at a moderate volume and set your usual listening
volume on the unit:
Touch , then set [Input Level] between –10 and
+15.
To set to the device type manually
Touch , then set [AUX Input] to [Audio], [Video],
or [Auto].
Connecting Rear View Camera
By connecting the optional rear view camera to the
CAMERA IN terminal, you can display the picture
from the rear view camera. For details, see
“Connection/Installation” (page 30).
Connecting with a paired BLUETOOTH
device
10GB
Listening to the Radio
To listen to the radio, press HOME then touch
[Tuner].
Reception controls/indications
Current band
Opens the band list.
Current frequency, program service name*,
RDS indication*
* During RDS reception.
PTY (program types) (FM only)
Opens the PTY list (page 11).
ZAP (ZAPPIN)
Helps to find a desired station by listening to
preset stations for a few seconds.
(option)
Opens the option menu.
SEEK/SEEK+
Tunes in automatically.
/
Tunes in manually.
Touch and hold to continuously skip
frequencies.
Preset numbers (1 to 6)
Selects a preset station.
Touch and hold to store the current frequency in
that preset.
1 Select the desired band (FM1, FM2, FM3,
AM1, or AM2).
2 Touch .
3 Touch [BTM], then [Search].
The unit stores stations in order of frequency on
the preset numbers (1 to 6).
1 Touch the current band.
The band list appears.
2 Touch the desired band (FM1, FM2, FM3,
AM1, or AM2).
3 Perform tuning.
To tune automatically
Touch –SEEK/SEEK+.
Scanning stops when the unit receives a station.
To tune manually
Touch and hold / to locate the approximate
frequency, then touch / repeatedly to fine
adjust to the desired frequency.
1 While receiving the station that you want to
store, press and hold the desired preset
number (1 to 6).
1 Select the band, then touch the desired
preset number (1 to 6).
Tuner Preset ZAPPIN helps you to find a desired
station by listening to preset stations for a few
seconds.
1 During radio reception, touch [ZAP].
Tuner Preset ZAPPIN starts, and subsequent
stations are received in sequence.
2 Touch [ZAP] again when the desired station
is received.
Listening to the Radio
Storing automatically (BTM)
Tuning
Storing manually
Receiving stored stations
Searching for the desired station from
preset stations (Tuner Preset ZAPPIN)
11GB
Using Radio Data System (RDS)
AF continuously retunes the station to the strongest
signal in a network, and TA provides current traffic
information or traffic programs (TP) if received.
1 Press HOME, then touch [Tuner].
2 Touch the desired band (FM1, FM2, or FM3).
3 Touch , then [AF] or [TA] to set [ON].
To store RDS stations with the AF and TA
setting
You can preset RDS stations along with an AF/TA
setting. Set AF/TA, then store the station with BTM
or manually. If you preset manually, you can also
preset non-RDS stations.
To receive emergency announcements
With AF or TA on, emergency announcements will
automatically interrupt the currently selected
source.
To stay with one regional program (Regional)
When the AF and Regional functions are on, you
will not be switched to another regional station
with a stronger frequency. If you leave this regional
program’s reception area, touch [Regional]
[OFF] during FM reception. This function does
not work in the UK and some other areas.
1 During FM reception, touch [PTY].
To scroll the list, touch /.
2 Touch the desired program type.
The unit searches for a station broadcasting the
selected program type.
To close the PTY list
Touch .
Type of programs
The CT data from the RDS transmission sets the
clock.
1 Set [Clock Time] to [ON] in [General Settings]
(page 18).
Setting alternative frequencies (AF) and
traffic announcement (TA)
Selecting program types (PTY)
News (News), Current Affairs (Current Affairs),
Information (Information), Sport (Sports), Education
(Education), Drama (Drama), Cultures (Culture),
Science (Science), Varied Speech (Varied), Pop Music
(Pop Music), Rock Music (Rock Music), Easy Listening
(M.O.R. Music), Light Classics M (Light classical),
Serious Classics (Serious classical), Other Music (Other
Music), Weather & Metr (Weather), Finance (Finance),
Children’s Progs (Children’s program), Social Affairs
(Social Affairs), Religion (Religion), Phone In (Phone
In), Travel & Touring (Travel), Leisure & Hobby
(Leisure), Jazz Music (Jazz Music), Country Music
(Country Music), National Music (National Music),
Oldies Music (Oldies Music), Folk Music (Folk Music),
Documentary (Documentary)
Setting clock time (CT)
12GB
Playing a Disc (XAV-W651BT)
Depending on the disc type, some operations may
be different or restricted.
1 Insert the disc (label side up).
Playback starts automatically.
If a DVD menu appears
Touch the desired item in the DVD menu.
You can also use the menu control panel, which can
be displayed by touching the screen anywhere
except the DVD menu items. Touch /// to
move the cursor, then touch [ENTER] to confirm.
If the menu control panel does not appear by
touching the display, use the remote commander.
Example of playback indications (DVD)
Current source icon, format
Playback status, elapsed playback time
Chapter/title number, audio format
Touch the display if the indications are not
displayed.
For audio discs, some indications are always
displayed during playback.
The PBC menu interactively assists with operations
while a PBC-compatible VCD is played.
1 Start playing a PBC-compatible VCD.
The PBC menu appears.
2 Touch .
The menu control panel appears.
3 Touch the number keys to select the desired
item, then touch [ENTER].
4 Follow the instructions in the menu for
interactive operations.
To return to the previous display
Touch .
To deactivate PBC functions
Set [Video CD PBC] to [OFF] (page 19).
Notes
• During PBC playback, the track number, playback item,
etc., do not appear on the playback display.
• Resume playback is unavailable during playback with PBC.
Changing the audio language/format
When playing a DVD video, the audio language can
be changed if the disc is recorded with multilingual
tracks. You can also change the audio format when
playing a disc recorded in multiple audio formats
(e.g., Dolby Digital).
During playback, touch the screen, then .
Touch repeatedly until the desired audio
language/format appears.
Example: Dolby Digital 5.1 ch
Audio language
Audio format/channel numbers
If the same language is displayed two or more
times, the disc is recorded in multiple audio
formats.
Playback
Using PBC (playback control) functions
Configuring audio settings
13GB
Changing the audio channel
When playing a VCD, you can listen to both left and
right channels, right channel only or left channel
only, via both right and left speakers.
During playback, touch repeatedly until the
desired audio channel appears.
The options are indicated below.
[Stereo]: Standard stereo sound (default)
[Left]: Left channel sound (monaural)
[Right]: Right channel sound (monaural)
Playing a USB Device
In these Operating Instructions, “iPod” is used as a
general reference for the iPod functions on the iPod
and iPhone, unless otherwise specified by the text
or illustrations.
For details on the compatibility of your iPod, see
About iPod” (page 22) or visit the support site on
the back cover.
MSC (Mass Storage Class) and MTP (Media Transfer
Protocol) type USB devices (such as a USB flash
drive, digital media player, Android phone)
compliant with the USB standard can be used.
Depending on the digital media player or Android
phone, setting the USB connection mode to MTP is
required.
Notes
• For details on the compatibility of your USB device, visit
the support site on the back cover.
• For details on the supported file formats, see “Supported
formats” (page 21).
1 Connect the USB device to the USB port.
Playback starts.
If a device is already connected, press HOME
then touch [iPod/USB] to start playback.
2 Adjust the volume on this unit.
To stop playback
Press SOURCE repeatedly until [OFF] appears.
To remove the device
Stop playback, then remove the device.
Caution for iPhone
When you connect an iPhone via USB, the phone
call volume is controlled by the iPhone, not the unit.
Do not inadvertently increase the volume on the
unit during a call, as a sudden loud sound may
result when the call ends.
Playing a BLUETOOTH Device
You can play contents on a connected device that
supports BLUETOOTH A2DP (Advanced Audio
Distribution Profile).
1 Make a BLUETOOTH connection with the
audio device (page 9).
2 Press HOME, then touch [BT Audio].
3 Operate the audio device to start playback.
4 Adjust the volume on this unit.
Notes
• Depending on the audio device, information such as title,
track number/time, and playback status may not be
displayed on this unit.
• Even if the source is changed on this unit, playback of the
audio device does not stop.
To match the volume level of the BLUETOOTH
device to other sources
You can reduce the volume level differences
between this unit and the BLUETOOTH device:
During playback, touch , then set [Input Level]
between –10 and +15.
14GB
Searching and Playing Tracks
1 During playback, touch (repeat) or
(shuffle) repeatedly until the desired play
mode appears.
Playback in the selected play mode may take
time to start.
Available play modes differ depending on the
selected sound source.
Note
Repeat play and shuffle play are not available for version 2.0
VCD with the PBC function.
1 During disc or USB playback, press the
number buttons on the remote commander
to enter an item (e.g., track) number, then
press ENTER on the remote commander.
Playback starts from the beginning of the
selected point.
Note
During VCD playback, this function is available only when
playing a VCD without PBC functions.
1 During disc (XAV-W651BT) or USB playback,
touch .
The list screen from the currently played item
appears.
Furthermore, touch (audio), (video), or
(photo) to list up by file type.
2 Touch the desired item.
Playback starts.
Other Settings During Playback
Further settings are available in each source by
touching . The available items differ depending
on the source.
Picture EQ
Adjusts the picture quality to suit the interior
brightness of the car: [Dynamic], [Standard],
[Theater], [Sepia].
(Available only when the parking brake is
applied, and iPod/USB, Disc (XAV-W651BT), or
AUX source is selected).
Aspect
Selects an aspect ratio for the screen of the unit.
(Available only when the parking brake is
applied, and iPod/USB, Disc (XAV-W651BT), or
AUX source is selected).
Normal
Displays a picture in the 4:3 aspect ratio (regular
picture).
Wide
Displays a picture in the 4:3 aspect ratio enlarged
to the left and right edges of the screen with
overflowing parts of the top and bottom cut off
to fill the screen.
Full
Displays a picture in the 16:9 aspect ratio.
Zoom
Displays a picture in the 4:3 aspect ratio enlarged
to the left and right edges of the screen.
DVD Audio Level (XAV-W651BT)
Adjust the audio output level between –10 and
+10 for a DVD recorded in Dolby Digital format to
balance the volume level between discs.
(Available only when Disc source is selected.)
Repeat play and shuffle play
Direct search play (XAV-W651BT)
Searching for a file from the list screen
15GB
To use a cellular phone, connect it with this unit. For
details, see “Preparing a BLUETOOTH Device”
(page 7).
Receiving a Call
1 Touch when a call is received.
The phone call starts.
Note
The ringtone and talker’s voice are output only from the
front speakers.
To reject/end a call
Touch .
Making a Call
1 Press HOME, then touch [Phone].
2 Touch one of the call icons on the
BLUETOOTH phone display.
(call history)*
1
Select a contact from the call history list. The
unit stores the last 20 calls.
(redial)
Make a call automatically to the last contact
you made.
(phonebook)*
1
Select a contact from the name list/number
list in the phonebook. To search the desired
contact in alphabetical order from the name
list, touch .
(voice command)*
2
*
3
Say a voice tag stored on the cellular phone.
(phone number input)
Enter the phone number.
Preset numbers (1 to 6)
Select the stored contact.
To store the contact, see “Presetting phone
numbers” (page 15).
*1 The cellular phone needs to support PBAP (Phone
Book Access Profile).
*2 Do not use the voice command function on the
cellular phone while it is connected to this unit.
*3 Voice command may not work depending on the
recognition specification of the cellular phone. For
details, visit the support site on the back cover.
3 Touch .
The phone call starts.
You can store up to 6 contacts in the preset list.
1 In the phone screen, select a phone number
that you want to store in the preset dial
from the phonebook.
The confirmation display appears.
2 Touch [Preset], then the desired preset
number (1 to 6).
The contact is stored to the selected preset
number.
Available Operations During a
Call
To adjust the ringtone volume
Rotate the volume control dial while receiving a call.
To adjust the talker’s voice volume
Rotate the volume control dial during a call.
To adjust the volume for the other party (Mic
gain adjustment)
During a handsfree call, touch , then set [MIC
Gain] to [Low], [Middle], or [High].
To switch between handsfree mode and
handheld mode
During a call, touch to switch the
phone call audio between the unit and cellular
phone.
Note
Depending on the cellular phone, this operation may not be
available.
To answer an incoming call automatically
Touch , then set [Auto Answer] to [ON].
Handsfree Calling (via BLUETOOTH
only)
Presetting phone numbers
16GB
SongPal with Android Phone
Downloading the latest
“SongPal” application is required
from Google Play.
Notes
• For your safety, follow your local
traffic laws and regulations, and do
not operate the application while
driving.
• Connecting an Android phone while
“SongPal” is installed to this unit
allows you to receive notifications of
your SMS or calendar, etc. through
the car speakers and control the unit by voice command.
• What you can control with “SongPal” varies depending on
the connected device.
• To make use of “SongPal” features, see the details on your
Android phone.
• Display images of the “SongPal” application used in this
Operating Instruction may differ with the actual ones.
• Messages of the “SongPal” application that appear on this
unit and your Android phone may differ.
• For further details on “SongPal,” visit the following URL:
http://rd1.sony.net/help/speaker/songpal/
1 Make the BLUETOOTH connection with
Android phone (page 9).
2 Launch the “SongPal” application.
3 Press HOME, then touch [Settings].
4 Touch , then set [SongPal] to [Connect].
Connection to Android phone starts.
For details on the operations on an Android
phone, see the help section of the application.
If the device number appears
Make sure that the number is displayed (e.g.,
123456), then select “Yes” on the Android phone.
To terminate connection
Set [SongPal] to [Disconnect] in [General Settings].
Selecting the source or application
You can select a source or application not only on
your Android phone but also on this unit by
operating the Android phone.
1 Show the source list of this unit on your Android
phone.
For details, refer to the operating instructions
supplied with the Android phone.
2 Touch the desired source.
Announcement of various information by
voice guide
When SMS, Twitter/Facebook/Calendar
notifications, etc., are received, they are
automatically announced through the car speakers.
For details on settings, refer to the help section of the
application.
Useful Functions
Establishing the SongPal connection
17GB
Activating voice recognition
By registering applications, you can control an
application by voice command. For details, refer to
the help section of the application.
To activate voice recognition
1
Press and hold VOICE to activate voice
recognition.
2 Say the desired voice command into the
microphone when [Say Source or App] appears on
the Android phone.
Notes
• To use this function, VOICE need to be assigned the
voice command function by selecting [Voice] in [SOURCE
Key Func.] (page 19).
• Voice recognition may not be available in some cases.
• Voice recognition may not work properly depending on
the performance of the connected Android phone.
• Operate under conditions where noise such as engine
sound is minimized during voice recognition.
Replying a message of SMS
You can reply a message by voice recognition.
1 Activate voice recognition, then input “Reply
(Reply).
The message input display appears on the “SongPal
application.
2 Input a reply message by voice recognition.
The list of message candidates appears on the
“SongPal” application.
3 Touch / to select the desired message, then
touch [Enter].
The message is sent out.
Using Siri Eyes Free
Siri Eyes Free allows you to use an iPhone
handsfree by simply speaking into the microphone.
This function requires you to connect an iPhone to
the unit via BLUETOOTH. Availability is limited to
iPhone 4s or later. Make sure that your iPhone is
running the latest iOS version.
You must complete BLUETOOTH registration and
connection configurations for the iPhone with the
unit in advance. For details, see “Preparing a
BLUETOOTH Device” (page 7).
1 Activate the Siri function on the iPhone.
For details, refer to the operating instructions
supplied with the iPhone.
2 Press and hold SOURCE.
The voice command display appears.
3 After the iPhone beeps, speak into the
microphone.
The iPhone beeps again, then Siri starts
responding.
To deactivate Siri Eyes Free
Touch [Close].
Notes
• The iPhone may not recognize your voice depending on
usage conditions. (For example, if you are in a moving car.)
• Siri Eyes Free may not function properly, or the response
time may lag in locations where iPhone signals are difficult
to receive.
• Depending on the iPhone’s operating condition, Siri Eyes
Free may not function properly, or may quit.
• If you play a track with an iPhone using the BLUETOOTH
audio connection, when the track starts playback via
BLUETOOTH, Siri Eyes Free automatically quits and the unit
switches to the BLUETOOTH audio source.
• When Siri Eyes Free is activated during audio playback, the
unit may switch to the BLUETOOTH audio source even if
you do not specify a track to play.
• When connecting the iPhone to the USB port, Siri Eyes Free
may not function properly, or may quit.
• When connecting the iPhone to the unit via USB, do not
activate Siri with the iPhone. Siri Eyes Free may not
function properly, or may quit.
• There is no audio sound while Siri Eyes Free is activated.
18GB
Basic Setting Operation
You can set items in the following setup categories:
General Settings, Sound Settings,
Screen Settings, Visual Settings
1 Press HOME, then touch [Settings].
2 Touch one of the setup category icons.
The items that can be set differ depending on
the source and settings.
3 Touch / to select the desired item.
To return to the previous display
Touch .
General Settings
Language
Selects the display language: [English],
[Español], [Français].
Time Format
Changes the time format: [12-hour], [24-hour].
Clock Time
Sets the clock time by the RDS data: [OFF], [ON].
Clock Adjust
Sets the clock time manually.
(Available only when [Clock Time] is set to [OFF].)
Beep
Activates the operation sound: [OFF], [ON].
Dimmer
Dims the display: [OFF], [Auto], [ON].
([Auto] is available only when the illumination
control lead is connected, and works when the
head light is turned on.)
Dimmer Level
Adjusts the brightness level when the dimmer is
activated: –5 to +5.
Touch Panel Adjust
Adjusts the touch panel calibration if the
touching position does not correspond with the
proper item.
Output Color System
Changes the color system according to the
connected monitor (SECAM is not supported):
[NTSC], [PAL].
(Available only when no source is selected.)
Camera Input
Selects the image from the rear view camera:
[OFF], [Normal], [Reverse] (mirror image).
Steering Control
Selects the input mode for the connected remote
control. To prevent a malfunction, be sure to
match the input mode with the connected
remote control before use.
Custom
Input mode for the steering wheel remote
control (Automatically selected when [User
Defined] is complete.).
Preset
Input mode for the wired remote control
excluding the steering wheel remote control.
User Defined
The steering button panel appears.
Press and hold the button you want to assign
to the steering wheel.
The button on the panel lights up (standby).
Press and hold the button on the steering
wheel you want to assign the function to.
The button on the panel changes to orange
(registration complete).
To register other functions, repeat steps
and .
(Available only when [Steering Control] is set to
[Custom].)
Notes
• While making settings, only button operation on the
unit is available. For safety, park your car before making
this setting.
• If an error occurs while registering, all the registered
information is cleared. Restart registration from the
beginning.
• This function may not be available on some vehicles.
For details on the compatibility of your vehicle, visit the
support site on the back cover.
Bluetooth Connection
Activates the BLUETOOTH signal: [OFF], [ON],
[Pairing] (enters into pairing standby mode).
Bluetooth Device Info
Displays the information of the device connected
to the unit by touching [Open].
(Available only when [Bluetooth Connection] is
set to [ON])
Bluetooth Reset
Initializes all BLUETOOTH-related settings such as
pairing information, call history, preset dial,
history of connected BLUETOOTH devices, etc.
Settings
19GB
SongPal
Establishes or terminates the “SongPal” function
(connection): [Connect], [Disconnect].
SOURCE Key Func.
Assigns the voice command function or the
display menu to the SOURCE button: [Voice],
[DSPL].
Rear View Camera (XAV-W651BT)
Adjusts the length and/or position of the marker
lines on the picture from the rear view camera by
touching [Line Edit].
Sound Settings
EXTRA BASS
Reinforces bass sound in synchronization with
the volume level: [OFF], [1], [2].
EQ5/Subwoofer
Selects an equalizer curve and adjusts the
subwoofer level.
EQ5
Selects the equalizer curve: [Electronica], [Soul],
[Country], [R&B], [Pop], [Rock], [Hip-Hop], [Jazz],
[Dance], [Custom], [OFF].
[Custom] adjusts the equalizer curve: –8 to +8.
Subwoofer
Adjusts the volume level of the subwoofer:
[OFF], –10 to +10.
Balance/Fader
Adjusts the balance/fader level.
Balance:
Adjusts the sound balance between the left and
right speakers: L15 to R15.
Fader:
Adjusts the sound balance between the front
and rear speakers: Front 15 to Rear 15.
Crossover
Adjusts the cut-off frequency and subwoofer
phase.
High Pass Filter
Selects the cut-off frequency of the front/rear
speakers: [63Hz], [100Hz], [120Hz], [150Hz],
[180Hz], [OFF].
Low Pass Filter
Selects the cut-off frequency of the subwoofer:
[OFF], [55Hz], [85Hz], [120Hz], [160Hz].
Subwoofer Phase
Selects the subwoofer phase: [Normal],
[Reverse].
Screen Settings
Demo
Activates the demonstration: [OFF], [ON].
Wallpaper
Changes the basis color of the background by
touching the desired color.
Visual Settings
Available only when no source is selected.
DVD Menu Language (XAV-W651BT)
Selects the default language for the discs menu:
[English], [Chinese], [German], [French], [Italian],
[Spanish], [Portuguese], [Dutch], [Danish],
[Swedish], [Finnish], [Norwegian], [Russian],
[Other].
DVD Audio Language (XAV-W651BT)
Selects the default language for the soundtrack:
[English], [Chinese], [German], [French], [Italian],
[Spanish], [Portuguese], [Dutch], [Danish],
[Swedish], [Finnish], [Norwegian], [Russian],
[Other].
DVD Subtitle Language (XAV-W651BT)
Selects the default subtitle language for DVD:
[English], [Chinese], [German], [French], [Italian],
[Spanish], [Portuguese], [Dutch], [Danish],
[Swedish], [Finnish], [Norwegian], [Russian],
[Other].
Monitor Type
Selects an aspect ratio suitable for the connected
monitor.
(Available only while the source is off.)
16:9
Displays a wide picture. Suitable when
connecting to a wide-screen monitor or a
monitor with a wide mode function.
Letterbox
Displays a wide picture with bands on the upper
and lower positions of the screen. Suitable when
connecting to a 4:3 screen monitor.
Pan Scan
Displays a wide picture on the entire screen and
automatically cuts off the portions that do not fit.
Video CD PBC (XAV-W651BT)
Activates PBC functions when playing back a
VCD: [OFF], [ON].
20GB
Precautions
Cool off the unit beforehand if your car has been
parked in direct sunlight.
Power antenna (aerial) extends automatically.
Moisture condensation (XAV-W651BT)
Should moisture condensation occur inside the
unit, remove the disc, and wait for about an hour
for it to dry out; otherwise the unit will not operate
properly.
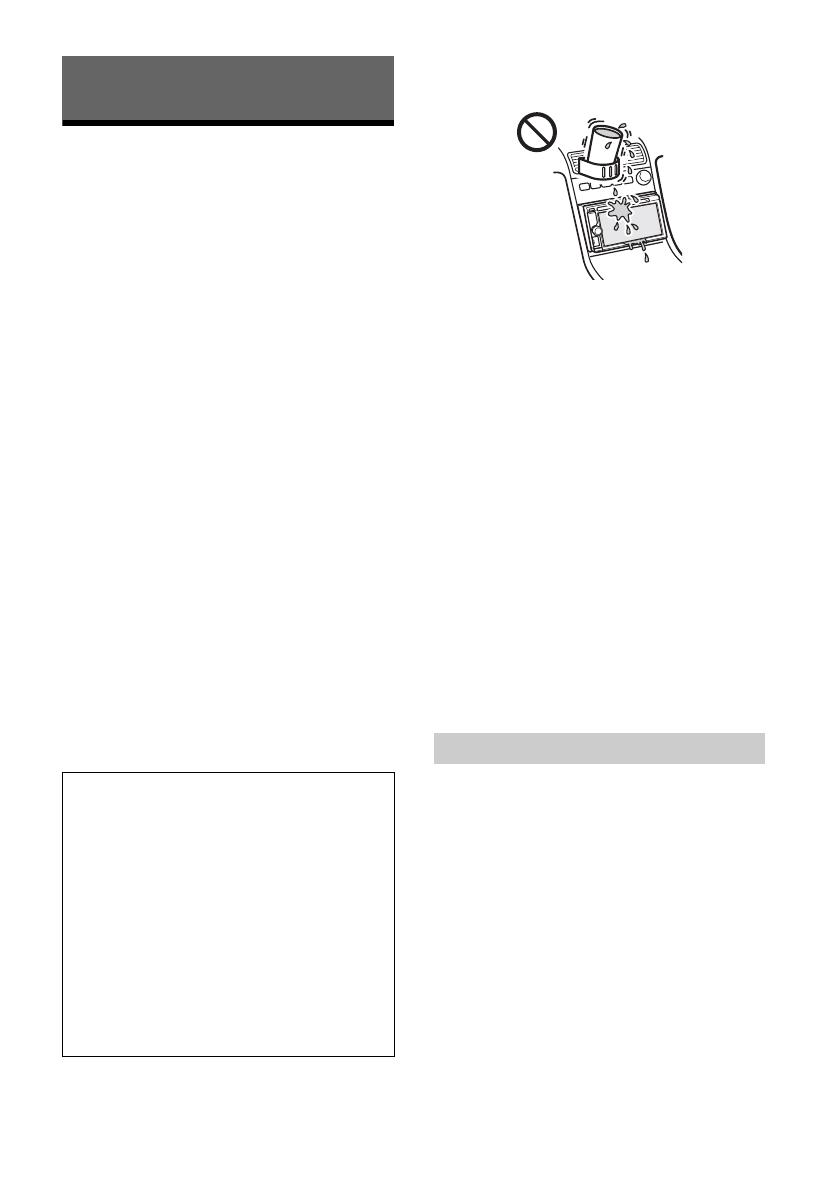
To maintain high sound quality
Do not splash liquid onto the unit or discs (XAV-
W651BT).
Notes on safety
Comply with your local traffic rules, laws, and
regulations.
While driving
Do not watch or operate the unit, as it may lead
to distraction and cause an accident. Park your
car in a safe place to watch or operate the unit.
Do not use the setup feature or any other
function which could divert your attention from
the road.
When backing up your car, be sure to look back
and watch the surroundings carefully for your
safety, even if the rear view camera is
connected. Do not depend on the rear view
camera exclusively.
While operating
Do not insert your hands, fingers, or foreign
objects into the unit, as it may cause injury or
damage to the unit.
Keep small articles out of the reach of children.
Be sure to fasten seatbelts to avoid injury in the
event of sudden movement of the car.
Notes on LCD panel
Do not get the LCD panel wet or expose it to
liquids. This may cause a malfunction.
Do not press down hard on the LCD panel as doing
so can distort the picture or cause a malfunction
(i.e., the picture may become unclear, or the LCD
panel may be damaged).
Do not touch the panel with objects other than
with your finger, as it may damage or break the
LCD panel.
Clean the LCD panel with a dry soft cloth. Do not
use solvents such as benzine, thinner,
commercially available cleaners, or antistatic
spray.
Do not use this unit outside the temperature
range 0 ºC – 40 ºC (32 ºF – 104 ºF).
If your car was parked in a cold or hot place, the
picture may not be clear. However, the monitor is
not damaged, and the picture will become clear
after the temperature in your car becomes normal.
Some stationary blue, red, or green dots may
appear on the monitor. These are called “bright
spots,” and can happen with any LCD. The LCD
panel is precision-manufactured with more than
99.99% of its segments functional. However, it is
possible that a small percentage (typically 0.01%)
of the segments may not light up properly. This
will not, however, interfere with your viewing.
Discs (XAV-W651BT)
–DVD*
1
: DVD VIDEO, DVD-R, DVD-R DL, DVD-RW
(Video mode), DVD+R, DVD+R DL, DVD+RW
VCD: Video CD (Ver. 1.0/1.1/2.0)
CD: Audio CD, CD-ROM/CD-R/CD-RW
File types*
2
Audio: MP3, WMA, AAC, FLAC, WAV
–Video: Xvid, MPEG-4
–Photo:JPEG
*1 “DVD” may be used in these Operating Instructions as a
general term for DVD VIDEOs, DVD-Rs/DVD-RWs, and
DVD+Rs/DVD+RWs.
*2 To play back those types of files, it is recommended to
store them on DVD discs or USB devices that are
supported by this unit.
Additional Information
Preventing an accident
Pictures appear only after you park the car and
set the parking brake.
If the car starts moving during video playback,
the following caution is displayed and you
cannot watch the video.
[Video blocked for your safety.]
The monitor connected to the REAR VIDEO OUT is
active while the car is in motion.
You cannot watch the video, but you can hear
audio.
Do not operate the unit or watch the monitor
while driving.
Playable discs and file types
  • Page 1 1
  • Page 2 2
  • Page 3 3
  • Page 4 4
  • Page 5 5
  • Page 6 6
  • Page 7 7
  • Page 8 8
  • Page 9 9
  • Page 10 10
  • Page 11 11
  • Page 12 12
  • Page 13 13
  • Page 14 14
  • Page 15 15
  • Page 16 16
  • Page 17 17
  • Page 18 18
  • Page 19 19
  • Page 20 20
  • Page 21 21
  • Page 22 22
  • Page 23 23
  • Page 24 24
  • Page 25 25
  • Page 26 26
  • Page 27 27
  • Page 28 28
  • Page 29 29
  • Page 30 30
  • Page 31 31
  • Page 32 32
  • Page 33 33
  • Page 34 34
  • Page 35 35
  • Page 36 36
  • Page 37 37
  • Page 38 38
  • Page 39 39
  • Page 40 40
  • Page 41 41
  • Page 42 42
  • Page 43 43
  • Page 44 44
  • Page 45 45
  • Page 46 46
  • Page 47 47
  • Page 48 48
  • Page 49 49
  • Page 50 50
  • Page 51 51
  • Page 52 52
  • Page 53 53
  • Page 54 54
  • Page 55 55
  • Page 56 56
  • Page 57 57
  • Page 58 58
  • Page 59 59
  • Page 60 60
  • Page 61 61
  • Page 62 62
  • Page 63 63
  • Page 64 64
  • Page 65 65
  • Page 66 66
  • Page 67 67
  • Page 68 68
  • Page 69 69
  • Page 70 70
  • Page 71 71
  • Page 72 72
  • Page 73 73
  • Page 74 74
  • Page 75 75
  • Page 76 76
  • Page 77 77
  • Page 78 78
  • Page 79 79
  • Page 80 80
  • Page 81 81
  • Page 82 82
  • Page 83 83
  • Page 84 84
  • Page 85 85
  • Page 86 86
  • Page 87 87
  • Page 88 88
  • Page 89 89
  • Page 90 90
  • Page 91 91
  • Page 92 92
  • Page 93 93
  • Page 94 94
  • Page 95 95
  • Page 96 96
  • Page 97 97
  • Page 98 98
  • Page 99 99
  • Page 100 100
  • Page 101 101
  • Page 102 102
  • Page 103 103
  • Page 104 104
  • Page 105 105
  • Page 106 106
  • Page 107 107
  • Page 108 108
  • Page 109 109
  • Page 110 110
  • Page 111 111
  • Page 112 112
  • Page 113 113
  • Page 114 114
  • Page 115 115
  • Page 116 116

Sony XAV-V630BT Istruzioni per l'uso

Categoria
Ricevitori multimediali per auto
Tipo
Istruzioni per l'uso
Questo manuale è adatto anche per