
MODEL H8258
DIGITAL ANGLE FINDER
INSTRUCTIONS
COPYRIGHT © MARCH, 2009 BY GRIZZLY INDUSTRIAL, INC.
WARNING: NO PORTION OF THIS MANUAL MAY BE REPRODUCED IN ANY SHAPE
OR FORM WITHOUT THE WRITTEN APPROVAL OF GRIZZLY INDUSTRIAL, INC.
#DD11615 PRINTED IN CHINA
Specifications
Angle Range ................................... 180° to -180°
Resolution......................................................0.1°
Repeatability ...............................................± 0.1°
Size ................................................2" x
13
⁄16" x 9"
Basic Functions
QUADRANT: This indicates which quadrant the
blade of the digital angle finder is in.
ON/OFF: Turns the digital display ON and OFF.
The digital display will automatically shut off in 5
minutes after non-use.
HOLD: Freezes the digital display.
ZERO/ABS: When pressed and released, toggles
the digital display back-and-forth between the
"ABS" (absolute) mode and zeros the incremental
display.
Press and hold the ZERO/ABS button for more
than five seconds will set a new zero point, mak-
ing the current blade location zero, ABS.
Using the Incremental Display
Being able to zero the display is useful when set-
ting up machinery, because you can use any angle
as a starting point to indicate how much you've
moved a component during adjustments without
adding/subtracting angles from each other.
Example—If you need to drill holes at 15° with
your drill press: 1) Set the blade to 90˚ and place
it on the drill press table, 2) press the ZERO/ABS
button, 3) rotate the blade until the digital display
reads 15°, and 4) rotate the table until the drill
press spindle is parallel with the blade of the digi-
tal angle finder.
A@
A88
:A>6
L7DA
34E
"èp$$'è
&'èp#*"è
$$'èp"è
#*"èp&'è
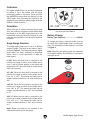
Figure 1. Model H8258.
A@
A88
:A>6
L7DA
34E
Figure 2. Buttons.
Note: Complete calibration instructions are on the
back of this sheet. To ensure accurate results from
your digital angle finder, calibrate your digital angle
finder before putting it into regular operation.
If you need help with this item, call our Tech
Support at: (570) 546-9663.

H8258 Digital Angle Finder
Calibration
The digital angle finder can be easily calibrated
by setting it on a flat surface with the blade
positioned parallel to the beam. Press and hold
the ABS/ZERO button while the display is in the
"ABS" mode. After performing this operation, the
display will show numbers getting larger when the
blade is rotated clockwise.
O
P
E
N
C
L
O
S
E
Figure 4. Battery replacement.
Battery Change
Battery Type Required ......................... CR2032
To change the battery, rotate the round cover on
the back of the digital angle finder counterclock-
wise. Pry the battery out and replace it, as shown
in Figure 4.
Note: Removing the battery resets the calibration
of the digital display. Re-calibration is required for
accurate results.
Angle Range Selection
The digital angle finder can be set to 4 different
ranges of angle. The label on the blade is repre-
sented in Figure 3. The label assumes the digital
angle finder has been calibrated as described
above. Here is a brief explanation of what the
label means:
0˚~ 22 5˚ When the lock knob is secured in this
position, the range of motion for the blade will be
from 0˚ with the blade parallel to the beam and
greater than 225˚ when the blade is rotated clock-
wise to the extreme.
-45˚~180˚ When the lock knob is secured in this
position, the range of motion for the blade will be
from -45˚ to 180˚. This means the blade can be
rotated counterclockwise to -45˚ and clockwise to
180˚.
-180˚~45˚ When the lock knob is secured in this
position, the range of motion for the blade will be
from -180˚ to 45˚. This means the blade can be
rotated counterclockwise to -180˚ and clockwise
to 45˚.
-225˚~0˚ When the lock knob is secured in this
position, the range of motion for the blade will be
from -225˚ to 0˚. This means the blade can be
rotated counterclockwise to -225˚ and clockwise
to 0˚.
Note: Rotate the blade to one extreme or the
other before removing the lock knob.
"èp$$'è
&'èp#*"è
$$'èp"è
#*"èp&'è
Figure 3. Each circle represents a location the
lock knob can be installed.
Orientation
When the blade is rotated counterclockwise past
zero, the numbers will display upside down while
the display is in the ABS mode. Switching to the
incremental mode will cause the display to read
right-side-up regardless of the direction the blade
is rotated.
-
 1
1
-
 2
2


in altre lingue
- English: Grizzly H8258 Owner's manual
Altri documenti
-
Hitec RCD IFHHFM-4-72 Manuale utente
-
Fiat Doblo Owner's Handbook Manual
-
Align RH50E23XT Manuale del proprietario
-
HP Treadmill 4328A Manuale utente
-
-
Regal 29 OBX Manuale del proprietario
-
Star Trac Ion Computer Manuale del proprietario
-