La pagina si sta caricando...

RRA320PNX
User Manual
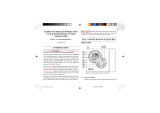
FM Radio Projection Alarm Clock
with Outdoor Temperature Display


1
CONTENTS
EN....................................................................................................................................................................................................................... 2
IT ........................................................................................................................................................................................................................ 10
FR ....................................................................................................................................................................................................................... 18
DE....................................................................................................................................................................................................................... 25
ES ....................................................................................................................................................................................................................... 33
POR .................................................................................................................................................................................................................... 40
NL ....................................................................................................................................................................................................................... 48
SWE ................................................................................................................................................................................................................... 56

2
EN
OVERVIEW
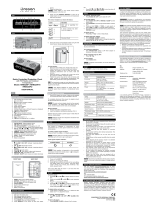
FRONT VIEW (FIG. 1)
1
234
10
11
12
7
8
9
6
13
14
5
1. AM / PM: Indicates AM / PM (12 hour mode)
2. Time zone offset
3. Indicates radio volume
4. Clock / Volume
5. Radio station (logged)
6. Sleep mode is ON
7. Indicates Radio mode is ON and frequency is displayed
8. Calendar / Radio frequency / Humidity
9. Sensor reception indicator
10. Sensor batteries low
11. User selectable temperature units
12. Temperature
13. Beep / Radio Alarm 1/ 2
14. Main unit batteries low / no battery
BACK VIEW (FIG. 2)
Ɯ
1. FOCUS Wheel : Adjust projection focus
2.
O
C/
O
F : Select the temperature unit
3. + / - : Increase / decrease values of the selected
setting
4. SET
: Set the clock time; Toggle between date/
humidity display
SET / : Set the alarm; View respective
alarm status
5. DIMMER : Select display brightness LO / HI
6. PROJECTION ON/OFF : Enable / disable
continuous projection
7. 180° FLIP : Flip projected image 180
o
8. RESET : Reset unit to default settings
9. AC / DC socket
10. Battery compartment
11. USB output port

3
EN
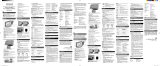
BOTTOM VIEW (FIG. 4)
Ɯ
1. SNOOZE / SLEEP buttons
REMOTE SENSOR (FIG. 5)
1
2
3
4
5
FRONT VIEW BACK VIEW
1. LED status indicator: blinks when transmitting a reading
2. Wall mount hole
3. Battery compartment
4. RESET: Reset unit to default settings
5. Channel Switch
TOP VIEW (FIG. 3)
1.
ALARM 1 ON / OFF : Activate / deactivate
Alarm 1 function
2. VOL / : Adjust radio volume
3.
ALARM 2 ON / OFF : Activate / deactivate
Alarm 2 function
4. STATION: Change radio station
5. TUNE / : Auto search / adjust radio frequency
6. RADIO ON / OFF: Turn Radio On / Off
7. SNOOZE / SLEEP: Alarm snooze or enable radio
sleep; Press and hold to turn off the backlight;
Activate the projection and backlight for 5 seconds.

4
EN
GETTING STARTED
REMOTE SENSOR INSTALLATION
1. Slide open the battery door.
2. Slide channel switch to select a channel (1, 2, 3).
Ensure you use a different channel for each sensor.
3. Insert the battery, matching the polarities (+ / -) See
FIG.5.
4. Press RESET after each battery change.
5 . Close the battery door.
6. Secure the sensor in the desired location using the
wall mount hole or table stand.
For best results:
• Place the sensor within 30 m (100 ft) of the main unit.
• Place the sensor out of direct sunlight and moisture.
• Position the sensor so that it faces the main unit,
minimizing obstructions such as doors, walls and
furniture.
• Place the sensor in a location with a clear view to the
sky, away from metallic / electronic objects.
• Position the sensor close to the main unit during cold
winter months as below-freezing temperatures may
affect battery performance and signal transmission.
TIP The transmission range may vary depending on
many factors. You may need to experiment with various
locations to get the best results.
NOTE
• Use alkaline batteries for longer usage and
consumer grade lithium batteries in temperatures
below freezing.
• Install battery in the remote sensor before connecting
power to the main unit.
MAIN UNIT INSTALLATION
Memory backup:
1. Remove the battery compartment cover.
2. Insert the batteries, matching the polarities (FIG. 2).
3. Press RESET after each battery change.
AC power:
Plug AC/DC adaptor into power socket. Make sure the
adapter is not obstructed and is easily accessible to the
unit.

5
EN
NOTE
• When the main unit is connected to power, it will
search and start receiving temperature / humidity
data from the sensor automatically.
• To completely disconnect from power, the adapter
should be disconnected from the main unit.
• The main unit and adapter should not be exposed to
wet conditions. No objects lled with liquid, such as
vases, should be placed on the main unit and adapter.
• Batteries serve as a back-up power supply. To fully
utilize all features, install adapter.
SET CLOCK
1. Press and hold .
2. Press + or - to change the settings.
3. Press to conrm and move to the next
setting. The setting options are as follows: time-
zone offset, 12/24 hr format, hour, minute, year,
month-day / day-month, day and month.
NOTE You need manually adjust to Daylight Saving
Time (DST) or back to standard time.
ALARM
To set the alarm:
1. Press SET or SET to display desired set
alarm time.
2. Press and hold SET or SET to enter
respective setting.
3. Press + / - to change the settings
4. Press or to conrm and move to the next
setting. The setting options are as follows: hour,
minute, beep alarm / radio alarm .
To adjust station and volume:
• If radio alarm is selected, press + / - to select the
radio station and + / - to adjust the volume.
To silence the alarm:
• Press SNOOZE / SLEEP to silence it for 8 minutes
OR
• Press SET / SET , /
,
to turn the
alarm off and activate it again after 24 hours.
RADIO
To activate / deactivate radio:
• Press RADIO ON / OFF to turn radio ON / OFF.
To set radio station:
1. For rst time using, press RADIO ON/OFF to turn on
the radio, the main unit will search the frequency and
save to the preset station (1-8) automatically.
2. To manually set the station, select a preset station,
then press and hold TUNE / TUNE to auto
search or press TUNE / TUNE to manually
select frequency. The desired frequency will save to
the corresponding station.
To adjust volume:
• Press VOL / VOL when in Radio Mode.

6
EN
To adjust sleep timer setting:
• Press SNOOZE / SLEEP to activate.
• Press SNOOZE / SLEEP again to change the sleep
time setting (120, 90, 60, 30, 15, OFF).
PROJECTION
This unit projects time and outdoor temperature
information for your convenience.
For continuous projection:
• Slide PROJECTION switch to ON when adaptor is
connected, to enable / disable.
To ip projected image by 180°:
• Press 180° FLIP.
To focus image :
• Turn FOCUS wheel.
NOTE If projection is illuminated, do not look directly
into the projector.
BACKLIGHT
• Slide the DIMMER switch to HI or LO to adjust
backlight level.
• Press and hold SNOOZE/SLEEP for 5 seconds to
turn off the backlight.
• Press SNOOZE/SLEEP to activate the backlight
and projection functions for 5 seconds, when the
backlight is off or set to LO.
RESET
Press RESET to return to the default settings.
SPECIFICATIONS
TYPE DESCRIPTION
MAIN UNIT
L x W x H
183 x 67 x 81 mm
(72 x 26.4 x 31.9 in)
Weight 386 g (13.6 oz) without battery
FM 87.5 to 108 MHz
Power
5 V 2 A AC adaptor
2 x UM-4 (AAA)
1.5 V batteries (for backup)
REMOTE THERMO SENSOR (THGN132N)
L x W x H
50 x 22 x 96 mm
(1.97 x 0.87 x 3.78 in)
Weight 62 g (2.22 oz) without battery
Temperature range -20 °C to 60°C(-4 °F to 140 °F)
Resolution 0.1°C (0.2 °F)
Humidity range 25% - 95%
Humidity resolution 1%
Signal frequency 433 MHz
Transmission range 30 m (98 ft) unobstructed
No. of channels 3
Power 1 x UM-3 (AA) 1.5 V battery

7
EN
PRECAUTIONS
• Use only fresh batteries of the required size and
type. Do not mix old and new batteries, different
types of batteries.
• Do not dispose old batteries as unsorted municipal
waste. Collection of such waste separately for
special treatment is necessary.
• If you do not plan to use the product for a long time,
remove the batteries. Batteries can leak chemicals
that can damage electronic parts.
• Do not subject the device to excessive force, shock,
dust, temperature or humidity.
• Do not cover the ventilation holes with any items
such as newspapers, curtains etc.
• Do not immerse the device in water. If you spill liquid
over it, dry it immediately with a soft, lint-free cloth.
• Do not clean the device with abrasive or corrosive
materials.
• Do not tamper with the device’s internal components.
Doing so invalidates the warranty.
• Images shown in this manual may differ from the
actual display.
• When disposing of this product, ensure it is collected
separately for special treatment.
• The contents of this manual may not be reproduced
without the permission of the manufacturer.
NOTE The technical specications for this product and
the contents of the user manual are subject to change
without notice.
NOTE Features and accessories will not be available
in all countries. For more information, please contact
your local retailer. To download an electronic version of
the user manual, please visit
http://global.oregonscientic.com/customerSupport.php.
ABOUT OREGON SCIENTIFIC
Visit our website www.oregonscientic.com to learn
more about Oregon Scientic products.
For any inquiry, please contact our Customer Services
at info@oregonscientic.com.
Oregon Scientic Global Distribution Limited reserves
the right to interpret and construe any contents, terms
and provisions in this user manual and to amend it, at
its sole discretion, at any time without prior notice. To
the extent that there is any inconsistency between the
English version and any other language versions, the
English version shall prevail.

8
EN
EU-DECLARTION OF CONFORMITY
Hereby the manufacturer, Oregon Scientic Global Distribution
Limited, declares that the radio equipment type FM Radio
Projection Alarm Clock with Outdoor Temperature Display
(Model: RRA320PNX) is in compliance with 2014/53/EU
Directive. The full text of the EU Declaration of Conformity is
available at the following internet address:
http://global.oregonscientic.com/customerSupport.php.
All EU countries, Switzerland CH
and Norway N
Countries RED Approval Complied
FCC STATEMENT
This device complies with Part 15 of the FCC Rules.
Operation is subject to the following two conditions: (1)
This device may not cause harmful interference, and
(2) This device must accept any interference received,
including interference that may cause undesired
operation.
WARNING: Changes or modications to this unit
not expressly approved by the party responsible for
compliance could void the user’s authority to operate
the equipment.
NOTE: This equipment has been tested and found
to comply with the limits for a Class B digital device,
pursuant to Part 15 of the FCC Rules. These limits
are designed to provide reasonable protection against
harmful interference in a residential installation.
This equipment generates, uses and can radiate radio
frequency energy and, if not installed and used in
accordance with the instructions, may cause harmful
interference to radio communications. However, there
is no guarantee that interference will not occur in a
particular installation. If this equipment does cause
harmful interference to radio or television reception,
which can be determined by turning the equipment
off and on, the user is encouraged to try to correct the
interference by one or more of the following measures:
• Reorient or relocate the receiving antenna.
• Increase the separation between the equipment
and receiver.
• Connect the equipment into an outlet on a circuit
different from that to which the receiver is connected.
• Consult the dealer or an experienced radio / TV
technician for help.

9
EN
DECLARATION OF CONFORMITY
The following information is not to be used as contact
for support or sales. Please call our customer service
number (listed on our website at www.oregonscientic.com,
or on the warranty card for this product) for all inquiries
instead.
We
Name: Oregon Scientic Inc.
Address: Brea Corporate Park 3020
Saturn St. Suite 200 Brea,
CA 92821
Telephone No.: 1 (888) 950-8889
declare that the product
Product No.: RRA320PNX
Product Name: FM Radio Projection Alarm Clock
with Outdoor Temperature Display
Manufacturer: Oregon Scientic
Global Distribution Limited
Address: Block C, 9/F, Kaiser Estate,
Phase 1,41 Man Yue St.,
Hung Hom, Kowloon,
Hong Kong
is in conformity with Part 15 of the FCC Rules.
Operation is subject to the following two conditions: 1)
This device may not cause harmful interference. 2) This
device must accept any interference received, including
interference that may cause undesired operation.
DISPOSAL INFORMATION FOR USERS
Pursuant to and in accordance with Article 14
of the Directive 2012/19/EU of the European
Parliament on waste electrical and electronic
equipment (WEEE), and pursuant to and in
accordance with Article 20 of the Directive 2013/56/EU
of the European Parliament on batteries and
accumulators and waste batteries.
The barred symbol of the rubbish bin shown on the
equipment indicates that, at the end of its useful life, the
product must be collected separately from other waste.
Please note that the batteries/rechargeable batteries
must be removed from the equipment before it is given
as waste. To remove the batteries/accumulators refer
to the specications in the user manual. Therefore, any
products that have reached the end of their useful life
must be given to waste disposal centers specializing
in separate collection of waste electrical and electronic
equipment, or given back to the dealer when purchasing
a new WEEE, pursuant to and in accordance with Article
14 as implemented in the country.
The adequate separate collection for the subsequent
start-up of the equipment sent to be recycled, treated
and disposal of in an environmentally compatible way
contributes to preventing possible negative effects on the
environment and health and optimizes the recycling and
reuse of components making up the apparatus.Abusive
disposal of the product by the user involves application of
the administrative sanctions according to the laws in force.

10
ENIT
PANORAMICA
VISTA ANTERIORE (FIG.1)
1
234
10
11
12
7
8
9
6
13
14
5
1. AM / PM: Indica AM / PM (modalità a 12 ore)
2. Compensazione fuso orario
3. Indica il volume della radio
4. Orologio / Volume
5. Stazione Radio (sintonizzata)
6. La modalità Sleep è ON
7. Indica che la modalità Radio è ON e viene
visualizzata la frequenza
8. Calendario / Frequenza radio / Umidità
9. Indicatore sensore di ricezione
10. Sensore batteria scarica
11. Unità di temperatura selezionabili dall’utente
12. Temperatura
13. Beep / Radiosveglia 1/ 2
14 Batterie dell’unità principale scariche / nessuna
batteria
VISTA POSTERIORE (FIG.2)
Ɯ
1. Rotella FOCUS (FOCALE): Regola la messa a
fuoco del proiettore
2.
O
C/
O
F: Seleziona l’unità della temperatura
3. + / - : Aumenta / reduce il valore dell’impostazione
selezionata
4. SET : Imposta l’ora dell’orologio; Passa tra data/
visualizzazione umidità
SET / : Imposta la sveglia; Visualizza lo stato
delle rispettive sveglie
5. DIMMER (COMMUTATORE): Seleziona la luminosità
del display LO / HI
6. PROJECTION (PROIEZIONE) ON/OFF: Attiva /
disattiva la proiezione continua
7. FLIP (RUOTA) a 180°: Ruota l’immagine proiettata
di 180°
8. RESET: Riporta l’unità alle impostazioni di fabbrica
9. Presa AC / DC
10. Vano batteria
11. Porta Uscita USB

11
ENIT
VISTA DAL BASSO (FIG.4)
Ɯ
1. Tasto SNOOZE / SLEEP
SENSORE REMOTO (FIG.5)
1
2
3
4
5
VISTA ANTERIORE VISTA POSTERIORE
1. Indicatore stato LED: lampeggia quando trasmette
una lettura
2. Foro per ssaggio a parete
3. Vano batteria
4. RESET: Riporta l’unità alle impostazioni di fabbrica
5. Cambia canale
VISTA DALL’ALTO (FIG.3)
1.
SVEGLIA 1 ON / OFF: Attiva / disattiva La
funzione Sveglia 1
2. VOL / : Regola il volume della sveglia
3.
SVEGLIA 2 ON / OFF: Attiva / disattiva La
funzione Sveglia 2
4. STATION (STAZIONE ): Cambia stazione radio
5. TUNE (SINTONIZZA) / : Ricerca automatica /
regola frequenza radio
6. RADIO ON / OFF: Accende / Spegne la Radio
7. SNOOZE / SLEEP: Posponi sveglia o attiva
radio sleep; Premi e tieni premuto per spegnere
la retroilluminazione; Attiva la proiezione e la
retroilluminazione per 5 secondi.

12
ENIT
PER COMINCIARE
INSTALLAZIONE SENSORE REMOTO
1. Fai scorrere lo sportello della batteria.
2. Fai scorrere il cambio canale per selezionare
un canale (1, 2, 3). Assicurati di usare un canale
diverso per ogni sensore.
3. Inserisci la batteria, facendo combaciare i poli (+ / -)
Vedi FIG.5.
4. Premi RESET ad ogni cambio della batteria.
5. Chiudi lo sportello della batteria.
6. Fissa il sensore nel luogo desiderato usando il foro
di ssaggio a parete o il supporto.
Per risultati migliori:
• Posiziona il sensore entro 30 m (100 ft) dall’unità
principale.
• Posiziona il sensore lontano dalla luce diretta del
sole e dall’umidità.
• Posiziona il sensore in modo che sia di fronte
all’unità principale, minimizzando gli ostacoli come
porte, pareti e mobili.
• Posiziona il sensore in un luogo con una visuale
libera del cielo, lontano da oggetti metallici /
elettronici.
• Posiziona il sensore vicino all’unità principale
durante i mesi invernali freddi poiché le temperature
gelide potrebbero inuenzare le prestazioni della
batteria e la trasmissione del segnale.
CONSIGLIO Il campo di trasmissione potrebbe variare
in base a vari fattori. Potresti dover sperimentare diversi
luoghi per ottenere risultati migliori.
NOTA
• Usa batterie alcaline per una maggiore longevità e
batterie a litio con temperature gelide.
• Installa la batteria nel sensore remote prima di
connettere la corrente all’unità principale.
INSTALLAZIONE UNITA’ PRINCIPALE
Backup della memoria:
1. Rimuovi il coperchio del vano batteria.
2. Inserisci le batterie, facendo combaciare i poli (FIG. 2).
3. Premi RESET ad ogni cambio della batteria.
Corrente AC:
Inserisci l’adattatore AC/DC nella presa di corrente.
Assicurati che l’adattatore non sia ostruito e che accede
facilmente all’unità.

13
ENIT
NOTA
• Quando l’unità principale è collegata alla corrente,
cercherà e inizierà a ricevere i dati su temperatura /
umidità automaticamente dal sensore.
• Per scollegare completamente la corrente, l’adattatore
deve essere scollegato dall’unità principale.
• L’unità principale e l’adattatore non devono essere
esposte a condizioni umide. Nessun oggetto
contenente liquido, come vasi, deve essere
collocate sull’adattatore o l’unità principale.
• Le batterie servono da alimentazione di back-up.
Per usare al Massimo le caratteristiche, installare
l’adattatore.
IMPOSTAZIONE OROLOGIO
1. Premi e tieni premuto
.
2. Premi + o – per cambiare le impostazioni.
3. Premi per confermare e passare
all’impostazione successiva. Le opzioni
d’impostazione sono come segue: bilanciamento
fuso orario, formato 12/24 ore, ore, minuti, anno,
mese-giorno / giorno-mese, giorno e mese.
NOTA Devi impostare manualmente l’Ora Legale
(DST) o riportare all’Ora Solare.
SVEGLIA
Per impostare la sveglia:
1. Premi SET o SET per visualizzare l’orario
desiderato della sveglia.
2. Premi e tieni premuto SET o SET per
accedere alle rispettive impostazioni.
3. Premi + / - per cambiare le impostazioni
4. Premi
o per confermare e passare
all’impostazione successiva. Le opzioni
d’impostazione sono come segue: ora, minuti, beep
sveglia / radiosveglia .
Per regolare stazione e volume:
• Se viene selezionata la radiosveglia, premi + / - per
selezionare la stazione radio e + / - per regolare il
volume.
Per silenziare la sveglia:
• Premi SNOOZE / SLEEP per silenziarla per 8 minuti
O
• Premi SET
/ SET , / per spegnere
la sveglia e riattivarla dopo 24 ore.
RADIO
Per Attivare / Disattivare la radio:
• Premi RADIO ON / OFF per Accendere / Spegnere.

14
ENIT
14
Per impostare la stazione radio:
1. Per il primo utilizzo, premi RADIO ON/OFF per
accendere la radio, l’unità principale cercherà la
frequenza e salverà la stazione preimpostata (1-8)
automaticamente.
2. Per impostare manualmente la stazione, seleziona
una stazione preimpostata, premi quindi e tieni
premuto TUNE / TUNE per la ricerca
automatica o premi TUNE / TUNE per
selezionare manualmente la frequenza. La frequenza
desiderata salverà la stazione corrispondente.
Per regolare il volume:
• Premi VOL / VOL quando sei in Modalità Radio.
Per impostare il timer sleep:
• Premi SNOOZE / SLEEP per attivarlo.
• Premi nuovamente SNOOZE / SLEEP per
modicare l’ora della modalità sleep (120, 90, 60,
30, 15, OFF).
PROIEZIONE
Questa unità proietta le informazioni su ora e temperatura
esterna per la tua comodità.
Per la proiezione continua:
• Scorri il tasto PROJECTION su ON quando
l’adattatore è connesso, per attivare / disattivare.
Per ruotare l’immagine proiettata di 180°:
• Premi 180° FLIP.
Per mettere a fuoco l’immagine:
• Ruota la rotella FOCUS.
NOTA Se il proiettore è acceso, non guardare
direttamente nel proiettore.
RETROILLUMINAZIONE
• Scorri il tasto DIMMER su HI o LO per regolare il
livello della retroilluminazione.
• Premi e tieni premuto SNOOZE/SLEEP per 5
secondi per spegnere la retroilluminazione.
• Premi SNOOZE/SLEEP per attivare le funzioni
di retroilluminazione e proiezione per 5 secondi,
quando la retroilluminazione è spenta o impostata
su LO.
RESET
Premi RESET per tornare alle impostazioni predenite.

15
ENIT
RECAUZIONI
• Usa batteria nuove della misura e tipologia richiesta.
Non utilizzare combinazioni di batterie vecchie e
nuove o di tipi diversi.
• Non smaltire le batterie vecchie nei riuti urbani
indifferenziati. È necessario un trattamento speciale
per la raccolta di questo tipo di riuti.
• Se non si intende utilizzare prodotto per un lungo
periodo, rimuovi le batterie. Queste possono perdere
elementi chimici che potrebbero danneggiare le parti
elettroniche.
• Non sottoporre il prodotto a forza eccessiva, urti,
polvere, temperatura o umidità.
• Non otturare i fori di aerazione con oggetti come
giornali, tende, etc.
• Non immergere l’unità in acqua. Se si versa del
liquido sul prodotto, asciugarlo immediatamente con
un panno morbido e privo di lanugine.
• Non pulire l’unità con materiali abrasivi, corrosivi o
contenenti alcool, in quanto possono causare danni.
• Non manomettere i componenti interni dell’unità.
Questo invalida la garanzia.
• Le immagini del manuale possono differire dalla realtà.
• Al momento dello smaltimento del prodotto,
conferirlo ai centri di raccolta specici.
• Il contenuto di questo manuale non può essere
riprodotto senza il permesso del produttore.
SPECIFICHE
TIPO DESCRIZIONE
UNITA’ PRINCIPALE
L x l x A
183 x 67 x 81 mm
(72 x 26,4 x 31,9 in)
Peso 386 g (13,6 oz) senza batteria
FM 87,5 to 108 MHz
Alimentazioner
Adattatore 5 V 2 A Adattatore CA
2 x UM-4 (AAA)
Batterie da 1,5 V (per il backup)
SENSORE TERMICO REMOTO (THGN132N)
L x l x A
50 x 22 x 96 mm
(1,97 x 0,87 x 3,78 in)
Peso 62 g (2.22 oz) senza batteria
Intervallo di
temperatura
Da -20 °C a 60°C (da -4 °F a 140
°F)
Risoluzione 0,1°C (0,2 °F)
Campo di umidità 25% - 95%
Risoluzione umidità 1%
Frequenza segnale 433 MHz
Campo di
trasmissione
30 m (98 ft) senza ostruzioni
N° di canali 3
Alimentazione 1 x Batteria UM-3 (AA) da 1,5 V

16
ENIT
NOTA Le speciche tecniche del prodotto e il contenuto
del manuale per l’utente possono essere modicati senza
preavviso.
NOTA Caratteristiche e accessori non disponibili in tutti
i paesi. Per ulteriori informazioni, rivolgersi al proprio
rivenditore. Si prega di visitare il sito http://global.
oregonscientic.com/customerSupport.php per scaricare
una versione elettronica del manuale.
INFORMAZIONI SU OREGON SCIENTIFIC
Per richiedere informazioni, contattate il nostro Servizio
Clienti al seguente collegamento: https://www.nital.it/
contatti/index.php.
Oregon Scientic Global Distribution Limited si riserva
il diritto di interpretare e denire eventuali contenuti,
termini e disposizioni contenuti in questo manuale per
l’utente e di modicarli, a sua esclusiva discrezione, in
qualsiasi momento e senza preavviso. Nella misura in
cui risultassero incongruenze tra la versione in inglese
e quelle in altre lingue, farà fede la versione in inglese.
DICHIARAZIONE DI CONFORMITA’ UE
Con la presente il fabbricante, Oregon Scientific
Global Distribution Limited, dichiara che questo tipo
di apparecchiatura Radiosveglia FM con Proiezione
con Visualizzazione Temperatura Esterna (modello:
RRA320PNX) è conforme alla direttiva 2014/53/UE. Il
testo completo della Dichiarazione di Conformità UE è
disponibile al seguente indirizzo internet: http://global.
oregonscientific.com/customerSupport.php.
PAESI CONFORMI ALLA DIRETTIVA RED
Tutti I Paesi UE, Svizzera
e Norvegia
N
CH
INFORMAZIONE AGLI UTENTI
Ai sensi dell’art.26 del Decreto Legislativo 14
marzo 2014, n. 49 “Attuazione della Direttiva
2012/19/UE sui rifiuti di apparecchiature
elettriche ed elettroniche (RAEE)” ed ai sensi
dell’art.22 del Decreto Legislativo 188 del 20
novembre 2008 “Attuazione della direttiva 2013/56/EU
concernente pile, accumulatori e relativi rifiuti “.
Il simbolo del cassonetto barrato riportato
sull’apparecchiatura o sulla sua confezione indica che
il prodotto alla ne della propria vita utile deve essere
raccolto separatamente dagli altri riuti per permetterne
un adeguato trattamento e riciclo.
Si ricorda che le pile/accumulatori devono essere rimosse
dall’apparecchiatura prima che questa sia conferita come
riuto. Per rimuovere le pile/ accumulatori fare riferimento
alle speciche indicazioni riportate nel manuale d’uso.
L’utente dovrà, pertanto, conferire gratuitamente
l’apparecchiatura e la pila giunta a ne vita agli idonei
centri comunali di raccolta differenziata dei riuti elettrici

17
ENIT
ed elettronici, oppure riconsegnarle al rivenditore secondo
le seguenti modalità:
• sia pile portatili sia apparecchiature di piccole
dimensioni, ovvero con almeno un lato esterno non
superiore a 25 cm, è prevista la consegna gratuita senza
obbligo di acquisto presso i negozi con una supercie di
vendita delle apparecchiature elettriche ed elettroniche
superiore ai 400 mq. Per negozi con dimensioni inferiori,
tale modalità è facoltativa.
• per apparecchiature con dimensioni superiori a
25 cm, è prevista la consegna in tutti i punti di vendita
in modalità 1 contro 1, ovvero la consegna al rivenditore
potrà avvenire solo all’atto dell’acquisto di un nuovo
prodotto equivalente, in ragione di uno a uno.
L’adeguata raccolta differenziata per l’avvio successivo
dell’apparecchiatura e delle pile/accumulatori dismessi
al riciclaggio, al trattamento e allo smaltimento
ambientalmente compatibile contribuisce ad evitare
possibili effetti negativi sull’ambiente e sulla salute e
favorisce il reimpiego e/o riciclo dei materiali di cui essi
sono composti.
Lo smaltimento abusivo di apparecchiature, pile ed
accumulatori da parte dell’utente comporta l’applicazione
delle sanzioni di cui alla corrente normativa di legge.

18
FR
VUE D’ENSEMBLE
VUE AVANT (FIG.1)
1
234
10
11
12
7
8
9
6
13
14
5
1. AM / PM : Indique AM / PM (mode 12 heures)
2. Fuseau horaire décalé
3. Indique le volume de la radio
4. Horloge / volume
5. Station de radio (connecté)
6. Le mode veille est activé
7. Indique le mode radio est activé et la fréquence est
afché
8. Calendrier / fréquence Radio / humidité
9. Indicateur de réception du capteur
10. batteries capteur faibles
11. Unités de température sélectionnables par
l’utilisateur
12. Température
13. Bip / Radio Alarme de 1/2
14. piles de l’unité principale faible / sans batterie
VUE ARRIÈRE (FIG.2)
Ɯ
1. Molette FOCUS (ZOOM) : Ajuster mise au point de
projection
2.
O
C/
O
F : Sélectionnez l’unité de température
3. + / - : les valeurs d’augmentation / diminution du
sélectionné réglage
4. SET
: Réglez l’heure d’horloge; Bascule entre
afchage date / humidité
SET / : Régler l’alarme; Voir l’état d’alarme
respectif
5. DIMMER (VARIATEUR) : Sélectionnez la luminosité
de l’écran LO / HI
6. PROJECTION ON/OFF : Activation / désactivation
de la projection continue
7. 180° FLIP : Retourner l’image projetée 180
o
8. RESET : unité Rétablir les paramètres par défaut
9. Prise AC / DC
10. Compartiment à piles
11. Port de sortie USB
/