
MO-EL S.p.a.
Via Galvani, 18
42027 Montecchio Emilia (RE)
ITALY
tel +39 (0522) 868011
fax +39 (0522) 864223
www.mo-el.com - [email protected]
USO E MANUTENZIONE
USE AND MAINTENANCE
EMPLOI ET ENTRETIEN
GEBRAUCH UND WARTUNG
USO Y MANTENIMIENTO
USO E MANUTENÇAO
NÁVOD K POUŽITÍ A ÚDRŽBĚ
KÄYTTÖ- JA HUOLTO-OHJE
INSTRUKCJA OBSŁUGI I KONSERWACJI
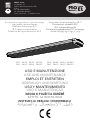
Riscaldatore a raggi infrarossi ad onde lunghe
Long waves infrared heater
Radiateur infrarouge IR-C
IR-C-Infrarot-Heizstrahler
Calefactor de rayos infrarrojos IR-C
Aquecedor de infravermelhos IR-C
Dlouhovlnný infrazářič IR-C
IR-C infrapunalämmitin
Promiennik podczerwieni IR-C emitujący
9815 - 9815D - 9815S - 9815SD 9818 - 9818D - 9818S - 9818SD
9824 - 9824D - 9824S - 9824SD 9832 - 9832D - 9832S - 9832SD

2
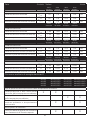
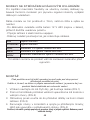
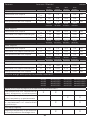
DATI TECNICI / TECHNICAL DATA
DONNEES TECHNIQUES / TECHNISCHE ANGABEN
DATOS TECNICOS / DATOS TECNICOS
TECHNICKÁ DATA / TEKNISET TIEDOT
DANE TECHNICZNE /
Tensione / Power supply
Tension / Anschlussspannung
Tensión / Tensão
/ Jännite
/
220-230 V
50-60 Hz
240 V
50-60 Hz
Consumo / Consumption
Consumo / Verbrauch
Consumo / Consumo
/ Kulutus
Konsumpcja /
1500 W / 1800 W / 2400 W / 3200 W
(1350 W) / (1650 W) / (2200 W) / (2950 W)
Livello di protezione / Protection degree
Niveau de production / Schutzgrad
Nivel de protección / Nível de protecção
/ Turvallisuustaso
/
IP55
Spettro di emissione / Emission spectrum
Spectre d’émission / Emissionsspektrum
Espectro de emisión / Espectro de emissão
Emisní spektrum / Päästöspektri
Spektrum emisji /
IR-C
Classe di isolamento / Insulation class
Classe d’isolement / Schutzklasse
Clase de aislamiento / Classe de isolamento
/ Eristysluokka
Klasa izolacji /
I
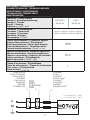
Interruttore
Circuit breaker
Interrupteur
Schalter
Interruptor
Přepínač
Vaihtaa
Przełącznik
RCD
DDFT
FI-Schalter
DDR
Fusibile*
Fuse*
Fusible*
Sicherung*
Fusível*
Pojistka*
Sulake*
Bezpiecznik*
* 10A (mod. 9815 - 9818)
16A (mod. 9824 - 9832)
L
N

3
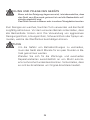
AVVERTENZE IMPORTANTI PER LA SICUREZZA
Leggere attentamente le istruzioni prima di installare il prodotto e conservarle
per future consultazioni. Il manuale deve essere conservato e trasmesso al
nuovo utente in caso di cessione dell’apparecchio.
1. L’ apparecchio è destinato esclusivamente all’impiego per il quale
è stato progettato, ovvero il raggiungimento ed il mantenimento
di un certo comfort termico per le persone tramite irraggiamento
su loro diretto. Il prodotto può anche essere usato per riscaldare
ambienti interni ma solo nella versione con sufsso ED ovvero
quella nella quale il prodotto viene abbinato al dispositivo di con-
trollo 9006ED. Il Costruttore non può essere considerato respon-
sabile per danni eventualmente provocati da un uso inadeguato.
2. Dopo aver disimballato il prodotto vericarne la completezza e as-
sicurarsi che non presenti segni di rotture, danneggiamenti o ma-
nomissioni.
3. L’apparecchio può essere utilizzato da bambini di almeno 8 anni
(come pure da persone con ridotte capacità siche, sensoriali o
mentali, o prive di esperienza o della necessaria conoscenza) pur-
ché essi siano sotto sorveglianza, oppure dopo che abbiano rice-
vuto istruzioni relative all’uso sicuro e abbiano compreso i poten-
ziali pericoli. I bambini non devono giocare con l’apparecchio.
• I bambini di età inferiore ai 3 anni dovrebbero essere tenuti a
distanza se non continuamente sorvegliati.
• I bambini di età compresa tra i 3 e gli 8 anni devono solamen-
te accendere/spegnere l’apparecchio purchè sia stato posto
o installato nella sua normale posizione di funzionamento e
che essi ricevano sorveglianza o istruzioni riguardanti l’utilizzo
dell’apparecchio in sicurezza e ne capiscano i pericoli.
• I bambini di età compresa tra i 3 e gli 8 anni non devono in-
serire la spina, regolare o pulire l’apparecchio né eseguire la
manutenzione a cura dell’utilizzatore.
4. I bambini dovrebbero essere supervisionati per assicurarsi che
non giochino con l’apparecchio.
5. L’apparecchio non deve essere installato in aree nelle quali pos-
sono essere presenti gas inammabili, polveri o vapori pericolosi.
IT USO E MANUTENZIONE

4
6. Quando si utilizza il riscaldatore, è necessario seguire alcune
regole fondamentali (applicabili a tutti gli apparecchi elettrici):
• Non toccare l’apparecchio con le mani bagnate.
• Non maneggiare l’apparecchio con i piedi nudi.
• Non lasciare che i bambini giochino con l’apparecchio.
7. Non apportare modiche al prodotto.
8. Mantenere le connessioni asciutte.
9. Se il cavo di alimentazione è danneggiato, evitare di utilizzarlo, ma
farlo sostituire dal Costruttore o da un Servizio Assistenza Tecni-
ca autorizzato o comunque da una persona con qualica similare,
in modo da prevenire ogni rischio.
10. Scollegare l’apparecchio dall’alimentazione se non lo si utilizza
per lunghi periodi.
Non utilizzare in stanze piccole occupate da persone incapaci di
uscire da sole solo se esse non sono poste sotto costante sor-
veglianza a meno che non si tratti del prodotto con suffisso ED.
In questo caso l’apparecchio di riscaldamento è dotato di un dis-
positivo esterno i controllo della temperatura ambientale.
Tutti gli utilizzatori devono essere informati riguardo tutti gli as-
petti del funzionamento e della sicurezza relativi all’apparecchio.
Queste istruzioni devono essere conservate come riferimento.
INSTALLAZIONE ELETTRICA
Prima di collegare l’apparecchio alla rete elettrica, assicurarsi che
la tensione corrisponda a quella indicata nell’etichetta dati targa
posta sull’apparecchio stesso, e che l’impianto elettrico sia con-
forme alle norme vigenti.
L’installazione dell’apparecchio deve essere effettuata da person-
ale competente e qualicato, in accordo con la norma CEI 64-8 che
regola gli impianti elettrici ed al regolamento UE 2015/1188. Prima di
collegare l’apparecchio, assicurarsi che l’impianto elettrico abbia un
sistema di messa a terra efciente.
L’apparecchio deve essere collegato alla rete elettrica con il cavo in
silicone H05SS-F in dotazione.
L’apparecchio è di classe I con grado di protezione IP55, general-
mente previsto per i prodotti che possono essere installati anche
all’aperto. Se si vuole mantenere questo grado di protezione alla pol-
vere e all’acqua, il collegamento con l’alimentazione deve essere ef-

5
fettuato per mezzo di un sistema che sia almeno IP55, secondo la
normativa italiana CEI 64-8.
È necessario interporre a monte della linea di alimenta zione un inter-
ruttore omnipolare di categoria di sovratensione III, con distanza di
apertura dei contatti di almeno 3 mm.
Assicurarsi che l’impianto sia protetto da un interruttore differenziale
magnetotermico con corrente d’intervento non superiore a 30mA.
- In nessun caso accendere l’apparecchio se si trova appoggiato al
suolo o su una supercie che non consenta una buona diffusione del
calore prodotto.
- Lasciare libera l’area davanti al riscaldatore per una distanza minima
di almeno un metro.
- L’apparecchio non deve essere posizionato immediatamente sotto
una presa di corrente, né di fronte ad essa.
- L’apparecchio di riscaldamento deve essere installato in modo da
impedire che gli interruttori o i comandi vengano toccati da chi si
trova nella vasca da bagno o nella doccia.
- Evitare l’uso di prolunghe, perché ci può essere pericolo di incendio.
- Assicurarsi che non ci sia la possibilità che materiale inammabile,
tende o materiali combustibili vengano a contatto col riscaldatore o si
trovino nelle sue vicinanze.
Tutti i riscaldatori ad irraggiamento sono volti a raggiungere e mantenere
un certo confort termico alle persone. E’ quindi molto importate studiare
con cura la zona in cui soggiornano le persone e di conseguenza orientare
l’irraggiamento verso di esse.
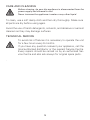
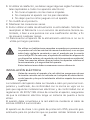
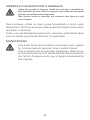
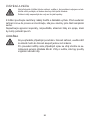
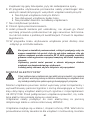
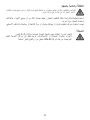
ATTENZIONE!
Alcune parti di questo prodotto possono diventare molto calde e
procurare ustioni. Prestare particolare attenzione in presenza di
bambini o persone vulnerabili.

6
MODELLI CON TELECOMANDO
Per la massima essibilitá tutti i modelli sono disponibili con dim-
mer per regolare comodamente l´intensitá del riscaldatore con il tel-
ecomando.
La lunghezza di ogni modello aumenta di 15cm mentre larghezza ed
altezza restano invariati.
- Inserire nel telecomando 1 batteria da 12 V di tipo A23 (non inclusa
nella confezione), rispettando le polarità indicate.
- Collegare l’apparecchio all’alimentazione.
- Utilizzare il telecomando come mostrato in tabella.
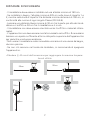
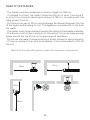
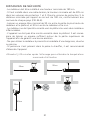
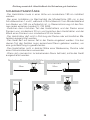
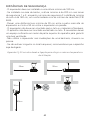
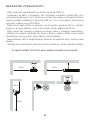
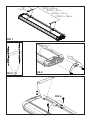
MONTAGGIO
Prima di essere utilizzato, il riscaldatore deve essere fissato al muro o al sof-
fitto per mezzo dei supporti in dotazione.
Assicurarsi che il muro a cui si intende fissare l’apparecchio sia solido e che
al suo interno non passino condutture elettriche o tubi dell’acqua.
1. Con una punta da trapano fare quattro fori nel muro come
mostrato nella graca.(FIG.1)
2. Fissare al muro i due supporti con fori grandi utilizzando viti e
tasselli di misura appropriata. (FIG.2)
3. Inserire il supporto ad arco nell´apposito binario del lato superi-
ore dell‘ apparecchio. (FIG.3)
4. Allineare i fori dei supporti e unirli tra loro utilizzando i bulloni
in dotazione, ssando il riscaldatore nell´inclinazione desiderata.
(FIG.4)
Assicurarsi che il riscaldatore rivolga i suoi raggi nella zona che si vuole
riscaldare. Stringere bene le viti al termine dell’operazione.
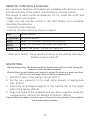
ON Accensione dell’apparecchio
STANDBY Spegnimento dell’apparecchio
LOW Selezione di 1/3 della potenza: il LED blu si accende
MED Selezione di 2/3 della potenza: il LED viola si accende
HIGH Selezione della potenza massima: il LED rosso si accende
Dopo ogni riaccensione il prodotto si riporterà all’impostazione
selezionata prima dello spegnimento.

7
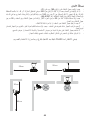
DISTANZE DI SICUREZZA
- Il riscaldatore deve essere installato ad una altezza minima di 180 cm.
- Se installato in bagno, l’altezza minima è 225 cm nelle zone di rispetto 1 e
2, mentre nella zona di rispetto 3 la distanza minima da terra è di 180 cm, in
conformità alle norme di ogni singolo Paese (CEI 64-8).
- Lasciare una distanza libera minima di 30 cm tra la parte più alta del riscal-
datore e il softto e 50 cm fra il riscaldatore e il muro.
- Il riscaldatore non deve essere orientato verso il softto o materiali inam-
mabili.
- L’apparecchio non deve essere montato incassato nel softto. È necessario
lasciare uno spazio sufciente attorno alla parte superiore dell’apparecchio
per garantire una buona aerazione.
- Non usare il riscaldatore nelle immediate vicinanze di una vasca da bagno,
doccia o piscina.
- Se non c’è nessuno nel locale da riscaldare, si raccomanda di spegnere
l’apparecchio.
Attendere 15-20 minuti dall’accensione per raggiungere la massima tempera-
tura di utilizzo.
50cm
50cm
30cm
180cm

8
PULIZIA E CURA DELL’APPARECCHIO
Prima di procedere alla pulizia, assicurarsi che l’apparecchio sia
disconnesso dalla rete elettrica e aspettare che tutte le sue parti si
siano completamente raffreddate.
Non immergere mai l’apparecchio in acqua o in altri liquidi.
Per la pulizia utilizzare un panno morbido inumidito e asciugare ac-
curatamente. Assicurarsi che tutte le parti siano asciutte prima di
utilizzare nuovamente.
Evitare l’uso di detergenti aggressivi, solventi, sostanze abrasive o
spray che possono danneggiare le superci.
MANUTENZIONE
Per evitare rischi di malfunzionamenti è necessario far fun-
zionare l’apparecchio per qualche ora ogni 6 mesi.
Per la manutenzione o le eventuali riparazioni, rivolgersi
esclusivamente a Centri di Assistenza Tecnica autorizzati
Mo-El. Assicurarsi che i ricambi siano originali.
.

9
9815/S
9818/S
9824/S
9832/S
9815ED/SED
9818ED/SED
9824ED/SED
9832ED/SED
9815D/SD
9818D/SD
9824D/SD
9832D/SD
9815DED/SDED
9818DED/SDED
9824DED/SDED
9832DED/SDED
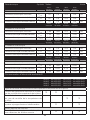
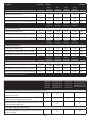
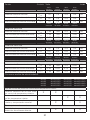
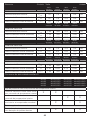
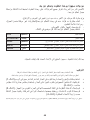
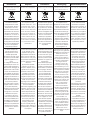
Tipo di potenza termica/controllo della temperatura ambiente
Potenza termica a fase unica senza
controllo della temperatura ambiente X X
Due o più fasi manuali senza controllo
della temperatura ambiente X X
Con controllo elettronico della tem-
peratura ambiente e temporizzatore
settimanale
X X
Altre opzioni di controllo
Controllo della temperatura ambiente
con rilevamento di nestre aperte X X
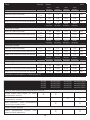
Dato Simbolo Valore Unità
9815
9815ED
9818
9818ED
9824
9824ED
9832
9832ED
Potenza termica
Potenza termica nominale Pnom 1.5 1.8 2.4 3.2 kW
Potenza termica minima (indicativa) Pmin 1.5 1.8 2.4 3.2 kW
Massima potenza termica continua Pmax c 1.5 1.8 2.4 3.2 kW
9815S
9815SED
9818S
9818SED
9824S
9824SED
9832S
9832SED
Potenza termica
Potenza termica nominale Pnom 1.35 1.65 2.2 2.95 kW
Potenza termica minima (indicativa) Pmin 1.35 1.65 2.2 2.95 kW
Massima potenza termica continua Pmax c 1.35 1.65 2.2 2.95 kW
9815D
9815DED
9818D
9818DED
9824D
9824DED
9832D
9832DED
Potenza termica
Potenza termica nominale Pnom 1.5 1.8 2.4 3.2 kW
Potenza termica minima (indicativa) Pmin 0.5 0.6 0.8 1.07 kW
Massima potenza termica continua Pmax c 1.5 1.8 2.4 3.2 kW
9815SD
9815SDED
9818SD
9818SDED
9824SD
9824SDED
9832SD
9832SDED
Potenza termica
Potenza termica nominale Pnom 1.35 1.65 2.2 2.95 kW
Potenza termica minima (indicativa) Pmin 0.45 0.55 0.73 0.98 kW
Massima potenza termica continua Pmax c 1.35 1.65 2.2 2.95 kW
Consumo ausiliario di energia elettrica=0

10
IMPORTANT SAFETY WARNINGS
Instructions should be carefully read before installation and retained by the
user. The booklet must be keeped and delivered to the new user in case of
cession of the machine.
1. This appliance is intended solely for the use it has been designed
for, namely the achievement and maintance of a ertain thermal
comfort for the people by means of irradiation on them. The pro-
duct can also be used to heat indoor environments but only in the
version with sufx ED in which the product is combined with the
control device 9005ED/9006ED. The Manufacturer is not respon-
sible for any damage that could happen for improper use.
2. After unpacking make sure that the appliance is complete and
shows no signs of visible damage or tampering.
3. The device can be used by children at least 8 years (as well as by
persons with reduced physical, sensory or mental capabilities, or
lack of experience or required knowledge) provided that they are
under surveillance, or after they have been instructed relating to
the safe use and have understood the potential dangers. Children
should not play with the appliance. Cleaning and maintenance
must be performed by the user and not by unsupervised children.
• Children of less than 3 years should be kept away unless
continuously supervised.
• Children aged from 3 years and less than 8 years shall only
switch on/off the appliance provided that it has been placed
or installed in its intended normal operating position and they
have been given supervision or instruction concerning use
of the appliance in a safe way and understand the hazards
involved.
• Children aged from 3 years and less than 8 years shall not
plug in, regulate and clean the appliance or perform user
maintenance.
4. Children should be supervised to ensure that they do not play with
the appliance.
5. Do not use in presence of gas, inammable or explosive liquids or
substances. Dened in BS5345.
EN USE AND MAINTENANCE

11
6. Some fundamental rules which apply to all electrical devices
must be observed when using the heater:
• Do not touch the heather with wet hands.
• Do not handle with bare feet.
• Do not let children play with the electrical appliance.
7. Do not apply any modication to the product.
8. Keep connections dry.
9. If the power supply cord is damaged, avoid to use the appliance.
For power cord replacing, please contact the manufacturer or the
technical service or a person with similar qualication, in order to
avoid any risk.
10. If the appliance is not used for a long period, disconnect it from
the power supply.
Do not use it in small rooms used by people who are unable to
leave such rooms on their own unless they are under constant
surveillance or unless the product is in the version with the suffix
ED. In this case the heating appliance does feature an external
device to control ambient temperature.
All users should be made aware of all aspects of operation and
safety and these instructions should be retained for reference.
ELECTRICAL INSTALLATION
Before connecting the appliance make sure that the voltage is
the same as indicated on the device and the line supply is corre-
sponding to the effective rules.
The installation should always be carried out by a qualied electri-
cian or a competent person in accordance with the current electrical
standards for your country:
(ex. HD 384 CENELEC for Mainland Europe, IEC 60446 and BS 7671
for the United Kingdom, IEC 60445(2010) & ET101:2008 for Ireland
and IEC 60364-7 1988 Internationally, AS/NZS 3000 for Australia) and
according to the UE 2015/1188 standards.
The energy supply to the heater must always be properly earthed.
The appliance must be connected to energy supply line by means of
the provided H05SS-F silicone cable.
An overvoltage category III Combined Circuit breaker and Residual
Current Device (RCD) with rated earth leakage operation not exceed-
ing 30mA must be tted upstream on the supply line in order to have

12
a contact separation in all poles that provide a full disconnection. The
circuit breaker must have a contact opening distance of at least 3
mm.
The product is in class I and IP55, wich is the protection rate forthe
units to be used even outdoor. For keeping the protection rate of
the appliance, the connection of the appliance with the power sup-
ply must be done by means of a minimum IP55 system, as per the
standards HD 384 CENELEC for Europe, or international IEC 60364-7
1988.
- Under no circumstances turn the appliance on if it is on any surface.
- A safety distance of not less than 100 cm should always be left in
front of the heaters or too near.
- The appliance must not be located neither directly below, nor in
front of a socket-outlet.
- The heater must be installed so as to prevent that the switches can
be touched from those who are in the shower.
- Avoid the use of an extension cord with this product, because the
extension cord may overheat and cause a risk of re.
- Ensure that there is no possibility of inammable material, combus-
tible material or curtains coming into contact with the heater, or lie
near the heater.
All radiant heaters are designed to achieve and maintain a certain thermal
comfort for people. It is therefore very important to carefully study the
area where people stay and consequently direct the radiation towards
them.
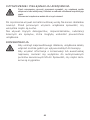
WARNING!
All irradiation heaters are designed to achieve and maintain a cer-
tain thermal comfort to the people who need it both outside and in-
side. It is therefore very important to carefully study the area where
people stay and consequently direct the radiation towards them.

13
REMOTE-CONTROLLED MODEL
For maximum exibility all models are available with dimmer to ad-
just the intensity of the heater comfortably by remote control.
The length of each model increases by 15 cm, while the width and
height remain unchanged..
- Insert into the remote control a 12V A23 battery (not included),
matching the polarities.
- Connecting the machine.
- Use the remote control as shown in gure.
MOUNTING
Before being used, the heater must be fixed to the wall or to the ceiling by
means of the provided supports
Ensure that the wall where you intend to attach the device is solid and that
within it do not pass electric cables or water pipes.
1. Drill four holes in the wall as shown.(FIG.1)
2. Fix the two supports to the wall using dowels of appropriate
size. (FIG.2)
3. Insert the arch-shaped support in the special rail on the upper
side of the device (FIG.3)
4. Align the holes of the supports and join them together using the
supplied bolts, setting the desired inclination. (FIG.4)
Ensure that the heater turns her rays in the area to be heated. Firmly tighten
the screws when finished.
ON Ignition device
STANDBY Shutdown device
LOW Select 1/3 of power: the blue LED lights on
MED Select 2/3 of power: the violet LED lights on
HIGH Select max power: the red LED lights on
After each restart, the product will return to the setting selected
before it was turned off.

14
SAFETY DISTANCES
- The heater must be installed at a minimum height of 180 cm.
- If installed in a toilet, the height should be 225 cm in zone 1 and zone 2;
in zone 3 the minimum above ground level is 180 cm, according with the
rules of each Country.
- A minimum air gap of 30 cm should always be allowed between the top
of the heater and a ceiling or roof. The appliance should be 50 cm far from
the walls.
- The heater must not be directed towards the ceiling or ammable materials.
- The device must not be mounted into the ceiling. You must leave enough
space around the top of the unit to ensure good ventilation.
- Do not use the heater in close proximity of a bath, shower or swimming pool.
- If there is nobody in the room to be heated, it is recommended to turn off
the unit.
Wait 15-20 minutes after power to reach the maximum temperature.
50cm
50cm
30cm
180cm

15
CARE AND CLEANING
Before cleaning, be sure the appliance is disconnected from the
power supply and allowed to cool.
Never immerse the appliance in water or any other liquid.
To clean, use a soft damp cloth and then dry thoroughly. Make sure
all parts are dry before using again.
Avoid the use of harsh detergents, solvents, and abrasive or aerosol
cleaners as they may damage surfaces.
TECHNICAL SERVICE
To avoid risk of failures it is necessary to operate the unit
for a few hours every 6 months.
If you have any question relevant your appliance, call the
local authorized distributor or the nearest Service Centre.
Every repairs should be carried on by an authorized Ser-
vice Centre and also ask always for original spare parts.
.

16
9815/S
9818/S
9824/S
9832/S
9815ED/SED
9818ED/SED
9824ED/SED
9832ED/SED
9815D/SD
9818D/SD
9824D/SD
9832D/SD
9815DED/SDED
9818DED/SDED
9824DED/SDED
9832DED/SDED
Type of heat output/room temperature control
Single stage heat output, no room
temperature control X X
Two or more manual stages, no room
temperature control X X
With electronic room temperature
control plus week timer X X
Other control options
Room temperature control, with
open window detection X X
Dato Symbol Value Unit
9815
9815ED
9818
9818ED
9824
9824ED
9832
9832ED
Thermal power
Nominal thermal power Pnom 1.5 1.8 2.4 3.2 kW
Minimum thermal power(indicative) Pmin 1.5 1.8 2.4 3.2 kW
Maximum continuous thermal power Pmax c 1.5 1.8 2.4 3.2 kW
9815S
9815SED
9818S
9818SED
9824S
9824SED
9832S
9832SED
Thermal power
Nominal thermal power Pnom 1.35 1.65 2.2 2.95 kW
Minimum thermal power(indicative) Pmin 1.35 1.65 2.2 2.95 kW
Maximum continuous thermal power Pmax c 1.35 1.65 2.2 2.95 kW
9815D
9815DED
9818D
9818DED
9824D
9824DED
9832D
9832DED
Thermal power
Nominal thermal power Pnom 1.5 1.8 2.4 3.2 kW
Minimum thermal power(indicative) Pmin 0.5 0.6 0.8 1.07 kW
Maximum continuous thermal power Pmax c 1.5 1.8 2.4 3.2 kW
9815SD
9815SDED
9818SD
9818SDED
9824SD
9824SDED
9832SD
9832SDED
Thermal power
Nominal thermal power Pnom 1.35 1.65 2.2 2.95 kW
Minimum thermal power(indicative) Pmin 0.45 0.55 0.73 0.98 kW
Maximum continuous thermal power Pmax c 1.35 1.65 2.2 2.95 kW
Auxiliary consumption of electricity=0

17
ISTRUCTIONS IMPORTANTES POUR LA SÉCURITÉ
Lire attentivement les consignes avant d’installer le produit et les conserver
pour des consultations futures. La notice doit être conservée et remise à
tout nouvel utilisateur en cas de vente de l’appareil.
1. L’appareil est exclusivement destiné à l’utilisation pour laquelle
il a été conçu, à savoir atteindre et maintenir un certain confort
thermique pour les personnes par rayonnement dirigé sur les per-
sonnes elles-mêmes. Le produit peut également être utilisé pour
chauffer des espaces intérieurs, mais uniquement dans la version
avec sufxe ED, à savoir la version dans laquelle le produit est as-
socié au dispositif de contrôle 9006ED/9005ED. Le Fabricant ne
peut être tenu pour responsable des dommages causés par une
utilisation impropre.
2. Après avoir déballé le produit, vérier qu’il est complet et ne pré-
sente aucun signe de rupture, d’endommagement ni d’altération.
3. L’appareil peut être utilisé par des enfants d’au moins 8 ans, ainsi
que par des personnes dont les capacités physiques, sensoriel-
les ou mentales seraient réduites, voire qui ne posséderaient pas
l’expérience ni les connaissances nécessaires, à condition qu’ils
soient surveillés ou qu’ils aient reçu les instructions d’utilisation
nécessaires et qu’ils soient conscients des risques potentiels. Les
enfants ne doivent pas jouer avec l’appareil.
• Les enfants de moins de 3 ans doivent être tenus à bonne
distance à moins d’être constamment surveillés.
• Les enfants d’âge compris entre 3 et 8 ans ne peuvent qu’all-
umer/éteindre l’appareil à condition que celui-ci ait été placé
ou installé dans sa position normale de fonctionnement et à
condition qu’ils soient surveillés ou qu’ils aient reçu des ins-
tructions relatives à l’utilisation de l’appareil en conditions de
sécurité et qu’ils en aient compris les dangers.
• Les enfants d’âge compris entre 3 et 8 ans ne doivent en au-
cun cas brancher la che d’alimentation, régler l’appareil, le
nettoyer ni en effectuer l’entretien qui incombe à l’utilisateur.
4. Les enfants doivent être surveillés pour s’assurer qu’ils ne jouent
pas avec l’appareil.
FR UTILISATION ET ENTRETIEN

18
5. L’appareil ne doit pas être installé à un endroit où peuvent être
présents des gaz inammables, des poussières ou des vapeurs
dangereuses.
6. Lors de l’utilisation du radiateur, il faut respecter certaines règles
fondamentales (applicables à tous les appareils électriques) :
• ne pas toucher l’appareil avec les mains mouillées ;
• ne pas manipuler l’appareil pieds nus ;
• ne pas laisser les enfants jouer avec l’appareil.
7. Ne pas modier le produit.
8. Veiller à ce que les branchements restent secs.
9. Dans le cas où le câble d’alimentation serait endommagé, éviter
de l’utiliser et le faire changer par le Fabricant ou par un Centre
d’assistance technique agréé, dans tous les cas par une personne
possédant des compétences équivalentes pour prévenir tout risque.
10. Débrancher l’appareil de l’alimentation dans le cas où il ne serait
pas utilisé pendant une longue durée.
Ne pas utiliser dans des pièces de petites dimensions occupées
par des personnes qui, en l’absence d’une surveillance constante,
seraient dans l’impossibilité de sortir d’elles-mêmes, à moins
que le produit utilisé ne soit le produit à suffixe ED. Dans ce cas,
l’appareil de chauffage est doté d’un dispositif externe de con-
trôle de la température ambiante.
Tous les utilisateurs doivent connaître tous les aspects du fonc-
tionnement et de la sécurité relatifs à l’appareil.
Ces consignes doivent être conservées pour référence.
INSTALLATION ÉLECTRIQUE
Avant de brancher l’appareil au secteur, vérifier que la tension
correspond à celle indiquée sur l’étiquette signalétique apposée
sur l’appareil et que le système électrique est conforme aux nor-
mes en vigueur.
L’installation de l’appareil doit être effectuée par du personnel com-
pétent et qualié, conformément à la norme en vigueur dans votre
pays qui réglemente les systèmes électriques et conformément au
règlement UE 2015/1188. Avant de brancher l’appareil, vérier que le
système électrique comprend un dispositif de mise à la terre efcace.
L’appareil doit être branché au secteur à l’aide du câble en sili-
cone H05SS-F fourni.

19
L’appareil est de classe I avec un indice de protection IP55, générale-
ment prévu pour les produits qui peuvent également être installés en
extérieur. Si l’on veut maintenir cet indice de protection à la poussière
et à l’eau, le branchement à l’alimentation doit être effectué à l’aide
d’un système qui est au moins IP55, selon la réglementation en vi-
gueur dans votre pays.
Il est nécessaire de placer, en amont de la ligne d’alimentation, un in-
terrupteur multipolaires de catégorie de surtension III, avec une distance
d’ouverture des contacts d’au moins 3 mm.
Vérier que le système est protégé par un disjoncteur magnéto-thermique
différentiel avec un courant d’intervention ne dépassant pas 30 mA.
- En aucun cas, il ne faut allumer l’appareil s’il est posé sur le sol ou
sur une surface ne permettant pas une bonne diffusion de la chaleur
produite.
- Laisser un espace libre devant le radiateur d’une distance minimale
d’un mètre.
- L’appareil ne doit pas être positionné immédiatement sous ou face
à une prise de courant.
- Le radiateur doit être installé de manière à empêcher le contact
entre les interrupteurs ou les commandes et toute personne se trou-
vant dans la baignoire ou la douche.
- Ne pas utiliser de rallonges, car elles peuvent représenter un dan-
ger d’incendie.
- Vérier qu’aucun matériau inammable, rideau ou matériau com-
bustible ne peut entrer en contact avec le radiateur ou ne se trouve
à proximité de ce dernier.
Tous les radiateurs à rayonnement sont conçus pour atteindre et main-
tenir un certain confort thermique pour les personnes, aussi bien en
intérieur qu’en extérieur. Aussi, il est très important de bien tenir compte
de la zone où les personnes séjournent et d’orienter le rayonnement en
conséquence.
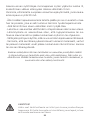
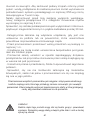
PRUDENCE!
Certaines parties de ce produit peuvent devenir très chaudes et
causer des brûlures. Une attention particulière doit être accordée
aux enfants et aux personnes vulnérables.

20
MODÈLES AVEC GRADATEUR ET TÉLÉCOMMANDE
Pour une exibilité optimale, tous les modèles sont disponibles avec
un gradateur pour régler facilement l’intensité du radiateur avec la
télécommande.
La longueur de chaque modèle augmente de 15 cm, tandis que la
largeur et la hauteur restent identiques..
- Placer un pile de 12 V de type A23 (non fournies) dans la télécom-
mande en respectant les polarités indiquées.
- Brancher l’appareil sur l’alimentation.
- Utiliser la télécommande comme indiqué sur la gure.
MONTAGE
Avant utilisation, le radiateur doit être fixé au mur ou au plafond à l’aide des
supports fournis.
S’assurer que le mur sur lequel l’appareil doit être installé est solide et qu’aucun
câblage électrique ni canalisations d’eau ne passent à l’intérieur du mur.
1. À l’aide d’une perceuse, réaliser quatre trous dans le mur comme
indiqué dans l’illustration.(FIG.1)
2. Fixer sur le mur les deux supports dotés de grands trous en uti-
lisant des vis et des chevilles de dimensions appropriées. (FIG.2)
3. Insérer le support à arc dans le rail adéquat de la partie supé-
rieure de l’appareil. (FIG.3)
4. Aligner les trous des supports et les assembler à l’aide des bou-
lons fournis, en xant le radiateur dans l’inclinaison souhaitée.
(FIG.4)
S’assurer que la chaleur diffusée par le radiateur est orientée vers la zone à
chauffer. Bien serrer les vis à la fin de l’opération.
ON Allumage de l’appareil
STANDBY Extinction de l’appareil
LOW Sélection de 1/3 de la puissance: le voyant bleu s’allume
MED Sélection de 2/3 de la puissance: le voyant violet s’allume
HIGH Sélection de la puissance maximale: le voyant rouge s’allume
Après chaque redémarrage, le produit revient au réglage
sélectionné avant sa mise hors tension.
La pagina si sta caricando...
La pagina si sta caricando...
La pagina si sta caricando...
La pagina si sta caricando...
La pagina si sta caricando...
La pagina si sta caricando...
La pagina si sta caricando...
La pagina si sta caricando...
La pagina si sta caricando...
La pagina si sta caricando...
La pagina si sta caricando...
La pagina si sta caricando...
La pagina si sta caricando...
La pagina si sta caricando...
La pagina si sta caricando...
La pagina si sta caricando...
La pagina si sta caricando...
La pagina si sta caricando...
La pagina si sta caricando...
La pagina si sta caricando...
La pagina si sta caricando...
La pagina si sta caricando...
La pagina si sta caricando...
La pagina si sta caricando...
La pagina si sta caricando...
La pagina si sta caricando...
La pagina si sta caricando...
La pagina si sta caricando...
La pagina si sta caricando...
La pagina si sta caricando...
La pagina si sta caricando...
La pagina si sta caricando...
La pagina si sta caricando...
La pagina si sta caricando...
La pagina si sta caricando...
La pagina si sta caricando...
La pagina si sta caricando...
La pagina si sta caricando...
La pagina si sta caricando...
La pagina si sta caricando...
La pagina si sta caricando...
La pagina si sta caricando...
La pagina si sta caricando...
La pagina si sta caricando...
La pagina si sta caricando...
La pagina si sta caricando...
La pagina si sta caricando...
La pagina si sta caricando...
La pagina si sta caricando...
La pagina si sta caricando...
La pagina si sta caricando...
La pagina si sta caricando...
La pagina si sta caricando...
La pagina si sta caricando...
La pagina si sta caricando...
La pagina si sta caricando...
-
 1
1
-
 2
2
-
 3
3
-
 4
4
-
 5
5
-
 6
6
-
 7
7
-
 8
8
-
 9
9
-
 10
10
-
 11
11
-
 12
12
-
 13
13
-
 14
14
-
 15
15
-
 16
16
-
 17
17
-
 18
18
-
 19
19
-
 20
20
-
 21
21
-
 22
22
-
 23
23
-
 24
24
-
 25
25
-
 26
26
-
 27
27
-
 28
28
-
 29
29
-
 30
30
-
 31
31
-
 32
32
-
 33
33
-
 34
34
-
 35
35
-
 36
36
-
 37
37
-
 38
38
-
 39
39
-
 40
40
-
 41
41
-
 42
42
-
 43
43
-
 44
44
-
 45
45
-
 46
46
-
 47
47
-
 48
48
-
 49
49
-
 50
50
-
 51
51
-
 52
52
-
 53
53
-
 54
54
-
 55
55
-
 56
56
-
 57
57
-
 58
58
-
 59
59
-
 60
60
-
 61
61
-
 62
62
-
 63
63
-
 64
64
-
 65
65
-
 66
66
-
 67
67
-
 68
68
-
 69
69
-
 70
70
-
 71
71
-
 72
72
-
 73
73
-
 74
74
-
 75
75
-
 76
76


MO-EL HOT-TOP 9815 - 9818 - 9824 - 9832 - 9815D - 9818D - 9824D - 9832D - 9815SD - 9818SD - 9824SD - 9832SD Manuale del proprietario
- Tipo
- Manuale del proprietario
- Questo manuale è adatto anche per
in altre lingue
- français: MO-EL HOT-TOP 9815 - 9818 - 9824 - 9832 - 9815D - 9818D - 9824D - 9832D - 9815SD - 9818SD - 9824SD - 9832SD Le manuel du propriétaire
- español: MO-EL HOT-TOP 9815 - 9818 - 9824 - 9832 - 9815D - 9818D - 9824D - 9832D - 9815SD - 9818SD - 9824SD - 9832SD El manual del propietario
- Deutsch: MO-EL HOT-TOP 9815 - 9818 - 9824 - 9832 - 9815D - 9818D - 9824D - 9832D - 9815SD - 9818SD - 9824SD - 9832SD Bedienungsanleitung
- português: MO-EL HOT-TOP 9815 - 9818 - 9824 - 9832 - 9815D - 9818D - 9824D - 9832D - 9815SD - 9818SD - 9824SD - 9832SD Manual do proprietário
- polski: MO-EL HOT-TOP 9815 - 9818 - 9824 - 9832 - 9815D - 9818D - 9824D - 9832D - 9815SD - 9818SD - 9824SD - 9832SD Instrukcja obsługi
Documenti correlati
-
 MO-EL MAUI 840C Manuale del proprietario
-
 MO-EL HATHOR 79104 - 79204 - 79304 - 791N - 79204N - 79304N - 791LGW - 792LGW - 793LGW Manuale del proprietario
-
 MO-EL AMERICAN BAR 739 Manuale del proprietario
-
 MO-EL PETALO 722CP - 722CRC - 728CP - 728CRC Manuale del proprietario
-
 MO-EL IRIS 866NP - 866N - 866NRC - 867NP - 867N - 867NRC Manuale del proprietario
-
 MO-EL AAREN INCASSO 9011 Manuale del proprietario
-
 MO-EL FIORE 766N - 767N Manuale del proprietario
-
 MO-EL GIROSOLE 769T - 769NS - 769N Manuale del proprietario


