
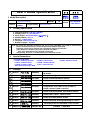
1. Trim Size (Format) : 185 mm x 260 mm
2. Printing Colors : 1 Color (BLACK)
3. Stock (Paper) : Uncoated paper, 백상지 60 g/㎡
4. Printing Method : Off-set
5. Bindery : Saddle stitch
6. Language : EN/ RU/ KA/ UK (4)
7. Number of pages : 76 pages
Changes
3.
REV.
NO.
MM/DD/YY
SIGNATURE
CHANGE NO.
CHANGE CONTENTS
1
4
5
6
8
7
9
10
2
3
“This part contain Eco-hazardous substances (Pb, Cd, Hg, Cr6+, PBB, PBDE, etc.) within LG standard level,
Details should be followed Eco-SCM management standard[LG(56)-A-2524].
Especially, Part should be followed and controlled the following specification.
(1)Eco-hazardous substances test report should be submitted
when Part certification test and First Mass Production.
(2) Especially, Don’t use or contain lead(Pb) and cadmium(Cd) in ink.
N
O
T
E
S
(1) Origin Notification
* LGEIN : Printed in Indonesia * LGEWA : Printed in U.K. * LGEMA : Printed in Poland
* LGESP : Printed in Brazil * LGEMX : Printed in Mexico
* LGEND : Printed in China * LGEIL : Printed in India
* Other Oversea Factories : NON
Special Instructions3.
담 당 관리자
Model Description
MODEL
BRAND
Printing Specification
Part No.
1.
2.
User’s Guide Specification
User’s Guide Specification
SUFFIX
32/37/42/47LH7000-ZA
LG
MFL41425835
(1005-REV11)
Product Name
LGERA
32/37/42/47LH70**
SHIN HJ
09.02.04
KIM JO
09.02.04
02/10/09
SHIN.H.J.
S9-42817
Amended picture for Stand Rear Cover of LH70**
03/30/09
Shin Hye Jung
S9-48133
Added LF2510-ZB & Changed Drawing for LU40 **
04/20/09
Shin Hye Jung
S9-50428
Added 32/37/42LG2100-ZA models.
06/04/09
Shin Hye Jung
S9-54081
Added LH90**, LG33**, LG31** models.
07/06/09
Yang So Jeong
S9-56926
Added 32/42/47LF5100-ZA, 32LG2200-ZA models.
08/26/09
Yang So Jeong
S9-60102
Changed LDC TV to LED LCD TV of LH90** &
Added contents of DVB-C function.
09/17/09
Yang So Jeong
S9-62143
Added CIC Call No.
10/30/09
Yang So Jeong
S9-65150
Added contents of installing batteries.
02/18/10
Shin Hye Jung
S0-77800
Added 19/22/26/32LD320-ZA models.
04/14/10
Shin Hye Jung
S0-85003
Changed ‘www.lg.com’. & Added LD321-ZB models.
11
05/07/10
Park Ye Na
S0-88018
Added 19/22/26/32LD320N-ZA, 19/22/26/32LD321N-
ZB models.

Pagination sheet
Pagination sheet
P/NO. MFL41425835
Total pages : 76 pages
Front
Cover
(EN)
P/NO.
34…2
18
Front
Cover
(RU)
34…2
18
Front
Cover
(KA)
34…2
18
Front
Cover
(UK)
…182
Blank Blank
Back
Cover
Blank

www.lg.com
OWNER’S MANUAL
LCD TV / LED LCD TV
Please read this manual carefully before operating
your set and retain it for future reference.
P/NO: MFL41425835 (1005-REV11)
Printed in Korea

2
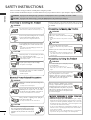
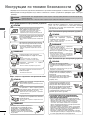
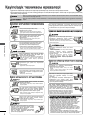
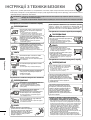
SAFETY INSTRUCTIONS
ENGLISH
• Please read these safety precautions carefully before using the product.
• In this manual, the illustration may be somewhat different from your product because it is just example to help the instruction.
If you ignore the warning message, you may be seriously injured or there is a possibility of accident or death.
If you ignore the caution message, you may be slightly injured or the product may be damaged.
PPrreeccaauuttiioonn iinn IInnssttaalllliinngg tthhee PPrroodduucctt
WARNING
WARNING
CAUTION
Keep away from heat sources like electrical heaters.
- Electrical shock, fire, malfunction or deformation may occur.
If you can smell smoke or other odors or hear a strange
sound unplug the power cord and contact the service
center.
- If you continue to use without taking proper measures, elec-
trical shock or fire can occur.
Do not use the product in damp place such as a bath-
room or any place where it is likely to get wet.
- This may cause a fire or could give an electric shock.
Install the product on a flat and stable place that
has no risk of dropping the product.
- If the product is dropped, you may be injured or the
product may be broken.
Keep the product away from direct sunlight.
- The product can be damaged.
Do not place the product in a built-in installation
such as bookcase or rack.
- Ventilation required.
EElleeccttrriiccaall PPoowweerr RReellaatteedd PPrreeccaauuttiioonnss
Make sure to connect the power cable to the ground-
ed current.
- You may be electrocuted or injured.
Do not touch the power plug with wet hands.
Additionally, it the cord pin is wet or covered with
dust, dry the power plug completely or wipe dust off.
- You may be electrocuted due to excess moisture.
During a thunder or lightning storm, unplug the
power cable or signal cable.
- You may be electrocuted or a fire can break out.
Protect the power cord from physical or mechanical
abuse, such as being twisted, kinked, pinched, closed in
a door, or walked upon. Pay particular attention to plugs,
wall outlets, and the point where the cord exits the
appliance.
PPrreeccaauuttiioonnss iinn MMoovviinngg tthhee PPrroodduucctt
Do not shock the product when moving it.
- You may be electrocuted or the product can be dam-
aged.
Make the panel face forward and hold it with both
hands to move.
- If you drop the product, the damaged product can
cause electric shock or fire. Contact with the service
center for repair.
Make sure to turn off the product.
Make sure to remove all cables before moving the
product.
- You may be electrocuted or the product can be dam-
aged.
PPrreeccaauuttiioonnss iinn UUssiinngg tthhee PPrroodduucctt
Do not disassemble, repair or modify the product at
your own discretion.
- Fire or electric shock accident can occur.
- Contact the service center for check, calibration or
repair.
To reduce the risk of fire or electric shock, do not
expose this apparatus to rain or moisture.
Apparatus shall not be exposed to dripping or
splashing and no objects filled with liquids, such as
vases, shall be placed on the apparatus.
WARNING
WARNING
CAUTION
CAUTION
CAUTION
WARNING
Refer all servicing to qualified service personnel.
Servicing is required when the apparatus has been
damaged in any way, such as power supply cord or plug
is damaged, liquid has been spilled or objects have
fallen into the apparatus, the apparatus has been
exposed to rain or moisture, does not operate normal-
ly, or has been dropped.
IIMMPPOORRTTAANNTT IINNFFOORRMMAATTIIOONN TTOO PPRREEVVEENNTT ““IIMMAAGGEE BBUURRNN
//BBUURRNN--IINN”” OONN YYOOUURR TTEELLEEVVIISSIIOONN SSCCRREEEENN
-
When a fixed image (e.g. logos, screen menus, video game, computer
display and teletext pages) is displayed on the television for an extend-
ed period it can become permanently imprinted on the screen. This
phenomenon is known as “image burn” or “burn-in”. Image burn is not
covered under the manufacturer’s warranty.
-
In order to prevent image burn, avoid displaying a fixed image on your
television’s screen for a prolonged period (2 or more hours for LCD, 1
or more hours for Plasma).
-
Image burn can also occur on the letterboxed areas of your television
if you use the 4:3 aspect ratio setting for an extended period.
As long as this unit is connected to the AC wall outlet, it is not dis-
connected from the AC power source even if you turn off this unit
by SWITCH.

3
ENGLISH
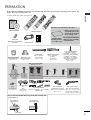
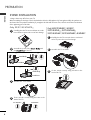
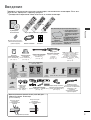
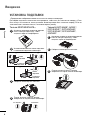
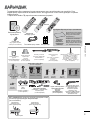
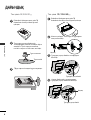
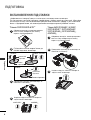
PREPARATION
Ensure that the following accessories are included with your TV. If an accessory is missing, please contact the
dealer where you purchased the TV.
■
Image shown may differ from your TV.
Owner’s Manual
Batteries
Remote Control
Power Cord
Polishing Cloth
Polishing cloth for
use on the screen.
This item is not included for all models.
* Lightly wipe any stains
or fingerprints on the
surface of the TV with
the polishing cloth.
Do not use excessive force.
This may cause scratching
or discolouration.
or
AV MODE
V MODE
ENERGY
ENERGY SA
SAVING
VING
RETURN / EXIT
MENU
Q.MENU INFO GUIDE
i
M
UTE
M
UTE
POWERPOWER
LIST
LIST
Q.VIEW
Q.VIEW
MARK
FAV
Cable management clip
(Only 32/37/42/47LH70
**
)
(Refer to p.11)
Stand rear cover
(Only 37/42/47LH70
**
)
(Refer to p.9)
(Only 47LH70
**
)
x 7
Protection Cover
(Except for 19/22LU40
**
, 19/22/26LU50
**
)
(Refer to p.12)
or
Cable Holder
(Only 19/22LU40
**
,
19/22/26LU50
**
)
(Refer to p.10)
Cable management clip
(Only 19/22LH20
*
*,
19/22LD3
*
*,
19/22LG31
**
)
(Refer to p.10)
(Refer to p.8)
1-screw for stand fixing
(Only 26LG31
**
, 26LU50
**
,
32/37/42LF25
**
, 32/37/42LG2
***
,
32/37/42LG33
**
, 26/32/37/42LH20
**
,
26/32LD3
**
, 32/37/42LH3
***
,
32/37/42LH40
**
, 32/37/42LH49
**
,
32/37/42LH50
**
, 32/37LH70
**
,
42LH90
**
,
32/42LF51
**
)
x 8
Bolts for stand assembly
(Refer to p.
4 to 6
)
(Only 32LH70
**
)
M4x20
M4x16
(Only 42LH70
**
)
x 3
M4x20
M4x16
x 4
(Only
19/22LU50
**
)
(Only
26LU50
**
)
x 2 x 3
Protective Bracket
and Bolt for Power Cord
(Only 32/37/42/47LH70
*
*
)
(Refer to p.11)
USB extension cable
(Only 32/37/42/47LH70
*
*
)
Make sure to use the provided
USB extension cable, Which is
specially designed for a slim fit.
x 8
M4x20
(Only 37LH70
**
)
Ferrite Core
(
This item is not included for
all models.
)
x 4
(Only 26LG31
**
,
32/37/42LF25
**
,
32/37/42LG2
***
,
32/37/42LG33
**
,
32/42LF51
**
)
x 4
12mm
12mm
Use screws 12 mm(+0.5/-0.5) long on the SET assembly side.
(
Only 42/47LH70**
)
Set assembly side
(without guide spacer)
Set assembly side
(with guide spacer)
Guide spacer
(Only
19/22LU40
**
)
x 5
Stand Rear Body
Cap
(Only
19/22LU40
**
)
(Refer to p.6)
or
POWER
POWER
TV/RAD
TV/RAD
ON/OFF
ON/OFF
RATIO
AV MODE
V MODE
MARK
MARK
FAV
(Only
26 LG 31
**
,
32/37/42LF25
**
,
32/37/42LG2
***
,
32/37/42LG33
**
,
26/32/37/42LH20
**
,
26/32LD3
**
,32/37/42/47L
H3
***
, 32/37/42/47LH40
**
,
32/37/42/47LH49
**
,
32/37/42/47LH50
**
,
42/47LH90
**,
32/42LF51
**
)
or

4
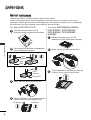
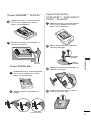
PREPARATION
ENGLISH
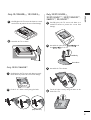
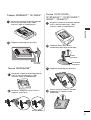
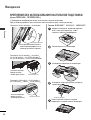
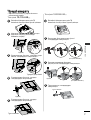
STAND INSTALLATION
1
3
4
Carefully place the TV screen side down on a cush-
ioned surface to protect the screen from damage.
2
Assemble the parts of the
SSttaanndd BBooddyy
with
the
SSttaanndd BBaassee
of the TV.
Assemble the TV as shown.
Fix the 4 bolts securely using the holes in the
back of the TV.
32LH70
**
Stand Body
Stand Base
42LH70
**
Only 32/37/42/47LH70
**
47LH70
**
37LH70
**
Stand Body
Stand Base
32/37LH70
**
M4x20
M4x20
M4x16
M4x20
1
2
3
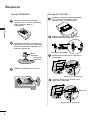
Carefully place the TV screen side down on a cushioned
surface to protect the screen from damage.
Assemble the TV as shown.
Fix the 4 bolts securely using the holes in the
back of the TV.
Only
26/32/37/42LH20
**
,
26/32LD3
**
,
32/37/42/47LH3
***
, 32/37/42/47LH40
**
,
32/37/42/47LH49
**
, 32/37/42/47LH50
**
, 42/47LH90
**
M4x20
42/47LH70
**
M4x16
■
Image shown may differ from your TV
When assembling the desk type stand, check whether the bolt is fully tightened. (If not tightened fully, the product can
tilt forward after the product installation.) If you tighten the bolt with excessive force, the bolt can deviate from abrasion
of the tightening part of the bolt.

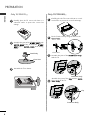
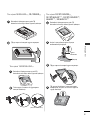
5
ENGLISH
1
Carefully place the TV screen side down on a cush-
ioned surface to protect the screen from damage.
2
Assemble the TV as shown.
Only 19/22LH20
**
, 19/22LD3
**
Cover Base
1
3
4
Carefully place the TV screen side down on a
cushioned surface to protect the screen from
damage.
2
Assemble the parts of the
SSttaanndd BBooddyy
with
the
CCoovveerr BBaassee
of the TV.
Assemble the TV as shown.
Fix the 4 bolts securely using the holes in the
back of the TV.
Stand Body
Cover Base
Only 32/37/42LF25
**,
32/37/42LG2
***,
32/37/42LG33
**,
26LG31
**,
32/42LF51
**
1
2
Carefully place the TV screen side down on a cush-
ioned surface to protect the screen from damage.
Fix the 2 or 3 bolts securely using the holes.
Only 19/22/26LU50
**
(Only 26LU50
**
)

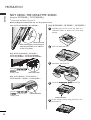
6
PREPARATION
ENGLISH
1
3
4
Carefully place the TV screen side down on a cush-
ioned surface to protect the screen from damage.
2
Fix the 3 bolts securely using the holes in the
CCoovveerr BBaassee
.
Assemble the parts of the
SSttaanndd RReeaarr BBooddyy
with the TV.
Assemble the parts of the
CCaapp
with the
SSttaanndd
RReeaarr BBooddyy
of the TV.
Only 19/22LU40
**
Stand Rear Body
Cover Base
Stand Rear Body
Cap
Only 19/22LG31
**
Stand Body
Cover Base
1
2
3
Carefully place the TV screen side down on a
cushioned surface to protect the screen from
damage.
Assemble the parts of the
SSTTAANNDD BBOODDYY
with
CCOOVVEERR BBAASSEE
of the TV. Insert the
SSTTAANNDD
BBOODDYY
into a
CCOOVVEERR BBAASSEE
until clicking
sound.
Assemble the TV as shown.

7
ENGLISH
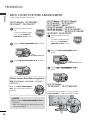
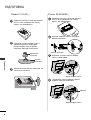
DETACHING STAND
■
Image shown may differ from your TV.
1
3
4
Carefully place the TV screen side down on a cush-
ioned surface to protect the screen from damage.
2
Detach the
CCaapp
from TV.
Press in the direction of the arrow to detach the
cap.
Loose the bolts and then detach the
SSttaanndd
RReeaarr BBooddyy
from TV.
Loose the bolts and then detach the
CCoovveerr
BBaassee
from TV.
Cap
Only 19/22LU40
**
Stand Rear Body
Cover Base
5
Loose the bolts and then detach the
SSttaanndd
BBooddyy
from TV.
Stand Body
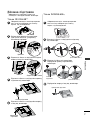
2
Loose the bolts and then detach the stand from TV.
3
Loose the bolts from TV.
Detach the
CCoovveerr BBaassee
from
TT VV
.
4
Detach the
SSttaanndd BBooddyy
from
TT VV
.
Stand Body
1
Carefully place the TV screen side down on a cush-
ioned surface to protect the screen from damage.
Cover Base
(Only 26LU50
**
)
(Only 26LU50
**
)
Only 19/22/26LU50
**

8
PREPARATION
ENGLISH
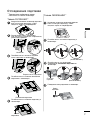
ATTACHING THE TV TO A DESK
(Only
26LG31
**
, 26LU50
**
, 32/37/42LF25
**
, 32/37/42LG2
***
,
32/37/42LG33
**
, 26/32/37/42LH20
**
, 26/32LD3
**
,
32/37/42LH3
***
, 32/37/42LH40
**
, 32/37/42LH49
**
,
32/37/42LH50
**
, 32/37LH70
**
, 42LH90
**
, 32/42LF51
**
)
■
Image shown may differ from your TV.
The TV must be attached to desk so it cannot be
pulled in a forward/backward direction, potentially
causing injury or damaging the product. Use only an
attached screw.
1-Screw
(provided as parts of the product)
Desk
Stand
WARNING
!
G
To prevent TV from falling over, the TV should
be securely attached to the floor/wall per
installation instructions. Tipping, shaking, or
rocking the machine may cause injury.
10 c m
10 c m
10 c m
10 c m
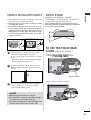
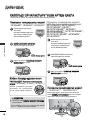
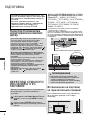
DESKTOP PEDESTAL INSTALLATION
For adequate ventilation allow a clearance of 10cm
all around the TV.
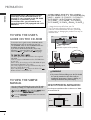
TO VIEW THE USER'S
GUIDE ON THE CD-ROM
To view the User's guide on the CD-ROM, Adobe
Acrobat Reader must be installed on your PC.
The "ACRORD" folder on the CD-ROM contains the
installation program for Acrobat Reader.
If you want to install Acrobat Reader, Open "My
Computer" Open the folder "LG" Open the
folder "ACRORD" double-click your language.
TToo vviieeww tthhee UUsseerr''ss gguuiiddee
The User's guide files are included in the supplied
CD-ROM.
Load the supplied CD-ROM into the CD-ROM drive
of your PC.
After a while, the web page of the CD-ROM will open
automatically.(Windows users only)
If the web page does not appear automatically, open
the User's guide file directly.
Open "My computer" Open the folder "LG"
Double click the "index.htm" file.
TO VIEW THE SIMPLE
MANUAL
You can easily and effectively access the TV infor-
mation by viewing the simple manual on the TV.
Press the
MMEENNUU
button and then
IINNFFOO
button
to enter the
SSiimmppllee MMaannuuaall
menu.
Press the
RREETTUURRNN
button to return to normal TV
viewing.
1
2
An extended Owner’s Manual that contains
information on the advanced features of
these LG TV sets is located on the CD- ROM
provided in an electronic version.
To read these files, you will need to use a
Personal Computer (PC) equipped with a CD-
ROM drive.

9
ENGLISH
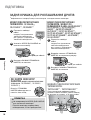
CAREFUL INSTALLATION ADVICE
A
You should purchase necessary components to fix the TV
safety and secure to the wall on the market.
A
Position the TV close to the wall to avoid the possibility
of it falling when pushed.
A
The instructions shown below are a safer way to set up
the TV, by fixing it to the wall, avoiding the possibility of
it falling forwards if pulled. This will prevent the TV from
falling forward and causing injury. This will also prevent
the TV from damage. Ensure that children do not climb
or hang from the TV.
NOTE
!
G
When moving the TV undo the cords first.
G
Use a platform or cabinet strong and large enough
to support the size and weight of the TV.
G
To use the TV safely make sure that the height of the
bracket on the wall and on the TV is the same.
3
1
2
Use the eye-bolts or TV brackets/bolts to fix the
product to the wall as shown in the picture.
(If your TV has bolts in the eyebolts, loosen then
bolts.)
* Insert the eye-bolts or TV brackets/bolts and tight-
en them securely in the upper holes.
Secure the wall brackets with the bolts on the wall.
Match the height of the bracket that is mounted on
the wall.
3
Use a sturdy rope to tie the product for alignment. It
is safer to tie the rope so it becomes horizontal
between the wall and the product.
2
1
2
1
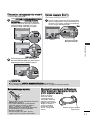
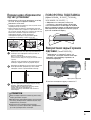
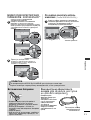
SWIVEL STAND
(Except for 19/22LH20
**
,
19/22LD3
**
,
19/22LU40
**
, 19/22/26LU50
**,
19/22LG31
**
)
■
Image shown may differ from your TV.
After installing the TV, you can adjust the TV set
manually to the left or right direction by 20 degrees
to suit your viewing position.
Grip the knob in your fingers and pull it.
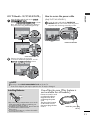
TO USE THE STAND REAR
COVER (Only 37/42/47LH70
**
)
■
Image shown may differ from your TV.
Install the
SSTTAANNDD RREEAARR CCOOVVEERR
as shown.
STAND REAR COVER

10
PREPARATION
ENGLISH
BACK COVER FOR WIRE ARRANGEMENT
LCD TV Models :
19/22LU40
**
, 19/22/26LU50
**
After Connecting the cables as necessary, install
CABLE HOLDER as shown and bundle the cables.
LCD TV Models / LED LCD TV Models :
32/37/42LF25
**
, 32/37/42LG2
***
,
32/37/42LG33
**
, 26LG31
**
,
26/32/37/42LH20
**
,
26/32LD3
**
,
32/37/42/47LH3
***
, 32/37/42/47LH40
**
,
32/37/42/47LH49
**
,
32/37/42/47/55LH50**
,
42/47LH90**, 32/42/47LF51**
Connect the cables as neces-
sary.
To connect additional equip-
ment, see the EXTERNAL
EQUIPMENT SETUP section.
1
Open the CABLE MANAGEMENT CLIP as
shown.
2
CABLE MANAGEMENT CLIP
Fit the
CCAABBLLEE MMAANNAAGGEEMMEENNTT CCLLIIPP
as
shown.
3
LCD TV Models :
19/22LH20
**
,
19/22LD3
**
, 19/22LG31
**
Connect the cables as neces-
sary.
To connect additional equip-
ment, see the EXTERNAL
EQUIPMENT SETUP section.
1
Install the CABLE MANAGEMENT CLIP as shown.
2
CABLE MANAGEMENT CLIP
Fit the CABLE MANAGEMENT CLIP as shown.
3
Hold the CABLE MANAGEMENT
CLIP with both hands and pull it
backward.
NOTE
!
GG
Do not use the CABLE MANAGEMENT CLIP to
lift the TV.
- If the TV is dropped, you may be injured or the
TV may be damaged.
How to remove the cable management
clip
(LCD TV Models : 19/22LH20
**
,
19/22LD3
**,
19 / 22 L G 31
**
)
■
Image shown may differ from your TV.

11
ENGLISH
LCD TV Models : 32/37/42/47LH70
**
Connect the cables as necessary.
To connect additional equipment, see the
EExxtteerrnnaall eeqquuiippmmeenntt SSeettuupp
section.
1
2
Align the hole with the tab on the
CCAABBLLEE
MMAANNAAGGEEMMEENNTT CCLLIIPP
.
Turn the
CCAABBLLEE MMAANNAAGGEEMMEENNTT CCLLIIPP
as shown.
Note : that excessive force might cause damage to
the product when using Cable Management clip.
NOTE
!
GG
Do not use the CABLE MANAGEMENT CLIP to lift the TV.
- If the TV is dropped, you may be injured or the TV may be damaged.
CABLE MANAGEMENT CLIP
How to secure the power cable
(Only 32/37/42/47LH70
**
)
PROTECTIVE BRACKET
Secure the power cable with the PROTECTIVE
BRACKET and the bolt as shown. It will help prevent
the power cable from being removed by accident.
1
Installing Batteries
■
Open the battery compartment cover on the
back and install the batteries matching cor-
rect polarity (+with +,-with -).
■
Install two 1.5V AAA batteries. Do not mix old
or used batteries with new ones.
■
Close cover.
■
To remove the batteries, perform the installa-
tion actions in reverse.
Install the power plug
closely.
Use of ferrite core (This feature is
not available for all models.)
Ferrite core can be used
to reduce the electro-
magnetic wave when
connecting the power
cord.
The closer the location
of the ferrite core to
the power plug, the bet-
ter it is.
Bolt

12
PREPARATION
ENGLISH
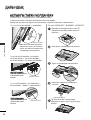
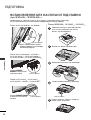
■
Image shown may differ from your TV.
When installing the wall-mounted unit, use the protection cover.
NOT USING THE DESK-TYPE STAND
(Except for 19/22LU40
**
, 19/22/26LU50
**
)
After removing the protection paper
from the protection cover, adhere it
to the TV as shown.
PROTECTION COVER
Only 26/32/37/42LH20
**
, 26/32LD3
**
,
32/37/42/47LH3***, 32/37/42/47LH40**,
32/37/42/47LH49**, 32/37/42/47/55LH50
**
Insert the
PPRROOTTEECCTTIIOONN
CCOOVVEERR
into the TV until
clicking sound.
Only 32/37/42LF25
**
, 32/37/42LG2
***
,
32/37/42LG33
**
, 26LG31
**,
32/42/47LF51
**
Insert the
PPRROOTTEECCTTIIOONN
CCOOVVEERR
into the TV until
clicking sound.
Only 32/37/42/47LH70
**
, 42/47LH90
**
Fix the 4 bolts securely using the holes in the
back of the TV.
5
Only 19/22LH20
**
, 19/22LD3
**
, 19/22LG31
**
PROTECTION COVER
PROTECTION COVER
1
3
4
Carefully place the TV screen side down on a
cushioned surface to protect the screen from
damage.
2
Loose the bolts from TV.
Detach the stand from TV.
Insert the
PPrrootteeccttiioonn CCoovveerr
into the TV.
PROTECTION COVER

13
ENGLISH
A
The TV can be installed in various ways such as on
a wall, or on a desktop etc.
A
The TV is designed to be mounted horizontally.
Power Supply
Circuit breaker
EARTHING
Ensure that you connect the earth wire to prevent
possible electric shock. If grounding methods are not
possible, have a qualified electrician install a separate
circuit breaker.
Do not try to earth the TV by connecting it to tele-
phone wires, lightening rods or gas pipes.
WALL MOUNT: HORIZONTAL
INSTALLATION
A
We recommend the use of a LG Brand wall mounting
bracket when mounting the TV to a wall.
A
We recommend that you purchase a wall mounting
bracket which supports VESA standard.
A
LG recommends that wall mounting be performed by a
qualified professional installer.
A
First you connect the USB extension cable to the USB
IN terminal, and then hang it on the wall.
(Only
32/37/42/47LH70
*
*
)
10 c m
10 c m
10 c m
10 c m
10 c m
NOTE
!
G Should Install wall mount on a solid wall perpendicular to
the floor.
G Should use a special wall mount, if you want to install it to
ceiling or slanted wall.
G The surface that wall mount is to be mounted on should
be of sufficient strength to support the weight of TV set;
e.g. concrete, natural rock, brick and hollow block.
G Installing screw type and length depends on the wall
mount used. Further information, refer to the instructions
included with the mount.
G LG is not liable for any accidents or damage to property or
TV due to incorrect installation:
- Where a non-compliant VESA wall mount is used.
- Incorrect fastening of screws to surface which may cause
TV to fall and cause personal injury.
- Not following the recommended Installation method.
AA
BB
Model
VESA
(A
*
B)
Standard
Screw
Quantity
19/22LU40**
19/22LU50**
26LU50**
19/22LG31**
26LG31**
32LF25**
37/42LF25**
32LG2***
37/42LG2***
32LG33**
37/42LG33**
19/22LH20**
26/32LH20**
37/42LH20**
19/22LD3**
26/32LD3**
32LH3***
37/42/47LH3***
32LH40**
37/42/47LH40**
32LH49**
37/42/47LH49**
32LH50**
37/42/47LH50**
55LH50**
32LH70**
37/42/47LH70**
42/47LH90**
32LF51**
42/47LF51**
100
*
10 0
100
*
10 0
200
*
10 0
100
*
10 0
200
*
10 0
200
*
10 0
200
*
200
200
*
10 0
200
*
200
200
*
10 0
200
*
200
100
*
10 0
200
*
10 0
200
*
200
100
*
10 0
200
*
10 0
200
*
10 0
200
*
200
200
*
10 0
200
*
200
200
*
10 0
200
*
200
200
*
10 0
200
*
200
400
*
400
200
*
10 0
200
*
200
200
*
200
200
*
10 0
200
*
200
M4
M4
M4
M4
M4
M4
M6
M4
M6
M4
M6
M4
M4
M6
M4
M4
M4
M6
M4
M6
M4
M6
M4
M6
M6
M4
M6
M6
M4
M6
4
4
4
4
4
4
4
4
4
4
4
4
4
4
4
4
4
4
4
4
4
4
4
4
4
4
4
4
4
4
Wall Mounting Bracket(Separate purchase)
(19/22LU50
**
/19/22LU40
**
/19/22LH20
**
/19/22LD3
**
/19/22LG31
**
)
RW120
(26LG31
**
/26LU50
**
/
32LF25
**
/32LG2
***
/32LG33
**
/
26/32LH20
**
/
26/32LD3
**
/
32LH3
***
/
32LH40
**
/32LH49
**
/
32LH50
**
/32LH70
**
/32LF51
**
)
RW230
(32/37/42LF25
**
/32/37/42LG2
***
/32/37/42LG33
**
/32/37/42LH20
**
/32LD3
**
/32/37/42/47LH3
***
/32/37/42/47LH40
**
/32/37/42/47LH49
**
/32/37/42/47LH50
**
/32/37/42/47LH70
**
/42/47LH90
**
/32/42/47LF51
**
)
AW-47LG30M
(55LH50
**
)
AW-55LH40M

14
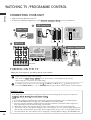
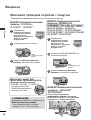
WATCHING TV /PROGRAMME CONTROL
ENGLISH
USB memory stick
■
Image shown may differ from your TV
■
To connect an additional equipment, see the
EExxtteerrnnaall eeqquuiippmmeenntt SSeettuupp
section in CD Manual.
. . . . . . . . . . . . . . . . . . . . . . . . . . . . . . . . . . . . . . . . . . . . . . . . . . . . . . . . . . . . . . . . . . . . . . . . . . . . . . . . . . . . . . . . . . . . . . . .
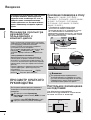
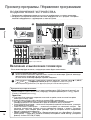
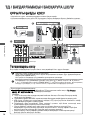
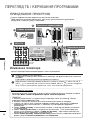
CONNECTING YOUR UNIT
(RGB)
(RGB)
VCR Connection
2
DVD/STB
2
Antenna Connection
1
Power Cord
3
DVD/STB back
TURNING ON THE TV
2
1
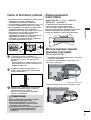
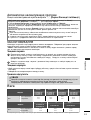
Initializing setup
Note:
a. If you close without completing the initial setting, the Initial Setting menu can be displayed again.
b. Press the RETURN button to change the current OSD to the previous OSD.
c. For those countries without confirmed DTV broadcasting standards, some DTV features might not
work, depending on the DTV broadcasting environment.
d. "Home Use” mode is the optimal setting for home environments, and is the TV's default mode.
e. "Store Demo" mode is the optimal setting for store environments. If a user modifies image quality data,
“Store Demo” mode initializes the product to the image quality set by us after a certain period of time.
f. The mode (Home Use, Store Demo) can be changed by executing Mode Setting in the OPTION menu.
If the OSD (On Screen Display) is displayed on the screen after turning on the TV, you can adjust the
LLaanngguuaaggee
,
MMooddee SSeettttiinngg
,
CCoouunnttrryy
,
AAuuttoo TTuunniinngg
.
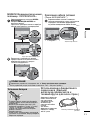
- When your TV is turned on, you will be able to use its features.
Firstly, connect the power cord correctly.
And switch the
MMaaiinn PPoowweerr SSwwiittcchh
on TV. (This feature is not available for all models.)
At this stage, the TV switches to standby mode.
In standby mode to turn TV on, press the
rr
/ I, INPUT or P
D E
(or P ) button on the TV or
press the POWER, INPUT, P or NUMBER button on the remote control and the TV will switch on.

15
ENGLISH
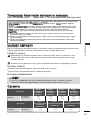
MAINTENANCE
Early malfunctions can be prevented. Careful and regular cleaning can prolong the life of your new TV.
Caution: Be sure to switch the power off and unplug the power cord before you begin any cleaning.
Cleaning the Screen
A good way to keep the dust off your screen for a while is to wet a soft cloth in a mixture of lukewarm water
and a little fabric softener or dish washing detergent. Wring the cloth until it is almost dry, and then use it
to wipe the screen.
Ensure there is no excess water on the screen. Allow any water or dampness to evaporate before switching on.
Cleaning the Cabinet
A
To remove dirt or dust, wipe the cabinet with a soft, dry, lint-free cloth.
A
Do not to use a wet cloth.
Extended Absence
G
If you expect to leave your TV dormant for prolonged periods (such as a holiday), unplug the power
cord to protect against possible damage from lightning or power surges.
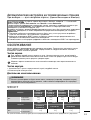
CAUTION
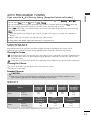
1
2
To watch DVB-C in the countries excluding Finland and Sweden, select '
----
' as the
CCoouunnttrryy
in
OOPPTTIIOONN
.
You can select
UUsseerr
mode or
FFuullll
mode in
AAuuttoo TTuunniinngg
.
The corresponding home frequency information may need to be changed when tuning the
UUsseerr
mode, and
the corresponding information depends on the Cable Service Operator (SO) in service.
During
FFuullll
mode tuning, some channel may be restricted for some Cable Service Operator (SO), and it may
take a long time for tuning.
NNoottee
G
Your cable provider may charge for their services, or require you to agree to its items and conditions of
business.
G
DVB-C Cable may not operate correctly with some cable providers.
G
Compatibility with DVB-C digital cable broadcasts is not guaranteed.
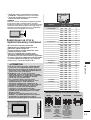
AUTO PROGRAMME TUNING
If you select the
““----””
of Country Setting, (Except for Finland and Sweden)
■
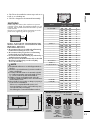
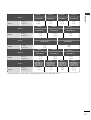
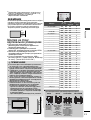
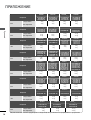
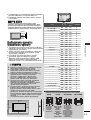
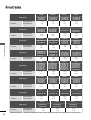
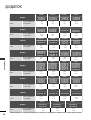
The specifications shown above may be changed without prior notice for quality improvement.
WEIGHT
with stand
without stand
MODELS
Weight
32LH4000-ZA
32LH4010-ZD
32LH4020-ZC
32LH40
**
37LH4000-ZA
37LH4010-ZD
37LH4020-ZC
37LH40
**
42LH4000-ZA
42LH4010-ZD
42LH4020-ZC
42LH40
**
47LH4000-ZA
47LH4010-ZD
47LH4020-ZC
47LH40
**
12.7 kg
11.5 kg
15.8 kg
14.0 kg
18.9 kg
17.1 kg
22.2 kg
19.6 kg
with stand
without stand
MODELS
Weight
23.6 kg
21.0 kg
32LG2100-ZA
32LG2200-ZA
42LG2100-ZA
37LG2100-ZA
32LG2
***
42LG2
***
37 LG 2
***
13.4 kg
11.9 kg
18.8 kg
16.2 kg

16
APPENDIX
ENGLISH
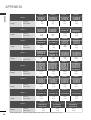
■
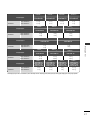
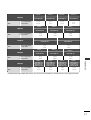
The specifications shown above may be changed without prior notice for quality improvement.
with stand
without stand
MODELS
Weight
19LU4000-ZB
19LU4010-ZC
19LU40
**
22LU4000-ZB
22LU4010-ZC
22LU40
**
19LH2000-ZA
19LH2010-ZB
19LH2020-ZC
19LH201C-ZA
19LH20
**
22LH2000-ZA
22LH2010-ZB
22LH2020-ZC
22LH201C-ZA
22LH20
**
4.4 kg
3.9 kg
5.5 kg
5.0 kg
3.8 kg
3.6 kg
4.8 kg
4.6 kg
with stand
without stand
MODELS
Weight
8.9 kg
7.8 kg
11.5 kg
10.3 kg
14 . 8
kg
13 . 0
kg
18.0 kg
16.2 kg
with stand
without stand
MODELS
Weight
12.1 kg
11.0 kg
14.9 kg
13.1 kg
18.0 kg
16.2 kg
22.5 kg
19.9 kg
with stand
without stand
MODELS
Weight
32LH7000-ZA
32LH7010-ZD
32LH7020-ZC
32LH7030-ZE
32LH70
**
37LH7000-ZA
37LH7010-ZD
37LH7020-ZC
37LH7030-ZE
37LH70
**
42LH7000-ZA
42LH7010-ZD
42LH7020-ZC
42LH7030-ZE
42LH70
**
47LH7000-ZA
47LH7010-ZD
47LH7020-ZC
47LH7030-ZE
47LH70
**
13.5 kg
11.6 kg
16.2 kg
14 . 1 k g
19.8 kg
17.2 kg
26.4 kg
22.8 kg
with stand
without stand
MODELS
Weight
with stand
without stand
MODELS
Weight
32LH4900-ZD
32LH49
**
37LH4900-ZD
37LH49
**
42LH4900-ZD
42LH49
**
47LH4900-ZD
47LH49
**
12.7 kg
11.5 kg
15.8 kg
14.0 kg
18.9 kg
17.1 kg
22.2 kg
19.6 kg
with stand
without stand
MODELS
Weight
23.6 kg
21.0 kg
32LF2500-ZA
32LF2510-ZB
42LF2500-ZA
42LF2510-ZB
37LF2500-ZA
37LF2510-ZB
32LF25
**
42LF25
**
37LF25
**
13.4 kg
11.9 kg
18.8 kg
16.2 kg
with stand
without stand
MODELS
Weight
32LH5000-ZB
32LH5010-ZD
32LH5020-ZE
32LH50
**
37LH5000-ZB
37LH5010-ZD
37LH5020-ZE
37LH50
**
42LH5000-ZB
42LH5010-ZD
42LH5020-ZE
42LH50
**
47LH5000-ZB
47LH50
**
12.6 kg
11.4 kg
16.3 kg
14.5 kg
19.0 kg
17.2 kg
23.4 kg
20.8 kg
47LH5010-ZD
47LH5020-ZE
23.6 kg
20.8 kg
8.9 kg
7.7 kg
19LU5000-ZA
19U5010-ZB
19LU5020-ZC
26LU5000-ZA
26U5010-ZB
26LU5020-ZC
22LU5000-ZA
22U5010-ZB
22LU5020-ZC
19LU50
**
26LU50
**
22LU50
**
4.4 kg
3.7 kg
5.4 kg
4.6 kg
26LH2000-ZA
26LH2020-ZC
26LH2010-ZB
26LH201C-ZA
26LH20
**
32LH2000-ZA
32LH2020-ZC
32LH2010-ZB
32LH201C-ZA
32LH20
**
37LH2000-ZA
37LH2020-ZC
37LH2010-ZB
37LH201C-ZA
37LH20
**
42LH2000-ZA
42LH2020-ZC
42LH2010-ZB
42LH201C-ZA
42LH20
**
32LH3000-ZA
32LH3020-ZD
32LH3800-ZD
32LH301C-ZA
32LH3010-ZB/
32LH3030-ZE/
32LH3040-ZG
32LH3
***
37LH3000-ZA
37LH3020-ZD
37LH3800-ZD
37LH301C-ZA
37LH3010-ZB/
37LH3030-ZE/
37LH3040-ZG
37LH3
***
42LH3000-ZA
42LH3020-ZD
42LH3800-ZD
42LH301C-ZA
42LH3010-ZB/
42LH3030-ZE/
42LH3040-ZG
42LH3
***
47LH3000-ZA
47LH3020-ZD
47LH301C-ZA
47LH3010-ZB/
47LH3030-ZE/
47LH3040-ZG
47LH3
***

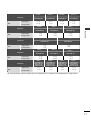
17
ENGLISH
with stand
without stand
MODELS
Weight
55LH5000-ZB
55LH50
**
42LH9000-ZA
42LH90
**
47LH9000-ZA
47LH90
**
26LG3100-ZA
26LG31
**
36.4 kg
32.9 kg
23.2 kg
19.5 kg
27.3 kg
23.5 kg
10.1 kg
8.6 kg
with stand
without stand
MODELS
Weight
23.6 kg
21.0 kg
32LG3300-ZA
42LG3300-ZA
37LG3300-ZA
32LG33
**
42LG33
**
37 LG 33
**
13.4 kg
11.9 kg
18.8 kg
16.2 kg
with stand
without stand
MODELS
Weight
29.2 kg
24.6 kg
32LF5100-ZA
47LF5100-ZA
42LF5100-ZA
32LF51
**
47LF51
**
42LF51
**
14.1 kg
12.6 kg
22.5 kg
20.0 kg
■
The specifications shown above may be changed without prior notice for quality improvement.
with stand
without stand
MODELS
Weight
19LG3100-ZA
19 L G 31
**
22LG3100-ZA
22LG31
**
4.5 kg
4.2 kg
5.6 kg
5.34 kg
with stand
without stand
MODELS
Weight
19LD3
**
19LD320-ZA
19LD320N-ZA
19LD321-ZB
19LD321N-ZB
3.8 kg
3.6 kg
22LD3
**
22LD320-ZA
22LD320N-ZA
22LD321-ZB
22LD321N-ZB
4.8 kg
4.6 kg
26LD3
**
26LD320-ZA
26LD320N-ZA
26LD321-ZB
26LD321N-ZB
8.9 kg
7.8 kg
32LD3
**
32LD320-ZA
32LD320N-ZA
32LD321-ZB
32LD321N-ZB
11.5 kg
10.3 kg

18
ENGLISH
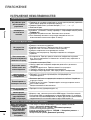
APPENDIX
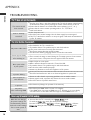
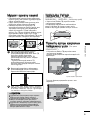
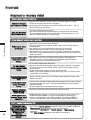
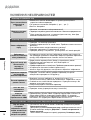
TROUBLESHOOTING
TThhee TTVV ddooeess nnoott ooppeerraattee pprrooppeerrllyy..
The remote control
does not work
Power is suddenly
turned off
A
Check to see if there is any object between the TV and the remote control causing
an obstruction. Ensure you are pointing the remote control directly at the TV.
A
Ensure that the batteries are installed with correct polarity (+ to +, - to -).
A
Ensure that the correct remote operating mode is set : TV, STB etc.
A
Install new batteries.
A
Is the sleep timer set?
A
Check the power control settings. Has the Power supply been interrupted.
A
If the TV is switched on and there is no input signal, it will switch off automatical-
ly after 15 minutes.
No picture & No sound
No or poor colour
or poor picture
Poor reception on
some channels
Lines or streaks
in pictures
No picture
when connecting HDMI
Horizontal/vertical bars
or picture shaking
Picture appears slowly
after switching on
A
Check whether the TV is switched on.
A
Try another channel. The problem may be with the broadcast.
A
Is the power cord inserted correctly into the mains?
A
Check your antenna direction and/or location.
A
Test the mains outlet by plugging another TV into the same outlet.
A
This is normal, the image is muted during the TV startup process. Please contact
your service centre, if the picture has not appeared after five minutes.
A
Adjust Colour in menu option.
A
Allow a sufficient distance between the TV and the VCR.
A
Try another channel. The problem may be with the broadcast.
A
Are the video cables installed properly?
A
Activate any function to restore the brightness of the picture.
A
Check for local interference such as an electrical appliance or power tool.
A
Station or cable channel experiencing problems, tune to another station.
A
Station signal is weak, reposition the antenna to receive weaker stations.
A
Check for sources of possible interference.
A
Check antenna (Change the position of the antenna).
A
Check that your HDMI cable is version 1.3 or higher.
If the HDMI cables don’t support HDMI version 1.3, flickering or no screen display
can result. Please use the latest cables that support at least HDMI version 1.3.
TThhee vviiddeeoo ffuunnccttiioonn ddooeess nnoott wwoorrkk..
TThheerree iiss aa pprroobblleemm wwiitthh PPIICCTTUURREE sseettttiinnggss..
A
It means that the TV is currently set to
SSttoorree DDeemmoo
mode.
To switch to
HHoommee uussee
mode you should do the followings:
From the TV Menu, choose
OOPPTTIIOONN
-> Choose
MMooddee SSeettttiinngg
-> Choose
HHoommee uussee
. Now, you have completed switching to the
HHoommee uussee
mode.
When the user changes
the picture settings, the
TV automatically converts
back to the initial settings
after a certain period of
time.
La pagina sta caricando ...
La pagina sta caricando ...
La pagina sta caricando ...
La pagina sta caricando ...
La pagina sta caricando ...
La pagina sta caricando ...
La pagina sta caricando ...
La pagina sta caricando ...
La pagina sta caricando ...
La pagina sta caricando ...
La pagina sta caricando ...
La pagina sta caricando ...
La pagina sta caricando ...
La pagina sta caricando ...
La pagina sta caricando ...
La pagina sta caricando ...
La pagina sta caricando ...
La pagina sta caricando ...
La pagina sta caricando ...
La pagina sta caricando ...
La pagina sta caricando ...
La pagina sta caricando ...
La pagina sta caricando ...
La pagina sta caricando ...
La pagina sta caricando ...
La pagina sta caricando ...
La pagina sta caricando ...
La pagina sta caricando ...
La pagina sta caricando ...
La pagina sta caricando ...
La pagina sta caricando ...
La pagina sta caricando ...
La pagina sta caricando ...
La pagina sta caricando ...
La pagina sta caricando ...
La pagina sta caricando ...
La pagina sta caricando ...
La pagina sta caricando ...
La pagina sta caricando ...
La pagina sta caricando ...
La pagina sta caricando ...
La pagina sta caricando ...
La pagina sta caricando ...
La pagina sta caricando ...
La pagina sta caricando ...
La pagina sta caricando ...
La pagina sta caricando ...
La pagina sta caricando ...
La pagina sta caricando ...
La pagina sta caricando ...
La pagina sta caricando ...
La pagina sta caricando ...
La pagina sta caricando ...
La pagina sta caricando ...
La pagina sta caricando ...
La pagina sta caricando ...
La pagina sta caricando ...
La pagina sta caricando ...
-
 1
1
-
 2
2
-
 3
3
-
 4
4
-
 5
5
-
 6
6
-
 7
7
-
 8
8
-
 9
9
-
 10
10
-
 11
11
-
 12
12
-
 13
13
-
 14
14
-
 15
15
-
 16
16
-
 17
17
-
 18
18
-
 19
19
-
 20
20
-
 21
21
-
 22
22
-
 23
23
-
 24
24
-
 25
25
-
 26
26
-
 27
27
-
 28
28
-
 29
29
-
 30
30
-
 31
31
-
 32
32
-
 33
33
-
 34
34
-
 35
35
-
 36
36
-
 37
37
-
 38
38
-
 39
39
-
 40
40
-
 41
41
-
 42
42
-
 43
43
-
 44
44
-
 45
45
-
 46
46
-
 47
47
-
 48
48
-
 49
49
-
 50
50
-
 51
51
-
 52
52
-
 53
53
-
 54
54
-
 55
55
-
 56
56
-
 57
57
-
 58
58
-
 59
59
-
 60
60
-
 61
61
-
 62
62
-
 63
63
-
 64
64
-
 65
65
-
 66
66
-
 67
67
-
 68
68
-
 69
69
-
 70
70
-
 71
71
-
 72
72
-
 73
73
-
 74
74
-
 75
75
-
 76
76
-
 77
77
-
 78
78


