
English Deutsch Français Español Italiano Svenska Greece Russia
中文
Setup Manual
Important: Please read PRECAUTIONS, this Setup Manual and the User’s Manual
stored on the CD-ROM carefully to familiarize yourself with safe and effective
usage. Please retain this manual for future reference.
Installationshandbuch
Wichtig: Lesen Sie die VORSICHTSMASSNAHMEN, dieses Handbuch zur
Einrichtung und das Benutzerhandbuch (auf der CD-ROM) aufmerksam
durch, um sich mit der sicheren und efzienten Bedienung vertraut zu
machen. Bewahren Sie dieses Handbuch zum späteren Nachschlagen auf.
Manuel d’installation
Important : Veuillez lire attentivement les PRECAUTIONS, ce Manuel d’installation ainsi
que le Manuel d’utilisation inclus sur le CD-ROM, an de vous familiariser
avec ce produit et de l’utiliser efcacement et en toute sécurité. Veuillez
conserver ce manuel pour référence ultérieure.
Manual de instalación
Importante: Lea detenidamente el apartado PRECAUCIONES, el Manual de instalación y
el Manual del usuario que encontrará en el CD-ROM para familiarizarse con
las normas de seguridad y los procedimientos de uso. Conserve este manual
para consultas posteriores.
Manuale di installazione
Importante: leggere attentamente la sezione PRECAUZIONI, il presente Manuale di
installazione e il Manuale dell’utente memorizzati sul CD-ROM per utilizzare il
prodotto in modo efcace e sicuro. Conservare il manuale per consultazioni
future.
Installationshandboken
Viktigt: Läs försiktighetsåtgärderna, den här installationshandboken och
användarhandboken som nns på CD-skivan noggrant så att du känner dig
säker och får ett effektivt användande av produkten. Behåll manualen för
framtida behov.
Εγχειρίδιο εγκατάστασης
Σημαντικό: Διαβάστε προσεκτικά τις ΠΡΟΦΥΛΑΞΕΙΣ, το Εγχειρίδιο εγκατάστασης και το
Εγχειρίδιο χρήστη που θα βρείτε στο CD-ROM προκειμένου να εξοικειωθείτε
με την ασφαλή και αποτελεσματική χρήση της συσκευής. Διατηρήστε αυτό το
εγχειρίδιο για μελλοντική χρήση.
Руководство по установке
Важно! Внимательно прочитайте МЕРЫ ПРЕДОСТОРОЖНОСТИ, настоящее
Руководство по установке и Руководство пользователя на CD-ROM для
получения сведений о безопасной и эффективной эксплуатации.
Сохраните это руководство для справки.
设定手册
重要事项: 请仔细阅读储存在光盘上的用户手册、本设定手册和预防措施、掌握如何安
全、有效地使用本产品。请保留本手册、以便今后参考。


English
Setup Manual
Important: Please read PRECAUTIONS, this Setup Manual and the User’s Manual
stored on the CD-ROM carefully to familiarize yourself with safe and
effective usage. Please retain this manual for future reference.

2
English
TroubleshootingSetting/AdjustmentInstallationPrior to use
FlexScan
®
HD2442W
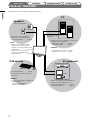
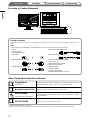
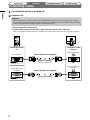
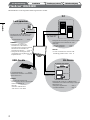
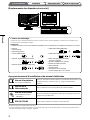
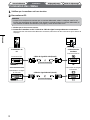
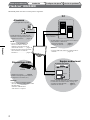
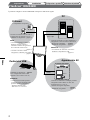
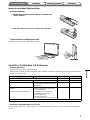
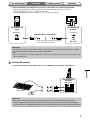
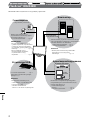
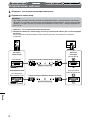
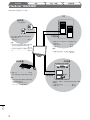
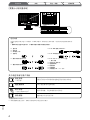
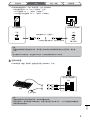
Speakers
(with built-in amplier)
Allows you to enjoy sound from a
connected PC or AV equipment, etc.
• Connection methods ..............page 10
NOTE
• Enables you to adjust the speaker
volume connected to the monitor
using the volume adjustment function
of the monitor. .......................page 13
• Enables you to enjoy sound by
connecting a headphone to the
headphone jack. .....................page 10
USB devices
Keyboard
• Connection methods ...............
page 9
(Also available to connect a printer or a
scanner, etc.)
Attention
• Use a PC/OS applicable to USB devices.
[Applicable OS]
- Windows 2000/XP/Vista
- Mac OS 8.5.1 or later
Mouse
PC
Enables you to use as a monitor by connecting to
a Windows PC or a Macintosh.
• Applicable resolution ............page 3
• Connection methods ..............page 8
Attention
• The USB setting is required to change
depending on a PC used. ......page 12
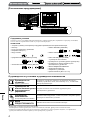
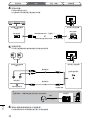
AV equipment
HDMI connector
DVD player
Game
Enables you to display projected images by
connecting a DVD, Video, game, etc.
• Applicable signal format .............
page 3
• Connection methods ................... page 10
HD2442W can be connected to the following devices.
HDMI connector
DVI connector
D-Sub mini 15-pin
connector

3
English
TroubleshootingSetting/AdjustmentInstallationPrior to use
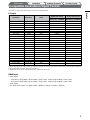
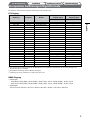
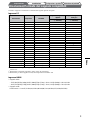
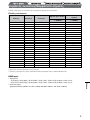
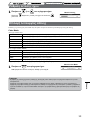
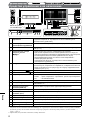
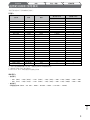
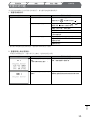
Compatible Resolutions/Signal Format
The monitor supports the following resolutions and signal format.
PC Input
Resolution Frequency Mode
Digital Input Signal Analog Input Signal
Dot Clock (~ 162 MHz) Dot Clock (~ 162 MHz)
640 × 400 70 Hz NEC PC-9821
—
ü
640 × 480 67 Hz Apple Macintosh
—
ü
640 × 480 ~75 Hz VGA, VESA
ü (60Hz) ü
720 × 400 70 Hz VGA TEXT
ü ü
720 × 480 60 Hz
VESA
ü ü
848 × 480 60 Hz
VESA
ü ü
800 × 600 ~75 Hz
VESA
ü (60Hz) ü
832 × 624 75 Hz Apple Macintosh
—
ü
1024 × 768 ~75 Hz
VESA
ü (60Hz) ü
1152 × 864 75 Hz
VESA —
ü
1152 × 870 75 Hz Apple Macintosh
—
ü
1280 × 768
*
1
60 Hz VESA CVT RB —
ü
1280 × 768
*
1
~75 Hz VESA CVT —
ü
1280 × 960 60 Hz
VESA
ü ü
1280 × 960 75 Hz Apple Macintosh
—
ü
1280 × 1024 ~75 Hz
VESA
ü (60Hz) ü
1360 × 768 60 Hz
VESA —
ü
1600 × 1200 60 Hz
VESA
ü ü
1680 × 1050
*
1
60 Hz VESA CVT
ü ü
1680 × 1050
*
1
60 Hz VESA CVT RB
ü ü
1920 × 1200
*
1
*
2
60 Hz VESA CVT RB
ü ü
1280 × 720p
*
3
50, 60 Hz 720p
ü ü
1920 × 1080p
*
3
50, 60 Hz 1080p
ü ü
*
1
When displaying the wide format input signal, a graphics board in conformance with VESA CVT standard is required.
*
2
Recommended resolution (Set this resolution.)
*
3
Resolution for some AV equipments such as Microsoft Xbox 360
HDMI Input
• Video signal
– 525i (480i) / 525p (480p) / 1125i (1080i) / 750p (720p) : 60Hz, 1125p (1080p) : 60Hz / 24Hz
– 625i (576i) / 625p (576p) / 1125i (1080i) / 750p (720p) : 50Hz, 1125p (1080p) : 50Hz / 24Hz
• Audio signal
2ch linear PCM (32kHz / 44.1kHz / 48kHz / 88.2kHz / 96kHz / 176.4kHz / 192kHz)

4
English
TroubleshootingSetting/AdjustmentInstallationPrior to use
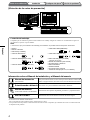
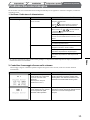
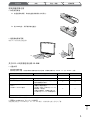
About Setup Manual and User’s Manual
Setup Manual
(this manual)
Describes basic information ranging from connection of the monitor to
external equipment, such as a PC, etc., to using the monitor.
Remote Control Guide
Describes usage and function of the remote control.
User’s Manual
(PDF le on the CD-ROM*)
Describes application information such as screen adjustments, settings,
and specications.
PRECAUTIONS
Describes how to use the monitor safely.
* Installation of Adobe Reader is required.
• Product specications vary with sales areas. Conrm that the manual is written in the language of the area of purchase.
[Location of Caution Statement]
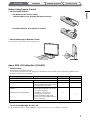
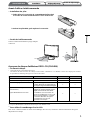
Package Contents
Check that all the following items are included in the packaging box. If any items are missing or damaged, contact your local
dealer.
NOTE
• Please keep the packaging box and materials for future movement or transport of the monitor.
□ Monitor
□ Remote control
□ AAA batteries (2 pcs)
□ Power cord
□ Digital signal cable (FD-C39)
□ Analog signal cable (MD-C87)
□ EIZO HDMI cable (00M0J262)
□ EIZO USB cable (MD-C93)
□ EIZO LCD Utility Disk (CD-ROM)
• User’s Manual
□ Setup Manual (this manual)
□ Remote Control Guide
□ PRECAUTIONS
□ Limited warranty
□ Recycling Information
□ Mounting Screws (M4 x 12, 4 pcs)

5
English
TroubleshootingSetting/AdjustmentInstallationPrior to use
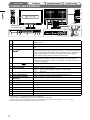
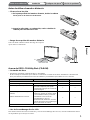
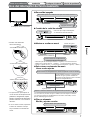
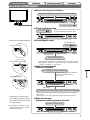
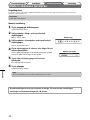
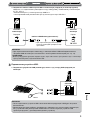
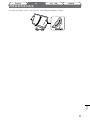
Before Using Remote Control
●
How to install batteries
1. On the back of the remote control,
slide the battery cover off in the direction of an arrow.
2. Input AAA batteries, and slide the cover back.
●
Re
ceivable Range of Remote Control
Use the remote control inside of the range as below.
5m
5m
30°
30°
7m
5m
30°
30°
7m
5m
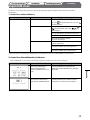
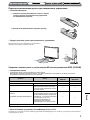
About EIZO LCD Utility Disk (CD-ROM)
●
Disk Contents
• Disk contents and software overview
The following is included in the disk. Refer to the “Readme.txt” or the “Readme” file on the disk for software startup
procedures or file access procedures.
Item Overview For Windows For Macintosh
A “Readme.txt” or “Readme” le
ü ü
Color Proles (ICC Proles) Color proles
ü ü
Screen Adjustment Utility Monitor pattern display software
used when adjusting the image of the
analog input signal manually.
ü
−
ScreenManager Pro for LCD (for
Windows)
A utility software program to control
monitor adjustments from a PC using
its mouse and keyboard.
ü
−
WindowMovie Checker Software
*
WindowMovie is a function of
ScreenManager Pro for LCD.
For more information, refer to the
User’s Manual of ScreenManager Pro
for LCD on the disk.
User’s Manual of this monitor (PDF le)
* WindowMovie Checker Software is not applicable to Windows Vista.
●
To use ScreenManager Pro for LCD
For the installation and use of ScreenManager Pro for LCD, refer to its User’s Manual on the disk.

6
English
9
17
18
15
16
13121110
14
3 4 5 6 7 82
1
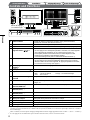
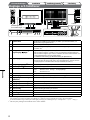
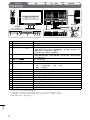
Setting menu
(ScreenManager
®
*
1
)
Power connector
TroubleshootingSetting/AdjustmentInstallationPrior to use
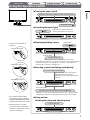
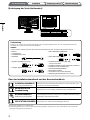
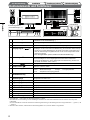
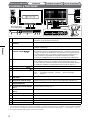
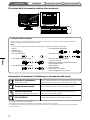
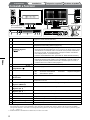
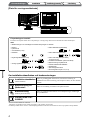
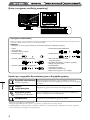
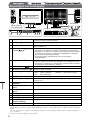
Controls and Functions
1 Remote control Use to set and adjust the monitor. (For the details, please read “Remote
Control Guide”.)
2 Remote control detector Receives the signal from the remote control.
3 Sensor Detects the environmental brightness. BrightRegulator function (see page
14).
4 Input Signal Selection Switch
( )
*
2
• Switches the signal input displayed on the monitor.
• When touching the switch for approx. 2 seconds, a video display appears in
the PC display. When touching the switch again for approx. 2 seconds, the
video display disappears and only PC display remains (single display).
PinP display function (Refer to “Remote Control Guide”).
5 Slide bar
*
2
• Uses when the setting/adjustment is performed on each menu.
• When touching it while the menu is not displayed, the shortcut menu is
displayed. By touching the slide bar for 5 seconds, the content of the menu
changes (see page 7).
6 Menu switch ( )
*
2
Displays/Quits the Setting menu.
7 Power switch ( ) Turns the power on or off.
8 Power indicator Indicates monitor’s operation status.
Blue : The screen is displayed Orange : Power saving
Off : Power off
9 Security lock slot Complies with Kensington’s MicroSaver security system.
10 Audio output terminal [Stereo mini jack] Connects the built-in amplier speakers, etc.
11 Input signal connectors
(HDMI 1/2)
[HDMI connector
× 2] Connects AV equipment.
12 Input signal connector (PC 1) [DVI-D connector] Connects a PC.
13 Input signal connector (PC 2) [D-Sub mini 15-pin connector] Connects a PC.
14 USB ports (Up) [Upstream × 2] Connects a PC.
15 Headphone jack [Stereo mini jack] Connects headphones.
16 USB ports (Down) [Downstream × 2] Connects a peripheral USB device.
17 ArcSwing 2 Stand Used to adjust the height and angle of the monitor screen.
18 Cable holder Covers the monitor cables.
*
1
ScreenManager
®
is an EIZO’s nickname of the Setting menu.
For how to use ScreenManager, refer to the User’s Manual on the CD-ROM.
(In this manual, the setting/adjustment item names in the Setting menu are put in angle brackets < >. (ex. : <Color>))
*
2
When touching while the power turns off, the monitor turns on.
Cabling

7
English
TroubleshootingSetting/AdjustmentInstallationPrior to use
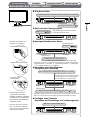
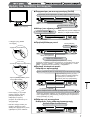
Using the Operation Switch
Operation switch
• There are three methods of
operation:
- Tracing the slide bar
Turning the power On/Off
Displaying/Quitting a menu
Setting menu
Shortcut menu
(When the menu is not displayed on the screen)
Selecting a menu item/Setting and Adjusting
The increase/decrease speed of the
adjustment value may change
depending on the tracing speed of the
slide bar.
At ne adjustment
Tapping once changes the adjustment value to one step up or down.
Touching the slide bar continuously may change the value serially.
Fixing an item
Deciding the setting and adjusting value
Power Off: Touch .
Power On: Touch any of the keys to turn on the monitor.
Tap
Touch .
Touch the slide bar.
Trace the slide bar left and right.
Tap either end of the slide bar, marked with and .
Tap the slide bar.
Switching the Input Signal
Each time you tap the switch, the
input signal switches to the other.
- Touching the switch
- Tapping the slide bar
• The operations with the slide
bar (selecting, setting, adjusting,
xing and deciding items) can be
performed with the remote control.
* When the signal is not input,
even if the contents of the menu
have been changed, the menu of
"Volume" is displayed.
By touching the switch for 5 seconds, the contents of the menu changes
as follows: "Volume" → (touching for 5 seconds) →"Color Mode" →
(touching for 5 seconds) → "Brightness".*

8
English
TroubleshootingSetting/AdjustmentPrior to use Installation
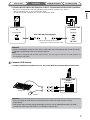
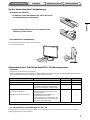
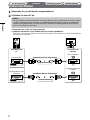
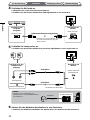
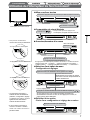
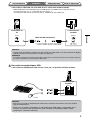
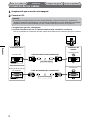
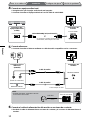
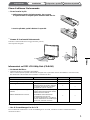
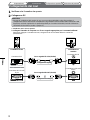
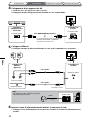
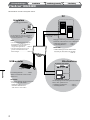
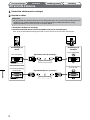
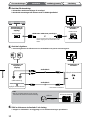
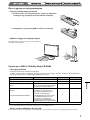
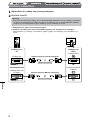
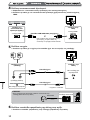
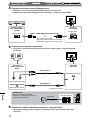
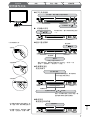
Connecting Cables
1
Check that the monitor is powered off.
2
Connect a PC.
Attention
• When replacing the current monitor with an HD2442W monitor, be sure to change the PC settings
for resolution and vertical frequency to those which are available for the HD2442W monitor referring
to the resolution table (see page
3) before connecting the PC.
1. Check that the PC is powered off.
2. Connect the monitor to the PC with a signal cable that matches the connectors.
After connecting the cable connectors, tighten the screws of the connectors to secure the coupling.
MacintoshWindows
MacintoshWindows
Connectors on the
PC
DVI connector
D-Sub mini 15-pin
connector
Connectors on the
monitor
Signal cable FD-C39 (supplied)
Signal cable MD-C87 (supplied)
Digital connection
Analog connection
DVI-D connector
D-Sub mini 15-pin
connector

9
English
TroubleshootingSetting/AdjustmentPrior to use Installation
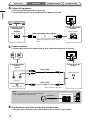
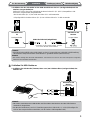
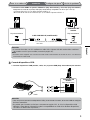
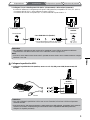
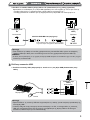
3. Connect the USB cable to the USB ports on the PC (downstream) and the monitor (upstream).
Be sure to connect to the USB port (upstream) that complies to the PC (PC 1/PC 2).
• DVI-D connector (PC 1): PC 1 USB port is used.
• D-Sub mini 15-pin connector (PC 2): PC 2 USB port is used.
Connectors on the
PC
Downstream
Connectors on the
monitor
Upstream
USB cable MD-C93 (supplied)
*
*
When connecting two PCs to the
monitor, please purchase another cable.
Attention
• When connecting the monitor to a PC using a USB cable, the USB setting on the monitor should be
changed corresponding to the PC used (see page 1
2).
NOTE
• The monitor is equipped with the USB audio function. You may enjoy sound from PC with speakers by
connecting the USB cables.
3
Connects USB devices.
1. Connect USB devices (keyboard, mouse, etc.) to the USB port (downstream) on the monitor.
Attention
• After connecting the USB devices and turning on the monitor, the USB function is set up
automatically.
• This monitor may not work properly depending on the PC, OS or USB devices used. (For USB
compliance of the respective devices, consult their manufacturers.)
Connectors on the
monitor
Downstream
Keyboard
Mouse

10
English
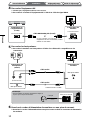
4
Connect AV equipment.
1. Check that the AV equipment is powered off.
2. Connect the monitor to the AV equipment with a HDMI signal cable.
TroubleshootingSetting/AdjustmentPrior to use Installation
Connectors on the
AV equipment
(Output)
HDMI connector
Connectors on the
monitor
HDMI cable 00M0J262 (supplied)
*
*
When connecting two AV equipment with
HDMI output, please purchase another
cable.
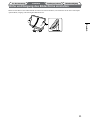
5
Connect speakers.
1. Connect the monitor to the speaker with an audio cable that matches the connectors.
Connectors on the
speakers
(Input)
(Pin jack)
R L
Stereo mini jack
Connector on the
monitor
Stereo mini jack
Audio cable
*
Audio cable
*
6
Plug the power cord of the monitor into a power outlet.
1. Plug the power cord into a power outlet and the Power connector on the monitor.
HDMI connector
*
Please purchase the cable.
NOTE
• When using headphones, connect the headphones
to the headphone jack on the monitor.
Headphone
Headphone jack

11
English
TroubleshootingSetting/AdjustmentPrior to use Installation
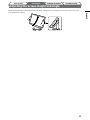
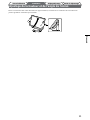
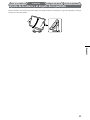
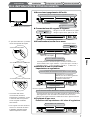
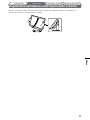
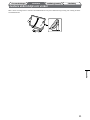
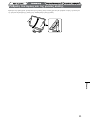
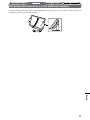
Adjusting the Screen Height and Angle
Hold left and right edge of the monitor with both hands, and adjust the screen height, tilt and swivel the screen to the
best condition for working.

12
English
Prior to use Installation TroubleshootingSetting/Adjustment
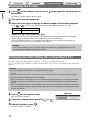
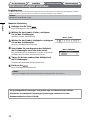
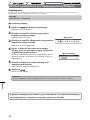
Displaying the Screen
1
Press on the remote control (or touch of the operation switch) to turn on
the monitor.
The monitor’s Power indicator lights up blue.
2
Turn on the external equipment.
3
Switch the input signal to display the desired image sent from the equipment.
Press or . Each time you press the button, the input signal switches to the other.
PC PC1
g
PC2...
HDMI HDMI1
g
HDMI2...
When receiving an analog signal from the PC
When turning on the monitor and PC for the rst time with the analog signal, the Auto Adjustment
function works to adjust the clock, phase, and display position automatically.
The auto adjustment function is not required when digital signals are input because images are
displayed correctly based on the preset data of the monitor.
Attention
• Turn off the monitor if you do not use the monitor for a long time. Unplugging the power cord
completely shuts off power supply to the monitor.
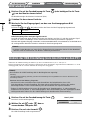
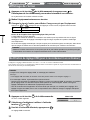
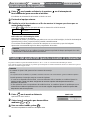
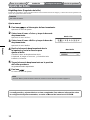
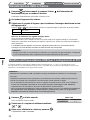
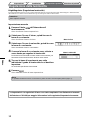
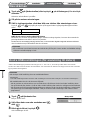
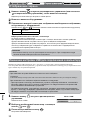
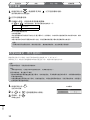
Changing the USB Setting (for connecting to PC)
Change the USB setting of the monitor to either “PC 1” or “PC 2”, according to the PC used.
If it is not set properly, the USB devices connected to the monitor may not work or no sound may come out from the
speakers.
Attention
• When changing the USB setting, a message window may appear.
Message:
“If the USB setting is changed, the USB connection to the selected PC will be lost. Do you change the setting?”
When the message is displayed, note the following.
- When connecting a memory device such as a USB memory to the monitor, do not change the setting.
The data may be lost and damaged. Be sure to change the USB setting after removing the memory
device.
- When an application such as a sound playback, etc. works, do not change the setting. The sound may
not output when the setting is returned to the original. Be sure to change the USB setting after exiting
from the application.
1
Press on the remote control.
The <USB> menu appears.
2
Select the computer to be used with or .
3
After the selection, press .
The USB setting is completed.
USB menu

13
English
Prior to use Installation TroubleshootingSetting/Adjustment
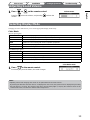
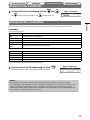
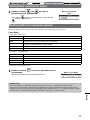
Adjusting Sound Volume
1
Press or on the remote control.
Pressing raises the volume, and pressing reduces the
volume.
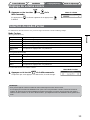
Selecting Display Mode
Changing the color mode allows you to set the appropriate display mode easily.
Color Mode
(For PC input signal)
Text Suitable for displaying texts for word processing or spreadsheets.
Picture Suitable for displaying images such as photos or picture images.
Movie Suitable for playing back animated images.
sRGB Suitable for color matching with sRGB compatible peripherals.
Game (PC) Suitable for displaying game images.
Custom (xxx
*
) Available for making desired settings.
(For HDMI input signal)
Standard Standard video display.
Cinema Suitable for cinema effect, etc.
Dynamic Suitable for a clearly outlined image.
Game Suitable for displaying game images.
Custom (xxx
*
) Available for making desired settings.
* The input selected at that time is displayed.
1
Press on the remote control.
Each time you press the button, the mode changes.
NOTE
• Adjusting volume and changing color mode can be performed from the shortcut menu.
By touching the slide bar when the menu is not displayed on the screen, the shortcut menu is displayed. By touching
the slide bar for 5 seconds, the content of the menu changes (
see page 7)
. Display the <Volume> menu or the
<Color Mode> menu, and trace the slide bar left and right to set.
Volume menu
Color Mode menu

14
English
Prior to use Installation TroubleshootingSetting/Adjustment
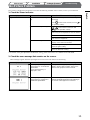
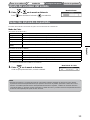
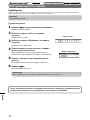
Adjusting Brightness
BrightRegulator
The screen brightness is automatically adjusted corresponding to both the brightness of the image and the environmental
brightness detected by the sensor at the lower side of the monitor.
Attention
• Do not cover the sensor.
Manual Setting
1
Touch of the operation switch.
The Setting menu appears.
2
Select the <Color> icon and tap the slide bar.
The <Color> menu appears.
3
Select the <Brightness> icon and tap the slide
bar.
The <Brightness> menu appears.
4
Trace the slide bar left and right to adjust the
brightness.
Tracing the slide bar to the left makes the brightness dark and
right does it bright.
5
Tap the slide bar at the desired brightness.
The specied brightness is saved.
6
Touch .
The Setting menu quits.
NOTE
• The <Brightness> menu can be displayed from the shortcut menu. (see page
7)
The basic settings and adjustments are completed. For advanced settings/adjustments,
refer to the User’s Manual on the CD-ROM.
Color menu
Brightness menu

15
English
Prior to use Installation Setting/Adjustment Troubleshooting
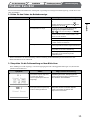
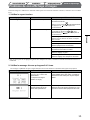
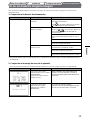
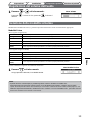
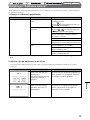
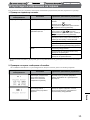
No-Picture Problem
If no picture is displayed on the monitor even after the following remedial action is taken, contact your local dealer.
1. Check the Power indicator.
Symptom Status Possible cause and remedy
No picture Power indicator does not light
up.
Check whether the power cord is correctly
connected.
Press
on the remote control (or touch of
the operation switch).
Power indicator lights orange. Switch the input signal with [INPUT SELECT]
( / ) on the remote control (or with
of the operation switch).
(When PC signal is input,)
Press a key on the keyboard or click the mouse.
Turn on the PC.
(When HDMI signal is input,)
Turn on the AV equipment.
Power indicator lights blue. Check whether the external equipment is
properly connected to the monitor.
(When PC signal is input,)
Check the gain
*
setting.
(When HDMI signal is input,)
Check the field rate
*
setting.
* For details of the gain adjustment and eld rate setting, please refer to the User’s Manual on the CD-ROM.
2. Check the error message that remains on the screen.
These messages appear when the input signal is incorrect even if the monitor is functioning.
Symptom Status Possible cause and remedy
The frequency of the signal
sent from the PC is outside the
specication.
(Such signal frequency is
displayed in red.)
Change the mode appropriately using the
graphics board’s utility software. Refer to the
manual of the graphics board for details.
The frequency of the signal
sent from the AV equipment is
outside the specication.
(When HDMI signal is input,)
Conrm the digital signal format by referring to
the manual of the equipment connected.

16
English
Copyright© 2008 EIZO NANAO CORPORATION All rights reserved.
No part of this manual may be reproduced, stored in a retrieval system, or transmitted, in any form or by any means,
electronic, mechanical, or otherwise, without the prior written permission of EIZO NANAO CORPORATION.
EIZO NANAO CORPORATION is under no obligation to hold any submitted material or information condential
unless prior arrangements are made pursuant to EIZO NANAO CORPORATION’s receipt of said information.
Although every effort has been made to ensure that this manual provides up-to-date information, please note that EIZO
monitor specications are subject to change without notice.
Apple and Macintosh are registered trademarks of Apple Inc.
VGA is a registered trademark of International Business Machines Corporation.
VESA is a registered trademark of Video Electronics Standards Association.
Windows and Xbox 360 are registered trademarks of Microsoft Corporation.
HDMI, the HDMI logo and High-Definition Multimedia Interface are trademarks or registered trademarks of HDMI Licensing LLC.
FlexScan, ScreenManager and EIZO are registered trademarks of EIZO NANAO CORPORATION in Japan and other countries.

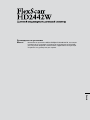
English
Setup Manual
Important: Please read this Setup Manual and the User’s Manual stored on the CD-
ROM carefully to familiarize yourself with safe and effective usage. Please
retain this manual for future reference.
Installationshandbuch
Wichtig:
Lesen Sie die VORSICHTSMASSNAHMEN, dieses Handbuch zur
Einrichtung und das Benutzerhandbuch (auf der CD-ROM) aufmerksam
durch, um sich mit der sicheren und efzienten Bedienung vertraut zu
machen. Bewahren Sie dieses Handbuch zum späteren Nachschlagen auf.
Deutsch

2
Deutsch
Fehlerbeseitigung
Einstellungen/Justierung
InstallationVor der Benutzung
FlexScan
®
HD2442W
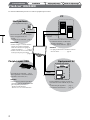
Lautsprecher
(mit integriertem Verstärker)
Ermöglicht die Tonausgabe über einen
angeschlossenen PC oder AV-Geräte
usw.
• Anschlussmethoden ..............Seite 10
HINWEIS
•
Ermöglicht das Anpassen der
Lautstärke der an den Monitor
angeschlossenen Lautsprecher mithilfe
der Funktion zum Einstellen der
Lautstärke des Monitors
. ........Seite 13
• Ermöglicht die Tonausgabe durch
Anschließen eines Kopfhörers an die
Kopfhörerbuchse. ..................Seite 10
USB-Geräte
Tastatur
• Anschlussmethoden .................
Seite 9
(Auch für den Anschluss eines Druckers
oder Scanners usw.)
Hinweis
• Verwenden Sie einen PC/ein
Betriebssystem, der bzw. das mit USB-
Geräten kompatibel ist.
[Für OS]
- Windows 2000/XP/Vista
- Mac OS 8.5.1 oder höher
Maus
PC
Ermöglicht die Verwendung eines Monitors durch
Anschließen an einen Windows-PC oder
Macintosh.
• Geeignete Auösung .............Seite 3
• Anschlussmethoden ...............
Seite 8
Hinweis
•
Je nach verwendetem PC muss die USB-
Einstellung geändert werden. ...Seite 12
AV-Geräte
HDMI-Anschluss
DVD-Player
Ermöglicht das Anzeigen von Bildern durch
Anschließen eines DVD-/Video-Players oder einer
Spielkonsole usw.
• Geeignetes Signalformat ............. Seite 3
• Anschlussmethoden .................... Seite 10
HD2442W kann an die folgenden Geräte angeschlossen werden:
DVI-Verbinder
15-poliger Mini-D-
Sub-Verbinder
HDMI-Anschluss
Spielkonsole
La pagina si sta caricando...
La pagina si sta caricando...
La pagina si sta caricando...
La pagina si sta caricando...
La pagina si sta caricando...
La pagina si sta caricando...
La pagina si sta caricando...
La pagina si sta caricando...
La pagina si sta caricando...
La pagina si sta caricando...
La pagina si sta caricando...
La pagina si sta caricando...
La pagina si sta caricando...
La pagina si sta caricando...
La pagina si sta caricando...
La pagina si sta caricando...
La pagina si sta caricando...
La pagina si sta caricando...
La pagina si sta caricando...
La pagina si sta caricando...
La pagina si sta caricando...
La pagina si sta caricando...
La pagina si sta caricando...
La pagina si sta caricando...
La pagina si sta caricando...
La pagina si sta caricando...
La pagina si sta caricando...
La pagina si sta caricando...
La pagina si sta caricando...
La pagina si sta caricando...
La pagina si sta caricando...
La pagina si sta caricando...
La pagina si sta caricando...
La pagina si sta caricando...
La pagina si sta caricando...
La pagina si sta caricando...
La pagina si sta caricando...
La pagina si sta caricando...
La pagina si sta caricando...
La pagina si sta caricando...
La pagina si sta caricando...
La pagina si sta caricando...
La pagina si sta caricando...
La pagina si sta caricando...
La pagina si sta caricando...
La pagina si sta caricando...
La pagina si sta caricando...
La pagina si sta caricando...
La pagina si sta caricando...
La pagina si sta caricando...
La pagina si sta caricando...
La pagina si sta caricando...
La pagina si sta caricando...
La pagina si sta caricando...
La pagina si sta caricando...
La pagina si sta caricando...
La pagina si sta caricando...
La pagina si sta caricando...
La pagina si sta caricando...
La pagina si sta caricando...
La pagina si sta caricando...
La pagina si sta caricando...
La pagina si sta caricando...
La pagina si sta caricando...
La pagina si sta caricando...
La pagina si sta caricando...
La pagina si sta caricando...
La pagina si sta caricando...
La pagina si sta caricando...
La pagina si sta caricando...
La pagina si sta caricando...
La pagina si sta caricando...
La pagina si sta caricando...
La pagina si sta caricando...
La pagina si sta caricando...
La pagina si sta caricando...
La pagina si sta caricando...
La pagina si sta caricando...
La pagina si sta caricando...
La pagina si sta caricando...
La pagina si sta caricando...
La pagina si sta caricando...
La pagina si sta caricando...
La pagina si sta caricando...
La pagina si sta caricando...
La pagina si sta caricando...
La pagina si sta caricando...
La pagina si sta caricando...
La pagina si sta caricando...
La pagina si sta caricando...
La pagina si sta caricando...
La pagina si sta caricando...
La pagina si sta caricando...
La pagina si sta caricando...
La pagina si sta caricando...
La pagina si sta caricando...
La pagina si sta caricando...
La pagina si sta caricando...
La pagina si sta caricando...
La pagina si sta caricando...
La pagina si sta caricando...
La pagina si sta caricando...
La pagina si sta caricando...
La pagina si sta caricando...
La pagina si sta caricando...
La pagina si sta caricando...
La pagina si sta caricando...
La pagina si sta caricando...
La pagina si sta caricando...
La pagina si sta caricando...
La pagina si sta caricando...
La pagina si sta caricando...
La pagina si sta caricando...
La pagina si sta caricando...
La pagina si sta caricando...
La pagina si sta caricando...
La pagina si sta caricando...
La pagina si sta caricando...
La pagina si sta caricando...
La pagina si sta caricando...
La pagina si sta caricando...
La pagina si sta caricando...
La pagina si sta caricando...
La pagina si sta caricando...
La pagina si sta caricando...
La pagina si sta caricando...
La pagina si sta caricando...
La pagina si sta caricando...
-
 1
1
-
 2
2
-
 3
3
-
 4
4
-
 5
5
-
 6
6
-
 7
7
-
 8
8
-
 9
9
-
 10
10
-
 11
11
-
 12
12
-
 13
13
-
 14
14
-
 15
15
-
 16
16
-
 17
17
-
 18
18
-
 19
19
-
 20
20
-
 21
21
-
 22
22
-
 23
23
-
 24
24
-
 25
25
-
 26
26
-
 27
27
-
 28
28
-
 29
29
-
 30
30
-
 31
31
-
 32
32
-
 33
33
-
 34
34
-
 35
35
-
 36
36
-
 37
37
-
 38
38
-
 39
39
-
 40
40
-
 41
41
-
 42
42
-
 43
43
-
 44
44
-
 45
45
-
 46
46
-
 47
47
-
 48
48
-
 49
49
-
 50
50
-
 51
51
-
 52
52
-
 53
53
-
 54
54
-
 55
55
-
 56
56
-
 57
57
-
 58
58
-
 59
59
-
 60
60
-
 61
61
-
 62
62
-
 63
63
-
 64
64
-
 65
65
-
 66
66
-
 67
67
-
 68
68
-
 69
69
-
 70
70
-
 71
71
-
 72
72
-
 73
73
-
 74
74
-
 75
75
-
 76
76
-
 77
77
-
 78
78
-
 79
79
-
 80
80
-
 81
81
-
 82
82
-
 83
83
-
 84
84
-
 85
85
-
 86
86
-
 87
87
-
 88
88
-
 89
89
-
 90
90
-
 91
91
-
 92
92
-
 93
93
-
 94
94
-
 95
95
-
 96
96
-
 97
97
-
 98
98
-
 99
99
-
 100
100
-
 101
101
-
 102
102
-
 103
103
-
 104
104
-
 105
105
-
 106
106
-
 107
107
-
 108
108
-
 109
109
-
 110
110
-
 111
111
-
 112
112
-
 113
113
-
 114
114
-
 115
115
-
 116
116
-
 117
117
-
 118
118
-
 119
119
-
 120
120
-
 121
121
-
 122
122
-
 123
123
-
 124
124
-
 125
125
-
 126
126
-
 127
127
-
 128
128
-
 129
129
-
 130
130
-
 131
131
-
 132
132
-
 133
133
-
 134
134
-
 135
135
-
 136
136
-
 137
137
-
 138
138
-
 139
139
-
 140
140
-
 141
141
-
 142
142
-
 143
143
-
 144
144
-
 145
145
-
 146
146
-
 147
147
-
 148
148


Eizo HD2442W Manuale del proprietario
- Tipo
- Manuale del proprietario
- Questo manuale è adatto anche per
in altre lingue
- français: Eizo HD2442W Le manuel du propriétaire
Documenti correlati
-
Eizo S1961 Manuale del proprietario
-
-
-
Eizo FlexScan SX3031W-H Manuale del proprietario
-
-
Eizo S2231W Manuale del proprietario
-
-
-
-