

2
Getting started
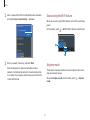
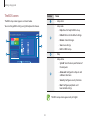
3 About this manual
7 Layout
11 Turning the computer on
and off
13 Unlocking the screen
13 Windows
Basics
16 Keyboard
18 Touchpad
21 CD/DVD drive (optional)
22 Memory card
25 External display
27 Wired LAN
30 Wireless LAN
32 Using the security slot
Applications
33 Using applications
34 Samsung Settings
35 Samsung Update
36 Online Support (S Service)
37 Samsung PC Help
(Self-help application)
38 Samsung PC Cleaner
Settings & Upgrade
39 LCD brightness
41 Volume
42 BIOS (Setup utility)
48 Battery
Troubleshooting
51 Samsung Recovery
57 Windows recovery
function
57 Q&A
Appendix
61 Product specifications
62 Ergonomic tips
66 Powering your device
68 Safety precautions
81 Important safety
information
84 Replacement parts and
accessories
87 Regulatory compliance
statements
105 WEEE symbol information
107 Samsung package Take-
Back program
Table of contents

3
Getting started
About this manual
•
This user manual is specially designed to detail the computer’s
functions and features.
•
The user manual supplied with the computer may vary
depending on the model.
•
Please read this manual before using the computer to ensure
safe and proper use.
•
Optional accessories, some devices, and software referred to
in this manual may not be provided or may not be subject to
upgrades. Note that the computer environment referred in
the user manual may not be the same as your environment.
•
Descriptions are based on the computer’s default settings
and the Windows 10 operating system. Available features and
additional services may vary depending on the computer or
operating system.
•
This user manual describes procedures for using the
touchpad, mouse and touch screen. Instructions for using the
touch screen are for models with the touch screen feature.
•
Images and screenshots are those of the representative model
of the series and may differ in appearance from the actual
product.
•
Content may differ from the final product and is subject to
change without prior notice. For the latest version of the
manual, refer to the Samsung website, www.samsung.com.

Getting started
4
Copyright
Copyright © 2015 Samsung Electronics
This manual is protected under international copyright laws.
No part of this manual may be reproduced, distributed, translated,
or transmitted in any form or by any means, electronic or
mechanical, including photocopying, recording, or storing in any
information storage and retrieval system, without the prior written
permission of Samsung Electronics.
Computer specifications or the contents of this manual may
be changed without prior notice due to an upgrade of the
computer’s functions.
Instructional icons and expressions
Warning
: situations that could cause injury to yourself or
others
Caution
: situations that could cause damage to the
computer or other equipment
Note
: notes, usage tips, or additional information
The path you should follow to carry out an instruction. For
example, “select
Settings
→
Devices
” indicates that you
should select
Settings
and then
Devices
.
Select Click the mouse or tap the touchpad or touch screen.

Getting started
5
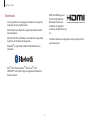
•
HDMI, the HDMI logo, and
the term High Definition
Multimedia Interface are
trademarks or registered
trademarks of HDMI Licensing
LLC.
•
All other trademarks and copyrights are the property of their
respective owners.
Trademarks
•
Samsung and the Samsung logo are trademarks or registered
trademarks of Samsung Electronics.
•
Intel and Core are trademarks or registered trademarks of the
Intel Corporation.
•
Microsoft, MS-DOS, and Windows are trademarks or registered
trademarks of the Microsoft Corporation.
•
Bluetooth
®
is a registered trademark of Bluetooth SIG, Inc.
worldwide.
•
Wi-Fi
®
, Wi-Fi Protected Setup
™
, Wi-Fi Direct
™
, Wi-Fi
CERTIFIED
™
, and the Wi-Fi logo are registered trademarks of
the Wi-Fi Alliance.

Getting started
6
Product capacity representation
Storage capacity representation
The capacity of the storage device (HDD, SSD) of the manufacturer
is calculated assuming that 1 KB = 1,000 Bytes.
However, the operating system (Windows) calculates the storage
device capacity assuming that 1 KB = 1,024 Bytes. Therefore, the
available capacity of the HDD in Windows is smaller than the
actual capacity due to the difference in capacity calculation. For
example, for an 80 GB HDD, Windows calculates the capacity as
74.5 GB, (80x1,000x1,000x1,000) Bytes/(1,024x1,024x1,024) Bytes
= 74.505 GB.
In addition, the capacity representation in Windows may be even
smaller because some programs, such as Samsung Recovery, may
reside in a hidden area of the HDD.
Memory capacity representation
The available memory capacity in Windows is less than the actual
capacity of memory. This is because some memory is required for
regular system operations.
For example, for 1 GB (= 1,024 MB) memory installed, Windows
may report the capacity as 1,022 MB or less.
Data precautions
Samsung Electronics shall not be liable for any data loss. Please
take care to avoid losing any important data and back up your
data to prevent any such data loss.
Operating system and software support
If you change the product’s factory OS (Operating System) to
another OS or if you install software which is not supported by the
product’s original factory OS, you will not receive any technical
support, product exchange or refund, and a fee will be charged
when requesting a service.
Please use your computer with the original factory OS. If you
install an OS other than the factory OS, data may be deleted or the
computer may not start.
Recommended screen resolutions
It is recommended to set the resolution of your display based on
standard Windows settings.
If you set a high resolution, such as QHD+ (3200x1800), it may not
correctly display some applications.

Getting started
7
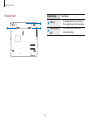
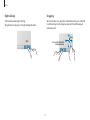
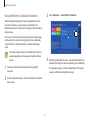
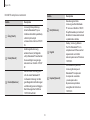
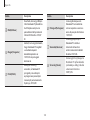
Number/Name Description
Microphone
(optional)
•
You can use the built-in
microphone.
Camera (optional)
•
Using this camera, you can take
still pictures and record video.
LCD
•
The screen’s images are displayed
here.
Power button
•
Turns the computer on and off.
Power LED
•
When the computer is on, the
power LED is lit.
Touchpad/
Touchpad
buttons
•
Moves the cursor and selects
options.
•
Functions as a mouse.
Keyboard
•
Enter text or control computer
functions.
Speaker
•
Sound is emitted from the
speakers.
Camera indicator
light (optional)
•
This indicates the camera
operating status.
Layout
•
Features or options may differ depending on the model.
•
The items marked as optional may not be provided or
may be provided in different locations.
•
Since some space on the HDD/SSD is reserved for
system recovery and operations, the available space on
the HDD/SSD may be less than the actual capacity.
Front view
2
9
3
7
6
1
5
4
8

Getting started
8
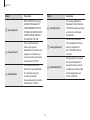
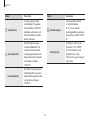
Number/Name Description
CD/DVD drive
(ODD) (optional)
•
Reads CDs or DVDs.
•
Since the CD/DVD drive is
optional, the drive may vary by
model.
USB 2.0 port
•
Connect various peripheral
devices, such as a mouse, camera,
or keyboard.
Security slot
•
Secure the computer by
connecting an optional lock and
cable to it.
Right view
1 32

Getting started
9
Number/Name Description
USB 3.0 port
or chargeable
USB 3.0 port
(optional)
•
USB ports to which you can
connect USB devices as well
as a chargeable USB port are
provided.
•
The USB port can be used to
connect and charge a USB device.
The port can be distinguished
by the figure (
or )
printed on the port of the
product.
Earpiece/Headset
jack
•
Connect an earpiece or a headset
to the computer to listen to
audio.
Memory card slot
•
Insert a memory card into the
slot.
Left view
1 2 3 4 5 6 7
Number/Name Description
DC jack
•
This jack connects to the AC
adapter to supply power to the
computer.
Wired LAN port
•
Connect the Ethernet cable to
this port.
External monitor
port
•
Connect a monitor, TV, or
projector to your computer using
a 15 pin D-SUB interface.
HDMI port
•
Used to connect an HDMI cable
to an external device.

Getting started
10
Number/Name Description
Battery
•
A rechargeable Lithium-ion battery
that supplies power to the computer.
Battery latches
•
The latches used to secure and
release the battery.
Bottom view
1
2
2

Getting started
11
3
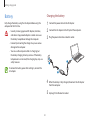
The computer turns on automatically when the LCD panel is
opened.
If the computer does not turn on automatically, press the
Power button.
Set the device not to automatically turn on the computer
when the LCD panel is opened.
1. Select the Start button (
)
→
Samsung
→
Samsung
Settings
.
2. Select
General
→
Auto Booting
→
OFF
.
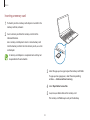
Turning the computer on and off
Fully charge the battery using the AC adapter before using
the computer
for the first time
.
Turning the computer on
1
Before turning on the computer, check that the battery is
charged and charge it if necessary.
2
Open the LCD panel.

Getting started
12
Turning the computer off
1
Select the Start button ( ).
2
Select
→
Shut down
.
•
Save all data before turning off the computer.
•
Since the procedures to turn the computer off may
differ depending on the installed operating system,
turn the computer off according to the procedures for
the purchased operating system.
About Windows Activation
When you turn the computer on for the first time, the Windows
activation screen appears.
Follow the activation procedures according to the instructions on
the screen to use the computer.
The computer’s date and time may be incorrect when you turn it
on for the first time. They may also be incorrect if the battery has
been fully discharged or removed. To set the date and time, go
to the desktop taskbar and right-click the clock area. Then, select
Adjust date/time
and set the current date and time.
•
To adjust the brightness of the screen, see LCD
brightness.
•
To adjust the sound, see Volume.

Getting started
13
Windows
Microsoft Windows is an operating system that is used to control a
computer.
•
Images and available features may differ depending on
the model and operating system.
•
This manual is designed for Windows 10 and content
may differ depending on the OS version.
•
The image displayed on the desktop screen may differ
between models and OS versions.
Unlocking the screen
To unlock the lock screen, do one of the following:
•
Mouse
: Click the lock screen.
•
Keyboard
: Press any key.
•
Touchpad
: Tap the touchpad.
If the account has a password, enter the password to log in after
unlocking the screen.

Getting started
14
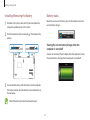
2
Select
New desktop
.
A new desktop will be added. You can select a desktop from
the list displayed at the bottom of the screen.
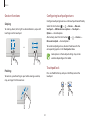
Multi desktop list
Help
To access help information, select the Start button ( )
→
Get started
( ).
You can check the help information after connecting to
the Internet.
Using the control panel
You can adjust basic system settings, such as hardware, software,
or user account settings.
Select the Start button (
)
→
Windows system
→
Control
Panel
. Alternatively, right-click the Start button ( ) and select
Control Panel
.
Then, select options you want to change.
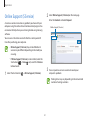
Using a multi desktop
Multi desktop allows you to work on various tasks at the same
time via multiple desktops. You can use different desktops for
various purposes.
Creating a new desktop
1
Select on the taskbar.

Getting started
15
Checking notifications
1
Select on the taskbar.
2
When the action center panel appears, select a message to
check it.
•
You can enable or disable push notifications for
applications. You can also set personalized hot keys
to appear in the action center by selecting the Start
button (
)
→
→
System
→
Notifications &
actions
.
•
Select
Expand
or
Collapse
to expand or minimize the
action center menu and select the feature you want to
use.
Deleting a desktop
1
Select on the taskbar.
2
Move the cursor over the desktop icon you want to delete.
Then, select
in the upper-right corner of the icon.
Moving a program to another desktop
1
Select on the taskbar.
2
Select a program or window you want to move.
Action Center
The Windows 10 action center allows you to receive system
notifications, such as updates, and push notifications, such as
emails and SNS updates. You can also adjust settings conveniently.
For example, you can select wireless network options or adjust the
volume and screen brightness via hot keys in the action center.

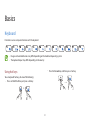
16
Basics
Keyboard
Enter text or access computer functions with the keyboard.
•
Images and available features may differ depending on the model and operating system.
•
The keyboard layout may differ depending on the country.
•
Press the
Fn Lock
key and then press a hot key.
Using hot keys
To use keyboard hot keys, do one of the following:
•
Press and hold the
Fn
key and press a hot key.
+

Basics
17
Key/Icon Description
F11
•
Turn off the camera and sound recorder
to prevent unauthorized access and illegal
recording.
F12
•
Wi-Fi network
: Turn the Wi-Fi feature on or off.
Fn +
•
Right-click
: Perform the right-click function.
If the hot keys do not work properly, install the
Samsung
Settings
application.
Hot key functions
Key/Icon Description
F1
•
Samsung Settings
: Launch the
Samsung
Settings
application.
F2
•
Screen brightness control
: Adjust the
brightness of the display.
F3
F4
•
LCD/External monitor
: Switch between the
LCD and an external display device when an
external display device is connected to the
computer.
F5
•
Touchpad
: Turn the touchpad function on or
off.
F6
•
Mute
: Mute or unmute the audio.
F7
•
Volume Control
: Adjust the volume level.
F8
F9
•
Turn the LCD on or off.
F10
•
Hide a selected window by decreasing its
brightness and opacity.

Basics
18
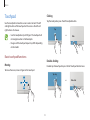
Clicking
Tap the touchpad or press the left touchpad button.
or
Tap
Click
Double-clicking
Double-tap the touchpad or press the left touchpad button twice.
or
Tap-tap
Click-click
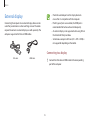
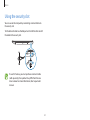
Touchpad
Use the touchpad to move the cursor or select an item. The left
and right buttons of the touchpad act the same as the left and
right buttons of a mouse.
•
Use the touchpad only with fingers. The touchpad will
not recognize actions of other objects.
•
Images and the touchpad layout may differ depending
on the model.
Basic touchpad functions
Moving
To move the cursor, move a finger on the touchpad.

Basics
19
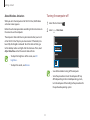
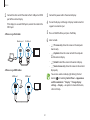
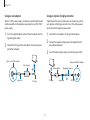
Dragging
To move an icon or an app tile to a desired location, press and hold
it and then drag it to the target position with the left touchpad
button pressed.
Move
Press and hold the left
touchpad button
Right-clicking
This function enables right-clicking.
To right-click an item, press the right touchpad button.
Click

Basics
20
Configuring touchpad gestures
Configure touchpad gestures to use the touchpad more efficiently.
Select the Start button (
)
→
→
Devices
→
Mouse &
touchpad
→
Additional mouse options
→
Touchpad
→
Options
→
desired options.
Alternatively, select the Start button (
)
→
→
Devices
→
Mouse & touchpad
→
desired options.
To cancel touchpad gestures, deselect check boxes for the
corresponding options in the
Touchpad
window.
Some options in the touchpad settings may not be
available depending on the model.
Touchpad lock
Press and hold the
Fn
key and press the
F5
key to lock the
touchpad.
+
Gesture functions
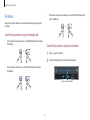
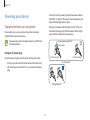
Swiping
To scroll up, down, left or right to a desired location, swipe with
two fingers on the touchpad.
or
Pinching
To zoom in, spread two fingers apart while viewing a website,
map, or image. Pinch to zoom out.
La pagina si sta caricando...
La pagina si sta caricando...
La pagina si sta caricando...
La pagina si sta caricando...
La pagina si sta caricando...
La pagina si sta caricando...
La pagina si sta caricando...
La pagina si sta caricando...
La pagina si sta caricando...
La pagina si sta caricando...
La pagina si sta caricando...
La pagina si sta caricando...
La pagina si sta caricando...
La pagina si sta caricando...
La pagina si sta caricando...
La pagina si sta caricando...
La pagina si sta caricando...
La pagina si sta caricando...
La pagina si sta caricando...
La pagina si sta caricando...
La pagina si sta caricando...
La pagina si sta caricando...
La pagina si sta caricando...
La pagina si sta caricando...
La pagina si sta caricando...
La pagina si sta caricando...
La pagina si sta caricando...
La pagina si sta caricando...
La pagina si sta caricando...
La pagina si sta caricando...
La pagina si sta caricando...
La pagina si sta caricando...
La pagina si sta caricando...
La pagina si sta caricando...
La pagina si sta caricando...
La pagina si sta caricando...
La pagina si sta caricando...
La pagina si sta caricando...
La pagina si sta caricando...
La pagina si sta caricando...
La pagina si sta caricando...
La pagina si sta caricando...
La pagina si sta caricando...
La pagina si sta caricando...
La pagina si sta caricando...
La pagina si sta caricando...
La pagina si sta caricando...
La pagina si sta caricando...
La pagina si sta caricando...
La pagina si sta caricando...
La pagina si sta caricando...
La pagina si sta caricando...
La pagina si sta caricando...
La pagina si sta caricando...
La pagina si sta caricando...
La pagina si sta caricando...
La pagina si sta caricando...
La pagina si sta caricando...
La pagina si sta caricando...
La pagina si sta caricando...
La pagina si sta caricando...
La pagina si sta caricando...
La pagina si sta caricando...
La pagina si sta caricando...
La pagina si sta caricando...
La pagina si sta caricando...
La pagina si sta caricando...
La pagina si sta caricando...
La pagina si sta caricando...
La pagina si sta caricando...
La pagina si sta caricando...
La pagina si sta caricando...
La pagina si sta caricando...
La pagina si sta caricando...
La pagina si sta caricando...
La pagina si sta caricando...
La pagina si sta caricando...
La pagina si sta caricando...
La pagina si sta caricando...
La pagina si sta caricando...
La pagina si sta caricando...
La pagina si sta caricando...
La pagina si sta caricando...
La pagina si sta caricando...
La pagina si sta caricando...
La pagina si sta caricando...
La pagina si sta caricando...
La pagina si sta caricando...
-
 1
1
-
 2
2
-
 3
3
-
 4
4
-
 5
5
-
 6
6
-
 7
7
-
 8
8
-
 9
9
-
 10
10
-
 11
11
-
 12
12
-
 13
13
-
 14
14
-
 15
15
-
 16
16
-
 17
17
-
 18
18
-
 19
19
-
 20
20
-
 21
21
-
 22
22
-
 23
23
-
 24
24
-
 25
25
-
 26
26
-
 27
27
-
 28
28
-
 29
29
-
 30
30
-
 31
31
-
 32
32
-
 33
33
-
 34
34
-
 35
35
-
 36
36
-
 37
37
-
 38
38
-
 39
39
-
 40
40
-
 41
41
-
 42
42
-
 43
43
-
 44
44
-
 45
45
-
 46
46
-
 47
47
-
 48
48
-
 49
49
-
 50
50
-
 51
51
-
 52
52
-
 53
53
-
 54
54
-
 55
55
-
 56
56
-
 57
57
-
 58
58
-
 59
59
-
 60
60
-
 61
61
-
 62
62
-
 63
63
-
 64
64
-
 65
65
-
 66
66
-
 67
67
-
 68
68
-
 69
69
-
 70
70
-
 71
71
-
 72
72
-
 73
73
-
 74
74
-
 75
75
-
 76
76
-
 77
77
-
 78
78
-
 79
79
-
 80
80
-
 81
81
-
 82
82
-
 83
83
-
 84
84
-
 85
85
-
 86
86
-
 87
87
-
 88
88
-
 89
89
-
 90
90
-
 91
91
-
 92
92
-
 93
93
-
 94
94
-
 95
95
-
 96
96
-
 97
97
-
 98
98
-
 99
99
-
 100
100
-
 101
101
-
 102
102
-
 103
103
-
 104
104
-
 105
105
-
 106
106
-
 107
107
-
 108
108


Samsung NP270E5KE Manuale utente
- Categoria
- I Quaderni
- Tipo
- Manuale utente
in altre lingue
- English: Samsung NP270E5KE User manual
Documenti correlati
-
Samsung NT501R4KE Manuale utente
-
-
Samsung NP370E4JI-EXP Manuale utente
-
Samsung NP9310SLA Manuale utente
-
Samsung NP500R5HE Manuale utente
-
-
Samsung NP910S5KI Manuale utente
-
-
Samsung EB-PJ200 Manuale utente
-
Samsung EO-IC500 Istruzioni per l'uso
Altri documenti
-
Acer ASPIRE V5-571PG-53334G75MAK Manuale del proprietario
-
Monster ABRA Manuale utente
-
Monster A7 V14.1 Manuale utente
-
Monster Abra A7 V14.1 Manuale utente
-
Monster Abra A5 Manuale utente
-
Acer Iconia Tab W510P Manuale del proprietario
-
Panasonic UT-MB5000 Guida utente
-
-
-
ECOVACS 7 Series Manuale utente