
®
USER MANUAL GB
MANUEL D’UTILISATION FR
BEDIENUNGSANLEITUNG DE
MANUALE ISTRUZIONI IT
GEBRUIKERSHANDLEIDING NL
MANUAL DE INSTRUÇÕES PT
MANUAL DE INSTRUCCIONES ES
BRUGERVEJLEDNING DK
BRUKSANVISNING NO
INSTRUKTIONSMANUAL SE
KÄYTTÖOHJE FI
ΟΔΗΓΙΕΣ ΧΡΗΣΕΩΣ GR
РУКОВОДСТВО ПОЛЬЗОВАТЕЛЯ RU
INSTRUKCJA OBSŁUGI PL
NÁVOD K OBSLUZE CZ
NAVODILA ZA UPORABO SI
KULLANIM KILAVUZU TR

P03
P09
P15
P21
P27
P33
P39
P45
P51
P57
P63
P69
P75
P81
P87
P93
99P
ENGLISH
FRANÇAIS
DEUTSCH
ITALIANO
NEDERLANDS
PORTUGUÉS
ESPAÑOL
DANSK
NORSK
SVENSKA
SUOMI
EΛΛHNIKA
PYССКИЙ
POLSKI
ČESKY
SLOVENČINA
TÜRKÇE

K3
K4
K
F
F2
F3
F4
F1
D
E*
G
H
I
E1*
L
M
C
A
B
B1
B2
B3
C
1
* Certain models only
K2
J
K1

2 3
4 5
6
7
TURBO

8
9
11
10
12
13
1
2

3
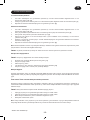
INSTRUCTIONS FOR SAFE USE
This appliance should only be used for domestic cleaning, as
described in this user guide. Please ensure that this guide is fully
understood before operating the appliance.
Always switch off and remove the charger from the socket before
cleaning the appliance or any maintenance task.
This appliance can be used by children aged from 8 years and
above and persons with reduced physical, sensory or mental
capabilities or lack of experience and knowledge if they have
been given supervision or instruction concerning use of the
appliance in a safe way and understand the hazards involved.
Children shall not play with the appliance. Cleaning and user
maintenance shall not be made by children without supervision.
If the power cord is damaged stop using the appliance immediately.
To avoid a safety hazard, an authorised Hoover service engineer
must replace the power cord.
Keep hands, feet, loose clothing and hair away from rotating
brushes.
Use only the original charger supplied with the appliance.
Check that your supply voltage is the same as that stated on the
charger.
This appliance is supplied with a double insulated battery charger
which is only suitable for insertion in a 230V (UK 240V) socket
outlet.
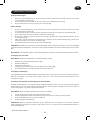
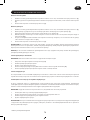
Plug the charger in to suitable socket outlet and connect the
power cord connector to the DC socket on the appliance. [4]
When charging the appliance, the power switch must be off.
Do plug in the charger after use to recharge the batteries.
It is normal for the charger to become warm to the touch when
charging.
Do not unplug the charger by pulling on the power cord.
Unplug the charger in the event of prolonged absence (holidays,
etc.). Recharge appliance again before use as batteries may self
GB

4
discharge over increased periods of storage.
removed. The appliance must be disconnected from the supply
mains when removing the battery. Dispose of the batteries
safely. Used batteries should be taken to a recycling station and
not disposed of with household waste. To remove the batteries,
please contact the Hoover Customer Centre or proceed according
to the following instructions.
IMPORTANT: Always fully discharge
the batteries before removal.
1. Run the cleaner until the batteries are completely empty.
2. Remove the ergonomic handle and the screws, in the main
body to open the cleaner.
3. Remove the motor battery housing and disconnect the cables.
4. Remove the batteries from the housing.
NOTE:
unit or for more detailed information on treatment, recovery and
your household waste disposal service.
DO NOT expose the batteries to a room
temperature above 40°C.
Use only attachments, consumables or spares recommended or
supplied by Hoover.
Static electricity: Some carpets can cause a small build up of
static electricity. Any static discharge is not hazardous to health.
Do not use your appliance out of doors or on any wet surface or
for wet pick up.
Do not pick up hard or sharp objects, matches, hot ashes,
cigarette ends or other similar items.
Do not
aerosols or their vapours.
Do not run over the power cord when using your appliance or
remove the plug by pulling on the power cord.
Do not continue to use your appliance or charger if it appears
faulty.
GB

5
operation of this appliance we recommend that any servicing
or repairs are only carried out by an authorised Hoover service
engineer.
Do not use the appliance to clean animals or people.
Do not replace the batteries with non-rechargeable batteries.
The Environment:
This appliance is marked according to the European directive 2011/65/EC on Waste Electrical and Electronic
waste handling of this product. The symbol on the product indicates that this product may not be treated
as household waste. Instead it shall be handed over to the applicable collection point for the recycling of
regulations for waste disposal. For more detailed information about treatment, recovery and recycling of this product,
This product complies with the European Directives 2006/95/EC, 2004/108/EC and 2011/65/EC.
GB

6
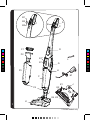
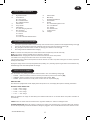
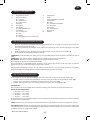
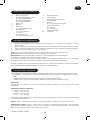
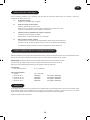
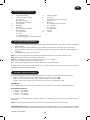
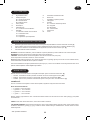
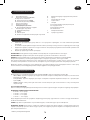
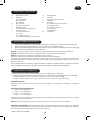
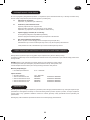
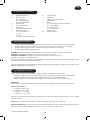
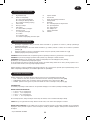
PRODUCT COMPONENTS
A. Ergonomic Handle
B. On/Off Switch
B1. OFF Position
B2. FLOOR Position
B3. CARPET Position
C. Turbo Button
D. Carry Handle
E. LED Display*
E1. LED Charging Indicator*
F. Dust Container
F2. Shroud
F3. Dust Bin
F4. Dust Container Release Button
H. Main Body
I. Nozzle Release Button
J. Rear Wheels
K. Nozzle
K1. Removable Agitator Cover
K2. Front Wheels
K3. Agitator
K4. Flexible Hose
L. Locking Screw
M. Charger
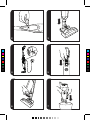
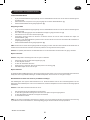
1. [2]
2. [3]
3. [4]
4.
NOTE: To remove the nozzle press the nozzle release button and pull away from the main body.
NOTE: Use only the charger supplied with your cleaner to recharge.
IMPORTANT: When charging the cleaner the On/Off switch must be in the OFF position.
It is normal for the charger to become warm to the touch when charging.
If the operating times reduces after repeated use let the cleaner run until it stops then recharge for 24 hours, repeat this
monthly for best results.
Unplug the charger in the event of prolonged absence (holidays, etc.). Recharge product again before us as batteries may
self
discharge over increased periods of storage.
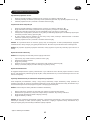
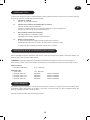
Turn the cleaner on by sliding the ON/OFF switch forwards to one of the following settings: [5]
FLOOR : ideal for hard floor surfaces. Normal power without power brush rotation. [B2]
CARPET: ideal for carpets and rugs. Normal power with agitator. [B3]
TURBO: press Turbo button for full power on either floor or carpet mode. [C]
DISPLAY LED*
BATTERY LEVEL INDICATOR*:
4 bars = 100% charge
3 bars = 75% charge
2 bars = 50% charge
1 bar = 25% charge
automatically.
TURBO: when the Turbo mode is activated on the ergonomic handle, the Turbo icon will light in blue.
CHARGE INDICATOR:
* Certain Models Only
GB

7
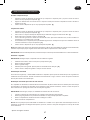
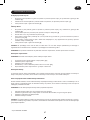
CLEANER MAINTENANCE
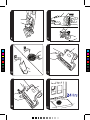
Emptying the Dust Container
1. Press the dust container release button and pull the dustbin forwards to remove it from the main body of the
cleaner. [6]
2. Hold the unit over a bin and push the bin empty slider to empty the dust container. [7]
3. Return the dust container to the cleaner main body. [8].
Cleaning the Filters
1. Press the dust container release button and pull the dust bin forwards to remove it from the main body of the
cleaner. [6]
2. [9]
3. [9]
4.
and dustbin. [10]
5.
cleaner. [13]
6. Return the dust container to the cleaner main body. [8].
NOTE:
IMPORTANT:
once a month.
Changing the Agitator
IMPORTANT: Always switch off the cleaner before changing the agitator.
1. Using a coin, turn the lock to the open position. [11]
2. Remove the Agitator cover
3. Remove the old Agitator.
4. [12]
5. Replace the Agitator cover and lock with a coin.
Battery Replacement
For reasons of safety the NiMh batteries in this cleaner are only replaceable by a Hoover Service engineer. When the
batteries fail to maintain charge, please contact the Hoover Customer Service Centre to arrange a replacement.
End of Product Life Battery Disposal
If the cleaner is to be disposed of the batteries should be removed. Used batteries should be taken to a recycling station
and not disposed of with household waste. To remove the batteries, please contact the Hoover Customer Centre or
proceed according to the following instructions:
IMPORTANT: Always fully discharge the batteries before removal.
1. Run the cleaner until the batteries are completely empty.
2. Remove the ergonomic handle and the screws, in the main body to open the cleaner.
3. Remove the motor battery housing and disconnect the cables.
4. Remove the batteries from the housing.
NOTE: or for more detailed information about treatment,
* Certain Models Only
GB

8
Should you have any problem with your cleaner, follow this simple check list before calling the Hoover Customer Service
Centre:
A. Cleaner does not switch on.
Check if the cleaner is charged.
B. Loss of suction or no suction
Remove nozzle and check for any blockages in the ducts and hose
C. Fast Flashing indicator (2xper second)
Incorrect charger connected to product.
Use only charger provided with your cleaner.
D. Batteries cannot be charged.
This may be a result of very long storage periods (over half year)
Contact Hoover customer service to arrange battery replacement.
If the problem persists contact the Hoover customer service centre.
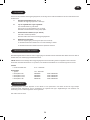
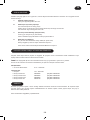
HOOVER SPARES AND CONSUMABLES
Always replace parts with genuine Hoover spares. These are available from your local Hoover dealer or direct from Hoover.
IMPORTANT: The battery in this cleaner is guaranteed for 6 months from purchase. After 6 months the customer
Consumables
Pre motor HEPA Filter: S117 – 35601338
Spares
Battery Pack 30V:
48006266 Charger: 48006269
Battery Pack 26.4V: 48006265 Charger: 48006268
Battery Pack 20.4V: 48006264 Charger: 48006267
Battery Pack 18V: 48006138 Charger: 48006258
regarding these conditions can be obtained from the dealer from whom the appliance was purchased. The bill of sale or
receipt must be produced when making any claim under the terms of this guarantee.
Subject to change without notice.
GB

9
INSTRUCTIONS DE SÉCURITÉ D’UTILISATION
ces instructions sont parfaitement comprises avant d’utiliser
l’appareil.
Il convient de toujours éteindre et mettre le chargeur hors tension
avant d’entreprendre des opérations de nettoyage ou d’entretien
de l’appareil.
Cet appareil peut être utilisé par des enfants âgés d’au moins
sensorielles ou mentales réduites, ou n’ayant pas d’expérience
ou de connaissances en la matière. Ces dernières doivent
recevoir des instructions sur l’utilisation de l’appareil en toute
doivent pas jouer avec l’appareil. Le nettoyage et l’entretien ne
devraient pas être effectués par des enfants sans supervision.
Si le cordon d’alimentation est endommagé, arrêtez
immédiatement d’utiliser l’appareil. Pour éviter les
doit remplacer le cordon d’alimentation.
Maintenez les mains, pieds, vêtements lâches et cheveux à
distance des brosses rotatives.
avec l’appareil.
Cet appreil Hoover est fourni avec un chargeur de batterie
Branchez le chargeur dans une prise de courant adaptée et
connectez le connecteur du cordon d’alimentation à la prise CC
de l’appareil. [4]
Lors du chargement de l’appareil, le commutateur d’arrêt/de
démarrage doit être sur arrêt.
Avant d’utiliser votre aspirateur pour la premiere fois, chargez-le
charge est en cours.
FR

10
Branchez le chargeur après utilisation pour recharger les batteries.
Il est normal pour le chargeur de devenir chaud au toucher
Ne pas débrancher en tirant sur le cordon d’alimentation.
Débranchez le chargeur en cas d’absence prolongée (vacances,
etc.). Rechargez l’appareil de nouveau avant de l’utiliser car
les batteries peuvent se décharger toutes seules si elles sont
stockées pendant longtemps.
Si vous mettez l’appareil au rebut, il convient de retirer les
batteries d’abord. L’appareil ne doit pas être branché au secteur
de manière sûre. Des batteries usées doivent être amenées à
un point de recyclage et non pas être éliminées avec les ordures
ménagères. Pour retirer les batteries, veuillez contacter le centre
d’assistance Hoover ou suivez les instructions suivantes.
IMPORTANT : Déchargez toujours complètement
les piles avant de les retirer.
soient complètement vides.
pour ouvrir le nettoyeur.
3. Enlevez le couvercle de la batterie du moteur et débranchez
les câbles.
4. Enlevez les batteries du couvercle.
NOTE :
ou si vous souhaitez obtenir de plus amples informations
concernant le traitement, la récupération et le recyclage de cet
appareil, veuillez contacter les services de voirie locaux ou un
service de traitement des ordures ménagères.
N’exposez pas les batteries à une température supérieure à 40°c.
de rechange recommandés ou fournis par Hoover.
Electricité statique : Certains tapis peuvent entraîner une petite
FR

11
N’utilisez pas votre appareil à l’extérieur, sur une surface humide
ou pour un ramassage humide.
Evitez d’aspirer les objets durs ou pointus, des cendres chaudes,
des mégots de cigarettes et d’autres objets similaires.
Evitez
produits de nettoyage, des aérosols ou leurs vapeurs.
le cordon d’alimentation.
Arrêtez d’utiliser votre appareil ou votre chargeur s’ils vous
semblent défectueux.
Service Hoover :
N’utilisez pas cet appareil pour nettoyer des personnes ou des
animaux.
Ne remplacez pas les piles avec des piles non rechargeables.
Environnement :
rebut doit être effectuée conformément à la réglementation locale en matière de déchets. Pour obtenir des
compléments d’information sur le traitement, la récupération et le recyclage de ce produit, merci de contacter votre
municipalité, le service local des ordures ménagères ou le revendeur du produit.
Ce produit est conforme aux Directives Européennes 006/95/EC, 2004/108/EC et 2011/65/EC.
FR

12
COMPOSANTS DU PRODUIT
A.
B. Bouton de Marche/Arrêt.
B1. Position ARRET
B2. Position SOL
B3. Position TAPIS
C. Bouton turbo
D. Poignée de transport
E.
E1. Indicateur de charge par LED*
F. Bac à poussière
F1. Filtre pré-moteur
F2. Tamis
F3. Cuve à poussière
F4. Bouton pour détacher le bac à poussière
H. Corps principal
I. Bouton pour détacher la brosse
J. Roues arrières
K. Brosse
K1. Couvercle de la brossette rotative détachable
K2. Roues avant
K3. Brossette rotative
K4. Flexible
L. Vis de blocage
M. Chargeur
PREPARATION DE L’ASPIRATEUR
1.
blocage fournie. [2]
2. [3]
3. Branchez le chargeur dans la prise c.c. Pour la première utilisation, chargez votre nettoyeur pendant 24 heures. [4]
4.
NOTE : Pour enlever la brosse, appuyez sur le bouton pour détacher la brosse et enlevez-la du corps principal.
NOTE :
IMPORTANT : Quand vous rechargez le nettoyeur, le bouton Marche/Arrêt doit être en position ARRET.
s’arrête puis rechargez-le pendant 24 heures ; effectuez cela tous les mois pour de meilleurs résultats.
Débranchez le chargeur en cas d’absence prolongée (vacances, etc.). Rechargez l’appareil de nouveau avant de l’utiliser
car
les batteries peuvent se décharger toutes seules si elles sont stockées pendant longtemps.
UTILISATION DE L’APPAREIL
Allumez l’appareil en faisant glisser le bouton MARCHE/ARRËT vers l’avant sur une des positions suivantes : [5]
Sol : idéale pour les surfaces dures. Puissance normale sans rotation de la brosse à moteur [B2]
[B3]
TURBO : appuyez sur le bouton Turbo pour la pleine puissance en mode sol ou tapis. [C]
Afchage LED*
INDICATEUR DE NIVEAU DE LA BATTERIE*:
4 lignes = charge à 100%
3 lignes = charge à 75%
2 lignes = charge à 50%
1 ligne = charge à 25%
TURBO :
INDICATEUR DE CHARGE :
FR

13
ENTRETIEN DE L’ASPIRATEUR
Vidage du bac à poussière
1. Appuyez sur le bouton pour détacher le bac à poussière et tirez la cuve à poussière vers l’avant pour l’enlever du
corps principal du nettoyeur. [6]
2. Maintenez l’unité au-dessus d’une poubelle et poussez le tiroir de la poubelle pour vider le bac à poussière. [7]
3. Remettez le bac à poussière dans le corps principal du nettoyeur. [8].
Nettoyage des ltres
1. Appuyez sur le bouton pour détacher le bac à poussière et tirez la cuve à poussière vers l’avant pour l’enlever du
corps principal du nettoyeur. [6]
2. [9]
3. [9]
4.
[10]
5.
remettre dans le corps principal du nettoyeur. [13]
6. Remettez le bac à poussière dans le corps principal du nettoyeur. [8].
NOTE :
IMPORTANT :
une fois par mois.
Changer la brossette rotative
IMPORTANT : Eteignez toujours le nettoyeur avant de changer la brossette rotative.
1. A l’aide d’une pièce de monnaie, tournez le verrou en position ouverte. [11]
2. Enlevez le couvercle de la brossette rotative.
3. Enlevez l’ancienne brossette rotative.
4. [12]
5. Remettez le couvercle de la brossette rotative et verrouillez avec une pièce de monnaie.
Changement de la batterie
réparateur Hoover. Quand les batteries ne tiennent plus la charge, veuillez contacter le service clientèle Hoover pour
effectuer le remplacement.
Mise au rebut de la batterie en n de vie de l’appareil
Si l’aspirateur doit être éliminé, les piles doivent être retirées. Des batteries usées doivent être amenées à un point
de recyclage et non pas être éliminées avec les ordures ménagères. Pour retirer les piles, veuillez contacter le centre
d’assistance Hoover ou suivez les instructions suivantes.
IMPORTANT : Déchargez toujours complètement les piles avant de les retirer.
1.
2.
3. Enlevez le couvercle de la batterie du moteur et débranchez les câbles.
4. Enlevez les batteries du couvercle.
NOTE : s désirez plus d’informations au sujet du traitement,
de la récupération et du recyclage de cet appareil, veuillez contacter votre mairie ou le service de ramassage des déchets
de votre lieu de résidence.
FR

14
PROCÉDURES DE RÉPARATION
clientèle Hoover :
A. Le nettoyeur ne s’allume pas.
B. Aspiration insufsante ou pas d’aspiration du tout
C. Indicateur qui clignote rapidement (2 x par seconde)
Chargeur inadapté branché à l’appareil.
D. Les batteries ne peuvent pas se charger.
Cela peut être dû à de très longues périodes de stockage (plus de 6 mois).
Contactez le service clientèle Hoover pour effectuer le changement de batterie.
Si le problème persiste, contactez le service clientèle Hoover.
PIÈCES DÉTACHÉES ET CONSOMMABLES HOOVER
revendeur Hoover. Lors de la commande de pièces, veuillez toujours préciser le numéro de votre modèle.
IMPORTANT : La batterie de cet aspirateur est garantie 6 mois à compter de la date d’achat. Après 6 mois, le client
Consommables
Filtre HEPA prémoteur : S117 – 35601338
Pièces détachées
Bloc batterie 30 V :
48006266 Chargeur : 48006269
Bloc batterie 26,4 V : 48006265 Chargeur : 48006268
Bloc batterie 20,4 V : 48006264 Chargeur : 48006267
Bloc batterie 18 V : 48006138 Chargeur : 48006258
obtenues auprès de votre revendeur. Les détails concernant ces conditions peuvent être obtenues auprès du revendeur
relevant des conditions de cette garantie.
FR

15
worden sein.
geistig oder sensorisch behinderten Personen bzw. Personen
benutzt werden. Im Falle eines Defektes, darf das Netzkabel
nur durch einen autorisierten Hoover-Kundendiensttechniker
ausgetauscht werden.
geliefert wurde.
Stellen Sie sicher, dass die Versorgungsspannung mit der auf
an und stecken Sie den Stecker vom Netzkabel in die
geschaltet sein.
DE

16
blinkt die Ladekontrollleuchte.
der Benutzung an.
Ziehen am Kabel heraus.
wenn die Akkus entnommen werden. Entsorgen Sie die Akkus
Um die Akkus herauszunehmen, wenden Sie sich bitte an das
WICHTIG:
bevor Sie diese herausnehmen und vergewissern
entladen sind.
3. Nehmen Sie das Akkus heraus und ziehen die Verbindungskabel
ab.
HINWEIS: Sollten Sie irgendwelche Schwierigkeiten beim
Informationen zur Behandlung, Reparatur oder zum Recycling
DE

17
Setzen Sie die Akkus niemals
Ersatzteile, die von Hoover empfohlen oder geliefert werden.
Statische Auadung: M
oder zur Aufnahme von nassen Materialien.
Keine
Zigarettenstummel oder Ähnliches aufsaugen.
Keine
zuziehen.
nicht weiter nutzen, wenn
Sie eine Fehlfunktion vermuten.
Hoover-Kundendienst: Um auf Dauer den sicheren und
lassen.
Nicht die Originalakkus durch andere Batterien oder Akkus
ersetzen.
Umweltschutz:
DE
La pagina si sta caricando...
La pagina si sta caricando...
La pagina si sta caricando...
La pagina si sta caricando...
La pagina si sta caricando...
La pagina si sta caricando...
La pagina si sta caricando...
La pagina si sta caricando...
La pagina si sta caricando...
La pagina si sta caricando...
La pagina si sta caricando...
La pagina si sta caricando...
La pagina si sta caricando...
La pagina si sta caricando...
La pagina si sta caricando...
La pagina si sta caricando...
La pagina si sta caricando...
La pagina si sta caricando...
La pagina si sta caricando...
La pagina si sta caricando...
La pagina si sta caricando...
La pagina si sta caricando...
La pagina si sta caricando...
La pagina si sta caricando...
La pagina si sta caricando...
La pagina si sta caricando...
La pagina si sta caricando...
La pagina si sta caricando...
La pagina si sta caricando...
La pagina si sta caricando...
La pagina si sta caricando...
La pagina si sta caricando...
La pagina si sta caricando...
La pagina si sta caricando...
La pagina si sta caricando...
La pagina si sta caricando...
La pagina si sta caricando...
La pagina si sta caricando...
La pagina si sta caricando...
La pagina si sta caricando...
La pagina si sta caricando...
La pagina si sta caricando...
La pagina si sta caricando...
La pagina si sta caricando...
La pagina si sta caricando...
La pagina si sta caricando...
La pagina si sta caricando...
La pagina si sta caricando...
La pagina si sta caricando...
La pagina si sta caricando...
La pagina si sta caricando...
La pagina si sta caricando...
La pagina si sta caricando...
La pagina si sta caricando...
La pagina si sta caricando...
La pagina si sta caricando...
La pagina si sta caricando...
La pagina si sta caricando...
La pagina si sta caricando...
La pagina si sta caricando...
La pagina si sta caricando...
La pagina si sta caricando...
La pagina si sta caricando...
La pagina si sta caricando...
La pagina si sta caricando...
La pagina si sta caricando...
La pagina si sta caricando...
La pagina si sta caricando...
La pagina si sta caricando...
La pagina si sta caricando...
La pagina si sta caricando...
La pagina si sta caricando...
La pagina si sta caricando...
La pagina si sta caricando...
La pagina si sta caricando...
La pagina si sta caricando...
La pagina si sta caricando...
La pagina si sta caricando...
La pagina si sta caricando...
La pagina si sta caricando...
La pagina si sta caricando...
La pagina si sta caricando...
La pagina si sta caricando...
La pagina si sta caricando...
La pagina si sta caricando...
La pagina si sta caricando...
La pagina si sta caricando...
-
 1
1
-
 2
2
-
 3
3
-
 4
4
-
 5
5
-
 6
6
-
 7
7
-
 8
8
-
 9
9
-
 10
10
-
 11
11
-
 12
12
-
 13
13
-
 14
14
-
 15
15
-
 16
16
-
 17
17
-
 18
18
-
 19
19
-
 20
20
-
 21
21
-
 22
22
-
 23
23
-
 24
24
-
 25
25
-
 26
26
-
 27
27
-
 28
28
-
 29
29
-
 30
30
-
 31
31
-
 32
32
-
 33
33
-
 34
34
-
 35
35
-
 36
36
-
 37
37
-
 38
38
-
 39
39
-
 40
40
-
 41
41
-
 42
42
-
 43
43
-
 44
44
-
 45
45
-
 46
46
-
 47
47
-
 48
48
-
 49
49
-
 50
50
-
 51
51
-
 52
52
-
 53
53
-
 54
54
-
 55
55
-
 56
56
-
 57
57
-
 58
58
-
 59
59
-
 60
60
-
 61
61
-
 62
62
-
 63
63
-
 64
64
-
 65
65
-
 66
66
-
 67
67
-
 68
68
-
 69
69
-
 70
70
-
 71
71
-
 72
72
-
 73
73
-
 74
74
-
 75
75
-
 76
76
-
 77
77
-
 78
78
-
 79
79
-
 80
80
-
 81
81
-
 82
82
-
 83
83
-
 84
84
-
 85
85
-
 86
86
-
 87
87
-
 88
88
-
 89
89
-
 90
90
-
 91
91
-
 92
92
-
 93
93
-
 94
94
-
 95
95
-
 96
96
-
 97
97
-
 98
98
-
 99
99
-
 100
100
-
 101
101
-
 102
102
-
 103
103
-
 104
104
-
 105
105
-
 106
106
-
 107
107


Hoover ATN204TM 011 Manuale utente
- Tipo
- Manuale utente
- Questo manuale è adatto anche per
Documenti correlati
-
Hoover ATV252LT 011 Manuale utente
-
Hoover ATV204GB 011 Manuale utente
-
-
Hoover AT70_AT64 ATHOS Manuale del proprietario
-
Hoover ATV252LT/1 011 Manuale utente
-
Hoover ATN18LI 011 Manuale utente
-
-
-
-
