Palson LIMA Manuale del proprietario
- Categoria
- Frullatori
- Tipo
- Manuale del proprietario
Questo manuale è adatto anche per

Batidora
Blender
Blender
Batedeira
Standmixer
Frullatore
Blender
Mplénter
Turmixgép
Blender
Lima
COD. 30526
GB
E
F
P
D
I
NL
GR
RU
AR
HU
TR
MODO DE EMPLEO
OPERATING INSTRUCTIONS
MODE D’EMPLOI
MODO DE EMPRÊGO
GEBRAUCHSANLEITUNG
ISTRUZIONI
GEBRUIKSAANWIJZING
TROPOS CRHSHS
HASZNÁLATI UTASÍTÁS
kullanma wekli
BG
ΔϗΎϔΧ

32

4
5
1
2
3
4
5
6
7
8
9
10
11
14
13
12
15
ESPAÑOL. . . . . . . . . . . . . . . 8
ENGLISH . . . . . . . . . . . . . . . 12
FRANÇAIS . . . . . . . . . . . . . . 16
PORTUGUÊS. . . . . . . . . . . . 20
DEUTSCH . . . . . . . . . . . . . . 24
ITALIANO . . . . . . . . . . . . . . . 28
NEDERLANDS. . . . . . . . . . . 32
ELLHNIKA . . . . . . . . . . . . . . 36
. . . . . . . . . . . . . . . 40
. . . . . . . . . . . 47
MAGYAR . . . . . . . . . . . . . . . 48
TÜRkÇe. . . . . . . . . . . . . . . . 52
. . . . . . . . . . . . . . 56
GB
E
F
P
D
I
NL
GR
RU
AR
HU
TR
BG
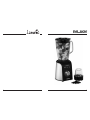
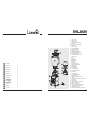
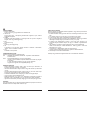
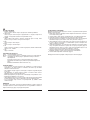
1 Tapón medidor
2 Tapa de la jarra
3 Jarra de cristal
4 Goma de sellado de la jarra
5 Cuchillas
6 Anillo portacuchillas de la jarra
7 Base motor
8 Cable y enchufe
9 Gomas antideslizantes
10 Selector de velocidad
11 Botones de función
12 Tapa de cristal del molinillo
13 Goma de sellado del molinillo
14 Cuchillas del molinillo
15 Anillo portacuchillas del molinillo
1 Measuring cap
2 Lid
3 Glass jug
4 Rubber seal
5 Blade assembly
6 Jug base
7 Motor base
8 Power cord and plug
9 Anti-slip rubber base tabs
10 Speed selector
11 Function buttons
12 Grinder glass lid
13 Grinder rubber seal
14 Grinder blade assembly
15 Grinder base
1 Bouchon doseur
2 Couvercle de la verseuse
3 Verseuse en verre
4 Joint d’étanchéité du bol mixeur
5 Lames
6 Compartiment porte-lames de la verseuse
7 Base moteur
8 Câble et prise
9 Pieds en caoutchouc antidérapants
10 Sélecteur de vitesse
11 Boutons de mise en route
12 Couvercle en verre du moulin à café
13 Joint d’étanchéité du moulin à café
14 Lames du moulin à café
15
Compartiment porte-lames du moulin à café

6
7
1 Tampa medidora
2 Tampa da jarra
3 Jarra de vidro
4 Borracha de vedação da jarra
5 Lâminas
6 Anel porta-lâminas da jarra
7 Base do motor
8 Cabo e ficha
9 Borrachas antideslizantes
10 Selector de velocidades
11 Botões de funções
12 Tampa de vidro do moinho
13 Borracha de selagem do moinho
14 Lâminas do moinho
15 Anel porta-lâminas do moinho
1 Messkappe
2 Deckel der Glaskanne
3 Glaskanne
4 Gummiversiegelung der Glaskanne
5 Schneidemesser
6 Messeraufsatz der Glaskanne
7 Gerätekörper mit Motor
8 Kabel und Stecker
9 Standfüße mit Antirutschbeschichtung
10 Geschwindigkeitsauswahlschalter
11 Funktionstasten
12 Glasdeckel der Kaffee- und Gewürzmühle
13 Gummiversiegelung der Kaffee- und
Gewürzmühle
14 Schneidemesser der Kaffee- und
Gewürzmühle
15 Messeraufsatz der Kaffee- und
Gewürzmühle
1 Tappo dosatore
2 Coperchio della caraffa
3 Caraffa in vetro
4 Guarnizione in gomma della caraffa
5 Lame
6 Anello portalame della caraffa
7 Base motore
8 Cavo e spina
9 Gommini antiscivolo
10 Selettore di velocità
11 Pulsanti funzione
12 Coperchio di vetro del macinino
13 Guarnizione in gomma del macinino
14 Lame del macinino
15 Anello portalame del macinino
1 Dop/maatbeker
2 Deksel van kan
3 Glazen kan
4 Afdichtingsring van kan
5 Mesunit
6 Koppelstuk mesunit van kan
7 Motorunit
8 Snoer en stekker
9 Antislip voetjes
10 Snelheidsregeling
11 Knoppen voor standen
12 Glazen deksel van molen
13 Afdichtingsring van molen
14 Mesunit van molen
15 Koppelstuk mesunit van molen
1 Mérökupak
2. Pohártetö
3 Üvegpohár
4 Az üvegpohár szigetelö gumija
5 Kések
6 Az üvegpohár körgyürüje a késekhez
7 Motor alap
8 Kábel és aljzat
9 Csúszásgátló gumik
10 Sebesség kiválasztó
11 Nyomógombok
12 A daráló üvegteteje
13 A daráló síguetelo gumija
14 A daráló kései
15 A daráló körgyürüje a késekhez
1 Ölçekli kapak
3 Cam sürahi
7 Motor gövdesi
9 Kaymayan ayak
1.ϱέΎϴόϣ ˯ΎτϏ
2.˯ΎϧϹ ˯ΎτϏ
3.ϲΟΎΟί ˯Ύϧ·
4.˯ΎϧϺϟ ΔϴσΎτϣ ΓΩΪγ
5.ϦϴϛΎϜγ
6.˯ΎϧϹ ϦϴϛΎϜγ ϞϤΤϟ ΔϘϠΣ
7.ϙήΤϤϟ ΓΪϋΎϗ
8.βΑΎϘϟϭ ϚϠδϟ
9.ϕϻΰϧϼϟ ΩΎπϣ ρΎτϣ
10.ΕΎϋήδϟ ήϴϐϣ
11.ϞϴϐθΘϟ ϴΗΎϔϣ
12.ΔϨΤτϤϠϟ ϲΟΎΟί ˯ΎτϏ
13.ΔϨΤτϤϠϟ ΔϴσΎτϣ ΓΩΪγ
14.ΔϨΤτϤϟ ϦϴϛΎϜγ
15.ΔϨΤτϤϟ ϦϴϛΎϜγ ϞϤΤΗ ΔϘϠΣ
1
2
3
4
5
6
7
8
9
10
11
14
13
12
15

8
9
manténgase fuera del alcance de niños o personas que requieran supervisión.
- Apague la unidad antes de desenchufar el enchufe de alimentación.
- Utilice únicamente las piezas de repuesto del fabricante.
- No transporte nunca la unidad agarrándola del cable.
- No retire los componentes individuales de la carcasa.
-
peligro.
-
Este producto no está permitido para uso infantil u otras personas sin asistencia
seguridad. Los niños deberían ser supervisados para asegurar que no juegan
con dicho producto.
- Utilizar siempre la batidora con la tapa puesta.
MONTAJE Y USO
vez.
2. Asegúrese de que la unidad está apagada y no la conecte antes de instalarla.
3. Primero coloque las cuchillas y la junta de goma en el anillo portacuchillas y
rosque este último a la jarra.
4. Después encaje la jarra sobre la base motor y asegúrese que queda bien fijada
a ésta.
5. Llene la jarra con los alimentos que desee y asegúrese de que ningún líquido rebose
del envase. La capacidad máxima de líquido no debe exceder los 1500 ml.
6. No utilice la unidad sin introducir ningún alimento en la jarra.
7. Coloque firmemente la tapa sobre la jarra.
8. Coloque el tapón dosificador en el centro de la tapa y gírelo en sentido contrario
a las agujas del reloj.
FUNCIONAMIENTO
1. Asegúrese de que el selector de velocidad esté girado en la posición “OFF” y a
continuación enchufe la batidora a la toma de corriente.
2. Esta unidad tiene un dispositivo de seguridad y no funciona si la jarra no está
encajada correctamente sobre la base motor.
3. Llene la jarra con los alimentos que desee.
4. Coloque la tapa sobre la jarra y ajústela. Coloque el tapón dosificador en el
5. Coloque la jarra sobre la base motor. La luz azul alrededor del selector de
velocidad indica que está enchufada a una toma de corriente. Ya se puede
emplear la batidora de forma normal.
La cantidad de granos de café debe ser inferior al 60% de la capacidad total
del recipiente molinillo. Coloque la cuchilla del molinillo y la junta de goma en el
anillo portacuchilla y fije este último firmemente al recipiente de vidrio. Sitúe el
molinillo en el soporte superior de la base motor. Ya puede moler granos de café
normalmente.
Nuestros productos están desarrollados para alcanzar los más altos estándares de
de PALSON.
ATENCIÓN:
- Lea todas las instrucciones antes de utilizar el aparato. Conserve estas
instrucciones para futura referencia.
- Una mala utilización y una manipulación inadecuada puede causar problemas
en el aparato y perjudicar al usuario.
- La unidad sólo será utilizada para el fin con el que se fabricó. No se aceptarán
responsabilidades por los daños surgidos del empleo inadecuado o una
manipulación errónea.
voltaje se corresponden con los datos que aparecen en la placa del aparato.
- No introduzca el aparato ni el enchufe de alimentación en agua u otros fluidos.
de la corriente y lléveselo a un servicio técnico autorizado para que lo examine
antes de volver a utilizarlo. Existe peligro de descarga eléctrica.
- No intente abrir la carcasa usted mismo. No introduzca ningún tipo de objeto en
la carcasa.
haya humedad ambiental.
- No sostenga el enchufe de alimentación con las manos mojadas o húmedas.
- Compruebe regularmente si existen daños en el enchufe de alimentación y en
autorizado para que le cambien el cable y el enchufe para evitar peligros.
taller para que la comprueben y la reparen si fuera necesario.
- No intente repararla usted mismo. Existe peligro de descarga eléctrica.
- No deje el cable colgando de bordes afilados y manténgalo alejado de los
objetos calientes y las llamas.
- La instalación de un protector de picos de voltaje le ofrecerá una protección
adicional con una corriente nominal de inicio de no más de 30 mA en la
instalación doméstica. Consulte con su electricista.
- El cable así como cualquier extensión necesaria del mismo se colocará de
forma que no suponga un riesgo para nadie que tire de él sin darse cuenta o lo
desconecte.
energía en cuestión. Si no provocará un sobrecalentamiento del cable y/o el
enchufe.
de las llamas abiertas (como el horno de gas) y utilícela fuera del alcance de
los niños.
- Este aparato no es apropiado para uso comercial ni para utilizarlo en el
exterior.
- Desenchufe el aparato cuando no lo esté utilizando y también antes de
limpiarlo.
E

10
E
11
el selector hasta la posición “ON” y pulse uno de los botones. Éste se iluminará
indicando que está en marcha.
baja) y “MAX” (velocidad alta) para conseguir la velocidad que necesite.
de volver a utilizarlo.
BOTONES DE FUNCIONES
1. BATIDO / SMOOTHIE
2. HIELO / ICE
3. TURBO
La unidad funciona únicamente cuando el pulsador está apretado y se para en
cuanto se deja de apretar. La cuchilla gira a alta velocidad.
4. MIN
La cuchilla gira a velocidad baja.
5. MAX
La cuchilla gira a gran velocidad.
6. ON
“HIELO / ICE” y “TURBO”.
7. OFF
La unidad está desconectada.
AJUSTE DE VELOCIDAD
Bajo: para uso ligero con líquidos.
Alto: para una consistencia más sólida - para mezclar líquidos y material sólido.
en su ajuste.
Tiene que mantenerlo en la posición “Turbo” o hacerlo girar repetidamente.
CONSEJOS ÚTILES
pequeñas porciones en la jarra de cristal una a una en lugar de poner una gran
cantidad de golpe.
(2-3cm).
Añada más y más líquido a través de la abertura de la tapa.
- Ponga siempre su mano en la parte superior de la batidora cuando esté haciendo
funcionar el aparato.
- Vaya con cuidado al batir líquidos espesos.
- Para batir ingredientes sólidos o líquidos muy espesos le recomendamos utilizar
la batidora en el modo “Turbo” para impedir que las cuchillas se paren.
- Para picar hielo facilmente es recomendable añadir una pequeña cantidad de
agua.
PRECAUCIÓN:
unidad y desconecte el enchufe. Vacíe parte del contenido y después vuelva a ponerla
en marcha.
LIMPIEZA Y ALMACENAMIENTO
Atención: Apague la unidad antes de limpiarla para evitar descargas y otros peligros.
estas intrucciones.
3. Limpie la base motor con un trapo suave y húmedo y algún producto de limpieza
suave.
4. Llene la jarra hasta la mitad con agua caliente y un poco de jabón. Deje que la
unidad funcione a velocidad máxima hasta que la jarra esté limpia (máximo 1
minuto).
5. El anillo portacuchillas puede separarse de la propia jarra. Desenrósquelo en el
sentido contrario a las agujas del reloj y extraiga las cuchillas junto con la goma de
sellado.
6. Limpie el molinillo llenándolo hasta la mitad con agua caliente y un poco de jabón;
coloque el molinillo en el soporte superior de la base motor. Deje que la unidad
funcione a velocidad máxima hasta que esté limpio. Después utilice el agua para
limpiar todos los componentes del molinillo (máximo 1 minuto).
7. Seque bien todos los componentes antes de volver a utilizarlos.
Precaución: Las cuchillas están muy afiladas. Tenga precaución cuando las
limpie.
8. No emplee productos de limpieza abrasivos.
Gracias por demostrarnos su confianza al elegir uno de nuestros productos.

12
13
GB
- Never move the unit pulling it by the power cord.
- Do not remove individual components from the blender motor casing.
or mental condition prevents them from using the appliance safely are not
permitted to use this product. Children should be supervised to ensure they do
not play with said product.
- Always use the blender with the lid securely in place.
ASSEMBLY AND USE
2. Make sure the unit is switched off and do not plug in before assembling.
3. First fix the blades and the rubber seal on to the jug base and fit the base on to
the jug.
4. Then fix the jug on to the motor base and make sure it is securely fixed to the base.
5. Fill the glass jug with the food you wish to blend and make sure the jug does not
overflow with liquid. The maximum capacity of liquid should not exceed 1500 ml.
6. Never use the unit without putting food in the jug.
7. Place the lid securely on the glass jar.
8. Insert the measuring cap in the opening in the lid and turn counter-clockwise to lock
in position.
HOW TO OPERATE THE BLENDER
1. Make sure the speed selector is turned to the “OFF” position and then plug the
blender in to the mains supply.
2. This unit is equipped with a safety device and the blender does not operate if the
jug is not fixed securely to the motor base.
3. Place the food you wish to blend in the glass jug.
4. Place the lid on the glass jug and close tightly. Insert the measuring jug in the
hole in the lid and carefully turn counter-clockwise to lock in position.
5. Fix the glass jug on to the motor base. The blue light around the speed selector
indicates that the appliance is connected to the mains supply. The blender may
now be used as normal.
of coffee beans must be less than 60% of the total capacity of the grinding jar.
Place the grinder blade assembly and the rubber seal on the grinder base and
firmly fix to the glass jar. Fix the grinder on to the top of the motor base. Coffee
beans may now be ground as normal.
selector switch to the “ON” position and press one of the buttons. The button will
light up indicating that the function is operating.
and “MAX” (high power speed) positions in order to achieve the required speed.
9. Use the appliance for a maximum of 2.5 minutes continuously and wait for 3
minutes before using again.
design. We hope you enjoy your new PALSON LIMA blender.
SAFETY PRECAUTIONS:
- Read all the instructions before using the appliance. Keep these instructions for
future reference.
- Misuse or improper handling may cause problems in the appliance and cause
injury to the user.
- The unit shall only be used for the purpose for which it has been designed.
No liability shall be accepted for damages arising from misuse or improper
handling.
voltage corresponds to those indicated on the bottom of the appliance.
- Do not put the appliance or the power plug in water or any other liquids. In the
supply and take it to an authorised service agent for repair before reusing. Electric
shock hazard exists.
- Do not attempt to open the blender motor casing. Do not insert any type of object
in the blender motor casing.
environment.
- Do not hold the power plug with wet or damp hands.
contact the manufacturer or an authorised service agent to have the power cord
and the plug replaced in order to prevent hazards.
the unit to the technical service centre to be checked and repaired if necessary.
- Do not attempt to repair the appliance yourself. Electric shock hazard exists.
- Do not leave the power cord hanging from sharp edges and keep away from hot
objects and flames.
- Installation of a voltage surge suppressor will provide additional protection with
a nominal operating current of not more than 30 mega amps in the household
electricity supply. Consult your electrician.
- The power cord along with any other necessary extension cord will be placed so
as not to cause a risk to anyone who might accidentally pull on it or disconnect
the plug.
the appliance is being used. If not it will cause overheating of the cord and/or the
plug.
flames (like a gas oven) and keep out of the reach of children.
- This appliance is not suitable for commercial use or for outdoor use.
- Unplug the appliance when not in use and also unplug before cleaning.
- Caution: the appliance is in stand-by mode while it remains connected to the
mains supply. Keep out of reach of children or persons requiring supervision.
- Switch off the unit before disconnecting the power plug.
- Use only the manufacturer’s spare parts.

14
15
GB
CLEANING AND STORAGE
Warning: Switch off the unit before cleaning to prevent electric shocks and other
hazards.
of these instructions.
4. Half-fill the jug with hot water and a small amount of washing liquid. Leave the unit
to operate at maximum speed until the jug is clean (maximum 1 minute).
5. The jug base can be separated from the jug itself. Unscrew in a counter-clockwise
direction and remove the blade assembly together with the rubber seal.
6. Clean the grinder by half-filling the jug with hot water and a little washing liquid; fix
the grinder on to the top of the motor base. Leave the unit to operate at maximum
speed until clean. Then use the water to clean all grinder components. (maximum
1 minute).
7. Dry all components well before using again.
Caution: The blades are very sharp. Handle with care when cleaning.
8. Never use abrasive detergents.
Thank you for choosing one of our products.
FUNCTION BUTTONS
1. BATIDO / SMOOTHIE
2. HIELO / ICE
perfect for crushing ice.
3. TURBO
The unit operates only when the pulse button is pressed and it shuts off once the
button is released. The blade turns at high speed.
4. MIN
The blade turns at low speed.
5. MAX
The blade turns at high speed.
6. ON
functions can be used.
7. OFF
The unit is switched off.
SPEED SETTINGS
Low: for low-power use with liquids.
High: for a more solid consistency- for blending liquids and solid foods.
(The selector switch does not remain in the “Turbo” position when released.
To use this setting you must hold the selector switch in this “Turbo” position
or turn it repeatedly to this setting.
Caution: Maximum capacity of the glass jug is 1.5L).
USEFUL TIPS
glass jug a little at a time instead of putting a large quantity all at once.
Gradually add further quantities of liquid through the lid opening.
- Always hold the blender top steady with your hand while the appliance is
operating.
- Proceed carefully when blending think liquids.
- To blend solid ingredients or very thick liquids we recommend you use the “Turbo”
setting to prevent the blades from sticking.
- To crush ice easily it is advisable to add a small quantity of water.
CAUTION:
If the glass jug is filled too much the blades may not spin freely thus preventing
unplug from the socket. Empty some of the contents and then switch on again.

16
17
F
des enfants.
en plein air.
- Débranchez l’appareil lorsque vous ne l’utilisez pas ou avant de le nettoyer.
hors de portée des enfants ou des personnes qui doivent être surveillées.
- Éteignez l’appareil avant de débrancher la prise du secteur.
- Utilisez uniquement les pièces de rechange du fabricant.
- Ne transportez jamais l’appareil en le soulevant par le câble.
- Ne retirez pas les composants individuels de la carcasse.
danger.
- Ce produit ne doit pas être utilisé sans surveillance ou supervision par un enfant
sa sécurité. Les enfants devraient être surveillés pour s’assurer qu’ils ne jouent pas
avec ce produit.
- Utilisez toujours le blender avec son couvercle.
MONTAGE ET UTILISATION
utilisation.
2. Assurez-vous que l’appareil est éteint et ne le branchez pas avant de l’avoir
installé.
3. Mettez d’abord en place les lames et le joint en caoutchouc du compartiment porte-
lames et vissez ce dernier à la verseuse.
4. Emboîtez ensuite la verseuse sur la base moteur et assurez-vous qu’elle est bien
5. Remplissez la verseuse avec les aliments de votre choix et assurez-vous qu’aucun
liquide ne déborde du récipient. La capacité maximum de liquide ne doit pas
dépasser les 1500 ml.
6. N’utilisez pas l’appareil à vide.
7. Placez le couvercle sur la verseuse.
8. Posez le bouchon doseur au centre du couvercle et faites-le pivoter dans le sens
contraire aux aiguilles d’une montre.
MISE EN ROUTE
1. Assurez-vous que le sélecteur de vitesse est en position « OFF » et branchez la
prise au secteur.
2. Cet appareil est doté d’un dispositif de sécurité et ne fonctionne pas si la verseuse
n’a pas été emboîtée correctement sur la base moteur.
3. Remplissez la verseuse avec les aliments de votre choix.
4. Placez le couvercle sur la verseuse et vissez-le. Posez le bouchon doseur au
centre du couvercle et faites-le pivoter délicatement dans le sens contraire des
aiguilles d’une montre.
Nos produits sont développés pour répondre aux standards les plus stricts en matière
maximum de votre nouveau blender LIMA de PALSON.
ATTENTION :
- Lisez attentivement les instructions avant d’utiliser l’appareil. Conservez ces
instructions pour pouvoir les consulter à l’avenir.
- Une mauvaise utilisation et une manipulation incorrecte peuvent endommager
l’appareil et mettre en péril l’utilisateur.
Le fabricant n’accepte aucune responsabilité en cas de blessures ou dommages
provoqués par une mauvaise utilisation de l’appareil ou d’une manipulation
incorrecte.
et la tension correspondent bien aux informations qui se trouvent sur la plaque
du blender.
d’électrocution.
- N’essayez pas d’ouvrir la carcasse vous-même. N’introduisez aucun objet à
l’intérieur de la carcasse.
atmosphère humide.
- Ne débranchez pas la prise avec les mains mouillées.
après-vente agréé pour faire changer le câble et la prise et écarter ainsi tout
danger.
- N’utilisez pas l’appareil si le câble d’alimentation ou la prise sont endommagés
ou si celui-ci est tombé par terre ou présente un quelconque défaut. Si tel est le
si nécessaire.
- N’essayez pas de le réparer vous-même. Il existe un danger d’électrocution.
- Ne laissez pas le câble d’alimentation pendre sur le coin d’une table ou plan de
- L’installation d’une protection contre les surtensions et les pics électriques vous
offrira une protection supplémentaire avec un courant nominal de démarrage
inférieur à 30 mA dans l’installation de la maison. Renseignez-vous auprès de
votre électricien.
- Le câble d’alimentation et éventuellement sa rallonge seront placés de façon
à ne représenter aucun risque si une personne trébuche ou le débranche
accidentellement.
en question. Vous risquez alors de provoquer une surchauffe du câble et/ou de
la prise.

18
19
F
CONSEILS UTILES
lieu de mettre une grande quantité en une seule fois.
petite quantité de liquide. Enlevez le centre du couvercle et ajoutez le liquide au
fur et à mesure par l’ouverture.
- Posez toujours une main sur la partie supérieure du blender lorsque l’appareil est
en marche.
- Soyez prudent lorsque vous mélangez des liquides épais.
recommandons d’utiliser le blender sur le mode « Turbo » pour empêcher que
les lames se bloquent.
ATTENTION :
Si la verseuse est trop pleine la mise en route peut être bloquée. Éteignez l’appareil
et débranchez la prise du secteur. Videz une partie de son contenu puis remettez
l’appareil en route.
NETTOYAGE ET RANGEMENT
Attention : éteignez l’appareil avant de le nettoyer pour écarter tout risque
d’électrocution.
que vous trouverez au début de ces instructions.
3. Nettoyez la base moteur avec un chiffon doux et humide et un produit d’entretien
non agressif.
4. Remplissez la verseuse à mi-hauteur avec de l’eau chaude et un peu de savon.
Faites fonctionner l’appareil à la vitesse maximum jusqu’à ce que la verseuse soit
propre (1 minute maxi).
5. Le compartiment porte-lames peut être séparé de la verseuse. Dévissez-le dans
le sens contraire des aiguilles d’une montre et retirez les lames en même temps
que le joint de scellage.
6. Nettoyez le moulin à café en le remplissant à mi-hauteur avec de l’eau chaude
et un peu de savon ; placez le moulin à café sur le support supérieur de la base
moteur. Faites fonctionner l’appareil à la vitesse maximum jusqu’à ce qu’il soit
propre. Utilisez ensuite cette eau pour nettoyer tous les composants du moulin à
café (1 minute maxi).
7. Séchez bien tous les composants avant de les réutiliser.
Attention : Les lames sont très tranchantes. Soyez prudent lorsque vous les
nettoyez.
8. N’utilisez jamais de produits de nettoyage abrasifs.
5. Posez la verseuse sur la base moteur. Le voyant bleu placé autour du sélecteur
de vitesse indique que l’appareil est branché au secteur. Vous pouvez maintenant
utiliser le blender normalement.
La quantité de grains de café doit être inférieure à 60% de la capacité totale du
récipient du moulin à café. Placez la lame du moulin à café et le joint en caoutchouc
du compartiment porte-lames et vissez ce dernier fermement au récipient en verre.
Placez le moulin à café sur le support supérieur de la base moteur. L’appareil est
maintenant prêt pour moudre les grains de café.
de votre choix. Celui-ci s’allumera pour indiquer que l’appareil fonctionne.
(vitesse minimum) et « MAX » (vitesse maximum) selon vos besoins.
l’utiliser à nouveau.
BOUTONS DE MISE EN ROUTE
1. BATIDO / SMOOTHIE
homogène.
2. HIELO / ICE
La lame tourne à grande vitesse pendant 1 seconde puis s’arrête pendant une
3. TURBO
L’appareil fonctionne uniquement lorsque vous appuyez sur le bouton et s’arrête
lorsque vous le relâchez. La lame tourne à grande vitesse.
4. MIN
La lame tourne à une vitesse plus lente.
5. MAX
La lame tourne à grande vitesse.
6. ON
« HIELO / ICE » et « TURBO ».
7. OFF
L’appareil est débranché.
RÉGLAGE DE LA VITESSE
Faible : pour une utilisation douce avec des liquides.
Élevée : pour plus de consistance plus épaisse – pour mélanger des liquides et des
aliments solides.
Turbo :
cette fonction.
Vous devez le maintenir sur la position « Turbo » ou le faire pivoter
constamment.

20
21
P
- Desligue a unidade antes de desligar a ficha de alimentação.
- Utilize apenas as peças de substituição do fabricante.
- Nunca transporte a unidade pegando nela pelo cabo.
- Não retire os componentes individuais da carcaça.
evitar perigos.
- Não é permitido o uso deste produto por crianças ou por outras pessoas sem
o seu uso com segurança. As crianças devem ser supervisionadas para se ter a
certeza de que não brincam com este produto.
- Utilize sempre a batedeira com a tampa colocada.
MONTAGEM E USO
primeira vez.
2. Certifique-se de que a unidade está desligada e não a conecte antes de a instalar.
3. Primeiramente coloque as lâminas e a junta de borracha no anel porta-lâminas e
enrosque este último na jarra.
4. Depois encaixe a jarra na base do motor e certifique-se de que ela fica bem fixada.
5. Encha a jarra com os alimentos desejados e certifique-se de que nenhum líquido
transborda da embalagem. A capacidade máxima de líquido não deve ultrapassar
os 1.500 ml.
6. Não utilize a unidade sem qualquer alimento introduzido na jarra.
7. Coloque a tampa da jarra sobre a jarra com firmeza.
8. Coloque a tampa doseadora no centro da tampa da jarra e rode-a no sentido anti-
horário.
FUNCIONAMENTO
1. Certifique-se de que o selector de velocidade está rodado para a posição “OFF”
e em seguida ligue a ficha da batedeira à tomada de corrente.
2. Esta unidade tem um dispositivo de segurança e não funciona se a jarra não
estiver correctamente encaixada na base do motor.
3. Encha a jarra com os alimentos desejados.
4. Coloque a tampa da jarra sobre a jarra e ajuste-a. Coloque a tampa doseadora
no centro da tampa da jarra e rode-a com cuidado no sentido anti-horário.
5. Coloque a jarra na base do motor. A luz azul à volta do selector de velocidade
indica que ela está conectada a uma tomada de corrente. A partir de agora pode
utilizar a batedeira de forma normal.
A quantidade de grãos de café deve ser inferior a 60% da capacidade total do
recipiente do moinho. Coloque a lâmina do moinho e a junta de borracha no
anel porta-lâminas e fixe este último no recipiente de vidro com firmeza. Coloque
o moinho no suporte superior da base do motor. A partir de agora pode moer
normalmente grãos de café.
indicando que está em funcionamento.
Os nossos produtos foram desenvolvidos para atingirem os mais altos níveis de
LIMA da PALSON.
ATENÇÃO:
- Leia todas as instruções antes de utilizar o aparelho. Guarde estas instruções para
consultas futuras.
- A má utilização e o manuseamento inadequado podem causar problemas no aparelho
e prejudicar o utilizador.
- A unidade só deve ser utilizada para o fim para o qual foi fabricada. Não serão
aceites responsabilidades pelos danos provocados pela utilização inadequada ou por
manuseamento errado.
aos dados indicados na placa do aparelho.
- Não introduza o aparelho nem a ficha de alimentação em água ou noutros fluidos.
leve-o a um serviço técnico autorizado para que o examine antes de voltar a utilizá-lo.
Há perigo de descarga eléctrica.
- Não tente abrir a carcaça você mesmo. Não introduza qualquer tipo de objecto na
carcaça.
de humidade ambiental.
- Não pegue na ficha de alimentação com as mãos molhadas ou húmidas.
- Verifique regularmente se há danos na ficha de alimentação e no adaptador. Caso haja
cabo e a ficha evitando perigos.
- Não utilize o aparelho se o cabo ou a ficha estiverem danificados ou se a unidade
- Não tente repará-la você mesmo. Corre o risco de choque eléctrico.
- Não deixe o cabo pousado sobre arestas afiadas e mantenha-o afastado de objectos
quentes e de chamas.
- A instalação de um protector contra picos de voltagem oferecer-lhe-á uma protecção
adicional com uma corrente nominal de início não superior a 30 mA na instalação
doméstica. Consulte o seu electricista.
de forma que não representem risco para qualquer pessoa que os puxe sem se
aperceber ou que os desconecte.
do cabo e/ou da ficha.
de chamas abertas (tais como as de fornos a gás) e utilize-a fora do alcance das
crianças.
- Este aparelho não é apropriado para uso comercial nem para ser utilizado no exterior.
- Retire a ficha do aparelho quando não o estiver a utilizar e igualmente antes de o
limpar.
- Cuidado: o aparelho continua ligado enquanto estiver conectado à corrente; mantenha-
o fora do alcance das crianças ou de pessoas que exijam supervisão.

22
23
P
CUIDADO:
em funcionamento.
LIMPEZA E ARMAZENAMENTO
Atenção: Desligue a unidade antes de a limpar para evitar descargas e outros perigos.
instruções.
3. Limpe a base do motor com um pano macio e húmido e algum produto de limpeza
suave.
4. Encha a jarra até meio com água quente e um pouco de sabão. Deixe que a
unidade funcione à velocidade máxima até que a jarra fique limpa (máximo 1
minuto).
5. O anel porta-lâminas pode ser separado da própria jarra. Desenrosque-o no
sentido anti-horário e retire as lâminas juntamente com a borracha de vedação.
6. Limpe o moinho enchendo-o até meio com água quente e um pouco de sabão;
coloque o moinho no suporte superior da base do motor. Deixe que a unidade
funcione à velocidade máxima até que esteja limpa. Depois utilize água para lavar
todos os componentes do moinho (máximo 1 minuto).
7. Seque bem todos os componentes antes de os voltar a utilizar.
Cuidado: As lâminas estão muito afiadas. Tenha cuidado ao limpá-las.
8. Não utilize produtos de limpeza abrasivos.
Obrigado por nos ter demonstrado a sua confiança ao escolher um dos nossos
produtos.
(baixa velocidade) e “MAX” (alta velocidade) para conseguir a velocidade de que
necessita.
antes de o voltar a utilizar.
BOTÕES DE FUNÇÕES
1. BATIDO/SMOOTHIE
2. HIELO/ICE
3. TURBO
A unidade só funciona quando o botão está pressionado e pára quando se deixa de
pressionar. A lâmina roda a alta velocidade.
4. MIN
A lâmina roda a baixa velocidade.
5. MAX
A lâmina roda a grande velocidade.
6. ON
“HIELO/ICE” e “TURBO”.
7. OFF
A unidade está desconectada.
AJUSTE DE VELOCIDADE
Baixo: para uso ligeiro com líquidos.
Alto: para uma consistência mais sólida - para misturar líquidos e material sólido.
no seu ajuste.
Tem que mantê-lo na posição “Turbo” ou fazê-lo rodar repetidamente.
CONSELHOS ÚTEIS
quantidade de uma só vez.
porções (2-3cm).
Adicione mais líquido através da abertura da tampa.
- Coloque sempre a sua mão na parte superior da batedeira quando estiver a fazer
funcionar o aparelho.
- Tenha cuidado ao bater líquidos espessos.
- Para bater ingredientes sólidos ou líquidos muito espessos recomendamos a
utilização da batedeira no modo “Turbo” para impedir que as lâminas parem.
- Para picar gelo facilmente é recomendável que se adicione uma pequena
quantidade de água.

24
25
D
es reinigen.
ist. Halten Sie es von Kindern und von Aufsicht bedürfenden Personen fern.
ziehen.
- Verwenden Sie ausschließlich Ersatzteile des Herstellers.
- Halten Sie das Gerät niemals am Kabel.
- Entfernen Sie keine Bestandteile des Gerätekörpers.
autorisierten technischen Kundendienst oder von einem qualifizierten Techniker
nicht ohne Aufsicht oder Assistenz benutzt werden. Kinder müssen beaufsichtigt
- Benutzen Sie den Standmixer nur mit aufgesetztem Deckel.
ZUSAMMENBAU UND BETRIEB
zum ersten Mal benutzen.
3. Setzen Sie zuerst Schneidemesser und Gummiring in den Messeraufsatzring ein
und schrauben Sie diesen an der Glaskanne fest.
dass sie richtig sitzt.
dass keine Flüssigkeit aus dem Behälter austritt. Das maximale Flüssigkeitsvolumen
darf 1.500 ml nicht überschreiten.
6. Benutzen Sie das Gerät nicht im Leerzustand. Füllen Sie zur Benutzung immer
Lebensmittel ein.
7. Verschließen Sie den Deckel fest auf der Glaskanne.
8. Setzen Sie die Messkappe in die Deckelmitte ein und drehen Sie sie entgegen dem
Uhrzeigersinn.
FUNKTIONSWEISE
„OFF“ steht und stecken Sie anschließend den Netzstecker in eine Steckdose.
eingesetzt ist.
3. Füllen Sie die gewünschten Lebensmittel in die Glaskanne ein.
4. Setzen Sie den Deckel sicher und fest auf die Glaskanne auf. Stecken Sie
die Messkappe in die Deckelmitte ein und drehen Sie sie entgegen dem
Uhrzeigersinn.
5. Bringen Sie die Glaskanne am Gerätekörper an. Das blaue Licht am
angeschlossen ist. Der Standmixer ist nun betriebsbereit.
Unsere Produkte entsprechen aufgrund Ihrer Entwicklung den höchsten Qualitäts-
Standmixer LIMA von PALSON.
ACHTUNG:
nehmen. Bewahren Sie diese Gebrauchsanleitung für späteres Nachlesen auf.
- Die falsche Benutzung und eine nicht ordnungsgemäße Handhabung können zur
Beschädigung des Geräts oder zu Verletzungen beim Benutzer führen.
- Das Gerät darf nur gemäß seiner bestimmungsgemäßen Verwendung benutzt werden.
die fehlerhafte Handhabung des Geräts entstehen.
Netzspannung Ihres Haushalts mit der auf der Geräteplakette angegebenen Spannung
übereinstimmt.
- Tauchen Sie weder das Gerät noch den Netzstecker in Wasser oder andere Flüssigkeiten.
vor der weiteren Benutzung von einem autorisierten Servicetechniker überprüfen. Sie
könnten anderenfalls einen elektrischen Schlag erleiden.
den Gerätekörper ein.
hoher Luftfeuchtigkeit.
- Greifen Sie den Netzstecker nicht mit nassen oder feuchten Händen.
-
Prüfen Sie den Netzstecker bzw. den Adapter regelmäßig auf Beschädigungen. Sollten Sie
um das Kabel und den Stecker zur Vermeidung von Gefahrensituationen austauschen zu
lassen.
-
das Gerät heruntergefallen ist oder auf andere Weise beschädigt wurde. Lassen
Sie das Gerät in einem solchen Fall in einer Kundendienstwerkstatt überprüfen und
gegebenenfalls reparieren
.
elektrischen Schlag erleiden.
- Lassen Sie das Kabel nicht über scharfe Kanten hängen und halten Sie es von heißen
Gegenständen und Flammen fern.
- Die Installation eines Schutzschalters kann Ihnen mit einem Nominalstrom von nicht
mehr als 30 mA im Hausstromkreislauf zusätzliche Sicherheit bieten. Lassen Sie sich
von Ihrem Elektriker beraten.
- Das Kabel sowie ein gegebenenfalls notwendiges Verlängerungskabel müssen so
Steckdose herauszieht.
- Bei Benutzung eines sehr langen Kabels muss die Stromversorgung diesem entsprechen.
Anderenfalls kann es zur Überhitzung des Kabels/ des Steckers kommen.
-
nicht in der Nähe von offenem Feuer (wie einem Gasherd) oder in der Reichweite von
Kindern auf.
- Dieses Gerät eignet sich nicht für die kommerzielle Nutzung. Das Gerät kann nicht im
Freien verwendet werden.

26
27
D
6. Zur Benutzung der Kaffee- und Gewürzmühle füllen Sie die Kaffeebohnen in
den Glasbehälter ein. Es dürfen nicht mehr als 60 % des Gesamtvolumens des
Kaffee- und Gewürzmühlenbehälters mit Kaffeebohnen befüllt werden. Setzen Sie
Schneidemesser und Gummiring in den Messeraufsatz der Kaffee- und Gewürzmühle
ein und befestigen Sie diesen sicher am Glasbehälter. Bringen Sie die Kaffee- und
Gewürzmühle an der oberen Halterung des Gerätekörpers an. Jetzt können Sie das
Gerät normal zum Mahlen der Kaffeebohnen (bzw. Gewürze) benutzen.
bringen Sie den Auswahlschalter in die Position „ON“ und drücken eine der Tasten.
Funktion in Betrieb ist.
Geschwindigkeitsauswahlschalter in eine Position zwischen „MIN“ (niedrigste
Geschwindigkeit) und „MAX“ (Höchstgeschwindigkeit).
FUNKTIONSTASTEN
1. BATIDO / SMOOTHIE (Milchshake)
gerührten Milchshake herzustellen.
2. HIELO / ICE (Eis)
Das Schneidemesser rotiert 1 Sekunde lang mit hoher Geschwindigkeit und stoppt
3. TURBO
hält der Gerätemotor an. Das Schneidemesser rotiert mit hoher Geschwindigkeit.
4. MIN
Das Schneidemesser rotiert mit niedriger Geschwindigkeit.
5. MAX
Das Schneidemesser rotiert mit hoher Geschwindigkeit.
6. ON (Ein)
„HIELO/ICE“ und „TURBO“ können genutzt werden.
7. OFF (Aus)
Das Gerät ist nicht ans Stromnetz angeschlossen.
EINSTELLEN DER GESCHWINDIGKEIT
Niedrig: Für leichte Anwendungen mit Flüssigkeiten.
Hoch: Für festere Substanzen - zum Mischen von Flüssigkeiten und festen
Lebensmitteln.
(In der Position „Turbo“ bleibt der Schalter in seiner Einstellung.
Halten Sie ihn in der Position „Turbo“ oder drehen Sie ihn wiederholt.
NÜTZLICHE HINWEISE
schneiden (2-3 cm).
- Geben Sie beim Mixen von festen Lebensmitteln zunächst ein wenig Flüssigkeit
hinzu. Füllen Sie anschließend nach und nach mehr Flüssigkeit durch die
Deckelöffnung ein.
- Behalten Sie während des Betriebs des Standmixers stets eine Hand auf dem
Deckel des Geräts.
- Lassen Sie beim Mixen von schweren Flüssigkeiten besondere Vorsicht walten.
- Zum Zerkleinern von Eis sollten Sie ein wenig Wasser in den Behälter geben.
VORSICHT:
solchen Fall aus und ziehen Sie den Netzstecker aus der Steckdose. Verringern Sie die
Füllmenge und mixen Sie anschließend erneut.
REINIGUNG UND WARTUNG
und andere Risiken zu vermeiden.
1. Darüber hinaus sollten Sie den Abschnitt mit den Sicherheitshinweisen am Anfang
dieser Gebrauchsanleitung durchlesen.
2. Reinigen Sie weder den Gerätekörper noch das Kabel oder den Stecker mit
Wasser.
sanften Reinigungsmittel.
4. Befüllen Sie die Glaskanne mit heißem Wasser und geben Sie ein wenig
Reinigungsmittel hinzu. Lassen Sie das Gerät solange auf Höchstgeschwindigkeit
5. Der Messeraufsatz kann aus der Glaskanne entfernt werden. Drehen Sie ihn
entgegen dem Uhrzeigersinn ab und entnehmen Sie Schneidemesser und
Gummiversiegelung.
6. Zur Reinigung der Kaffee- und Gewürzmühle füllen Sie sie bis zur Hälfte mit heißem
Wasser und ein wenig Reinigungsmittel und setzen sie auf die obere Halterung des
bis die Kaffee- und Gewürzmühle sauber ist (höchstens 1 Minute). Verwenden Sie
reinigen.
Vorsicht: Die Schneidemesser sind sehr scharf. Seien Sie beim Reinigen sehr
vorsichtig.
8. Verwenden Sie keine scheuernden Reinigungsmittel.
Vielen Dank für Ihr Vertrauen in unsere Produkte.

28
29
I
- Non trasportare mai l’unità afferrandola per il cavo.
- Non estrarre i singoli componenti dal corpo dell’apparecchio.
pericoli.
- Questo prodotto non è adatto all’uso da parte di bambini o altre persone il cui
È opportuno che i bambini facciano uso del prodotto sotto la supervisione di un
adulto per evitare che lo utilizzino come un giocattolo.
- Utilizzare sempre il frullatore con il coperchio.
MONTAGGIO E UTILIZZO
volta.
2. Assicurarsi che l’unità sia spenta e non collegarla prima dell’installazione.
avvitare quest’ultimo alla caraffa.
4. Quindi incastrare la caraffa sulla base motore e assicurarsi che sia saldamente
fissata ad essa.
5. Riempire la caraffa con gli alimenti desiderati e assicurarsi che nessun liquido trabocchi
dal contenitore. La capacità massima di liquido non deve superare i 1500 ml.
6. Non utilizzare l’unità a vuoto.
7. Collocare saldamente il coperchio sulla caraffa.
8. Collocare il tappo dosatore al centro del coperchio e ruotarlo in senso antiorario.
FUNZIONAMENTO
1. Assicurarsi che il selettore di velocità sia girato in posizione “OFF” e quindi collegare
il frullatore alla presa di corrente.
2. Questa unità è dotata di un dispositivo di sicurezza e non funziona se la caraffa
non è agganciata correttamente sulla base motore.
3. Riempire la caraffa con gli alimenti desiderati.
4. Collocare il coperchio sulla caraffa e fissarla. Collocare il tappo dosatore al centro
5. Collocare la caraffa sulla base motore. La luce blu attorno al selettore di velocità
indica che l’apparecchio è collegato a una presa di corrente. Ora è possibile
utilizzare il frullatore in modo normale.
La quantità di chicchi di caffè deve essere inferiore al 60% della capacità totale
del recipiente del macinino. Collocare la lama del macinino e la guarnizione in
gomma nell’anello portalame e fissare quest’ultimo saldamente al recipiente di
vetro. Posizionare il macinino sul supporto superiore della base motore. Ora è
possibile macinare normalmente i chicchi di caffè.
indicando che è in funzione.
e “MAX” (velocità alta) per impostare la velocità necessaria.
prima di utilizzarlo nuovamente.
e di design. Ci auguriamo che il vostro nuovo frullatore LIMA di PALSON sia di vostro
gradimento.
ATTENZIONE:
- Leggere tutte le istruzioni prima di utilizzare l’apparecchio. Conservare queste
istruzioni per future consultazioni.
- Un errato utilizzo e una manipolazione inadeguata possono causare problemi
all’apparecchio e costituire un pericolo per l’utente.
- L’unità deve essere utilizzata solo per lo scopo per il quale è stata fabbricata. Non
si accetteranno responsabilità per danni derivanti dall’impiego inadeguato o da
una manipolazione errata.
corrispondano ai dati indicati sulla targhetta dell’apparecchio.
- Non immergere l’apparecchio né la spina di alimentazione in acqua o altri liquidi. Se
affinché lo esamini. Vi è pericolo di scarica elettrica.
- Non tentare di aprire il corpo dell’apparecchio da soli. Non introdurre alcun tipo di
oggetto nel corpo dell’apparecchio.
- Non tenere in mano la spina di alimentazione con mani bagnate o umide.
- Verificare regolarmente l’assenza di danni alla spina di alimentazione e
- Non utilizzare l’apparecchio se il cavo o la spina sono danneggiati o se l’unità è
riparazioni affinché la controllino e la riparino se necessario.
- Non tentare di ripararla da soli. Vi è pericolo di scarica elettrica.
- Non lasciare che il cavo penda da un piano con bordi taglienti e tenerlo lontano da
oggetti caldi e fiamme libere.
- L’installazione di un dispositivo di protezione contro i picchi di tensione offrirà
un’ulteriore protezione con una corrente nominale iniziale non superiore a 30 mA
nell’impianto domestico. Consultare il proprio elettricista.
posizionato in modo che non costituisca un pericolo qualora venisse tirato o
scollegato inavvertitamente.
energia in questione. In caso contrario provocherà un surriscaldamento del cavo e/o
della spina.
fiamme libere (come i fornelli a gas) e al di fuori della portata dei bambini.
- Il presente apparecchio non è idoneo all’uso commerciale né per essere utilizzato
all’esterno.
- Scollegare l’apparecchio quando non lo si utilizza e prima di pulirlo.
- Precauzione: l’apparecchio rimane acceso quando è collegato alla corrente; tenere
fuori dalla portata dei bambini o di persone che necessitino di supervisione.
- Spegnere l’unità prima di estrarre la spina di alimentazione.
- Utilizzare solo i pezzi di ricambio del fabbricante.

30
31
I
PULIZIA E IMMAGAZZINAMENTO
pericoli.
delle presenti istruzioni.
3. Pulire la base motore con un panno morbido e umido e un detergente delicato.
4. Riempire la caraffa fino a metà con acqua calda e poco detersivo. Lasciare in
funzione l’unità a velocità massima fino a che la caraffa non sarà pulita (massimo 1
minuto).
5. L’anello portalame si può separare dalla caraffa stessa. Svitarlo in senso antiorario
ed estrarre le lame insieme alla guarnizione in gomma.
6. Pulire il macinino riempiendolo fino a metà con acqua calda e poco detersivo;
posizionare il macinino sul supporto superiore della base motore. Lasciare in funzione
l’unità a velocità massima fino a che non sarà pulito. Quindi utilizzare l’acqua per
pulire tutti i componenti del macinino (massimo 1 minuto).
7. Asciugare bene tutti i componenti prima di utilizzarli di nuovo.
Precauzione: le lame sono molto affilate. Prestare attenzione durante le operazioni
di pulizia.
8. Non utilizzare prodotti per la pulizia abrasivi.
Grazie per la fiducia accordataci scegliendo uno dei nostri prodotti.
PULSANTI FUNZIONE
1. BATIDO/SMOOTHIE
2. HIELO/ICE
secondi: perfetto per tritare il ghiaccio.
3. TURBO
L’unità funziona esclusivamente quando si preme il pulsante e si ferma non appena
si cessa di premerlo. La lama gira a velocità elevata.
4. MIN
La lama gira a velocità ridotta.
5. MAX
La lama gira ad alta velocità.
6. ON
“HIELO/ICE” e “TURBO”.
7. OFF
L’unità è scollegata.
REGOLAZIONE DELLA VELOCITÀ
Basso: per uso leggero con liquidi.
Alto: per una consistenza più solida: per mescolare liquidi e solidi.
(Nella posizione “Turbo” l’interruttore non rimane bloccato
permanentemente.
È necessario mantenerlo nella posizione “Turbo” o farlo girare
ripetutamente.
CONSIGLI UTILI
quantità in una volta sola.
- Appoggiare sempre la mano sulla parte superiore del frullatore quando
l’apparecchio è in funzione.
- Procedere con cautela quando si frullano alimenti densi.
- Per frullare ingredienti solidi o molto densi si consiglia di utilizzare il frullatore in
modalità “Turbo” per impedire che le lame si blocchino.
- Per tritare facilmente il ghiaccio si consiglia di aggiungere una piccola quantità
d’acqua.
PRECAUZIONE:
spegnere l’unità e scollegare la spina. Vuotare parte del contenuto e quindi riavviare
l’apparecchio.

32
33
NL
bereik van kinderen of personen die toezicht behoeven.
- Schakel het apparaat uit voordat u de stekker uit het stopcontact haalt.
- Gebruik uitsluitend reserveonderdelen van de fabrikant.
- Verplaats het apparaat nooit door aan het snoer te trekken.
- Haal de afzonderlijke componenten van de beker niet uit elkaar.
gevaren te voorkomen.
- Dit product mag niet zonder hulp of toezicht worden gebruikt door kinderen of
niet met dit product gaan spelen.
- Gebruik de blender altijd met het deksel dicht.
MONTAGE EN GEBRUIK
gebruikt.
2. Controleer of het apparaat uitgeschakeld is en niet is aangesloten voor u het in
werking stelt.
3. Plaats eerst de mesjes en de afdichtingsring in het koppelstuk van de mesunit en
draai deze laatste vast op de kan.
4. Plaats daarna de kan op de motorunit en controleer of de kan goed bevestigd is.
5. Vul de kan met het gewenste voedsel en controleer of er geen vloeistof uit de kan
loopt. De hoeveelheid vloeistof mag niet meer zijn dan 1500 ml.
6. Het apparaat niet gebruiken zonder voedsel in de kan.
7. Plaats het deksel goed op de kan.
8. Plaats de dop/maatbeker in het midden van het deksel en draai tegen de wijzers van
de klok in.
WERKING
1. Controleer of de snelheidsregeling op de stand “OFF” staat en steek vervolgens de
stekker in het stopcontact.
2. Dit apparaat heeft een veiligheidsmechanisme en werkt niet als de kan niet juist op
de motorunit is geplaatst.
3. Vul de kan met het gewenste voedsel.
4. Plaats het deksel op de kan en draai het vast. Plaats de dop/maatbeker in het midden
5. Plaats de kan op de motorunit. Het blauwe lampje bij de snelheidsregeling geeft aan
dat het apparaat is aangesloten op het netwerk. Nu kan de blender op de normale
wijze gebruikt worden.
hoeveelheid koffiebonen moet minder zijn dan 60% van de totale capaciteit van de
molenkom. Plaats het mes van de molen en de afdichtingsring in het koppelstuk
van de mesunit en bevestig deze goed aan de glazen kan. Plaats de molen op de
hoogste steun van de motorunit. Nu kunnen de koffiebonen gemalen worden.
draai de schakelaar op “ON” en druk op een van de knoppen. Deze licht dan op ten
teken dat hij ingeschakeld is.
ontwerp te bereiken. Wij hopen dat u van uw nieuwe LIMA blender van PALSON zult
genieten.
LET OP:
- Lees eerst de aanwijzingen door voordat u het apparaat gaat gebruiken. Bewaar
deze aanwijzingen om het indien nodig te kunnen raadplegen.
- Verkeerd gebruik en onjuiste behandeling kunnen problemen aan het apparaat
veroorzaken en de gebruiker kan daarvan schade ondervinden.
- Het product kan alleen gebruikt worden voor het doel waarvoor het bestemd is.
Er wordt geen aansprakelijkheid geaccepteerd voor schade door onjuist gebruik of
verkeerde behandeling.
gegevens die op het plaatje van het apparaat staan.
- Steek het apparaat of de stekker niet in water of andere vloeistoffen. Indien het
naar een geautoriseerde servicedienst om het te laten onderzoeken voordat u het
opnieuw gaat gebruiken. Er bestaat gevaar voor elektrische schokken.
- Probeer de unit niet zelf te openen. Geen voorwerpen in het apparaat werpen.
in vochtige ruimtes.
- De stekker niet met natte of vochtige handen vastpakken.
- Controleer regelmatig of er schade is aan de stekker of aan de adapter. In het geval
het snoer te laten vervangen om gevaar te voorkomen.
- Het apparaat niet gebruiken als het snoer of stekker beschadigd zijn of als het
apparaat op de grond is gevallen of als er op een andere wijze schade is ontstaan.
In deze gevallen brengt u het apparaat naar een servicedienst om het te laten
controleren en indien noodzakelijk te laten repareren.
- Probeer het apparaat niet zelf te repareren. Er bestaat gevaar voor elektrische
schokken.
- Laat het snoer niet langs scherpe randen hangen en houd het verwijderd van hete
voorwerpen en open vuren.
- Het installeren van een spanningsbeschermer biedt u extra bescherming met een
nominale primaire stroom van niet meer dan 30 mA in uw huis. Raadpleeg uw
elektriciën.
- Het snoer of eventuele verlenging ervan wordt op dusdanige wijze aangesloten dat
er geen risico’s aan verbonden zijn voor degene die er onbewust aan trekt of uit het
stopcontact haalt.
veroorzaken.
van open vuren (zoals een gasfornuis) en gebruik het buiten bereik van kinderen.
Dit apparaat is niet geschikt voor commercieel gebruik en evenmin om buiten te
gebruiken.
- Haal de stekker uit het stopcontact als u het apparaat niet gebruikt of als u het gaat
schoonmaken.

34
35
NL
snelheid) en “MAX” (hoge snelheid) om de gewenste snelheid in te stellen.
voordat u het opnieuw gebruikt.
FUNCTIEKNOPPEN
1. BATIDO/ SMOOTHIE
2. HIELO/ ICE
perfect om ijsblokjes te vermalen.
3. TURBO
Het apparaat werkt alleen als de knop ingedrukt blijft en stopt zodra u ophoudt met
drukken. Het mes draait op hoge snelheid.
4. MIN
Het mes draait op lage snelheid.
5. MAX
Het mes draait op hoge snelheid.
6. ON
en “TURBO” kunnen worden gebruikt.
7. OFF
Het apparaat is niet aangesloten.
DE SNELHEID INSTELLEN
Laag: bij licht gebruik met vloeistoffen.
Hoog: voor iets steviger voedsel – om vloeistoffen en vast materiaal te mengen.
Turbo: om ijs te vermalen; druk krachtig en kort op de knoppen.
U moet de schakelaar in de stand “Turbo” houden of het steeds laten
draaien.
BRUIKBARE ADVIEZEN
beter één voor één kleine porties in de glazen kan te doen in plaats van een grote
hoeveelheid in een keer.
meer vloeistof toe door de opening van het deksel.
- Leg uw hand altijd op het bovenste gedeelte van de blender als die in werking is.
- Ga voorzichtig om met het mengen van dikke vloeistoffen.
in de stand “Turbo” te zetten om te voorkomen dat de mesjes vastlopen.
- Om gemakkelijk ijsblokjes te vermalen is het raadzaam een kleine hoeveelheid
water toe te voegen.
VOORZICHTIG:
de stekker uit het stopcontact. Haal een deel van de ingrediënten uit de kan en zet
het apparaat weer aan.
SCHOONMAKEN EN OPBERGEN
Let op: Schakel het apparaat uit voordat u het schoonmaakt om elektrische schokken
en andere gevaren te vermijden.
1. Bovendien dient u het hoofdstuk “Veiligheidsvoorschriften” aan het begin van deze
aanwijzingen te lezen.
3. Maak de motorunit schoon met een zachte vochtige doek en een zacht
schoonmaakmiddel.
4. Vul de kan tot de helft met heet water en een beetje zeep. Zet het apparaat aan op
de maximale snelheid tot de kan schoon is (maximaal 1 minuut).
5. Het koppelstuk van de mesunit kan losgemaakt worden van de kan. Schroef deze
los tegen de wijzers van de klok in en haal de mesjes samen met de afdichtingsring
er uit.
6. Maak de molen schoon door die tot de helft met heet water te vullen en een beetje
zeep; plaats de molen op de bovenste steun van de motorunit. Zet het apparaat
aan op de maximale snelheid totdat de molen schoon is. Gebruik water om alle
onderdelen van de molen schoon te maken (maximaal 1 minuut).
7. De onderdelen goed drogen voordat u ze weer gebruikt.
Voorzichtig: De mesjes zijn erg scherp. Wees voorzichtig bij het schoonmaken.
8. Gebruik geen bijtende schoonmaakmiddelen.
Bedankt voor het in ons gestelde vertrouwen bij het kiezen van een van onze
producten.

36
37
GR
ΤΟΠΟΘΕΤΗΣΗ ΚΑΙ ΧΡΗΣΗ
ΛΕΙΤΟΥΡΓΙΑ
ΠΡΟΣΟΧΗ:

38
39
GR
ΠΡΟΦΥΛΑΞΗ:
ΚΑΘΑΡΙΣΜΟΣ ΚΑΙ ΣΥΝΤΗΡΗΣΗ
ΔΙΑΚΟΠΤΕΣ ΛΕΙΤΟΥΡΓΙΑΣ
3. TURBO
4. MIN
5. MAX
6. ON
7. OFF
ΡΥΘΜΙΣΗ ΤΑΧΥΤΗΤΑΣ
ΧΡΗΣΙΜΕΣ ΣΥΜΒΟΥΛΕΣ
3cm).
La pagina si sta caricando...
La pagina si sta caricando...
La pagina si sta caricando...
La pagina si sta caricando...
La pagina si sta caricando...
La pagina si sta caricando...
La pagina si sta caricando...
La pagina si sta caricando...
La pagina si sta caricando...
La pagina si sta caricando...
La pagina si sta caricando...
-
 1
1
-
 2
2
-
 3
3
-
 4
4
-
 5
5
-
 6
6
-
 7
7
-
 8
8
-
 9
9
-
 10
10
-
 11
11
-
 12
12
-
 13
13
-
 14
14
-
 15
15
-
 16
16
-
 17
17
-
 18
18
-
 19
19
-
 20
20
-
 21
21
-
 22
22
-
 23
23
-
 24
24
-
 25
25
-
 26
26
-
 27
27
-
 28
28
-
 29
29
-
 30
30
-
 31
31


Palson LIMA Manuale del proprietario
- Categoria
- Frullatori
- Tipo
- Manuale del proprietario
- Questo manuale è adatto anche per
in altre lingue
- English: Palson LIMA Owner's manual
- français: Palson LIMA Le manuel du propriétaire
- español: Palson LIMA El manual del propietario
- Deutsch: Palson LIMA Bedienungsanleitung
- русский: Palson LIMA Инструкция по применению
- Nederlands: Palson LIMA de handleiding
- português: Palson LIMA Manual do proprietário
- Türkçe: Palson LIMA El kitabı
Documenti correlati
Altri documenti
-
Black & Decker BXJB1200E Manuale utente
-
-
Matsui M15BW09E Manuale utente
-
Beko TBN7400B Metropolis line Manuale del proprietario
-
H Koenig MXK30 Manuale utente
-
Philips hr 2074 50 Manuale utente
-
Kenwood BL430 Manuale del proprietario
-
Tefal BL811D38 Manuale del proprietario
-
Taurus Optima Legend Istruzioni per l'uso
-
Philips HR2067/00 Manuale utente